Protocols for Protein
Contents
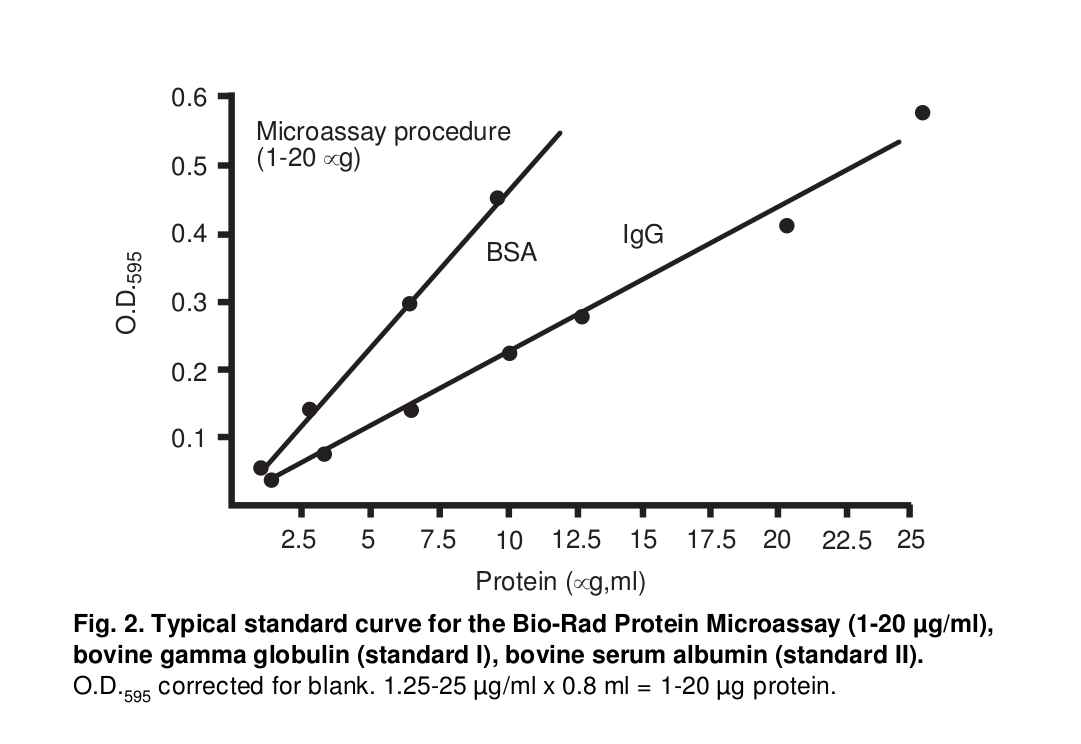
Measurement of protein concentration
Procedure
Mix the following reagents to create Pre-Reaction Mix. indicate the number of protein samples
Dispense Pre-Reaction Mix to microtiter plate and add 10 |ul| of each protein samples to microtiter plate. Mix with vortex mixer for 30 sec
Incubate at room temperature for at least 5 minutes. Absorbance will increase over time; samples should incubate at room temperature for no more than 1 hour.
Measure each absorbance at |OD595| of protein samples using Bio-Rad MICROPLATE READER
Estimate the concentration of protein samples according to calibration curve of bovine |y-globulin| (0.2-0.8 |ug/ul|)
SDS Polyacrylamide gel electrophoresis (SDS-PAGE)
Denaturing the sample Protein
- From Medium
- Add 1.0 |ul| of 6x |SDS| Sample buffer to 5.0 |ul| of a protein sample and mix it well by vortexing
- Heat the sample at 100 |C| for 3 min and spin down, store at -20 |C|
- From Cell
- Aspirate supernate and wash with |PBS|
- Add Lysis Buffer and voltex 5 min to mix well
- Centrifuge 5 min at 15,000 rpm, 4 |C|
- Transfer approximately 50 |ul| of supernate to new eppendolf tube
- Add 10 |ul| of 6x |SDS| Sample buffer and mix it well by voltexing
- Heat the sample at 100 |C| for 3 min and spin-down, store at -20 |C|
Casting Gel
Materials
- 30% Acrylamide stock solution
- 10% Ammonium persulfate (APS)
- 2x Running Gel buffer
- 2x Stacking Gel buffer
| 7.5 % | 10 % | 15 % | Final | |
|---|---|---|---|---|
| 30% Acrylamide stock solution | 3.75 |ml| | 5.0 |ml| | 7.5 |ml| | |
| |ddH2O| | 3.75 |ml| | 2.5 |ml| | ||
| 2x Running Gel buffer | 7.5 |ul| | 7.5 |ul| | 7.5 |ul| | 1x |
| 10% Ammonium persulfate (APS) | 100 |ul| | 100 |ul| | 100 |ul| | |
| TEMED [1] | 5 |ul| | 5 |ul| | 5 |ul| | |
| TOTAL (0.105 ml is ignored) | 15 |ml| | 15 |ml| | 15 |ml| |
| [1] | The solution start to coagulate after TEMED (It reacts with APS) is added. So add TEMED after everything ready. |
Note
The temperature of all reagents should be RT when mixing. Thus filtrate 10ml of 30% Acrylamide stock solution and leave it and TEMED (and/or any reagents stocked at 4 |C|) at RT overnight is recommended.
Note
APS and TEMED is used to coagulate the gel. Thus the concentration of these reagents is not primary. Approximately APS should be 0.0006% and TEMED should be 0.0003%
Note
See the table below to determine the acrylamide concentration
| 7.5% | 50 - 200 |kDa| |
| 10% | 30 - 70 |kDa| |
| 15% | 12 - 45 |kDa| |
| 2 |ml| | 4 |ml| | 6 |ml| | Final | |
|---|---|---|---|---|
| 30% Acrylamide stock solution | 0.27 |ml| | 0.54 |ml| | 0.81 |ml| | 4% |
| |ddH2O| | 0.73 |ml| | 1.46 |ml| | 2.19 |ml| | |
| 2x Stacking Gel buffer | 1 |ml| | 2 |ml| | 3 |ml| | 1x |
| 10% Ammonium persulfate (APS) | 50 |ul| | 100 |ul| | 100 |ul| | |
| TEMED [2] | 2 |ul| | 4 |ul| | 4 |ul| |
| [2] | The solution start to coagulate after TEMED is added. So add TEMED after everything ready. |
Procedure
Ready 30% Acrylamide stock solution and 10% Ammonium persulfate (APS). 30% Acrylamide stock solution should be filtrated and 10% Ammonium persulfate should be created just before use as the recipe below
10% Ammonium persulfate Ammonium persulfate
1 |g|
100 |ul|
10% Ammonium persulfate can be store several days at 4 |C| and several weeks at -20 |C|
Wipe gel plates with 70% ethanol fully and dry up. Do not touch the inner surface of the gel plates with your hands
Put a rubber spacer between gel plates and fasten its with clip
Put a comb and mark 5 mm ahead of the comb tip
Mix reagents of Polyacrylamide Running Gel Solution except TEMED
Add appropriate volume of TEMED and immediately pour the solution into the space between the gel plates to slightly above the line [3]
Immediately overlay |dH2O| (approximately 1 ml) to the surface carefully. Leave it 30-60 min at 37 |C| to coagulate
Note
Oxygen contains in air obstruct the coagulation. Thus |dH2O| overlay is required.
Note
The coagulation speed decreese extreamly when the the temperature is under 20 |C|
Mix reagents of Polyacrylamide Stacking Gel Solution except TEMED while waiting
After the solution has coagulate, remove the overlay |dH2O| completely
Add appropriate volume of TEMED to the stacking gel solution mixed before and immediately overlay the solution. Overlay |dH2O| with syringe carefully and put a comb and leave it 30 min at 37 |C|
Remove the comb and rubber after the solution has coagulate and add 1x running buffer to each well to prevent dehydration. If you want, wrap the gel in plastic wrap and store in 4 |C|. You can store the gel with this way in several days.
| [3] | Because after the solution coagulate, the surface of solution get be slightly lower |
Electrophoresis
Precedure
Dilute 10x SDS Running buffer to 1x SDS Running buffer and add pour it to the bottom bath
Set Polyacrylamide gel plate to the running bath. Remove bubbles with a hypodermic syringe.
Note
If the rubber remains on gel plate, just take it off before set
Clean up wells with hypodermic syringe completely.
Add samples to well (generally 5 |ul| of sample is enough) and carefully overlay 1x SDS Running buffer to each well with hypodermic syringe
Pour 1x SDS Running buffer to the upper bath
Set the CC to 20-30 |mA| (for 1 mini gel) or 70 |mA| (for 2 mini gel) and run 60-90 min
Soak the gel into 50% methanol and 10% acetic acid for 20-30 min
Note
Do not leave the gel without this step. Without this step, the proteins doesn’t stack on the gel and may difuse to the running buffer
Stain the gel with CBB or by silver-staing method
IPTG induction test
Materials
- 2 |ml| of M9ZB medium containing appropriate antibiotics on 12 |ml| culture tube
- 30 |ml| of M9ZB medium containing appropriate antibiotics on 50 |ml| falcon tube
- 100 |mM| |IPTG| (filter sterilized)
- 6x |SDS| Sample buffer
- |PBS| buffer or |TE| buffer
Procedure
Inoculate 2 |ml| of appropriate M9ZB medium (containing antibiotic) in a culture tube with a single colony from a plate or sterile loop of cells from a glycerol stock
Incubate at 37 |C| with shaking at 250 rpm to an |OD600| of approximately 0.5. Add the entire 2 |ml| culture to 30 |ml| M9ZB medium containing antibiotic(s)
Shake the culture at the desired temperature (usually 37 |C|) until the |OD600| is approximately 0.5-1.0 (e.g., 2-3 hours in M9ZB medium at 37 |C|). Monitor the |OD600| during growth by removing aliquots aseptically (0.5 |ml| may be enough).
Just prior to induction, split the 20 |ml| culture into 2 10 |ml| cultures on 12 |ml| culture tube. Add |IPTG| to one of the 10 |ml| cultures and use the other culture as an un-induced control. For plasmid having the T7lac promoter, add 100 |ul| of 100 |mM| |IPTG| (final of 1.0 |mM|) or for “plain” T7 promoter vectors, add 40 |ul| of 100 |mM| |IPTG| (final of 0.4 |mM|)
Incubate at 30 |C| ( 20 - 37 |C|, Lower temperature is better for prepending the samples from destruction ) with shaking at 250 rpm for 4 hours. Every one hour include starting time (T=0), collect sample of induced/un-induced to eppendolf tube with the following method
Monitor the |OD600| by removing aliquots aseptically (0.5 |ml| may be enough)
Calculate required volume of sample with a formular below and remove appropriate volume of suspended cells and centrifuge in an eppendorf at full speed for 5 min
Note
This is required to adjust the number of cells in samples constant. and The of the formular above should be 250 - 500 |ul|
Pour off the supernatant and resuspend in 50 |ul| of buffer (|PBS| or |TE|). Use a micropipette tip and vigorously mix the cell pellet and disrupt the cells as much as possible
Add 10 |ul| of 6x |SDS| Sample buffer and mix well
Heat the mixed sample at 100 |C| for 3 min to denature proteins and the store the samples at - 20 |C| until running protein gels has ready
After all, run Polyacrylamide gel electrophoresis (SDS-PAGE) with collected protein samples. Apply 3 |ul| of samples may enough.
IPTG induction
Materials
- 2 |ml| of M9ZB medium containing appropriate antibiotics on 12 |ml| culture tube
- 100 |ml| of M9ZB medium containing appropriate antibiotics on 100 |ml| medium bottle
- 100 |mM| |IPTG| (filter sterilized)
- Ni-NTA Binding buffer
- 0.15 |M| NaCl
- Liquid nitrogen
- Extracting buffer (Homogenise solution) - Method 2
- 5 |M| NaCl and Ammonium sulfate (|NH42SO4|) - Method 2
Procedure
Method 1
Inoculate 2 |ml| of appropriate M9ZB medium (containing antibiotic) in a culture tube with a single colony from a plate or sterile loop of cells from a glycerol stock
Incubate at 37 |C| with shaking at 250 rpm overnight. Transfer the entire 2 |ml| culture to 100 |ml| M9ZB medium containing antibiotic(s)
Shake the culture at the desired temperature (usually 37 |C|) until the |OD600| is approximately 0.5-1.0 (e.g., 2-3 hours in M9ZB medium at 37 |C|). Monitor the |OD600| during growth by removing aliquots aseptically.
Add |IPTG| to 100 |ml| cultures. For plasmid having the T7lac promoter, add 1000 |ul| of 100 |mM| |IPTG| (final of 1.0 |mM|) or for “plain” T7 promoter vectors, add 400 |ul| of 100 |mM| |IPTG| (final of 0.4 |mM|)
Incubate at 30 |C| (20 - 37 |C|, same temperature as IPTG induction test) with shaking at 250 rpm for hours. is determined from previous IPTG induction test
Split the 100 |ml| cultures into two of 50 |ml| falcon tubes for easy operation.
Note
This is required to make easy to centrifuge the samples thus split equivalent amounts
Warning
The follwoing steps should be performed in a cold room or on ice for prepending the samples from destruction
Centrifuge the tubes at 5,000 rpm for 5 min at 4 |C| (with TOMY TA-22 rotor) and discard supernatant
Elute the samples in 10 |ml| of Ni-NTA Binding buffer
Freeze the suspensions with liquid nitrogen and then thaw that gradually
Note
You can homogenize by sonication for 5 min on ice at 7 by 30% interval
Centrifuge the tubes at 35,000 rpm for 30 min at 4 |C| (with BECKMAN 60Ti rotor) and collect the supernatant (approximately 20 |ml|) into 50 |ml| falcon tube
Method 2
Use this method for proteins which may bind to something and are required to unbind with sodiums.
Inoculate 2 |ml| of appropriate M9ZB medium (containing antibiotic) in a culture tube with a single colony from a plate or sterile loop of cells from a glycerol stock
Incubate at 37 |C| with shaking at 250 rpm overnight. Transfer the entire 2 |ml| culture to 100 |ml| M9ZB medium containing antibiotic(s)
Shake the culture at the desired temperature (usually 37 |C|) until the |OD600| is approximately 0.5-1.0 (e.g., 2-3 hours in M9ZB medium at 37 |C|). Monitor the |OD600| during growth by removing aliquots aseptically.
Add |IPTG| to 100 |ml| cultures. For plasmid having the T7lac promoter, add 1000 |ul| of 100 |mM| |IPTG| (final of 1.0 |mM|) or for “plain” T7 promoter vectors, add 400 |ul| of 100 |mM| |IPTG| (final of 0.4 |mM|)
Incubate at 30 |C| (20 - 37 |C|, same temperature as IPTG induction test) with shaking at 250 rpm for hours. is determined from previous IPTG induction test
Split the 100 |ml| cultures into two of 50 |ml| falcon tubes for easy operation.
Note
This is required to make easy to centrifuge the samples thus split equivalent amounts
Warning
The follwoing steps should be performed in a cold room or on ice for prepending the samples from destruction
Centrifuge the tubes at 5,000 rpm for 5 min at 4 |C| (with TOMY TA-22 rotor) and discard supernatant. Suspend the pellet in ice-cold 10 |ml| of 0.15 |M| NaCl with vortex mixer
Centrifuge the tubes at 5,000 rpm for 5 min at 4 |C| and discard supernatant. Suspend the pellet in ice-cold 8 |ml| of Extracting buffer (Homogenise solution) with vortex mixer
Add ice-cold 2 |ml| of 5 |M| NaCl and invert the tubes for mixing (DO NOT USE VORTEX MIXER)
Freeze the suspensions with liquid nitrogen and then thaw that gradually
Note
You can homogenize by sonication for 5 min on ice at 7 by 30% interval
Centrifuge the tubes at 35,000 rpm for 30 min at 4 |C| (with BECKMAN 60Ti rotor) and collect the supernatant into 50 |ml| falcon tube
Add 3.53 |g| of Ammonium sulfate (|NH42SO4|) into the samples little by little [4] and leave the samples on ice for 15 min
Centrifuge the tubes at 7,500 rpm for 15 min at 4 |C| (with TOMY TA-22 rotor) and discard supernatant
Elute the samples in 2 |ml| of Ni-NTA Binding buffer
Desalting the samples with Amersham Biosciences PD-10 Desalting column. Following steps shows usage of the column [5]
- Cut off bottom cap, remove top cap and pour off excess liquid
- If available mount the LabMate Buffer Reservoir on top of the PD-10 column and place the columns in the PD-10 Desalting Workmate
- Equilibrate the column with approximately 25 |ml| elution buffer. Discard the flow-through (you can use the plastic tray to collect the flow-through)
- Add sample of a total volume of 2.5 |ml|. If the sample is less than 2.5 |ml|, then add buffer until the total volume of 2.5 |ml| is achieved. Discard the flow-through
- Elute with 3.5 |ml| buffer and collect the flow-through
Collect the samples (approximately 7.0 |ml|) into 15 |ml| falcon tube
| [4] | 70.6 |g| of Ammonium sulfate can solute in 100 |ml| of |H2O| at 0 |C|. Adding 3.53 |g| of Ammonium sulfate to samples is for creating 50% Ammonium salfate saturated samples at 0 |C|. |
Affinity chromatography with His-Bind Resins
| REFERENCE: | http://www.pssj.jp/archives/Protocol/Purification/NTA_01/NTA_01_01.html |
|---|---|
| REFERENCE: | NOVAGEN Ni-NTA His-Bind Resins Handbook |
| REFERENCE: | YMZK Tsuda manual |
Materials
- Cleared lysate from a 40-200 |ml| culture
- NOVAGEN 50% Ni-NTA His-Bind resins and empty column or reuse
- Ni-NTA Charge buffer for reuse
- Ni-NTA Binding buffer
- Ni-NTA Wash buffer
- Ni-NTA Elute buffer
- Ni-NTA Strip buffer
- 20-30% |EtOH|
Preparation
Add 1 |ml| of NOVAGEN 50% Ni-NTA His-Bind resins slurry to a column and discard the flow-through
Note
Skip this step for reuse His-Bind column
Wash with 5 |ml| of |ddH2O| (5 volumes of the resins) and discard the flow-through
Add 1 |ml| of Ni-NTA Charge buffer to the column and discard the flow-through
Note
This step is required to re-bind |Ni2plus| to the column. Skip this step with new column
Wash with 4 |ml| of Ni-NTA Binding buffer and discard the flow-through
Procedure
Warning
All operations should be performed in a cold room for prepending the samples from destruction
- Remove at least 1 |ml| of the samples for SDS-PAGE analysis (Sample 1)
- Add 4 |ml| of the samples to the column and save flow-through for SDS-PAGE analysis (Sample 2)
- Wash with 2 4 |ml| of Ni-NTA Wash buffer, collect wash fractions. Save wash fractions for SDS-PAGE analysis (Sample 3, 4)
- Elute the protein with 4 0.5 |ml| of Ni-NTA Elute buffer. Collect the eluate in four tubes for SDS-PAGE analysis (Sample 5, 6, 7, 8)