Welcome to Titan Rover’s documentation!
Titan Rover is a collaboration of multi-disciplinary students who gather together to research, design, manufacture, and test a Mars Exploration Rover (MER) on behalf of Cal State Fullerton at the University Rover Challenge (URC). The rover is built from the ground up using in-house materials and is completely designed by team members of Titan Rover.
Contributing
Thank you for taking interest in helping contribute to the Titan Rover project. This guide hopes to serve as a clear way for you to get onboard what we are doing and the way we do things.
Getting Started
If you have never used Git before then that’s okay. We got you covered right here:
Make sure you understand the basic commands of Git
like: pull, push, commit, and checkout
If you do not have a GitHub account, then you will need to create one in order to push your development progress to our GitHub repository.
Create a GitHub account: https://github.com/join
Projects
We currently have the following projects baking in the oven:
- UserInterface
- MobileApp
- ProcessManager
- Autonomy
- ComputerVision
- Mobility
- Science
- NvidiaTX2
You are more than welcome, and in fact, are encouraged to try to contribute to more than 1 project. The more you help with different projects, the more you come to learn about the entire rover system.
We have a projects page* where you can read more about our system: https://github.com/CSUFTitanRover/TitanRover2018/projects
* There are additional side projects listed that are not listed above.
We encourage our team members to track issues/progress of your team by going to the project tracking view. Which is done by clicking on the project link in the projects page listing.
e.g. https://github.com/CSUFTitanRover/TitanRover2018/projects/1
GitFlow
GitFlow is a naming convention for a certain type of branching model. Here at *Titan Rover Industriestm* we are using the Feature Branch Workflow. Here at Titan Rover Industriestm we are using the Feature Branch Workflow.
Our use cases for feature branches are mainly to be implementing one single aspect of a project. Once done implementing a feature, then you would submit a Pull Request to merge the branch back into your base project branch and have it reviewed by your team lead.
Feature Naming Scheme
If you need to create a feature branch, it’s suggested to follow this naming scheme.
feature/<ProjectName>-<FeatureName>-<IssueID>
- Project Name (Pascal Case) - refers to the base project the feature is for.
- Feature Name (Camel Case) - refers to the name of the feature(s) you are implementing.
- Issue ID(s) - refers to the ID of an issue that is created in the GitHub Issues page.
- If you are tackling a Feature that refers to multiple issues then simply append the issue numbers, separated by a dash.
Simple Example: feature/UserInterface-rethinkDB-24
Multiple Issues Example: feature/UserInterface-components-14-17-23
Creating a Feature Branch
If you need to create a feature branch then always remember to branch off from your base project branch. For example, if I need to create a feature branch under the User Interface project then I will branch off from the User Interface branch.
├───master
  ├───UserInterface
    ├───feature/UserInterface-Layout-19
Git Layout
Our layout for the git structure looks like so:
├───master
   ├───UserInterface
   ├───MobileApp
   ├───ProcessManager
   ├───Autonomy
   ├───ComputerVision
   ├───Mobility
   ├───Science
   ├───NvidiaTX2
   ├───docs
Project Layout
Our current project layout looks like so from a top level view:
├───docs
├───hoembase
├───rover
├───schematics
- docs will hold all of our documentation files
- homebase will hold any code that will be run on the homebase e.g. User Interface
- rover will hold any code that will run on the rover e.g. Control Systems
- schematics will hold any schematic diagrams that are helpful for the Eletrical team to use for wiring up our rover
Git GUI
If you are not a fan of using Git in your CLI, you can always use a GUI to interact with Git. Here are a number of good Git GUIs that are free:
GitHub Labels
We have a number of labels that can be applied to any GitHub Issues created and thought it would be helpful to go over them. You can view our labels here: https://github.com/CSUFTitanRover/TitanRover2018/labels
Priority tags - define how urgent it is an issue needs to be completed
- There should only be 1 priority tag per issue
Status tags - define what the status is for an issue
- There should only be 1 status tag per issue
Default tags - these tags help describe what the issue is or wants
- There can be any number of tags per issue
Typical Workflow
A typical day in development land looks like so:
git pullfor new updates if there are any.- Do your development
- Commit your work and push to GitHub.
A typical day implementing a feature:
git pullfor new updates if there are any.- Do your development and complete the feature.
- Commit your work and push to GitHub.
- Create a Pull-Request to merge your feature into your base project.
- Add your team lead as a Reviewer.
User Interface
The user interface (UI) is a real-time data driven web application. Its purpose is to provide the team with real-time updates of sensor data, camera feeds, and any other kind of diagnostic data to monitor the rover.
Introduction
Background
In the years prior to the 2016 Titan Rover project, the UI was very bare bones and did not require a lot of intricate features. However, starting with the 2016 Titan Rover project and due to the increasing dificulties of the URC guidelines, the UI needed to include useful features like an offline map for tracking the rover’s position. The 2016 Titan Rover team decided to build the 2016 platform using Node.js and that included the UI as well. At the time, the two main libraries being considered were React.js and Angular.js. After much consideration, it was decided to move forward with React because at the time Angular was going through some breaking changes to the main library.
Abstract
The user interface must be designed to be a soft real-time system. Meaning, losing some data packets being streamed from the rover to the UI will not hurt the application. The user interface must also update as new data is received in order to display data in real-time. The maximum delay between new data packets being recieved in the UI should be less than 350ms. If the delay time is longer than 350ms then user experience will degrade. The user interface must be customizable by the user so that they can configure the layout of the UI in a way that is meaningful to them.
Javascript
The UI is written primarily in Javascript, more specifically the version ES2015. ES2015 brings in a lot of features to the language that you can read more here:
Why Javascript?
You may be wondering why we have to use Javascript for building a web application. Well, web applications are intended to be ran inside a Web Browser (e.g. Google Chrome). The reason for this is that we are continuing our User Interface development as a web application since last year there were no issues.
Learning Javascript
Here are some resources that you can use to learn Javascript:
React
React is a javascript library created by Facebook and provides a way to create user interfaces in a declarative, efficient, and flexible way.
Learning React
Assuming that you have some programming experience and have a dirve for self-learning, here are some tutorials to get you started:
- Facebook Official Tutorial
- React Video Series
- React-js-in-design-patterns
- Creating a react application (create a free account to access more videos in the series)
npm commands
Here are a list of npm commands that have been set up for typical use when developing the UI:
npm start- starts a dev server that serves the UI and auto reloads on changesnpm test- runs the unit testsnpm run styleguide- starts a styleguidist servernpm run lint- runs ESLint on the project to enfore the project defined coding standardnpm run lint:fix- runs ESLint on the project and tries to auto-fix any errors found
The following npm commands aren’t for typical use when developing the UI:
npm run build- transpiles and minifies a production ready applicationnpm run styleguide:build- builds a static styleguide website with our component documentationnpm run report-coverage- reports code coverage to codecovnpm run serve- serves the built user interface locally on port 3000npm run eject- ejects the project from the create-react-app configuration DO NOT USE THIS UNLESS DIRECTED TO
create-react-app
We used create-react-app to bootstrap the development process of our react application. create-react-app is a command-line (CLI) tool that generates a project and hides away all the configuration process necessary for development. This means, we can focus just on coding the react app instead of having to configure the project beforehand. You do not need to install the create-react-app CLI tool as the user interface project folder has everything already set up.
Deepstream
Deepstream is a powerful websocket server that syncs realtime data between browsers, smartphones, backends and the IoT.
What Is Deepstream
There are similarities that can be drawn between Deepstream and other products like Firebase, Redis, etc. Deepstream supports concepts like pub/sub, rpcs, and data-syncing. It can be considered that Deepstream acts as a message broker with a data store, however, this blog post explains the comparisons in much more detail.
Message Broker
A message broker can be defined as a physical component that handles the communication between applications. Instead of communicating with each other, applications communicate only with the message broker. An application sends a message to the message broker, providing the logical name of the receivers. The message broker looks up applications registered under the logical name and then passes the message to them. Figure 1 illustrates this configuration.

Figure 1. A message broker mediating the collaboration between participating applications
Expanding on the idea of Deepstream acting as a message broker with a data store, with this in mind, one can develop a product with multiple moving parts written in different programming languages and still have things working together. A message broker allows you to treat data and events from a language agnostic standpoint.
Data Store
Deepstream offers a in-cache data store that can hold all types of data.
- Numbers (Integers/Doubles)
- Strings
- Objects
- Lists
Pub/Sub
Deepstream offers the ability of a publish and subscribe event pattern. Clients can publish data through the deepstream system and any clients subscribed can receive that data.
RPC
Deepstream offers remote procedural call (RPC) which are equivalent to a request-response pattern.
Data-Sync
Deepstream offers data-syncing when items/records are updated in your data store.
Why Use Deepstream
As mentioned before, Deepstream can be considered a message broker with a data store and can deliver updates between different applications. With the rover having sensors reading data and also needing that same data in different places (e.g. different Python processes and the User Interface), then using Deepstream can allow us to access said data with the same API.
Use Case
Having a message broker can be very beneficial for a system with a lot of moving parts. In order to understand this importance it is best explained with an example without using a message broker and then contrasted with an example using a message broker.
Example (No Deepstream)
Picture an Arduino with a temperature sensor, it has a .ino file written in C++ that reads the current temperature and then needs to send that data to a Python process, let’s call it PMain. PMain will receive that current temperature and compute an expected temperature for the next reading through some magical algorithm. PMain will run on it’s own computer separate from the ardunio. Once the expected temperature is computed, PMain needs to send both the current and next expected temperature to a User Interface to display the data to the user. Let’s assume the User Interface is a native desktop application written using C# and will run on it’s own laptop. Figure 2 Illustrates the entire program layout.

Figure 2. The layout of our 3 part program for our example.
So here’s the big question… How are we suppose to transfer data from a C++ program to Python and then to a User Interface?
You may jump to the answer that we can execute c++ inside a python program however that won’t work because remember, the arduino and python programs are running on their own boards.
As you can see, since every part of the entire program is separated physically from each other then this narrows down the possible solutions to our probelm.
The best possible solution would be to transfer data over the network. Therefore, relying on a network connection to handle your data being transfered from your Arduino to PMain and then to the User Interface. However, this means deciding what network protocol to use e.g. TCP or UDP. TCP is good if you need to make sure your data gets sent from the Arduino to PMain, however, the messages may not be delivered very quickly with all the protocol overhead with making it fail-safe. UDP is good choice if you don’t care about losing data packets and just want it to arrive as quickly as possible. There is also HTTP and MQTT as a network protocol however the one important thing to keep in mind is: Once you get your data sent to PMain then how will you send it to the User Interface?
You see, we need to think about all of the moving parts in our example. You may think it’s as easy as 1-2-3 but then you get hit with a baseball right to the gut. Welcome to the world of Titan Rover where things are much more complicated then they seem.
Coming off our tangent, let’s decide what to do for our network requirements. Let’s use TCP for sending data from the Arduino to PMain since we want to make sure we get every temperature reading. Then, we will use UDP for sending the computed and recorded data from PMain to the User Interface. Figure 3 Illustrates the updated program layout.

Figure 3. The updated layout of our 3 part program.
Example Reflection (No Deepstream)
This updated program layout works well for our example. We have each component taking care of the data and sending it down along the stream. One thing to note, however, is that each component in our system needs to take care of sending data downstream. The more components we add, the more those components need to be configured for passing data along. Let’s go overboard and add 3 more components to our diagram.
.png)
As you can see, things start to get crazy the more interconnected things you add. You also need keep track of your network endpoints of where to send your data downstream. Let’s continue our example now using a message broker.
Example (With Deepstream)
Going back to our original system design, let’s add Deepstream as our message broker. Figure 4 Illustrates how the program looks with Deepstream added. Just a reminder that Deepstream operates over TCP.

Figure 4. The 3 part program with Deepstream.
The new design is still pretty clear on the path the data takes to get to the User Interface. I know it might not be impressive with such a simple example so let’s add deepstream to the overboard example. Figure 5 Illustrates the new overboard design with Deepstream.
.png)
Figure 5. The overboard example with Deepstream.
As you can see, adding Deepstream helps clear out the clutter. It is very easy to see where the data is going and offsets the burden of the python programs sending the new data downstream to Deepstream.
Example Reflection (With Deepstream)
Adding a Message Broker can reduce clutter in a system design with a lot of moving parts. So how do you determine if you can benefit from a Message Broker in your product? Well, in the case of using Deepstream, since it offers typical features of a Message Broker plus it has a in-cache data store, then, I would advise to analyze your system and ask the following questions:
- Does your product compose of multiple programs needing access to the same data (one single data store)?
- Does your product require sending messages across your system?
- Does your product require updates across your system in real-time (publish/subscribe events)?
If you answered yes to any of these then it might be worth looking into using something like Deepstream. However, there are some things to be aware of if you do want to adopt a Message Broker:
- Make sure your hardware can support the Message Broker server.
- Make sure there are client libraries written in the language you are using to develop your product.
- Make sure what ever network protocol the Message Broker uses under the hood complies with your system standards (e.g. UDP or TCP).
How we can use Deepstream
For the Controls Team, we can take advantage of using Deepstream by allowing multiple components to update the data store independently of each other. As those updates occur, we can react to them and determine what needs to be done. There is obvisouly the requirement that each component must be able to have a network connection, however, this can be remedied by adding a network hat or some other solution.
Here’s an example configuration of a potential system layout:

Again, this is just an example configuration but the main point still sticks that we can use Deepstream to make it easier to have direct updates across the entire system.
Rover Deepstream Server
This is the main directory for the official Deepstream server that will run on our Rover’s Computer.
Ports the DS rover server will listen on:
| Endpoint | Address | PORT |
|---|---|---|
| Websocket | 0.0.0.0 | 4020 |
| HTTP | 0.0.0.0 | 4080 |
Universal Method to install and run deepstream:
This process is necessary if you are running deepstream on a raspberry pi, and works on the raspberry pi as well as any other Linux distro
FIRST, Make sure you have NodeJs installed:
NodeJs install:
For **Raspberry pi & Beaglebone ONLY** go here and copy paste the code block into your cli to install NodeJs on your raspberry pi or beaglebone.
For x86 or x64 Linux use the installers go here do this:
curl -sL https://deb.nodesource.com/setup_9.x | sudo -E bash -
sudo apt-get install -y nodejs build-essential
exit; # You don't want to be root user for the next steps
`
For Windows go here
For Mac go here
The Linux Guide (raspberry pi, x86 or x64):
After you have successfully installed NodeJs…
Clone the deepstream project:
I like to keep deepstream in my Documents folder:
cd ~/Documents/;
git clone https://github.com/deepstreamIO/deepstream.io;
cd deepstream.io/;
git submodule update --init
if, after the submodule update, you get an error:
Permission denied (publickey).
fatal: Could not read from remote repository.
You will need to add your ssh key to github, so let’s do that, first we should see if you already have one:
cat ~/.ssh/id_rsa.pub
# if you get "No such file or directory" do this:
ssh-keygen;
# otherwise, continue to the next step, and skip these comments
# Just enter through, DO NOT add a pswword to your ssh-key.
# if you add a password to your ssh key, it will complicate things. So
# when prompted for a password TWICE, just keep hitting enter.
# Once you see the RSA random characters you can print your public ssh key:
cat ~/.ssh/id_rsa.pub
Once you have printed your ssh key (looks like this):
ssh-rsa AAAAB3Nz...........
highlight, and copy it from your terminal. You should have NO SPACES copied, and you need to include the ssh-rsa ….. part of the string.
Finally, Go to your browser, Open Settings on your github Account, On the left you will see alink:
SSH and GPG keys
click it, and click the bright green button Add SSH key, give your key a name like myLaptop or something, then paste your ssh key in the big text block area. now you can re-run:
git submodule update --init
# and you will not have ANY errors.
# I think this has to do with SSL over the school network, so some people will have this problem, and some wont.
Now you can do this from within your deepstream.io/ folder
npm i;
npm start;
At this point, you are running deepstream, but we have some config files in deepstream that we want to edit. First go ahead and crash deepstream ctrl-c.
# Install pm2 also, which we will need later to start deepstream on startup
sudo npm install pm2 -g;
Now after we have also installed pm2, Let’s look at the deepstream file tree:
├── appveyor.yml
├── ascii-logo.txt
├── benchmarks
├── bin
├── CHANGELOG.md
├── conf  (file)
├── dist  (file)             <-- we will launch dist/bin/deepstream on startup with pm2
├── elton-square.png             as well as dist/conf/config.yml
├── jasmine.json
├── jasmine-runner.js
├── LICENSE
├── node_modules
├── package.json
├── package-lock.json
├── protocol
├── README.md
├── scripts
├── src
├── test
├── test-e2e
├── tsconfig.json
└── tslint.json
you are going to want to open dist/conf/config.yml and edit lines ~21 and ~47:
Example of part of the dist/conf/config.yml file...
...
16 connectionEndpoints:
17   websocket:
18     type: default
19     options:
20         # port for the websocket server
21         port: 4020                          # FOR TITANROVER
22         # host for the websocket server
23         host: 0.0.0.0
24         # url path websocket connections connect to
25         urlPath: /deepstream
26         # url path for http health-checks, GET requests to this path will return 200 if deepstream is alive
27         healthCheckPath: /health-check
28         # the amount of milliseconds between each ping/heartbeat message
29         heartbeatInterval: 30000
30         # the amount of milliseconds that writes to sockets are buffered
31         outgoingBufferTimeout: 0
32
33         # Security
34         # amount of time a connection can remain open while not being logged in
35         # or false for no timeout
36         unauthenticatedClientTimeout: 180000
37         # invalid login attempts before the connection is cut
38         maxAuthAttempts: 3
39         # if true, the logs will contain the cleartext username / password of invalid login attempts
40         logInvalidAuthData: false
41         # maximum allowed size of an individual message in bytes
42         maxMessageSize: 1048576
43   http:
44     type: default
45     options:
46       # port for the http server
47       port: 4080                                # FOR TITANROVER
48       # host for the http server
49       host: 0.0.0.0
50       # allow 'authData' parameter in POST requests, if disabled only token and OPEN auth is
51       # possible
52       allowAuthData: true
53       # enable the authentication endpoint for requesting tokens/userData.
54       # note: a custom authentication handler is required for token generation
55       enableAuthEndpoint: false
56       # path for authentication requests
57       authPath: /auth
58       # path for POST requests
59       postPath: /
60       # path for GET requests
61       getPath: /
...
line 21 should be set to this:
port: 4020
line 47 should be set to this:
port: 4080
Save the file, and now let’s setup deepstream to automatically run on startup.
# First you will need to bee your root user
sudo su;
# Change into the deepstream.io/dist/bin/ folder:
cd dist/bin/;
# add deepstream to the pm2
pm2 start deepstream --name deepstream;
# save the pm2 settings
pm2 save;
# add the startup process to pm2
pm2 startup;

# Now if you want to check pm2 to see if deepstream is running, just make sure you are root and...
pm2 ls;
You should see something like this:
┌────────────┬────┬──────┬──────┬────────┬─────────┬────────┬─────┬───────────┬──────┬──────────┐
│ App name │ id │ mode │ pid │ status │ restart │ uptime │ cpu │ mem │ user │ watching │
├────────────┼────┼──────┼──────┼────────┼─────────┼────────┼─────┼───────────┼──────┼──────────┤
│ deepstream │ 0 │ fork │ 1552 │ online │ 0 │ 4h │ 0% │ 74.2 MB │ root │ disabled │
└────────────┴────┴──────┴──────┴────────┴─────────┴────────┴─────┴───────────┴──────┴──────────┘
Use `pm2 show <id|name>` to get more details about an app
If you want to view the logs for deepstream, just sudo su, then you can view deepstream logs:
pm2 log deepstream;
You should see this:
audstanley-G750JM bin # pm2 log deepstream
[TAILING] Tailing last 15 lines for [deepstream] process (change the value with --lines option)
/root/.pm2/logs/deepstream-error-0.log last 15 lines:
/root/.pm2/logs/deepstream-out-0.log last 15 lines:
0|deepstre |  =====================   starting   =====================
0|deepstre | INFO | logger ready: std out/err
0|deepstre | INFO | deepstream version: 4.0.0-beta.2
0|deepstre | INFO | configuration file loaded from ../conf/config.yml
0|deepstre | INFO | authenticationHandler ready: none
0|deepstre | INFO | cache ready: local cache
0|deepstre | INFO | storage ready: noop storage
0|deepstre | INFO | permissionHandler ready: valve permissions loaded from /home/audstanley/Documents/deepstream.io/dist/conf/permissions.yml
0|deepstre | INFO | Listening for websocket connections on 0.0.0.0:4020/deepstream
0|deepstre | INFO | Listening for health checks on path /health-check
0|deepstre | INFO | connectionEndpoint ready: µWebSocket Connection Endpoint
0|deepstre | INFO | Listening for http connections on 0.0.0.0:4080
0|deepstre | INFO | Listening for health checks on path /health-check
0|deepstre | INFO | connectionEndpoint ready: HTTP connection endpoint
0|deepstre | INFO | Deepstream started
Ctrl-C to get out of viewing the log.
# To log out of root user:
exit;
Now you have successfully installed deepstream, and pm2 will launch deepstream every time your computer starts up. Now you can get and post data to deepstream. You will need the deepstream.py file in your project’s folder to get and post data easily to deepstream. The deepstream.py file has a dependency called: requests,
Let’s install that NOW
sudo apt-get install python-requests
Happy coding Titan Rover data to deepstream.
Windows Guide:
If you are on windows, there are two ways you can install deepstream.
Follow this guide first, then you can install NodeJs in bash. Open the Windows command prompt:
bash
Then you can follow this Linux portion of this guide
The second method is boring and complex, just get bash on ubuntu on windows.
Mac Guide:
todo;
Process Manager & Dependencies
The process manager is a work in progress and can be found here
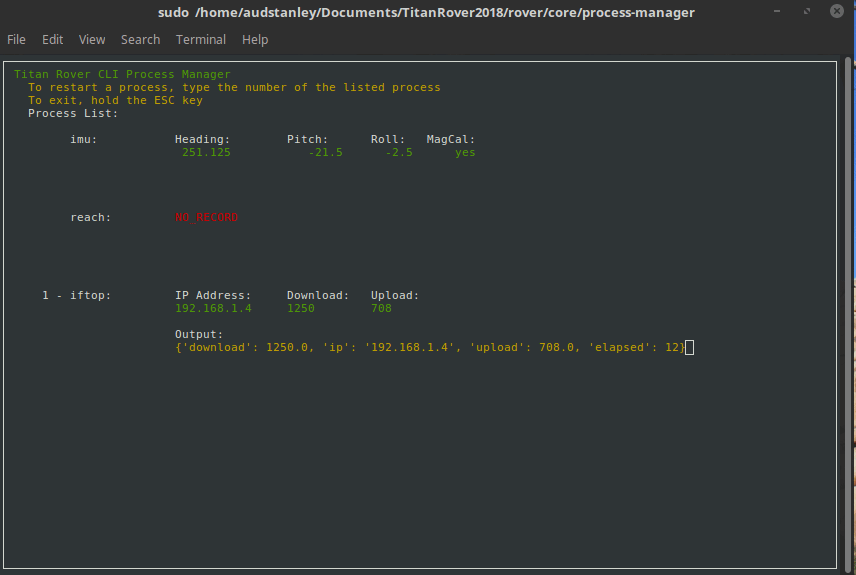
Setup
In order to add your python script to the master startup process, you need to modify the process.json file. Here is an example of the processes.json file where each process is an object in the array:
[
    {
        "path": "/TitanRover2018/rover/core/process-manager/motionConf/",
        "python": "sudo",
        "screenName": "motion",
        "script": "motion",
        "computer": "rover"
    },
    {
        "path": "/TitanRover2018/rover/core/servers/ArduinoSocketServer/",
        "python": "python3.5",
        "screenName": "mobility",
        "script": "mobility.py",
        "computer": "both"
    },
    {
        "path": "/TitanRover2018/rover/core/servers/iftop/",
        "python": "python",
        "screenName": "speed",
        "script": "iftop.py",
        "computer": "rover"
    },
    {
        "path": "/TitanRover2018/rover/controls-systems/mobility/GNSS/",
        "python": "python",
        "screenName": "reach",
        "script": "emlidreach.py",
        "computer": "rover"
    },
    {
        "path": "/TitanRover2018/rover/controls-systems/mobility/GNSS/",
        "python": "python",
        "screenName": "reachSocketServer",
        "script": "socketServer.py",
        "computer": "rover"
    },
    {
        "path": "/TitanRover2018/rover/core/servers/autonomanual/",
        "python": "python3.5",
        "screenName": "autonomanual",
        "script": "autonomanual.py",
        "computer": "rover"
    },
    {
        "path": "/TitanRover2018/rover/core/process-manager/roverAPI/",
        "python": "python3.5",
        "screenName": "roverAPI",
        "script": "roverAPI.py",
        "computer": "rover"
    }

]
There are three processes in this example above. All you need to do is add your process to the file.
The *path*** in this **processes.json file is the path to your python script.
The **python** is which version of python will be running your script. default python will run python2.7
The *screenName*** is the name of the screen session your script will run under. This needs to be **unique and it should also match the name of your deepstream record. (preferably)
The **script** is the full name of your python script.
In order for your scripts to run properly, you need to ALSO change the pathToTitanRover.json file to something like this:
{ "path": "/home/pi" }
Be sure to leave out a trailing slash. My personal pathToTitanRover.json file looks like this, and yours will vary:
{ "path": "/home/audstanley/Documents" }
This is because my Titan Rover 2018 file is in my Documents folder.
now, you can run the setup:
sudo python setup.py
This will install all dependencies except for deepstream, which you can find how to install here
If you want to add your deepstream records to the process manager get in contact with me, or feel free to look at the main.py in this process manager folder.
Motion
Motion will automatically install with the setup.py script and be added to the startup process along with the other startup processes. This may not be something you want, because motion takes control of your web camera, if you are on a laptop. If you don’t want this, you can simply remove the line that references motion in your /etc/crontab file. The line should look something like this:
@reboot root cd /home/audstanley/Documents/TitanRover2018/rover/core/process-manager/motionConf/ && screen -dmLS motion && screen -S motion -X stuff "sudo motion \015";
if you want to get motion running on startup again, you can simply rerun:
sudo python setup.py
and motion will be added to the startup process again.
Screen
Let’s talk a little about how all of these startup precesses all work. Your script gets added to /etc/crontab and it’s added to a screen session. If you already ran the setup.py as sudo, then you currently have screen installed on your machine. In short, screen is like bash, but where you can go into a screen session, or pop out of a screen session, and your script keeps running in the background. This becomes immensely helpful when debugging, since your stdout, and stderr can be viewed at any time. If your script is failing for any reason, then it’s really easy to find out how and why by going into the screen session and viewing errors, and your stdout prints to console. Another great thing about screen is that screen has the option to save log files of all of the output from your session.
Since all the screen sessions are being called in the startup process as root, you will first need to be root in order to view them.
sudo su;
Now that you are root, you can view the screen sessions:
screen -ls;
If you see something like No sockets found, then your screen sessions have not started yet, and the easiest way to start those sessions is to reboot. (assuming you have run the setup.py already)
If you want to create your own screen sessions (in detached mode):
screen -dmS someScreenNameThatYouLike
To attach to a screen session:
screen -x someScreenNameThatYouLike;
# or to attach to a TitanRover process:
screen -x speed; # which is a session for you to be able to view your upload download speed
# most likely this session will show a python error, and you can trouble shoot how to fis this error.
# You will likely need to change the file /TitanRover2018/rover/core/servers/iftop/iftop.py
# and edit the variable:
# interface = "wlp3s0"
# on line 10, to an interface that you have on your machine.
# once you change that, iftop.py will work on startup (which is running in the screen session "speed")
If you want to leave the session without stopping your script, you can gracefully leave the session by holding Ctrl A then lift up on the A key, and hit D (Holding Ctrl the whole time)
These are some of the basics, for more info read the docs:
man screen;
# or
screen --help;