Node.Py Documentation
Here you will find information on how to set up your Node.Py tools on-the-fly so you can start working on your projects. We’ve prepared individual tutorials on setting up Raspberry Pi and SenseHAT, Node-RED, and ESP8266 boards with MicroPython firmware. You will also find information on how to program individual sensors with MicroPython.
Click any link below to get started.
Setting up Raspberry Pi and SenseHAT
There are two ways to set up a Raspberry Pi.
From a Custom Image
The easiest way to get Raspberry Pi and SenseHAT to work is to download our custom image from our download page. This image will come with all software and hardware set up and read to go. The only thing you will need to do is to expand your Linux partition by typing this command in the terminal:
$ sudo raspi-config --expand-rootfs
$ sudo reboot
From a Clean Raspbian or NOOBs Installation
If you have a clean installation of Raspbian (or NOOBs) on your Raspberry Pi, you will need to confirm that you are running the latest Raspbian Stretch first:
$ cat /etc/os-release
If your Raspberry Pi is not running Stretch, chances are that you do not have the SenseHAT extension for Stretch, or the Thorny Python IDE. We highly recommend that you upgrade to Stretch. This official guide will show you how to upgrade.
If you already have Raspbian Stretch running, you will need to set up your locale, keyboard, and timezone. You can do this with the raspi-config utility in your terminal, through System Settings, or with an automatic script:
# bash <(curl -SL https://gist.githubusercontent.com/adoyle/71803222aff301da9662/raw/e40f2a447e0ae333801e6fddf5e6bdb7430c289d/raspi-init.sh)
If you need to use VNC, SSH, or i2c, you will have to manually enable them in raspi-config.
You will also need to update your Node-RED after this step. Although Node-RED comes pre-installed on the Raspberry Pi, this version is outdated and you will need to update node.js and Node-RED. Please click next and follow the next tutorial.
Setting up Node-RED
If you are using our custom image, please skip the section below. Node-RED is already set up on your Raspberry Pi.
Setting up Node-RED on Raspberry Pi
The easiest way to set up Node-RED on your Raspberry Pi is to use this command:
$ bash <(curl -sL https://raw.githubusercontent.com/node-red/raspbian-deb-package/master/resources/update-nodejs-and-nodered)
You will also need to install some useful nodes as well:
$ sudo npm install -g node-red-dashboard
$ sudo npm install -g node-red-contrib-python3-function
$ sudo npm install -g node-red-contrib-web-worldmap
Setting up Node-RED on a Server
The benefit of running Node-RED on a Raspberry Pi is that you can create flows that control the SenseHAT. However, sometimes it is easier to have it run on a server. To do this, you need to, first, make sure you have node.js set up on the server. You can use this command to check:
$ node --version
If you are running node.js version 6.x and above, you are ready to install Node-RED. Otherwise, go to the official node.js download page to install the LTS version.
npm will be automatically installed with node.js. On Linux systems, you can run the following command to install Node-RED.
$ sudo npm install -g node-red
$ sudo npm install -g node-red-dashboard
$ sudo npm install -g node-red-contrib-python3-function
$ sudo npm install -g node-red-contrib-web-worldmap
On Windows systems, you can start a command line window with administrative privileges: Start Menu -> Windows System -> right click on Command Line and select run as administrator. Then, run the following commands:
$ npm install -g node-red
$ npm install -g node-red-dashboard
$ npm install -g node-red-contrib-python3-function
$ npm install -g node-red-contrib-web-worldmap
Setting Up Node-RED on the Cloud
There are also benefits running Node-RED on a Cloud Platform. The Node-RED official websites have exellent instructions on setting up Node-RED on different cloud platforms. We recommend that you use the IBM Bluemix platform since IBM has better support for Node-RED.
Running Node-RED
To launch the Node-RED web-based flow editor, go to http://127.0.0.1:1880 in your browser.
Setting up the ESP8266 Board with MicroPython firmware
Flashing the MicroPython firmware
Please follow this official guide on how to flash the MicroPython firmware.
Programming the ESP8266 board with an IDE
The ESP8266 board can be programmed with any computer, including a Raspberry Pi. There are multiple IDEs available for different platforms. We recommend that you use Windows computers to program the ESP8266 boards, because there are two great IDEs available on Windows:
ESPlorer is also an excellent IDE available for all platforms.
Getting Started with Raspberry Pi Camera
In this tutorial we will go through how to set up the Raspberry Pi Camera. We will go through the installation, enabling camera from the Pi, testing the camera, and writing Python code for taking individual pictures. We will also cover how to set up Node-RED to easily take pictures with the PiCamera or control the camera remotely the PiCamera remotely.
Hardware installation
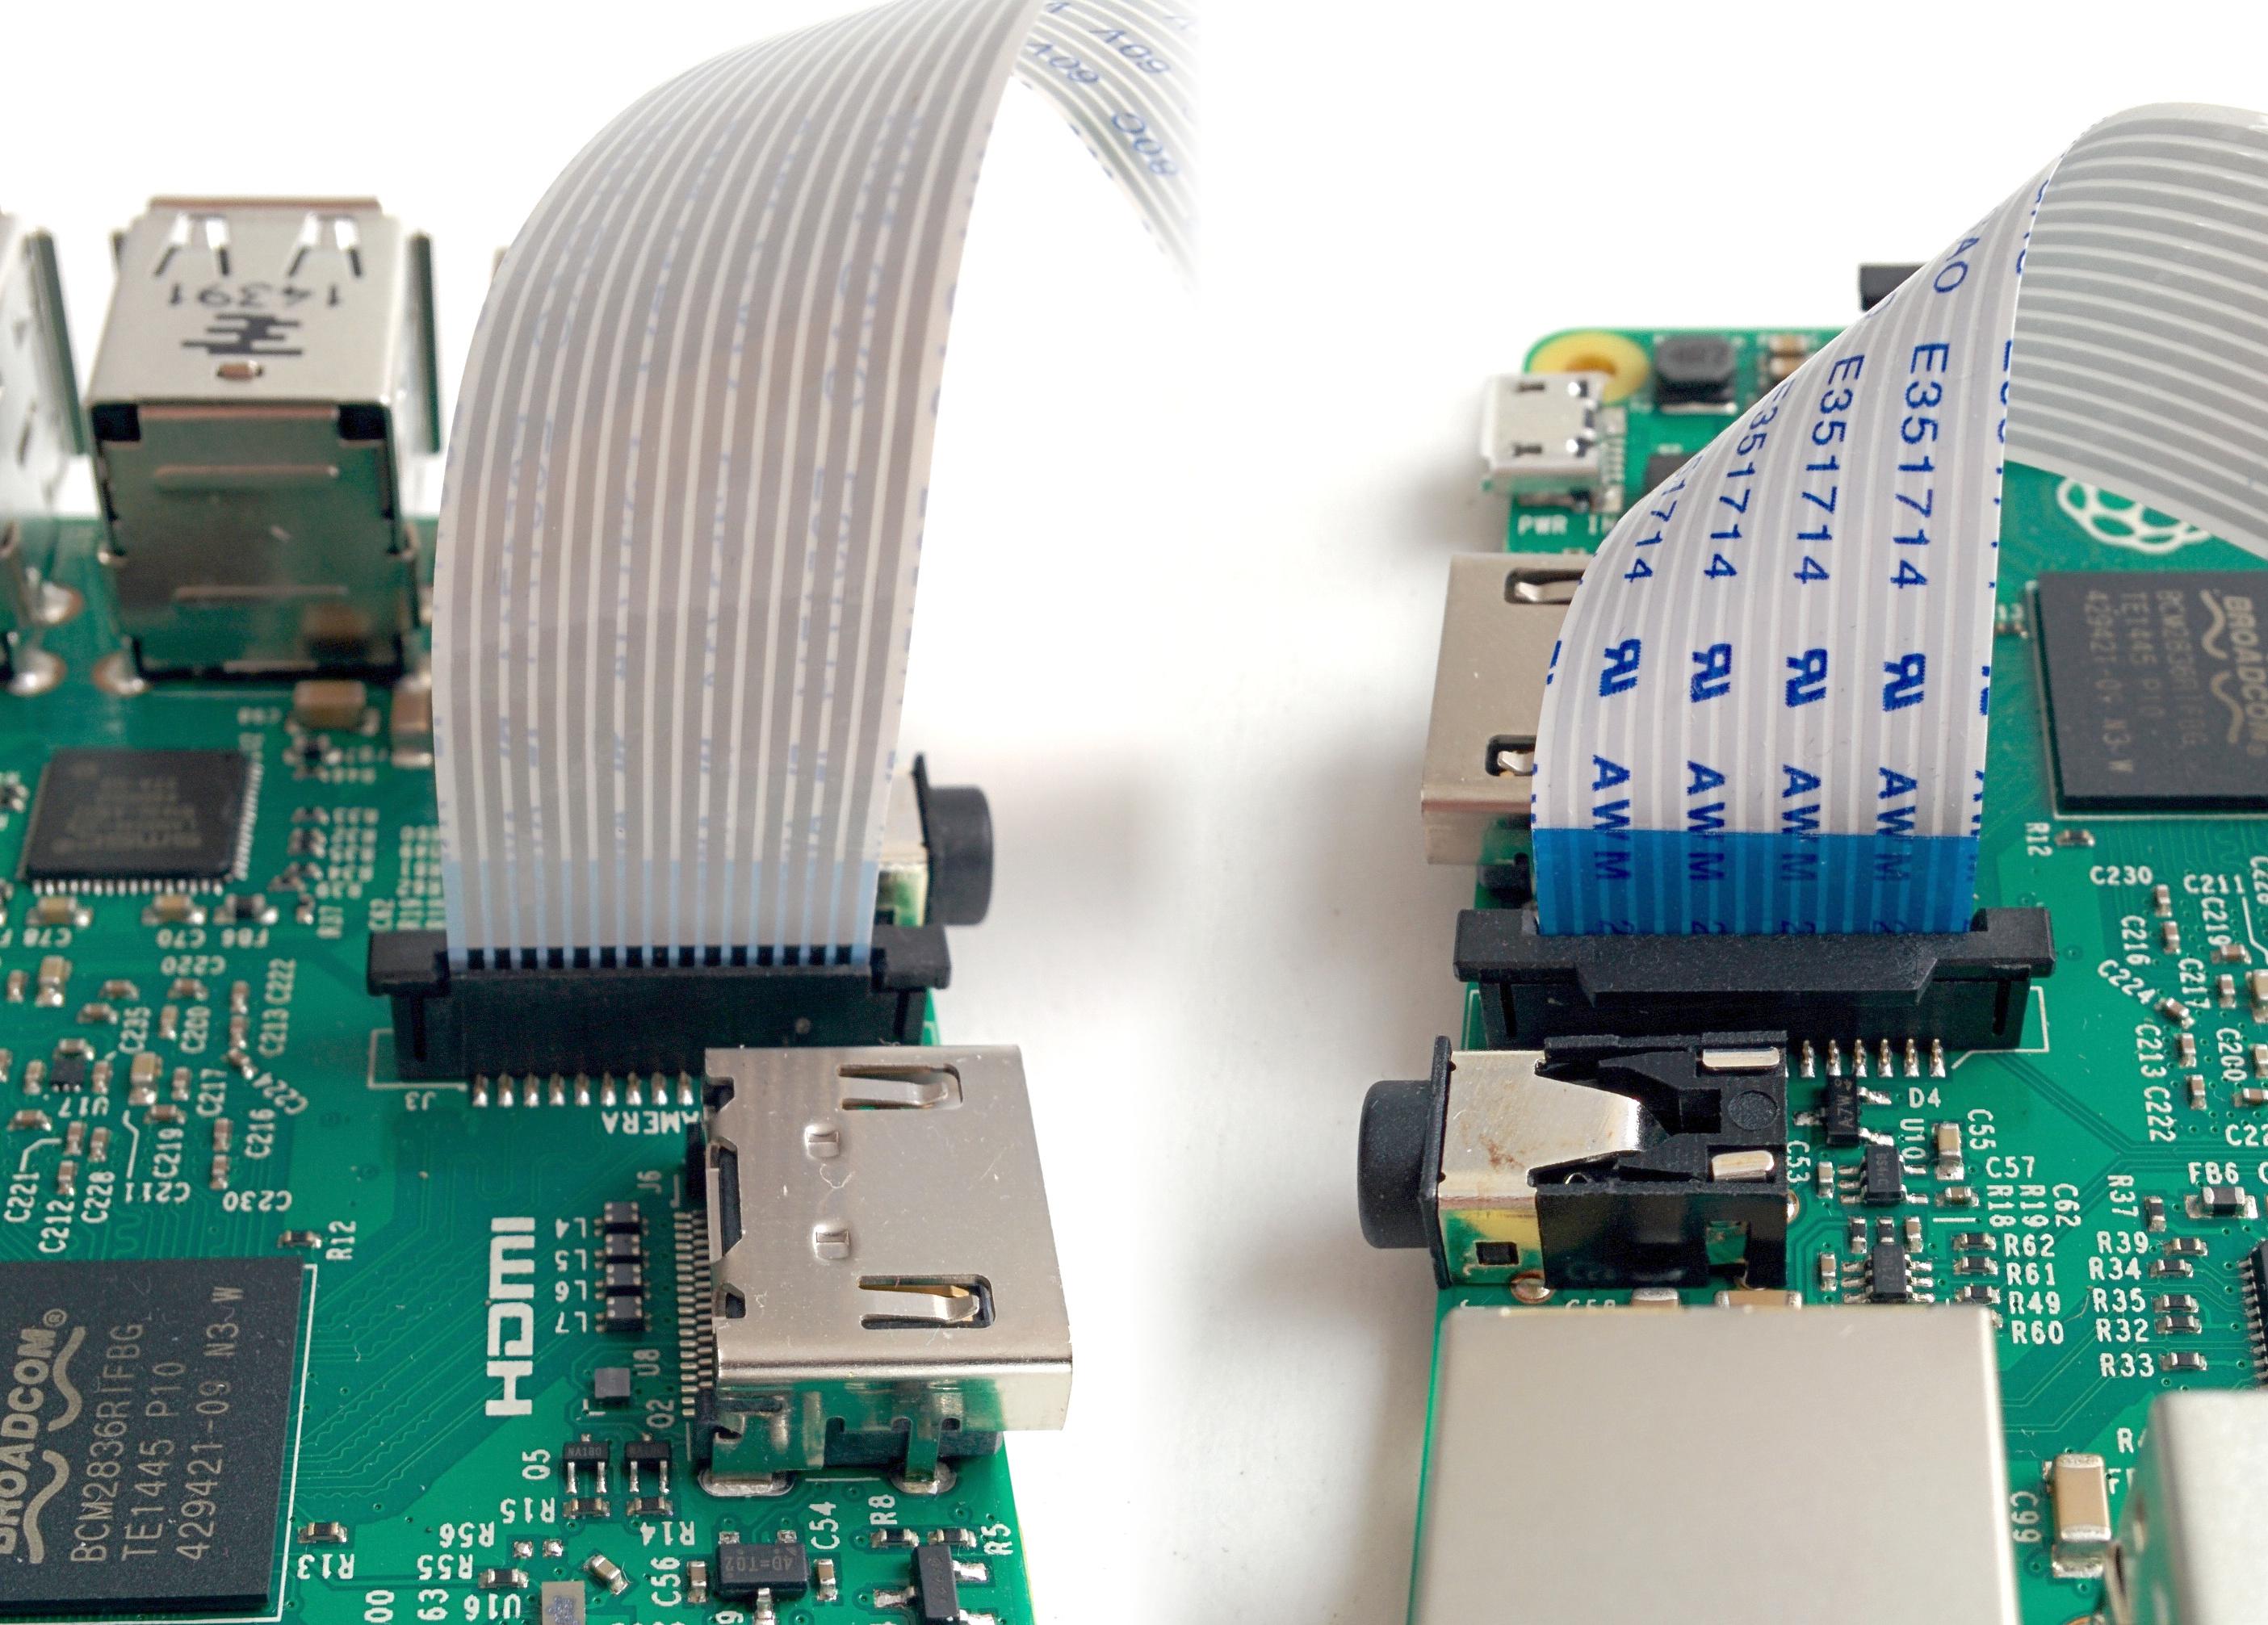
First, find the camera port on the Raspberry Pi 3. It is located right next to the HDMI port. Gently lift the white collar on the port. Next, insert the cable into the camera port, the side with blue texts facing the Ethernet port. Make sure that the cable is inserted all the way in. Gently push down the white collar to secure the cable.
Note
If you also need to have a SenseHAT installed, make sure that you stick the cable through the slot on the SenseHAT first. Otherwise it will be difficult to install the PiCamera after you install SenseHAT.
Software setup
The camera interface on the Raspberry Pi is not turned on by default. You will need to manually turn it on. There are two ways to do this:
- Through the raspi-config utility
- Through the Raspberry Pi settings on the desktop.
Turning on the camera interface through raspi-config
Type the following command in the terminal (located on the task bar, or press Ctrl+Alt+T):
$ sudo raspi-config
In the terminal interface that follows, choose Interfacing Options, and then Camera. Choose yes, save the configuration, and reboot the Raspberry Pi.
Turning on the camera interface through the GUI
Start the Raspberry Pi Configuration utility and enable the camera module:

You will also need to reboot your Raspberry Pi after this.
Test your configuration
To make sure that your Camera is set up properly, use this command:
$ raspistill -o image.jpg
A preview of the camera should appear, and after 5 seconds, you will see an image called image.jpg in the homepi folder.
Hint
If you are using VNC, you will need to go to settings of the VNC client on the Raspberry Pi. Navigate to Menu > Options > Troubleshooting and select Enable experimental direct capture mode.
Next, make sure that you have the Python library installed. In the terminal, type this:
$ python3 -c "import picamera"
If no error messages pop up, congratulations. You’ve configured your Raspberry Pi correctly.
Programming your PiCamera
Warning
When trying out these scripts do not name your file picamera.py.
Naming scripts after existing Python modules will cause errors when you
try and import those modules (because Python checks the current directory
before checking other paths).
Starting a preview
from picamera import PiCamera
camera = PiCamera()

camera.resolution(1024, 768) # 4:3 aspect ratio
camera.start_preview()
You will need the first two lines before you instruct the PiCamera to do anything. The thrid line sets up the resolution for the camera. The camera supports taking 4K videos at 30FPS!
Taking a picture
from time import sleep
from picamera import PiCamera

camera = PiCamera()
camera.resolution = (1600, 1200) # 4:3 aspect ratio

sleep(2) # warming up
camera.capture('foo.jpg')
Capturing timelapse sequences
The simplest way to capture long time-lapse sequences is with the
capture_continuous() method. With this method, the camera
captures images continually until you tell it to stop. Images are automatically
given unique names and you can easily control the delay between captures. The
following example shows how to capture images with a 5 minute delay between
each shot::
from time import sleep
from picamera import PiCamera

camera = PiCamera()
camera.start_preview()
sleep(2)
for filename in camera.capture_continuous('img{counter:03d}.jpg'):
    print('Captured %s' % filename)
    sleep(300) # wait 5 minutes
However, you may wish to capture images at a particular time, say at the start of every hour. This simply requires a refinement of the delay in the loop (the
datetime module is slightly easier to use for calculating dates and
times; this example also demonstrates the timestamp template in the
captured filenames)::
from time import sleep
from picamera import PiCamera
from datetime import datetime, timedelta

def wait():
    # Calculate the delay to the start of the next hour
    next_hour = (datetime.now() + timedelta(hour=1)).replace(
        minute=0, second=0, microsecond=0)
    delay = (next_hour - datetime.now()).seconds
    sleep(delay)

camera = PiCamera()
camera.start_preview()
wait()
for filename in camera.capture_continuous('img{timestamp:%Y-%m-%d-%H-%M}.jpg'):
    print('Captured %s' % filename)
    wait()
Controlling the PiCamera using Node-RED
Node-RED offers a myriad of functionalities to control the Raspberry Pi. The only thing you need to do is to install the camerapi node:
$ cd .node-red
$ npm install node-red-contrib-camerapi
Once the camerapi node is installed, start Node-RED by going to the Programming menu, click on Node-RED. Leave the terminal window open, fire up a new browser window, and go to http://127.0.0.1:1880. You will need an inject node, and a camerapi takephoto node. Drag them to an empty flow, and connect them. Double-click on the camera pi node, you will see the following setting:

The only option that needs explanation is the first one. The File Mode option controls how the files are named. Choose Generate and the file name will be generated automatically. Choose Filemode, you can specify the file name. You can also choose to override the file name using msg.filename in the msg object passed to the node, so that you can write a function to fine control the filename.
Note
You can find your picture under the /home/pi/Pictures folder.
Now you can deploy the flow. Whenever you click the button to the left of the inject node, a new picture will be taken.
Alternatively, you can also change the options of the inject node to have Node-RED take the picture at a certain time interval by changing the repeat option.
