#WeAreNotWaiting
This page contains links to open source documentation for the #WeAreNotWaiting movement.
Hosted on other repositories:
Hosted in this repository:
Community-maintained Nightscout documentation
Select your language below.
Nightscout - Home


Welcome to Nightscout’s documentation! Choose a link below to get started. Not sure where to start? Click here to learn more.
#WeAreNotWaiting and this is why.
All information, thought, and code described here is intended for informational and educational purposes only. Nightscout currently makes no attempt at HIPAA privacy compliance. Use of code from github.com is without warranty or support of any kind. Please review the LICENSE found within each repository for further details. Use Nightscout at your own risk, and do not use the information or code to make medical decisions.
Section 1: About Nightscout
What is Nightscout?
Nightscout is an open source, Do-It-Yourself (DIY) project that allows real time access to a continuous glucose monitor (CGM) data via a personal website, a smartwatch, or apps and widgets available for smartphones.
Nightscout was developed by parents of children with type 1 diabetes and has continued to be developed, maintained, and supported by volunteers. When first implemented, Nightscout was a solution specifically for remote monitoring of Dexcom G4 CGM data. Today, Nightscout is compatible with an increasing number of glucose monitor models including Dexcom’s G4/G5/G6, Freestyle Libre, and Medtronic. Nightscout also provides browser-based visualization for #OpenAPS users, #AndroidAPS users, and Loop users.
#WeAreNotWaiting and this is why.
How does it work?
The technology is simple: Your glucose monitor continues to work as it always has by reading the glucose level of the T1D who is wearing a compatible sensor/transmitter. An uploader device reads the data from the glucose monitor and transmits the readings to the Internet, where any web-connected device can view the numbers.
This image from the Wall Street Journal article, “Citizen Hackers Tinker with Medical Devices”, illustrates the entire system.
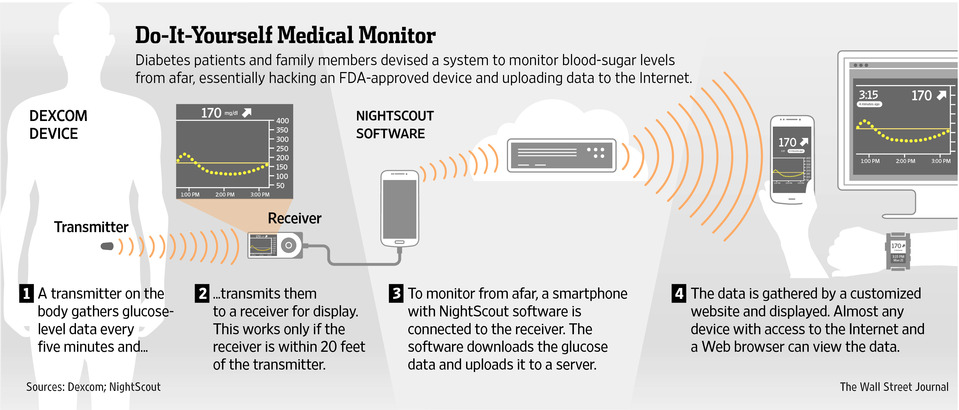
Image Courtesy of Wall Street Journal. Published on line, Friday, Sept. 26, 2014
What does it cost?
The Nightscout software itself is open source and therefore free. There are however incidental costs which will vary based on your needs and setup. The four main cost categories are:
- Internet data upload, i.e. the cost of a smart phone, as well as data package charges if not using wifi
- Web hosting / services, i.e. to run your website and store your data
- In some cases, additional hardware is needed to collect data from the glucose monitor, e.g. a NFC reader for Freestyle Libre
- Optional accessories such as a smartwatch
At the time of this writing, web hosting / services can for the most part be obtained for free. Setting up accounts with web service providers is covered in the Deployment to Heroku section.
Is it safe? Is it approved?
Nightscout is purely DIY software, built by patient volunteers or their caregivers, each to meet their own needs. All code is available online, and each user of Nightscout must decide for themselves whether they consider it safe. While all development takes place with safety as a first priority, the information shown on Nightscout cannot replace your primary, approved information source, i.e. the software or device provided with your glucose monitor.
In short:
- Do not use any of the Nightscout information or code to make medical decisions.
- There is no support or any warranty of any kind.
- The quality and performance of the project is with you if you choose to use it.
Regulatory authorities require each submitted product to have a legal manufacturer. Given there is no central organization responsible for Nightscout, it cannot be formally approved.
Where do I find more information?
The menu to the left provides links to further information, including how to install Nightscout and how to understand its interface. If you have a question not covered in the documentation, head over to Where to get help.
All information, thought, and code described here is intended for informational and educational purposes only. Nightscout currently makes no attempt at HIPAA privacy compliance. Use of code from github.com is without warranty or support of any kind. Please review the LICENSE found within each repository for further details. Use Nightscout at your own risk, and do not use the information or code to make medical decisions.
Project background
For a brief history of Nightscout, see Wikipedia.
All information, thought, and code described here is intended for informational and educational purposes only. Nightscout currently makes no attempt at HIPAA privacy compliance. Use of code from github.com is without warranty or support of any kind. Please review the LICENSE found within each repository for further details. Use Nightscout at your own risk, and do not use the information or code to make medical decisions.
How to contribute
Nightscout is a community-led project and the most valuable contribution you can make is your time. Every little bit helps.
Documentation
Nightscout has a legacy which includes documentation scattered across multiple sites. This site is an attempt to pull all that documentation together into one place and have it available for the community to update. Options for helping with documentation include:
- Updating this documentation. If you find a mistake or that information is incomplete, the fastest way to help out is to submit the change yourself via a method called a pull request to the documentation repository Nightscout documentation on Github.
- If you are unable to raise a pull request yourself, you can notify the community of a documentation issue. The community would prefer you do this via a pull request though! We highly value direct contribution.
- If you find another site hosting Nightscout documentation which appears to be out of date or redundant, you can notify us via a documentation issue as well.
- If you’d like to volunteer for a larger block of work, such as translation of the documentation or review prior to a new release of Nightscout, reach out on Gitter.
Code
If you would like to contribute code, please head over to Github and read CONTRIBUTING.md.
Supporting users
Although there is no warranty or support for Nightscout, there is an active community helping each other out. The best way to support others is to join the Facebook group CGM in the Cloud. There are no formal roles on that group; each person helps out according to their ability.
All information, thought, and code described here is intended for informational and educational purposes only. Nightscout currently makes no attempt at HIPAA privacy compliance. Use of code from github.com is without warranty or support of any kind. Please review the LICENSE found within each repository for further details. Use Nightscout at your own risk, and do not use the information or code to make medical decisions.
Where to get help
Nightscout is a community-led project and as such there is no warranty nor dedicated support group you can contact. That said, there is an active community helping each other out. Usually help is only minutes away. There are three main channels through which you can get help.
- The best way find help is to join the Facebook group CGM in the Cloud and post a question.
- Reach out on Gitter, a chat room.
- If you have found a bug in Nightscout, you can open an issue. If you are not sure what you have found is a bug, it makes sense to discuss with the community on Facebook or Gitter before opening the issue.
In all of the cases above, it makes sense to provide some context while asking for help. For example, if you are having trouble with installation, which service are you using, Heroku or Azure? What messages are you seeing? Providing some context allows the community members who want to help you some starting information to get the ball rolling.
All information, thought, and code described here is intended for informational and educational purposes only. Nightscout currently makes no attempt at HIPAA privacy compliance. Use of code from github.com is without warranty or support of any kind. Please review the LICENSE found within each repository for further details. Use Nightscout at your own risk, and do not use the information or code to make medical decisions.
License & Disclaimers
License
cgm-remote-monitor - web app to broadcast cgm readings Copyright (C) 2017 Nightscout contributors. See the COPYRIGHT file at the root directory of this distribution and at https://github.com/nightscout/cgm-remote-monitor/blob/master/COPYRIGHT
This program is free software: you can redistribute it and/or modify it under the terms of the GNU Affero General Public License as published by the Free Software Foundation, either version 3 of the License, or (at your option) any later version.
This program is distributed in the hope that it will be useful, but WITHOUT ANY WARRANTY; without even the implied warranty of MERCHANTABILITY or FITNESS FOR A PARTICULAR PURPOSE. See the GNU Affero General Public License for more details.
You should have received a copy of the GNU Affero General Public License along with this program. If not, see <http://www.gnu.org/licenses/>.
Disclaimer
All information, thought, and code described here is intended for informational and educational purposes only. Nightscout currently makes no attempt at HIPAA privacy compliance. Use of code from github.com is without warranty or support of any kind. Please review the LICENSE found within each repository for further details. Use Nightscout at your own risk, and do not use the information or code to make medical decisions.
Section 2: Before you start
Compatible CGM hardware
WORK IN PROGRESS
Nightscout is compatible with a wide variety of CGM systems. This page contains links to additional hardware which may be needed in addition to a phone. For software needs, see the section Uploader software.
Dexcom
- G4 via the G4 platinum receiver and bluetooth
- G5 directly via bluetooth
- G6 directly via bluetooth
Medtronic
- Enlite with 5xx or 7xx series pumps, via RileyLink
- Enlite with 6xx series pumps, via the Contour Nexlink glucose meter and USB OTG cable
Abott
- Freestyle Libre with a Ambrosia Blucon attachment
- Freestyle Libre with a HighHigh Brilliant Miaomiao attachment
All information, thought, and code described here is intended for informational and educational purposes only. Nightscout currently makes no attempt at HIPAA privacy compliance. Use of code from github.com is without warranty or support of any kind. Please review the LICENSE found within each repository for further details. Use Nightscout at your own risk, and do not use the information or code to make medical decisions.
Uploader software
Below are different applications which can upload CGM and other data to Nightscout. Visit their respective pages to learn more about how to install and configure them.
What you’ll need
In order to configure uploader software you will need your Nightscout URL and API_SECRET.
There is an autoconfigure tool which will be helpful in configuring your software if your device supports reading of QR codes.

Open source uploaders
The following open source uploaders connect to a wide range of CGM hardware, and have additional features as well, i.e. to track and upload treatments.
- Xdrip+ (Android)
- Spike (iOS)
- Medtronic 600 series Android uploader (see complete setup cookbook here)
Open source artificial pancreas systems
The artificial pancreas systems below are able to upload a wide range of data including CGM, pump, and treatment information.
Commercial systems supported by open source software
All information, thought, and code described here is intended for informational and educational purposes only. Nightscout currently makes no attempt at HIPAA privacy compliance. Use of code from github.com is without warranty or support of any kind. Please review the LICENSE found within each repository for further details. Use Nightscout at your own risk, and do not use the information or code to make medical decisions.
Section 3: Install, config, and updates
Installing Nightscout
WORK IN PROGRESS
If you plan to use Nightscout, we recommend using Heroku, as Nightscout can reach the usage limits of the free Azure plan and cause it to shut down for hours or days. If you end up needing a paid tier, the $7/mo Heroku plan is also much cheaper than the first paid tier of Azure. Currently, the only added benefit to choosing the $7/mo Heroku plan vs the free Heroku plan is a section showing site use metrics for performance (such as response time). This has limited benefit to the average Nightscout user. In short, Heroku is the free and best option for Nightscout hosting.
- Nightscout Setup with Heroku (recommended)
- Nightscout Setup with Microsoft Azure (not recommended)
Please switch from Azure to Heroku.
Hint
If following your installation your site appears empty, as in there are no glucose or other data visible, then you will need to configure an uploader. If your site does not resemble this at all (white or black screen, dashes, error message), have a look at the troubleshooting guide.

All information, thought, and code described here is intended for informational and educational purposes only. Nightscout currently makes no attempt at HIPAA privacy compliance. Use of code from github.com is without warranty or support of any kind. Please review the LICENSE found within each repository for further details. Use Nightscout at your own risk, and do not use the information or code to make medical decisions.
Server-side configuration
WORK IN PROGRESS
delta(BG Delta)direction(BG Direction)upbat(Uploader Battery)timeago(Time Ago)devicestatus(Device Status)errorcodes(CGM Error Codes)ar2(AR2 Forecasting)simplealarms(Simple BG Alarms)profile(Treatment Profile)
careportal(Careportal)boluscalc(Bolus Wizard)food(Custom Foods)rawbg(Raw BG)iob(Insulin-on-Board)cob(Carbs-on-Board)bwp(Bolus Wizard Preview)cage(Cannula Age)sage(Sensor Age)iage(Insulin Age)treatmentnotify(Treatment Notifications)basal(Basal Profile)bridge(Share2Nightscout bridge)mmconnect(MiniMed Connect bridge)pump(Pump Monitoring)openaps(OpenAPS)loop(Loop)xdrip-js(xDrip-js)alexa(Amazon Alexa)cors(CORS)
Where to go to set these variables
Environment
VARIABLE (default) - description
MONGO_CONNECTION- Your mongo uri, for example:mongodb://sally:sallypass@ds099999.mongolab.com:99999/nightscout. (The data being uploaded from the server to the client is from a MongoDB server such as mongolab. Try the what is my mongo string tool to get a good idea of your mongo string. You can copy and paste the text in the gray
box into your MONGO_CONNECTION environment variable.)
- DISPLAY_UNITS (mg/dl) - Choices: mg/dl and mmol. Setting to mmol puts the entire server into mmol mode by default, no further settings needed.
- BASE_URL - Used for building links to your sites api, ie pushover callbacks, usually the URL of your Nightscout site you may want https instead of http.
ENABLE- Used to enable optional features, expects a space delimited list, such as:careportal rawbg iob, see plugins belowDISABLE- Used to disable default features, expects a space delimited list, such as:direction upbat, see plugins belowAPI_SECRET- A secret passphrase that must be at least 12 characters long, required to enablePOSTandPUT; also required for the Care PortalAUTH_DEFAULT_ROLES(readable) - possible valuesreadable,denied, or any valid role name. Whenreadable, anyone can view Nightscout without a token. Setting it todeniedwill require a token from every visit, usingstatus-onlywill enable api-secret based login.IMPORT_CONFIG- Used to import settings and extended settings from a url such as a gist. Structure of file should be something like:{"settings": {"theme": "colors"}, "extendedSettings": {"upbat": {"enableAlerts": true}}}TREATMENTS_AUTH(on) - possible valuesonoroff. Deprecated, if set tooffthecareportalrole will be added toAUTH_DEFAULT_ROLES
These alarm setting effect all delivery methods (browser, pushover, maker, etc), some settings can be overridden per client (web browser)
ALARM_TYPES(simpleif anyBG_* ENV’s are set, otherwisepredict) - currently 2 alarm types are supported, and can be used independently or combined. Thesimplealarm type only compares the current BG toBG_* thresholds above, thepredictalarm type uses highly tuned formula that forecasts where the BG is going based on it’s trend.predictDOES NOT currently use any of theBG_* ENV’sBG_HIGH(260) - must be set using mg/dl units; the high BG outside the target range that is considered urgentBG_TARGET_TOP(180) - must be set using mg/dl units; the top of the target range, also used to draw the line on the chartBG_TARGET_BOTTOM(80) - must be set using mg/dl units; the bottom of the target range, also used to draw the line on the chartBG_LOW(55) - must be set using mg/dl units; the low BG outside the target range that is considered urgentALARM_URGENT_HIGH(on) - possible valuesonoroffALARM_URGENT_HIGH_MINS(30 60 90 120) - Number of minutes to snooze urgent high alarms, space separated for options in browser, first used for pushoverALARM_HIGH(on) - possible valuesonoroffALARM_HIGH_MINS(30 60 90 120) - Number of minutes to snooze high alarms, space separated for options in browser, first used for pushoverALARM_LOW(on) - possible valuesonoroffALARM_LOW_MINS(15 30 45 60) - Number of minutes to snooze low alarms, space separated for options in browser, first used for pushoverALARM_URGENT_LOW(on) - possible valuesonoroffALARM_URGENT_LOW_MINS(15 30 45) - Number of minutes to snooze urgent low alarms, space separated for options in browser, first used for pushoverALARM_URGENT_MINS(30 60 90 120) - Number of minutes to snooze urgent alarms (that aren’t tagged as high or low), space separated for options in browser, first used for pushoverALARM_WARN_MINS(30 60 90 120) - Number of minutes to snooze warning alarms (that aren’t tagged as high or low), space separated for options in browser, first used for pushover
MONGO_COLLECTION(entries) - The collection used to store SGV, MBG, and CAL records from your CGM deviceMONGO_TREATMENTS_COLLECTION(treatments) -The collection used to store treatments entered in the Care Portal, see theENABLEenv var aboveMONGO_DEVICESTATUS_COLLECTION(devicestatus) - The collection used to store device status information such as uploader batteryMONGO_PROFILE_COLLECTION(profile) - The collection used to store your profilesMONGO_FOOD_COLLECTION(food) - The collection used to store your food databaseMONGO_ACTIVITY_COLLECTION(activity) - The collection used to store activity dataPORT(1337) - The port that the node.js application will listen on.HOSTNAME- The hostname that the node.js application will listen on, null by default for any hostname for IPv6 you may need to use::.SSL_KEY- Path to your ssl key file, so that ssl(https) can be enabled directly in node.jsSSL_CERT- Path to your ssl cert file, so that ssl(https) can be enabled directly in node.jsSSL_CA- Path to your ssl ca file, so that ssl(https) can be enabled directly in node.jsHEARTBEAT(60) - Number of seconds to wait in between database checksDEBUG_MINIFY(true) - Debug option, setting tofalsewill disable bundle minification to help tracking down error and speed up development
TIME_FORMAT(12)- possible values12or24NIGHT_MODE(off) - possible valuesonoroffSHOW_RAWBG(never) - possible valuesalways,neverornoiseCUSTOM_TITLE(Nightscout) - Usually name of T1THEME(default) - possible valuesdefault,colors, orcolorblindfriendlyALARM_TIMEAGO_WARN(on) - possible valuesonoroffALARM_TIMEAGO_WARN_MINS(15) - minutes since the last reading to trigger a warningALARM_TIMEAGO_URGENT(on) - possible valuesonoroffALARM_TIMEAGO_URGENT_MINS(30) - minutes since the last reading to trigger a urgent alarmSHOW_PLUGINS- enabled plugins that should have their visualizations shown, defaults to all enabledSHOW_FORECAST(ar2) - plugin forecasts that should be shown by default, supports space delimited values such as"ar2 openaps"LANGUAGE(en) - language of Nightscout. If not available english is used- Currently supported language codes are: bg (Български), cs (Čeština), de (Deutsch), dk (Dansk), el (Ελληνικά), en (English), es (Español), fi (Suomi), fr (Français), he (עברית), hr (Hrvatski), it (Italiano), ko (한국어), nb (Norsk (Bokmål)), nl (Nederlands), pl (Polski), pt (Português (Brasil)), ro (Română), ru (Русский), sk (Slovenčina), sv (Svenska), zh_cn (中文(简体)), zh_tw (中文(繁體))
SCALE_Y(log) - The type of scaling used for the Y axis of the charts system wide.- The default
log(logarithmic) option will let you see more detail towards the lower range, while still showing the full CGM range. - The
linearoption has equidistant tick marks, the range used is dynamic so that space at the top of chart isn’t wasted. - The
log-dynamicis similar to the defaultlogoptions, but uses the same dynamic range and thelinearscale.
- The default
EDIT_MODE(on) - possible valuesonoroff. Enable or disable icon allowing enter treatments edit mode.
There are a few alternate web views available that display a simplified BG stream. Append any of these to your Nightscout URL:
/clock.html- Shows current BG. Grey text on a black background./bgclock.html- Shows current BG, trend arrow, and time of day. Grey text on a black background./clock-color.html- Shows current BG and trend arrow. White text on a background that changes color to indicate current BG threshold (green = in range; blue = below range; yellow = above range; red = urgent below/above).
Plugins
Plugins are used extend the way information is displayed, how notifications are sent, alarms are triggered, and more.
The built-in/example plugins that are available by default are listed below. The plugins may still need to be enabled by adding to the ENABLE environment variable.
These can be disabled by setting the DISABLE env var, for example DISABLE="direction upbat"
delta (BG Delta)¶Calculates and displays the change between the last 2 BG values.
direction (BG Direction)¶Displays the trend direction.
upbat (Uploader Battery)¶Displays the most recent battery status from the uploader phone. . Use these extended setting to adjust behavior:
UPBAT_ENABLE_ALERTS(false) - Set totrueto enable uploader battery alarms via Pushover and IFTTT.UPBAT_WARN(30) - Minimum battery percent to trigger warning.UPBAT_URGENT(20) - Minimum battery percent to trigger urgent alarm.
timeago (Time Ago)¶Displays the time since last CGM entry. Use these extended setting to adjust behavior:
TIMEAGO_ENABLE_ALERTS(false) - Set totrueto enable stale data alarms via Pushover and IFTTT.ALARM_TIMEAGO_WARN(on) - possible valuesonoroffALARM_TIMEAGO_WARN_MINS(15) - minutes since the last reading to trigger a warningALARM_TIMEAGO_URGENT(on) - possible valuesonoroffALARM_TIMEAGO_URGENT_MINS(30) - minutes since the last reading to trigger a urgent alarm
devicestatus (Device Status)¶Used by upbat and other plugins to display device status info. Supports the DEVICESTATUS_ADVANCED="true" extended setting to send all device statuses to the client for retrospective use and to support other plugins.
errorcodes (CGM Error Codes)¶Generates alarms for CGM codes 9 (hourglass) and 10 (???).
- Use extended settings to adjust what errorcodes trigger notifications and alarms:
ERRORCODES_INFO(1 2 3 4 5 6 7 8) - By default the needs calibration (blood drop) and other codes below 9 generate an info level notification, set to a space separate list of number oroffto disableERRORCODES_WARN(off) - By default there are no warning configured, set to a space separate list of numbers oroffto disableERRORCODES_URGENT(9 10) - By default the hourglass and ??? generate an urgent alarm, set to a space separate list of numbers oroffto disable
ar2 (AR2 Forecasting)¶Generates alarms based on forecasted values. See Forecasting using AR2 algorithm
- Enabled by default if no thresholds are set OR
ALARM_TYPESincludespredict. - Use extended settings to adjust AR2 behavior:
AR2_CONE_FACTOR(2) - to adjust size of cone, use0for a single line.
simplealarms (Simple BG Alarms)¶Uses BG_HIGH, BG_TARGET_TOP, BG_TARGET_BOTTOM, BG_LOW thresholds to generate alarms. Enabled by default if 1 of these thresholds is set OR ALARM_TYPES includes simple.
profile (Treatment Profile)¶Add link to Profile Editor and allow to enter treatment profile settings. Also uses the extended setting:
PROFILE_HISTORY(off) - possible valuesonoroff. Enable/disable NS ability to keep history of your profiles (still experimental)PROFILE_MULTIPLE(off) - possible valuesonoroff. Enable/disable NS ability to handle and switch between multiple treatment profiles
careportal (Careportal)¶An optional form to enter treatments.
boluscalc (Bolus Wizard)¶food (Custom Foods)¶An option plugin to enable adding foods from database in Bolus Wizard.
rawbg (Raw BG)¶Calculates BG using sensor and calibration records from and displays an alternate BG values and noise levels.
iob (Insulin-on-Board)¶Adds the IOB pill visualization in the client and calculates values that used by other plugins. Uses treatments with insulin doses and the dia and sens fields from the treatment profile.
cob (Carbs-on-Board)¶Adds the COB pill visualization in the client and calculates values that used by other plugins. Uses treatments with carb doses and the carbs_hr, carbratio, and sens fields from the treatment profile.
bwp (Bolus Wizard Preview)¶This plugin in intended for the purpose of automatically snoozing alarms when the CGM indicates high blood sugar but there is also insulin on board (IOB) and secondly, alerting to user that it might be beneficial to measure the blood sugar using a glucometer and dosing insulin as calculated by the pump or instructed by trained medicare professionals. The values provided by the plugin are provided as a reference based on CGM data and insulin sensitivity you have configured, and are not intended to be used as a reference for bolus calculation. The plugin calculates the bolus amount when above your target, generates alarms when you should consider checking and bolusing, and snoozes alarms when there is enough IOB to cover a high BG. Uses the results of the iob plugin and sens, target_high, and target_low fields from the treatment profile. Defaults that can be adjusted with extended setting.
BWP_WARN(0.50) - IfBWPis >BWP_WARNa warning alarm will be triggered.BWP_URGENT(1.00) - IfBWPis >BWP_URGENTan urgent alarm will be triggered.BWP_SNOOZE_MINS(10) - minutes to snooze when there is enough IOB to cover a high BG.BWP_SNOOZE- (0.10) If BG is higher then thetarget_highandBWP<BWP_SNOOZEalarms will be snoozed forBWP_SNOOZE_MINS.
cage (Cannula Age)¶Calculates the number of hours since the last Site Change treatment that was recorded. * CAGE_ENABLE_ALERTS (false) - Set to true to enable notifications to remind you of upcoming cannula change.
CAGE_INFO(44) - If time since lastSite ChangematchesCAGE_INFO, user will be warned of upcoming cannula changeCAGE_WARN(48) - If time since lastSite ChangematchesCAGE_WARN, user will be alarmed to to change the cannulaCAGE_URGENT(72) - If time since lastSite ChangematchesCAGE_URGENT, user will be issued a persistent warning of overdue
change.
- CAGE_DISPLAY (hours) - Possible values are ‘hours’ or ‘days’. If ‘days’ is selected and age of canula is greater than 24h
number is displayed in days and hours
sage (Sensor Age)¶Calculates the number of days and hours since the last Sensor Start and Sensor Change treatment that was recorded.
SAGE_ENABLE_ALERTS(false) - Set totrueto enable notifications to remind you of upcoming sensor change.SAGE_INFO(144) - If time since last sensor event matchesSAGE_INFO, user will be warned of upcoming sensor changeSAGE_WARN(164) - If time since last sensor event matchesSAGE_WARN, user will be alarmed to to change/restart the sensorSAGE_URGENT(166) - If time since last sensor event matchesSAGE_URGENT, user will be issued a persistent warning of overdue change.
iage (Insulin Age)¶Calculates the number of days and hours since the last Insulin Change treatment that was recorded.
IAGE_ENABLE_ALERTS(false) - Set totrueto enable notifications to remind you of upcoming insulin reservoir change.IAGE_INFO(44) - If time since lastInsulin ChangematchesIAGE_INFO, user will be warned of upcoming insulin reservoir changeIAGE_WARN(48) - If time since lastInsulin ChangematchesIAGE_WARN, user will be alarmed to to change the insulin reservoirIAGE_URGENT(72) - If time since lastInsulin ChangematchesIAGE_URGENT, user will be issued a persistent warning of overdue change.
treatmentnotify (Treatment Notifications)¶Generates notifications when a treatment has been entered and snoozes alarms minutes after a treatment. Default snooze is 10 minutes, and can be set using the TREATMENTNOTIFY_SNOOZE_MINS extended setting.
basal (Basal Profile)¶Adds the Basal pill visualization to display the basal rate for the current time. Also enables the bwp plugin to calculate correction temp basal suggestions. Uses the basal field from the treatment profile. Also uses the extended setting:
BASAL_RENDER(none) - Possible values arenone,default, oricicle(inverted)
mmconnect (MiniMed Connect bridge)¶Transfer real-time MiniMed Connect data from the Medtronic CareLink server into Nightscout (read more).
MMCONNECT_USER_NAME- Your user name for CareLink Connect.MMCONNECT_PASSWORD- Your password for CareLink Connect.MMCONNECT_INTERVAL(600001 minute) - Number of milliseconds to wait between requests to the CareLink server.MMCONNECT_MAX_RETRY_DURATION(32) - Maximum number of total seconds to spend retrying failed requests before giving up.MMCONNECT_SGV_LIMIT(24) - Maximum number of recent sensor glucose values to send to Nightscout on each request.MMCONNECT_VERBOSE- Set this to “true” to log CareLink request information to the console.MMCONNECT_STORE_RAW_DATA- Set this to “true” to store raw data returned from CareLink astype: "carelink_raw"database entries (useful for development).
pump (Pump Monitoring)¶Generic Pump Monitoring for OpenAPS, MiniMed Connect, RileyLink, t:slim, with more on the way.
- Requires
DEVICESTATUS_ADVANCED="true"to be set PUMP_ENABLE_ALERTS(false) - Set totrueto enable notifications for Pump battery and reservoir.PUMP_WARN_ON_SUSPEND(false) - Set totrueto get an alarm when the pump is suspended.PUMP_FIELDS(reservoir battery) - The fields to display by default. Any of the following fields:reservoir,battery,clock,status, anddevicePUMP_RETRO_FIELDS(reservoir battery clock) - The fields to display in retro mode. Any of the above fields.PUMP_WARN_CLOCK(30) - The number of minutes ago that needs to be exceed before an alert is triggered.PUMP_URGENT_CLOCK(60) - The number of minutes ago that needs to be exceed before an urgent alarm is triggered.PUMP_WARN_RES(10) - The number of units remaining, a warning will be triggered when dropping below this threshold.PUMP_URGENT_RES(5) - The number of units remaining, an urgent alarm will be triggered when dropping below this threshold.PUMP_WARN_BATT_P(30) - The % of the pump battery remaining, a warning will be triggered when dropping below this threshold.PUMP_URGENT_BATT_P(20) - The % of the pump battery remaining, an urgent alarm will be triggered when dropping below this threshold.PUMP_WARN_BATT_V(1.35) - The voltage (if percent isn’t available) of the pump battery, a warning will be triggered when dropping below this threshold.PUMP_URGENT_BATT_V(1.30) - The voltage (if percent isn’t available) of the pump battery, an urgent alarm will be triggered when dropping below this threshold.
openaps (OpenAPS)¶Integrated OpenAPS loop monitoring, uses these extended settings:
- Requires
DEVICESTATUS_ADVANCED="true"to be set OPENAPS_ENABLE_ALERTS(false) - Set totrueto enable notifications when OpenAPS isn’t looping. If OpenAPS is going to offline for a period of time, you can add anOpenAPS Offlineevent for the expected duration from Careportal to avoid getting alerts.OPENAPS_WARN(30) - The number of minutes since the last loop that needs to be exceed before an alert is triggeredOPENAPS_URGENT(60) - The number of minutes since the last loop that needs to be exceed before an urgent alarm is triggeredOPENAPS_FIELDS(status-symbol status-label iob meal-assist rssi) - The fields to display by default. Any of the following fields:status-symbol,status-label,iob,meal-assist,freq, andrssiOPENAPS_RETRO_FIELDS(status-symbol status-label iob meal-assist rssi) - The fields to display in retro mode. Any of the above fields.
Also see Pushover and IFTTT Maker.
loop (Loop)¶iOS Loop app monitoring, uses these extended settings:
- Requires
DEVICESTATUS_ADVANCED="true"to be set *LOOP_ENABLE_ALERTS(false) - Set totrueto enable notifications when Loop isn’t looping. LOOP_WARN(30) - The number of minutes since the last loop that needs to be exceeded before an alert is triggeredLOOP_URGENT(60) - The number of minutes since the last loop that needs to be exceeded before an urgent alarm is triggered- Add
looptoSHOW_FORECASTto show forecasted BG.
xdrip-js (xDrip-js)¶Integrated xDrip-js monitoring, uses these extended settings:
- Requires
DEVICESTATUS_ADVANCED="true"to be set XDRIP-JS_ENABLE_ALERTS(false) - Set totrueto enable notifications when CGM state is not OK or battery voltages fall below threshold.XDRIP-JS_STATE_NOTIFY_INTRVL(0.5) - Set to number of hours between CGM state notificationsXDRIP-JS_WARN_BAT_V(300) - The voltage of either transmitter battery, a warning will be triggered when dropping below this threshold.
speech (Speech)¶Speech synthesis plugin. When enabled, speaks out the blood glucose values, IOB and alarms. Note you have to set the LANGUAGE setting on the server to get all translated alarms.
cors (CORS)¶Enables CORS so other websites can make request to your Nightscout site. Uses these extended settings:
CORS_ALLOW_ORIGIN(*) - The list of sites that are allow to make requests
See IFTTT-maker for environment variables you can configure for this service.
Extended Settings
Some plugins support additional configuration using extra environment variables. These are prefixed with the name of the plugin and a _. For example setting MYPLUGIN_EXAMPLE_VALUE=1234 would make extendedSettings.exampleValue available to the MYPLUGIN plugin.
Plugins only have access to their own extended settings, all the extended settings of client plugins will be sent to the browser.
DEVICESTATUS_ADVANCED(true) - Defaults to true. Users who only have a single device uploading data to Nightscout can set this to false to reduce the data use of the site.
Treatment Profile
Some of the plugins make use of a treatment profile that can be edited using the Profile Editor.
All information, thought, and code described here is intended for informational and educational purposes only. Nightscout currently makes no attempt at HIPAA privacy compliance. Use of code from github.com is without warranty or support of any kind. Please review the LICENSE found within each repository for further details. Use Nightscout at your own risk, and do not use the information or code to make medical decisions.
Update your Nightscout site
The easiest way to update your version of Nightscout to the latest recommended version is to use the update my fork tool. It even gives out stars if you are up to date.
The tool will guide you through the update process, which takes place in two steps:
- Updating your fork of cgm-remote-monitor on Github
- Redeploying the site to Azure or Heroku

All information, thought, and code described here is intended for informational and educational purposes only. Nightscout currently makes no attempt at HIPAA privacy compliance. Use of code from github.com is without warranty or support of any kind. Please review the LICENSE found within each repository for further details. Use Nightscout at your own risk, and do not use the information or code to make medical decisions.
Section 4: Understanding your Nightscout site
Understanding the main user interface
WORK IN PROGRESS
Overview
Open your website in a browser window. If you do not know your website URL, refer back to the installation instructions you used to set up the site.
The Nightscout user interface varies in features, depending on the configuration and settings menu options you have selected. A very basic Nightscout website looks like this.

…while a site with many features enabled looks like this.

Understanding the main layout
For the sake of completeness, this guide will explain all the components on a site with many features enabled. Your site is laid out into six main sections, as shown below.

- Section 1 is the title bar. It contains the name of your site, as well as icons for accessing certain features.
- Section 2 shows current information about the status of various systems reporting to Nightscout or other DYI diabetes applications such as an artificial pancreas (OpenAPS or other).
- Section 3 shows current information about you, your treatment, and the items medically attached to you.
- Section 4 shows your basal infusion rate over time, if available.
- Section 5 shows your glucose values over time, along with treatments such as food and insulin treatments.
- Section 6 shows the last 48 hours of history (if available) and allows to scroll back and forth through that period.
Each section is described in further detail below.
Section 1: The title bar

Here is an explanation of the various elements in this section of the user interface:
This is the title of your site. It can be changed in the settings menu.This icon indicates that your device is locked (unauthorized) for data entry. Click on the lock to enter your API secret and unlock the site for your device.or
Enable (grey) or disable (red) allowing enter treatments edit mode. This icon will only be available if your device is unlocked (authorized) for data entry.This icon allows you to switch audio (alarms) on and off.This icon will open the settings menu.This icon leads to the care portal, where you can add treatments and other information.


Section 2: Current system status

The rounded-corner boxes in this part of the user interface are referred to as “pills”. In some cases you will get additional information by hovering your mouse pointer over a pill.
Here is an explanation of the various elements in this section of the user interface:
Time in your current location. You may select 12 or 24-hour format in the settings menu.Time since the last glucose reading. The pill will change colour as the readings get older.Battery level of the uploader device. When hovering your mouse over this pill you see the battery levels of all devices involved in the upload process, if available.The status of your pump, including reservoir level, battery level, time since last status update, and status (i.e. Running or Suspended). When hovering your mouse over this pill you will see further information including active basal information.The time since OpenAPS last ran. When hovering your mouse over this pill you will see detailed information about the last decision made by OpenAPS.The timeframe of the detailed chart. Click one of the timeframes shown to select it.Click this menu to select whether or not to see prediction lines, and which algorithm to use: Show AR2 forecast shows upper and lower forecasts for the next hour based on available information. Show OpenAPS forecast will show various forecast lines based on the expected effects of IOB, UAM, temporary basal, etc.


Section 3: Current status of the person being monitored

The rounded-corner boxes in this part of the user interface are referred to as “pills”. In some cases you will get additional information by hovering your mouse pointer over a pill.
Here is an explanation of the various elements in this section of the user interface:
The most recent glucose value available in Nightscout. You may choose to see this information in mg/dL or mmol/L format in the settings menu.Trend arrow: A quick and easy way to read the current glucose trend. Similar to the functionality on most CGM and flash gluose monitoring systems.Delta: Change in glucose since the last reading.Amount of insulin on board based on latest information available, i.e. the amount still active based on all the bolus and basal insulin given in the last few hours. This value is calculated using the DIA (duration of insulin action) value in the profile. When hovering your mouse over this pill you will see a breakdown of bolus and basal IOB.Amount of carbohydrate still to be converted to glucose, based on latest information available, i.e. the amount still to be converted to sugar, given all the carbs injected in the last few hours. This value is calculated using the carb activity/absorbtion rate in the profile. When hovering your mouse over this pill you will see the time and amount of the last carb entry.Canula age: The number of hours since the latest cannula was inserted. This value is calculated based on the pump site change event as reported in the care portal. When hovering your mouse over this pill you will see the date and time of the last reported cannula insertion / pump site change.Sensor age: The number of days and hours since the latest sensor was inserted or started. This value is calculated based on the sensor insert or sensor start event as reported in the care portal. When hovering your mouse over this pill you will see the date and time of the last reported sensor insertion / sensor start.The current basal rate. If the rate is preceded with a T: then it is a temporary basal rate. When hovering your mouse over this pill you will see additional information including start time, duration, and time remaining.


Section 4: Basal infusion over time
If this section is not visible to you, you may enable it in the settings menu, under Render Basal. The image below shows the default visualisation. It is also possible to show this graph reversed vertically (upside down) using the icicle visualisation.

This section will show basal rates over time. The dotted line shows the normal basal rate, while the solid line and shading shows the actual current basal rate, which may be different if a temporary basal rate is active.
Here is an explanation of the various elements in this section of the user interface:
This is the basal rate represented in that part of the graph, shown as units per hour. This might also be represented as a percentage. For example, 120% would mean you are running a temporary basal rate which is 20% higher than your usual basal rate at this time.This graph shows basal rate changes. The coloured-in areas under the solid lines are temporary basal rates enacted by an artificial pancreas system.This dashed line represents the normal basal rate at this time, as defined in your profile.


Section 5: Glucose and treatments over time

This section shows your glucose curve and any insulin and glucose treatments which have been uploaded to Nightscout. The time period shown depends on the time period you have selected in section 2 above. This example shows a three hour timeframe.
By hovering your mouse over any data point on this graph, you can get additional information about the data point.
Here is an explanation of the various elements in this section of the user interface:
These are the glucose values. They will be shown in green when glucose is within the target range. The colour will change to yellow when outside the target range, or to red as values go low or high.This is a carb treatment. The size of the dot will be smaller or larger based on the amount of carb reported.This is an insulin treatment. The size of the dot will be smaller or larger based on the amount of insulin delivered.This vertical line separates the actual measured values, on the left, and the predicted future values, on the right.These dots represent predictions of next glucose based on currently-available information in Nightscout. The blue dots are predictions based on the AR2 algorithm, and the purple dots are predictions based on the OpenAPS algorithm. It is also possible to enable predictions from Loop in `configuration``_. Hovering your mouse over a dot will provide further information about the prediction. You may not have both prediction types available. Prediction lines can be switched on and off in Section 2 above.These lines appear at the top and bottom of this section. The dashed lines represent the upper and lower limits of your target zone. The dotted lines represent the high and low mark. These can be customized in configuration.This grey dot represents a note which has been entered manually or automatically in the treatments. Hover your mouse over the dot for further information, as shown in this image.This red dot represents a sensor calibration or finger stick blood test. Hover your mouse over the dot for further information.The scale at the far right of the screen shows the glucose values in mg/dL or mmol/L. The units displayed can be configured in the settings menu. Also in the settings menu you can select a logarithmic, linear, or logarithmic dynamic scale.


Section 6: 48-hour history

This section shows up to the last 48 hours of glucose history. Everything to the right of the white vertical line is shown in detail in section 5 above. Everything to the left of the white vertical line is history.
By clicking anywhere on the history, you can change section 5 to show that period of time in detail. When doing so, all the values in sections 2, 3, and 4 will also change to reflect that specific time. The time and the glucose values will get crossed out (strikethrough), to ensure you remember you are looking at historical data and not current data. To come back to current data, simply click within the history and drag all the way to the right. You will know you are looking at current data when the time and glucose value are no longer crossed out.
The content on this page was derived from content initially posted here http://www.nightscout.info/wiki/welcome/website-features, with thanks to the original contributors: Gail DeVore, Greg Waehner, and Amy Cowen.
All information, thought, and code described here is intended for informational and educational purposes only. Nightscout currently makes no attempt at HIPAA privacy compliance. Use of code from github.com is without warranty or support of any kind. Please review the LICENSE found within each repository for further details. Use Nightscout at your own risk, and do not use the information or code to make medical decisions.
Nightscout reports
This page describes the various reporting options in Nightscout.

Finding the reports
Reports can be accessed in one of two ways:
- From the settings menu: Click the menu and select Reports.

- From the URL: Enter your Nightscout site and append /reports to the end:

Report types

There are 9 reports available from Nightscout. Each report is available by clicking on its respective tab and pressing the Show button.
Day to day
This report shows the blood glucose curve of each day. Additional information can also be shown, such as carbohydrates, insulin delivery, and basal rate. The image below shows an example of one day.

This is the only report to have additional customization options. You may experiment selecting the different options and clicking Show to see what each option adds to the report. Note, the Size drop down is especially useful for reducing the size of this report such that it can be printed.

Daily stats
This report shows the time in range on a day by day basis, along with other useful information like highest and lowest readings.

Distribution
This report shows time in range over the entire selected period. It also shows an estimate of HbA1C and other useful statistics such as time in fluctuation. Click to get more in-depth information about GVI and about PGS.

Hourly stats
This report shows distribution of glucose over each hour of the day. If temp basals are rendered, a second table is displayed showing netIOB on a daily and hourly basis.

Percentile chart
This report shows distribution of glucose over each hour of the day, in a percentile chart.

Weekly success
This report shows percentage of low, in range, and high readings on a weekly basis. This report requires a minimum of 7 days’ worth of data to be available.

Calibrations
This report shows the history of sensor calibrations and how glucose values correlate to interstitial values measured by the sensor. You may graph individual calibrations by selecting the checkbox next to the label MBG.

Treatments
This report allows you to view, edit or delete items in the history of treatments uploaded to Nightscout, including bolus, temp basal, and carb entries. Because this view takes longer to load, you need to click the “Show” button while on this view specifically to load it. You will only be able to edit or delete entries in this report if your device is authenticated. See the section Authentication status below.

Profiles
This report shows the profiles available in Nightscout. For more about profiles, see the section profile editor.

Choosing report options

At the top of the Nightscout Reporting screen are customization options you may use filter the data you would like to see in the report. Note that the target bg range specified in these options will determine what the reports consider low and high readings, and are not the same as the targets you set up in your site configuration for display in the main user interface.
Printing reports
Nightscout reports can be printed using your browser’s “Print” function. Most reports have no print configuration options, so you will need to use your printer options to scale and/or lay out the print. Some tips:
- Nightscout reports are best printed in landscape layout.
- On the Day to day report, you can change the size of the graphs. It may be necessary to reduce the size of the graphs in order to include insulin distribution, for example.
Authentication status
To enable site features including Care Portal and editing records in the Treatments report, you will need to ensure your device is authenticated. This section of the reporting screen shows your authentication status and allows you to authenticate or de-authenticate your current device.
You do not need to authenticate your device if all you would like to do is run and view reports.
If your device is unauthorized, click the Authenticate link. This will open a window asking you to enter your API secret, as created when you set up and configured your site. You may also check a box to save your authenticated status on your device (“store hash”), so you do not need to re-authenticate each time you reopen your Nightscout site.

If you would like to de-authenticate your device, click Remove.

All information, thought, and code described here is intended for informational and educational purposes only. Nightscout currently makes no attempt at HIPAA privacy compliance. Use of code from github.com is without warranty or support of any kind. Please review the LICENSE found within each repository for further details. Use Nightscout at your own risk, and do not use the information or code to make medical decisions.
Profile editor
WORK IN PROGRESS
The profile editor allows you to set up the treatment profile, which contains information about the treatment of the person being monitored.
Finding the profile editor
The profile editor is available in the Settings menu.

Alternatively, you can find the profile editor by appending /profile to the end of your site name.

Values to be set
timezone(Time Zone) - time zone local to the patient. Should be set.units(Profile Units) - blood glucose units used in the profile, either “mgdl” or “mmol”dia(Insulin duration) - value should be the duration of insulin action to use in calculating how much insulin is left active. Defaults to 3 hours.carbs_hr(Carbs per Hour) - The number of carbs that are processed per hour, for more information see #DIYPS.carbratio(Carb Ratio) - grams per unit of insulin.sens(Insulin sensitivity) How much one unit of insulin will normally lower blood glucose.basalThe basal rate set on the pump.target_high- Upper target for correction boluses.target_low- Lower target for correction boluses.
Some example profiles are here.

All information, thought, and code described here is intended for informational and educational purposes only. Nightscout currently makes no attempt at HIPAA privacy compliance. Use of code from github.com is without warranty or support of any kind. Please review the LICENSE found within each repository for further details. Use Nightscout at your own risk, and do not use the information or code to make medical decisions.
Care portal
WORK IN PROGRESS
All information, thought, and code described here is intended for informational and educational purposes only. Nightscout currently makes no attempt at HIPAA privacy compliance. Use of code from github.com is without warranty or support of any kind. Please review the LICENSE found within each repository for further details. Use Nightscout at your own risk, and do not use the information or code to make medical decisions.
Section 5: Site maintenance
Admin tools
WORK IN PROGRESS
All information, thought, and code described here is intended for informational and educational purposes only. Nightscout currently makes no attempt at HIPAA privacy compliance. Use of code from github.com is without warranty or support of any kind. Please review the LICENSE found within each repository for further details. Use Nightscout at your own risk, and do not use the information or code to make medical decisions.
Database maintenance
WORK IN PROGRESS
All information, thought, and code described here is intended for informational and educational purposes only. Nightscout currently makes no attempt at HIPAA privacy compliance. Use of code from github.com is without warranty or support of any kind. Please review the LICENSE found within each repository for further details. Use Nightscout at your own risk, and do not use the information or code to make medical decisions.
Section 6: 3rd party integration
Pushover
In addition to the normal web based alarms, there is also support for Pushover based alarms and notifications.
To get started install the Pushover application on your iOS or Android device and create an account.
Using that account login to Pushover, in the top left you’ll see your User Key, you’ll need this plus an application API Token/Key to complete this setup.
You’ll need to Create a Pushover Application. You only need to set the Application name, you can ignore all the other settings, but setting an Icon is a nice touch. Maybe you’d like to use this one?
Pushover is configured using the following Environment Variables:
ENABLE-pushovershould be added to the list of plugin, for example: ENABLE=”pushover”.PUSHOVER_API_TOKEN- Used to enable pushover notifications, this token is specific to the application you create from in Pushover.PUSHOVER_USER_KEY- Your Pushover user key, can be found in the top left of the Pushover site, this can also be a pushover delivery group key to send to a group rather than just a single user. This also supports a space delimited list of keys. To disable INFO level pushes set this to off.PUSHOVER_ALARM_KEY- An optional Pushover user/group key, will be used for system wide alarms (level >WARN). If not defined this will fallback toPUSHOVER_USER_KEY. A possible use for this is sending important messages and alarms to a CWD that you don’t want to send all notification too. This also support a space delimited list of keys. To disable Alarm pushes set this to off.PUSHOVER_ANNOUNCEMENT_KEY- An optional Pushover user/group key, will be used for system wide user generated announcements. If not defined this will fallback toPUSHOVER_USER_KEYorPUSHOVER_ALARM_KEY. This also support a space delimited list of keys. To disable Announcement pushes set this tooff.BASE_URL- Used for pushover callbacks, usually the URL of your Nightscout site, use https when possible.API_SECRET- Used for signing the pushover callback request for acknowledgments.If you never want to get info level notifications (treatments) use
PUSHOVER_USER_KEY="off"If you never want to get an alarm via pushover usePUSHOVER_ALARM_KEY="off"If you never want to get an announcement via pushover usePUSHOVER_ANNOUNCEMENT_KEY="off"If only
PUSHOVER_USER_KEYis set it will be used for all info notifications, alarms, and announcements.
For testing/development try localtunnel.
All information, thought, and code described here is intended for informational and educational purposes only. Nightscout currently makes no attempt at HIPAA privacy compliance. Use of code from github.com is without warranty or support of any kind. Please review the LICENSE found within each repository for further details. Use Nightscout at your own risk, and do not use the information or code to make medical decisions.
IFTTT maker
In addition to the normal web based alarms, and pushover, there is also integration for IFTTT Maker.
With Maker you are able to integrate with all the other IFTTT Channels. For example you can send a tweet when there is an alarm, change the color of hue light, send an email, send and sms, and so much more.
Setup IFTTT account: login or create an account
Find your secret key on the maker page
Configure Nightscout by setting these environment variables:
ENABLE-makershould be added to the list of plugin, for example:ENABLE="maker".MAKER_KEY- Set this to your secret key that you located in step 2, for example:MAKER_KEY="abcMyExampleabc123defjt1DeNSiftttmak-XQb69p"This also support a space delimited list of keys.MAKER_ANNOUNCEMENT_KEY- An optional Maker key, will be used for system wide user generated announcements. If not defined this will fallback toMAKER_KEY. A possible use for this is sending important messages and alarms to a CWD that you don’t want to send all notification too. This also support a space delimited list of keys.
Plugins can create custom events, but all events sent to maker will be prefixed with ns-. The core events are:
- ns-event - This event is sent to the maker service for all alarms and notifications. This is good catch all event for general logging.
- ns-allclear - This event is sent to the maker service when an alarm has been ack’d or when the server starts up without triggering any alarms. For example, you could use this event to turn a light to green.
- ns-info - Plugins that generate notifications at the info level will cause this event to also be triggered. It will be sent in addition to ns-event.
- ns-warning - Alarms at the warning level with cause this event to also be triggered. It will be sent in addition to ns-event.
- ns-urgent - Alarms at the urgent level with cause this event to also be triggered. It will be sent in addition to ns-event.
- see the full list of events
All information, thought, and code described here is intended for informational and educational purposes only. Nightscout currently makes no attempt at HIPAA privacy compliance. Use of code from github.com is without warranty or support of any kind. Please review the LICENSE found within each repository for further details. Use Nightscout at your own risk, and do not use the information or code to make medical decisions.
Section 7: Technical information / Advanced
Local implementation of Nightscout
In addition to the recommended Heroku installation, it is technically possible to install Nightscout locally:
- Linux based install (Debian, Ubuntu, Raspbian) install with own Node.JS and MongoDB install (see software requirements below)
- Windows based install with own Node.JS and MongoDB install (see software requirements below)
- Vagrant install
Software requirements
- Node.js Latest Node 8 LTS (Node 8.11.3 or later). Use Install instructions for Node or use
setup.sh - MongoDB 3.x or later. MongoDB 2.4 is only supported for Raspberry Pi.
Installation on Linux
As a non-root user clone this repo then install dependencies into the root of the project:
$ npm install
Installation notes for Windows and Node 10
- See install MongoDB, Node.js, and Nightscout on a single Windows system, if you want to host your Nightscout outside of the cloud. Although the instructions are intended for Windows Server the procedure is compatible with client versions of Windows such as Windows 7 and Windows 10.
- If you deploy to Windows and want to develop or test you need to install Cygwin (use setup-x86_64.exe and make sure to install
build-essentialpackage. Test your configuration by executingmakeand check if all tests are ok. - There may be some issues with Node 10.6.0 or later with Nightscout. Node 10 support will be in the 0.11 release. Please don’t use Nightscout with (Node 9 or) Node 10 at this moment.
Vagrant install
Optionally, use Vagrant with the included Vagrantfile and setup.sh to install OS and node packages to a virtual machine.
host$ vagrant up
host$ vagrant ssh
vm$ setup.sh
The setup script will install OS packages then run npm install.
The Vagrant VM serves to your host machine only on 192.168.33.10, you can access the web interface on http://192.168.33.10:1337
Setting environment variables
Easy to emulate on the commandline:
echo 'MONGO_CONNECTION=mongodb://sally:sallypass@ds099999.mongolab.com:99999/nightscout' >> my.env
echo 'MONGO_COLLECTION=entries' >> my.env
From now on you can run using
$ (eval $(cat my.env | sed 's/^/export /') && PORT=1337 node server.js)
All information, thought, and code described here is intended for informational and educational purposes only. Nightscout currently makes no attempt at HIPAA privacy compliance. Use of code from github.com is without warranty or support of any kind. Please review the LICENSE found within each repository for further details. Use Nightscout at your own risk, and do not use the information or code to make medical decisions.
Database structure
WORK IN PROGRESS
All information, thought, and code described here is intended for informational and educational purposes only. Nightscout currently makes no attempt at HIPAA privacy compliance. Use of code from github.com is without warranty or support of any kind. Please review the LICENSE found within each repository for further details. Use Nightscout at your own risk, and do not use the information or code to make medical decisions.
Authentication model
WORK IN PROGRESS
All information, thought, and code described here is intended for informational and educational purposes only. Nightscout currently makes no attempt at HIPAA privacy compliance. Use of code from github.com is without warranty or support of any kind. Please review the LICENSE found within each repository for further details. Use Nightscout at your own risk, and do not use the information or code to make medical decisions.
Nightscout API
The Nightscout API enables direct access to your DData without the need for direct Mongo access. You can find CGM data in /api/v1/entries, Care Portal Treatments in /api/v1/treatments, and Treatment Profiles in /api/v1/profile. The server status and settings are available from /api/v1/status.json.
By default the /entries and /treatments APIs limit results to the the most recent 10 values from the last 2 days. You can get many more results, by using the count, date, dateString, and created_at parameters, depending on the type of data you’re looking for.
Example Queries
(replace http://localhost:1337 with your base url, YOUR-SITE)
- 100’s:
http://localhost:1337/api/v1/entries.json?find[sgv]=100 - Count of 100’s in a month:
http://localhost:1337/api/v1/count/entries/where?find[dateString][$gte]=2016-09&find[dateString][$lte]=2016-10&find[sgv]=100 - BGs between 2 days:
http://localhost:1337/api/v1/entries/sgv.json?find[dateString][$gte]=2015-08-28&find[dateString][$lte]=2015-08-30 - Juice Box corrections in a year:
http://localhost:1337/api/v1/treatments.json?count=1000&find[carbs]=15&find[eventType]=Carb+Correction&find[created_at][$gte]=2015 - Boluses over 2U:
http://localhost:1337/api/v1/treatments.json?find[insulin][$gte]=2
The API is Swagger enabled, so you can generate client code to make working with the API easy. To learn more about the Nightscout API, visit https://YOUR-SITE.com/api-docs.html or review swagger.yaml.
All information, thought, and code described here is intended for informational and educational purposes only. Nightscout currently makes no attempt at HIPAA privacy compliance. Use of code from github.com is without warranty or support of any kind. Please review the LICENSE found within each repository for further details. Use Nightscout at your own risk, and do not use the information or code to make medical decisions.
Section 8: Troubleshooting and questions
Glossary of terms
WORK IN PROGRESS
All information, thought, and code described here is intended for informational and educational purposes only. Nightscout currently makes no attempt at HIPAA privacy compliance. Use of code from github.com is without warranty or support of any kind. Please review the LICENSE found within each repository for further details. Use Nightscout at your own risk, and do not use the information or code to make medical decisions.
Troubleshooting guide
WORK IN PROGRESS
All information, thought, and code described here is intended for informational and educational purposes only. Nightscout currently makes no attempt at HIPAA privacy compliance. Use of code from github.com is without warranty or support of any kind. Please review the LICENSE found within each repository for further details. Use Nightscout at your own risk, and do not use the information or code to make medical decisions.
FAQ
WORK IN PROGRESS
All information, thought, and code described here is intended for informational and educational purposes only. Nightscout currently makes no attempt at HIPAA privacy compliance. Use of code from github.com is without warranty or support of any kind. Please review the LICENSE found within each repository for further details. Use Nightscout at your own risk, and do not use the information or code to make medical decisions.