Welcome to nebulas wiki’s documentation!
Category
Here is all you need to dive into Nebulas.
NebulasIO
- Website:https://nebulas.io
- Non-Tech Whitepaper:https://nebulas.io/docs/NebulasWhitepaperZh.pdf
- Tech Whitepaper:https://nebulas.io/docs/NebulasTechnicalWhitepaperZh.pdf
Go-Nebulas
- Wiki: https://github.com/nebulasio/wiki
- Join Testnet: https://github.com/nebulasio/wiki/blob/master/testnet.md
- Join Mainnet: https://github.com/nebulasio/wiki/blob/master/mainnet.md
- Explorer: https://explorer.nebulas.io
- Tutorials:
- English 101
- Installation (thanks Victor)
- Sending a Transaction (thanks Victor)
- Writing Smart Contract in JavaScript (thanks otto)
- Introducing Smart Contract Storage (thanks Victor)
- Interacting with Nebulas by RPC API (thanks Victor)
- 中文 - 入门教程
- English 101
Wallet
- Web Wallet: https://github.com/nebulasio/web-wallet
DApp
- Web SDK: https://github.com/nebulasio/neb.js
- Smart Contract: https://github.com/nebulasio/wiki/blob/master/smart_contract.md
- Standard Protocol:
Community Tools
- Nebulearn: https://nebulearn.com/official-docs/go-nebulas (thanks to Tehjr)
- Demo DApp: https://github.com/15010159959/super-dictionary (thanks to ChengOrangeJu, yupnano, Kurry)
- Chrome Extension: https://github.com/ChengOrangeJu/WebExtensionWallet (thanks to ChengOrangeJu, yupnano)
Contribution
We are very glad that you are considering to write tutorials or documents of Nebulas. If you did write something, please submit a issue to let us know, we will add your name and url to this page soon.
What’s Nebulas
Nebulas: Next Generation Public Blockchain
Nebulas is aiming to build a continuously improving ecosystem.
Nebulas is a next-generation public blockchain. It introduces Nebulas Rank (NR), a new measure of value for every unit of the blockchain universe, like addresses, DApps and smart contracts. Based on NR, it involves Nebulas Incentive (NI), which incentives developers with Developer Incentive Protocol, and users with the Proof of Devotion consensus algorithm. Moreover, it proposes Nebulas Force (NF), which gives the blockchain and smart contracts within it a self-evolving capacity. In unison, NR, NI, and NF produce a continuously improving and expanding blockchain ecosystem.
There are three technical features: value ranking, self-evolution, and native incentive.
Facing the opportunity and challenge as above, we aim to create a self-evolving blockchain system based on value incentive.
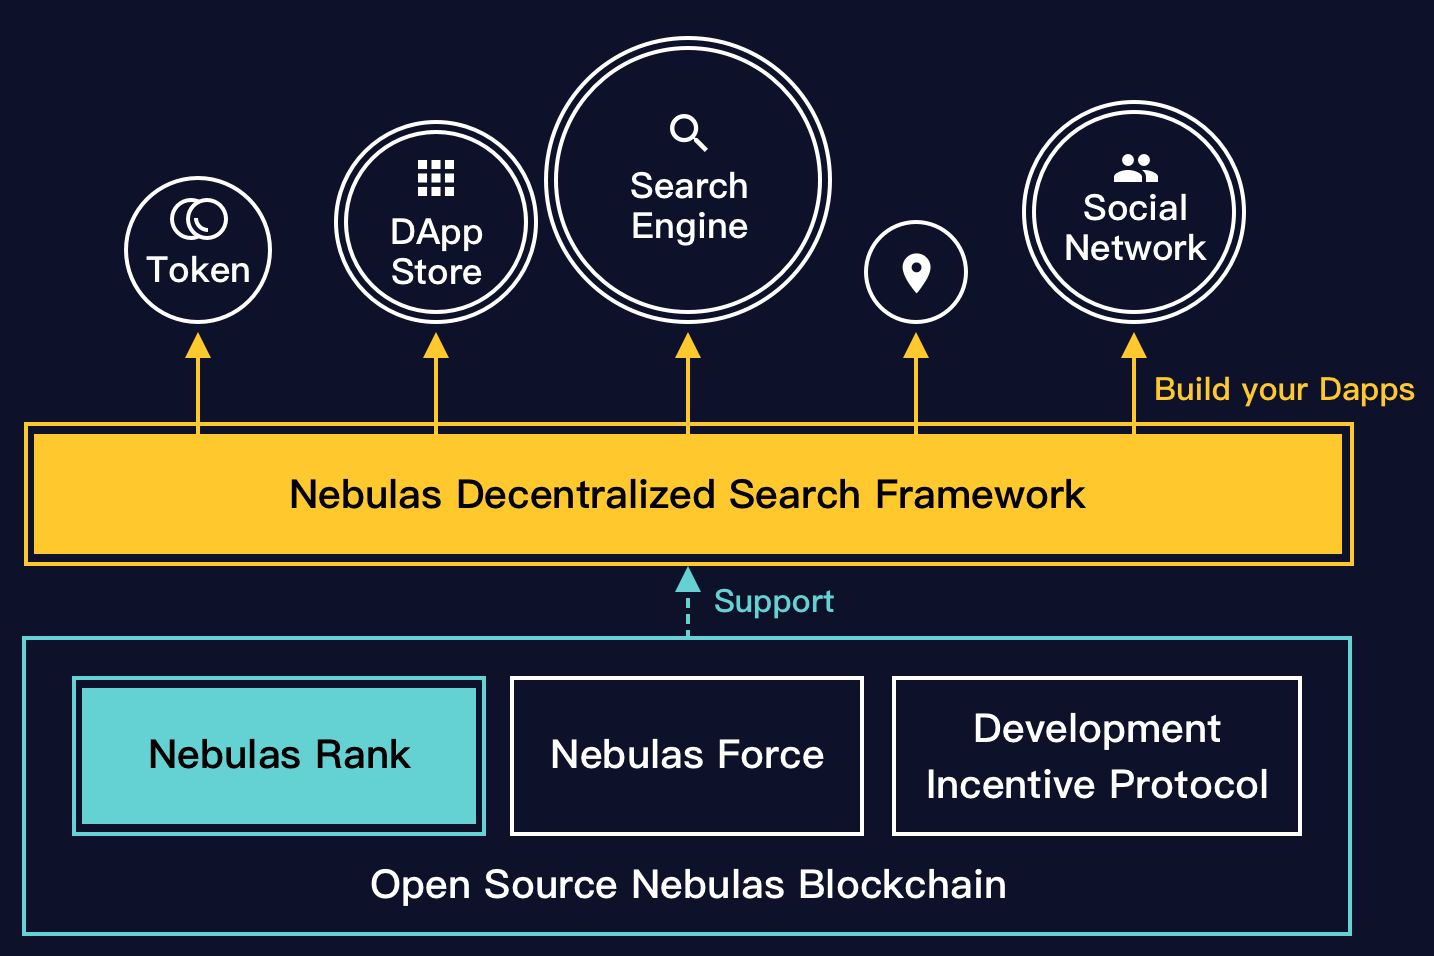
Principles
The Nebulas blockchain has three major principles:
Nebulas Rank (NR)
Nebulas Rank (NR) is an open sourced ranking algorithm used to measure the influence of relationships among addresses, smart contracts, and distributed applications (DApps). It helps both users utilize information among the ever-increasing amount of data on all blockchains & developers to use our search framework directly in their own applications.
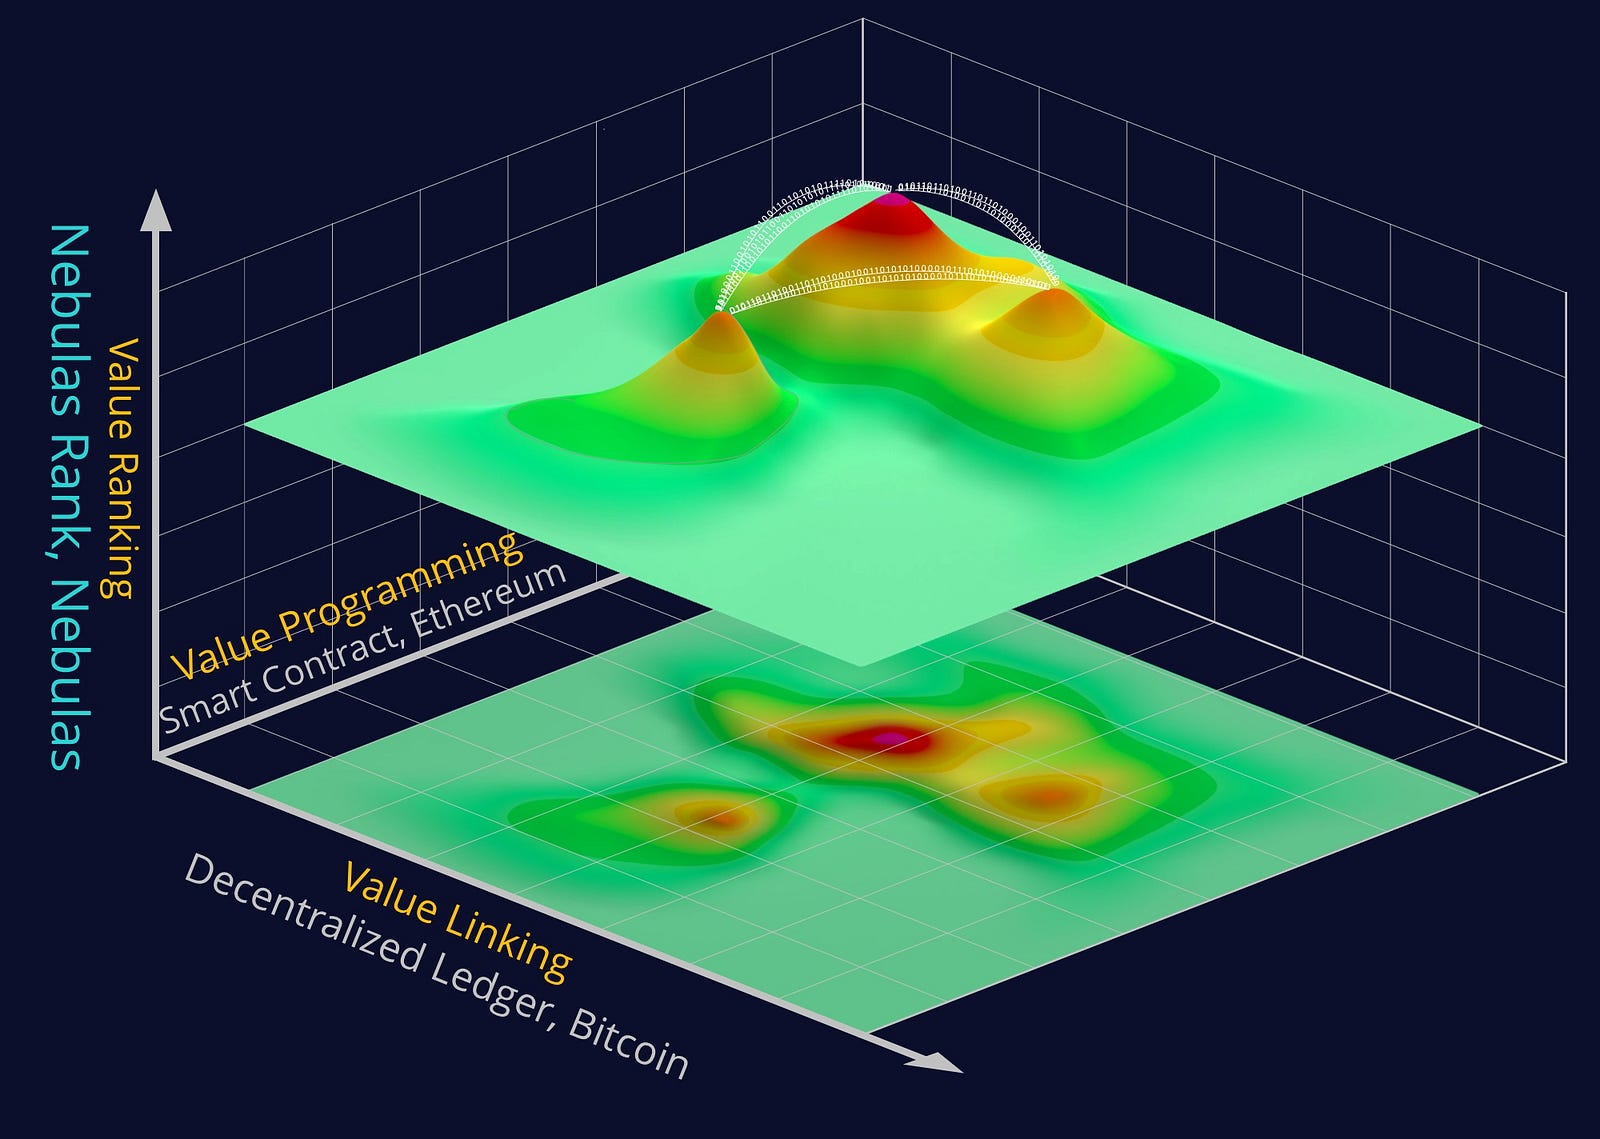
In Nebulas, we measure value regarding:
- Liquidity
Finance essentially is the social activities which optimize social resources via capital liquidity and promote economic development. Blockchains establish a value network in which the financial assets can flow. Daily volume of Bitcoin and Ethereum, which are most familiar to us, already exceeds $1 billion. From these data, we can see that the more transaction volume and transaction scale, the higher liquidity. In turn, higher liquidity will increase the quantity of transaction and enhance the value. That will further strengthen financial assets’ value, creating a complete positive feedback mechanism. Therefore liquidity, i.e. transaction frequency and scale, is the first dimension that NR measures.
- Propagation
Social platforms like WeChat and Facebook have almost 3 billion active users per month. Social platforms’ rapid user growth is a result of the reflection of existing social network and stronger viral growth. In particular, viral transmission, i.e. speed, scope, depth of information transmission and linkage, is the key index to monitor social network’s quality and user growth. In blockchain world, we can see the same pattern. Powerful viral propagation indicates scope and depth of asset liquidity, which can promote the blockchain world’s asset quality and asset scale. Thus, viral transmission, i.e. scope and depth of asset liquidity, is the second dimension that NR measures.
- Interoperability
At Internet’s early stage, there are only basic websites and private information. Now, information on different platforms can be forwarded on the network, and isolated data silos are gradually being broken. This trend is the process of identifying higher dimensional information. In our point of view, the world of blockchains shall follow a similar pattern, but its speed will be faster. The information on users’ assets, smart contracts, and DApps will become richer, and the interaction of higher dimensional information shall be more frequent, thus better interoperability shall become more and more important. Therefore, NR’s third measure dimension is interoperability.
Based on above-stated dimensions, we start to construct Nebulas’ NR system by drawing from richer data, building a better model, digging up more diversified value dimensions, and establishing a measure of value in blockchain world.
Nebulas Force (NF)
A series of basic protocols such as NR, PoD, DIP shall become a part of blockchain data. With the growth of data on Nebulas, these basic protocols will upgrade, and this will avoid fracture between developers and community as well as the “fork”. We call this fundamental capability of blockchain “Nebulas Force” (NF).
As Nebulas community grows, NF and basic protocols’ update ability shall be open to the community. According to users’ NR weight and community voting mechanism, the community determines Nebulas’ evolution direction and its update objectives. With the help of NF’s core technology and its openness, Nebulas will have ever-growing evolving potential and infinite evolving possibilities endlessly.
 {#7746}
Nebulas Incentive (NI)
Nebulas Incentive include Proof of Devotion (PoD) and Developer Incentive Protocol (DIP).
Proof-of-Devotion (PoD)
Based on Nebulas’ NR system, we shall adopt PoD (Proof-of-Devotion) consensus algorithm. PoD gives an “influential” user of Nebulas Blockchain an opportunity to become a bookkeeper and receive Nebulas’ block rewards and transaction fee as revenues, which will encourage them to contribute to Nebulas’ stability and security continuously.
Developer Incentive Protocol (DIP)
In Nebulas, we propose the concept of DIP (Developer Incentive Protocol) for developers of smart contracts and DApps. DIP’s core concept: in pre-specified blocks’ interval, for those developers whose smart contracts and DApps deploy online in the most recent interval with NR value higher than a specified threshold, DIP shall reward them corresponding developer incentives (NAS token), and these incentives shall be recorded on blocks by bookkeepers. With DIP’s positive incentive mechanism, more and more developers get incentives to create valuable smart contracts and DApps, which helps to build a positive feedback ecosystem for the developers’ community.
Value ranking
To enable value discovery in blockchain, Nebulas Rank measures multidimensional data in the blockchain world and powers the decentralized search framework.
Native incentives
To avoid the damage caused by forking to the blockchain, Nebulas Force enables rapid iteration and upgradability to its blockchain without the need for hard forks.
Nebulas Incentives
With forward-looking incentive and consensus mechanisms, the Nebulas Incentive rewards developers and users who contribute to the sustainability and growth of the ecosystem.
This is the except of Nebulas Non-technical Whitepaper.
If you want to know more about Nebulas, please subscribe this official blog, or visit our website: nebulas.io. Read our Non-technical White Paper (English), Technical White Paper (English).
Thank you.
Go-Nebulas
Design Overview

TODO: More features described in our whitepaper, such as NR, PoD, DIP and NF, will be integrated into the framework in later versions very soon.
Core Dataflow
Here is a core workflow example to explain how Nebulas works in current version. For each Nebulas node, it keeps receiving blocks or transactions from network and mining new block locally.

More Details
Blockchain
Model
Nebulas use accounts model instead of UTXO model. The execution of transactions will consume gas.
Data Structure
Block Structure
+---------------+----------------+--------------+
| blockHeader | transactions | dependency |
+---------------+----------------+--------------+
blockHeader: header info
transactions: transactions array
dependency: the dependency relationship among transactions
Block Header Structure
+-----------+--------+--------------+------------+-------------+-------+--------+
| chainid | hash | parentHash | coinbase | timestamp | alg | sign |
+-----------+--------+--------------+------------+-------------+-------+--------+
+-------------+-----------+--------------+-----------------+
| stateRoot | txsRoot | eventsRoot | consensusRoot |
+-------------+-----------+--------------+-----------------+
chainid: chain identity the block belongs to
hash: block hash
parentHash: parent block hash
coinbase: account to receive the mint reward
timestamp: the number of nanoseconds elapsed since January 1, 1970 UTC
alg: the type of signature algorithm
sign: the signature of block hash
stateRoot: account state root hash
txsRoot: transactions state root hash
eventsRoot: events state root hash
consensusRoot: consensus state, including proposer and the dynasty of validators
Transaction Structure
+-----------+--------+--------+------+---------+---------+-------------+
| chainid | hash | from | to | value | nonce | timestamp |
+-----------+--------+--------+------+---------+---------+-------------+
+--------+------------+------------+
| data | gasPrice | gasLimit |
+--------+------------+------------+
chainid: chain identity the block belongs to
hash: transaction hash
from: sender's wallet address
to: receiver's wallet address
value: transfer value
nonce: transaction nonce
timestamp: the number of seconds elapsed since January 1, 1970 UTC
alg: the type of signature algorithm
sign: the signature of block hash
data: transaction data, including the type of transaction(binary transfer/deploy smart contracts/call smart contracts) and payload
gasPrice: the price of each gas consumed by the transaction
gasLimit: the max gas that can be consumed by the transaction
Blockchain Update
In our opinion, Blockchain only needs to care about how to process new blocks to grow up safely and efficiently. What’s more, Blockchain can only get new blocks in the following two channels.
Because of the unstable network latency, we cannot make sure any new block received can be linked to our current Chain directly. Thus, we need the Blocks Pool to cache new blocks.
At first, we need the Transactions Pool to cache transactions from network. Then, we wait for a new block created by local Consensus component, such as DPoS.
No matter where a new block comes from, we use the same steps to process it as following.

World State
Every block contains the current world state, consist of following four states. They are all maintained as Merkle Trees.
All accounts in current block are stored in Accounts State. Accounts are divided into two kinds, normal account & smart contract account.
Normal Account, including
- wallet address
- balance
- nonce: account’s nonce, it will increment in steps of 1
Smart Contract Account, including
- contract address
- balance
- birth place: the transaction hash where the contract is deployed
- variables: contains all variables’ values in the contract
All transactions submitted on chain are storage in Transactions State.
While transactions are executed, many events will be triggered. All events triggered by transactions on chain are stored in Events State.
The context of consensus algorithm is stored in consensus state.
As for DPoS, the consensus state includes
- timestamp: current slot of timestamp
- proposer: current proposer
- dynasty: current dynasty of validators
We choose Protocol Buffers to do general serialization in consideration of the following benefits:
- Large scale proven.
- Efficiency. It omits key literals and use varints encoding.
- Multi types and multilangue client support. Easy to use API.
- Schema is good format for communication.
- Schema is good for versioning/extension, i.e., adding new message fields or deprecating unused ones.
Specially, we use json to do serialization in smart contract codes instead of protobuf for the sake of readability.
Synchronization
Sometimes we will receive a block with height much higher than its current tail block. When the gap appears, we need to sync blocks from peer nodes to catch up with them.
Nebulas provides two method to sync blocks from peers: Chunks Downloader and Block Downloader. If the gap is bigger than 32 blocks, we’ll choose Chunk Downloader to download a lot of blocks in chunks. Otherwise, we choose Block Downloader to download block one by one.
Chunk is a collection of 32 successive blocks. Chunks Downloader allows us to download at most 10 chunks following our current tail block each time. This chunk-based mechanism could help us minimize the number of network packets and achieve better safety.
The procedure is as following,
1. A sends its tail block to N remote peers.
2. The remote peers locate the chunk C that contains A's tail block.
Then they will send back the headers of 10 chunks, including the chunk C and 9 C's subsequent chunks, and the hash H of the 10 headers.
3. If A receives >N/2 same hash H, A will try to sync the chunks represented by H.
4. If A has fetched all chunks represented by H and linked them on chain successfully, Jump to 1.
In steps 1~3, we use majority decision to confirm the chunks on canonical chain. Then we download the blocks in the chunks in step 4.
Note: ChunkHeader contains an array of 32 block hash and the hash of the array. ChunkHeaders contains an array of 10 ChunkHeaders and the hash of the array.
Here is a diagram of this sync procedure:

When the length gap between our local chain with the canonical chain is smaller than 32, we’ll use Block downloader to download the missing blocks one by one.
The procedure is as following,
1. C relays the newest block B to A and A finds B's height is bigger than current tail block's.
2. A sends the hash of block B back to C to download B's parent block.
3. If A received B's parent block B', A will try to link B' with A's current tail block.
If failed again, A will come back to step 2 and continue to download the parent block of B'. Otherwise, finished.
This procedure will repeat until A catch up with the canonical chain.
Here is a diagram of this download procedure:

Merkle Patricia Tree
Basic: Radix Tree
Reference: https://en.wikipedia.org/wiki/Radix_tree
A Radix Tree using address as the key looks like below:
- Addresses are represented as Hex Characters
- Each node in the Tree is a 16-elements array, 16 branch-slots(0123...def)
- leaf node: value can be any binary data carried by the address
- non-leaf node: value is the hash value calculated based on the children’s data
As for a 160-bits address, the max height of the tree is 40

Problems: much space for a single entry 40 steps for each lookup
Advanced: Merkle Patricia Tree
In order to reduce the storage of Radix Tree. The nodes in Merkle Patricia Tree are divided into three kinds,
- extension node: compress nodes using common prefix
- leaf node: compress nodes using unique suffix
- branch node: same as node in Radix Tree

How to store Merkle Patricia Tree
Key/Value Storage
hash(value) = sha3(serialize(value))
key = hash(value)
How to update Merkle Patricia Tree
Query
DFS from top to bottom
Update, Delete or Insert
1.Query the node from top to bottom
2.update the hash along the path from bottom to top

Performance Each operation costs O(log(n))
How to verify using Merkle Patricia Tree
Theorems
1.Same merkle trees must have same root hash.
2.Different merkle trees must have different root hash.
Using the theorems, we can verify the result of the execution of transactions.
Quick Verification
A light client, without sync huge transactions, can immediately determine the exact balance and status of any account by simply asking the network for a path from the root to the account node.
Consensus
We think each consensus algorithm can be described as the combination of State Machine and Fork Choice Rules.
DPoS(Delegate Proof-of-Stake)
Notice For Nebulas, the primary consensus algorithm should be PoD, the DPoS algorithm is just a temporary solution. After the formal verification of PoD algorithm, we will transition mainnet to PoD. All witness (bookkeeper/miner) of DPoS are now accounts officially maintained by Nebulas. We will make sure a smooth transition from DPoS to PoD. We will create new funds to manage all the rewards of bookkeeping. And we will NOT sell those NAS on exchanges. All NAS will be used for building the Nebulas ecosystem, for example, rewarding DApp developers on Nebulas. And we will provide open access to all the spending of these rewards periodically.
As for the DPoS in Nebulas, it can also be decribed as a state machine.

- Always choose the longest chain as the canonical chain.
- If A and B has the same length, we choose the one with smaller hash.

Transaction Process Diagram
When a transaction is submitted, it is necessary to check the chain in the transaction. Transactions that are submitted externally or have been packaged into the block are somewhat different when doing validation.
New Transaction Process (from network, rpc)
Transactions submitted through an RPC or other node broadcast.
- Api SendRawTransaction Verification below steps when exist fail, then return err
- check whether fromAddr and toAddr is valid (tx proto verification)
- check len of Payload <= MaxDataPayLoadLength (tx proto verification)
- 0 < gasPrice <= TransactionMaxGasPrice and 0 < gasLimit <= TransactionMaxGas (tx proto verification)
- check Alg is SECP256K1 (tx proto verification)
- chainID Equals, Hash Equals, Sign verify??; fail and drop;
- check nonceOfTx > nonceOfFrom
- check Contract status is ExecutionSuccess if type of tx is TxPayloadCallType, check toAddr is equal to fromAddr if type of tx is TxPayloadDeployType
- Transaction pool Verification
- gasPrice >= minGasPriceOfTxPool & 0 < gasLimit <= maxGasLimitOfTxPool??; fail and drop;
- chainID Equals, Hash Equals, Sign verify??; fail and drop;
Transaction in Block Process
The transaction has been packaged into the block, and the transaction is verified after receiving the block.
- Packed
- Nonce Verification: nonceOfFrom +1 == nonceOfTx ??; nonceOfTx < nonceOfFrom +1 fail and drop, nonceOfTx > nonceOfFrom +1 fail and giveback to tx pool;
- check balance >= gasLimit * gasPrice ??; fail and drop;
- check gasLimit >= txBaseGas(MinGasCountPerTransaction + dataLen*GasCountPerByte) ??; fail and drop;
- check payload is valid ??; fail and submit; gasConsumed is txBaseGas ( all txs passed the step tx will be on chain)
- check gasLimit >= txBaseGas + payloasBaseGas(TxPayloadBaseGasCount[payloadType]) ??;fail and submit; gasConsumed is txGasLimit
- check balance >= gasLimit * gasPrice + value ??;fail and submit; gasConsumed is txBaseGas + payloadsBaseGas
- transfer value from SubBalance and to AddBalance ??;fail and submit; gasConsumed is txBaseGas + payloadsBaseGas
- check gasLimit >= txBaseGas + payloadsBaseGas + gasExecution ??;fail and submit; gasConsumed is txGasLimit
- success submit gasConsumed is txBaseGas + payloadsBaseGas + gasExecution
- Verify
- check whether fromAddr and toAddr is valid (tx proto verification) ??; fail and submit;
- check len of Payload <= MaxDataPayLoadLength (tx proto verification) ??; fail and submit;
- 0 < gasPrice <= TransactionMaxGasPrice and 0 < gasLimit <= TransactionMaxGas (tx proto verification)
- check Alg is SECP256K1 (tx proto verification) ??; fail and submit;
- chainID Equals, Hash Equals, Sign verify??; fail and drop;
- Next steps like Transaction Packed in Block Process.
Event functionality
The Event functionality is used to make users or developers subscribe interested events. These events are generated during the execution of the blockchain, and they record the key execution steps and execution results of the chain. To query and verify the execution results of transactions and smart contracts, we record these two types of events into a trie and save them to the chain.
Event structure:
type Event struct {
Topic string // event topic, subscribe keyword
Data string // event content, a json string
}
After a event is generated, it will be collected for processing in eventEmitter. Users can use the emitter subscription event. If the event is not subscribed, it will be discarded, and for the event that has been subscribed, the new event will be discarded because of the non-blocking mechanism, if the channel is not blocked in time.
Events list:
Event Reference
This event occurs when the tail block of the chain is updated.
- Topic:
chain.newTailBlock - Data:
height: block heighthash: block hashparent_hash: block parent hashacc_root: account state root hashtimestamp: block timestamptx: transaction state root hashminer: block miner
This event occurs when a block is revert on the chain.
- Topic:
chain.revertBlock - Data: The content of this topic is like TopicNewTailBlock data.
This event occurs when the latest irreversible block change.
- Topic:
chain.latestIrreversibleBlock - Data: The content of this topic is like TopicNewTailBlock data.
This event occurs when a transaction is pushed into the transaction pool.
- Topic:
chain.pendingTransaction - Data:
chainID: transaction chain idhash: transaction hashfrom: transaction from address stringto: transaction to address stringnonce: transaction noncevalue: transaction valuetimestamp: transaction timestampgasprice: transaction gas pricegaslimit: transaction gas limittype: trsnaction type
This event occurs when the end of a transaction is executed. This event will be recorded on the chain, and users can query with RPC interface GetEventsByHash.
This event records the execution results of the transaction and is very important.
- Topic:
chain.transactionResult - Data:
hash: transaction hashstatus: transaction status, 0 failed, 1success, 2 pendinggasUsed: transaction gas usederror: transaction execution error. If the transaction is executed successfully, the field is empty.
This event occurs when the contract is executed. When the contract is executed, the contract can record several events in the execution process. If the contract is successful, these events will be recorded on the chain and can be subscribed, and the event of the contract will not be recorded at the time of the failure. This event will also be recorded on the chain, and users can query with RPC interface GetEventsByHash.
- Topic:
chain.contract.[topic]The topic of the contract event has a prefixchain.contract., the content is defined by the contract writer. - Data: The content of contract event is defined by contract writer.
Subscribe
All events can be subscribed and the cloud chain provides a subscription RPC interface Subscribe. It should be noted that the event subscription is a non-blocking mechanism. New events will be discarded when the RPC interface is not handled in time.
Query
Only events recorded on the chain can be queried using the RPC interface GetEventsByHash. Current events that can be queried include:
Transaction Gas
In Nebulas, either a normal transaction which transfer balance or a smart contract deploy & call burns gas, and charged from the balance of from address. A transaction contains two gas parameters gasPrice and gasLimit :
gasPrice: the price of per gas.gasLimit: the limit of gas use.
The actual gas consumption of a transaction is the value: gasPrice * gasUsed, which will be the reward to the miner coinbase. The gasUsed value must less than or equal to the gasLimit. Transaction’s gasUsed can be estimate by RPC interface estimategas and store in transaction’s execution result event.
Design reason
Users want to avoid gas costs when the transaction is packaged. Like Bitcoin and Ethereum, Nebulas GAS is used for transaction fee, it have two major purposes:
- As a rewards for minter, to incentive them to pack transactions. The packaging of the transaction costs the computing resources, especially the execution of the contract, so the user needs to pay for the transaction.
- As a cost for attackers. The DDOS attach is quite cheap in Internet, black hackers hijack user’s computer to send large network volume to target server. In Bitcoin and Ethereum network, each transaction must be paid, that significant raise the cost of attack.
Gas constitution
When users submit a transaction, gas will be burned at these aspects:
transaction submitiontransaction data storagetransaction payload additiontransaction payload execution(smart contract execution)
In all these aspects, the power and resources of the net will be consumed and the miners will need to be paid.
A transaction’s submition will add a transaction to the tail block. Miners use resources to record the deal and need to be paid. It will burn a fixed number of gas, that would be defined in code as the following:
// TransactionGas default gas for normal transaction
TransactionGas = 20000
If the transaction verifies failed, the gas and value transfer will rollback.
When deploying a contract or call contract’s method, the raw data of contract execution save in the transaction’s data filed, which cost the storage of resources on the chain. A formula to calculate gas:
TransactionDataGas = 1
len(data) * TransactionDataGas
The TransactionDataGas is a fixed number of gas defined in code.
Different types of transactions’ payload have different gas consumption when executed. The types of transactions currently supported by nebulas are as follows:
binary: Thebinarytype of transaction allows users to attach binary data to transaction execution. These binary data do not do any processing when the transaction is executed.- The fixed number of gas defined 0.
deploy & call: Thedeployandcalltype of transaction allows users to deploy smart contract on nebulas. Nebulas must startnvmto execute the contract, so these types of transction must paid for the nvm start.- The fixed number of gas defined 60.
The binary type of transaction do not do any processing when the transaction is executed, so the execution need not be paid.
When a smart contract deploys or call in transaction submition, the contract execution will consume miner’s computer resources and may store data on the chain.
- execution instructions: Every contract execution cost the miner’s computer resources, the v8 instruction counter calculates the execution instructions. The limit of execution instructions will prevent the excessive consumption of computer computing power and the generation of the death cycle.
- contract storage: The smart contract’s
LocalContractStoragewhich storage contract objects also burn gas. Only one gas per 32 bytes is consumed when stored(set/put),getordeletenot burns gas.
The limit of contract execution is:
gasLimit - TransactionGas - len(data) * TransactionDataGas - TransactionPayloadGasCount[type]
Gas Count Matrix
The gas count matrix of smart contract execution
| Operator | Gas Count/Opt. | Description | | — | —: | :— | | Binary | 1 | Binary & logical operator | | Load | 2 | Load from memory | | Store | 2 | Save to memory | | Return | 2 | Return value, save to memory | | Call (inner) | 4 | Call functions in the same Smart Contract | | Call (external) | 100 | Call functions from other Smart Contract |
| Expression | Sample Code | Binary Opt. | Load Opt. | Store Opt. | Return Opt. | Call (inner) Opt. | Gas Count | | | | — | :— | —: | —: | —: | —: | —: | —: | | CallExpression | a(x, y) | 0 | 0 | 1 | 1 | 1 | 8 | | | | AssignmentExpression | x&=y | 1 | 0 | 1 | 0 | 0 | 3 | | | | BinaryExpression | x==y | 1 | 0 | 0 | 1 | 0 | 3 | | | | UpdateExpression | x++ | 1 | 0 | 1 | 0 | 0 | 3 | | | | UnaryExpression | x+y | 1 | 0 | 0 | 1 | 0 | 3 | | | | LogicalExpression | x | | y | 1 | 0 | 0 | 1 | 0 | 3 | | MemberExpression | x.y | 0 | 1 | 0 | 1 | 0 | 4 | | | | NewExpression | new X() | 0 | 0 | 1 | 1 | 1 | 8 | | | | ThrowStatement | throw x | 0 | 0 | 0 | 1 | 1 | 6 | | | | MetaProperty | new.target | 0 | 1 | 0 | 1 | 0 | 4 | | | | ConditionalExpression | x?y:z | 1 | 0 | 0 | 1 | 0 | 3 | | | | YieldExpression | yield x | 0 | 0 | 0 | 1 | 1 | 6 | | | | Event | | 0 | 0 | 0 | 0 | 0 | 20 | | | | Storage | | 0 | 0 | 0 | 0 | 0 | 1 gas/bit | | |
Tips
In nebulas, the transaction pool of each node has a minimum and maximum gasPrice and maximum gasLimit value. If transaction’s gasPrice is not in the range of the pool’s gasPrice or the gasLimit greater than the pool’s gasLimit the transaction will be refused.
Transaction pool gasPrice and gasLimit configuration:
gasPrice- minimum: The minimum gasPrice can be set in the configuration file. If the minimum value is not configured, the default value is
1000000(10^6). - maximum: The maximum gasPrice is
1000000000000(10^12), transaction pool’s maximum configuration and transaction’sgasPricecan’t be overflow.
- minimum: The minimum gasPrice can be set in the configuration file. If the minimum value is not configured, the default value is
gasLimit- minimum: The transaction’s minimum gasLimit must greater than zero.
- maximum: The maximum gasPrice is
50000000000(50*10^9), transaction pool’s maximum configuration and transaction’sgasLimitcan’t be overflow.
Logs
Introduction
Nebulas provides two kinds of logs: console log & verbose log.
Console Log(CLog) is used to help you understand which job Neb is working on now, including start/stop components, receive new blocks on chain, do synchronization and so on.
- CLog will print all logs to stdout & log files both. You can check them in your standard output directly.
Nebulas console log statements
// log level can be `Info`,`Warning`,`Error`
logging.CLog().Info("")
Nebulas start service should give a console log, the logs should before the service start. The log format just like this:
logging.CLog().Info("Starting xxx...")
Nebulas stop service should give a console log, the logs should before the service stoped. The log format just like this:
logging.CLog().Info("Stopping xxx...")
Verbose Log(VLog) is used to help you understant how Neb works on current job, including how to verifiy new blocks, how to discover new nodes, how to mint and so on.
- VLog will print logs to log files only. You can check them in your log folders if needed.
What’r more, you can set your concerned level to VLog to filter informations. The level filter follows the priority as Debug < < < <
Hookers
By default, Function hookers & FileRotate hookers are added to CLog & VLog both.
FunctionHooker will append current caller’s function name & code line to the loggers. The result looks like this,
time=”2018-01-03T20:20:52+08:00” level=info msg=”node init success” file=net_service.go func=p2p.NewNetManager line=137 node.listen=”[0.0.0.0:10001]“
FileRotateHooker will split logs into many smaller segments by time. By default, all logs will be rotated every 1 hour. The log folder looks like this,
neb-2018010415.log neb-2018010416.log neb.log ->
/path/to/neb-2018010415.log
If you have any suggestions about logs, please feel free to submit issues on our wiki repo. Thanks!
Nebulas Address Design
Nebulas address system is carefully designed. As you will see below, both account and smart contract address are strings starting with a “n”, which could be thought of as our faith Nebulas/NAS.
Account Address
Similar to Bitcoin and Ethereum, Nebulas also adopts elliptic curve algorithm as its basic encryption algorithm for Nebulas accounts. The address is derived from public key, which is in turn derived from the private key that encrypted with user’s passphrase.Also we have the checksum design aiming to prevent a user from sending Nas to a wrong user account accidentally due to entry of several incorrect characters.
The specific calculation formula is as follows:
1. content = ripemd160(sha3_256(public key))
length: 20 bytes
+--------+--------+------------------+
2. checksum = sha3_256( | 0x19 + 0x57 | content | )[:4]
+--------+--------+------------------+
length: 4 bytes
+--------+---------+-----------------+------------+
3. address = base58( | 0x19 | 0x57 | content | checksum | )
+--------+---------+-----------------+------------+
length: 35 chars
0x57 is a one-byte “type code” for account address, 0x19 is a one-byte fixed “padding”
At this stage, Nebulas just adopts the normal bitcoin base58 encoding schema. A valid address is like: n1TV3sU6jyzR4rJ1D7jCAmtVGSntJagXZHC
Smart Contract Address
Calculating contract address differs slightly from account, passphrase of contract sender is not required but address & nonce. For more information, please check smart contract and rpc.sendTransaction. Calculation formula is as follows:
1. content = ripemd160(sha3_256(tx.from, tx.nonce))
length: 20 bytes
+--------+--------+------------------+
2. checksum = sha3_256( | 0x19 | 0x58 + content | )[:4]
+--------+--------+------------------+
length: 4 bytes
+--------+---------+-----------------+------------+
3. address = base58( | 0x19 | 0x58 | content | checksum | )
+--------+---------+-----------------+------------+
length: 35 chars
0x58 is a one-byte “type code” for smart contract address, 0x19 is a one-byte fixed “padding”
A valid address is like: n1sLnoc7j57YfzAVP8tJ3yK5a2i56QrTDdK
DIP (TBD)
How to Develop
Contribution Guideline
The go-nebulas project welcomes all contributors. The process of contributing to the Go project may be different than many projects you are used to. This document is intended as a guide to help you through the contribution process. This guide assumes you have a basic understanding of Git and Go.
Becoming a contributor
Before you can contribute to the go-nebulas project you need to setup a few prerequisites.
Contributor License Agreement
TBD.
Preparing a Development Environment for Contributing
Setting up dependent tools
dep is an (not-yet) official dependency management tool for Go. go-nebulas project use it to management all dependencies.
For more information, please visit https://github.com/golang/dep
Golint is official linter for Go source code. Every Go source file in go-nebulas must be satisfied the style guideline. The mechanically checkable items in style guideline are listed in Effective Go and the CodeReviewComments wiki page.
For more information about Golint, please visit https://github.com/golang/lint.
Making a Contribution
Discuss your design
The project welcomes submissions but please let everyone know what you’re working on if you want to change or add to the go-nebulas project.
Before undertaking to write something new for the go-nebulas, please file an issue (or claim an existing issue). Significant changes must go through the change proposal process before they can be accepted.
This process gives everyone a chance to validate the design, helps prevent duplication of effort, and ensures that the idea fits inside the goals for the language and tools. It also checks that the design is sound before code is written; the code review tool is not the place for high-level discussions.
Besides that, you can have an instant discussion with core developers in developers channel of Nebulas.IO on Slack.
Making a change
First you need to fork and have a local copy of the source checked out from the forked repository.
You should checkout the go-nebulas source repo inside your $GOPATH. Go to $GOPATH run the following command in a terminal.
$ mkdir -p src/github.com/nebulasio
$ cd src/github.com/nebulasio
$ git clone git@github.com:{your_github_id}/go-nebulas.git
$ cd go-nebulas
Most Go installations project use a release branch, but new changes should only be made based on the develop branch. (They may be applied later to a release branch as part of the release process, but most contributors won’t do this themselves.) Before making a change, make sure you start on the develop branch:
$ git checkout develop
$ git pull
Make your changes
The entire checked-out tree is editable. Make your changes as you see fit ensuring that you create appropriate tests along with your changes. Test your changes as you go.
Files in the go-nebulas repository don’t list author names, both to avoid clutter and to avoid having to keep the lists up to date. Instead, your name will appear in the change log and in the CONTRIBUTORS file and perhaps the AUTHORS file. These files are automatically generated from the commit logs perodically. The AUTHORS file defines who “The go-nebulas Authors”—the copyright holders—are.
New files that you contribute should use the standard copyright header:
// Copyright (C) 2017 go-nebulas authors
//
// This file is part of the go-nebulas library.
//
// the go-nebulas library is free software: you can redistribute it and/or modify
// it under the terms of the GNU General Public License as published by
// the Free Software Foundation, either version 3 of the License, or
// (at your option) any later version.
//
// the go-nebulas library is distributed in the hope that it will be useful,
// but WITHOUT ANY WARRANTY; without even the implied warranty of
// MERCHANTABILITY or FITNESS FOR A PARTICULAR PURPOSE. See the
// GNU General Public License for more details.
//
// You should have received a copy of the GNU General Public License
// along with the go-nebulas library. If not, see <http://www.gnu.org/licenses/>.
//
Files in the repository are copyright the year they are added. Do not update the copyright year on files that you change.
Goimports, Golint and Govet
Every Go source file in go-nebulas must pass Goimports, Golint and Govet check. Golint check the style mistakes, we should fix all style mistakes, including comments/docs. Govet reports suspicious constructs, we should fix all issues as well.
Run following command to check your code:
$ make fmt lint vet
lint.report text file is the Golint report, vet.report text file is the Govet report.
Testing
You’ve written test code, tested your code before sending code out for review, run all the tests for the whole tree to make sure the changes don’t break other packages or programs:
$ make test
test.report text file or test.report.xml XML file is the testing report.
Commit your changes
The most importance of committing changes is the commit message. Git will open an editor for a commit message. The file will look like:
# Please enter the commit message for your changes. Lines starting
# with '#' will be ignored, and an empty message aborts the commit.
# On branch foo
# Changes not staged for commit:
# modified: editedfile.go
#
At the beginning of this file is a blank line; replace it with a thorough description of your change. The first line of the change description is conventionally a one-line summary of the change, prefixed by the primary affected package, and is used as the subject for code review email. It should complete the sentence “This change modifies Go to _.” The rest of the description elaborates and should provide context for the change and explain what it does. Write in complete sentences with correct punctuation, just like for your comments in Go. If there is a helpful reference, mention it here. If you’ve fixed an issue, reference it by number with a # before it.
After editing, the template might now read:
math: improve Sin, Cos and Tan precision for very large arguments
The existing implementation has poor numerical properties for
large arguments, so use the McGillicutty algorithm to improve
accuracy above 1e10.
The algorithm is described at http://wikipedia.org/wiki/McGillicutty_Algorithm
Fixes #159
# Please enter the commit message for your changes. Lines starting
# with '#' will be ignored, and an empty message aborts the commit.
# On branch foo
# Changes not staged for commit:
# modified: editedfile.go
#
The commented section of the file lists all the modified files in your client. It is best to keep unrelated changes in different commits, so if you see a file listed that should not be included, abort the command and move that file to a different branch.
The special notation “Fixes #159” associates the change with issue 159 in the go-nebulas issue tracker. When this change is eventually applied, the issue tracker will automatically mark the issue as fixed. (There are several such conventions, described in detail in the GitHub Issue Tracker documentation.)
Creating a Pull Request
For more information about creating a pull request, please refer to the Create a Pull Request in Github page.
How to debug Go-Nebulas project
作者:Wenbo Liu aries.lwb@gmail.com, July 17, 2017
Go-Nebulas项目地址:https://github.com/nebulasio/go-nebulas.git
简介
这篇短文基于Mac OSX 和 Ubuntu系统,简单介绍如何调试Go-Nebulas项目,主要介绍三种方法调试:dlv命令行调试,Gogland IDE调试,以及Visual Studio Code调试。
调试器Delve安装
在 Mac OSX 上安装Delve
Google官方为golang的调试例子用gdb,但是delve是更合适的调试器,比gdb能提供更多的信息。安装delve,在Mac上一般采用Homebrew。但是很遗憾,在本文写就时,Homebrew提供的delve包老旧,有bug,无法正确调试Go-Nebulas。普通的go项目是可以的,具体体现就是调试Go-Nebulas项目时,断点无法停住,会永远hang住。我们必须从github上下载delve的最新源代码编译成delve binary,步骤如下:
先用Homebrew安装有bug的Delve:
brew install go-delve/delve/delve
rm /usr/local/bin/dlv
安装此有问题的Delve,其实就是为了让它帮我们在Mac机器上签发一个自签名的dlv-cert证书。如果你自己愿意繁琐的手动创建证书,也可以不用安装Delve,参考https://github.com/derekparker/delve/blob/v0.12.2/Documentation/installation/osx/install.md的【Create a self-signed certificate】。 第二条rm命令是为了删除这个有问题的dlv binary,我们需要从源码编译出一个正确的版本,并且利用Homebew为我们安装的证书做codesign。 下载源代码
mkdir -p /Users/xxx/go-delve/src/github.com/derekparker
cd /Users/xxx/go-delve/src/github.com/derekparker
git clone https://github.com/derekparker/delve.git
创建一个临时文件夹,从github下载代码。注意文件夹中标注红色的部分,必须完全一样,这是因为go项目的源码组织规则,否则下一步编译会出错,报警package not found。其它部分请根据自己机器环境设置。
编译
export GOPATH=/Users/xxx/go-delve
cd /Users/xxx/go-delve/src/github.com/derekparker/delve
make install
应该会出现如下提示,表明编译成功:
scripts/gencert.sh || (echo "An error occurred when generating and installing a new certicate"; exit 1)
go install -ldflags="-s" github.com/derekparker/delve/cmd/dlv
codesign -s "dlv-cert" /Users/xxx/go-delve/bin/dlv
然后cp /Users/liuwb/go-delve/bin/dlv/usr/local/bin/,把编译好的dlv拷贝进/usr/local/bin目录,替换之前有bug的dlv debugger。输入命令dlv version,如果能正常运行,显示版本号,说明dlv已经被加入到PATH。
在 Ubuntu 上安装Delve
对于Ubuntu系统,可以直接使用下面的指令安装Delve:
go get -u github.com/derekparker/delve/cmd/dlv
下载Go-Nebulas工程代码
mkdir /Users/xxx/workspace/blockchain/src/github.com/nebulasio/
cd /Users/xxx/workspace/blockchain/src/github.com/nebulasio/
git clone https://github.com/nebulasio/go-nebulas.git
创建一个临时文件夹,从github下载代码。注意文件夹中标注红色的部分,必须完全一样,这是因为go项目的源码组织规则,其它部分请根据自己机器环境设置。
Delve命令行调试 如果你以前用gdb调试过C程序,对dlv命令行调试的风格也不会陌生。完整的dlv命令文档,参见https://github.com/derekparker/delve/blob/master/Documentation/usage/dlv.md 这里只介绍debug部分。
输入如下命令进入调试
export GOPATH=/Users/xxx/workspace/blockchain/
cd /Users/xxx/workspace/blockchain/
dlv debug github.com/nebulasio/go-nebulas/cmd/neb -- --config /Users/xxx/workspace/blockchain/src/github.com/nebulasio/go-nebulas/conf/default/config.conf
运行无误的话,会进入debug session:
Type 'help' for list of commands.
(dlv)
我们打算在neb的函数入口设置断点,输入命令
(dlv) break main.neb
Breakpoint 1 set at 0x4ba6798 for main.neb() ./src/github.com/nebulasio/go-nebulas/cmd/neb/main.go:80
(dlv)
dlv调试器提示代码将在cmd/neb/main.go的行号80行停住,注意这时neb程序还没有运行。输入命令continue:
(dlv) continue
> main.neb() ./src/github.com/nebulasio/go-nebulas/cmd/neb/main.go:80 (hits goroutine(1):1 total:1) (PC: 0x4ba6798)
75: sort.Sort(cli.CommandsByName(app.Commands))
76:
77: app.Run(os.Args)
78: }
79:
=> 80: func neb(ctx *cli.Context) error {
81: n, err := makeNeb(ctx)
82: if err != nil {
83: return err
84: }
85:
查看变量,可用print命令:
(dlv) print ctx
*github.com/nebulasio/go-nebulas/vendor/github.com/urfave/cli.Context {
App: *github.com/nebulasio/go-nebulas/vendor/github.com/urfave/cli.App {
Name: "neb",
HelpName: "debug",
Usage: "the go-nebulas command line interface",
UsageText: "",
ArgsUsage: "",
Version: ", branch , commit ",
Description: "",
Commands: []github.com/nebulasio/go-nebulas/vendor/github.com/urfave/cli.Command len: 11, cap: 18, [
(*github.com/nebulasio/go-nebulas/vendor/github.com/urfave/cli.Command)(0xc4201f4000),
(*github.com/nebulasio/go-nebulas/vendor/github.com/urfave/cli.Command)(0xc4201f4128),
(*github.com/nebulasio/go-nebulas/vendor/github.com/urfave/cli.Command)(0xc4201f4250),
(*github.com/nebulasio/go-nebulas/vendor/github.com/urfave/cli.Command)(0xc4201f4378),
(*github.com/nebulasio/go-nebulas/vendor/github.com/urfave/cli.Command)(0xc4201f44a0),
更多技术资料,请参考 https://github.com/derekparker/delve/tree/master/Documentation/cli https://blog.gopheracademy.com/advent-2015/debugging-with-delve/ http://hustcat.github.io/getting-started-with-delve/
Visual Studio Code调试
Visual Studio Code是微软公司发布的跨平台代码编辑工具,下载地址:https://code.visualstudio.com/Download VS Code需要安装Go插件

打开文件夹/Users/xxx/workspace/blockchain/src/github.com/nebulasio/go-nebulas/,在.vscode文件夹下创建两个文件settings.json和launch.json。 settings.json文件内容:
// Place your settings in this file to overwrite default and user settings.
{
"go.gopath": "/Users/xxx/workspace/blockchain/",
"go.formatOnSave": true,
"go.gocodeAutoBuild": false,
"go.toolsGopath": "/Users/xxx/workspace/gotools",
"explorer.openEditors.visible": 0,
}
go.toolsGopath是analysis tools安装的地址,可以指定为任何目录,这些analysis tools可以供其它workspace共享。
launch.json文件内容:
{
"version": "0.2.0",
"configurations": [
{
"name": "Launch",
"type": "go",
"request": "launch",
"mode": "debug",
"program": "${workspaceRoot}/cmd/neb",
"env": {
"GOPATH": "/Users/xxx/workspace/blockchain/"
},
"args": [
"--config",
"/Users/xxx/workspace/blockchain/src/github.com/nebulasio/go-nebulas/conf/default/config.conf"
],
"showLog": true
}
]
}
在cmd/neb/main.go,neb函数中设置断点,F5运行,Go-Nebulas项目会进行编译运行,停在断点: 
然后,就可以开心的启动Nebulas代码调试之旅!
debuging-with-gdb
OverView
Last week we found a lot of “Failed to update latest irreversible block.” in neb log with Leon. The reference code (nebulasio/go-nebulas/core/blockchain.go updateLatestIrreversibleBlock ) , in the code we found the cur variable is not equal to the tail variable , why? to find the cause, we try to use tool to dynamically display variable information and facilitate single-step debugging.
Goroutines
In c++ program we often use gbd to debug, so we think why not to use gdb to debug golang program . First we try to look up the BlockChain loop goroutine state and print the variables .
In c++ we all use info threads and thread x to show thread info but in the golang program ,we should use info goroutines and goroutine xx bt to displays the current list of running goroutines.
(gdb) info goroutines Undefined info command: “goroutines”. Try “help info”. (gdb) source /usr/local/go/src/runtime/runtime-gdb.py Loading Go Runtime support. (gdb) info goroutines
1 waiting runtime.gopark
2 waiting runtime.gopark
3 waiting runtime.gopark
4 waiting runtime.gopark
5 syscall runtime.notetsleepg
6 syscall runtime.notetsleepg
7 waiting runtime.gopark
... ...
(gdb) goroutine 84 bt
#0 runtime.gopark (unlockf={void (struct runtime.g , void , bool *)} 0xc420c57c80, lock=0x0, reason="select", traceEv=24 '\030', traceskip=1) at /data/packages/go/src/runtime/proc.go:288
#1 0x0000000000440fd9 in runtime.selectgo (sel=0xc420c57f48, ~r1=842353656960) at /data/packages/go/src/runtime/select.go:395
#2 0x0000000000ad2d73 in github.com/nebulasio/go-nebulas/core.(*BlockChain).loop (bc=0xc4202c6320)at /neb/golang/src/github.com/nebulasio/go-nebulas/core/blockchain.go:184
#3 0x0000000000460421 in runtime.goexit () at /data/packages/go/src/runtime/asm_amd64.s:2337
#4 .....
But neb has too many goroutines, we don’t kown which one , we give up
BreakPoints
Second we try to set break point to debug
(gdb) b blockchain.go:381
Breakpoint 2 at 0xad4373: file /neb/golang/src/github.com/nebulasio/go-nebulas/core/blockchain.go, line 381.
(gdb) b core/blockchain.go:390
Breakpoint 3 at 0xad44c6: file /neb/golang/src/github.com/nebulasio/go-nebulas/core/blockchain.go, line 390.
(gdb) info breakpoints // show all breakpoints
(gdb) d 2 //delete No 2 breakpoint
Now let the neb continue its execution until the next breakpoint, enter the c command: (gdb) c Continuing
Thread 6 "neb" hit Breakpoint 2, github.com/nebulasio/go-nebulas/core.(*BlockChain).updateLatestIrreversibleBlock (bc=0xc4202c6320, tail=0xc4244198c0)
at /neb/golang/src/github.com/nebulasio/go-nebulas/core/blockchain.go:382
382 miners := make(map[string
now we can use p(print) to print variables value
(gdb) `p cur`
$2 = (struct github.com/nebulasio/go-nebulas/core.Block *) 0xc420716f90
(gdb) `p cur.height`
$3 = 0
(gdb) `p bc`
$4 = (struct github.com/nebulasio/go-nebulas/core.BlockChain *) 0xc4202c6320
(gdb) `p bc.latestIrreversibleBlock`
$5 = (struct github.com/nebulasio/go-nebulas/core.Block *) 0xc4240bbb00
(gdb) `p bc.latestIrreversibleBlock.height`
$6 = 51743
(gdb) `p tail`
$7 = (struct github.com/nebulasio/go-nebulas/core.Block *) 0xc4244198c0
(gdb) `p tail.height`
$8 = 51749
now we can use info goroutines again, to find current goroutine. info goroutines with the * indicating the current execution, so we find the current goroutine nunmber quickly.
the next breakpoint we can use c command , so we found the cur and lib is not equal, because of length of the miners is less than ConsensusSize, In the loop the cur change to the parent block .
Other
When compiling Go programs, the following points require particular attention:
- Using -ldflags “-s” will prevent the standard debugging information from being printed
- Using -gcflags “-N-l” will prevent Go from performing some of its automated optimizations -optimizations of aggregate variables, functions, etc. These optimizations can make it very difficult for GDB to do its job, so it’s best to disable them at compile time using these flags.
References
neb-dont-generate-coredump-file
OverView
During Testing, neb may be crash, and we want to get the coredump file which could help us to find the reason. However, neb don’t generate coredump file by default. We can find the crash log in /var/log/apport.log when a crash occurred:
"called for pid 10110, signal 11, core limit 0, dump mode 1 "
The coredump file is very very important, it can serve as useful debugging aids in several situations, and help us to debug quickly. Therefore we should make neb to generate coredump file.
Set the core file size
We can use ulimit -a command to show core file size. If it’s size is zero, which means coredump file is disabled, then we should set a value for core file size. for temporarily change we can use ulimit -c unlimited , and for permanently change we can edit /etc/security/limits.conf file, it will take effect after reboot or command sysctl -p.
<domain> <type> <item> <value>
* soft core unlimited
But these ways are’t work, neb still can’t generate coredump file and cat /proc/$pid/limits always “Max core file size 0”
Why? Why? Why? It doesn’t Work
- If the setting is wrong? Just try a c++ programe build, run it and we can find that it can generate coredump.
- Neb is started by supervisord, is it caused by supervisord?
- Try to start neb without supervisord, then the neb coredump is generated!
- Yes, the reason is supervisord, then we can google “supervisord+coredump” to solve it.
Solution
Supervisord only set RLIMIT_NOFILE, RLIMIT_NOPROC by set_rlimits , others are seted default 0 1. modify supervisord code options.py in 1293 line
vim /usr/lib/python2.6/site-packages/supervisor/options.py
soft, hard = resource.getrlimit(resource.RLIMIT_CORE)
resource.setrlimit(resource.RLIMIT_CORE, (-1, hard))
- restart supervisord and it works .
Other seetings
You can also change the name and path of coredump file by changing file /proc/sys/kernel/core_pattern:
echo "/neb/app/core-%e-%p-%t" > /proc/sys/kernel/core_pattern
%p: pid
%: '%' is dropped
%%: output one '%'
%u: uid
%g: gid
%s: signal number
%t: UNIX time of dump
%h: hostname
%e: executable filename
%: both are dropped
References
Tutorials
English 101
- Installation (thanks Victor)
- Sending a Transaction (thanks Victor)
- Writing Smart Contract in JavaScript (thanks otto)
- Introducing Smart Contract Storage (thanks Victor)
- Interacting with Nebulas by RPC API (thanks Victor)
中文 - 入门教程
Nebulas 101 - 01 Compile and Install Nebulas
The project code for Nebulas has been released in several versions and tested to run locally. You can download the Nebulas source code to compile the private chain locally.
To learn about Nebulas, please read the Nebulas Non-Technical White Paper.
To learn about the technology, please read the Nebulas Technical White Paper and the Nebulas github code.
Nebulas can only runs on Mac and Linux at this stage. The Windows version will be coming soon.
Golang Environment
Nebulas is implemented in Golang now.
| Components | Version | Description | | — | — | — | | Golang |
>
= 1.9.2 | The Go Programming Language |Mac OSX
Homebrew is recommended for installing golang on Mac.
# install
brew install go
# environment variables
export GOPATH=/path/to/workspace
Notice:GOPATH is a local golang working directory which could be decided by youself. After GOPATH is configured, your go projects need to be placed in GOPATH directory.
Linux
# download
wget https://dl.google.com/go/go1.9.3.linux-amd64.tar.gz
# extract
tar -C /usr/local -xzf go1.9.3.linux-amd64.tar.gz
# environment variables
export PATH=$PATH:/usr/local/go/bin
export GOPATH=/path/to/workspace
Compile Nebulas
Download
Clone source code with the following commands.
# enter workspace
mkdir -p $GOPATH/src/github.com/nebulasio
cd $GOPATH/src/github.com/nebulasio
# download
git clone https://github.com/nebulasio/go-nebulas.git
# enter repository
cd go-nebulas
# master branch is most stable
git checkout master
Install RocksDB
OS X:
Install rocksdb via Homebrew
brew install rocksdb
Linux - Ubuntu
Install Dependencies
apt-get update apt-get -y install build-essential libgflags-dev libsnappy-dev zlib1g-dev libbz2-dev liblz4-dev libzstd-dev
Install rocksdb by source code:
git clone https://github.com/facebook/rocksdb.git cd rocksdb && make shared_lib && make install-shared
Linux - Centos
Install Dependencies
yum -y install epel-release && yum -y update yum -y install gflags-devel snappy-devel zlib-devel bzip2-devel gcc-c++ libstdc++-develInstall rocksdb by source code:
git clone https://github.com/facebook/rocksdb.git cd rocksdb & make shared_lib && make install-shared
Install Go Dependencies
Go dependencies in Go-Nebulas is managed by Dep.
| Components | Version | Description | | — | — | — |
Dep |
>
= 0.3.1 | Dep is a dependency management tool for Go. |Mac OSX
Install Dep via Homebrew
brew install dep brew upgrade dep
Linux
Install dep
cd /usr/local/bin/ wget https://github.com/golang/dep/releases/download/v0.3.2/dep-linux-amd64 ln -s dep-linux-amd64 dep
Switch to the root directory of the project to download dependencies for Go-Nebulas:
cd $GOPATH/src/github.com/nebulasio/go-nebulas
make dep
make depdownloads lots of dependencies. It might take a long time to download for the first time. Some dependencies may fail to download. If you can not download, you can directly download the zipped dependency files generated by dep vendor.tar.gz and extract it to the nebulas root directory.vendor.tar.gz MD5: c2c1ff9311332f90e11fb81b48ca0984
Nebulas’s NVM (Nebulas Virtual Machine) depends on the V8 JavaScript engine. We’ve built the v8 dependencies for Mac/Linux. Run the following commands to install them.
cd $GOPATH/src/github.com/nebulasio/go-nebulas
make deploy-v8
Build Neb
You can now build the executable for Nebulas after golang dependencies and V8 dependency packages is installed.
Build under the project root directory:
cd $GOPATH/src/github.com/nebulasio/go-nebulas
make build
Once the building is complete,there will be a executable file neb generated under the root directory. 
Start NEB
Genesis Block
Before launching a new Nebulas chain, we have to define the configuration of genesis block.
# Neb genesis text file. Scheme is defined in core/pb/genesis.proto.
meta {
# Chain identity
chain_id: 100
}
consensus {
dpos {
# Initial dynasty, including all initial miners
dynasty: [
[ miner address ],
...
]
}
}
# Pre-allocation of initial tokens
token_distribution [
{
address: [ allocation address ]
value: [ amount of allocation tokens ]
},
...
]
An example genesis.conf is located in conf/default/genesis.conf.
Configuration
Before getting a neb node started, we have to define the configuration of this node.
# Neb configuration text file. Scheme is defined in neblet/pb/config.proto:Config.
# Network Configuration
network {
# For the first node in a new Nebulas chain, `seed` is not need.
# Otherwise, every node need some seed nodes to introduce it into the Nebulas chain.
# seed: ["/ip4/127.0.0.1/tcp/8680/ipfs/QmP7HDFcYmJL12Ez4ZNVCKjKedfE7f48f1LAkUc3Whz4jP"]
# P2p network service host. support mutiple ip and ports.
listen: ["0.0.0.0:8680"]
# The private key is used to generate a node ID. If you don't use the private key, the node will generate a new node ID.
# private_key: "conf/network/id_ed25519"
}
# Chain Configuration
chain {
# Network chain ID
chain_id: 100
# Database storage location
datadir: "data.db"
# Accounts' keystore files location
keydir: "keydir"
# The genesis block configuration
genesis: "conf/default/genesis.conf"
# Signature algorithm
signature_ciphers: ["ECC_SECP256K1"]
# Miner address
miner: "n1SAQy3ix1pZj8MPzNeVqpAmu1nCVqb5w8c"
# Coinbase address, all mining reward received by the above miner will be send to this address
coinbase: "n1FF1nz6tarkDVwWQkMnnwFPuPKUaQTdptE"
# The passphrase to miner's keystore file
passphrase: "passphrase"
}
# API Configuration
rpc {
# GRPC API port
rpc_listen: ["127.0.0.1:8684"]
# HTTP API port
http_listen: ["127.0.0.1:8685"]
# The module opened
http_module: ["api", "admin"]
}
# Log Configuration
app {
# Log level: [debug, info, warn, error, fatal]
log_level: "info"
# Log location
log_file: "logs"
# Open crash log
enable_crash_report: false
}
# Metrics Configuration
stats {
# Open node metrics
enable_metrics: false
# Influxdb configuration
influxdb: {
host: "http://localhost:8086"
db: "nebulas"
user: "admin"
password: "admin"
}
}
A lot of examples can be found in $GOPATH/src/github.com/nebulasio/go-nebulas/conf/
Run Nodes
The Nebulas chain you are running at this point is private and is different with official Testnet and Mainnet.
Start your first Nebulas node with the following commands.
cd $GOPATH/src/github.com/nebulasio/go-nebulas
./neb -c conf/default/config.conf
After starting, the following should be visible in the terminal: 
By default, the node using conf/default/config.conf won’t mine new blocks. Start your first Nebulas mining node with another commands.
cd $GOPATH/src/github.com/nebulasio/go-nebulas
./neb -c conf/example/miner.conf
After the node starts, if the connection with the seed node is successful, you can see the following log which is in log file logs/miner/neb.log: 
Note: You can start many nodes locally. Please make sure the ports in your node configurations won’t conflict with each other.
Next step: Tutorial 2
Nebulas 101 - 02 Sending Transactions on Nebulas
For this portion of the tutorial we will pick up where we left off in the Installation tutorial.
Nebulas provides three methods to send transactions:
- Sign & Send
- Send with Passphrase
- Unlock & Send
Here is an introduction to sending a transaction in Nebulas through the three methods above and verifying whether the transaction is successful.
Prepare Accounts
In Nebulas, each address represents an unique account.
Prepare two accounts: an address to send tokens (the sending address, called “from”) and an address to receive the tokens (the receiving address, called “to”).
The Sender
Here we will use the coinbase account in the conf/example/miner.conf, which is n1FF1nz6tarkDVwWQkMnnwFPuPKUaQTdptE as the sender. As the miner’s coinbase account, it will receive some tokens as the mining reward. Then we could send these tokens to another account later.
The Receiver
Create a new wallet to receive the tokens.
$ ./neb account new
Your new account is locked with a passphrase. Please give a passphrase. Do not forget this passphrase.
Passphrase:
Repeat passphrase:
Address: n1SQe5d1NKHYFMKtJ5sNHPsSPVavGzW71Wy
When you run this command you will have a different wallet address withn1FF1nz6tarkDVwWQkMnnwFPuPKUaQTdptE. Please use your generated address as the receiver.
The keystore file of the new wallet will be located in $GOPATH/src/github.com/nebulasio/go-nebulas/keydir/
Start the Nodes
Start Seed Node
Firstly, start a seed node as the first node in local private chain.
./neb -c conf/default/config.conf
Start Miner Node
Secondly, start a miner node connecting to the seed node. This node will generate new blocks in local private chain.
./neb -c conf/example/miner.conf
How long a new block will be minted?
In Nebulas, DPoS is chosen as the temporary consensus algorithm before Proof-of-Devotion(PoD, described in Technical White Paper) is ready. In this consensus algorithm, each miner will mint new block one by one every 15 seconds.
In current context, we have to wait for 315(=15*21) seconds to get a new block because there is only one miner among 21 miners defined in
conf/default/genesis.confworking now.
Once a new block minted by the miner, the mining reward will be added to the coinbase wallet address used in conf/example/miner.conf which is n1FF1nz6tarkDVwWQkMnnwFPuPKUaQTdptE.
Interact with Nodes
Nebulas provides developers with HTTP API, gRPC API and CLI to interact with the running nodes. Here, we will share how to send a transaction in three methods with HTTP API (API Module | Admin Module).
The Nebulas HTTP Lisenter is defined in the node configuration. The default port of our seed node is8685.
At first, check the sender’s balance before sending a transaction.
Check Account State
Fetch the state of sender’s account n1FF1nz6tarkDVwWQkMnnwFPuPKUaQTdptE with /v1/user/accountstate in API Module using curl.
> curl -i -H Accept:application/json -X POST http://localhost:8685/v1/user/accountstate -d '{"address":"n1FF1nz6tarkDVwWQkMnnwFPuPKUaQTdptE"}'
{
"result": {
"balance": "67066180000000000000",
"nonce": "0",
"type": 87
}
}
Note Type is used to check if this account is a smart contract account.88represents smart contract account and87means a non-contract account.
As we see, the receiver has been rewarded some tokens for mining new blocks.
Then let’s check the receiver’s account state.
> curl -i -H Accept:application/json -X POST http://localhost:8685/v1/user/accountstate -d '{"address":"your_address"}'
{
"result": {
"balance": "0",
"nonce": "0",
"type": 87
}
}
The new account doesn’t have tokens as expected.
Send a Transaction
Now let’s send a transaction in three methods to transfer some tokens from the sender to the receiver!
In this way, we can sign a transaction in an offline environment and then submit it to another online node. This is the safest method for everyone to submit a transaction without exposing your own private key to the Internet.
First, sign the transaction to get raw data.
> curl -i -H 'Content-Type: application/json' -X POST http://localhost:8685/v1/admin/sign -d '{"transaction":{"from":"n1FF1nz6tarkDVwWQkMnnwFPuPKUaQTdptE","to":"n1QZMXSZtW7BUerroSms4axNfyBGyFGkrh5", "value":"1000000000000000000","nonce":1,"gasPrice":"1000000","gasLimit":"2000000"}, "passphrase":"passphrase"}'
{"result":{"data":"CiAbjMP5dyVsTWILfXL1MbwZ8Q6xOgX/JKinks1dpToSdxIaGVcH+WT/SVMkY18ix7SG4F1+Z8evXJoA35caGhlXbip8PupTNxwV4SRM87r798jXWADXpWngIhAAAAAAAAAAAA3gtrOnZAAAKAEwuKuC1wU6CAoGYmluYXJ5QGRKEAAAAAAAAAAAAAAAAAAPQkBSEAAAAAAAAAAAAAAAAAAehIBYAWJBVVuRHWSNY1e3bigbVKd9i6ci4f1LruDC7AUtXDLirHlsmTDZXqjSMGLio1ziTmxYJiLj+Jht5RoZxFKqFncOIQA="}}
Note Nonce is an very important attribute in a transaction. It’s designed to prevent replay attacks. For a given account, only after its transaction with nonce N is accepted, will its transaction with nonce N+1 be processed. Thus, we have to check the latest nonce of the account on chain before preparing a new transaction.
Then, send the raw data to an online Nebulas node.
> curl -i -H 'Content-Type: application/json' -X POST http://localhost:8685/v1/user/rawtransaction -d '{"data":"CiAbjMP5dyVsTWILfXL1MbwZ8Q6xOgX/JKinks1dpToSdxIaGVcH+WT/SVMkY18ix7SG4F1+Z8evXJoA35caGhlXbip8PupTNxwV4SRM87r798jXWADXpWngIhAAAAAAAAAAAA3gtrOnZAAAKAEwuKuC1wU6CAoGYmluYXJ5QGRKEAAAAAAAAAAAAAAAAAAPQkBSEAAAAAAAAAAAAAAAAAAehIBYAWJBVVuRHWSNY1e3bigbVKd9i6ci4f1LruDC7AUtXDLirHlsmTDZXqjSMGLio1ziTmxYJiLj+Jht5RoZxFKqFncOIQA="}'
{"result":{"txhash":"1b8cc3f977256c4d620b7d72f531bc19f10eb13a05ff24a8a792cd5da53a1277","contract_address":""}}⏎
If you trust a Nebulas node so much that you can delegate your keystore files to it, the second method is a good fit for you.
First, upload your keystore files to the keydir folders in the trusted Nebulas node.
Then, send the transaction with your passphrase.
> curl -i -H 'Content-Type: application/json' -X POST http://localhost:8685/v1/admin/transactionWithPassphrase -d '{"transaction":{"from":"n1FF1nz6tarkDVwWQkMnnwFPuPKUaQTdptE","to":"n1QZMXSZtW7BUerroSms4axNfyBGyFGkrh5", "value":"1000000000000000000","nonce":2,"gasPrice":"1000000","gasLimit":"2000000"},"passphrase":"passphrase"}'
{"result":{"txhash":"3cdd38a66c8f399e2f28134e0eb556b292e19d48439f6afde384ca9b60c27010","contract_address":""}}
Note Because we have sent a transaction with nonce 1 from the accountn1FF1nz6tarkDVwWQkMnnwFPuPKUaQTdptE, new transaction with samefromshould be increased by 1, namely 2.
This is the most dangerous method. You probably shouldn’t use it unless you have complete trust in the receiving Nebulas node.
First, upload your keystore files to the keydir folders in the trusted Nebulas node.
Then unlock your accounts with your passphrase for a given duration in the node. The unit of the duration is nano seconds (300000000000=300s).
> curl -i -H 'Content-Type: application/json' -X POST http://localhost:8685/v1/admin/account/unlock -d '{"address":"n1FF1nz6tarkDVwWQkMnnwFPuPKUaQTdptE","passphrase":"passphrase","duration":"300000000000"}'
{"result":{"result":true}}
After unlocking the account, everyone is able to send any transaction directly within the duration in that node without your authorization.
> curl -i -H 'Content-Type: application/json' -X POST http://localhost:8685/v1/admin/transaction -d '{"from":"n1FF1nz6tarkDVwWQkMnnwFPuPKUaQTdptE","to":"n1QZMXSZtW7BUerroSms4axNfyBGyFGkrh5", "value":"1000000000000000000","nonce":3,"gasPrice":"1000000","gasLimit":"2000000"}'
{"result":{"txhash":"8d69dea784f0edfb2ee678c464d99e155bca04b3d7e6cdba6c5c189f731110cf","contract_address":""}}⏎
Transaction Receipt
We’ll get a txhash in three methods after sending a transaction successfully. The txhash value can be used to query the transaction status.
> curl -i -H Accept:application/json -X POST http://localhost:8685/v1/user/getTransactionReceipt -d '{"hash":"8d69dea784f0edfb2ee678c464d99e155bca04b3d7e6cdba6c5c189f731110cf"}'
{"result":{"hash":"8d69dea784f0edfb2ee678c464d99e155bca04b3d7e6cdba6c5c189f731110cf","chainId":100,"from":"n1FF1nz6tarkDVwWQkMnnwFPuPKUaQTdptE","to":"n1QZMXSZtW7BUerroSms4axNfyBGyFGkrh5","value":"1000000000000000000","nonce":"3","timestamp":"1524667888","type":"binary","data":null,"gas_price":"1000000","gas_limit":"2000000","contract_address":"","status":1,"gas_used":"20000"}}⏎
The status fields may be 0, 1 or 2.
- 0: Failed. It means the transaction has been submitted on chain but its execution failed.
- 1: Successful. It means the transaction has been submitted on chain and its execution successeed.
- 2: Pending. It means the transaction hasn’t been packed into a block.
Double Check
Let’s double check the receiver’s balance.
> curl -i -H Accept:application/json -X POST http://localhost:8685/v1/user/accountstate -d '{"address":"n1QZMXSZtW7BUerroSms4axNfyBGyFGkrh5"}'
{"result":{"balance":"3000000000000000000","nonce":"0","type":87}}
Here you should see a balance that is the total of all the successful transfers that you executed.
Next step: Tutorial 3
Nebulas 101 - 03 Write and run a smart contract
Through this tutorial we will learn how to write, deploy, and execute smart contracts in Nebulas.
Preparation
Before entering the smart contract, first review the previously learned content:
- Install, compile and start neb application
- Create a wallet address, setup coinbase, and start mining
- Query neb node information, wallet address and balance
- Send a transaction and verify the transaction was successful
If who have doubts about the above content you should go back to the previous chapters. So lets do this. We will learn and use smart contracts through the following steps:
- Write a smart contract
- Deploy the smart contract
- Call the smart contract, and verify the contract execution results
Write a smart contract
Like Ethereum, Nebulas implements NVM virtual machines to run smart contracts, and the NVM implementation uses the JavaScript V8 engine, so for the current development we can write smart contracts using JavaScript and TypeScript.
Write a brief specification of a smart contract:
- The Smart contract code must be a Prototype object;
- The Smart contract code must have a init() method, this method will only be executed once during deployment;
- The private methods in Smart contract must be prefixed with _ , and the private method cannot be a be directly called outside of the contract;
Below we use JavaScript to write the first smart contract: bank safe. This smart contract needs to fulfill the following functions:
- The user can save money from this bank safe.
- Users can withdraw money from this bank safe.
- Users can check the balance in the bank safe.
Smart contract example:
'use strict';
var DepositeContent = function (text) {
if (text) {
var o = JSON.parse(text);
this.balance = new BigNumber(o.balance);
this.expiryHeight = new BigNumber(o.expiryHeight);
} else {
this.balance = new BigNumber(0);
this.expiryHeight = new BigNumber(0);
}
};
DepositeContent.prototype = {
toString: function () {
return JSON.stringify(this);
}
};
var BankVaultContract = function () {
LocalContractStorage.defineMapProperty(this, "bankVault", {
parse: function (text) {
return new DepositeContent(text);
},
stringify: function (o) {
return o.toString();
}
});
};
// save value to contract, only after height of block, users can takeout
BankVaultContract.prototype = {
init: function () {
//TODO:
},
save: function (height) {
var from = Blockchain.transaction.from;
var value = Blockchain.transaction.value;
var bk_height = new BigNumber(Blockchain.block.height);
var orig_deposit = this.bankVault.get(from);
if (orig_deposit) {
value = value.plus(orig_deposit.balance);
}
var deposit = new DepositeContent();
deposit.balance = value;
deposit.expiryHeight = bk_height.plus(height);
this.bankVault.put(from, deposit);
},
takeout: function (value) {
var from = Blockchain.transaction.from;
var bk_height = new BigNumber(Blockchain.block.height);
var amount = new BigNumber(value);
var deposit = this.bankVault.get(from);
if (!deposit) {
throw new Error("No deposit before.");
}
if (bk_height.lt(deposit.expiryHeight)) {
throw new Error("Can not takeout before expiryHeight.");
}
if (amount.gt(deposit.balance)) {
throw new Error("Insufficient balance.");
}
var result = Blockchain.transfer(from, amount);
if (!result) {
throw new Error("transfer failed.");
}
Event.Trigger("BankVault", {
Transfer: {
from: Blockchain.transaction.to,
to: from,
value: amount.toString()
}
});
deposit.balance = deposit.balance.sub(amount);
this.bankVault.put(from, deposit);
},
balanceOf: function () {
var from = Blockchain.transaction.from;
return this.bankVault.get(from);
},
verifyAddress: function (address) {
// 1-valid, 0-invalid
var result = Blockchain.verifyAddress(address);
return {
valid: result == 0 ? false : true
};
}
};
module.exports = BankVaultContract;
As you can see from the smart contract example above, BankVaultContract is a prototype object that has an init() method. It satisfies the most basic specification for writing smart contracts that we have described before. BankVaultContract implements two other methods:
- save(): The user can save money to the bank safe by calling the save() method;
- takeout(): Users can withdraw money from bank safe by calling takeout() method;
- balanceOf(): The user can check the balance with the bank vault by calling the balanceOf() method;
The contract code above uses the built-in Blockchain object and the built-in BigNumber() method. Let’s break down the parsing contract code line by line:
save():
// Deposit the amount into the safe
save: function (height) {
var from = Blockchain.transaction.from;
var value = Blockchain.transaction.value;
var bk_height = new BigNumber(Blockchain.block.height);
var orig_deposit = this.bankVault.get(from);
if (orig_deposit) {
value = value.plus(orig_deposit.balance);
}
var deposit = new DepositeContent();
deposit.balance = value;
deposit.expiryHeight = bk_height.plus(height);
this.bankVault.put(from, deposit);
},
takeout ():
takeout: function (value) {
var from = Blockchain.transaction.from;
var bk_height = new BigNumber(Blockchain.block.height);
var amount = new BigNumber(value);
var deposit = this.bankVault.get(from);
if (!deposit) {
throw new Error("No deposit before.");
}
if (bk_height.lt(deposit.expiryHeight)) {
throw new Error("Can not takeout before expiryHeight.");
}
if (amount.gt(deposit.balance)) {
throw new Error("Insufficient balance.");
}
var result = Blockchain.transfer(from, amount);
if (!result) {
throw new Error("transfer failed.");
}
Event.Trigger("BankVault", {
Transfer: {
from: Blockchain.transaction.to,
to: from,
value: amount.toString()
}
});
deposit.balance = deposit.balance.sub(amount);
this.bankVault.put(from, deposit);
},
Deploy smart contracts
The above describes how to write a smart contract in Nebulas, and now we need to deploy the smart contract to the chain. Earlier, we have introduced how to make a transaction in Nebulas, and we used the sendTransaction() interface to initiate a transfer. Deploying a smart contract in Nebulas is actually achieved by sending a transaction by calling the sendTransaction() interface, just with different parameters.
// transaction - from, to, value, nonce, gasPrice, gasLimit, contract
sendTransactionWithPassphrase(transaction, passphrase)
We have a convention that if from and to are the same address, contract is not null and binary is null, we assume that we are deploying a smart contract.
from: the creator’s addressto: the creator’s addressvalue: it should be"0"when deploying the contract;nonce: it should be 1 more than the current nonce in the creator’s account state, which can ben obtained viaGetAccountState.gasPrice: The gasPrice used to deploy the smart contract, which can be obtained viaGetGasPrice, or using default values:"1000000";gasLimit: The gasLimit for deploying the contract. You can get the estimated gas consumption for the deployment viaEstimateGas, and cannot use the default value. And you could also set a larger value. The actual gas consumption is decided by the deployment execution.contract: the contract information, the parameters passed in when the contract is deployedsource: contract codesourceType: Contract code type,jsandts(corresponding to javaScript and typeScript code)args: parameters for the contract initialization method. Use empty string if there is no parameter, and use JSON array if there is a parameter.
Detailed Interface Documentation API.
Example of deploying a smart contract using curl:
> curl -i -H 'Accept: application/json' -X POST http://localhost:8685/v1/admin/transactionWithPassphrase -H 'Content-Type: application/json' -d '{"transaction": {"from":"n1H4MYms9F55ehcvygwWE71J8tJC4CRr2so","to":"n1H4MYms9F55ehcvygwWE71J8tJC4CRr2so", "value":"0","nonce":1,"gasPrice":"1000000","gasLimit":"2000000","contract":{"source":"\"use strict\";var DepositeContent=function(text){if(text){var o=JSON.parse(text);this.balance=new BigNumber(o.balance);this.expiryHeight=new BigNumber(o.expiryHeight);}else{this.balance=new BigNumber(0);this.expiryHeight=new BigNumber(0);}};DepositeContent.prototype={toString:function(){return JSON.stringify(this);}};var BankVaultContract=function(){LocalContractStorage.defineMapProperty(this,\"bankVault\",{parse:function(text){return new DepositeContent(text);},stringify:function(o){return o.toString();}});};BankVaultContract.prototype={init:function(){},save:function(height){var from=Blockchain.transaction.from;var value=Blockchain.transaction.value;var bk_height=new BigNumber(Blockchain.block.height);var orig_deposit=this.bankVault.get(from);if(orig_deposit){value=value.plus(orig_deposit.balance);} var deposit=new DepositeContent();deposit.balance=value;deposit.expiryHeight=bk_height.plus(height);this.bankVault.put(from,deposit);},takeout:function(value){var from=Blockchain.transaction.from;var bk_height=new BigNumber(Blockchain.block.height);var amount=new BigNumber(value);var deposit=this.bankVault.get(from);if(!deposit){throw new Error(\"No deposit before.\");} if(bk_height.lt(deposit.expiryHeight)){throw new Error(\"Can not takeout before expiryHeight.\");} if(amount.gt(deposit.balance)){throw new Error(\"Insufficient balance.\");} var result=Blockchain.transfer(from,amount);if(!result){throw new Error(\"transfer failed.\");} Event.Trigger(\"BankVault\",{Transfer:{from:Blockchain.transaction.to,to:from,value:amount.toString()}});deposit.balance=deposit.balance.sub(amount);this.bankVault.put(from,deposit);},balanceOf:function(){var from=Blockchain.transaction.from;return this.bankVault.get(from);},verifyAddress:function(address){var result=Blockchain.verifyAddress(address);return{valid:result==0?false:true};}};module.exports=BankVaultContract;","sourceType":"js", "args":""}}, "passphrase": "passphrase"}'
{"result":{"txhash":"aaebb86d15ca30b86834efb600f82cbcaf2d7aaffbe4f2c8e70de53cbed17889","contract_address":"n1rVLTRxQEXscTgThmbTnn2NqdWFEKwpYUM"}}
The return value for deploying a smart contract is the transaction’s hash address txhash and the contract’s deployment address contract_address. Get the return value does not guarantee the successful deployment of the contract, because the sendTransaction () is an asynchronous process, which need to be packaged by the miner. Just as the previous transfer transaction, the transfer does not arrive in real time, it depends on the speed of the miner packing. Therefore we need to wait for a while (about 1 minute), then you can verify whether the contract is deployed successfully by querying the contract address or calling this smart contract.
Verify the deployment of the contract is successful
Check the receipt of the deploy transaction via
GetTransactionReceiptto verify whether the contract has been deployed successfully.> curl -i -H 'Content-Type: application/json' -X POST http://localhost:8685/v1/user/getTransactionReceipt -d '{"hash":"aaebb86d15ca30b86834efb600f82cbcaf2d7aaffbe4f2c8e70de53cbed17889"}' {"result":{"hash":"aaebb86d15ca30b86834efb600f82cbcaf2d7aaffbe4f2c8e70de53cbed17889","chainId":100,"from":"n1H4MYms9F55ehcvygwWE71J8tJC4CRr2so","to":"n1H4MYms9F55ehcvygwWE71J8tJC4CRr2so","value":"0","nonce":"1","timestamp":"1524711841","type":"deploy","data":"eyJTb3VyY2VUeXBlIjoianMiLCJTb3VyY2UiOiJcInVzZSBzdHJpY3RcIjt2YXIgRGVwb3NpdGVDb250ZW50PWZ1bmN0aW9uKHRleHQpe2lmKHRleHQpe3ZhciBvPUpTT04ucGFyc2UodGV4dCk7dGhpcy5iYWxhbmNlPW5ldyBCaWdOdW1iZXIoby5iYWxhbmNlKTt0aGlzLmV4cGlyeUhlaWdodD1uZXcgQmlnTnVtYmVyKG8uZXhwaXJ5SGVpZ2h0KTt9ZWxzZXt0aGlzLmJhbGFuY2U9bmV3IEJpZ051bWJlcigwKTt0aGlzLmV4cGlyeUhlaWdodD1uZXcgQmlnTnVtYmVyKDApO319O0RlcG9zaXRlQ29udGVudC5wcm90b3R5cGU9e3RvU3RyaW5nOmZ1bmN0aW9uKCl7cmV0dXJuIEpTT04uc3RyaW5naWZ5KHRoaXMpO319O3ZhciBCYW5rVmF1bHRDb250cmFjdD1mdW5jdGlvbigpe0xvY2FsQ29udHJhY3RTdG9yYWdlLmRlZmluZU1hcFByb3BlcnR5KHRoaXMsXCJiYW5rVmF1bHRcIix7cGFyc2U6ZnVuY3Rpb24odGV4dCl7cmV0dXJuIG5ldyBEZXBvc2l0ZUNvbnRlbnQodGV4dCk7fSxzdHJpbmdpZnk6ZnVuY3Rpb24obyl7cmV0dXJuIG8udG9TdHJpbmcoKTt9fSk7fTtCYW5rVmF1bHRDb250cmFjdC5wcm90b3R5cGU9e2luaXQ6ZnVuY3Rpb24oKXt9LHNhdmU6ZnVuY3Rpb24oaGVpZ2h0KXt2YXIgZnJvbT1CbG9ja2NoYWluLnRyYW5zYWN0aW9uLmZyb207dmFyIHZhbHVlPUJsb2NrY2hhaW4udHJhbnNhY3Rpb24udmFsdWU7dmFyIGJrX2hlaWdodD1uZXcgQmlnTnVtYmVyKEJsb2NrY2hhaW4uYmxvY2suaGVpZ2h0KTt2YXIgb3JpZ19kZXBvc2l0PXRoaXMuYmFua1ZhdWx0LmdldChmcm9tKTtpZihvcmlnX2RlcG9zaXQpe3ZhbHVlPXZhbHVlLnBsdXMob3JpZ19kZXBvc2l0LmJhbGFuY2UpO30gdmFyIGRlcG9zaXQ9bmV3IERlcG9zaXRlQ29udGVudCgpO2RlcG9zaXQuYmFsYW5jZT12YWx1ZTtkZXBvc2l0LmV4cGlyeUhlaWdodD1ia19oZWlnaHQucGx1cyhoZWlnaHQpO3RoaXMuYmFua1ZhdWx0LnB1dChmcm9tLGRlcG9zaXQpO30sdGFrZW91dDpmdW5jdGlvbih2YWx1ZSl7dmFyIGZyb209QmxvY2tjaGFpbi50cmFuc2FjdGlvbi5mcm9tO3ZhciBia19oZWlnaHQ9bmV3IEJpZ051bWJlcihCbG9ja2NoYWluLmJsb2NrLmhlaWdodCk7dmFyIGFtb3VudD1uZXcgQmlnTnVtYmVyKHZhbHVlKTt2YXIgZGVwb3NpdD10aGlzLmJhbmtWYXVsdC5nZXQoZnJvbSk7aWYoIWRlcG9zaXQpe3Rocm93IG5ldyBFcnJvcihcIk5vIGRlcG9zaXQgYmVmb3JlLlwiKTt9IGlmKGJrX2hlaWdodC5sdChkZXBvc2l0LmV4cGlyeUhlaWdodCkpe3Rocm93IG5ldyBFcnJvcihcIkNhbiBub3QgdGFrZW91dCBiZWZvcmUgZXhwaXJ5SGVpZ2h0LlwiKTt9IGlmKGFtb3VudC5ndChkZXBvc2l0LmJhbGFuY2UpKXt0aHJvdyBuZXcgRXJyb3IoXCJJbnN1ZmZpY2llbnQgYmFsYW5jZS5cIik7fSB2YXIgcmVzdWx0PUJsb2NrY2hhaW4udHJhbnNmZXIoZnJvbSxhbW91bnQpO2lmKCFyZXN1bHQpe3Rocm93IG5ldyBFcnJvcihcInRyYW5zZmVyIGZhaWxlZC5cIik7fSBFdmVudC5UcmlnZ2VyKFwiQmFua1ZhdWx0XCIse1RyYW5zZmVyOntmcm9tOkJsb2NrY2hhaW4udHJhbnNhY3Rpb24udG8sdG86ZnJvbSx2YWx1ZTphbW91bnQudG9TdHJpbmcoKX19KTtkZXBvc2l0LmJhbGFuY2U9ZGVwb3NpdC5iYWxhbmNlLnN1YihhbW91bnQpO3RoaXMuYmFua1ZhdWx0LnB1dChmcm9tLGRlcG9zaXQpO30sYmFsYW5jZU9mOmZ1bmN0aW9uKCl7dmFyIGZyb209QmxvY2tjaGFpbi50cmFuc2FjdGlvbi5mcm9tO3JldHVybiB0aGlzLmJhbmtWYXVsdC5nZXQoZnJvbSk7fSx2ZXJpZnlBZGRyZXNzOmZ1bmN0aW9uKGFkZHJlc3Mpe3ZhciByZXN1bHQ9QmxvY2tjaGFpbi52ZXJpZnlBZGRyZXNzKGFkZHJlc3MpO3JldHVybnt2YWxpZDpyZXN1bHQ9PTA/ZmFsc2U6dHJ1ZX07fX07bW9kdWxlLmV4cG9ydHM9QmFua1ZhdWx0Q29udHJhY3Q7IiwiQXJncyI6IiJ9","gas_price":"1000000","gas_limit":"2000000","contract_address":"n1rVLTRxQEXscTgThmbTnn2NqdWFEKwpYUM","status":1,"gas_used":"22016"}}As shown above, the status of the deploy transaction becomes 1. It means the contract has been deployed successfully.
Execute Smart Contract Method
The way to execute a smart contract method in Nebulas is also straightforward, using the sendTransactionWithPassphrase() method to invoke the smart contract method directly.
// transaction - from, to, value, nonce, gasPrice, gasLimit, contract
sendTransactionWithPassphrase(transaction, passphrase)
from: the user’s account addressto: the smart contract addressvalue: The amount of money used to transfer by smart contract.nonce: it should be 1 more than the current nonce in the creator’s account state, which can ben obtained viaGetAccountState.gasPrice: The gasPrice used to deploy the smart contract, which can be obtained viaGetGasPrice, or using default values"1000000";gasLimit: The gasLimit for deploying the contract. You can get the estimated gas consumption for the deployment viaEstimateGas, and cannot use the default value. And you could also set a larger value. The actual gas consumption is decided by the deployment execution.contract: the contract information, the parameters passed in when the contract is deployedfunction:the contract method to be calledargs: parameters for the contract initialization method. Use empty string if there is no parameter, and use JSON array if there is a parameter.
For example, execute save() method of the smart contract:
> curl -i -H 'Accept: application/json' -X POST http://localhost:8685/v1/admin/transactionWithPassphrase -H 'Content-Type: application/json' -d '{"transaction":{"from":"n1LkDi2gGMqPrjYcczUiweyP4RxTB6Go1qS","to":"n1rVLTRxQEXscTgThmbTnn2NqdWFEKwpYUM", "value":"100","nonce":1,"gasPrice":"1000000","gasLimit":"2000000","contract":{"function":"save","args":"[0]"}}, "passphrase": "passphrase"}'
{"result":{"txhash":"5337f1051198b8ac57033fec98c7a55e8a001dbd293021ae92564d7528de3f84","contract_address":""}}
Verify the execution of the contract method
saveis successful Executing a contract method is actually submitting a transaction on chain as well. We can verify the result through checking the receipt of the transaction viaGetTransactionReceipt.> curl -i -H 'Content-Type: application/json' -X POST http://localhost:8685/v1/user/getTransactionReceipt -d '{"hash":"5337f1051198b8ac57033fec98c7a55e8a001dbd293021ae92564d7528de3f84"}' {"result":{"hash":"5337f1051198b8ac57033fec98c7a55e8a001dbd293021ae92564d7528de3f84","chainId":100,"from":"n1LkDi2gGMqPrjYcczUiweyP4RxTB6Go1qS","to":"n1rVLTRxQEXscTgThmbTnn2NqdWFEKwpYUM","value":"100","nonce":"1","timestamp":"1524712532","type":"call","data":"eyJGdW5jdGlvbiI6InNhdmUiLCJBcmdzIjoiWzBdIn0=","gas_price":"1000000","gas_limit":"2000000","contract_address":"","status":1,"gas_used":"20361"}}As shown above, the status of the transaction becomes 1. It means the contract method has been executed successfully.
Execute the smart contract takeout() method:
> curl -i -H 'Accept: application/json' -X POST http://localhost:8685/v1/admin/transactionWithPassphrase -H 'Content-Type: application/json' -d '{"transaction":{"from":"n1LkDi2gGMqPrjYcczUiweyP4RxTB6Go1qS","to":"n1rVLTRxQEXscTgThmbTnn2NqdWFEKwpYUM", "value":"0","nonce":2,"gasPrice":"1000000","gasLimit":"2000000","contract":{"function":"takeout","args":"[50]"}}, "passphrase": "passphrase"}'
{"result":{"txhash":"46a307e9beb21f52992a7512f3705fe58ee6c1887122a1b52f5ce5fd5f536a91","contract_address":""}}
Verify the execution of the contract method
takeoutis successful In the execution of the above contract methodsave, we save 100 NAS into the smart contractn1rVLTRxQEXscTgThmbTnn2NqdWFEKwpYUM. Using the contract methodtakeout, we’ll withdrawn 50 NAS from the 100 NAS. The balance of the smart contract should be 50 NAS now.> curl -i -H 'Content-Type: application/json' -X POST http://localhost:8685/v1/user/accountstate -d '{"address":"n1rVLTRxQEXscTgThmbTnn2NqdWFEKwpYUM"}' {"result":{"balance":"50","nonce":"0","type":88}}The result is as expected.
Query Smart Contract Data
In a smart contract, the execution of some methods won’t change anything on chain. These methods are designed to help us query data in readonly mode from blockchains. In Nebulas, we provide an API call for users to execute these readonly methods.
// transaction - from, to, value, nonce, gasPrice, gasLimit, contract
call(from, to, value, nonce, gasPrice, gasLimit, contract)
The parameters of call is the same as the parameters of executing a contract method .
Call the smart contract method balanceOf:
> curl -i -H 'Accept: application/json' -X POST http://localhost:8685/v1/user/call -H 'Content-Type: application/json' -d '{"from":"n1LkDi2gGMqPrjYcczUiweyP4RxTB6Go1qS","to":"n1rVLTRxQEXscTgThmbTnn2NqdWFEKwpYUM","value":"0","nonce":3,"gasPrice":"1000000","gasLimit":"2000000","contract":{"function":"balanceOf","args":""}}'
{"result":{"result":"{\"balance\":\"50\",\"expiryHeight\":\"84\"}","execute_err":"","estimate_gas":"20209"}}
Next step: Tutorial 4
Nebulas 101 - 04 Smart Contract Storage
Earlier we covered how to write smart contracts and how to deploy and invoke smart contracts in the Nebulas.
Now we introduce in detail the storage of the smart contract. Nebulas smart contracts provide on-chain data storage capabilities. Similar to the traditional key-value storage system (eg: redis), smart contracts can be stored on the Nebulas by paying with (gas).
LocalContractStorage
Nebulas’ Smart Contract environment has built-in storage object LocalContractStorage, which can store numbers, strings, and JavaScript objects. The stored data can only be used in smart contracts. Other contracts can not read the stored data.
Basics
The LocalContractStorage API includes set, get and del, which allow you to store, read, and delete data. Storage can be numbers, strings, objects
LocalContractStorage Data:¶// store data. The data will be stored as JSON strings
LocalContractStorage.put(key, value);
// Or
LocalContractStorage.set(key, value);
LocalContractStorage Data:¶// get the value from key
LocalContractStorage.get(key);
LocalContractStorage Data:¶// delete data, data can not be read after deletion
LocalContractStorage.del(key);
// Or
LocalContractStorage.delete(key);
Examples:
'use strict';
var SampleContract = function () {
};
SampleContract.prototype = {
init: function () {
},
set: function (name, value) {
// Storing a string
LocalContractStorage.set("name",name);
// Storing a number (value)
LocalContractStorage.set("value", value);
// Storing an objects
LocalContractStorage.set("obj", {name:name, value:value});
},
get: function () {
var name = LocalContractStorage.get("name");
console.log("name:" + name)
var value = LocalContractStorage.get("value");
console.log("value:" + value)
var obj = LocalContractStorage.get("obj");
console.log("obj:" + JSON.stringify(obj))
},
del: function () {
var result = LocalContractStorage.del("name");
console.log("del result:" + result)
}
};
module.exports = SampleContract;
Advanced
In addition to the basic set, get, and del methods, LocalContractStorage also provides methods to bind properties of smart contracts. We could read and write binded properties directly without invoking LocalContractStorage interfaces to get and set.
Object instance, field name and descriptor should be provided to bind properties.
Binding Interface
// define a object property named `fieldname` to `obj` with descriptor.
// default descriptor is JSON.parse/JSON.stringify descriptor.
// return this.
defineProperty(obj, fieldName, descriptor);
// define object properties to `obj` from `props`.
// default descriptor is JSON.parse/JSON.stringify descriptor.
// return this.
defineProperties(obj, descriptorMap);
Here is an example to bind properties in a smart contract.
'use strict';
var SampleContract = function () {
// The SampleContract `size` property is a storage property. Reads and writes to` size` will be stored on the chain.
// The `descriptor` is set to null here, the default JSON.stringify () and JSON.parse () will be used.
LocalContractStorage.defineMapProperty(this, "size");
// The SampleContract `value` property is a storage property. Reads and writes to` value` will be stored on the chain.
// Here is a custom `descriptor` implementation, storing as a string, and returning Bignumber object during parsing.
LocalContractStorage.defineMapProperty(this, "value", {
stringify: function (obj) {
return obj.toString();
},
parse: function (str) {
return new BigNumber(str);
}
});
// Multiple properties of SampleContract are set as storage properties in batches, and the corresponding descriptors use JSON serialization by default
LocalContractStorage.defineProperties(this, {
name: null,
count: null
});
};
module.exports = SampleContract;
Then, we can read and write these properties directly as the following example.
SampleContract.prototype = {
// Used when the contract first deploys, can not be used a second after the first deploy.
init: function (name, count, size, value) {
// Store the data on the chain when deploying the contract
this.name = name;
this.count = count;
this.size = size;
this.value = value;
},
testStorage: function (balance) {
// value will be read from the storage data on the chain, and automatically converted to Bignumber set according to the descriptor
var amount = this.value.plus(new BigNumber(2));
if (amount.lessThan(new BigNumber(balance))) {
return 0
}
}
};
What’s more, LocalContractStorage also provides methods to bind map properties. Here is an example to bind map properties and use them in a smart contract.
'use strict';
var SampleContract = function () {
// Set `SampleContract`'s property to `userMap`. Map data then can be stored onto the chain using `userMap`
LocalContractStorage.defineMapProperty(this, "userMap");
// Set `SampleContract`'s property to `userBalanceMap`, and custom define the storing and serializtion reading functions.
LocalContractStorage.defineMapProperty(this, "userBalanceMap", {
stringify: function (obj) {
return obj.toString();
},
parse: function (str) {
return new BigNumber(str);
}
});
// Set `SampleContract`'s properties to mulitple map batches
LocalContractStorage.defineMapProperties(this,{
key1Map: null,
key2Map: null
});
};
SampleContract.prototype = {
init: function () {
},
testStorage: function () {
// Store the data in userMap and serialize the data onto the chain
this.userMap.set("robin","1");
// Store the data into userBalanceMap and save the data onto the chain using a custom serialization function
this.userBalanceMap.set("robin",new BigNumber(1));
},
testRead: function () {
//Read and store data
var balance = this.userBalanceMap.get("robin");
this.key1Map.set("robin", balance.toString());
this.key2Map.set("robin", balance.toString());
}
};
module.exports = SampleContract;
Iterate Map
In contract, map does’t support iterator. if you need to iterate the map, you can use the following way: define two map, arrayMap, dataMap, arrayMap with a strictly increasing counter as key, dataMap with data key as key.
"use strict";
var SampleContract = function () {
LocalContractStorage.defineMapProperty(this, "arrayMap");
LocalContractStorage.defineMapProperty(this, "dataMap");
LocalContractStorage.defineProperty(this, "size");
};
SampleContract.prototype = {
init: function () {
this.size = 0;
},
set: function (key, value) {
var index = this.size;
this.arrayMap.set(index, key);
this.dataMap.set(key, value);
this.size +=1;
},
get: function (key) {
return this.dataMap.get(key);
},
len:function(){
return this.size;
},
iterate: function(limit, offset){
limit = parseInt(limit);
offset = parseInt(offset);
if(offset>this.size){
throw new Error("offset is not valid");
}
var number = offset+limit;
if(number > this.size){
number = this.size;
}
var result = "";
for(var i=offset;i<number;i++){
var key = this.arrayMap.get(i);
var object = this.dataMap.get(key);
result += "index:"+i+" key:"+ key + " value:" +object+"_";
}
return result;
}
};
module.exports = SampleContract;
Next step: Tutorial 5
Nebulas 101 - 05 Interacting with Nebulas by RPC API
Nebulas chain node can be accessed and controlled remotely through RPC. Nebulas chain provides a series of APIs to get node information, account balances, send transactions and deploy calls to smart contracts.
The remote access to the Nebulas chain is implemented by gRPC, and also could be accessed by HTTP via the proxy (grpc-gateway). HTTP access is a interface implemented by RESTful, with the same parameters as the gRPC interface.
API
We’ve implemented RPC server and HTTP sercer to provide API service in Go-Nebulas.
Modules
All interfaces are divided into two modules: API and Admin.
- API: Provides interfaces that are not related to the user’s private key.
- Admin: Provides interfaces that are related to the user’s private key.
It’s recommended for all Nebulas nodes to open API module for public users and Admin module for authorized users.
Configuration
RPC server and HTTP server can be configured in the configuration file of each Nebulas node.
rpc {
# gRPC API service port
rpc_listen: ["127.0.0.1:8684"]
# HTTP API service port
http_listen: ["127.0.0.1:8685"]
# Open module that can provide http service to outside
http_module: ["api", "admin"]
}
Example
Here is some examples to invoke HTTP interfaces using curl.
GetNebState
We can invoke GetNebState in API module to fetch the current state of local Nebulas node, including chain identity, tail block, protocl version and so on.
> curl -i -H Accept:application/json -X GET http://localhost:8685/v1/user/nebstate
{"result":{"chain_id":100,"tail":"0aa1cceb7801b110fdd5217ba0a4356780c940133924d1c1a4eb60336934dab1","lib":"0000000000000000000000000000000000000000000000000000000000000000","height":"479","protocol_version":"/neb/1.0.0","synchronized":false,"version":"0.7.0"}}
UnlockAccount
We can invoke UnlockAccount in Admin module to unlock an account in memory. All unlocked accounts can be used to send transactions directly without passphrases.
> curl -i -H 'Content-Type: application/json' -X POST http://localhost:8685/v1/admin/account/unlock -d '{"address":"n1NrMKTYESZRCwPFDLFKiKREzZKaN1nhQvz", "passphrase": "passphrase"}'
{"result":{"result":true}}
RPC server is implemented with GRPC. The serialization of GPRC is based on Protocol Buffers. You can find all rpc protobuf files in Nebulas RPC Protobuf Folder.
Here is some examples to invoke rpc interfaces using golang.
GetNebState
We can invoke GetNebState in API module to fetch the current state of local Nebulas node.
import(
"github.com/nebulasio/go-nebulas/rpc"
"github.com/nebulasio/go-nebulas/rpc/pb"
)
// GRPC server connection address configuration
addr := fmt.Sprintf("127.0.0.1:%d",uint32(8684))
conn, err := grpc.Dial(addr, grpc.WithInsecure())
if err != nil {
log.Warn("rpc.Dial() failed:", err)
}
defer conn.Close()
// API interface to access node status information
api := rpcpb.NewAPIServiceClient(conn)
resp, err := ac.GetNebState(context.Background(), & rpcpb.GetNebStateRequest {})
if err != nil {
log.Println("GetNebState", "failed", err)
} else {
log.Println("GetNebState tail", resp)
}
LockAccount
Account n1NrMKTYESZRCwPFDLFKiKREzZKaN1nhQvz has been unlocked after invoking v1/admin/account/unlock via HTTP request above. We can invoke LockAccount in Admin module to lock it again.
import(
"github.com/nebulasio/go-nebulas/rpc"
"github.com/nebulasio/go-nebulas/rpc/pb"
)
// GRPC server connection address configuration
addr := fmt.Sprintf("127.0.0.1:%d",uint32(8684))
conn, err := grpc.Dial(addr, grpc.WithInsecure())
if err != nil {
log.Warn("rpc.Dial() failed:", err)
}
defer conn.Close()
// Admin interface to access, lock account address
admin := rpcpb.NewAdminServiceClient(conn)
from := "n1NrMKTYESZRCwPFDLFKiKREzZKaN1nhQvz"
resp, err = management.LockAccount(context.Background(), & rpcpb.LockAccountRequest {Address: from})
if err != nil {
log.Println("LockAccount", from, "failed", err)
} else {
log.Println("LockAccount", from, "result", resp)
}
Next
Nice job! Let’s join official Testnet or Mainnet to enjoy Nebulas now!
Nebulas 101 - 01 编译安装星云链
星云链的项目代码已经发布了几个版本,经过测试可以在本地运行,大家可以下载星云链源代码在本地编译私有链。
想了解星云链的同学可以阅读星云链非技术白皮书。
对技术感兴趣的同学可以看星云链技术白皮书和星云链Github代码。
星云链现阶段只能在Mac和Linux上运行,后续会推出windows版本。
Golang环境搭建
| Components | Version | Description | | — | — | — | | Golang |
>
= 1.9.2 | The Go Programming Language |我们会分别介绍Mac OSX和Linux两种系统下golang环境的搭建。
Mac OSX
在Mac OSX里,我们推荐使用Homebrew来安装Golang.
# 安装
brew install go
# 配置环境变量
export GOPATH=/path/to/workspace
提示: 在golang的开发中,GOPATH是必须的,它指定了我们使用golang开发的工作空间。所有的源码都应放在GOPATH之下。
Linux
# download
wget https://dl.google.com/go/go1.9.3.linux-amd64.tar.gz
# extract
tar -C /usr/local -xzf go1.9.3.linux-amd64.tar.gz
# environment variables
export PATH=$PATH:/usr/local/go/bin
export GOPATH=/path/to/workspace
编译星云链
下载源码
可以使用如下指令直接下载最新版本的星云链源码。
# 进入工作目录
mkdir -p $GOPATH/src/github.com/nebulasio
cd $GOPATH/src/github.com/nebulasio
# 下载源码
git clone https://github.com/nebulasio/go-nebulas.git
# 进入项目目录
cd go-nebulas
# 切换到最稳定的master分支
git checkout master
安装rocksdb依赖库
同样我们会介绍如何在MAC OSX和Linux正确安装RocksDB。
在linux环境下,由于ubuntu和centos系统的用户偏多,我们将分别介绍这两个主流环境下RocksDB的安装。
Ubuntu
首先安装RocksDB所需依赖库
apt-get update apt-get -y install build-essential libgflags-dev libsnappy-dev zlib1g-dev libbz2-dev liblz4-dev libzstd-dev
下载源码并编译安装
git clone https://github.com/facebook/rocksdb.git cd rocksdb & make shared_lib && make install-shared
Centos
首先安装RocksDB所需依赖库
yum -y install epel-release && yum -y update yum -y install gflags-devel snappy-devel zlib-devel bzip2-devel gcc-c++ libstdc++-devel下载源码并编译安装
git clone https://github.com/facebook/rocksdb.git cd rocksdb & make shared_lib && make install-shared
安装Go依赖库
在Go-Nebulas中,Go的三方库都通过Dep来做管理。
| Components | Version | Description | | — | — | — |
Dep |
>
= 0.3.1 | Dep is a dependency management tool for Go. |我们同样分别介绍Mac OSX和Linux下Dep的安装方法。
Mac OSX
通过Homebrew直接安装并升级Dep
brew install dep brew upgrade dep
Linux
通过源码来安装Dep
cd /usr/local/bin/ wget https://github.com/golang/dep/releases/download/v0.3.2/dep-linux-amd64 ln -s dep-linux-amd64 dep
我们切换到Go-Nebulas项目根目录,然后使用Dep来下载三方库。
cd $GOPATH/src/github.com/nebulasio/go-nebulas
make dep
提示:
make dep将会下载很多依赖库。在部分地区,这个过程可能比较耗时。所以,我们提供了依赖库的压缩包vendor.tar.gz。可以使用下列指令通过压缩包来安装GO依赖库。wget http://ory7cn4fx.bkt.clouddn.com/vendor.tar.gz cd $GOPATH/src/github.com/nebulasio/go-nebulas tar zxf vendor.tar.gz
安装Chrome V8依赖库
星云虚拟机目前依赖于Chrome的V8引擎,为了大家使用方便,我们已经为Mac OSX和Linux编译好了V8的动态库。运行如下指令就可以完成安装。
cd $GOPATH/src/github.com/nebulasio/go-nebulas
make deploy-v8
编译可执行文件
完成所有上述依赖库的安装后,现在我们可以进入Go-Nebulas根目录编译星云链的可执行文件了。
cd $GOPATH/src/github.com/nebulasio/go-nebulas
make build
编译成功后,将会看到如下信息。
运行星云链
创世区块
在启动一个新的星云链前,我们必须定义创世区块的配置文件。
meta {
# 每条链的唯一标识
# 每个区块和交易只会属于一条唯一的链,保证安全性
chain_id: 100
}
consensus {
# 在贡献度证明(PoD)被充分验证前,星云链采用DPoS共识算法
# DPoS共识中,21个人组成一个朝代
# 每隔一段时间都会切换朝代,每个朝代内,21个矿工轮流出块
# 由于DPoS只是过渡方案,所以暂时不开放给公众挖矿,即当前版本朝代不会发生变更
dpos {
# 初始朝代,包含21个初始矿工地址
dynasty: [
[ miner address ],
...
]
}
}
# 预分配的代币
token_distribution [
{
address: [ allocation address ]
value: [ amount of allocation tokens ]
},
...
]
可以在根目录conf/default/genesis.conf下,找到一个完整的创世区块配置实例。
配置文件
在我们启动一个星云节点前,我们需要定义好该节点的配置文件。
# 网络配置
network {
# 对于全网第一个节点,不需要配置seed
# 否则,其他节点启动时需要配置seed,seed节点将会把网络中其他节点的路由信息同步给刚启动的节点
# 可以配置多个seed, ["...", "..."]
seed: ["/ip4/127.0.0.1/tcp/8680/ipfs/QmP7HDFcYmJL12Ez4ZNVCKjKedfE7f48f1LAkUc3Whz4jP"]
# 节点监听网络消息端口,可以配置多个
listen: ["0.0.0.0:8680"]
# 网络私钥,用于确认身份节点
# private_key: "conf/network/id_ed25519"
}
# 链配置
chain {
# 链的唯一标识
chain_id: 100
# 数据存储地址
datadir: "data.db"
# 账户keystore文件存储地址
keydir: "keydir"
# 创世区块配置
genesis: "conf/default/genesis.conf"
# 签名算法,请勿修改
signature_ciphers: ["ECC_SECP256K1"]
# 矿工地址,矿工的keystore文件需要放置在配置的keydir下
miner: "n1XkoVVjswb5Gek3rRufqjKNpwrDdsnQ7Hq"
# Coinbase地址,该地址用于接收矿工的挖矿奖励,可以和矿工地址一致
# 该地址的keystore无需暴露,不用放置在配置的keydir下
coinbase: "n1FF1nz6tarkDVwWQkMnnwFPuPKUaQTdptE"
# 矿工地址的密码
passphrase: "passphrase"
}
# API配置
rpc {
# GRPC服务端口
rpc_listen: ["127.0.0.1:8684"]
# HTTP服务端口
http_listen: ["127.0.0.1:8685"]
# 开放的API模块
# API模块包含所有和用户私钥无关的接口
# Admin模块包含所有和用户私钥相关的接口,需要慎重考虑该模块的访问权限
http_module: ["api", "admin"]
}
# 日志配置
app {
# 日志级别: 支持[debug, info, warn, error, fatal]
log_level: "info"
# 日志存放位置
log_file: "logs"
# 是否打开crash report服务
enable_crash_report: false
}
# 监控服务配置
stats {
# 是否打开监控服务
enable_metrics: false
# 监控服务将数据上传到Influxdb
# 配置Influxdb的访问信息
influxdb: {
host: "http://localhost:8086"
db: "nebulas"
user: "admin"
password: "admin"
}
}
A lot of examples can be found in $GOPATH/src/github.com/nebulasio/go-nebulas/conf/
启动星云链
此时启动的星云链是本地的私有链,和官方的测试网和主网没有任何相互关联
启动你的第一个星云节点。
cd $GOPATH/src/github.com/nebulasio/go-nebulas
./neb -c conf/default/config.conf
启动成功的话,将会看到如下信息,有Started Neblet的日志输出。
默认情况下,使用配置文件conf/default/config.conf启动的节点不是矿工节点。
接下来,启动你的第一个矿工节点,它的seed节点即我们刚刚启动的第一个节点。
cd $GOPATH/src/github.com/nebulasio/go-nebulas
./neb -c conf/example/miner.conf
在这个节点启动后,你会先看到如下信息,表示当前节点正在找种子节点同步。

等待一会儿,将会看到如下信息,表示当前节点已经连上了seed节点完成了同步。

再等待几分钟,你会看到如下信息,表示当前矿工节点挖出了第一个区块。

提示: 目前的DPoS共识算法,会有21个节点轮流出块。由于我们只启动了21个矿工节点中的一个矿工节点,所以每隔15*21s才出一个块。你可以启动更多的矿工节点,填补的空缺。但是需要注意,多个节点间的端口号不要相互冲突了。
Nebulas 101 - 02 在星云链上发送交易
Nebulas提供了三种方式去发送我们的交易:
- 签名 & 发送
- 密码 & 发送
- 解锁 & 发送
下面我们分别介绍如何通过以上三种方式在nebulas中发送一笔交易,并验证交易是否成功。
准备账户
在星云链上,每个地址表示一个唯一的账户,一一对应。
在发送交易前,我们需要准备两个账户:一个账户用来发送代币 (称为”from”) 和另一个账户来接受代币 (称为”to”).
发送者账户
在这里,我们将会使用配置文件conf/default/genesis.conf中预分配过代币的账户中选择一个作为发送者账户,默认选择n1FF1nz6tarkDVwWQkMnnwFPuPKUaQTdptE。
接受者账户
我们使用如下指令创建一个全新的账户来做接受者,请记住输入的密码。
$ ./neb account new
Your new account is locked with a passphrase. Please give a passphrase. Do not forget this passphrase.
Passphrase:
Repeat passphrase:
Address: n1SQe5d1NKHYFMKtJ5sNHPsSPVavGzW71Wy
提示:你创建的新账户和上面可能不一样,请以你创建的账户做为接受者继续接下来的实验。
新账户的keystore文件将会被放置在$GOPATH/src/github.com/nebulasio/go-nebulas/keydir/内。
启动私有链
我们将在本地搭建一个私有链来作为本教程的测试环境。
启动矿工节点
接着,我们启动一个矿工节点接入本地私有链,这个节点之后将会产生新的区块。
./neb -c conf/example/miner.conf
多久会生成一个新的区块?
在星云链上, 在贡献度证明(Proof-of-Devotion, 技术白皮书中有详细描述)被充分验证前,DPoS被选择作为一个过渡方案。在我们采用DPoS共识算法中,总共有21个矿工,每个矿工会轮流每15s出一个新区块。
在我们目前的测试环境中,由于我们只启动了21个矿工中的一个,所以需要等待15*21s才会出一个新区块。
一旦一个新区块被挖出,挖块奖励将会被自动发送到当前矿工配置的Coinbase账户中,在conf/example/miner.conf里,该账户就是n1FF1nz6tarkDVwWQkMnnwFPuPKUaQTdptE.
星云链交互
星云链提供给开发者HTTP API, RPC API和CLI来和运行中的星云节点交互。在教程中,我们将会基于HTTP API(API Module | Admin Module)来介绍三种发送交易的方法。
提示:星云链的HTTP服务默认端口号为8685。
首先,在发送新交易前,我们检查下发送者账户的状态。
检查账户状态
每个交易如果需要上链,都需要给矿工缴纳一部分手续费,所以发送者账户中需要有一部分钱才能成功发送交易。一般一个普通转账交易,手续费在0.000000002NAS左右,非常少。
我们可以通过API Module中的/v1/user/accountstate接口来获取发送者账户n1FF1nz6tarkDVwWQkMnnwFPuPKUaQTdptE的账户信息,检查下是否有足够的钱支付上链手续费。
> curl -i -H Accept:application/json -X POST http://localhost:8685/v1/user/accountstate -d '{"address":"n1FF1nz6tarkDVwWQkMnnwFPuPKUaQTdptE"}'
{"result":{"balance":"5000000000000000000000000","nonce":"0","type":87}}
提示:
Type用于标记账户类型。88表示该账户为智能合约账户,部署一个合约之后,就可以得到一个合约账户。87表示非合约账户,我们通过./neb account new创建的账户就是非合约账户,用户存储链上资产。提示:
Nonce用于标记账户发起的所有交易的顺序。同一个账户,每发起一个新的交易,Nonce就加一,初始为0,第一个交易的Nonce为1。
如我们所见,发送者账户在预分配后拥有5000000000000000000000000(5 * 10^24)个代币,1个NAS是1000000000000000000(10^18)个代币,用于支付交易上链的手续费绰绰有余。
然后我们检查接受者账户的状态。
> curl -i -H Accept:application/json -X POST http://localhost:8685/v1/user/accountstate -d '{"address":"n1SQe5d1NKHYFMKtJ5sNHPsSPVavGzW71Wy"}'
{"result":{"balance":"0","nonce":"0","type":87}}
如我们期望的那样,新账户没有任何代币。
发送交易
接下来,我们将介绍星云链上三种发送交易的方式。
使用这种方式,我们可以在离线环境下先使用私钥签名好交易,然后把签好名的交易在联网的机器上发出。这是最安全的发送交易的方式,私钥可以完全离线保存,不触网。Web-Wallet正是基于Neb.js采用这种方法发送的交易。
首先,我们使用Admin Module中的v1/admin/sign接口给准备发的交易签名,得到交易的二进制数据。
> curl -i -H 'Content-Type: application/json' -X POST http://localhost:8685/v1/admin/sign -d '{"transaction":{"from":"n1FF1nz6tarkDVwWQkMnnwFPuPKUaQTdptE","to":"n1QZMXSZtW7BUerroSms4axNfyBGyFGkrh5", "value":"1000000000000000000","nonce":1,"gasPrice":"1000000","gasLimit":"2000000"}, "passphrase":"passphrase"}'
{"result":{"data":"CiAbjMP5dyVsTWILfXL1MbwZ8Q6xOgX/JKinks1dpToSdxIaGVcH+WT/SVMkY18ix7SG4F1+Z8evXJoA35caGhlXbip8PupTNxwV4SRM87r798jXWADXpWngIhAAAAAAAAAAAA3gtrOnZAAAKAEwuKuC1wU6CAoGYmluYXJ5QGRKEAAAAAAAAAAAAAAAAAAPQkBSEAAAAAAAAAAAAAAAAAAehIBYAWJBVVuRHWSNY1e3bigbVKd9i6ci4f1LruDC7AUtXDLirHlsmTDZXqjSMGLio1ziTmxYJiLj+Jht5RoZxFKqFncOIQA="}}
提示:在发送交易时,对于同一个账户,只有当他Nonce为N的交易上链后,Nonce为N+1的交易才能上链,有严格的顺序,Nonce必须严格加1。可以通过GetAccountState接口查看最新的Nonce。
然后,我们将签好名的交易原始数据提交到本地私有链里的星云节点。
> curl -i -H 'Content-Type: application/json' -X POST http://localhost:8685/v1/user/rawtransaction -d '{"data":"CiAbjMP5dyVsTWILfXL1MbwZ8Q6xOgX/JKinks1dpToSdxIaGVcH+WT/SVMkY18ix7SG4F1+Z8evXJoA35caGhlXbip8PupTNxwV4SRM87r798jXWADXpWngIhAAAAAAAAAAAA3gtrOnZAAAKAEwuKuC1wU6CAoGYmluYXJ5QGRKEAAAAAAAAAAAAAAAAAAPQkBSEAAAAAAAAAAAAAAAAAAehIBYAWJBVVuRHWSNY1e3bigbVKd9i6ci4f1LruDC7AUtXDLirHlsmTDZXqjSMGLio1ziTmxYJiLj+Jht5RoZxFKqFncOIQA="}'
{"result":{"txhash":"1b8cc3f977256c4d620b7d72f531bc19f10eb13a05ff24a8a792cd5da53a1277","contract_address":""}}⏎
如果你信任一个星云节点帮你保存keystore文件,你可以使用第二种方法发送交易。
首先,上传你的keystore文件到你信任的星云节点的keydir文件夹下。如果在节点在本地,可以使用如下指令。
cp /path/to/keystore.json /path/to/keydir/
然后,我们发送交易的同时,带上我们keystore的密码,在被信任的节点使用SendTransactionWithPassphrase接口上一次性完成签名和发送过程。
> curl -i -H 'Content-Type: application/json' -X POST http://localhost:8685/v1/admin/transactionWithPassphrase -d '{"transaction":{"from":"n1FF1nz6tarkDVwWQkMnnwFPuPKUaQTdptE","to":"n1QZMXSZtW7BUerroSms4axNfyBGyFGkrh5", "value":"1000000000000000000","nonce":2,"gasPrice":"1000000","gasLimit":"2000000"},"passphrase":"passphrase"}'
{"result":{"txhash":"3cdd38a66c8f399e2f28134e0eb556b292e19d48439f6afde384ca9b60c27010","contract_address":""}}
提示:因为我们在之前使用n1FF1nz6tarkDVwWQkMnnwFPuPKUaQTdptE发送了一个Nonce为1的交易,所以这里新的交易的Nonce应该增加1,变成2再提交。
这是最危险的发送交易的方法。除非你完全信任一个星云节点,否则不要使用这种方法来发送交易。
首先,上传你的keystore文件到你信任的星云节点的keydir文件夹下。如果在节点在本地,可以使用如下指令。
cp /path/to/keystore.json /path/to/keydir/
然后,使用你的keystore文件的密码,在指定的时间范围来在被信任的节点上使用Unlock接口解锁账户。时间单位为纳秒,300000000000为300s。
> curl -i -H 'Content-Type: application/json' -X POST http://localhost:8685/v1/admin/account/unlock -d '{"address":"n1FF1nz6tarkDVwWQkMnnwFPuPKUaQTdptE","passphrase":"passphrase","duration":"300000000000"}'
{"result":{"result":true}}
一旦一个账户在节点上被解锁,任何可以访问该机器SendTransaction接口的人,都可以直接使用该账户的身份发送交易。
> curl -i -H 'Content-Type: application/json' -X POST http://localhost:8685/v1/admin/transaction -d '{"from":"n1FF1nz6tarkDVwWQkMnnwFPuPKUaQTdptE","to":"n1QZMXSZtW7BUerroSms4axNfyBGyFGkrh5", "value":"1000000000000000000","nonce":3,"gasPrice":"1000000","gasLimit":"2000000"}'
{"result":{"txhash":"8d69dea784f0edfb2ee678c464d99e155bca04b3d7e6cdba6c5c189f731110cf","contract_address":""}}⏎
交易收据
不论使用的哪一种方法发送交易,我们都会得到两个返回值,txhash和contract_address。其中txhash为交易hash,是一个交易的唯一标识。如果当前交易是一个部署合约的交易,contract_address将会是合约地址,调用合约时都会使用这个地址,是合约的唯一标识。我们将在编写并运行智能合约中介绍如何发送部署合约的交易。
使用txhash我们可以查看交易收据,知道当前交易的状态。
> curl -i -H Accept:application/json -X POST http://localhost:8685/v1/user/getTransactionReceipt -d '{"hash":"8d69dea784f0edfb2ee678c464d99e155bca04b3d7e6cdba6c5c189f731110cf"}'
{"result":{"hash":"8d69dea784f0edfb2ee678c464d99e155bca04b3d7e6cdba6c5c189f731110cf","chainId":100,"from":"n1FF1nz6tarkDVwWQkMnnwFPuPKUaQTdptE","to":"n1QZMXSZtW7BUerroSms4axNfyBGyFGkrh5","value":"1000000000000000000","nonce":"3","timestamp":"1524667888","type":"binary","data":null,"gas_price":"1000000","gas_limit":"2000000","contract_address":"","status":1,"gas_used":"20000"}}⏎
这里的status可能有三种状态值,0,1和2。
- 0: 交易失败. 表示当前交易已经上链,但是执行失败了。可能是因为部署合约或者调用合约参数错误。
- 1: 交易成功. 表示当前交易已经上链,而且执行成功了。
- 2: 交易待定. 表示当前交易还没有上链。可能是因为当前交易还没有被打包;如果长时间处于当前状态,可能是因为当前交易的发送者账户的余额不够支付上链手续费。
复查接受者账户余额
我们复查一下接受者账户上的钱是否已经到账了。
> curl -i -H Accept:application/json -X POST http://localhost:8685/v1/user/accountstate -d '{"address":"n1QZMXSZtW7BUerroSms4axNfyBGyFGkrh5"}'
{"result":{"balance":"3000000000000000000","nonce":"0","type":87}}
我们用三种方式分别发送了一笔转账,每笔转一个NAS,所以这里看到接受者账户中已经有了3个NAS,即3000000000000000000个代币。
Nebulas 101 - 03 编写并运行智能合约
在这篇教程中我们会学习怎样在Nebulas中编写、部署并执行智能合约。
准备工作
在进入智能合约之前,先温习下先前学过的内容:
- 安装、编译并启动neb应用
- 创建钱包地址,设置coinbase,并开始挖矿
- 查询neb节点信息、钱包地址余额等
- 发送转账交易,并验证交易是否成功
如果对上述的内容有疑惑的同学可以重新去学习前面的章节,接下来我们会通过下面的步骤来学习和使用智能合约:
- 编写智能合约
- 部署智能合约
- 调用智能合约,验证合约执行结果
编写智能合约
跟以太坊类似,Nebulas实现了NVM虚拟机来运行智能合约,NVM的实现使用了JavaScript V8引擎,所以当前的开发版,我们可以使用JavaScript、TypeScript来编写智能合约。
编写智能合约的简要规范:
- 智能合约代码必须是一个Prototype的对象;
- 智能合约代码必须有一个init()的方法,这个方法只会在部署的时候被执行一次;
- 智能合约里面的私有方法是以_开头的方法,私有方法不能被外部直接调用;
下面我们使用JavaScript来编写第一个智能合约:银行保险柜。 这个智能合约需要实现以下功能:
- 用户可以向这个银行保险柜存钱。
- 用户可以从这个银行保险柜取钱。
- 用户可以查询银行保险柜中的余额。
智能合约示例:
'use strict';
var DepositeContent = function (text) {
if (text) {
var o = JSON.parse(text);
this.balance = new BigNumber(o.balance);
this.expiryHeight = new BigNumber(o.expiryHeight);
} else {
this.balance = new BigNumber(0);
this.expiryHeight = new BigNumber(0);
}
};
DepositeContent.prototype = {
toString: function () {
return JSON.stringify(this);
}
};
var BankVaultContract = function () {
LocalContractStorage.defineMapProperty(this, "bankVault", {
parse: function (text) {
return new DepositeContent(text);
},
stringify: function (o) {
return o.toString();
}
});
};
// save value to contract, only after height of block, users can takeout
BankVaultContract.prototype = {
init: function () {
//TODO:
},
save: function (height) {
var from = Blockchain.transaction.from;
var value = Blockchain.transaction.value;
var bk_height = new BigNumber(Blockchain.block.height);
var orig_deposit = this.bankVault.get(from);
if (orig_deposit) {
value = value.plus(orig_deposit.balance);
}
var deposit = new DepositeContent();
deposit.balance = value;
deposit.expiryHeight = bk_height.plus(height);
this.bankVault.put(from, deposit);
},
takeout: function (value) {
var from = Blockchain.transaction.from;
var bk_height = new BigNumber(Blockchain.block.height);
var amount = new BigNumber(value);
var deposit = this.bankVault.get(from);
if (!deposit) {
throw new Error("No deposit before.");
}
if (bk_height.lt(deposit.expiryHeight)) {
throw new Error("Can not takeout before expiryHeight.");
}
if (amount.gt(deposit.balance)) {
throw new Error("Insufficient balance.");
}
var result = Blockchain.transfer(from, amount);
if (!result) {
throw new Error("transfer failed.");
}
Event.Trigger("BankVault", {
Transfer: {
from: Blockchain.transaction.to,
to: from,
value: amount.toString()
}
});
deposit.balance = deposit.balance.sub(amount);
this.bankVault.put(from, deposit);
},
balanceOf: function () {
var from = Blockchain.transaction.from;
return this.bankVault.get(from);
},
verifyAddress: function (address) {
// 1-valid, 0-invalid
var result = Blockchain.verifyAddress(address);
return {
valid: result == 0 ? false : true
};
}
};
module.exports = BankVaultContract;
上面智能合约的示例可以看到,BankVaultContract是一个prototype对象,这个对象有一个init()方法,满足了我们说的编写智能合约最基础的规范。
BankVaultContract实现了另外两个方法:
- save(): 用户可以通过调用save()方法向银行保险柜存钱;
- takeout(): 用户可以通过调用takeout()方法向银行保险柜取钱;
- balanceOf(): 用户可以通过调用balanceOf()方法向银行保险柜查询余额;
上面的合约代码用到了内置的Blockchain对象和内置的BigNumber()方法,下面我们来逐行拆解分析合约代码:
save():
// Deposit the amount into the safe
save: function (height) {
var from = Blockchain.transaction.from;
var value = Blockchain.transaction.value;
var bk_height = new BigNumber(Blockchain.block.height);
var orig_deposit = this.bankVault.get(from);
if (orig_deposit) {
value = value.plus(orig_deposit.balance);
}
var deposit = new DepositeContent();
deposit.balance = value;
deposit.expiryHeight = bk_height.plus(height);
this.bankVault.put(from, deposit);
},
takeout():
takeout: function (value) {
var from = Blockchain.transaction.from;
var bk_height = new BigNumber(Blockchain.block.height);
var amount = new BigNumber(value);
var deposit = this.bankVault.get(from);
if (!deposit) {
throw new Error("No deposit before.");
}
if (bk_height.lt(deposit.expiryHeight)) {
throw new Error("Can not takeout before expiryHeight.");
}
if (amount.gt(deposit.balance)) {
throw new Error("Insufficient balance.");
}
var result = Blockchain.transfer(from, amount);
if (!result) {
throw new Error("transfer failed.");
}
Event.Trigger("BankVault", {
Transfer: {
from: Blockchain.transaction.to,
to: from,
value: amount.toString()
}
});
deposit.balance = deposit.balance.sub(amount);
this.bankVault.put(from, deposit);
},
部署智能合约
上面介绍了在Nebulas中怎么去编写一个智能合约,现在我们需要把智能合约部署到链上。在Nebulas中部署一个智能合约其实也是发送一个transaction来实现,前面有介绍过用户如何在Nebulas中进行转账交易,由于是本地测试,我们直接使用解锁 & 发送的方式来发送交易。
首先,我们在conf/default/genesis.conf中预分配过代币的账户里,选择账户n1H4MYms9F55ehcvygwWE71J8tJC4CRr2so作为本章的发送者账号,并检查该账户的状态。
> curl -i -H Accept:application/json -X POST http://localhost:8685/v1/user/accountstate -d '{"address":"n1H4MYms9F55ehcvygwWE71J8tJC4CRr2so"}'
{"result":{"balance":"5000000000000000000000000","nonce":"0","type":87}}
该账户有足够的钱来支付手续费,接下来,我们解锁发送者账户n1H4MYms9F55ehcvygwWE71J8tJC4CRr2so,解锁12小时。
> curl -i -H 'Content-Type: application/json' -X POST http://localhost:8685/v1/admin/account/unlock -d '{"address":"n1H4MYms9F55ehcvygwWE71J8tJC4CRr2so","passphrase":"passphrase","duration":"43200000000000"}'
{"result":{"result":true}}
然后,我们发送部署BankVault合约的交易。
> curl -i -H 'Accept: application/json' -X POST http://localhost:8685/v1/admin/transactionWithPassphrase -H 'Content-Type: application/json' -d '{"transaction": {"from":"n1H4MYms9F55ehcvygwWE71J8tJC4CRr2so","to":"n1H4MYms9F55ehcvygwWE71J8tJC4CRr2so", "value":"0","nonce":1,"gasPrice":"1000000","gasLimit":"2000000","contract":{"source":"\"use strict\";var DepositeContent=function(text){if(text){var o=JSON.parse(text);this.balance=new BigNumber(o.balance);this.expiryHeight=new BigNumber(o.expiryHeight);}else{this.balance=new BigNumber(0);this.expiryHeight=new BigNumber(0);}};DepositeContent.prototype={toString:function(){return JSON.stringify(this);}};var BankVaultContract=function(){LocalContractStorage.defineMapProperty(this,\"bankVault\",{parse:function(text){return new DepositeContent(text);},stringify:function(o){return o.toString();}});};BankVaultContract.prototype={init:function(){},save:function(height){var from=Blockchain.transaction.from;var value=Blockchain.transaction.value;var bk_height=new BigNumber(Blockchain.block.height);var orig_deposit=this.bankVault.get(from);if(orig_deposit){value=value.plus(orig_deposit.balance);} var deposit=new DepositeContent();deposit.balance=value;deposit.expiryHeight=bk_height.plus(height);this.bankVault.put(from,deposit);},takeout:function(value){var from=Blockchain.transaction.from;var bk_height=new BigNumber(Blockchain.block.height);var amount=new BigNumber(value);var deposit=this.bankVault.get(from);if(!deposit){throw new Error(\"No deposit before.\");} if(bk_height.lt(deposit.expiryHeight)){throw new Error(\"Can not takeout before expiryHeight.\");} if(amount.gt(deposit.balance)){throw new Error(\"Insufficient balance.\");} var result=Blockchain.transfer(from,amount);if(!result){throw new Error(\"transfer failed.\");} Event.Trigger(\"BankVault\",{Transfer:{from:Blockchain.transaction.to,to:from,value:amount.toString()}});deposit.balance=deposit.balance.sub(amount);this.bankVault.put(from,deposit);},balanceOf:function(){var from=Blockchain.transaction.from;return this.bankVault.get(from);},verifyAddress:function(address){var result=Blockchain.verifyAddress(address);return{valid:result==0?false:true};}};module.exports=BankVaultContract;","sourceType":"js", "args":""}}, "passphrase": "passphrase"}'
{"result":{"txhash":"aaebb86d15ca30b86834efb600f82cbcaf2d7aaffbe4f2c8e70de53cbed17889","contract_address":"n1rVLTRxQEXscTgThmbTnn2NqdWFEKwpYUM"}}
- from: 合约创建者账户地址
- to: 和from一致,同为合约创建者地址
- value:部署合约时为
"0" - nonce: 比创建者当前的
nonce多1,可以通过GetAccountState获取创建前当前nonce - gasPrice:部署智能合约用到的gasPrice,可以通过
GetGasPrice获取,或者使用默认值:"1000000"; - gasLimit: 部署合约的gasLimit,通过
EstimateGas可以获取部署合约的gas消耗,不能使用默认值,也可以设置一个较大值,执行时以实际使用计算。 - contract: 合约信息,部署合约时传入的参数
source: 合约代码sourceType: 合约代码类型,支持js和ts(对应javaScript和typeScript代码)args: 合约初始化方法参数,无参数为空字符串,有参数时为JSON数组
部署智能合约的返回值是transaction的hash地址txhash和合约的部署地址contract_address。 得到返回值并不能保证合约已经部署成功,因为发送交易是一个异步的过程,需要经过矿工打包,正如之前的转账交易一样,转账并不能实时到账,依赖矿工打包的速度,所以需要等待一段时间,然后可以通过查询合约地址的信息或者调用智能合约来验证合约是否部署成功。
验证合约是否部署成功
在部署智能合约的时候得到了transaction的hash地址
txhash,我们可以很方便的使用console控制台查询transaction的hash信息来验证合约是否部署成功。> curl -i -H 'Content-Type: application/json' -X POST http://localhost:8685/v1/user/getTransactionReceipt -d '{"hash":"aaebb86d15ca30b86834efb600f82cbcaf2d7aaffbe4f2c8e70de53cbed17889"}' {"result":{"hash":"aaebb86d15ca30b86834efb600f82cbcaf2d7aaffbe4f2c8e70de53cbed17889","chainId":100,"from":"n1H4MYms9F55ehcvygwWE71J8tJC4CRr2so","to":"n1H4MYms9F55ehcvygwWE71J8tJC4CRr2so","value":"0","nonce":"1","timestamp":"1524711841","type":"deploy","data":"eyJTb3VyY2VUeXBlIjoianMiLCJTb3VyY2UiOiJcInVzZSBzdHJpY3RcIjt2YXIgRGVwb3NpdGVDb250ZW50PWZ1bmN0aW9uKHRleHQpe2lmKHRleHQpe3ZhciBvPUpTT04ucGFyc2UodGV4dCk7dGhpcy5iYWxhbmNlPW5ldyBCaWdOdW1iZXIoby5iYWxhbmNlKTt0aGlzLmV4cGlyeUhlaWdodD1uZXcgQmlnTnVtYmVyKG8uZXhwaXJ5SGVpZ2h0KTt9ZWxzZXt0aGlzLmJhbGFuY2U9bmV3IEJpZ051bWJlcigwKTt0aGlzLmV4cGlyeUhlaWdodD1uZXcgQmlnTnVtYmVyKDApO319O0RlcG9zaXRlQ29udGVudC5wcm90b3R5cGU9e3RvU3RyaW5nOmZ1bmN0aW9uKCl7cmV0dXJuIEpTT04uc3RyaW5naWZ5KHRoaXMpO319O3ZhciBCYW5rVmF1bHRDb250cmFjdD1mdW5jdGlvbigpe0xvY2FsQ29udHJhY3RTdG9yYWdlLmRlZmluZU1hcFByb3BlcnR5KHRoaXMsXCJiYW5rVmF1bHRcIix7cGFyc2U6ZnVuY3Rpb24odGV4dCl7cmV0dXJuIG5ldyBEZXBvc2l0ZUNvbnRlbnQodGV4dCk7fSxzdHJpbmdpZnk6ZnVuY3Rpb24obyl7cmV0dXJuIG8udG9TdHJpbmcoKTt9fSk7fTtCYW5rVmF1bHRDb250cmFjdC5wcm90b3R5cGU9e2luaXQ6ZnVuY3Rpb24oKXt9LHNhdmU6ZnVuY3Rpb24oaGVpZ2h0KXt2YXIgZnJvbT1CbG9ja2NoYWluLnRyYW5zYWN0aW9uLmZyb207dmFyIHZhbHVlPUJsb2NrY2hhaW4udHJhbnNhY3Rpb24udmFsdWU7dmFyIGJrX2hlaWdodD1uZXcgQmlnTnVtYmVyKEJsb2NrY2hhaW4uYmxvY2suaGVpZ2h0KTt2YXIgb3JpZ19kZXBvc2l0PXRoaXMuYmFua1ZhdWx0LmdldChmcm9tKTtpZihvcmlnX2RlcG9zaXQpe3ZhbHVlPXZhbHVlLnBsdXMob3JpZ19kZXBvc2l0LmJhbGFuY2UpO30gdmFyIGRlcG9zaXQ9bmV3IERlcG9zaXRlQ29udGVudCgpO2RlcG9zaXQuYmFsYW5jZT12YWx1ZTtkZXBvc2l0LmV4cGlyeUhlaWdodD1ia19oZWlnaHQucGx1cyhoZWlnaHQpO3RoaXMuYmFua1ZhdWx0LnB1dChmcm9tLGRlcG9zaXQpO30sdGFrZW91dDpmdW5jdGlvbih2YWx1ZSl7dmFyIGZyb209QmxvY2tjaGFpbi50cmFuc2FjdGlvbi5mcm9tO3ZhciBia19oZWlnaHQ9bmV3IEJpZ051bWJlcihCbG9ja2NoYWluLmJsb2NrLmhlaWdodCk7dmFyIGFtb3VudD1uZXcgQmlnTnVtYmVyKHZhbHVlKTt2YXIgZGVwb3NpdD10aGlzLmJhbmtWYXVsdC5nZXQoZnJvbSk7aWYoIWRlcG9zaXQpe3Rocm93IG5ldyBFcnJvcihcIk5vIGRlcG9zaXQgYmVmb3JlLlwiKTt9IGlmKGJrX2hlaWdodC5sdChkZXBvc2l0LmV4cGlyeUhlaWdodCkpe3Rocm93IG5ldyBFcnJvcihcIkNhbiBub3QgdGFrZW91dCBiZWZvcmUgZXhwaXJ5SGVpZ2h0LlwiKTt9IGlmKGFtb3VudC5ndChkZXBvc2l0LmJhbGFuY2UpKXt0aHJvdyBuZXcgRXJyb3IoXCJJbnN1ZmZpY2llbnQgYmFsYW5jZS5cIik7fSB2YXIgcmVzdWx0PUJsb2NrY2hhaW4udHJhbnNmZXIoZnJvbSxhbW91bnQpO2lmKCFyZXN1bHQpe3Rocm93IG5ldyBFcnJvcihcInRyYW5zZmVyIGZhaWxlZC5cIik7fSBFdmVudC5UcmlnZ2VyKFwiQmFua1ZhdWx0XCIse1RyYW5zZmVyOntmcm9tOkJsb2NrY2hhaW4udHJhbnNhY3Rpb24udG8sdG86ZnJvbSx2YWx1ZTphbW91bnQudG9TdHJpbmcoKX19KTtkZXBvc2l0LmJhbGFuY2U9ZGVwb3NpdC5iYWxhbmNlLnN1YihhbW91bnQpO3RoaXMuYmFua1ZhdWx0LnB1dChmcm9tLGRlcG9zaXQpO30sYmFsYW5jZU9mOmZ1bmN0aW9uKCl7dmFyIGZyb209QmxvY2tjaGFpbi50cmFuc2FjdGlvbi5mcm9tO3JldHVybiB0aGlzLmJhbmtWYXVsdC5nZXQoZnJvbSk7fSx2ZXJpZnlBZGRyZXNzOmZ1bmN0aW9uKGFkZHJlc3Mpe3ZhciByZXN1bHQ9QmxvY2tjaGFpbi52ZXJpZnlBZGRyZXNzKGFkZHJlc3MpO3JldHVybnt2YWxpZDpyZXN1bHQ9PTA/ZmFsc2U6dHJ1ZX07fX07bW9kdWxlLmV4cG9ydHM9QmFua1ZhdWx0Q29udHJhY3Q7IiwiQXJncyI6IiJ9","gas_price":"1000000","gas_limit":"2000000","contract_address":"n1rVLTRxQEXscTgThmbTnn2NqdWFEKwpYUM","status":1,"gas_used":"22016"}}如上所示,部署合约的交易的状态变成了1,表示合约部署成功了。
执行智能合约方法
在Nebulas中调用智能合约的方式也很简单,同样是通过发送交易来调用智能合约。
调用智能合约的save方法
> curl -i -H 'Accept: application/json' -X POST http://localhost:8685/v1/admin/transactionWithPassphrase -H 'Content-Type: application/json' -d '{"transaction":{"from":"n1LkDi2gGMqPrjYcczUiweyP4RxTB6Go1qS","to":"n1rVLTRxQEXscTgThmbTnn2NqdWFEKwpYUM", "value":"100","nonce":1,"gasPrice":"1000000","gasLimit":"2000000","contract":{"function":"save","args":"[0]"}}, "passphrase": "passphrase"}'
{"result":{"txhash":"5337f1051198b8ac57033fec98c7a55e8a001dbd293021ae92564d7528de3f84","contract_address":""}}
- from: 用户的账户地址
- to: 智能合约地址
- value: 调用save()方法时想要存入智能合约代币数量
- nonce: 比创建者当前的
nonce多1,可以通过GetAccountState获取创建前当前nonce - gasPrice:部署智能合约用到的gasPrice,可以通过
GetGasPrice获取,或者使用默认值:"1000000"; - gasLimit: 部署合约的gasLimit,通过
EstimateGas可以获取部署合约的gas消耗,不能使用默认值,也可以设置一个较大值,执行时以实际使用计算。 - contract: 合约信息,部署合约时传入的参数
function: 调用合约方法args: 合约方法参数,无参数为空字符串,有参数时为JSON数组
验证智能合约的方法
save是否执行成功由于执行合约方法本质是提交一个交易,所以我们可以通过验证交易是否提交成功来判断合约方法是否执行成功。
> curl -i -H 'Content-Type: application/json' -X POST http://localhost:8685/v1/user/getTransactionReceipt -d '{"hash":"5337f1051198b8ac57033fec98c7a55e8a001dbd293021ae92564d7528de3f84"}' {"result":{"hash":"5337f1051198b8ac57033fec98c7a55e8a001dbd293021ae92564d7528de3f84","chainId":100,"from":"n1LkDi2gGMqPrjYcczUiweyP4RxTB6Go1qS","to":"n1rVLTRxQEXscTgThmbTnn2NqdWFEKwpYUM","value":"100","nonce":"1","timestamp":"1524712532","type":"call","data":"eyJGdW5jdGlvbiI6InNhdmUiLCJBcmdzIjoiWzBdIn0=","gas_price":"1000000","gas_limit":"2000000","contract_address":"","status":1,"gas_used":"20361"}}如上所示,交易状态变为了1,表示执行
save方法成功了。
调用智能合约的takeout方法
> curl -i -H 'Accept: application/json' -X POST http://localhost:8685/v1/admin/transactionWithPassphrase -H 'Content-Type: application/json' -d '{"transaction":{"from":"n1LkDi2gGMqPrjYcczUiweyP4RxTB6Go1qS","to":"n1rVLTRxQEXscTgThmbTnn2NqdWFEKwpYUM", "value":"0","nonce":2,"gasPrice":"1000000","gasLimit":"2000000","contract":{"function":"takeout","args":"[50]"}}, "passphrase": "passphrase"}'
{"result":{"txhash":"46a307e9beb21f52992a7512f3705fe58ee6c1887122a1b52f5ce5fd5f536a91","contract_address":""}}
验证智能合约的方法
takeout是否执行成功在上面save方法的执行中,我们在合约
n1rVLTRxQEXscTgThmbTnn2NqdWFEKwpYUM中存了100NAS。此时,我们执行takeout函数,从中取出50NAS。合约里应该还有50NAS。我们检测下合约账户的余额来验证takeout方法执行是否成功。> curl -i -H 'Content-Type: application/json' -X POST http://localhost:8685/v1/user/accountstate -d '{"address":"n1rVLTRxQEXscTgThmbTnn2NqdWFEKwpYUM"}' {"result":{"balance":"50","nonce":"0","type":88}}结果和预期相符。
查询智能合约数据
在智能合约中,我们有一些方法并不更改合约的状态,这些方法被设计来帮助我们获取合约数据,它们是只读的。在星云链上,我们在API Module中为用户提供了Call接口来帮助用户来执行这些只读的方法,使用Call接口不会发送交易,也就无需支付上链手续费。
我们调用合约n1rVLTRxQEXscTgThmbTnn2NqdWFEKwpYUM中的balanceOf方法来查询该合约的余额。
> curl -i -H 'Accept: application/json' -X POST http://localhost:8685/v1/user/call -H 'Content-Type: application/json' -d '{"from":"n1LkDi2gGMqPrjYcczUiweyP4RxTB6Go1qS","to":"n1rVLTRxQEXscTgThmbTnn2NqdWFEKwpYUM","value":"0","nonce":3,"gasPrice":"1000000","gasLimit":"2000000","contract":{"function":"balanceOf","args":""}}'
{"result":{"result":"{\"balance\":\"50\",\"expiryHeight\":\"84\"}","execute_err":"","estimate_gas":"20209"}}
Nebulas 101 - 04 智能合约存储区
前面我们介绍了怎么编写智能合约以及怎样在星云链部署和调用智能合约。
今天我们来详细的介绍有关星云链智能合约的存储。星云链智能合约(smart contract)提供了链上数据存储功能。类似于传统的key-value存储系统(eg:redis),可以付费(消耗gas)将数据存储到星云链上。
LocalContractStorage
星云链的智能合约运行环境内置了存储对象LocalContractStorage,可以存储数字,字符串,JavaScript对象,存储数据只能在智能合约内使用,其他合约不能读取存储的内容。
基础用法
LocalContractStorage的简单接口包括set,get,del接口,实现了存储,读取,删除数据功能。存储可以是数字,字符串,对象。
LocalContractStorage存储数据
// 存储数据,数据会被json序列化成字符串保存
LocalContractStorage.put(key, value);
// 或者
LocalContractStorage.set(key, value);
LocalContractStorage读取数据
// 获取数据
LocalContractStorage.get(key);
LocalContractStorage删除数据
// 删除数据, 数据删除后无法读取
LocalContractStorage.del(key);
// 或者
LocalContractStorage.delete(key);
下面是一个具体在合约中使用LocalContractStorage的实例:
'use strict';
var SampleContract = function () {
};
SampleContract.prototype = {
init: function () {
},
set: function (name, value) {
// 存储字符串
LocalContractStorage.set("name",name);
// 存储数字
LocalContractStorage.set("value", value);
// 存储对象
LocalContractStorage.set("obj", {name:name,value:value});
},
get: function () {
var name = LocalContractStorage.get("name");
console.log("name:"+name)
var value = LocalContractStorage.get("value");
console.log("value:"+value)
var obj = LocalContractStorage.get("obj");
console.log("obj:"+JSON.stringify(obj))
},
del: function () {
var result = LocalContractStorage.del("name");
console.log("del result:"+result)
}
};
module.exports = SampleContract;
高级用法
LocalContractStorage除了基本的set,get,del方法,还提供方法来绑定合约属性。对绑定过的合约属性的读写将直接在LocalContractStorage上读写,而无需调用get和set方法。
在绑定一个合约属性时,需要提供对象实例,属性名和序列化方法。
绑定接口
// define a object property named `fieldname` to `obj` with descriptor.
// default descriptor is JSON.parse/JSON.stringify descriptor.
// return this.
defineProperty(obj, fieldName, descriptor);
// define object properties to `obj` from `props`.
// default descriptor is JSON.parse/JSON.stringify descriptor.
// return this.
defineProperties(obj, descriptorMap);
下面是一个在合约中使用LocalContractStorage绑定属性的例子:
'use strict';
var SampleContract = function () {
// SampleContract的`size`属性为存储属性,对`size`的读写会存储到链上,
// 此处的`descriptor`设置为null,将使用默认的JSON.stringify()和JSON.parse()
LocalContractStorage.defineMapProperty(this, "size", null);
// SampleContract的`value`属性为存储属性,对`value`的读写会存储到链上,
// 此处的`descriptor`自定义实现,存储时直接转为字符串,读取时获得Bignumber对象
LocalContractStorage.defineMapProperty(this, "value", {
stringify: function (obj) {
return obj.toString();
},
parse: function (str) {
return new BigNumber(str);
}
});
// SampleContract的多个属性批量设置为存储属性,对应的descriptor默认使用JSON序列化
LocalContractStorage.defineProperties(this, {
name: null,
count: null
});
};
module.exports = SampleContract;
然后,我们可以如下在合约里直接读写这些属性。
SampleContract.prototype = {
// 合约部署时调用,部署后无法二次调用
init: function (name, count, size, value) {
// 在部署合约时将数据存储到链上
this.name = name;
this.count = count;
this.size = size;
this.value = value;
},
testStorage: function (balance) {
// 使用value时会从存储中读取链上数据,并根据descriptor设置自动转换为Bignumber
var amount = this.value.plus(new BigNumber(2));
if (amount.lessThan(new BigNumber(balance))) {
return 0
}
}
};
LocalContractStorage还提供了对合约中map属性的绑定方法。
下面是一个绑定map属性的例子:
'use strict';
var SampleContract = function () {
// 为`SampleContract`定义`userMap`的属性集合,数据可以通过`userMap`存储到链上
LocalContractStorage.defineMapProperty(this, "userMap");
// 为`SampleContract`定义`userBalanceMap`的属性集合,并且存储和读取序列化方法自定义
LocalContractStorage.defineMapProperty(this, "userBalanceMap", {
stringify: function (obj) {
return obj.toString();
},
parse: function (str) {
return new BigNumber(str);
}
});
// 为`SampleContract`定义多个集合
LocalContractStorage.defineMapProperties(this,{
key1Map: null,
key2Map: null
});
};
SampleContract.prototype = {
init: function () {
},
testStorage: function () {
// 将数据存储到userMap中,并序列化到链上
this.userMap.set("robin","1");
// 将数据存储到userBalanceMap中,使用自定义序列化函数,保存到链上
this.userBalanceMap.set("robin",new BigNumber(1));
},
testRead: function () {
//读取存储数据
var balance = this.userBalanceMap.get("robin");
this.key1Map.set("robin", balance.toString());
this.key2Map.set("robin", balance.toString());
}
};
module.exports = SampleContract;
Map数据遍历
在智能合约中如果需要遍历map集合,可以采用如下方式:定义两个map,分别是arrayMap,dataMap,arrayMap采用严格递增的计数器作为key,dataMap采用data的key作为key,详细参见set方法。遍历实现参见forEach,先遍历arrayMap,得到dataKey,再对dataMap遍历。Tip:由于Map遍历性能开销比较大,不建议对大数据量map进行遍历,建议按照limit,offset形式进行遍历,否者可能会由于数据过多,导致调用超时。
"use strict";
var SampleContract = function () {
LocalContractStorage.defineMapProperty(this, "arrayMap");
LocalContractStorage.defineMapProperty(this, "dataMap");
LocalContractStorage.defineProperty(this, "size");
};
SampleContract.prototype = {
init: function () {
this.size = 0;
},
set: function (key, value) {
var index = this.size;
this.arrayMap.set(index, key);
this.dataMap.set(key, value);
this.size +=1;
},
get: function (key) {
return this.dataMap.get(key);
},
len:function(){
return this.size;
},
forEach: function(limit, offset){
limit = parseInt(limit);
offset = parseInt(offset);
if(offset>this.size){
throw new Error("offset is not valid");
}
var number = offset+limit;
if(number > this.size){
number = this.size;
}
var result = "";
for(var i=offset;i<number;i++){
var key = this.arrayMap.get(i);
var object = this.dataMap.get(key);
result += "index:"+i+" key:"+ key + " value:" +object+"_";
}
return result;
}
};
module.exports = SampleContract;
Nebulas 101 - 05 通过RPC接口与星云链交互
星云链节点启动后可以通过RPC远程控制访问。星云链提供了一系列API来获取节点的信息,账号余额,发送交易和部署调用智能合约。
星云链的远程访问是GRPC实现的,通过代理(GRPC Gateway)也可以通过HTTP访问。HTTP访问是RESTful实现的接口,参数与GRPC的调用接口参数相同。
API
我们已经在每个星云节点中实现了RPC服务器和HTTP服务器,提供给用户丰富的接口来与星云节点交互。
接口模块
现在,星云节点的所有的接口被分为两个模块:API和Admin。
- API:提供所有和用户私钥无关的接口
- Admin:提供所有和用户私钥相关的接口
建议星云节点对外提供服务时,可以把API接口开放给公众,而将Admin接口开放给授权用户。
配置文件
星云节点中的RPC服务器和HTTP服务器都可以在节点的配置中配置对应的端口,以及开放的模块。
# 用户与节点交互的服务配置,同一台机器启动多个时注意修改端口防止占用
rpc {
# gRPC API服务端口
rpc_listen: ["127.0.0.1:8684"]
# HTTP API服务端口
http_listen: ["127.0.0.1:8685"]
# 开放可对外提供http服务的模块
http_module: ["api","admin"]
}
使用实例
通过HTTP接口和星云节点交互。
GetNebState
我们可以调用API模块中的GetNebState接口来获取节点当前状态,包括所在链ID,最新区块,协议版本等等。
> curl -i -H Accept:application/json -X GET http://localhost:8685/v1/user/nebstate
{"result":{"chain_id":100,"tail":"0aa1cceb7801b110fdd5217ba0a4356780c940133924d1c1a4eb60336934dab1","lib":"0000000000000000000000000000000000000000000000000000000000000000","height":"479","protocol_version":"/neb/1.0.0","synchronized":false,"version":"0.7.0"}}
UnlockAccount
我们可以调用Admin模块中的UnlockAccount接口来在节点内存中解锁一个账户。所有解锁的账户都可以被用来直接发送交易,而不需要密码。
> curl -i -H 'Content-Type: application/json' -X POST http://localhost:8685/v1/admin/account/unlock -d '{"address":"n1NrMKTYESZRCwPFDLFKiKREzZKaN1nhQvz", "passphrase": "passphrase"}'
{"result":{"result":true}}
RPC服务器基于GRPC实现. GRPC的基于Protocol Buffers来做序列化,你可以在星云RPC Protobuf文件夹下找到所有的RPC相关的Proto文件定义。
这里有一些使用golang调用RPC接口的实例。
GetNebState
我们可以使用API模块中的GetNebState接口来获取节点当前状态。
import(
"github.com/nebulasio/go-nebulas/rpc"
"github.com/nebulasio/go-nebulas/rpc/pb"
)
// GRPC server connection address configuration
addr := fmt.Sprintf("127.0.0.1:%d",uint32(8684))
conn, err := grpc.Dial(addr, grpc.WithInsecure())
if err != nil {
log.Warn("rpc.Dial() failed:", err)
}
defer conn.Close()
// API interface to access node status information
api := rpcpb.NewAPIServiceClient(conn)
resp, err := ac.GetNebState(context.Background(), & rpcpb.GetNebStateRequest {})
if err != nil {
log.Println("GetNebState", "failed", err)
} else {
log.Println("GetNebState tail", resp)
}
LockAccount
我们已经在之前使用HTTP接口把账户n1NrMKTYESZRCwPFDLFKiKREzZKaN1nhQvz解锁了。 我们可以调用Admin模块中的LockAccount再次锁定它。
import(
"github.com/nebulasio/go-nebulas/rpc"
"github.com/nebulasio/go-nebulas/rpc/pb"
)
// GRPC server connection address configuration
addr := fmt.Sprintf("127.0.0.1:%d",uint32(8684))
conn, err := grpc.Dial(addr, grpc.WithInsecure())
if err != nil {
log.Warn("rpc.Dial() failed:", err)
}
defer conn.Close()
// Admin interface to access, lock account address
admin := rpcpb.NewAdminServiceClient(conn)
from := "n1NrMKTYESZRCwPFDLFKiKREzZKaN1nhQvz"
resp, err = management.LockAccount(context.Background(), & rpcpb.LockAccountRequest {Address: from})
if err != nil {
log.Println("LockAccount", from, "failed", err)
} else {
log.Println("LockAccount", from, "result", resp)
}
Todo List
Go-Nebulas
Wallet
Crash Reporter in Nebulas
In this doc, we introduce the crash reporter in Nebulas, which is used to collect crash reports in Nebulas and send it back to Nebulas Team, so the whole community can help improving the quality of Nebulas.
Overview
We, the Nebulas Team and the Nebulas community, always try our best to ensure the stability of Nebulas, since people put their faith and properties on it. That means critical bugs are unacceptable, and we are aware of that. However, we can’t blindly think Nebulas is stable enough or there won’t be any bugs. Thus, we have plan B, the crash reporter, to collect crash report and send it back to Nebulas community. We hope the whole community can leverage the crash reports and keep improving Nebulas.
Using crash reporter is a very common practice. For example, Microsoft Windows includes a crash reporting service called Windows Error Reporting that prompts users to send crash reports to Microsoft for online analysis. The information goes to a central database run by Microsoft. Apple also involves a standard crash reporter in macOS, named Crash Reporter. The Crash Reporter can send the crash logs to Apple Inc, for their engineers to review. Opensource community also have their own crash reporter, like Bug Buddy for Gnome, Crashpad for Chrome, Talkback for Mozilla, and etc.
In Nebulas, the crash reporter just works like the other crash reporters. It’s aware of the crash, collects necessary information about the crash, and sends it back the Nebulas server. The server is hosted by Nebulas, and accessible for the whole community.
As a opensource, decentralized platform, we are aware of that the crash reporter may violate some users’ privacy concern. Thus, we remove all private information in the crash report, like the user name, user id, user’s home path and IP address. Furthermore, the crash reporter is optional and users may choose close it if users still have some concerns.
How to use it
To enable or disable the crash reporter, you need to look into the configuration file, config.conf, and change enable_crash_reporter to true to enable it, while false to disable it.
How it works
In this section, we would like to share some tech details. If you are not interested in the details, you can ignore this section.
The crash reporter is actually a daemon process, which is started by neb. When starting the crash reporter, neb will tell it the process id (pid) of neb process, and the crash file path. For the crash reporter, it will periodically check if the neb process and the crash file exists. At the time it finds the crash file, it will eliminate the private information and send it back to Nebulas.
Currently, the crash report is generated by the stderr output from neb. We’d like the work with the whole community to collect detailed information in the future.
Roadmap of Nebulas
Milestones
- In 2017 December, Nebulas test-net will be online.
- In 2018 Q1, Nebulas v1.0 will be released and main-net will be online (ahead of the original schedules).
v1.0 (2018 Q1)
- Fully functional blockchain, with JavaScript and TypeScript as the languages of Smart Contract.
- A user-friendly Nebulas Wallet for both desktop and mobile device to manage their own assets on Nebulas.
- A web-based Nebulas Block Explorer to let developers and users search and view all the data on Nebulas.
v2.0 (2018 Q4)
- Add Nebulas Rank (NR) to each addresses on Nebulas, help users and developers finding more values inside.
- Implement Developer Incentive Protocol (DIP) to encourage developers build more valuable decentralized applications on Nebulas.
v3.0 (2019 Q4)
- Fully functional Nebulas Force and PoD implementation.
Long term goals
- Scalability for large transaction volume.
- Subchain support.
- Zero-knowledge Proof integration.
Versions
v0.1.0 [done]
Goals
- Implement a nebulas kernel.
- In-memory blockchain with PoW consensus.
- Fully P2P network support.
Download here.
v0.2.0 [done]
Goals
- Provide (RPC) API to submit/query transaction externally.
- Implement Sync Protocol to bootstrap any nodes that join into nebulas network at any time, from any tail.
Core
- Implement transaction pool.
- Prevent record-replay attack of transaction.
- Integrate Protocol Buffer for serialization.
Net
- Refactor the design of network.
- Implement Sync Protocol.
- Implement Broadcast and Relay function.
API
- Add Balance API.
- Add Transaction API.
- Add some debugging API, eg “Dump Chain”, “Dump Block”.
Crypto
- Support Ethereum-keystore file.
- Support multi key files management in KeyStore.
Download here.
v0.3.0 [done]
Goals
- Support disk storage for all blockchain data.
- Add smart contract execution engine, based on Chrome V8.
Core
- Add disk storage with a middleware of storage.
- Implement smart contract transaction.
NVM
- Integrate Chrome V8 as Smart Contract execution engine.
Download here.
v0.4.0 [done]
Goals
- Implement Gas calculating in Smart Contract Execution Engine.
- Support more API.
- Add repl in neb application.
- Add metrics and reporting capability.
Core
- Add Gas related fields in Transaction.
- Implemented Gas calculation mechanism.
NVM
- Add execution limits to V8 Engine.
- Add Gas calculation mechanism.
CMD
- Add repl in neb application
Misc
- Add more API.
- Add metrics and reporting capability.
Download here.
v0.5.0 [done]
Goals
- Prepare for test-net releasing, improve stability.
Core
- Improve stability and missing functions if we miss anything.
Consensus
- Implement DPoS consensus algorithm and keep developing PoD algorithm.
NVM
- Finalize the Gas Cost Matrix.
- Support Event liked pubsub functionality.
Misc
- Add more metrics to monitor the stability of neb applications.
Download here.
v0.6.0 [done]
Goals
- Stability improvement, performance optimization.
- Reconstruct P2P network.
- Redesign block sync logic.
Testnet
- Fix bugs & improv the performance.
Network
- Add Stream for single connection management.
- Add StreamManager for connections management.
- Implement priority message chan.
- Add route table persistence strategy.
- Improve strategy to process TCP packet splicing.
Log
- Add console log(CLog), printing log to both console & log files, to inform developers what’s happening in Neb.
- Add verbose log(VLog), printing log to log files, to inform devs how Neb works in details.
- Log adjustment.
Sync
- Use chunk header hash to boost the sync performance.
- Adjust the synchronous retry logic and timeout configuration.
- Fix bugs in synchronization and add more metrics statistics.
Download here.
v0.6.1 [done]
Goals
- Improve test net compatibility.
Core
- Upgrade the storage structure of the block
Download here.
v0.8.0 [done]
Goals
- New Nebulas Block Explorer.
- New Nebulas Wallet.
- New web-based Playground tools to interactive with Nebulas.
v1.0.0 [done]
Goals
- Ready for main-net.
- Support JavaScript and TypeScript as Smart Contract Language.
- Stable and high performance blockchain system.
- Release new Nebulas Block Explorer.
- Release new Nebulas Wallet for both desktop and mobile device.
- A web-based playground tools for developer.
Download explorer.
Download wallet.
Download neb.js.
Frequently Asked Questions
This document will focus on the technology behind the Nebulas platform. For broader questions, please view the Reddit FAQ.
For a better understanding of the Nebulas platform it’s highly recommended to read the Nebulas Technical Whitepaper.
Table of Contents
- Nebulas Rank (NR)
- Nebulas Force (NF)
- Developer Incentive Protocol (DIP)
- Proof of Devotion (PoD) Consensus Algorithm
- Nebulas Search Engine
- Fundamentals
Nebulas Rank (NR)
Measures value by considering liquidity and propagation of the address. Nebulas Ranking tries to establish a trustful, computable and deterministic measurement approach. With the value ranking system, we will see more and more outstanding applications surfacing on the Nebulas platform.
When will Nebulas Rank (NR) be ready?
answer here
Will dApps with more transactions naturally be ranked higher?
answer here
How does the Nebulas Rank (NR) separate quality dApps from highly transacted dApps?
answer here
Is the Nebulas Ranking algorithm open-source?
Yes
Who can contribute to the algorithm?
At this time the Nebulas core team is responsible for the development of the algorithm. Over time we will open it up to the community to contribute and vote to determine the future of the algorithm.
Can the Nebulas Rank (NR) algorithm be cheated?
We will implement strict manipulation controls, and of course the Nebulas Rank (NR) will continually be evolving to meet the needs of the community.
Nebulas Force (NF)
Supports upgrading core protocols and smart contracts on the chains. It provides self-evolving capabilities to Nebulas system and its applications. With Nebulas Force, developers can build rich applications in fast iterations, and the applications can dynamically adapt to community or market changes.
When will Nebulas Force (NF) be ready?
answer here
Can smart contracts be upgraded?
Yes, [short summary explaining how it works]
How is Nebulas Force (NF) smart contract upgrading better than other solutions that are currently or soon-to-be available?
answer here
Can the Nebulas blockchain protocol code be upgraded without forking?
Yes, [short summary explaining how it works]
Can the Nebulas Virtual Machine (NVM) be upgraded?
Yes, [short summary explaining how it works]
Developer Incentive Protocol (DIP)
Designed to build the blockchain ecosystem in a better way. The Nebulas token incentives will help top developers to create more values in Nebulas.
When will the Developer Incentive Protocol (DIP) be ready?
answer here
Will there be a limit as to how many rewards one dApp can receive?
answer here
Will developers still be able to do their own ICOs?
answer here
Will only the top Nebulas Rank (NR) dApps receive rewards?
answer here
How often will rewards be given?
answer here
How will you stop cheaters?
The way the DIP is is designed makes it very hard for cheaters to be successful. Since smart contracts can only be called passively, it would be highly cost ineffective for a user to try to cheat the system. More about this topic can be read in the Technical Whitepaper.
Proof of Devotion (PoD) Consensus Algorithm
To build a healthy ecosystem, Nebulas proposes three key points for consensus algorithm: speediness, irreversibility and fairness. By adopting the advantages of PoS and PoI, and leveraging NR, PoD will take the lead in consensus algorithms.
When will the Proof of Devotion (PoD) Consensus Algorithm be ready?
answer here
What consensus algorithm will be used until PoD is ready?
answer here
How are bookkeepers chosen?
The PoD consensus algorithm uses the Nebulas Rank (NR) to qualify nodes to be eligible. One node from the set is randomly chosen to propose the new block and the rest will become the validators.
Do bookkeepers still have to stake?
Yes, once chosen to be a validator for a new block, the validator will need to place a deposit to continue.
How many validators will there be in each set?
answer here
What anti-cheating mechanisms are there?
answer here
Nebulas Search Engine
Nebulas constructs a search engine for decentralized applications based on Nebulas value ranking. Using this engine, users can easily find desired decentralized applications from the massive market.
When will the Nebulas Search Engine be ready?
answer here
Will you be able to search dApps not on the Nebulas platform?
answer here
Will the Nebulas Search Engine also be decentralized?
answer here
Will the Nebulas Rank (NR) control the search results ranking?
answer here
What data will you be able to search?
We plan many different ways to be able to search the blockchain:
- crawl relevant webpages and establish mapping between them and the smart contracts
- analyze the code of open-source smart contracts
- establish contract standards that enable easier searching
Fundamentals
Nebulas Name Service (NNS)
By using smart contracts, the Nebulas development team will implement a DNS-like domain system named Nebulas Name Service (NNS) on the chain while ensuring that it is unrestricted, free and open. Any third-party developers can implement their own domain name resolution services independently or based on NNS.
When will the Nebulas Name Service be ready?
answer here
When a name is bid on, how long do others have to place their bid?
answer here
How do others get notified that a name is being bid on?
answer here
When a name is reserved who gets the bid amount?
answer here
If I want to renew my name after one year will I need to deposit more NAS?
answer here
Will we be able to reserve names prior to the launch of NNS?
answer here
Lightning Network
Nebulas implements the lightning network as the infrastructure of blockchains and offers flexible design. Any third-party developers can use the basic service of lightning network to develop applications for frequent transaction scenarios on Nebulas. In addition, Nebulas will launch the world’s first wallet app that supports the lightning network.
When will lightning network be supported?
answer here
The Nebulas Token (NAS)
The Nebulas network has its own built-in token, NAS. NAS plays two roles in the network. First, as the original money in the network, NAS provides asset liquidity among users, and functions as the incentive token for PoD bookkeepers and DIP. Second, NAS will be charged as the calculation fee for running smart contracts. The minimum unit of NAS is 10−18 NAS.
What will happen to the Nebulas ERC20 tokens when NAS is launched?
answer here
Will dApps on the Nebulas platform be able to issue their owns ICOs and tokens?
answer here
Smart Contracts
What languages will be supported when Main-net launches?
answer here
Will Ethereum Smart Contracts (Solidity) be fully supported?
answer here
What other language support will follow (and when)?
answer here
binary storage
What is recommended way to store binary data in Nebulas blockchain? Is it possible at all? Do you encourage such use of blockchain? Also, i couldn’t find information regarding GlobalContractStorage mentioned in docs, what is it?
Currently binary data can be stored on chain by binary transaction. The limit size of binary is 128k. But we don’t encourage storing data on the chain because the user might store some illegal data.
GlobalContractStoragenot currently implemented. It provides support for multiple contract sharing data for the same developer.
ChainID & connect
Can you tell us what the chainID of Mainnet and Testnet is? I have compiled the source code of our nebulas, but not even our test network?
chainID of Nebulas:
- Mainnet: 1
- Testnet: 1001
- private: default 100, users can customize the values.
The network connection:
smart contract deploy
Our smart contract deployment, I think is to submit all contract code directly, is the deployment method like this?
Yeah, We can deploy the contract code directly, just as it is to release code to the NPM repository, which is very simple and convenient.
smart contract IDE
We don’t have any other smart contract ides, like solidity’s “Remix”? Or is there documentation detailing which contract parameters can be obtained? (because I need to implement the random number and realize the logic, I calculate the final random number according to the parameters of the network, so I may need some additional network parameters that will not be manipulated.)
You can use web-wallet to deploy the contract, it has test function to check the parameters and contract execution result.
DApp Development
How to Join Nebulas Mainnet
Introduction
We are glad to release Nebulas Mainnet here. Please join and enjoy Nebulas Mainnet.
https://github.com/nebulasio/go-nebulas/tree/master
Configuration
The Mainnet configuration files are in folder mainnet/conf, including
genesis.conf
All configurable information about genesis block is defined in genesis.conf, including
- meta.chain_id: chain identity
- consensus.dpos.dynasty: the initial dynasty of validators
- token_distribution: the initial allocation of tokens
Attention: DO NOT change the genesis.conf.
config.conf
All configurable information about runtime is defined in config.conf.
Please check the template.conf to find more details about the runtime configuration.
Tips: the official seed node info is as below,
seed:["/ip4/52.2.205.12/tcp/8680/ipfs/QmQK7W8wrByJ6So7rf84sZzKBxMYmc1i4a7JZsne93ysz5","/ip4/52.56.55.238/tcp/8680/ipfs/QmVy9AHxBpd1iTvECDR7fvdZnqXeDhnxkZJrKsyuHNYKAh","/ip4/13.251.33.39/tcp/8680/ipfs/QmVm5CECJdPAHmzJWN2X7tP335L5LguGb9QLQ78riA9gw3"]
API List
Main Endpoint:
| API | URL | Protocol | | — | :—: | :—: | | RESTful | https://mainnet.nebulas.io/ | HTTP |
- GetNebState : returns nebulas client info.
- GetAccountState: returns the account balance and nonce.
- Call: execute smart contract local, don’t submit on chain.
- SendRawTransaction: submit the signed transaction.
- GetTransactionReceipt: get transaction receipt info by tansaction hash.
More Nebulas APIs at RPC.
Tutorials
English
- Installation (thanks Victor)
- Sending a Transaction (thanks Victor)
- Writing Smart Contract in JavaScript (thanks otto)
- Introducing Smart Contract Storage (thanks Victor)
- Interacting with Nebulas by RPC API (thanks Victor)
Contribution
Feel free to join Nebulas Mainnet. If you did find something wrong, please submit a issue or submit a pull request to let us know, we will add your name and url to this page soon.
How to Join Nebulas Testnet
Introduction
We are glad to release Nebulas Testnet here. It simulate the Nebulas network and NVM, and allow developers to interact with Nebulas without paying the cost of gas.
https://github.com/nebulasio/go-nebulas/tree/testnet
Configuration
The testnet configuration files are in folder testnet/conf under testnet branch, including
genesis.conf
All configurable information about genesis block is defined in genesis.conf, including
- meta.chain_id: chain identity
- consensus.dpos.dynasty: the initial dynasty of validators
- token_distribution: the initial allocation of tokens
Attention: DO NOT change the genesis.conf.
config.conf
All configurable information about runtime is defined in config.conf.
Please check the template.conf to find more details about the runtime configuration.
Tips: the official seed node info is as below,
seed:["/ip4/52.60.150.236/tcp/8680/ipfs/QmVJikqWQst13QsgdCLBjgcSWwpAAdZjoExGdvK3r2CNhv"]
API List
Test Endpoint:
| API | URL | Protocol | | — | :—: | :—: | | RESTful | https://testnet.nebulas.io/ | HTTP |
- GetNebState : returns nebulas client info.
- GetAccountState: returns the account balance and nonce.
- LatestIrreversibleBlock: returns the lastest irreversible block.
- Call: execute smart contract locally. the tx won’t be submitted on chain.
- SendRawTransaction: submit signed transaction. The transaction must be signed before send.
- GetTransactionReceipt: get transaction receipt info by tansaction hash.
More Nebulas APIs at RPC.
Tutorials
English
- Installation (thanks Victor)
- Sending a Transaction (thanks Victor)
- Writing Smart Contract in JavaScript (thanks otto)
- Introducing Smart Contract Storage (thanks Victor)
- Interacting with Nebulas by RPC API (thanks Victor)
Contribution
Feel free to join Nebulas Testnet. If you did find something wrong, please submit a issue or submit a pull request to let us know, we will add your name and url to this page soon.
Smart Contract
Languages
In Nebulas, there are two supported smart contract languages:
They are supported by the integration of Chrome V8, a widely used JavaScript engine developed by The Chromium Project for Google Chrome and Chromium web browsers.
Execution Model
The diagram below is the Execution Model of Smart Contract:

- All src of Smart Contract and arguments are packaged in Transaction and deployed on Nebulas.
- The execution of Smart Contract are divided into two phases:
- Preprocess: inject tracing instruction, etc.
- Execute: generate executable src and execute it.
Contracts
Contracts in Nebulas are similar to classes in object-oriented languages. They contain persistent data in state variables and functions that can modify these variables.
Writing Contract
A contract must be a Prototype Object or Class in JavaScript or TypeScript.
A Contract must include an init function, it will be executed only once when deploying. Functions, named starting with _ are private, can’t be executed in Transaction. The others are all public and can be executed in Transaction.
Since Contract is executed in Chrome V8, all instance variables are in memory, it’s not wise to save all of them to state trie in Nebulas. In Nebulas, we provide LocalContractStorage and GlobalContractStorage objects to help developers define fields needing to be saved to state trie. And those fields should be defined in constructor of Contract, before other functions.
The following is a sample contract:
class Rectangle {
constructor() {
// define fields stored to state trie.
LocalContractStorage.defineProperties(this, {
height: null,
width: null,
});
}
// init function.
init(height, width) {
this.height = height;
this.width = width;
}
// calc area function.
calcArea() {
return this.height * this.width;
}
// verify function.
verify(expected) {
let area = this.calcArea();
if (expected != area) {
throw new Error("Error: expected " + expected + ", actual is " + area + ".");
}
}
}
Visibility
In JavaScript, there is no function visibility, all functions defined in prototype object are public.
In Nebulas, we define two kinds of visibility public and private:
publicAll functions whose name matches regexp^[a-zA-Z$][A-Za-z0-9_$]*$are public, exceptinit. Public functions can be called via Transaction.privateAll functions whose name starts with_are private. A private function can only be called by public functions.
Global Objects
console
The console module provides a simple debugging console that is similar to the JavaScript console mechanism provided by web browsers.
The global console can be used without calling require('console').
console.info([...args])
...args <any>The console.info() function is an alias for
console.log().
console.log([...args])
...args <any>Print
argsto Nebulas Logger at levelinfo.
console.debug([...args])
...args <any>Print
argsto Nebulas Logger at leveldebug.
console.warn([...args])
...args <any>Print
argsto Nebulas Logger at levelwarn.
console.error([...args])
...args <any>Print
argsto Nebulas Logger at levelerror.
LocalContractStorage
The LocalContractStorage module provides a state trie based storage capability. It accepts string only key value pairs. And all data are stored to a private state trie associated with current contract address, only the contract can access them.
interface Descriptor {
// serialize value to string;
stringify?(value: any): string;
// deserialize value from string;
parse?(value: string): any;
}
interface DescriptorMap {
[fieldName: string]: Descriptor;
}
interface ContractStorage {
// get and return value by key from Native Storage.
rawGet(key: string): string;
// set key and value pair to Native Storage,
// return 0 for success, otherwise failure.
rawSet(key: string, value: string): number;
// define a object property named `fieldname` to `obj` with descriptor.
// default descriptor is JSON.parse/JSON.stringify descriptor.
// return this.
defineProperty(obj: any, fieldName: string, descriptor?: Descriptor): any;
// define object properties to `obj` from `props`.
// default descriptor is JSON.parse/JSON.stringify descriptor.
// return this.
defineProperties(obj: any, props: DescriptorMap): any;
// define a StorageMap property named `fieldname` to `obj` with descriptor.
// default descriptor is JSON.parse/JSON.stringify descriptor.
// return this.
defineMapProperty(obj: any, fieldName: string, descriptor?: Descriptor): any;
// define StorageMap properties to `obj` from `props`.
// default descriptor is JSON.parse/JSON.stringify descriptor.
// return this.
defineMapProperties(obj: any, props: DescriptorMap): any;
// delete key from Native Storage.
// return 0 for success, otherwise failure.
del(key: string): number;
// get value by key from Native Storage,
// deserialize value by calling `descriptor.parse` and return.
get(key: string): any;
// set key and value pair to Native Storage,
// the value will be serialized to string by calling `descriptor.stringify`.
// return 0 for success, otherwise failure.
set(key: string, value: any): number;
}
interface StorageMap {
// delete key from Native Storage, return 0 for success, otherwise failure.
del(key: string): number;
// get value by key from Native Storage,
// deserialize value by calling `descriptor.parse` and return.
get(key: string): any;
// set key and value pair to Native Storage,
// the value will be serialized to string by calling `descriptor.stringify`.
// return 0 for success, otherwise failure.
set(key: string, value: any): number;
}
BigNumber
The BigNumber module use the bignumber.js, a JavaScript library for arbitrary-precision decimal and non-decimal arithmetic. The contract can use BigNumber directly to handle the value of the transaction and other values transfer.
var value = new BigNumber(0);
value.plus(1);
...
Blockchain
The Blockchain module provides a object for contracts to obtain transactions and blocks executed by the current contract. Also, the NAS can be transferred from the contract and the address check is provided.
Blockchain API:
// current block
Blockchain.block;
// current transaction, transaction's value/gasPrice/gasLimit auto change to BigNumber object
Blockchain.transaction;
// transfer NAS from contract to address
Blockchain.transfer(address, value);
// verify address
Blockchain.verifyAddress(address);
properties:
block: current block for contract executiontimestamp: block timestampseed: random seedheight: block height
transaction: current transaction for contract executionhash: transaction hashfrom: transaction from addressto: transaction to addressvalue: transaction value, a BigNumber object for contract usenonce: transaction noncetimestamp: transaction timestampgasPrice: transaction gasPrice, a BigNumber object for contract usegasLimit: transaction gasLimit, a BigNumber object for contract use
transfer(address, value): transfer NAS from contract to address- params:
address: nebulas address to receive NASvalue: transfer value, a BigNumber object
- return:
0: transfer success1: transfer failed
- params:
verifyAddress(address): verify address- params:
address: address need to check
- return:
1: address is valid0: address is invalid
- params:
Example to use:
'use strict';
var SampleContract = function () {
LocalContractStorage.defineProperties(this, {
name: null,
count: null
});
LocalContractStorage.defineMapProperty(this, "allocation");
};
SampleContract.prototype = {
init: function (name, count, allocation) {
this.name = name;
this.count = count;
allocation.forEach(function (item) {
this.allocation.put(item.name, item.count);
}, this);
console.log('init: Blockchain.block.coinbase = ' + Blockchain.block.coinbase);
console.log('init: Blockchain.block.hash = ' + Blockchain.block.hash);
console.log('init: Blockchain.block.height = ' + Blockchain.block.height);
console.log('init: Blockchain.transaction.from = ' + Blockchain.transaction.from);
console.log('init: Blockchain.transaction.to = ' + Blockchain.transaction.to);
console.log('init: Blockchain.transaction.value = ' + Blockchain.transaction.value);
console.log('init: Blockchain.transaction.nonce = ' + Blockchain.transaction.nonce);
console.log('init: Blockchain.transaction.hash = ' + Blockchain.transaction.hash);
},
transfer: function (address, value) {
var result = Blockchain.transfer(address, value);
console.log("transfer result:", result);
Event.Trigger("transfer", {
Transfer: {
from: Blockchain.transaction.to,
to: address,
value: value
}
});
},
verifyAddress: function (address) {
var result = Blockchain.verifyAddress(address);
console.log("verifyAddress result:", result);
}
};
module.exports = SampleContract;
Event
The Event module records execution events in contract. The recorded events are stored in the event trie on the chain, which can be fetched by FetchEvents method in block with the execution transaction hash. All contract event topics have a chain.contract. prefix before the topic they set in contract.
Event.Trigger(topic, obj);
topic: user-defined topicobj: JSON object
You can see the example in SampleContract before.
Math.random
Math.random()returns a floating-point, pseudo-random number in the range from 0 inclusive up to but not including 1. The typical usage is:
"use strict";
var BankVaultContract = function () {};
BankVaultContract.prototype = {
init: function () {},
game: function(subscript){
var arr =[1,2,3,4,5,6,7,8,9,10,11,12,13];
for(var i = 0;i < arr.length; i++){
var rand = parseInt(Math.random()*arr.length);
var t = arr[rand];
arr[rand] =arr[i];
arr[i] = t;
}
return arr[parseInt(subscript)];
},
};
module.exports = BankVaultContract;
Math.random.seed(myseed)if needed, you can use this method to reset random seed. The argumentmyseedmust be a string.```js
“use strict”;
var BankVaultContract = function () {};
BankVaultContract.prototype = {
init: function () {},
game:function(subscript, myseed){
var arr =[1,2,3,4,5,6,7,8,9,10,11,12,13];
console.log(Math.random());
for(var i = 0;i < arr.length; i++){
if (i == 8) {
// reset random seed with `myseed`
Math.random.seed(myseed);
}
var rand = parseInt(Math.random()*arr.length);
var t = arr[rand];
arr[rand] =arr[i];
arr[i] = t;
}
return arr[parseInt(subscript)];
},
};
module.exports = BankVaultContract;
### Date
```js
"use strict";
var BankVaultContract = function () {};
BankVaultContract.prototype = {
init: function () {},
test: function(){
var d = new Date();
return d.toString();
}
};
module.exports = BankVaultContract;
Tips:
- Unsupported methods:
toDateString(),toTimeString(),getTimezoneOffset(),toLocaleXXX(). new Date()/Date.now()returns the timestamp of current block in milliseconds.getXXXreturns the result ofgetUTCXXX.
accept
this method is aimed to make it possible to send a binary transfer to a contract account. As the to is a smart contact address, which has declared a function accept() and it excutes correctly, the transfer will succeed. If the Tx is a non-binary Tx,it will be treated as a normal function.
"use strict";
var DepositeContent = function (text) {
if(text){
var o = JSON.parse(text);
this.balance = new BigNumber(o.balance);//余额信息
this.address = o.address;
}else{
this.balance = new BigNumber(0);
this.address = "";
}
};
DepositeContent.prototype = {
toString: function () {
return JSON.stringify(this);
}
};
var BankVaultContract = function () {
LocalContractStorage.defineMapProperty(this, "bankVault", {
parse: function (text) {
return new DepositeContent(text);
},
stringify: function (o) {
return o.toString();
}
});
};
BankVaultContract.prototype = {
init: function () {},
save: function () {
var from = Blockchain.transaction.from;
var value = Blockchain.transaction.value;
value = new BigNumber(value);
var orig_deposit = this.bankVault.get(from);
if (orig_deposit) {
value = value.plus(orig_deposit.balance);
}
var deposit = new DepositeContent();
deposit.balance = new BigNumber(value);
deposit.address = from;
this.bankVault.put(from, deposit);
},
accept:function(){
this.save();
Event.Trigger("transfer", {
Transfer: {
from: Blockchain.transaction.from,
to: Blockchain.transaction.to,
value: Blockchain.transaction.value,
}
});
}
};
module.exports = BankVaultContract;
NRC20
Abstract
The following standard allows for the implementation of a standard API for tokens within smart contracts. This standard provides basic functionality to transfer tokens, as well as allows tokens to be approved so they can be spent by another on-chain third party.
Motivation
A standard interface allows that a new token can be created by any application easily : from wallets to decentralized exchanges.
Methods
name
Returns the name of the token - e.g. "MyToken".
// returns string, the name of the token.
function name()
symbol
Returns the symbol of the token. E.g. “TK”.
// returns string, the symbol of the token
function symbol()
decimals
Returns the number of decimals the token uses - e.g. 8, means to divide the token amount by 100000000 to get its user representation.
// returns number, the number of decimals the token uses
function decimals()
totalSupply
Returns the total token supply.
// returns string, the total token supply, the decimal value is decimals* total.
function totalSupply()
balanceOf
Returns the account balance of a address.
// returns string, the account balance of another account with address
function balanceOf(address)
transfer
Transfers value amount of tokens to address, and MUST fire the Transfer event. The function SHOULD throw if the from account balance does not have enough tokens to spend.
Note Transfers of 0 values MUST be treated as normal transfers and fire the Transfer event.
// returns `true`, if transfer success, else throw error
function transfer(address, value)
transferFrom
Transfers value amount of tokens from address from to address to, and MUST fire the Transfer event.
The transferFrom method is used for a withdraw workflow, allowing contracts to transfer tokens on your behalf. This can be used for example to allow a contract to transfer tokens on your behalf and/or to charge fees in sub-currencies. The function SHOULD throw unless the from account has deliberately authorized the sender of the message via some mechanism.
Note Transfers of 0 values MUST be treated as normal transfers and fire the Transfer event.
// returns `true`, if transfer success, else throw error
function transferFrom(from, to, value)
approve
Allows spender to withdraw from your account multiple times, up the currentValue to the value amount. If this function is called again it overwrites the current allowance with value.
NOTE: To prevent attack vectors, the user needs to give a previous approve value, and the default value that is not approve is 0.
// returns `true`, if approve success, else throw error
function approve(spender, currentValue, value)
allowance
Returns the amount which spender is still allowed to withdraw from owner.
// returns string, the value allowed to withdraw from `owner`.
function allowance(owner, spender)
Events
transferEvent
MUST trigger when tokens are transferred, including zero value transfers.
A token contract which creates new tokens SHOULD trigger a Transfer event with the from address set to totalSupply when tokens are created.
function transferEvent: function(status, from, to, value)
approveEvent
MUST trigger on any call to approve(spender, currentValue, value).
function approveEvent: function(status, from, spender, value)
Implementation
Example implementations are available at
'use strict';
var Allowed = function (obj) {
this.allowed = {};
this.parse(obj);
}
Allowed.prototype = {
toString: function () {
return JSON.stringify(this.allowed);
},
parse: function (obj) {
if (typeof obj != "undefined") {
var data = JSON.parse(obj);
for (var key in data) {
this.allowed[key] = new BigNumber(data[key]);
}
}
},
get: function (key) {
return this.allowed[key];
},
set: function (key, value) {
this.allowed[key] = new BigNumber(value);
}
}
var StandardToken = function () {
LocalContractStorage.defineProperties(this, {
_name: null,
_symbol: null,
_decimals: null,
_totalSupply: {
parse: function (value) {
return new BigNumber(value);
},
stringify: function (o) {
return o.toString(10);
}
}
});
LocalContractStorage.defineMapProperties(this, {
"balances": {
parse: function (value) {
return new BigNumber(value);
},
stringify: function (o) {
return o.toString(10);
}
},
"allowed": {
parse: function (value) {
return new Allowed(value);
},
stringify: function (o) {
return o.toString();
}
}
});
};
StandardToken.prototype = {
init: function (name, symbol, decimals, totalSupply) {
this._name = name;
this._symbol = symbol;
this._decimals = decimals || 0;
this._totalSupply = new BigNumber(totalSupply).mul(new BigNumber(10).pow(decimals));
var from = Blockchain.transaction.from;
this.balances.set(from, this._totalSupply);
this.transferEvent(true, from, from, this._totalSupply);
},
// Returns the name of the token
name: function () {
return this._name;
},
// Returns the symbol of the token
symbol: function () {
return this._symbol;
},
// Returns the number of decimals the token uses
decimals: function () {
return this._decimals;
},
totalSupply: function () {
return this._totalSupply.toString(10);
},
balanceOf: function (owner) {
var balance = this.balances.get(owner);
if (balance instanceof BigNumber) {
return balance.toString(10);
} else {
return "0";
}
},
transfer: function (to, value) {
value = new BigNumber(value);
if (value.lt(0)) {
throw new Error("invalid value.");
}
var from = Blockchain.transaction.from;
var balance = this.balances.get(from) || new BigNumber(0);
if (balance.lt(value)) {
throw new Error("transfer failed.");
}
this.balances.set(from, balance.sub(value));
var toBalance = this.balances.get(to) || new BigNumber(0);
this.balances.set(to, toBalance.add(value));
this.transferEvent(true, from, to, value);
},
transferFrom: function (from, to, value) {
var spender = Blockchain.transaction.from;
var balance = this.balances.get(from) || new BigNumber(0);
var allowed = this.allowed.get(from) || new Allowed();
var allowedValue = allowed.get(spender) || new BigNumber(0);
value = new BigNumber(value);
if (value.gte(0) && balance.gte(value) && allowedValue.gte(value)) {
this.balances.set(from, balance.sub(value));
// update allowed value
allowed.set(spender, allowedValue.sub(value));
this.allowed.set(from, allowed);
var toBalance = this.balances.get(to) || new BigNumber(0);
this.balances.set(to, toBalance.add(value));
this.transferEvent(true, from, to, value);
} else {
throw new Error("transfer failed.");
}
},
transferEvent: function (status, from, to, value) {
Event.Trigger(this.name(), {
Status: status,
Transfer: {
from: from,
to: to,
value: value
}
});
},
approve: function (spender, currentValue, value) {
var from = Blockchain.transaction.from;
var oldValue = this.allowance(from, spender);
if (oldValue != currentValue.toString()) {
throw new Error("current approve value mistake.");
}
var balance = new BigNumber(this.balanceOf(from));
var value = new BigNumber(value);
if (value.lt(0) || balance.lt(value)) {
throw new Error("invalid value.");
}
var owned = this.allowed.get(from) || new Allowed();
owned.set(spender, value);
this.allowed.set(from, owned);
this.approveEvent(true, from, spender, value);
},
approveEvent: function (status, from, spender, value) {
Event.Trigger(this.name(), {
Status: status,
Approve: {
owner: from,
spender: spender,
value: value
}
});
},
allowance: function (owner, spender) {
var owned = this.allowed.get(owner);
if (owned instanceof Allowed) {
var spender = owned.get(spender);
if (typeof spender != "undefined") {
return spender.toString(10);
}
}
return "0";
}
};
module.exports = StandardToken;
RPC Overview
Remote Procedure Calls (RPCs) provide a useful abstraction for building distributed applications and services.
Nebulas provides both gRPC and RESTful API for users to interact with Nebulas.
grpc provides a concrete implementation of the gRPC protocol, layered over HTTP/2. These libraries enable communication between clients and servers using any combination of the supported languages.
grpc-gateway is a plugin of protoc. It reads gRPC service definition, and generates a reverse-proxy server which translates a RESTful JSON API into gRPC. we use it to map gRPC to HTTP.
Endpoint
Default endpoints:
| API | URL | Protocol |
|---|---|---|
| gRPC | http://localhost:8684 | Protobuf |
| RESTful | http://localhost:8685 | HTTP |
gRPC API
We can run the gRPC example testing client code:
go run main.go
The testing client gets account state from sender address, makes a transaction from sender to receiver, and also checks the account state of receiver address.
We can see client log output like:
GetAccountState n1QZMXSZtW7BUerroSms4axNfyBGyFGkrh5 nonce 4 value 3142831039999999999992
SendTransaction n1QZMXSZtW7BUerroSms4axNfyBGyFGkrh5 -> n1Zn6iyyQRhqthmCfqGBzWfip1Wx8wEvtrJ value 2 txhash:"2c2f5404a2e2edb651dff44a2d114a198c00614b20801e58d5b00899c8f512ae"
GetAccountState n1Zn6iyyQRhqthmCfqGBzWfip1Wx8wEvtrJ nonce 0 value 10
HTTP
Now we also provided HTTP to access the RPC API. The file that ends with gw.go is the mapping file. Now we can access the rpc API directly from our browser, you can update the rpc_listen and http_listen in conf/default/config.conf to change RPC/HTTP port.
Example:
curl -i -H 'Content-Type: application/json' -X GET http://localhost:8685/v1/user/nebstate
if success, response will be returned like this
{
"result":{
"chain_id":100,
"tail":"b10c1203d5ae6d4d069d5f520eb060f2f5fb74e942f391e7cadbc2b5148dfbcb",
"lib":"da30b4ed14affb62b3719fb5e6952d3733e84e53fe6e955f8e46da503300c985",
"height":"365",
"protocol_version":"/neb/1.0.0",
"synchronized":false,
"version":"0.7.0"
}
}
Or, there is error form grpc, repose will carry the error message
{
"error":"message..."
}
RPC methods
RPC API Reference
GetNebState
Return the state of the neb.
| Protocol | Method | API |
|---|---|---|
| gRpc | GetNebState | |
| HTTP | GET | /v1/user/nebstate |
Parameters
none
Returns
chain_id Block chain id
tail Current neb tail hash
lib Current neb lib hash
height Current neb tail block height
protocol_version The current neb protocol version.
synchronized The peer sync status.
version neb version.
HTTP Example
// Request
curl -i -H 'Content-Type: application/json' -X GET http://localhost:8685/v1/user/nebstate
// Result
{
"result":{
"chain_id":100,
"tail":"b10c1203d5ae6d4d069d5f520eb060f2f5fb74e942f391e7cadbc2b5148dfbcb",
"lib":"da30b4ed14affb62b3719fb5e6952d3733e84e53fe6e955f8e46da503300c985",
"height":"365",
"protocol_version":"/neb/1.0.0",
"synchronized":false,
"version":"0.7.0"
}
}
GetAccountState
Return the state of the account. Balance and nonce of the given address will be returned.
| Protocol | Method | API |
|---|---|---|
| gRpc | GetAccountState | |
| HTTP | POST | /v1/user/accountstate |
Parameters
address Hex string of the account addresss.
height block account state with height. If not specified, use 0 as
tail height.
Returns
balance Current balance in unit of 1/(10^18) nas.
nonce Current transaction count.
type The type of address, 87 stands for normal address and 88 stands
for contract address
HTTP Example
// Request
curl -i -H 'Content-Type: application/json' -X POST http://localhost:8685/v1/user/accountstate -d '{"address":"n1Z6SbjLuAEXfhX1UJvXT6BB5osWYxVg3F3"}'
// Result
{
result {
"balance":"9489999998980000000000"
"nonce":51
"type":87
}
}
LatestIrreversibleBlock
Return the latest irreversible block.
| Protocol | Method | API |
|---|---|---|
| gRpc | LatestIrreversibleBlock | |
| HTTP | GET | /v1/user/lib |
Parameters
none
Returns
hash Hex string of block hash.
parent_hash Hex string of block parent hash.
height block height.
nonce block nonce.
coinbase Hex string of coinbase address.
timestamp block timestamp.
chain_id block chain id.
state_root Hex string of state root.
txs_root Hex string of txs root.
events_root Hex string of event root.
consensus_root
Timestamptime of consensus stateProposerproposer of current consensus stateDynastyRootHex string of dynasty root
miner the miner of this block
is_finality block is finality
transactions block transactions slice.
transactionGetTransactionReceipt response info.
HTTP Example
// Request
curl -i -H 'Content-Type: application/json' -X GET http://localhost:8685/v1/user/lib
// Result
{
"result":{
"hash":"c4a51d6241db372c1b8720e62c04426bd587e1f31054b7d04a3509f48ee58e9f",
"parent_hash":"8f9f29028356d2fb2cf1291dcee85785e1c20a2145318f36c136978edb6097ce",
"height":"407",
"nonce":"0",
"coinbase":"n1QZMXSZtW7BUerroSms4axNfyBGyFGkrh5",
"timestamp":"1521963660",
"chain_id":100,
"state_root":"a77bbcd911e7ee9488b623ce4ccb8a38d9a83fc29eb5ad43009f3517f1d3e19a",
"txs_root":"664671e2fda200bd93b00aaec4ab12db718212acd51b4624e8d4937003a2ab22",
"events_root":"2607e32c166a3513f9effbd1dc7caa7869df5989398d0124987fa0e4d183bcaf",
"consensus_root":{
"timestamp":"1521963660",
"proposer":"GVeOQnYf20Ppxa2cqTrPHdpr6QH4SKs4ZKs=",
"dynasty_root":"IfTgx0o271Gg4N3cVKHe7dw3NREnlYCN8aIl8VvRXDY="
},
"miner": "n1WwqBXVMuYC3mFCEEuFFtAXad6yxqj4as4"
"is_finality":false,
"transactions":[]
}
}
Call
Call a smart contract function. The smart contract must have been submited. Method calls are run only on the current node, not broadcast.
| Protocol | Method | API |
|---|---|---|
| gRpc | Call | |
| HTTP | POST | /v1/user/call |
Parameters
The parameters of the call method is the same as the
SendTransaction
parameters. Special attention:
to Hex string of the receiver account addresss. The value
ofto** is a contract address.**
contract transaction contract object for call smart contract.
- Sub properties(
source** and ``sourceType`` are not need**):functionthe contract call function for call contarct function.argsthe params of contract. The args content is JSON string of parameters array.
Returns
result result of smart contract method call
execute_err execute error
estimate_gas estimate gas used
HTTP Example
// Request
curl -i -H 'Content-Type: application/json' -X POST http://localhost:8685/v1/user/call -d '{"from":"n1Z6SbjLuAEXfhX1UJvXT6BB5osWYxVg3F3","to":"n1mL2WCZyRi1oELEugfCZoNAW3dt8QpHtJw","value":"0","nonce":3,"gasPrice":"1000000","gasLimit":"2000000","contract":{"function":"transferValue","args":"[500]"}}'
// Result
{
"result": "0",
"execute_err": "insufficient balance",
estimate_gas: "22208"
}
SendRawTransaction
Submit the signed transaction. The transaction signed value should be return by SignTransactionWithPassphrase.
| Protocol | Method | API |
|---|---|---|
| gRpc | SendRawTransaction | |
| HTTP | POST | /v1/user/rawtransaction |
Parameters
data Signed data of transaction
Returns
txhash Hex string of transaction hash.
contract_address returns only for deploy contract transaction.
HTTP Example
// Request
curl -i -H 'Content-Type: application/json' -X POST http://localhost:8685/v1/user/rawtransaction -d '{"data":"CiCrHtxyyIJks2/RErvBBA862D6iwAaGQ9OK1NisSGAuTBIYGiY1R9Fnx0z0uPkWbPokTeBIHFFKRaosGhgzPLPtjEF5cYRTgu3jz2egqWJwwF/i9wAiEAAAAAAAAAAADeC2s6dkAAAoAjDd/5jSBToICgZiaW5hcnlAZEoQAAAAAAAAAAAAAAAAAA9CQFIQAAAAAAAAAAAAAAAAAABOIFgBYkGLnnvGZEDSlocc202ZRWtUlbl2RHfGNdBY5eajFiHKThfgXIwGixh17LpnZGnYHlmfiGe2zqnFHdj7G8b2XIP2AQ=="}'
// Result
{
"result":{
"txhash": "f37acdf93004f7a3d72f1b7f6e56e70a066182d85c186777a2ad3746b01c3b52"
}
}
Deploy Contract Example
// Request
curl -i -H 'Content-Type: application/json' -X POST http://localhost:8685/v1/user/rawtransaction -d '{"data":"CiDam3G9Sy5fV6/ZcjasYPwSF39ZJDIHNB0Us94vn6p6ohIaGVfLzJ83pom1DO1gD307f1JdTVdDLzbMXO4aGhlXy8yfN6aJtQztYA99O39SXU1XQy82zFzuIhAAAAAAAAAAAAAAAAAAAAAAKBswwfTs1QU64AcKBmRlcGxveRLVB3siU291cmNlVHlwZSI6ImpzIiwiU291cmNlIjoiJ3VzZSBzdHJpY3QnXG5cbnZhciBUcmFuc2ZlclZhbHVlQ29udHJhY3QgPSBmdW5jdGlvbiAoKSB7XG4gICAgLy8gTG9jYWxDb250cmFjdFN0b3JnZS5kZWZpbmVQcm9wZXJ0aWVzKHRoaXMsIHtcbiAgICAvLyAgICAgdG90YWxCYWxhbmNlOiBudWxsXG4gICAgLy8gfSlcbn1cblxuXG5UcmFuc2ZlclZhbHVlQ29udHJhY3QucHJvdG90eXBlID0ge1xuICAgICBpbml0OiBmdW5jdGlvbigpIHtcbiAgICAvLyAgICAgdGhpcy50b3RhbEJhbGFuY2UgPSAwO1xuICAgICB9LFxuXG4gICAgdHJhbnNmZXI6IGZ1bmN0aW9uKHRvKSB7XG4gICAgICAgIHZhciByZXN1bHQgPSBCbG9ja2NoYWluLnRyYW5zZmVyKHRvLCBCbG9ja2NoYWluLnRyYW5zYWN0aW9uLnZhbHVlKTtcbiAgICAgICAgLy8gdmFyIHJlc3VsdCA9IEJsb2NrY2hhaW4udHJhbnNmZXIodG8sIDApO1xuICAgICAgICBpZiAoIXJlc3VsdCkge1xuXHQgICAgXHR0aHJvdyBuZXcgRXJyb3IoXCJ0cmFuc2ZlciBmYWlsZWQuXCIpO1xuICAgICAgICB9XG4gICAgICAgIHJldHVybiBCbG9ja2NoYWluLnRyYW5zYWN0aW9uLnZhbHVlO1xuICAgIH0sXG4gICAgdHJhbnNmZXJTcGVjaWFsVmFsdWU6IGZ1bmN0aW9uKHRvLCB2YWx1ZSkge1xuICAgICAgICB2YXIgYW1vdW50ID0gbmV3IEJpZ051bWJlcih2YWx1ZSk7XG4gICAgICAgIHZhciByZXN1bHQgPSBCbG9ja2NoYWluLnRyYW5zZmVyKHRvLCBhbW91bnQpO1xuICAgICAgICAvLyB2YXIgcmVzdWx0ID0gQmxvY2tjaGFpbi50cmFuc2Zlcih0bywgMCk7XG4gICAgICAgIGlmICghcmVzdWx0KSB7XG4gICAgICAgICAgICB0aHJvdyBuZXcgRXJyb3IoXCJ0cmFuc2ZlciBmYWlsZWQuXCIpO1xuICAgICAgICB9IGVsc2Uge1xuICAgICAgICAgICAgcmV0dXJuIDBcbiAgICAgICAgfVxuICAgIH0sXG4gICAgXG59XG5tb2R1bGUuZXhwb3J0cyA9IFRyYW5zZmVyVmFsdWVDb250cmFjdDsifUBkShAAAAAAAAAAAAAAAAAAD0JAUhAAAAAAAAAAAAAAAAABMS0AWAFiQcJUX32jGcduxnJCjvJ9kRcGXhSK2+h3Tb46ySjAToGAY11C7mysGEU11OE6YTd+WNAo/CEbThvI0iKcjHhgBZUB"}'
// Result
{
"result":{
"txhash": "f37acdf93004f7a3d72f1b7f6e56e70a066182d85c186777a2ad3746b01c3b52",
"contract_address":"4702b597eebb7a368ac4adbb388e5084b508af582dadde47"
}
}
GetBlockByHash
Get block header info by the block hash.
| Protocol | Method | API |
|---|---|---|
| gRpc | GetBlockByHash | |
| HTTP | POST | /v1/user/getBlockByHash |
Parameters
hash Hex string of transaction hash.
full_fill_transaction If true it returns the full transaction
objects, if false only the hashes of the transactions.
Returns
See LatestIrreversibleBlock response.
HTTP Example
// Request
curl -i -H 'Content-Type: application/json' -X POST http://localhost:8685/v1/user/getBlockByHash -d '{"hash":"00000658397a90df6459b8e7e63ad3f4ce8f0a40b8803ff2f29c611b2e0190b8", "full_fill_transaction":"true"}'
// Result
{
"result":{
"hash":"c4a51d6241db372c1b8720e62c04426bd587e1f31054b7d04a3509f48ee58e9f",
"parent_hash":"8f9f29028356d2fb2cf1291dcee85785e1c20a2145318f36c136978edb6097ce",
"height":"407",
"nonce":"0",
"coinbase":"n1QZMXSZtW7BUerroSms4axNfyBGyFGkrh5",
"timestamp":"1521963660",
"chain_id":100,
"state_root":"a77bbcd911e7ee9488b623ce4ccb8a38d9a83fc29eb5ad43009f3517f1d3e19a",
"txs_root":"664671e2fda200bd93b00aaec4ab12db718212acd51b4624e8d4937003a2ab22",
"events_root":"2607e32c166a3513f9effbd1dc7caa7869df5989398d0124987fa0e4d183bcaf",
"consensus_root":{
"timestamp":"1521963660",
"proposer":"GVeOQnYf20Ppxa2cqTrPHdpr6QH4SKs4ZKs=",
"dynasty_root":"IfTgx0o271Gg4N3cVKHe7dw3NREnlYCN8aIl8VvRXDY="
},
"miner": "n1WwqBXVMuYC3mFCEEuFFtAXad6yxqj4as4"
"is_finality":false,
"transactions":[{
"hash":"1e96493de6b5ebe686e461822ec22e73fcbfb41a6358aa58c375b935802e4145",
"chainId":100,
"from":"n1Z6SbjLuAEXfhX1UJvXT6BB5osWYxVg3F3",
"to":"n1orSeSMj7nn8KHHN4JcQEw3r52TVExu63r",
"value":"10000000000000000000","nonce":"34",
"timestamp":"1522220087",
"type":"binary",
"data":null,
"gas_price":"1000000",
"gas_limit":"2000000",
"contract_address":"",
"status":1,
"gas_used":"20000"
}]
}
}
GetBlockByHeight
Get block header info by the block height.
| Protocol | Method | API |
|---|---|---|
| gRpc | GetBlockByHeight | |
| HTTP | POST | /v1/user/getBlockByHeight |
Parameters
height Height of transaction hash.
full_fill_transaction If true it returns the full transaction
objects, if false only the hashes of the transactions.
Returns
See LatestIrreversibleBlock response.
HTTP Example
// Request
curl -i -H 'Content-Type: application/json' -X POST http://localhost:8685/v1/user/getBlockByHeight -d '{"height": 256, "full_fill_transaction": true}'
// Result
{
"result":{
"hash":"c4a51d6241db372c1b8720e62c04426bd587e1f31054b7d04a3509f48ee58e9f",
"parent_hash":"8f9f29028356d2fb2cf1291dcee85785e1c20a2145318f36c136978edb6097ce",
"height":"407",
"nonce":"0",
"coinbase":"n1QZMXSZtW7BUerroSms4axNfyBGyFGkrh5",
"timestamp":"1521963660",
"chain_id":100,
"state_root":"a77bbcd911e7ee9488b623ce4ccb8a38d9a83fc29eb5ad43009f3517f1d3e19a",
"txs_root":"664671e2fda200bd93b00aaec4ab12db718212acd51b4624e8d4937003a2ab22",
"events_root":"2607e32c166a3513f9effbd1dc7caa7869df5989398d0124987fa0e4d183bcaf",
"consensus_root":{
"timestamp":"1521963660",
"proposer":"GVeOQnYf20Ppxa2cqTrPHdpr6QH4SKs4ZKs=",
"dynasty_root":"IfTgx0o271Gg4N3cVKHe7dw3NREnlYCN8aIl8VvRXDY="
},
"miner": "n1WwqBXVMuYC3mFCEEuFFtAXad6yxqj4as4"
"is_finality":false,
"transactions":[{
"hash":"1e96493de6b5ebe686e461822ec22e73fcbfb41a6358aa58c375b935802e4145",
"chainId":100,
"from":"n1Z6SbjLuAEXfhX1UJvXT6BB5osWYxVg3F3",
"to":"n1orSeSMj7nn8KHHN4JcQEw3r52TVExu63r",
"value":"10000000000000000000","nonce":"34",
"timestamp":"1522220087",
"type":"binary",
"data":null,
"gas_price":"1000000",
"gas_limit":"2000000",
"contract_address":"",
"status":1,
"gas_used":"20000"
}]
}
}
GetTransactionReceipt
Get transactionReceipt info by tansaction hash. If the transaction not submit or only submit and not packaged on chain, it will reurn not found error.
| Protocol | Method | API |
|---|---|---|
| gRpc | GetTransactionReceipt | |
| HTTP | POST | /v1/user/getTransactionReceipt |
Parameters
hash Hex string of transaction hash.
Returns
hash Hex string of tx hash.
chainId Transaction chain id.
from Hex string of the sender account addresss.
to Hex string of the receiver account addresss.
value Value of transaction.
nonce Transaction nonce.
timestamp Transaction timestamp.
type Transaction type.
data Transaction data, return the payload data.
gas_price Transaction gas price.
gas_limit Transaction gas limit.
contract_address Transaction contract address.
status Transaction status, 0 failed, 1 success, 2 pending.
gas_used transaction gas used
HTTP Example
// Request
curl -i -H 'Content-Type: application/json' -X POST http://localhost:8685/v1/user/getTransactionReceipt -d '{"hash":"cda54445ffccf4ea17f043e86e54be11b002053f9edbe30ae1fbc0437c2b6a73"}'
// Result
{
"result":{
"hash":"cda54445ffccf4ea17f043e86e54be11b002053f9edbe30ae1fbc0437c2b6a73",
"chainId":100,
"from":"n1Z6SbjLuAEXfhX1UJvXT6BB5osWYxVg3F3",
"to":"n1PxKRaJ5jZHXwTfgM9WqkZJJVXBxRcggEE",
"value":"10000000000000000000",
"nonce":"53",
"timestamp":"1521964742",
"type":"binary",
"data":null,
"gas_price":"1000000",
"gas_limit":"20000",
"contract_address":"",
"status":1,
"gas_used":"20000"
}
}
GetTransactionByContract
Get transactionReceipt info by contract address. If contract not exists or packaged on chain, a not found error will be returned.
| Protocol | Method | API |
|---|---|---|
| gRpc | GetTransactionByContract | |
| HTTP | POST | /v1/user/getTransactionByContract |
Parameters
address Hex string of contract account address.
Returns
The result is the same as that of GetTransactionReceipt
HTTP Example
// Request
curl -i -H 'Content-Type: application/json' -X POST http://localhost:8685/v1/user/getTransactionByContract -d '{"address":"n1sqDHGjYtX6rMqFoq5Tow3s3LqF4ZxBvE3"}'
// Result
{
"result":{
"hash":"c5a45a789278f5cce9e95e8f31c1962567f58844456fed7a6eb9afcb764ca6a3",
"chainId":100,
"from":"n1Z6SbjLuAEXfhX1UJvXT6BB5osWYxVg3F3",
"to":"n1Z6SbjLuAEXfhX1UJvXT6BB5osWYxVg3F3",
"value":"0",
"nonce":"1",
"timestamp":"1521964742",
"type":"deploy",
"data":"eyJTb3VyY2VUeXBlIjoianMiLCJTb3VyY2UiOiJcInVzZSBzdHJpY3RcIjtcblxudmFyIENvbnRyYWN0ID0gZnVuY3VuY3Rpb24oKSB7XG5cbiAgICAgICAgRXZlbnQuVHJpZ2dlcih......UmFuZG9tMlwiOiByMTIsXG4gImRlZmF1bHRTZWVkUmFuZG9tM1wiOiByMTMsXG4gICAgICAgICAgICBcInVzZXJTZWVkUmFuZG9tXCI6IHIyXG4gICAgICAgIH0pO1xuICAgIH1cbn07XG5cbm1vZHVsZS5leHBvcnRzID0gQ29udHJhY3Q7IiwiQXJncyI6IiJ9",
"gas_price":"1000000",
"gas_limit":"20000",
"contract_address":"n1sqDHGjYtX6rMqFoq5Tow3s3LqF4ZxBvE3",
"status":1,
"gas_used":"20000",
"execute_error":"",
"execute_result":"\"\""
}
}
Subscribe
Return the subscribed events of transaction & block. The request is a keep-alive connection.
| Protocol | Method | API |
|---|---|---|
| gRpc | Subscribe | |
| HTTP | POST | /v1/user/subscribe |
Parameters
topics repeated event topic name, string array.
The topic name list:
chain.pendingTransactionThe topic of pending a transaction in transaction_pool.chain.latestIrreversibleBlockThe topic of updating latest irreversible block.chain.transactionResultThe topic of executing & submitting tx.chain.newTailBlockThe topic of setting new tail block.chain.revertBlockThe topic of reverting block.
HTTP Example
// Request
curl -i -H 'Content-Type: application/json' -X POST http://localhost:8685/v1/user/subscribe -d '{"topics":["chain.linkBlock", "chain.pendingTransaction"]}'
// Result
{
"result":{
"topic":"chain.pendingTransaction",
"data":"{
\"chainID\":100,
\"hash\":\"b466c7a9b667db8d15f74863a4bc60bc989566b6c3766948b2cacb45a4fbda42\",
\"from\":\"n1Z6SbjLuAEXfhX1UJvXT6BB5osWYxVg3F3\",
\"to\":\"n1Z6SbjLuAEXfhX1UJvXT6BB5osWYxVg3F3\",
\"nonce\":6,
\"value\":\"0\",
\"timestamp\":1522215320,
\"gasprice\": \"1000000\",
\"gaslimit\":\"20000000\",
\"type\":\"deploy\"}"
}
"result":{
"topic":"chain.pendingTransaction",
"data": "..."
}
...
}
GetGasPrice
Return current gasPrice.
| Protocol | Method | API |
|---|---|---|
| gRpc | GetGasPrice | |
| HTTP | GET | /v1/user/getGasPrice |
Parameters
none
Returns
gas_price gas price. The unit is 10^-18 NAS.
HTTP Example
// Request
curl -i -H 'Content-Type: application/json' -X GET http://localhost:8685/v1/user/getGasPrice
// Result
{
"result":{
"gas_price":"1000000"
}
}
EstimateGas
Return the estimate gas of transaction.
| Protocol | Method | API |
|---|---|---|
| gRpc | EstimateGas | |
| HTTP | POST | /v1/user/estimateGas |
Parameters
The parameters of the EstimateGas method is the same as the
SendTransactionparameters.
HTTP Example
// Request
curl -i -H 'Content-Type: application/json' -X POST http://localhost:8685/v1/user/estimateGas -d '{"from":"n1QZMXSZtW7BUerroSms4axNfyBGyFGkrh5","to":"n1SAeQRVn33bamxN4ehWUT7JGdxipwn8b17", "value":"1000000000000000000","nonce":1,"gasPrice":"1000000","gasLimit":"2000000"}'
// Result
{
"gas":"20000",
"err":""
}
GetEventsByHash
Return the events list of transaction.
| Protocol | Method | API |
|---|---|---|
| gRpc | GetEventsByHash | |
| HTTP | POST | /v1/user/getEventsByHash |
Parameters
hash Hex string of transaction hash.
HTTP Example
// Request
curl -i -H 'Content-Type: application/json' -X POST http://localhost:8685/v1/user/getEventsByHash -d '{"hash":"ec239d532249f84f158ef8ec9262e1d3d439709ebf4dd5f7c1036b26c6fe8073"}'
// Result
{
"result":{
"events":[{
"topic":"chain.transactionResult",
"data":"{
\"hash\":\"d7977f96294cd232781d9c17f0f3212b48312d5ef0f556551c5cf48622759785\",
\"status\":1,
\"gas_used\":\"22208\",
\"error\":\"\"
}"
}]
}
}
GetDynasty
GetDynasty get dpos dynasty.
| Protocol | Method | API |
|---|---|---|
| gRpc | GetDynasty | |
| HTTP | POST | /v1/user/dynasty |
Parameters
height block height
Returns
miners repeated string of miner address.
HTTP Example
// Request
curl -i -H 'Content-Type: application/json' -X POST http://localhost:8685/v1/user/dynasty -d '{"height": 1}'
// Result
{
{
"result":{
"miners":[
"n1FkntVUMPAsESuCAAPK711omQk19JotBjM",
"n1JNHZJEUvfBYfjDRD14Q73FX62nJAzXkMR",
"n1Kjom3J4KPsHKKzZ2xtt8Lc9W5pRDjeLcW",
"n1TV3sU6jyzR4rJ1D7jCAmtVGSntJagXZHC",
"n1WwqBXVMuYC3mFCEEuFFtAXad6yxqj4as4",
"n1Zn6iyyQRhqthmCfqGBzWfip1Wx8wEvtrJ"
]
}
}
}
Beside the NEB API RPC interface nebulas provides additional management APIs. Neb console supports both API and management interfaces. Management RPC uses the same gRPC and HTTP port, which also binds NEB API RPC interfaces.
Nebulas provide both gRPC and RESTful management APIs for users to interact with Nebulas. Our admin proto file defines all admin APIs. We recommend using the console access admin interfaces, or restricting the admin RPC to local access.
Default management RPC Endpoint:
| API | URL | Protocol | | — | :—: | :—: | | gRPC | http://localhost:8684 | Protobuf | | RESTful | http://localhost:8685 | HTTP |
Return the p2p node info.
| Protocol | Method | API | | — | — | — | | gRpc | | NodeInfo | | HTTP | GET | /v1/user/nodeinfo |
Parameters
none
Returns
id the node ID.
chain_id the block chainID.
coninbase coinbase
peer_count Number of peers currenly connected.
synchronized the node synchronized status.
bucket_size the node route table bucket size.
protocol_version the network protocol version.
RouteTable*[] route_table the network routeTable
message RouteTable {
string id = 1;
repeated string address = 2;
}
HTTP Example
# Request
curl -i -H 'Content-Type: application/json' -X GET http://localhost:8685/v1/admin/nodeinfo
# Result
{
"result":{
"id":"QmP7HDFcYmJL12Ez4ZNVCKjKedfE7f48f1LAkUc3Whz4jP",
"chain_id":100,
"coinbase":"n1QZMXSZtW7BUerroSms4axNfyBGyFGkrh5",
"peer_count":4,
"synchronized":false,
"bucket_size":64,
"protocol_version":"/neb/1.0.0",
"route_table":[
{
"id":"QmP7HDFcYmJL12Ez4ZNVCKjKedfE7f48f1LAkUc3Whz4jP",
"address":[
"/ip4/127.0.0.1/tcp/8680",
"/ip4/192.168.1.206/tcp/8680"
]
},
{
"id":"QmUxw4PZ8kMEnHD8WaSVE92dtvdnwgufM6m5DrWemdk2M7",
"address":[
"/ip4/192.168.1.206/tcp/10003","/ip4/127.0.0.1/tcp/10003"
]
}
]
}
}
Return account list.
| Protocol | Method | API | | — | — | — | | gRpc | | Accounts | | HTTP | GET | /v1/admin/accounts |
none
addresses account list
# Request
curl -i -H 'Content-Type: application/json' -X GET http://localhost:8685/v1/admin/accounts
# Result
{
"result":{
"addresses":[
"n1FkntVUMPAsESuCAAPK711omQk19JotBjM",
"n1JNHZJEUvfBYfjDRD14Q73FX62nJAzXkMR",
"n1Kjom3J4KPsHKKzZ2xtt8Lc9W5pRDjeLcW",
"n1NHcbEus81PJxybnyg4aJgHAaSLDx9Vtf8",
"n1QZMXSZtW7BUerroSms4axNfyBGyFGkrh5",
"n1TV3sU6jyzR4rJ1D7jCAmtVGSntJagXZHC",
"n1WwqBXVMuYC3mFCEEuFFtAXad6yxqj4as4",
"n1Z6SbjLuAEXfhX1UJvXT6BB5osWYxVg3F3",
"n1Zn6iyyQRhqthmCfqGBzWfip1Wx8wEvtrJ"
]
}
}
NewAccount create a new account with passphrase.
| Protocol | Method | API | | — | — | — | | gRpc | | NewAccount | | HTTP | POST | /v1/admin/account/new |
Parameters
passphrase New account passphrase.
Returns
address New Account address.
HTTP Example
# Request
curl -i -H 'Content-Type: application/json' -X POST http://localhost:8685/v1/admin/account/new -d '{"passphrase":"passphrase"}'
# Result
{
"result":{
"address":"n1czGUvbQQton6KUWga4wKDLLKYDEn39mEk"
}
}
UnlockAccount unlock account with passphrase. After the default unlock time, the account will be locked.
| Protocol | Method | API | | — | — | — | | gRpc | | UnLockAccount | | HTTP | POST | /v1/admin/account/unlock |
Parameters
address UnLock account address.
passphrase UnLock account passphrase.
duration Unlock accoutn duration.
Returns
result UnLock account result, unit is ns.
HTTP Example
# Request
curl -i -H 'Content-Type: application/json' -X POST http://localhost:8685/v1/admin/account/unlock -d '{"address":"n1czGUvbQQton6KUWga4wKDLLKYDEn39mEk","passphrase":"passphrase","duration":"1000000000"}'
# Result
{
"result":{
"result":true
}
}
LockAccount lock account.
| Protocol | Method | API | | — | — | — | | gRpc | | LockAccount | | HTTP | POST | /v1/admin/account/lock |
Parameters
address Lock account address.
Returns
result Lock account result.
HTTP Example
# Request
curl -i -H 'Content-Type: application/json' -X POST http://localhost:8685/v1/admin/account/lock -d '{"address":"n1czGUvbQQton6KUWga4wKDLLKYDEn39mEk"}'
# Result
{
"result":{
"result":true
}
}
SignTransactionWithPassphrase sign transaction. The transaction’s from addrees must be unlocked before sign call.
| Protocol | Method | API | | — | — | — | | gRpc | | SignTransactionWithPassphrase | | HTTP | POST | /v1/admin/sign |
Parameters
transaction this is the same as the SendTransaction parameters.
passphrase from account passphrase
Returns
data Signed transaction data.
sign normal transaction Example
# Request
curl -i -H 'Content-Type: application/json' -X POST http://localhost:8685/v1/admin/sign -d '{"transaction":{"from":"n1QZMXSZtW7BUerroSms4axNfyBGyFGkrh5","to":"n1QZMXSZtW7BUerroSms4axNfyBGyFGkrh5", "value":"1000000000000000000","nonce":1,"gasPrice":"1000000","gasLimit":"2000000"}, "passphrase":"passphrase"}'
# Result
{
"result":{
"data":"CiBOW15yoZ+XqQbMNr4bQdJCXrBTehJKukwjcfW5eASgtBIaGVduKnw+6lM3HBXhJEzzuvv3yNdYANelaeAaGhlXbip8PupTNxwV4SRM87r798jXWADXpWngIhAAAAAAAAAAAA3gtrOnZAAAKAEwucHt1QU6CAoGYmluYXJ5QGRKEAAAAAAAAAAAAAAAAAAPQkBSEAAAAAAAAAAAAAAAAAAehIBYAWJB/BwhwhqUkp/gEJtE4kndoc7NdSgqD26IQqa0Hjbtg1JaszAvHZiW+XH7C+Ky9XTKRJKuTOc446646d/Sbz/nxQE="
}
}
SendTransactionWithPassphrase send transaction with passphrase.
| Protocol | Method | API | | — | — | — | | gRpc | | SendTransactionWithPassphrase | | HTTP | POST | /v1/admin/transactionWithPassphrase |
Parameters
transaction transaction parameters, which is the same as the SendTransaction parameters.
passphrase From address passphrase.
Returns
txhash transaction hash.
contract_address returns only for deploy contract transaction.
Example
# Request
curl -i -H 'Content-Type: application/json' -X POST http://localhost:8685/v1/admin/transactionWithPassphrase -d '{"transaction":{"from":"n1QZMXSZtW7BUerroSms4axNfyBGyFGkrh5","to":"n1QZMXSZtW7BUerroSms4axNfyBGyFGkrh5", "value":"1000000000000000000","nonce":1,"gasPrice":"1000000","gasLimit":"2000000"},"passphrase":"passphrase"}'
# Result
{
"result":{
"hash":"143eac221da8079f017bd6fd6b6a08ea0623114c93c638b94334d16aae109666",
"contract_address":""
}
}
Send the transaction. Parameters from, to, value, nonce, gasPrice and gasLimit are required. If the transaction is to send contract, you must specify the contract.
| Protocol | Method | API | | — | — | — | | gRpc | | SendTransaction | | HTTP | POST | /v1/user/transaction |
Parameters
from Hex string of the sender account addresss.
to Hex string of the receiver account addresss.
value Amount of value sending with this transaction.
nonce Transaction nonce.
gas_price gasPrice sending with this transaction.
gas_limit gasLimit sending with this transaction.
type transaction payload type. If the type is specified, the transaction type is determined and the corresponding parameter needs to be passed in, otherwise the transaction type is determined according to the contract and binary data. [optional]
- type enum:
binary: normal transaction with binarydeploy: deploy smart contractcall: call smart contract function
contract transaction contract object for deploy/call smart contract. [optional]
- Sub properties:
sourcecontract source code for deploy contract.sourceTypecontract source type for deploy contract. Currently supportjsandtsjsthe contract source write with javascript.tsthe contract source write with typescript.
functionthe contract call function for call contarct function.argsthe params of contract. The args content is JSON string of parameters array.
binary any binary data with a length limit = 64bytes. [optional]
Notice:
from = towhen deploy a contract, thetoaddress must be equal tofromaddress.noncethe value is plus one(+1) on the nonce value of the current from address. Current nonce can get from GetAccountState.gasPriceandgasLimitneed for every transaction. We recommend taking them use GetGasPrice and EstimateGas.contractparameter only need for smart contract deploy and call. When a smart contract is deployed, thesourceandsourceTypemust be specified, theargsis optional and passed in when the initialization function takes a parameter. Thefunctionfield is used to call the contract method.
Returns
txhash transaction hash.
contract_address returns only for deploying contract transaction.
Normal Transaction Example
# Request
curl -i -H 'Content-Type: application/json' -X POST http://localhost:8685/v1/admin/transaction -d '{"from":"n1QZMXSZtW7BUerroSms4axNfyBGyFGkrh5","to":"n1SAeQRVn33bamxN4ehWUT7JGdxipwn8b17", "value":"1000000000000000000","nonce":1000,"gasPrice":"1000000","gasLimit":"2000000"}'
# Result
{
"result":{
"txhash":"fb5204e106168549465ea38c040df0eacaa7cbd461454621867eb5abba92b4a5",
"contract_address":""
}
}
Deploy Smart Contract Example
# Request
curl -i -H 'Content-Type: application/json' -X POST http://localhost:8685/v1/admin/transaction -d '{"from":"n1QZMXSZtW7BUerroSms4axNfyBGyFGkrh5","to":"n1QZMXSZtW7BUerroSms4axNfyBGyFGkrh5", "value":"0","nonce":2,"gasPrice":"1000000","gasLimit":"2000000","contract":{
"source":"\"use strict\";var BankVaultContract=function(){LocalContractStorage.defineMapProperty(this,\"bankVault\")};BankVaultContract.prototype={init:function(){},save:function(height){var deposit=this.bankVault.get(Blockchain.transaction.from);var value=new BigNumber(Blockchain.transaction.value);if(deposit!=null&&deposit.balance.length>0){var balance=new BigNumber(deposit.balance);value=value.plus(balance)}var content={balance:value.toString(),height:Blockchain.block.height+height};this.bankVault.put(Blockchain.transaction.from,content)},takeout:function(amount){var deposit=this.bankVault.get(Blockchain.transaction.from);if(deposit==null){return 0}if(Blockchain.block.height<deposit.height){return 0}var balance=new BigNumber(deposit.balance);var value=new BigNumber(amount);if(balance.lessThan(value)){return 0}var result=Blockchain.transfer(Blockchain.transaction.from,value);if(result>0){deposit.balance=balance.dividedBy(value).toString();this.bankVault.put(Blockchain.transaction.from,deposit)}return result}};module.exports=BankVaultContract;","sourceType":"js", "args":""}}'
# Result
{
"result":{
"txhash":"3a69e23903a74a3a56dfc2bfbae1ed51f69debd487e2a8dea58ae9506f572f73",
"contract_address":"n21Y7arNbUfLGL59xgnA4ouinNxyvz773NW"
}
}
SignHash sign the hash of a message.
| Protocol | Method | API | | — | — | — | | gRpc | | SignHash | | HTTP | POST | /v1/admin/sign/hash |
Parameters
address Sign address
hash A sha3256 hash of the message
alg Sign algorithm
Returns
data Signed transaction data.
sign normal transaction Example
# Request
curl -i -H 'Content-Type: application/json' -X POST http://localhost:8685/v1/admin/sign/hash -d '{"address":"n1QZMXSZtW7BUerroSms4axNfyBGyFGkrh5","hash":"W+rOKNqs/tlvz02ez77yIYMCOr2EubpuNh5LvmwceI0=","alg":1}'
# Result
{
"result":{
"data":"a7HHsLRvKTNazD1QEogY+Fre8KmBIyK+lNa4zv0Z72puFVkY9uZD6nGixGx/6s1x6Baq7etGwlDNxVvHsoGWbAA="
}
}
StartPprof starts pprof
| Protocol | Method | API | | — | — | — | | gRpc | | Pprof | | HTTP | POST | /v1/admin/pprof |
Parameters
listen the address to listen
Returns
result start pprof result
Example
# Request
curl -i -H 'Content-Type: application/json' -X POST http://localhost:8685/v1/admin/pprof -d '{"listen":"0.0.0.0:1234"}'
# Result
{
"result":{
"result":true
}
}
GetConfig return the config current neb is using
| Protocol | Method | API | | — | — | — | | gRpc | | GetConfig | | HTTP | GET | /v1/admin/getConfig |
Parameters
none
Returns
config neb config
Example
# Request
curl -i -H 'Content-Type: application/json' -X GET http://localhost:8685/v1/admin/getConfig
# Result
{
"result":{
"config":{
"network":{
"seed":[],
"listen":["0.0.0.0:8680"],
"private_key":"conf/network/ed25519key",
"network_id":1
},
"chain":{
"chain_id":100,
"genesis":"conf/default/genesis.conf",
"datadir":"data.db",
"keydir":"keydir",
"start_mine":true,
"coinbase":"n1QZMXSZtW7BUerroSms4axNfyBGyFGkrh5",
"miner":"n1Zn6iyyQRhqthmCfqGBzWfip1Wx8wEvtrJ",
"passphrase":"",
"enable_remote_sign_server":false,
"remote_sign_server":"",
"gas_price":"",
"gas_limit":"",
"signature_ciphers":["ECC_SECP256K1"]
},
"rpc":{
"rpc_listen":["127.0.0.1:8684"],
"http_listen":["127.0.0.1:8685"],
"http_module":["api","admin"],
"connection_limits":0,
"http_limits":0,
"http_cors":[]
},
"stats":{
"enable_metrics":false,
"reporting_module":[],
"influxdb":{
"host":"http://localhost:8086",
"port":0,
"db":"nebulas",
"user":"admin",
"password":"admin"
},
"metrics_tags":[]
},
"misc":null,
"app":{
"log_level":"debug",
"log_file":"logs",
"log_age":0,
"enable_crash_report":true,
"crash_report_url":"https://crashreport.nebulas.io",
"pprof":{
"http_listen":"0.0.0.0:8888",
"cpuprofile":"",
"memprofile":""
},
"version":"0.7.0"
}
}
}
}
REPL console
Nebulas provide an interactive javascript console, which can invoke all API and management RPC methods. The console is connected to the local node by default without specifying host.
start console
Start console using the command:
./neb console
In the case of not specifying the configuration file, the terminal’s startup defaults to the configuration of conf/default/config.conf. If the local configuration file is not available or you want to specify the configuration file, the terminal starts like this:
./neb -c <config file> console
console interaction
The console can use the admin.setHost interface to specify the nodes that are connected. When the console is started or the host is not specified, the terminal is interacting with the local node. Therefore, you need to start a local node before starting the console.
> admin.setHost("https://testnet.nebulas.io")
Tips: The Testnet only starts the RPC interface of the API, so only the api scheme is available.
console usage
We have API and admin two schemes to access the console cmds. Users can quickly enter instructions using the TAB key.
> api.
api.call api.getBlockByHash api.getNebState api.subscribe
api.estimateGas api.getBlockByHeight api.getTransactionReceipt
api.gasPrice api.getDynasty api.latestIrreversibleBlock
api.getAccountState api.getEventsByHash api.sendRawTransaction
> admin.
admin.accounts admin.nodeInfo admin.signHash
admin.getConfig admin.sendTransaction admin.signTransactionWithPassphrase
admin.lockAccount admin.sendTransactionWithPassphrase admin.startPprof
admin.newAccount admin.setHost admin.unlockAccount
Some management methods may require passphrase. The user can pass in the password when the interface is called, or the console prompts the user for input when the password is not entered. We recommend using a console prompt to enter your password because it is not visible.
Enter the password directly:
> admin.unlockAccount("n1UWZa8yuvRgePRPgp8a2jX4J9UwGXfHp6i", "passphrase")
{
"result": {
"result": true
}
}
Use terminal prompt:
> admin.unlockAccount("n1UWZa8yuvRgePRPgp8a2jX4J9UwGXfHp6i")
Unlock account n1UWZa8yuvRgePRPgp8a2jX4J9UwGXfHp6i
Passphrase:
{
"result": {
"result": true
}
}
The interfaces with passphrase prompt:
admin.newAccount
admin.unlockAccount
admin.signHash
admin.signTransactionWithPassphrase
admin.sendTransactionWithPassphrase
The command parameters of the command line are consistent with the parameters of the RPC interface. NEB RPC and NEB RPC_Admin.
console exit
The console can exit with the ctrl-C or exit command.
Infrastructure
Network Protocol
For the network protocol, there are lots of existing solution. However, the Nebulas Team finally decides to define our own wire protocol, ensures the following principles to design the protocol:
- the protocol should be simple and straight.
- the message can be verified before receiving all package, fail early.
- the protocol should be debugging friendly, developer can easily understand the raw message.
Protocol
In Nebulas, we define our own wire protocol, as the following:
0 1 2 3 (bytes)
0 1 2 3 4 5 6 7 8 9 0 1 2 3 4 5 6 7 8 9 0 1 2 3 4 5 6 7 8 9 0 1
+-+-+-+-+-+-+-+-+-+-+-+-+-+-+-+-+-+-+-+-+-+-+-+-+-+-+-+-+-+-+-+-+
| Magic Number |
+---------------------------------------------------------------+
| Chain ID |
+-----------------------------------------------+---------------+
| Reserved | Version |
+-----------------------------------------------+---------------+
| |
+ +
| Message Name |
+ +
| |
+---------------------------------------------------------------+
| Data Length |
+---------------------------------------------------------------+
| Data Checksum |
+---------------------------------------------------------------+
| Header Checksum |
|---------------------------------------------------------------+
| |
+ Data +
. .
. .
| |
+---------------------------------------------------------------+
- Magic Number: 32 bits (4 chars)
- The protocol magic number, A constant numerical or text value used to identify protocol.
- Default: 0x4e, 0x45, 0x42, 0x31
- Chain ID: 32 bits
- The Chain ID is used to distinguish the test network and the main network.
- Reserved: 24 bits
- reserved field.
- The first bit indicates whether the network message is compressed.
- compressed: {0x80, 0x0, 0x0}; uncompressed: {0x0, 0x0, 0x0}
- Version: 8 bits
- The version of the Message Name.
- Message Name: 96 bits (12 chars)
- The identification or the name of the Message.
- Data Length: 32 bits
- The total length of the Data.
- Data Checksum: 32 bits
- The CRC32 checksum of the Data.
- Header Checksum: 32 bits
- The CRC32 checksum of the fields from Magic Number to Data Checksum, totally 256 bits.
- Data: variable length, max 512M.
- The message data.
We always use Big-Endian in message protocol.
Handshaking Messages
- Hello
the handshaking message when peer connect to others.
version: 0x1
data: struct {
string node_id // the node id, generated by underlying libp2p.
string client_version // the client version, x.y.z schema, eg. 0.1.0.
}
- OK
the response message for handshaking.
version: 0x1
data: struct {
string node_id // the node id, generated by underlying libp2p.
string node_version // the client version, x.y.z schema, eg. 0.1.0.
}
- Bye
the message to close connection.
version: 0x1
data: struct {
string reason
}
Networking Messages
- NetSyncRoutes
request peers to sync route tables.
version: 0x1
- NetRoutes
contains the local route tables.
version: 0x1
data: struct {
PeerID[] peer_ids // router tables.
}
struct PeerID {
string node_id // the node id.
}
Nebulas Messages
TBD.
Crypto Design Doc
Similar to Bitcoin and Ethereum, Nebulas also adopts elliptic curve algorithm as its basic encryption algorithm for Nebulas transactions. Users’ private key will be encrypted with user’s passphrases and stored in keystore.
Hash
Support generic hash functions, like sha256, sha3256 and ripemd160 etc.
Keystore
Nebulas Keystore are designed to manage user’s keys.
Key
The Key interface is designed to support various keys, including symmetric keys and asymmetric keys.
Provider
Keystore provide different methods to save keys, such as
memory_provider and persistence_provider. Before saved, key has
been encrypted in keystore.
memory provider: This type of provider keep keys in memory. After the key has been encrypted with the passphrase when user setkey or load, it is cached in memory provider.persistence provider: This type of provider serialize the encrypted key to the file. The file is compatible with the ethereum’s keystore file,users can back up the address with its privatekey in it.
Signature
The Signature interface is used to provide applications the functionality of a digital signature algorithm. A Signature object can be used to generate and verify digital signatures.
There are two phases to use a Signature object for either signing data :
- Initialization: with a private key, which initializes the signature for signing (see initSign() in the source code of go-nebulas).
- Signing on all input bytes.
A Signature object can recover the public key with a signatrue and the plain text was singed on(see function RecoverSignerFromSignature in go-nebulas). So just comparing the from address and the address derived from the public key can verfiy a transaction
Similar as Android Keystore, TPM, TEE and hardware low level security protection will be supported as a provider later.
NVM - Nebulas Virtual Machine
NVM is one of the most important components in Nebulas. As the name described, it provides a managed virtual machine execution environments for Smart Contract and Protocol Code.
go-nebulas now support two kinds of Virtual Machine:
- V8: Chrome V8
- LLVM: Low-Level Virtual Machine
In go-nebulas, we design and implement Nebulas V8 Engine based on Chrome V8.
Nebulas V8 Engine provides a high performance sandbox for Smart Contract execution. It guarantees user deployed code is running in a managed environment, and prevents massive resource consumption on hosts. Owing to use of Chrome V8, JavaScript and TypeScript are first-class languages for Nebulas Smart Contract. Anyone familiar with JavaScript or TypeScript can write their own Smart Contract and run it in Nebulas V8.
The following content is an example of Smart Contract written in JavaScript:
"use strict";
var BankVaultContract = function() {
LocalContractStorage.defineMapProperty(this, "bankVault");
};
// save value to contract, only after height of block, users can takeout
BankVaultContract.prototype = {
init:function() {},
save:function(height) {
var deposit = this.bankVault.get(Blockchain.transaction.from);
var value = new BigNumber(Blockchain.transaction.value);
if (deposit != null && deposit.balance.length > 0) {
var balance = new BigNumber(deposit.balance);
value = value.plus(balance);
}
var content = {
balance:value.toString(),
height:Blockchain.block.height + height
};
this.bankVault.put(Blockchain.transaction.from, content);
},
takeout:function(amount) {
var deposit = this.bankVault.get(Blockchain.transaction.from);
if (deposit == null) {
return 0;
}
if (Blockchain.block.height < deposit.height) {
return 0;
}
var balance = new BigNumber(deposit.balance);
var value = new BigNumber(amount);
if (balance.lessThan(value)) {
return 0;
}
var result = Blockchain.transfer(Blockchain.transaction.from, value);
if (result > 0) {
deposit.balance = balance.dividedBy(value).toString();
this.bankVault.put(Blockchain.transaction.from, deposit);
}
return result;
}
};
module.exports = BankVaultContract;
For more information about the smart contract in Nebulas, please go to Smart Contract.
For more information about the design of Nebulas V8 Engine, please go to Nebulas V8 Engine.
TBD.
Nebulas V8 Engine
Nebulas V8 Engine is
LLVM Engine
TBD.
permission_control_in_smart_contract
What Is Permission Control Of Smart Contract
The permission control of a smart contract refers to whether the contract caller has permission to invoke the function in the contract. There are two types of permission control: owner permission control and other permission control.
Owner permissions control: Only the creator of the contract can call this method, other callers can not call the method.
Other permission control: The contract method can be invoked if the contract developer defines a conditional caller according to the contract logic. Otherwise, it cannot be invoked.
Owner Permission Control
If you want to specify a owner to a small contract and wish if some functions could be called only by the owner and no one else. You can use following lines of code in your smart contract.
"use strict";
var onlyOwnerContract = function () {
LocalContractStorage.defineProperty(this, "owner");
};
onlyOwnerContract.prototype = {
init: function() {
this.owner=Blockchain.transaction.from;
},
onlyOwnerFunction: function(){
if(this.owner==Blockchain.transaction.from){
//your smart contract code
return true;
}else{
return false;
}
}
};
module.exports = BankVaultContract;
Explanation:
The function init is only called once when the contract is deployed, there you specify the owner of the contract.The onlyOwnerFunctiuon ensures that the function is called by the owner of contact.
Other Permission Control
In your smart contract, if you need to specify other permission control to a smart contract. For example, in your smart contract, you need to verify the transaction value in your smart contract. you can write your smart contract in the following way.
'use strict';
var Mixin = function () {};
Mixin.UNPAYABLE = function () {
if (Blockchain.transaction.value.gt(0)) {
return false;
}
return true;
};
Mixin.PAYABLE = function () {
if (Blockchain.transaction.value.gt(0)) {
return true;
}
return false;
};
Mixin.POSITIVE = function () {
console.log("POSITIVE");
return true;
};
Mixin.UNPOSITIVE = function () {
console.log("UNPOSITIVE");
return false;
};
Mixin.decorator = function () {
var funcs = arguments;
if (funcs.length < 1) {
throw new Error("mixin decorator need parameters");
}
return function () {
for (var i = 0; i < funcs.length - 1; i ++) {
var func = funcs[i];
if (typeof func !== "function" || !func()) {
throw new Error("mixin decorator failure");
}
}
var exeFunc = funcs[funcs.length - 1];
if (typeof exeFunc === "function") {
exeFunc.apply(this, arguments);
} else {
throw new Error("mixin decorator need an executable method");
}
};
};
var SampleContract = function () {
};
SampleContract.prototype = {
init: function () {
},
unpayable: function () {
console.log("contract function unpayable:", arguments);
},
payable: Mixin.decorator(Mixin.PAYABLE, function () {
console.log("contract function payable:",arguments);
}),
contract1: Mixin.decorator(Mixin.POSITIVE, function (arg) {
console.log("contract1 function:", arg);
}),
contract2: Mixin.decorator(Mixin.UNPOSITIVE, function (arg) {
console.log("contract2 function:", arg);
}),
contract3: Mixin.decorator(Mixin.PAYABLE, Mixin.POSITIVE, function (arg) {
console.log("contract3 function:", arg);
}),
contract4: Mixin.decorator(Mixin.PAYABLE, Mixin.UNPOSITIVE, function (arg) {
console.log("contract4 function:", arg);
})
};
module.exports = SampleContract;
Explanation:
Mixin.UNPAYABLE,Mixin.PAYABLE,Mixin.POSITIVE ,Mixin.UNPOSITIVE are permission control function。The permission control function as follows:
- Mixin.UNPAYABLE: check the transaction sent value, if value is less than 0 return true, otherwise returns false
- Mixin.UNPAYABLE : check the transaction sent value, if value is greater than 0 return true, otherwise returns false
- Mixin.UNPOSITIVE :output log UNPOSITIVE
- Mixin.POSITIVE :output log POSITIVE
Implement permission control in Mixin.decorator:
- check arguments: if (funcs.length
<
1) - invoke permission control function: if (typeof func !== “function” || !func())
- if permission control function success ,invoke other function: var exeFunc = funcs[funcs.length - 1]
Permission control tests in smart contracts are as follows:
The permission control function of the contract1 is Mixin.POSITIVE. If the permission check passes, the output is printed, otherwise the error is thrown by the permission check function.
contract1: Mixin.decorator(Mixin.POSITIVE, function (arg) { console.log("contract1 function:", arg); })
The permission control function of the contract2 is Mixin.UNPOSITIVE. If the permission check passes, the output is printed, otherwise the error is thrown by the permission check function.
contract2: Mixin.decorator(Mixin.UNPOSITIVE, function (arg) { console.log("contract2 function:", arg); })
The permission control function of the contract3 is Mixin.PAYABLE, Mixin.POSITIVE. If the permission check passes, the output is printed, otherwise the error is thrown by the permission check function.
contract3: Mixin.decorator(Mixin.PAYABLE, Mixin.POSITIVE, function (arg) { console.log("contract3 function:", arg); })
The permission control function of the contract4 is Mixin.PAYABLE, Mixin.UNPOSITIVE. If the permission check passes, the output is printed, otherwise the error is thrown by the permission check function.
contract4: Mixin.decorator(Mixin.PAYABLE, Mixin.UNPOSITIVE, function (arg) { console.log("contract4 function:", arg); })
Tips:
With reference to the above example, the developer needs only three steps to implement other permission controls:
- Implement permission control functions.
- Implement the decorator function, and the permission check is completed by the conditional statement if (typeof func !== “function” || !func()).
- Refer to the contract1 function to implement other permission control.
Licensing
Nebulas Open Source Project License
The preferred license for the Nebulas Open Source Project is the GNU Lesser General Public License Version 3.0 (“LGPL v3”), which is commercial friendly, and encourage developers or companies modify and publish their changes.
However, we also aware that big corporations is favoured by other licenses, for example, Apache Software License 2.0 (“Apache v2.0”), which is more commercial friendly. For the Nebulas Team, we are very glad to see the source code and protocol of Nebulas is widely used both in open source applications and non-open source applications.
In this way, we are still considering the license choice, which kind of license is the best for nebulas ecosystem. We expect to select one of the LGPL v3, the Apache v2.0 or the MIT license. If the latter is chosen, it will come with an amendment allowing it to be used more widely.
Contributor License Agreement
TBD.
Config
There are four types of configuration files in Nebulas.
- Normal node.
- Miner node.(Miner - related configuration is increased relative to normal nodes)
- Super node.(Some connection limits are higher than normal nodes)
- Sign node. (Do not synchronize information with any node, only do signature and unlock)
Normal node
network {
seed: ["/ip4/13.251.33.39/tcp/8680/ipfs/QmVm5CECJdPAHmzJWN2X7tP335L5LguGb9QLQ78riA9gw3"]
listen: ["0.0.0.0:8680"]
private_key: "conf/networkkey"
}
chain {
chain_id:1
datadir: "data.db"
keydir: "keydir"
genesis: "conf/genesis.conf"
signature_ciphers: ["ECC_SECP256K1"]
}
rpc {
rpc_listen: ["0.0.0.0:8784"]
http_listen: ["0.0.0.0:8785"]
http_module: ["api","admin"]
connection_limits:200
http_limits:200
}
app {
log_level: "debug"
log_file: "logs"
enable_crash_report: true
}
stats {
enable_metrics: false
}
Miner node
network {
seed: ["/ip4/13.251.33.39/tcp/8680/ipfs/QmVm5CECJdPAHmzJWN2X7tP335L5LguGb9QLQ78riA9gw3"]
listen: ["0.0.0.0:8680"]
private_key: "conf/networkkey"
}
chain {
chain_id: 1
datadir: "data.db"
keydir: "keydir"
genesis: "conf/genesis.conf"
coinbase: "n1EzGmFsVepKduN1U5QFyhLqpzFvM9sRSmG"
signature_ciphers: ["ECC_SECP256K1"]
start_mine:true
miner: "n1PxjEu9sa2nvk9SjSGtJA91nthogZ1FhgY"
remote_sign_server: "127.0.0.1:8694"
enable_remote_sign_server: true
}
rpc {
rpc_listen: ["127.0.0.1:8684"]
http_listen: ["0.0.0.0:8685"]
http_module: ["api","admin"]
connection_limits:200
http_limits:200
}
app {
log_level: "debug"
log_file: "logs"
enable_crash_report: true
}
stats {
enable_metrics: false
}
Super node
network {
seed: ["/ip4/13.251.33.39/tcp/8680/ipfs/QmVm5CECJdPAHmzJWN2X7tP335L5LguGb9QLQ78riA9gw3"]
listen: ["0.0.0.0:8680"]
private_key: "conf/networkkey"
stream_limits: 500
reserved_stream_limits: 50
}
chain {
chain_id:1
datadir: "data.db"
keydir: "keydir"
genesis: "conf/genesis.conf"
signature_ciphers: ["ECC_SECP256K1"]
}
rpc {
rpc_listen: ["0.0.0.0:8684"]
http_listen: ["0.0.0.0:8685"]
http_module: ["api"]
connection_limits:500
http_limits:500
http_cors: ["*"]
}
app {
log_level: "debug"
log_file: "logs"
enable_crash_report: true
pprof:{
http_listen: "0.0.0.0:8888"
}
}
stats {
enable_metrics: false
}
Sign node
network {
listen: ["0.0.0.0:8680"]
private_key: "conf/networkkey"
}
chain {
chain_id:0
datadir: "data.db"
keydir: "keydir"
genesis: "conf/genesis.conf"
signature_ciphers: ["ECC_SECP256K1"]
}
rpc {
rpc_listen: ["0.0.0.0:8684"]
http_listen: ["127.0.0.1:8685"]
http_module: ["admin"]
connection_limits:200
http_limits:200
}
app {
log_level: "debug"
log_file: "logs"
enable_crash_report: true
pprof:{
http_listen: "127.0.0.1:8888"
}
}
stats {
enable_metrics: false
}
Contributors
Coming Soon.