NeatSeq-Flow: A Lightweight Software for Efficient Execution of High-Throughput Sequencing Workflows.


Important links
Attention
Due to version conflicts, the GUI was temporarily out of order. The problem has been solved so if, for some reason, NeatSeq-Flow GUI does not work for you, please try re-installing it.
What is NeatSeq-Flow?
NeatSeq-Flow is a platform for modular design and execution of bioinformatics workflows on a local computer or, preferably, computer cluster. The platform has a command-line interface as well as a fully functional graphical user interface (GUI), both used locally without the need to connect to remote servers. Analysis programs comprising a workflow can be anything executable from the Linux command-line, either publicly available or in-house programs. Ready-to-use workflows are available for common Bioinformatics analyses such as assembly & annotation, RNA-Seq, ChIP-Seq, variant calling, metagenomics and genomic epidemiology. Creation and sharing of new workflows is easy and intuitive, without need for programming knowledge. NeatSeq-Flow is general-purpose and may easily be adjusted to work on different types of analyses other than high-throughput sequencing.
NeatSeq-Flow is fully accessible to non-programmers, without compromising power, flexibility and efficiency. The user only has to specify the location of input files and the workflow design, and need not bother with the location of intermediate and final files, nor with transferring files between workflow steps. Workflow execution is fully parallelized on the cluster, and progress can be inspected through NeatSeq-Flow “terminal monitor”. All workflow steps, parameters and order of execution are stored in one file, which together with the shell scripts produced by NeatSeq-Flow comprise a complete documentation of the workflow and enable future execution of the exact same workflow or modifications thereof.
Available Modules and Workflows
Authors
- Menachem Sklarz
- Liron Levin
- Michal Gordon
- Vered Chalifa-Caspi
Bioinformatics Core Facility, NIBN, Ben-Gurion University of the Negev, Beer-Sheva, Israel.
Cite NeatSeq-Flow
Contact Us
Web Site Contents:
About NeatSeq-Flow
Author: Vered Chalifa-Caspi
NeatSeq-Flow is a platform for modular design and execution of bioinformatics workflows on a local computer or, preferably, computer cluster. The platform has a command-line interface as well as a fully functional graphical user interface (GUI), both used locally without the need to connect to remote servers. Analysis programs comprising a workflow can be anything executable from the Linux command-line, either publicly available or in-house programs. Ready-to-use workflows are available for common Bioinformatics analyses such as assembly & annotation, RNA-Seq, ChIP-Seq, variant calling, metagenomics and genomic epidemiology. Creation and sharing of new workflows is easy and intuitive, without need for programming knowledge. NeatSeq-Flow is general-purpose and may easily be adjusted to work on different types of analyses other than high-throughput sequencing.
- The main benefits in using NeatSeq-Flow:
- Simple, cross-platform installation.
- All workflow components and parameters, as well as their order of execution (a.k.a workflow design), are specified in a single file which may be prepared by the user either manually (YAML format) or through the GUI. This, together with the shell scripts produced by NeatSeq-Flow and additional NeatSeq-Flow summary files, comprise a complete documentation of the executed workflow and enable future execution of the exact same workflow or modifications thereof.
- The user is relieved from the need to know or manage the locations of intermediate or final files, or to transfer files between workflow steps. Workflow output file locations are determined by NeatSeq-Flow such that they are neatly organized in an intuitive directory structure.
- NeatSeq-Flow’s “Terminal Monitor” shows script execution in real time, and reports on execution errors immediately when they occur, thus facilitating user control on the workflow.
- The platform can accommodate workflows of any degree of complexity, and efficiently executes them in a parallelized manner on the user’s computer cluster.
- Through an intuitive GUI, NeatSeq-Flow is fully accessible to non-programmers, without compromising power, flexibility and efficiency.
- Users can easily create complex workflows from a variety of high-throughput sequencing applications made available by NeatSeq-Flow as independent modules. In addition, a generic module enables direct incorporation of applications without pre-built modules.
- Advanced users can run NeatSeq-Flow through the command-line, and create their own modules using a provided template and only basic Python commands.
- The modules and workflows are designed to be easily shared. In addition, the support for usage of CONDA environments enables easy portability and sharing of entire working environment for workflow execution.
- NeatSeq-Flow input and output:
- The input for NeatSeq-Flow is high throughput sequencing raw or processed data and any other sequence data (e.g. FASTQ, FASTA, BAM, BED, VCF), or any other data defined by the user. The output is a neat directory structure with all NeatSeq-Flow-generated shell scripts, intermediate and result files of the executed analysis programs, STDERR and SDTOUT of all shell scripts, a log file, workflow documentation and a self-sustaining workflow backup for reproducibility.
- NeatSeq-Flow processing method:
NeatSeq-Flow operations are implemented as modules, where each module is a wrapper for one or a set of analysis programs. In addition, NeatSeq-Flow includes a generic module which can execute any analysis program.
The user needs to specify the location of the workflow input files, the order of operations, and their parameters. NeatSeq-Flow then creates a hierarchy of shell scripts: a “master script” that calls all step-level scripts; step level scripts that call all sample- (or project-) level scripts; and sample- (and/or project-) level scripts that call the relevant analysis programs. The latter shell scripts contain the code for executing the analysis programs, including input and output file locations, user-defined parameters and dependency directives (i.e. which steps need to wait for previous steps before they start). Execution of the workflow takes place by running the workflow’s master shell script.
Parallelization on cluster CPUs is applied both sample-wise as well as step-wise for steps that are on independent branches of the workflow. When necessary, large input files are splitted and the results merged after execution. The workflow output files are neatly organized by module, step and sample, making it easy to locate required information. All workflow elements necessary for its execution are copied into a dedicated backup directory, enabling reproducing the workflow at any time in the future.
- How NeatSeq-Flow saves time and reduces errors:
- NeatSeq-Flow helps to significantly reduce the time required for designing and executing multi-step analyses. Traditionally, the bioinformatician would write shell scripts that execute the different operations of his/her desired workflow, and send them sequentially to a computer cluster job scheduler for execution on distributed nodes. Creating and executing these script-based workflows is time consuming and error prone, especially when considering projects with hundreds or thousands of samples, with many steps and plenty of intermediate files, or when the same analysis has to be repeated with different combinations of programs and parameters.
- With NeatSeq-Flow, the user only needs to specify the location of input files and the workflow design. Then, NeatSeq-Flow creates all necessary shell scripts and executes them on the cluster. The scripts contain directives enabling parallelization and ensuring sequential execution. This makes the analysis much faster than manually running scripts one after the other.
- The user is relieved from the need to know or manage the locations of intermediate or final files, or to transfer files between workflow steps. Workflow output file locations are determined by NeatSeq-Flow such that they are neatly organized in an intuitive directory structure.
- NeatSeq-Flow “Terminal Monitor” shows script execution in real time, and reports on execution errors immediately when they occur, thus facilitating user control on the workflow.
- Repeating a workflow with different combinations of programs and/or with different parameters is as easy as opening the “parameter files” (either in the GUI or through a text editor) and modifying it, and then rerunning. Similarly, repeating a workflow with a different set of sample files only requires re-specifying the files in the GUI or modifying the “sample file” in Excel.
- NeatSeq-Flow development
NeatSeq-Flow, founded by Dr. Menachem Sklarz, has been developed at the Bioinformatics Core Facility of the National Institute of Biotechnology in the Negev, Ben-Gurion University of the Negev. The software is in operation since November 2014, and is still under continuous development. NeatSeq-Flow GUI has been developed by Dr. Liron Levin and is operational since June 2018.
New modules and workflows are continuously added to NeatSeq-Flow, and our hope is that the growing community of NeatSeq-Flow users will help expand NeatSeq-Flow repository by contributing additional modules and workflows and extending existing ones.
Read more: NeatSeq-Flow article on BioRXiv
NeatSeq-Flow Tutorial
Author: Liron Levin
This tutorial describes how to create and execute the workflow described in the NeatSeq-Flow manuscript (Article on BioRXiv).
Table of Contents:
Short Description
The example workflow receives FASTQ files and performs:
- Quality testing and trimming of the raw sequence reads (paired- or single-end).
- Alignment (“mapping”) of the reads to a reference genome using two different programs.
- Sorting the samples’ BAM files as final results.
- Creation of a report on reads and mapping quality.
The input files in this tutorial are whole genome sequenced bacteria, and the resulting BAM files may be used for subsequent variant calling and other analyses.
The example workflow is distributed as part of NeatSeq-Flow for quick testing.
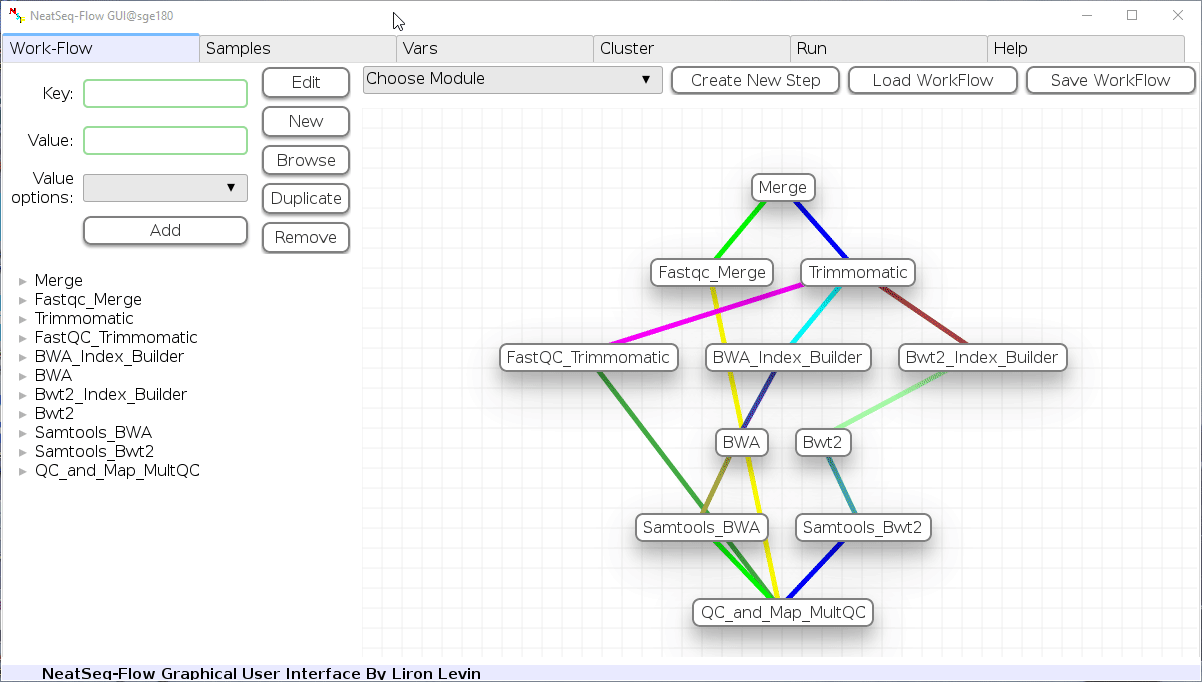
The workflow consists of the following steps:
| Step | Module | Program |
|---|---|---|
| Merge | Import | |
| Fastqc_Merge | fastqc_html | fastqc |
| Trimmomatic | trimmo | trimmomatic |
| FastQC_Trimmomatic | fastqc_html | fastqc |
| BWA_Index_Builder | bwa_builder | bwa |
| BWA | bwa_mapper | bwa |
| Bwt2_Index_Builder | bowtie2_builder | bowtie2 |
| Bwt2 | bowtie2_mapper | bowtie2 |
| Samtools_BWA | samtools | samtools |
| Samtools_Bwt2 | samtools | samtools |
| QC_and_Map_MultQC | Multiqc | MultiQC |
Workflow Schema

Required data
This WF requires samples with fastq file(s) (paired or single) and a reference genome in fasta format.
Note
- The files for the tutorial are included in the installation procedure below.
- The three samples used in this example workflow are SRR453031, SRR453032 and SRR453033 from Staphylococcus aureus subsp. aureus Genome Sequencing project (BioProject PRJNA157545). The Staphylococcus aureus GCF_000284535.1 genome assembly was used as reference genome.
- To save run-time and space, the raw sample files contain only the first 500,000 lines each.
Required programs
- fastqc
- trimmomatic
- multiqc
- samtools=1.3
- BWA
- bowtie2
Note
The programs are installed as part of the installation process using CONDA.
Install NeatSeq-Flow
In this Tutorial we will install NeatSeq-Flow and all it’s dependencies in one go with a provided bash script.
The script performs the following:
- Miniconda installation
gitinstallation- NeatSeq-Flow conda environment creation
Everything will be installed in a directory called NeatSeq_Flow_install in your HOME directory. To uninstall NeatSeq-Flow, just delete the directory.
cd $HOME curl -LO https://raw.githubusercontent.com/bioinfo-core-BGU/neatseq-flow/master/docs/source/_extra/extra/NeatSeq_Flow_install_script.sh bash NeatSeq_Flow_install_script.sh temp export PATH=$HOME'/NeatSeq_Flow_install/bin:'$PATH
Note
To keep conda in your PATH, whenever opening a new terminal type this command:
export PATH=$HOME'/NeatSeq_Flow_install/bin:'$PATH
Setup the Tutorial Work-Flow
In this part we will:
- Create a Tutorial directory
- Create the Tutorial conda environment
- Download the Tutorial’s Work-Flow parameter file
- Download the Tutorial’s Work-Flow Sample’s file
Create a Tutorial directory
In the command line type:
mkdir Tutorial cd Tutorial
Create the Tutorial conda environment
This step will download and install all the Required programs for this Tutorial Work-Flow.
Download the NeatSeq Flow Tutorial installer file:
curl https://raw.githubusercontent.com/bioinfo-core-BGU/neatseq-flow-tutorial/master/NeatSeq_Flow_Tutorial_Install.yaml > NeatSeq_Flow_Tutorial_Install.yamlCreate the NeatSeq_Flow_Tutorial conda environment:
conda env create -f NeatSeq_Flow_Tutorial_Install.yaml
Download the Tutorial’s Work-Flow parameter file
In the command line type:
curl https://raw.githubusercontent.com/bioinfo-core-BGU/neatseq-flow-tutorial/master/Example_WF_conda_env.yaml > Tutorial_Parameter_file.yaml
Download the Tutorial’s Work-Flow Sample’s file
In the command line type:
curl https://raw.githubusercontent.com/bioinfo-core-BGU/neatseq-flow-tutorial/master/Samples_conda.nsfs > Tutorial_Samples_file.nsfs
Note
- The sample’s file indicate the files that will be used in this analysis.
- These files were downloaded when the Tutorial’s conda environment was created in the Create the Tutorial conda environment step and are found within the conda environment itself
Title Example_WF_From_the_manuscript
#Type Path
Nucleotide /$CONDA_PREFIX/TUTORIAL/Data/Reference_genome.fasta
#SampleID Type Path
Sample1 Forward /$CONDA_PREFIX/TUTORIAL/Data/Sample1.F.fastq.gz
Sample1 Reverse /$CONDA_PREFIX/TUTORIAL/Data/Sample1.R.fastq.gz
Sample2 Forward /$CONDA_PREFIX/TUTORIAL/Data/Sample2.F.fastq.gz
Sample2 Reverse /$CONDA_PREFIX/TUTORIAL/Data/Sample2.R.fastq.gz
Sample3 Forward /$CONDA_PREFIX/TUTORIAL/Data/Sample3.F.fastq.gz
Sample3 Reverse /$CONDA_PREFIX/TUTORIAL/Data/Sample3.R.fastq.gz
- The “$CONDA_PREFIX” indicate the location of the Tutorial’s conda environment.
Learn How to use the Graphical User Interface
Typically, the installation of both NeatSeq-Flow and its GUI is done on a Linux operating system. It is then possible to use the GUI from a Windows computer through a Windows X server such as MobaXterm.
In this part of the Tutorial we will:
Prerequisites
- The computer where the GUI is installed needs to have a web browser, preferably FireFox.
- To use the GUI from another computer having a Windows operating system, that computer needs to have a Windows X server, e.g. MobaXterm.
Activate the GUI
Activate the NeatSeq_Flow conda environment:
bash source activate NeatSeq_FlowRun NeatSeq_Flow_GUI:
NeatSeq_Flow_GUI.py
Learn How to Create a Work-Flow
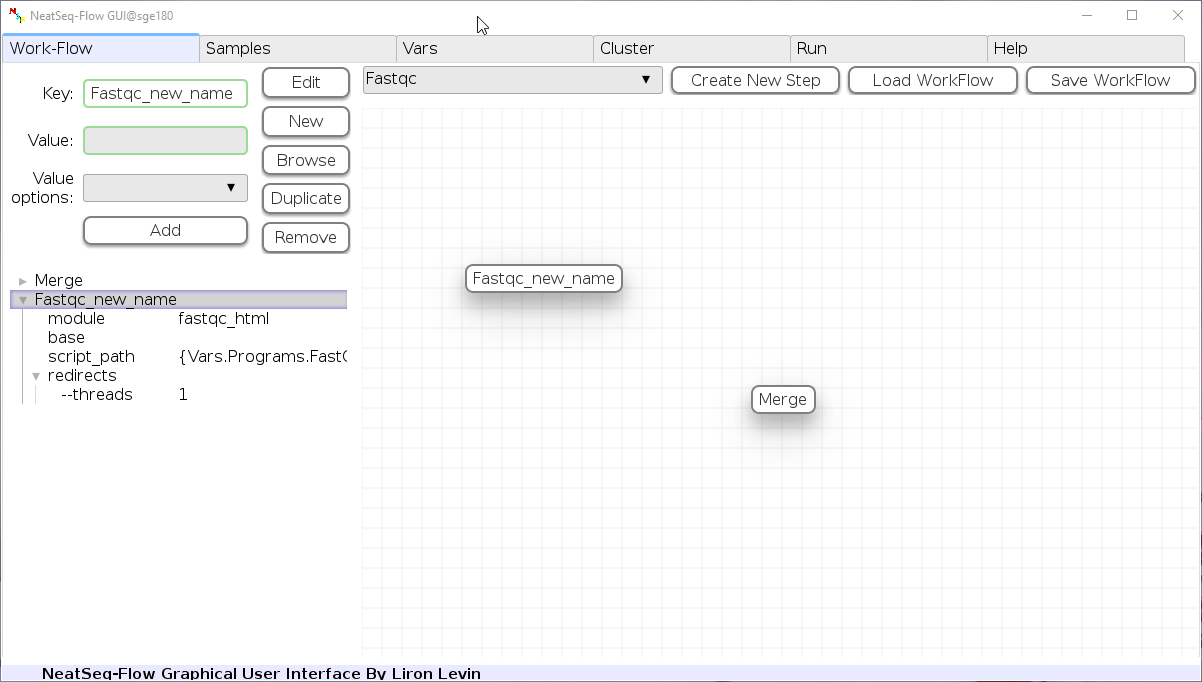
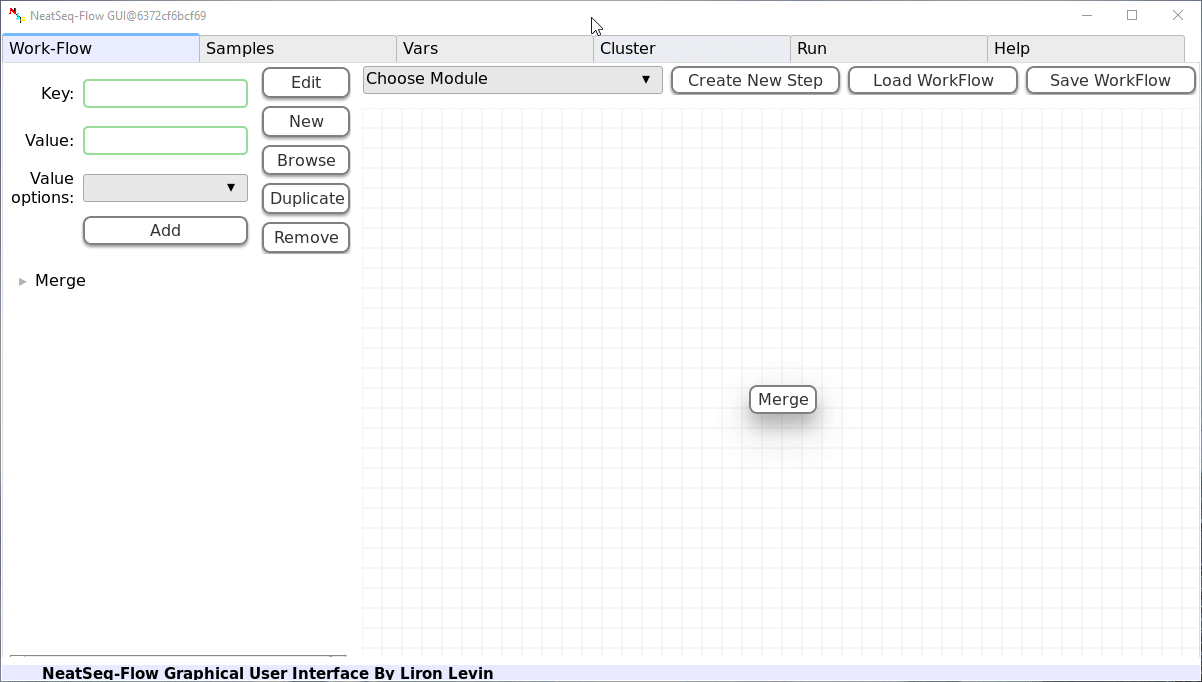
Add New Step:

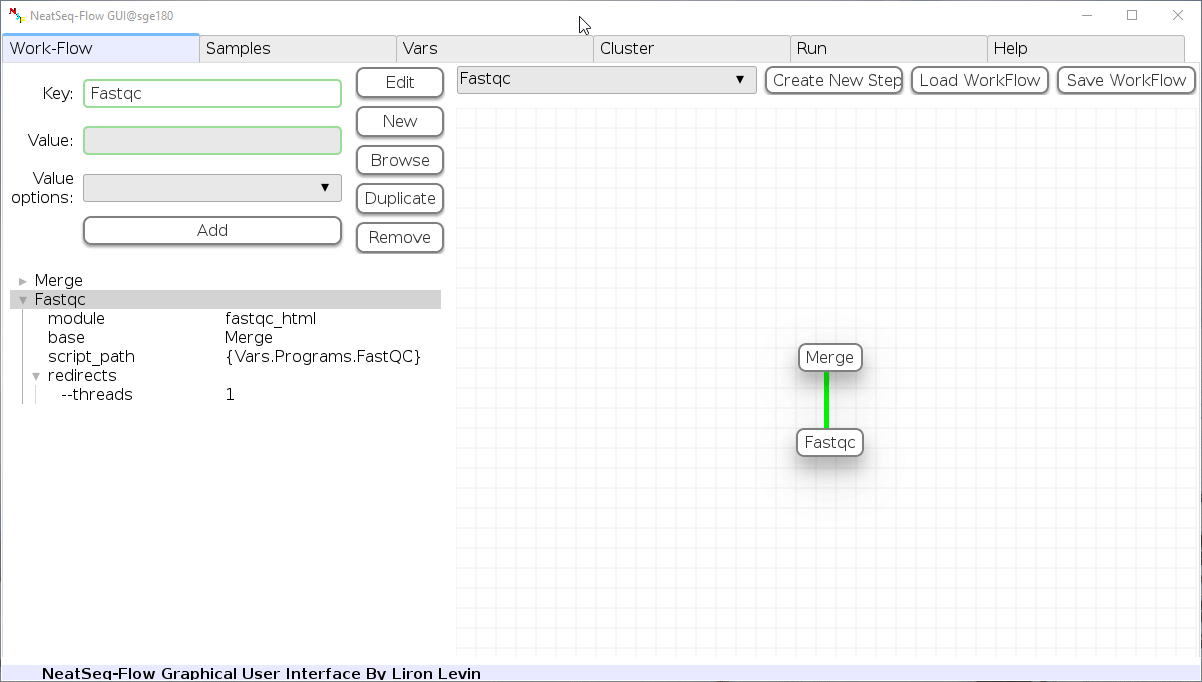
In the ‘Work-Flow’ Tab choose a module template and click on the ‘Create New Step’ button.
Change Step Name:

You can change the new step name by clicking on the step name and edit the key field and then click the ‘Edit’ button to set the change.
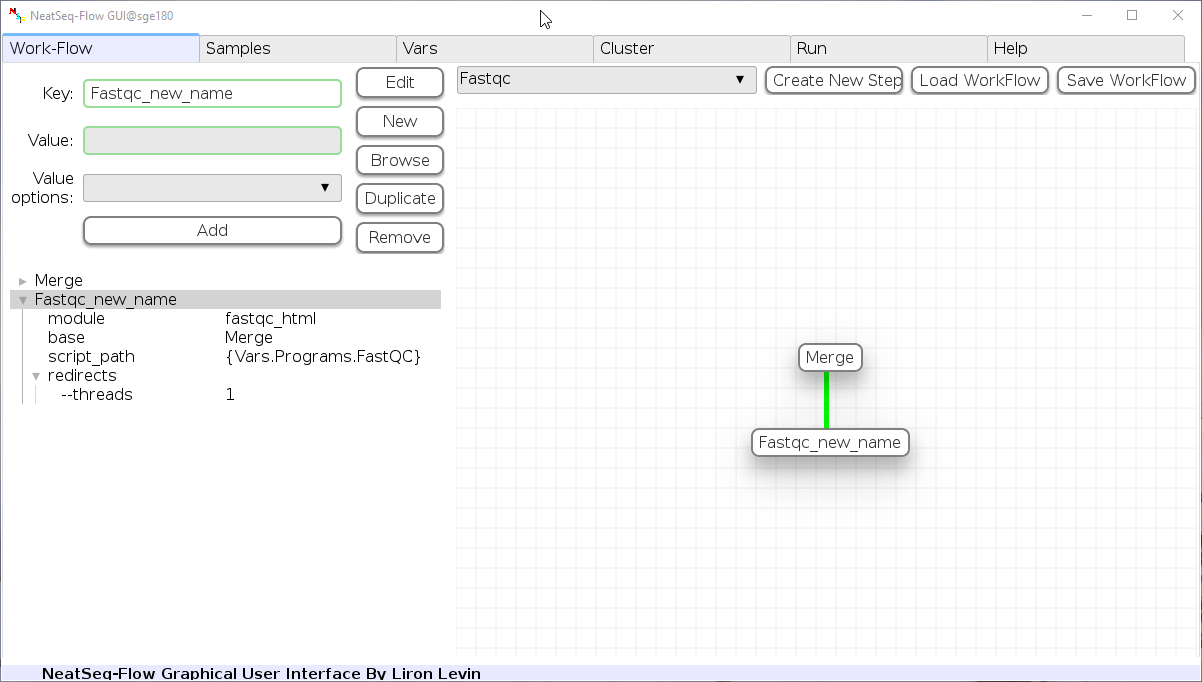
To determine the position of the new step in the work-flow:
- Click on the step button to see the step options
- Click on the base option
- Click on the ‘Value options’ drop-down menu
- Choose a previous step and click the ‘Add’ button. This can be repeated to choose several previous steps.
- Click the ‘Edit’ button to set the changes.
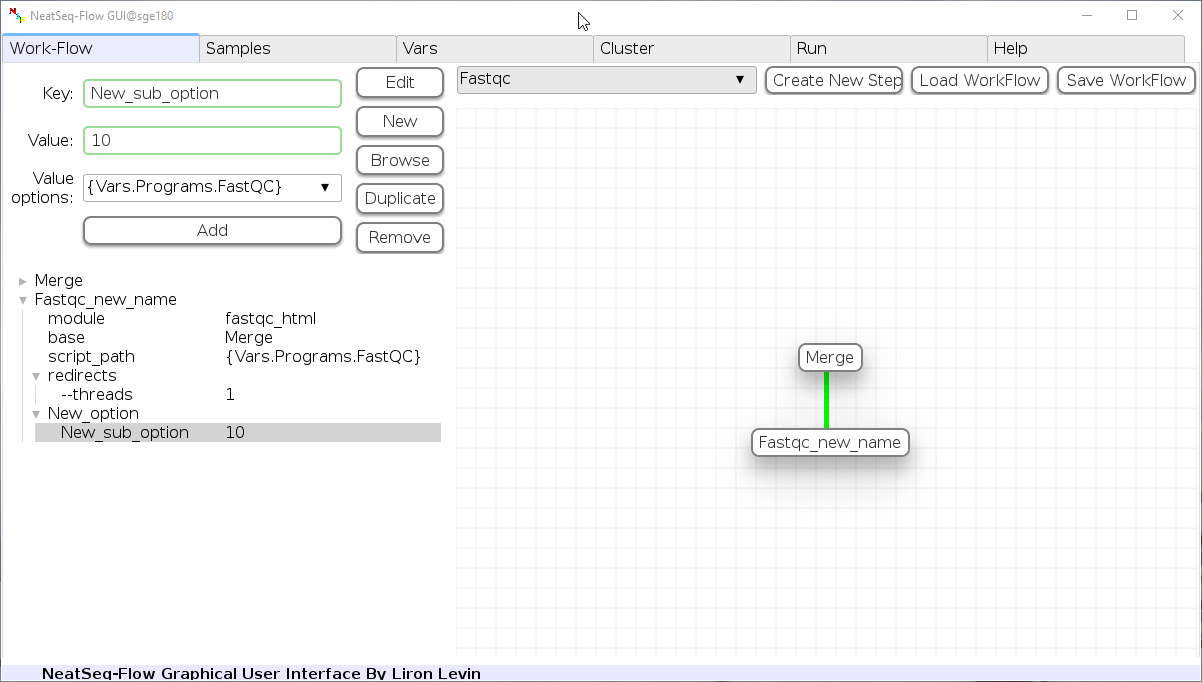
Add new step option:
- Click on the step’s name (or a step option to create a new sub option)
- Click on the ‘New’ button.
- It is possible to edit the new option name and value by editing the ‘Key’ field and the ‘Value’ field, it is also possible to choose from the ‘Value options’ drop-down menu.
- Click the ‘Edit’ button to set the changes.
Edit step’s options:

- Click on the step’s option name and change the ‘Key’ field and/or the ‘Value’ field, it is also possible to choose from the ‘Value options’ drop-down menu.
- When using the ‘Value options’ drop-down menu, in some cases it is possible to choose variables that are defined in the ‘Vars’ Tab. They will appear in the form of {Vars.some_field.some_sub_field} to indicate the value found in the ‘Vars’ Tab in the some_sub_field field ( which is a sub field of ‘some_field’ ).
- It is possible to choose file location as a value to the ‘Value’ field by clicking on the ‘Browse’ button.
- Click the ‘Edit’ button to set the changes.
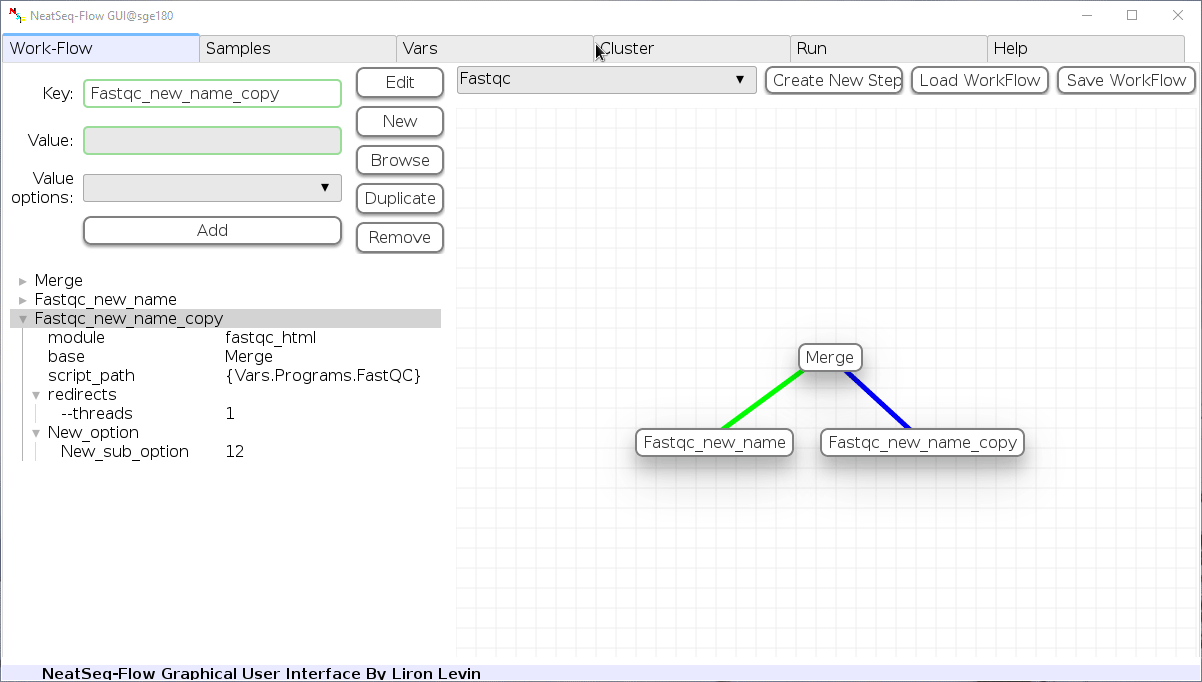
Duplicate field or step:
- Click on the step’s name (to duplicate the step) or on a step’s option name (to duplicate the option and it’s sub fields)
- Click the ‘Duplicate’ button
Remove field or step:
- Click on the step’s name (to remove the step) or on a step’s option name (to remove the option and it’s sub fields)
- Click the ‘Remove’ button
Configure the Used Variables in the Work-Flow
Edit Variables:
In the ‘Vars’ Tab choose a variable name to edit, change the key or value and then click on the ‘Edit’ button.
Create New Variable:
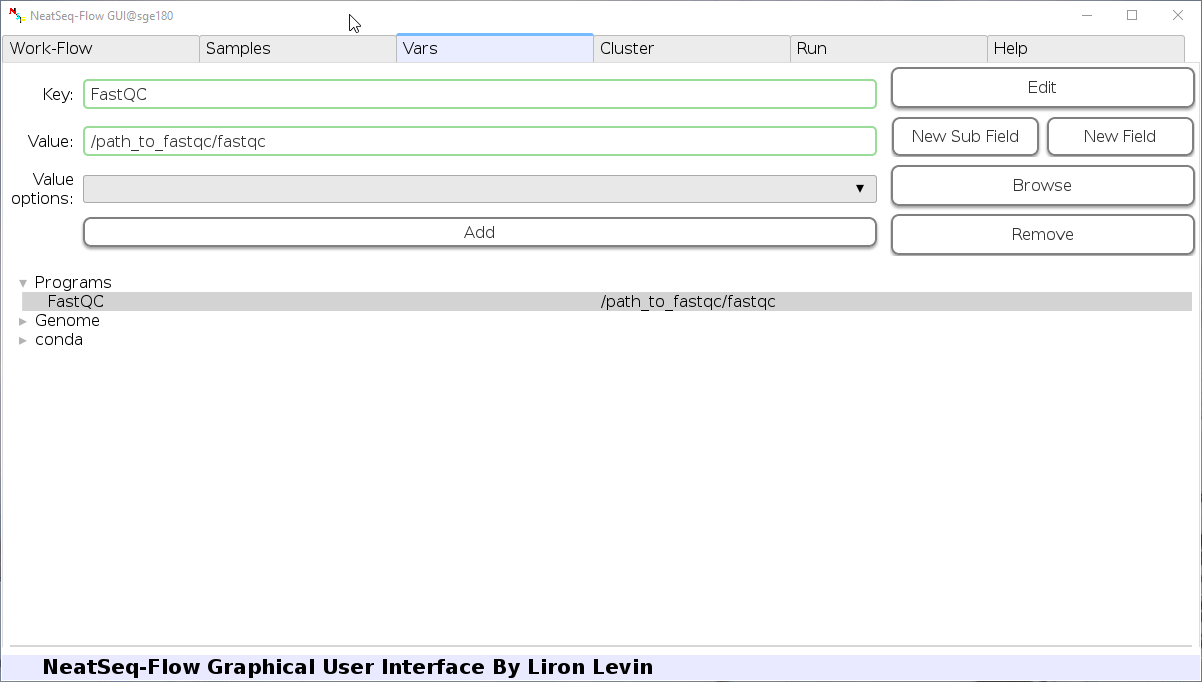
- You can create new variable by clicking on some existing variable name and then click the ‘New Field’ button.
- You can create new sub variable by clicking on the existing variable to which you want to create a sub variable and then click the ‘New Sub Field’ button.
Load a Work-Flow Parameter File
Load a Parameter file:

- In the ‘Work-Flow’ Tab click on the ‘Load WorkFlow’ button, then choose the work-flow’s parameter file ‘Tutorial_Parameter_file.yaml’ and click open.
Configure a Sample file
In the ‘Samples’ Tab:
Edit The Project Title Name:
- You can edit the project title name by clicking on the Project Title name.
Add a Sample/Project File:
- You can add a sample/project file by clicking the ‘Add Sample File’ or ‘Add project File’ button and choose a file/s.
Load a Sample file:
- Click on the ‘Load Sample File’ button, then choose the work-flow’s sample file ‘Tutorial_Samples_file.nsfs’ and click open.
- You can edit the names of the samples by clicking on the sample name.
- You can remove a sample/project file by clicking the ‘Remove’ button.
- You can change a sample/project file type by clicking the drop-down menu or by editing the type name.
Configure the Cluster information
Edit Field:
In the ‘Cluster’ Tab choose a field name to edit, change the key or value and then click on the ‘Edit’ button.
Create New Field:
- You can create new field by clicking on some existing field name and then click the ‘New Field’ button.
- You can create new sub field by clicking on the existing field to which you want to create a sub field and then click the ‘New Sub Field’ button.
Run the Work-Flow
If NeatSeq-Flow is installed using conda (as in this Tutorial): Choose the conda environment of which NeatSeq-Flow installed in.
If NeatSeq-Flow is installed Locally: Choose the neatseq_flow.py script location.
In order to Generate the Work-Flow scripts:
- Select the Sample file.
- Select the Work-Flow parameter-file.
- Choose the Project Directory to generate the Work-Flow’s scripts in (the default is to use the Current Working Directory )
- Click on the ‘Generate scripts’ button.
To run the Work-Flow click on the ‘Run scripts’ button
It is possible to monitor the Work-Flow progress by clicking the ‘Run Monitor’ button
Note
It is possible to terminate the current run by clicking on the ‘Kill Run’ button.
Learn how to use the Command Line Interface
To Run the Tutorial Work-Flow in a command line Interface:
Activate the NeatSeq_Flow conda environment:
bash source activate NeatSeq_FlowGenerate the scripts by typing in the command line:
neatseq_flow.py -s Tutorial_Samples_file.nsfs -p Tutorial_Parameter_file.yamlNote
It is possible to indicate the Project Directory to generate the Work-Flow’s scripts in using the -d option (the default is to use the Current Working Directory )
It is possible to see all NeatSeq-Flow’s options by typing:
neatseq_flow.py -h
Run the Work-Flow by typing in the command line:
bash scripts/00.workflow.commands.sh 1> null &Run the Work-Flow monitor by typing in the command line:
neatseq_flow_monitor.pyNote
It is possible to terminate the current run by typing:
bash scripts/99.kill_all.sh
Contact
Please contact Liron Levin at: levinl@post.bgu.ac.il
Installation Guide
Author: Menachem Sklarz
Page Contents:
General
Since most high-throughput sequencing analysis programs are Linux based, NeatSeq-Flow is typically used on a Linux operating system, preferably (but not necessarily) on a computer cluster. However, the workflow design and script generation steps can be run on any operating system that has Phyton installed.
NeatSeq-Flow GUI is also installed on the Linux computer/cluster, but it is possible to access it from a Windows computer through a Windows X server.
NeatSeq-Flow can be installed in one of the following ways:
- Install NeatSeq-Flow with installation script (recommended)
- Install and execute NeatSeq-Flow with Conda
- Install and execute NeatSeq-Flow without Conda
Conda allows easy installation of NeatSeq-Flow in one go. For selected workflows, as well as for the NeatSeq-Flow tutorial, we also provide entire Conda environments which include NeatSeq-Flow with all necessary analysis programs (see NeatSeq-Flow Workflows.
Install NeatSeq-Flow with installation script
You can install NeatSeq-Flow and all it’s dependencies in one go with a provided bash script.
The script performs the following:
- Miniconda installation
gitinstallation- NeatSeq-Flow conda environment creation
Installing
- Temporary installation
Everything will be installed in a directory called
NeatSeq_Flow_install. To uninstall NeatSeq-Flow, just delete the directory.curl -sl https://raw.githubusercontent.com/bioinfo-core-BGU/neatseq-flow/master/docs/source/_extra/extra/NeatSeq_Flow_install_script.sh | bash -s -- temp- Permanent installation
Miniconda will be installed in the default location. If it already exists, the installed version will be used.
The NeatSeq-Flow environment will be created in the default conda environments directory (“$HOME/miniconda3/envs”).
curl -sl https://raw.githubusercontent.com/bioinfo-core-BGU/neatseq-flow/master/docs/source/_extra/extra/NeatSeq_Flow_install_script.sh | bash -s -- perm
Running NeatSeq-Flow
Follow the instructions given by the installation script when complete. Briefly:
Add conda to the PATH (copy-paste the command from the terminal)
Activate the environment and tell NeatSeq-Flow where the base conda installation is located:
source activate NeatSeq_Flow export CONDA_BASE=$(conda info --root)
Run NeatSeq_Flow_GUI:
NeatSeq_Flow_GUI.py
Alternatively, run NeatSeq_Flow command-line version:
neatseq_flow.py --help
When done, deactivate the environment:
source deactivate
Install and execute NeatSeq-Flow with Conda
Installing Using Conda will install NeatSeq-Flow with all its dependencies [1] in one go:
Prerequisites
- The computer where the GUI is installed needs to have a web browser, preferably FireFox.
- To use the GUI from another computer having a Windows operating system, that computer needs to have a Windows X server, e.g. MobaXterm.
Install miniconda
For Linux 64bit, in the terminal:
curl -LO https://repo.continuum.io/miniconda/Miniconda3-latest-Linux-x86_64.sh
sh Miniconda3-latest-Linux-x86_64.sh
During conda’s installation: type *yes* to add conda to the PATH
Note
For different operating system go to minionda downloads page NeatSeq-Flow uses python version>=3.5. Make sure you download an appropriate version.
Important
If you do not have git installed, please install it with the following command:
conda install -c anaconda git
Install NeatSeq-Flow
Download the NeatSeq-Flow
conda environment file:curl -LO http://neatseq-flow.readthedocs.io/en/latest/extra/NeatSeq_Flow_conda_env.yaml
Create the NeatSeq_Flow conda environment:
conda env create -n NeatSeq_Flow -f NeatSeq_Flow_conda_env.yaml
Running NeatSeq-Flow
Activate the NeatSeq_Flow conda environment:
bash source activate NeatSeq_FlowExecute the following command to tell NeatSeq-Flow where the base conda installation is located:
export CONDA_BASE=$(conda info --root)
Make a directory for your project and change into it:
mkdir first_neatseq_flow_proj; cd first_neatseq_flow_proj
Run NeatSeq_Flow_GUI:
NeatSeq_Flow_GUI.py
Alternatively, run NeatSeq_Flow command-line version:
neatseq_flow.py \ --sample_file $CONDA_PREFIX/NeatSeq-Flow-Workflows/Sample_sets/PE_tabular.nsfs \ --param_file $CONDA_PREFIX/NeatSeq-Flow-Workflows/RNA_seq_Trinity.yaml \ --message "My first NeatSeq-Flow WF using conda"
When done, deactivate the environment:
source deactivate
Note
You don’t need to have the environment activated in order to execute the scripts!
Attention
See the tutorial for a full example of how to use NeatSeq-Flow
Install and execute NeatSeq-Flow without Conda
First, install NeatSeq-Flow as described here.
Then, make sure you have these programs installed:
- git
- pip
- python = 3.6.5
- wxpython [2]
- pyyaml
- munch
- pandas [2]
- Flexx [2]
- A web-browser (Preferably firefox) [2]
Now, install the GUI:
Clone the package from github:
git clone https://github.com/bioinfo-core-BGU/neatseq-flow.git
You may have to install the dependencies. This can be done with:
pip install wxpython pyyaml munch pandas Flexx
Clone the package of modules from github:
git clone https://github.com/bioinfo-core-BGU/neatseq-flow-modules.git
Clone the github repository of the GUI:
git clone https://github.com/bioinfo-core-BGU/NeatSeq-Flow-GUI.git
Execute the GUI:
python3 NeatSeq-Flow-GUI/bin/NeatSeq_Flow_GUI.py
Alternatively, execute the CLI version of NeatSeq-Flow:
Create a new directory anywhere, cd into it and execute the following commands (
$NSF_mainis the directory where NeatSeq-Flow is installed):python $NSF_main/bin/neatseq_flow.py \ --sample_file $NSF_main/Workflows/Sample_sets/PE_tabular.nsfs \ --param_file $NSF_main/Workflows/mapping.yaml \ --message "My first NeatSeq-Flow WF"
To use the GUI from another computer having a Windows operating system, use a Windows X server such as MobaXterm.
Footnotes
| [1] | Not including the web-browser |
| [2] | (1, 2, 3, 4) Required for the GUI only |
NeatSeq-Flow User Manual
Introduction
Author: Menachem Sklarz
The following sections provide a detailed description of NeatSeq-Flow usage.
NeatSeq-Flow is executed in 3 steps:
- Specification of workflow design and the input files
- Generation of shell scripts
- Workflow execution
In the first step, the workflow design and the input file specifications are written to a “parameter” and a “sample” file, respectively. These files can be created manually (in YAML format), or through the GUI.
In the script generation step, NeatSeq-Flow creates a set of directories in the workflow main directory (described in the following pages) with all necessary shell scripts for the workflow execution, and with dedicated directories for result files and additional information.
NeatSeq-Flow’s “Terminal Monitor” enables tracking the execution process in real time, and reports on execution errors immediately when they occur. The monitor, too, is descibed in the pages below.
NeatSeq-Flow can be used in two ways: with the GUI or from the command line. The pages in this section describe usage of both methods.
Specifying workflow design and input files
Author: Menachem Sklarz
Page Contents:
Introduction
The workflow design information and the specification of input files are written to parameter and sample files, respectively.
Following is a description of the parameter and sample files which are required in order to execute NeatSeq-Flow.
The parameter file is stored in YAML format and the sample file in a tab-delimited format.
The files can be created either through the NeatSeq-Flow GUI or by using a text editor, such as Notepad++.
Parameter file definition
Tip
The parameter file is rarely created from scratch. Take an existing parameter file defined for the analysis you require and modify it to suit your SGE cluster and specific requirements.
The parameter file must include a Global parameters section and a Step-wise parameters section. It may also include a Variables section. All sections are described below:
Global parameters
Attention
In the NeatSeq-Flow GUI, the global parameters described below are set in the Cluster tab.
Several SGE and other parameters can be set globally so that all scripts use them for execution. Overriding the defaults on a step-wise basis is possible in the step-wise section of the parameter file.
All global parameters are set within a Global_params block in YAML format.
Executor- Define the cluster manager to use. Options are
SGE(default),SLURMorLocal. The SLURM and Local support are in Beta development stage. Qsub_q- Defines the default queue to send the jobs to (this is the value passed to
qsubwith the-qparameter). Qsub_nodesLimits the nodes to which to send the jobs. Must be nodes that are available to the queue requested in
Qsub_q. The nodes should be passed in a YAML list format. e.g.Qsub_nodes: - node1 - node2
Qsub_opts- Other SGE parameters to be set as default for all scripts, e.g.
-V -cwdetc. The parameters should be passed in one long string and not as a list.
Attention
It is highly recommended to pass the -notify argument to qsub in this string. If it is passed, all modules producing bash-based scripts will report early termination of scripts with qdel in the log file. If -notify is not passed, jobs killed with qdel will have a line in the log file reporting the job start time but there will be no indication that the job was terminated (besides it not having a line indicating finish time)
Qsub_path- The path to the
qstatcommand. If not set, qstat will be used as-is with no path. Sometimes in remote nodes theqstatcommand is not in the path and if Qsub_path is not set, the step start and stop logging will fail.
Tip
The correct value for the Qsub_path parameter can be determined by executing the following command:
dirname `which qsub`
For SLURM:
dirname `which sbatch`
Default_wait- The time, in seconds, to wait for jobs to enter the queue before terminating the step-level script. Must be an integer. The default is 10, which is usually a good value to start with. If downstream jobs seem to be sent for execution before earlier jobs have terminated, increase this value.
module_path- Enables including modules not in the main NeatSeq-Flow package. This includes the modules downloaded from the NeatSeq-Flow Modules and workflows repository as well as modules you added yourself (see section Module and Workflow Repository). Keep your modules in a separate path and pass the path to NeatSeq-Flow with
module_path. Several of these can be passed in YAML list format for more than one external module path. The list will be searched in order, with the main NeatSeq-Flow package being searched last.
Attention
When executing NeatSeq-Flow within a conda environment, NeatSeq-Flow will add the path to the modules repository automatically (See Install and execute NeatSeq-Flow with Conda). You don’t have to worry about setting it in the parameter file unless you have your own modules installed in a different location.
job_limitIf there is an upper limit on the jobs you can send to the job manager, you can use the
job_limitparameter to pass NeatSeq-Flow a file with one line, e.g.:limit=1000 sleep=60
This will make the scripts check every 60 seconds if there are less than 1000 jobs registered for the user. New jobs will be released only when there are less than the specified limit.
condaIf you want to use a conda environment to execute the scripts, pass this parameter with the following two sub-parameters:
pathThe path to the environment you want to use. If left empty, and a
condaenvironment is active, NeatSeq-Flow will use the path to the active environment. However, you will have to define the base of the conda installation with:export CONDA_BASE=$(conda info --root)
env- The name of the environment to use. If absent or left empty, NeatSeq-Flow will extract the name from the
CONDA_DEFAULT_ENVenvironment variable, which contains the name of the active conda environment.
setenv- Enables setting environment variables for all steps in the workflow. Is equivalent to setting
setenvin all steps (see setenv in step parameters.).
Following is an example of a global-parameters block:
Global_params:
Default_wait: 10
Qsub_path: /path/to/qstat
Qsub_q: queue.q
Qsub_nodes: [node1,node2,node3]
Qsub_opts: -V -cwd -notify
module_path:
- /path/to/modules1/
- /path/to/modules2/
Attention
As of version 1.4.0, NeatSeq-Flow supports SLURM clusters, as well as stand-alone computers. This is done by adding the Executor parameter in the Global_params section, and setting it’s value to SLURM or Local. This is, however, in beta development stage.
Variables
Attention
In the NeatSeq-Flow GUI, the variables are set in the Vars tab.
In this section, you can set values to variables which can then be incorporated in required positions in the parameter file.
The values are incoporated by referencing them in curly braces. e.g. if you set blast: /path/to/blastp in the Vars section, then you you can reference it with {Vars.blastp} in the other global and step-wise parameters sections.
Step-wise parameters
Attention
In the NeatSeq-Flow GUI, the step-wise parameters described below are set in the Work-Flow tab.
Step-wise parameters define parameters which are specific to the various steps included in the workflow.
All step-wise parameters are set within a Step_params block in YAML format.
A parameter block for a step (a module instance) should look as follows:
Step_params:
trim1:
module: trimmo
base: merge1
script_path: java -jar trimmomatic-0.32.jar
qsub_params:
-pe: shared 20
node: node1
todo: LEADING:20 TRAILING:20
redirects:
-threads: 20
trim1 is the step name. This should be a single-word, informative name (alphanumeric and underscore are permitted) which will be included in the script names and output directory names.
Following the step name, with indentation, are the step parameters as defined below.
Step parameters can be divided into the following groups:
module- The name of the module of which this step is an instance.
base- The name of the step on which the current step is based (not required for the Import step, which is always first and single).
basecan be a YAML formatted list of base steps. script_path- The full path to the script executed by this step.
Note
- If the program executed by the module is on the search PATH of all the nodes in the queue, you can just pass the program name without the full path. This is not usually recommended.
- If the program requires a specific version of python or Rscript, you can append those before the actual path, e.g.
/path/to/python /path/to/executable - Sometimes, modules can require a path to a directory rather than to an executable. See, e.g., module
UCSC_BW_wig. - Some modules, such as
manage_typesdo not use thescript_pathparameter. For these modules, you must include an emptyscript_path, as it is a required parameter.
Other parameters you can set for each step to control the execution of the step scripts:
tag- Set a tag for the instance. All instances downstream to the tagged instance will have the same tag. The scripts created by all instances with the same tag can be executed at once using the tag master-script created in directory
scripts/tags_scripts.
Tip
- If an instance has multiple bases, the tag of the first tagged base will be used.
- To stop an instance from getting its base’s tag, set an empty
tag:parameter.
intermediate- Will add a line to script
scripts/95.remove_intermediates.shfor deleting the results of this step. If the data produced by this step is not required in the long term, add this flag and when you are done with the project, you can executescripts/95.remove_intermediates.shto remove all intermediate files.
setenv- Set various environment variables for the duration of script execution. This is useful when the software executed by the script requires setting specific environment variables which you do not want to set globally on all nodes. The step
setenvtakes precedence over gobalsetenvsettings. Ifsetenvis empty, no variables will be set in scripts even when a globalsetenvis set.
Note
For bash scripts, export will automatically be used instead of setenv.
precode- Additional code to be added before the actual script, such as unsetting variables and what not. Rarely used.
qsub_paramsSet cluster-related parameters which will be effective for the current step only:
node- A node or YAML list of nodes on which to run the step scripts (overrides global parameter
Qsub_nodes) queueor-q- Will limit the execution of the step’s scripts to this queue (overrides global parameter
Qsub_q) -pe- Will set the
-peparameter for all scripts for this module (see SGEqsubmanual). -XXX: YYY- Set the value of qsub parameter
-XXXtoYYY. This is a way to define other SGE parameters for all step scripts.
scope- Defines whether to use sample-wise files or project-wise files. Check per-module documentation for whether and how this parameter is defined (see, e.g., the
blastmodule). sample_listLimit this step to a subset of the samples. Scripts will be created only for the samples in the list. This selection will be valid for all instances based on this instance.
The sample list can be expressed in two ways:
A yaml list or a comma-separated list of sample names:
sample_list: [sample1, sample2]
A category and level(s) from a mapping file:
sample_list: category: Category1 levels: [level1,level2]
For using all but a subset of samples, use
exclude_sample_listinstead ofsample_list.
Tip
A use case could be when you want to run a step with different parameters for different sample subsets. Both versions of the instance should inherit from a common base and the downstream step can inherit both versions, thus all samples will have all files, created with different parameters.
Tip
To return to a wider sample list, add a second base which contains the version of the rest of the samples which you need.
conda- Is used to define step specific conda parameters. The syntax is the same as for the global
condadefinition (see here). If set, thepathandenvwill be used to execute the scripts of this step only. If a globalcondaexists, the local definition will override the global definition.
Attention
If you have set global conda parameters, and want a step to execute not within a conda environment, pass an empty conda field.
arg_separator- Sometimes, the delimiter between program argument and value is not blank space (‘ ‘) but something else, like ‘=’. For these modules, you should set
arg_separatorto the separator character. e.g.arg_separator: '='See PICARD programs for examples.
local- A local folder which exists in all cluster nodes. Uses a local directory for intermediate files before copying results to final destination in
datadir. This is useful when the cluster manager requires you to limit your IO to the central disk system.
Parameters to be redirected to the actual program executed by the step.
Redirected parameters are specified within a redirects: block (see example in Step-wise parameters above).
Note
the parameter name must include the - or -- required by the program defined in script_path.
- The local directory passed to
localmust exist on all nodes in the queue. - For a list of qsub parameters, see the qsub man page
- The list of nodes passed to
nodewithin theqsub_paramsblock will be appended to the queue name (global or step specific). Don’t add the queue name to the node names.
Sample file definition
Attention
In the NeatSeq-Flow GUI, the samples can be defined in the Samples tab.
Attention
As of version 1.3.0, NeatSeq-Flow no longer supports the List-format used in previous versions!
Attention
It is recommended to provide full paths to the files listed in the sample file. However, if relative paths are provided, NeatSeq-Flow will attempt to expand them to full paths, using the current directory as the base directory.
Important
When passing URLs as sample locations (see documentation for Import module), it is compulsory to append the protocol, or scheme, at the beginning of the URL.
- Good:
ftp://ftp.sra.ebi.ac.uk/vol1/fastq/SRR453/SRR453032/SRR453032_1.fastq.gz - Bad:
ftp.sra.ebi.ac.uk/vol1/fastq/SRR453/SRR453032/SRR453032_1.fastq.gz
The sample file has, at the moment, 4 sections:
Project title
The project title is supplied in a line with the following structure:
Title name_of_analysis
Attention
The word Title and the title name must be separated by a single TAB character. This is the rule for all sections of the sample file.
Caution
If more that one title line is included, one of them will be selected and a warning will be generated.
Sample files
The samples themselves are coded in a TAB-separated table with a header, as follows:
#SampleID Type Path
The table must be in consecutive lines following the header line.
- The first field is the sample name (no spaces!),
- the 2nd field is the file type and
- the third field is the file path.
Additional columns are ignored.
You may comment out lines in the table by prepending a # character.
An example of a sample table follows:
#SampleID Type Path
Sample1 Forward /full/path/to/Sample1_R1_001.fastq.gz
Sample1 Reverse /full/path/to/Sample1_R2_001.fastq.gz
Sample2 Forward /full/path/to/Sample2_R1_001.fastq.gz
Sample2 Reverse /full/path/to/Sample2_R2_001.fastq.gz
The following file types are recognized by NeatSeq-Flow and will be automatically imported into the correct position in the file index (indicated in the second column):
| Source | Target |
|---|---|
| Forward | fastq.F |
| Reverse | fastq.R |
| Single | fastq.S |
| Nucleotide | fasta.nucl |
| Protein | fasta.prot |
| SAM | sam |
| BAM | bam |
| REFERENCE | reference |
| VCF | vcf |
| G.VCF | g.vcf |
| GTF | gtf |
| GFF | gff |
| GFF3 | gff3 |
| manifest | qiime2.manifest |
| barcodes | barcodes |
Other types can be included, as well. For how to import them correctly into NeatSeq-Flow, see the documentation for Import module.
Note
- Each line represents one file. For samples with multiple files, add lines with the same sample name.
- Keep forward and reverse files in pairs. Each forward file should have it’s reverse file in the following line.
- Each sample can contain different combinations of file types but the user must be careful when doing unexpected things like that…
Project files
As of NeatSeq-Flow version 1.3.0, you can pass project-wise files, such as reference files, through the sample file. This is done as above for the sample data, in a separate table with the following structure:
#Type Path
For example, a project file section could look like this:
#Type Path
Nucleotide /path/to/reference.fasta
Protein /path/to/reference.faa
# This is a comment line
The same file types that can be used in the Sample files section, can also be used in the project files section.
Attention
Up to NeatSeq-Flow version 1.2.0, the sample file can only contain sample files. No project files are permitted.
- If you have project files, create a single sample which will represent your project.
- If you have mainly sample files, such as fastq files, and some project level files such as reference genomes, pass them to the modules through the parameter file.
ChIP-seq specific definitions
For ChIP-seq experiments, one must define ChIP and Control (‘input’) pairs. This is done in the following manner (in the sample file):
Sample_Control anti_sample1:input_sample1
Sample_Control anti_sample2:input_sample2
Just replace anti_sample1 and input_sample1 with the relevant sample names.
Executing NeatSeq-Flow
Author: Menachem Sklarz
Table of Contents
Step 1: Workflow script generation
Using the GUI
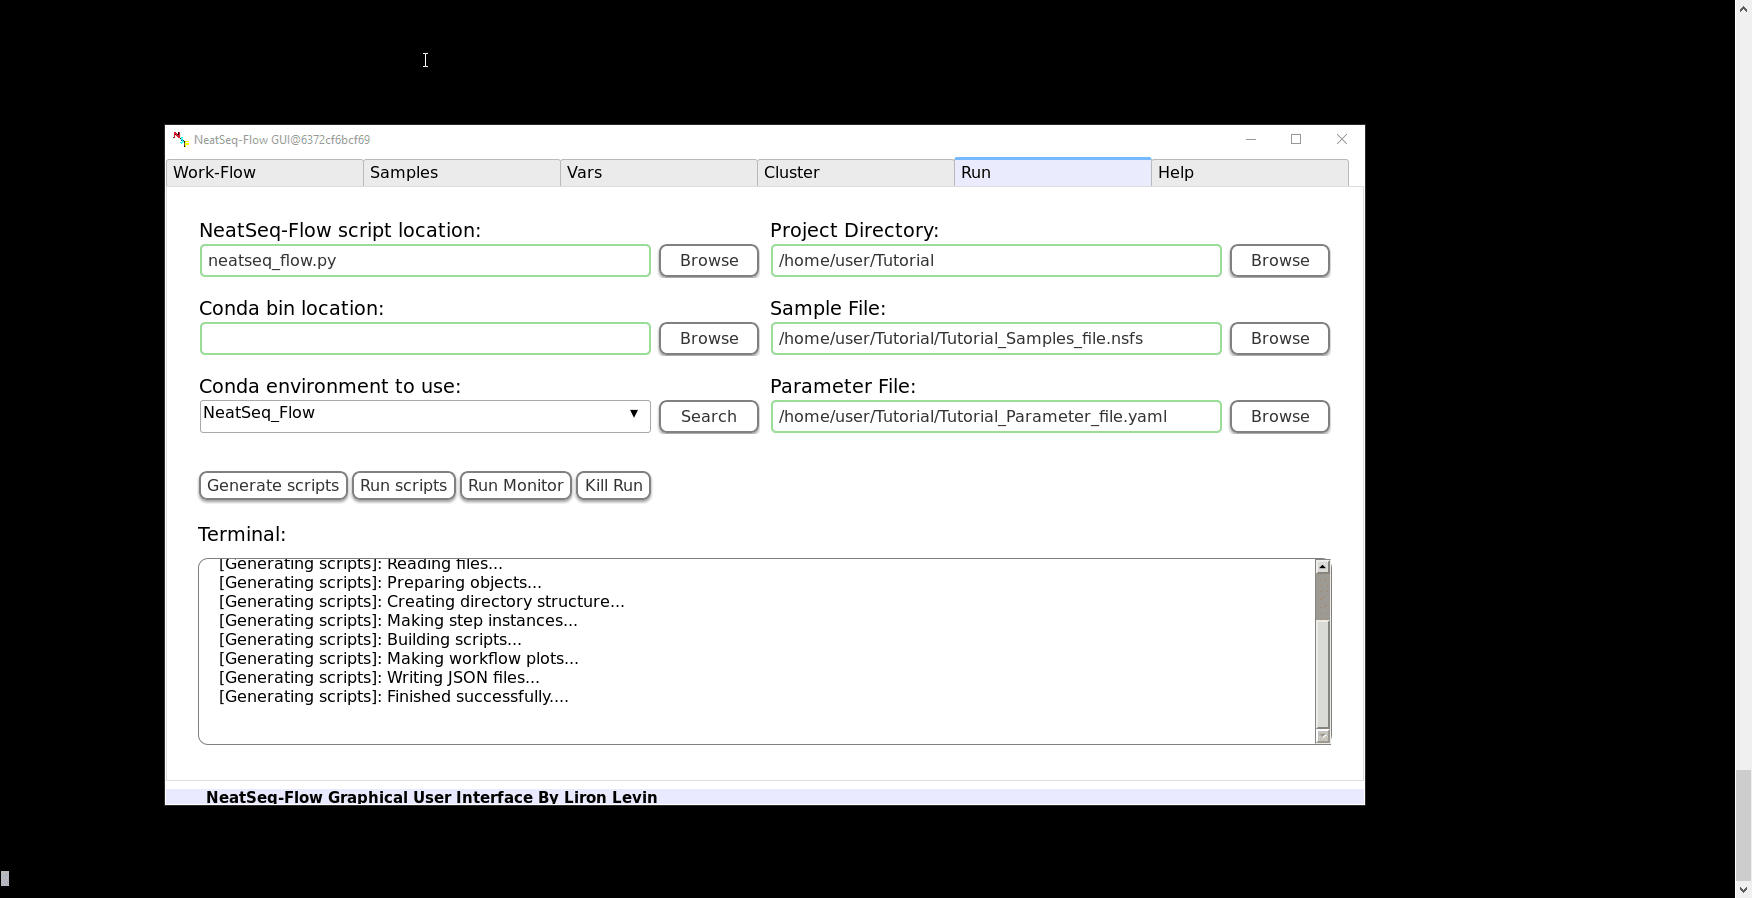
To execute the script generator, go to the Run tab and click on Generate scripts.
If you see the following lines in the Terminal box, then the scripts were generated successfully:
Reading files...
Preparing objects...
Creating directory structure...
Making step instances...
Building scripts...
Making workflow plots...
Writing JSON files...
Finished successfully....
Using the command line
Activate the NeatSeq_Flow conda environment:
bash source activate NeatSeq_FlowExecute the following command to tell NeatSeq-Flow where the base conda installation is located:
export CONDA_BASE=$(conda info --root)
Run NeatSeq_Flow command-line version:
neatseq_flow.py \ --sample_file sample_data.nsfs \ --param_file parameters.yaml \ --message "My NeatSeq-Flow WF using conda"
Executing NeatSeq-Flow’s script generator is done as follows (make sure python and neatseq_flow.py are in your search path):
python neatseq_flow.py \
-s sample_file.nsfs \
-p param_file.nsfp \
-m "message" \
-d /path/to/workflow/directory
If you get Finihed successfully... then the scripts were generated successfully.
Comments:
- NeatSeq-Flow does not require installation. If you have a local copy, append the full path to
neatseq_flow.py. - It is not compulsory to pass a message via
-mbut it is highly recommended for documentation and reproducibility. - if
-dis omitted, the current directory will be used as the workflow location.
Step 2: Executing the workflow
Using the GUI
To run the full workflow, click on Run scripts in the Run tab.
Note
It is not possible to execute individual steps or samples with the GUI.
Using the command line
The workflow can be executed fully automatically; on a step-by-step basis or for individual samples separately.
Automatic execution
Execute the following command within the workflow directory:
bash scripts/00.workflow.commands.sh
The
scripts/00.workflow.commands.shscript runs all the steps at once, leaving flow control entirely to the cluster job manager.Step-wise execution
Each line in
scripts/00.workflow.commands.shcalls a step-wise script inscripts/, e.g.scripts/01.Import_merge1.sh, which contains a list ofqsubcommands executing the individual scripts on each sample.The following command will execute only the
merge1step:qsub scripts/01.Import_merge1.sh
Sample-wise execution
The individual sample-level scripts are stored in folders within
scripts/. e.g allmerge1scripts are stored inscripts/01.Import_merge1/. To execute the step only for a specific sample, execute the relevant script from within the individual script folder.
Output directory structure
Author: Menachem Sklarz
Table of Contents
The main directory structure
The directories are elaborated on below.

The directory structure created by NeatSeq-Flow
The scripts directory
- Executing
bash 00.workflow.commands.shwill execute the entire workflow. - The scripts beginning
01.Import…etc. execute entire steps. - The actual scripts running each step per sample or on the entire project are contained in the equivalent directories
01.Import…etc. - The scripts are numbered by execution order (see
00.workflow.commands.sh)

The scripts directory created by NeatSeq-Flow
The data directory
In the data directory, the analysis outputs are organized by module, by module instance and by sample.
Below is the data directory for the example, showing the tree organization for the bowtie2_mapper and Multiqc modules.

The data directory created by NeatSeq-Flow, showing the tree organization.
The backup directory
The backup directory contains a history of workflow sample and parameter files.

The backups directory created by NeatSeq-Flow
The logs directory
The logs directory contains various logging files:
- version_list. A list of all the versions of the workflow with equivalent comments
- file_registration. A list of files produced, including md5 signatures, and the script and workflow version that produced them
log_file_plotter.R. An R script for producing a plot of the execution times. (Run with Rscript and receives a single argument – a log file to plot)log_<workflow_ID>.txt. Log of the execution times of the script per workflow version ID.log_<workflow_ID>.txt.html. Graphical representation of the progress of the WF execution, as produced by thelog_file_plotter.Rscript (see figure below)

The logs directory created by NeatSeq-Flow

A graphical representation of the workflow execution.
The stderr and stdout directories
- The stderr and stdout directories store the script standard error and outputs, respectively.
- These are stored in files containing the module name, module instance, sample name, workflow ID and cluster job ID.
The objects directory
The objects directory contains various files describing the workflow:

The objects directory created by NeatSeq-Flow
pipeline_graph.html: An SVG diagram of the workflow.
diagrammer.R: an R script for producing a DiagrammeR diagram of the workflow.pipedata.json: A JSON file containing all the workflow data, for uploading to JSON compliant databases etc.workflow_graph.htmlis the output from executingRscript diagrammer.R.
Note
The
diagrammer.Rscript requires installing theDiagrammeRandhtmlwidgetsR packages.
NeatSeq-Flow Monitor
Author: Liron Levin
Table of Contents
| Authors: | Liron Levin |
|---|---|
| Affiliation: | Bioinformatics core facility |
| Organization: | National Institute of Biotechnology in the Negev, Ben Gurion University. |
SHORT DESCRIPTION
Neatseq-Flow Monitor can be used to track the progress of running work-flows of a specific project in real-time.
Alternatively Neatseq-Flow Monitor can be used to compare between previous runs of a specific project.
Neatseq-Flow Monitor uses the information in the Neatseq-Flow log files and information gathered from the cluster scheduler
Neatseq-Flow monitor provides the following information:
- List of available log files for a specific work-flow [project]
- List of steps and samples as they distribute by the cluster scheduler
- Steps and samples Start and finished times
- Number of started and finished jobs
- Number and identity of the current ruining jobs
- Step progress bar
- Color indication for the status of steps and samples
Requires
Neatseq-Flow Monitor is written in python and requires the following packages that are not included in python 2.7 release:
pandas
Parameters that can be set
| Parameter | Values | Comments |
|---|---|---|
| -D | PATH | Neatseq-flow project directory [default= current working directory ] |
| -R | STR | Log file Regular Expression [in ./log/ ] [default=log_[0-9]+.txt$] |
| –Monitor_RF | FLOAT | Monitor Refresh rate [default=1] |
| –File_browser_RF | FLOAT | File Browser Refresh rate [default=1] |
| –Bar_Marker | CHAR | Progress Bar Marker [default=#] |
| –Bar_Spacer | CHAR | Progress Bar Spacer [default=Space] |
| –Bar_len | INT | Progress Bar Total Length [in chars] [default=50] |
Comments
Note
Neatseq Flow Monitor can be run only after the Neatseq Flow script generator is finished successfully [a project is created]
Tip
Running neatseq_flow_monitor.py from the project directory without arguments will use all the default parameters and will show the project available log files.
Help message:
usage: Neatseq_Flow_Monitor.py [-h] [-D STR] [-R STR] [--Monitor_RF FLOAT]
[--File_browser_RF FLOAT]
[--Bar_Marker CHAR] [--Bar_Spacer CHAR]
[--Bar_len INT]
Neatseq-flow Monitor_v1.1 By Liron Levin
optional arguments:
-h, --help show this help message and exit
-D STR Neatseq-flow project directory [default=cwd]
-R STR Log file Regular Expression [in ./log/ ]
[default=log_[0-9]+.txt$]
--Monitor_RF FLOAT Monitor Refresh rate [default=1]
--File_browser_RF FLOAT
File Browser Refresh rate [default=1]
--Bar_Marker CHAR Progress Bar Marker [default=#]
--Bar_Spacer CHAR Progress Bar Spacer [default=Space]
--Bar_len INT Progress Bar Total Length [in chars] [default=50]

Using the generic modules
Author: Menachem Sklarz
Two generic modules are provided to enable including in workflows programs for which no dedicated module exists. Using the modules saves writing dedicated modules and can therefore be utilized by non-programmers as well; however, this comes at a cost of adding clutter to the workflow parameter definition file.
The generic modules, called Generic and Fillout_Generic, do not contain a definition of input and output file types, therefore the user has to specify the input and output file types in the parameter file.
Genericis simpler to use for defining most Linux programs, and has extra file type management capacities.
Fillout_Genericcan incorporate more than one command per step, as well as cater to irregular program calls, such as calls including complex pipes.
How NeatSeq-Flow works
Author: Menachem Sklarz
A detailed description of how NeatSeq-Flow works is provided in NeatSeq-Flow article on BioRXiv. Pay special attention to Supplementary Figures S3 and S4.
Here we describe how file locations are internally managed and how they are transferred between workflow steps.
In NeatSeq-Flow, locations of files produced by the programs being executed are stored in a python dictionary called sample_data (after executing NeatSeq-Flow, this dictionary can be found in the JSON file WorkflowData.json in the objects directory). The dictionary stores each file type in a dedicated slot. For instance, fastq reads are stored in fastq.X slots, where X is either F, R or S for forward-, reverse- and single-end reads, respectively. FASTA, SAM and BAM files, too, have dedicated slots.
A workflow is a combination of module instances that inherit the above-mentioned dictionary from other modules (these are called the base step of the instance). Each module expects to find files in specific slots in the sample_data dictionary, which should be put there by one of the modules it inherits from. The instance then stores the filenames of its scripts’ outputs in slots in the dictionary. You can see these requirements in the module documentation, in the Requires and Output sections.
Often, the files are sample-specific, such as fastq files. In this case, they are stored in a dedicated sample slot in the dictionary, e.g. sample_data["Sample1"]. Project-wide files, such as an assembly created from all the project fastq files, are stored in the sample_data["project_data"] dictionary.
Some of the modules take their inputs and put their outputs in the sample-specific slots and some use the project-wide slots. The sample-specific slots are indicated in the documentation as sample_data[<sample>]. Some modules can do both, and their exact behaviour is either controlled by a module parameter (e.g. scope in bowtie2_mapper) or guessed at by the module based on the dictionary structure.
Creating a workflow is then like assembling a puzzle. Each instance of a module must have an ancestor module (base module) that puts files in the slots required by the module. e.g. when the samtools module is executed, it expects to find a SAM file in sample_data[<sample>]["sam"]. It, in turn, produces a BAM and puts it in sample_data[<sample>]["bam"] for use by other modules that are based on it.
Sometimes, module instances overwrite existing slots. This does not mean the files will be overwritten. It only means that access to these slots in downstream instances will refer to the newer files. e.g. the trimmo module puts its outputs in the same slots as the Import module. Therefore, a fastqc_html instance based on the Import instance will use the files created by Import while a fastqc_html instance based on the trimmo instance will use the files created by trimmo.
Note
This might seem complicated, but once you get used to the dictionary structure you will see how flexible the whole thing really is.
Tip
Module instances can be based on more than one instance. e.g. if instance i is based on instances j,k, it is the same as having j based on k and i based on j. In other words, if both k and j write to the same slot, i will have access only to the output from j.
If k and j are independent of each other, then basing i on j,k enables j and k to run in parallel, thus reducing runtime.
Tip
If you run NeatSeq-Flow with the word stop_and_show: in one of the instances’ parameter blocks, NeatSeq-Flow will terminate at that instance and show the structure of the sample_data dictionary. You can use the output to decide which modules can inherit from the instance.
As of version 1.4, stop_and_show: output includes the provenance of the file types, i.e. the histroy of instances modifying the file types. For examples, the following output:
Samples: Sample1, Sample2, Sample3
Slots:
- fastq.R.unpaired (>trim_gal)
- Reverse (>merge1)
- fastq.F (>merge1->trim_gal)
- fastq.F.unpaired (>trim_gal)
- Forward (>merge1)
- fastq.R (>merge1->trim_gal)
shows that fastq.F and fastq.R files were created by merge1 and modified by trim_gal, while files fastq.R.unpaired and fastq.F.unpaired were created by trim_gal instance.
Read more on how NeatSeq-Flow works: NeatSeq-Flow article on BioRXiv
Adding New Modules
Author: Menachem Sklarz
Introduction
In NeatSeq-Flow, the workflow parameter file describes the steps to be performed in the workflow. Each step involves executing a command-line program on the file types managed by the workflow. The description of each step is in the form of a YAML-format block defining the program to be used and the arguments that should be passed to the program. Occasionally, steps include executing further, downstream analyses following execution of the main program. The definition block is concise and readable in that much of the nuts-and-bolts of data input and output are managed behind the scenes in the step Module.
However, often no module exists for a program we would like to include in our workflow. In order to incorporate analysis programs which do not yet have modules, one can proceed in two ways:
Use one of the generic modules
This method is preferable for quickly getting a working workflow without the need to create a new module for the program. However, it requires the specification of several additional parameters in the workflow design step, and is less recommended for programs that are planned to be re-used many times, in different scenarios, in the future.
Create a new module
Creating modules is quite easy, and requires only basic Python programming knowledge. Still, please make sure a module does not already exist for the program you want to run before creating a new module.
It is our hope that the community of users will provide access to a wide range of modules, making the process of developing new workflows more straightforward for non-programmers.
This section provides detailed instructions for writing modules for analysis-programs and scripts for which no module exists.
Note
It is recommended to go over the How NeatSeq-Flow works page before writing new modules.
Steps in writing NeatSeq-Flow modules
Modules are python objects which NeatSeq-Flow can find and load into it’s script-generating engine. Each step is an instance of a module, defined by passing the module name via the module field in the instance YAML-block.
The following conditions have to be met for NeatSeq-Flow to find and load the module:
- The module is stored in a file called
<module_name>.pywhere<module_name>is the module name. - The class defined in the file is called
Step_<module_name>. - The file is located in a directory containing an empty
__init__.pyfile. - This directory is in the directories list passed to NeatSeq-Flow through the
module_pathglobal parameter (see Parameter file definition).
Tip
The directory containing the <module_name>.py file can be nested within other directories to any depth, and only the upper level needs to be provided via module_path, provided that each directory in the directory structure contains and empty __init__.py file.
Generally speaking, modules are called in three contexts by NeatSeq-Flow:
- Function
step_specific_init()is called when the class is constructed. - Function
step_sample_initiation()is called when the class is exposed to thesample_datadictionary of file types available to the class. - Function
build_scripts()is then called to actually perform the script-building.
The first two functions should be used for input checking. Making sure the user supplied all the required parameters, and giving clear error messages when not, will make it easier for the user to quickly get the module instance up-and-running.
The easiest way to write a new module is to use one of the template files and make only the analysis-program-specific modifications.
Preparing the module file
Choose a name for the module. e.g.
bowtie2_mapper. Make sure the name is not already in use.Decide which level the module will work on: samples or project-wide?
- Use the
general templateif it can work on both sample and project levels. - Use the
sample templateif it works on the sample level. - Use the
project templateif it works on the project level.
- Use the
Change the name of the template file to to
<module_name>.py.Make sure the file is within a directory which includes an empty
__init__.pyfile. This directory is passed to NeatSeq-Flow through themodule_pathglobal parameter (see Parameter file definition)Change the class name to
Step_<module_name>in the line beginning withclass Step_.... Make sure<module_name>here is identical to the one you used in the filename above.
Places to modify in the actual code
step_specific_init()¶As mentioned above, this function is where the parameters the user has passed via the YAML-block are checked.
The parameters are containd in a dictionary called self.params. For example, the program path is contained in self.params["script_path"] and redirected arguments are included in self.params["redirects"] dictionary.
Making sure the YAML block is correctly formatted saves the user time - the error message will be displayed before any script generation is done.
Additionally, clearly worded error messages will make it easier for the user to understand what he did wrong.
- Set
self.shellto csh or bash, depending on the shell language you want your scripts to be coded in (It is best to usebashbecause it will work with CONDA. See Install and execute NeatSeq-Flow with Conda). - Check the user has passed all the parameters you expect him to pass. You do not have to check the general NeatSeq-Flow syntax, such as
moduleandscript_pathfields. For example, if you expect the user to supply atype2usefield, checktype2useexists inself.paramsand raise anAssertionException(see Exceptions and Warnings) if not.
step_sample_initiation()¶This function is called after previous steps have made their modifications on the file-type dictionary, self.sample_data.
Here, it is recommended to put code checking the existence of all file types the module expects. e.g. the samtools module checks that a bam or sam file exist in the scope required by the user. NeatSeq-Flow has automatic file-type checking but having dedicated tests with clear error messages makes it easier for the user to pinpoint the problem.
For raising errors, please use the assertion-checking machinery (Exceptions and Warnings) to make sure the error messages are displayed in NeatSeq-Flow fashion.
build_scripts()¶This is the place to put the script-building code.
Building the script is done in several stages:
- Clear the script in
self.script. - Assemble the command(s) to be executed in
self.script. - Create the final script for execution, including the extra code added automatically by NeatSeq-Flow.
- Modify
sample_datato reflect the changes and new file produced by the command.
If the script is assembled per-sample, the three steps above should be repeated for each sample, in a loop:
for sample in self.sample_data["samples"]:
Attention
For modules that can operate both on project-scope and sample-scope files, you can use a single loop for both options. See general template for how this is done.
Set self.script to contain the command/s executed by the script (This will go inside the for loop for sample-level steps)
Initialize it with
self.script = ""Calling
self.script += self.get_script_const()will add thesetenvparameter, if it exists; thescript_pathparameter and the redirected parameters. Then all that remains is to see to input and output parameters.The input parameter, typically
-i, is usually based on the sample data structure, e.g.:self.script += "-i {inp} \\\n\t".format(inp=self.sample_data[sample]["fasta.nucl"])
Note
The
"\\\n\t"at the end of the string makes the final script more readable.The output parameter (typicall
-o) should be set to a filename withinself.base_dir. If the step is a sample-level step, get a directory for the output files by callingself.make_folder_for_sample(sample).For example, the following code sets the output parameter
-oto<sample_dir>/<sample_name>.output.bam.sample_dir = self.make_folder_for_sample(sample) output_filename = sample_dir + sample + ".output.bam" self.script += "-o {outp} \n\n".format(outp=output_filename)
Tip
Function
self.make_folder_for_sample(sample)will returnself.base_dirifsampleis set to"project_data".Tip
You can add more than one command in the
self.scriptvariable if the two commands are typically executed together. Seetrinitymodule for an example.
Place the output file somewhere in the sample_data structure. e.g.:
self.sample_data[sample]["bam"] = output_filenameAttention
If the output is a standard file, e.g. BAM or fastq files, put them in the respective places in
sample_data. See documentation for similar modules to find out the naming scheme. Otherwise, use a concise file-type descriptor for the file and specify the location you decided on in the module documentation.
Slots for commonly used files¶ File type Scope Slot fastq Sample sample_data[<sample>]['fastq.F|fastq.R|fastq.S']fasta Sample sample_data[<sample>]['fasta.nucl|fasta.prot']fasta Project sample_data["project_data"]['fasta.nucl|fasta.prot']SAM Sample sample_data[<sample>]['sam']BAM Sample sample_data[<sample>]['bam']Aligner index Sample sample_data[<sample>][<aligner name>.index']Aligner index Project sample_data["project_data"][<aligner name>.index']Aligner reference Sample sample_data[<sample>]['reference']GFF Sample sample_data[<sample>]['gff']GFF Project sample_data["project_data"]['gff']
Creating the final executable script is done by adding the following line (within the sample-loop, if one exists):
self.create_low_level_script()
That, and a little bit of debugging, usually, is all it requires to add a module to NeatSeq-Flow.
Tip
As mentioned above, module instances can be based on more than one instance. i.e. i can be based on j,k. It was stated that in this case, if j and k instances write to the same slot, i will have access only to the version created by j.
However, you can write modules such that i has access to the same slot both in k and in j: All instance versions of the
sample_datadict are available in the dictionary returned byself.get_base_sample_data()in the module class. The dictionary is keyed by the base instance name. This can be used to access overwridden versions of files created by instances upstream to the present module.For example, if base contains the name of the base instance (e.g. merge1), you can access the base’s sample data as follows:
self.get_base_sample_data()[base]And accessing file
fasta.nuclin samplesample1from basemerge1can be done with the following command:self.get_base_sample_data()["merge1"]["sample1"]["fasta.nucl"]
Attention
The description above assumes you don’t want to support the option of working on a local directory and transferring the finished results to the final location (see local parameter). If you do want to support it, you have to create a temporary directory with:
use_dir = self.local_start(sample_dir)
or:
use_dir = self.local_start(self.base_dir)
Use use_dir when defining the script, but use sample_dir and self.base_dir when assigining to self.sample_data (see the templates for examples).
Finally, add the following line before self.create_low_level_script():
self.local_finish(use_dir,sample_dir)
Note: The procedure above enables the user to decide whether to run locally by adding the local parameter to the step parameter block in the parameter file!
make_sample_file_index()¶This function is a place to put code that produces an index file of the files produced by this step (BLAST uses this function, so you can check it out in blast.py). The index file can be used by downstream instances or by create_spec_wrapping_up_script() (see below).
create_spec_preliminary_script()¶Here, you can create the code for a script that will be run before all other scripts are executed. If not defined or returns nothing, it will be ignored (i.e. you can set it to pass). This is useful if you need to prepare a database, for example, before the other scripts use it.
create_spec_wrapping_up_script()¶Here, you create the code for a script that will be run after all other step scripts are executed. If not defined or returns nothing, it will be ignored (i.e. you can set it to “pass”). This is the place to call make_sample_file_index() to create an index of the files produced in this step; and to call a script that takes the index file and does some kind of data agglomeration.
Attention
It is highly recommended to create an instance-scope list of the redirected parameters that the user should not pass because they are dealt with by your module. The list should be called self.auto_redirs and you should place it directly after the class definition line (i.e. the line beginning with class Step_...). After instance creation, the list is checked by NeatSeq-Flow to make sure the user did not pass forbidden parameters.
Tip
Most Linux programs separate flags and arguments with a space, e.g. head -n 20, and this is the default behaviour for NeatSeq-Flow. However, some programs require a different separator, such as =, for example the PICARD suite. If your module wraps such a program, set self.arg_separator to the separator symbol, e.g.:
self.arg_separator = "="
Exceptions and Warnings
When programming a module, the programmer usually has certain requirements from the user, for instance parameters that are required to be set in the parameter file, sets of parameters which the user has to choose from and parameters which can take only specific values.
This kind of condition is typically programmed in python using assertions.
In NeatSeq-Flow, assertions are managed with the AssertionExcept exception class. For testing the parameters, create an if condition which raises an AssertionExcept. The arguments to AssertionExcept are as follows:
- An error message to be displayed.
AssertionExceptwill automatically add the step name to the message. - Optional: The sample name, in case the condition failed for a particular sample (e.g. a particular sample does not have a BAM file defined.)
A typical condition testing code snippet:
for sample in self.sample_data["samples"]:
if CONDITION:
raise AssertionExcept(comment = "INFORMATIVE error message\n", sample = sample)
If you only want to warn the user about a certain issue, rather than failing, you can induce NeatSeq-Flow to produce a warning message with the same format as an AssertionExcept message, as follows:
for sample in self.sample_data["samples"]:
if CONDITION:
self.write_warning(warning = "Warning message.\n", sample = sample, admonition = "WARNING")
Note
As for AssertionExcept, the sample argument is optional.
Tip
When calling AssertionExcept and self.write_warning, setting sample to "project_data" will have the same effect as not passing sample.
Example: minimap2 module
minimap2 is A versatile pairwise aligner for genomic and spliced nucleotide sequences. We will use it as an example for creating a new module for an analysis program.
In the minimap2 manual, it says:
Without any options, minimap2 takes a reference database and a query sequence file as input and produce approximate mapping, without base-level alignment (i.e. no CIGAR), in the PAF format:
minimap2 ref.fa query.fq > approx-mapping.paf
Additional arguments go between the program and the arguments, e.g:
minimap2 -ax map-pb ref.fa pacbio.fq.gz > aln.sam
There are 5 use-cases for the program:
- Map long noisy genomic reads
- Map long mRNA/cDNA reads
- Find overlaps between long reads
- Map short accurate genomic reads
- Full genome/assembly alignment
We will start by building a module for use cases 1, 2 and 4. Later, we will improve the module to also enable 3 and 5.
Getting ready
Before actually programming the module, we would like to prepare the files for testing our new module.
As expected, we will call our new module minimap2. We will use this name repeatedly in the following sections, and it is important to be consistent with the spelling.
Install and activate a NeatSeq-Flow conda environment
Make a directory for the project:
mkdir minimap2_module cd minimap2_module/Make a temporary python directory for the module and transfer the file into it:
mkdir module_dir touch module_dir/__init__.py
Download the
general template, rename it tominimap2.pyand move it into themodule_dir:curl -L https://raw.githubusercontent.com/bioinfo-core-BGU/neatseq-flow/master/docs/source/_extra/extra/NeatSeqFlow_ModuleTemplate.py > minimap2.py mv minimap2.py module_dir/
We need a sample file which has a project-scope fasta file as a reference and sample-scope read files, in fastq format, to align to the reference. This is the simplest use-case of minimap2. Later, we will develop the module further and enable other sample file configurations.
Download
a similar sample file from hereor create your own sample file. It should look like this (make sure the fields are TAB-separated!):Title minimap2_devel #Type Path Nucleotide /path/to/nucl.fna #SampleID Type Path Sample1 Forward /path/to/Sample1.Forward.fq Sample1 Reverse /path/to/Sample1.Reverse.fq Sample2 Single /path/to/Sample2.Single.fq
Finally, we need a parameter file to play around with.
- Copy the
Basic Preparation parameter file(if using the link, you have to rename the file tominimap2_parameters.yaml):
curl -L https://raw.githubusercontent.com/bioinfo-core-BGU/neatseq-flow-modules/master/Workflows/Basic_Preparation.yaml > minimap2_parameters.yaml
- Open the
minimap2_parameters.yamlfile in a text editor of choice, or with the GUI. - Keep the
Global_paramsand andVarssections. You can remove theDocumentationsection. - In the
Step_paramssection, keep only themerge1section. - Add a YAML-block for the
minimap2module parameters:- The instance name is arbitrary. I will call it
Minimap2_basic. - The module name is up to us. We will call it
minimap2. - The base is the import step,
merge1in this case. - The
script_pathsection is less important for the moment. Set it to/path/to/minimap2
- The instance name is arbitrary. I will call it
Minimap2_basic: module: minimap2 base: merge1 script_path: /path/to/minimap2- Copy the
Choosing input files
Usually, minimap2 takes 2 arguments: The reference and the sequences to align. For paired end reads in separate files, it takes 3 arguments:
minimap2 -ax sr ref.fa read1.fq read2.fq > aln.sam # paired-end alignment
We will not try guessing where to take the input from. The user will have to specify the source of the reference file with reference: and the source of the reads with scope.
The reference is always a nucleotide fasta file, stored in fasta.nucl. The reads can be either fasta or fastq files.
Usually, the user will align sample-scope reads to a project-scope reference, so that will be the default behaviour. The user will be able to change that behaviour by specifying the following parameters in the instance YAML-block:
reference: Can be a path for a reference external to the workflow, orsampleto use a sample-scopefasta.nuclfile, orprojectto use a project-scopefasta.nuclfile (= the default).scope: Can be set tosampleto use sample-scope reads (the default) or toprojectto use a project-scope reads.type2use: Will determine whether the reads are in fasta or fastq format.
The reads can be either in fastq format or in fasta format. This can cause an issue when both reference and reads are project-scope fasta file! In the advance section below, we will try solving this issue. For now, we will not allow such a configuration.
It does not make sense to try aligning project-scope reads to a sample-scope reference. Therefore, we’ll add a test for this scenario and stop execution if it occurs.
| Reference scope | Reads type | Reads scope |
|---|---|---|
| External path | fasta/fastq | sample/project |
| project | fasta | sample |
| project | fastq | sample/project |
| sample | fastq | sample |
Add the following lines to the parameter file minimap2_parameters.yaml, to suit the sample data configuration:
reference: project scope: sample type2use: fastq
Determining output type
According to the minimap2 manual, passing a -a argument will make minimap2 produce it’s output in sam format, otherwise, the default, is a paf format. The -a argument can be passed by the user via the redirects YAML-block. We will have to look for it there and set the output file type appropriately!
Defining the module code
Open the minimap2.py file in an editor of choice.
The file begins with a skeleton of a module deocumentation. Later on you can fill in the empty fields but for now just change
MODULE_NAMEtominimap2.Then, proceed to the definition of the module class. Find the line containing
class Step_MODULENAMEand change it to:class Step_minimap2(Step):
Delete the line defining
auto_redirs. It is not relevant for this module.Finally, scroll to the definition of the
step_specific_init()method.
step_specific_init() method¶Important
Before we proceed, let’s make sure NeatSeq-Flow can find and use the minimap2 module we have begun defining.
neatseq_flow.py -s sample_data.nsfs -p minimap2_parameters.yaml
You should get the following error:
Reading files... WARNING: The following module paths do not exist and will be removed from search path: ../neatseq_flow_modules Preparing objects... Creating directory structure... Making step instances... Step minimap2 not found in regular path or user defined paths. An error has occurred. See comment above.
The problem is that we have not told NeatSeq-Flow where to look for the new module! In line 7 of the parameter file, change the module_path definition to the full path to the module_dir you created above.
module_path: /full/path/to/module_dir
If you execute NeatSeq-Flow again, you should get a python SyntaxError. That’s great - it means the module was found!
The step_specific_init() function comes with a test on scope. We’ll leave it and the line defining the shell as bash.
Replace the section titled Various assertions with the following test:
# Check type2use is defined and is fasta or fastq if "type2use" not in self.params: raise AssertionExcept("Please provide 'type2use' parameter!") if self.params["type2use"] not in ["fastq","fasta"]: raise AssertionExcept("'type2use' must be either 'fasta' or 'fastq'!") # Check reference is defined if "reference" not in self.params: raise AssertionExcept("Please provide 'reference' parameter!") # Check the various scenarios and combinations of reference, scope and type2use if self.params["reference"] == "project": if self.params["type2use"] == "fasta" and self.params["scope"] == "project": raise AssertionExcept("You can't have both project-scope 'reference' and project-scope reads!") elif self.params["reference"] == "sample": if self.params["scope"] == "project": raise AssertionExcept("You can't have sample-scope 'reference' and project-scope reads!") if self.params["type2use"] == "fasta": raise AssertionExcept("You can't have both sample-scope 'reference' and sample-scope fasta reads!")
Rerun NeatSeq-Flow and you will get a SyntaxError from a later part of the module definition. So let’s fix it:
step_sample_initiation() method¶In this function, we should check that the inputs we are expecting exist in the self.sample_data dictionary. For now, we’ll use the default NeatSeq-Flow error checking mechanism. Just comment out the section titled # Testing a condition on each sample.
Attention
The first section in function step_sample_initiation() sets self.sample_list to a list of samples, depending on scope. This is important because the build_scripts() function loops over self.sample_list. Therefore, you do not need to provide a special treatment for different scopes in build_scripts(). See implementation below.
Rerun NeatSeq-Flow and you will get a NeatSeq-Flow error message as follows:
In Minimap2_basic (project scope): Type "INPUT_FILE_TYPE" does not exists! Check scope and previous steps.
An error has occurred. See comment above.
Printing current JSON and exiting
This is OK. We have to work on the actual script building part!
build_scripts() method¶The template comes with:
- a loop on samples (as mentioned above, the sample list depends on the definition of
scope!) - a definition of
sample_dircontaining a directory path for the sample output files. - a call to
set_spec_script_name()which must be there. An explanation is beyond the scope of this tutorial. - a call to
local_start(), which defines ause_dirwhich is a directory path in which the outputs will actually be written (see explanation onlocal_start()elsewhere) - finall, it also initializes
self.scriptwithself.script = ""
Now, we will define three variables:
referenececontaining the path to the reference.readscontaining a path (or paths) to the reads files.outputcontaining the name of the output file.
In the section beginning with the comment # Define location and prefix for output files, add the following lines to define the output file name (pay attention to indentation!):
output_prefix = sample + ".minimap2" output_suffix = "sam" if "-a" in self.params["redir_params"] else "paf" output = ".".join([output_prefix,output_suffix])
Note:
- We decide on
output_suffixbased on the existence of-ain theself.params["redir_params"]dictionary keys! outputis the filename without the directory path. That part is added later, by context.
Defining the reference:
Add these lines after the definition of the output:
# Define reference if self.params["reference"] == "project": reference = self.sample_data["project_data"]["fasta.nucl"] elif self.params["reference"] == "sample": reference = self.sample_data[sample]["fasta.nucl"] else: reference = self.params["reference"]
We set reference to the project fasta file, sample fasta file or path passed in the parameters, depending on the value of the reference parameter in self.params.
Defining the reads:
The following lines will set the reads variable, depending on the value of type2use and on the types of reads files defined for the sample:
# Define reads: if self.params["type2use"]=="fasta": reads = self.sample_data[sample]["fasta.nucl"] else: # self.params["type2use"]=="fastq": if "fastq.S" in self.sample_data[sample]: reads = self.sample_data[sample]["fastq.S"] else: reads = "{F} {R}".format(F=self.sample_data[sample]["fastq.F"], R=self.sample_data[sample]["fastq.R"])
If you want to check everything is alright, you can add the following lines and execute NeatSeq-Flow:
print("reference: "+reference) print("reads: "+reads) print("output: "+use_dir+output) sys.exit()
You should get the definition of reference, reads and output for the first sample. You can check various combinations of parameters in the parameter file and their effects on the output. When done, comment out the sys.exit() line.
Building the script
This can be done in to python flavours. It depends on your personal taste, so I will show both:
The following lines should replace the section after the comment # Get constant part of script: (line of code beginning with self.script +=).
self.script += self.get_script_const() self.script += "%s \\\n\t" % reference self.script += "%s \\\n\t" % reads self.script += "> %s \n\n" % (use_dir+output)
What this does is to add the following strings to self.script:
- The constant part including environment variable definition,
script_pathandredirects. - the reference
- the reads
- the full path to the output file.
Alternatively, the same can be achieved with the following code:
self.script += """ {const} {reference} \\ {reads} \\ > {outp} """.format(const=self.get_script_const(), reference=reference, reads=reads, outp=use_dir+output)
Putting output file ``sample_data``
Finally, we need to place the output file in the sample_data dictionary so that downstream module instances can get the path and do further work on it.
After the # Put the output file/s in the sample_data dictionary comment, replace the two lines of code with the following lines:
self.sample_data[sample][output_suffix] = sample_dir + output self.stamp_file(self.sample_data[sample][output_suffix])
We set the output_suffix slot for sample to the output file within sample_dir. Remember that output_suffix is either sam or paf. The sam slot is recognized by other modules, samtools for instance. So you can now put a samtools module instance downstream to your minimap2 instance to perform sorting and indexing on the sam file, e.g..
The second command makes the bash script record the resulting files md5 checksum in the workflow’s logs/file_registration.txt file.
That’s it. We’re done with the basic version of the new minimap2 module!!
NeatSeq-Flow Cheat-Sheet
Author: Menachem Sklarz
Page Contents:
Input Files
Sample file
Passed to NeatSeq-Flow with the -s argument.
Includes four sections:
Two tab-separated columns:
- File type
- File path
#Type Path
Nucleotide /path/to/genome.fasta
Three tab-separated columns:
- Sample ID
- File type
- File path
Additional columns will be ignored:
#SampleID Type Path lane
Sample1 Forward /path/to/Sample1_F1.fastq.gz 1
Sample1 Forward /path/to/Sample1_F2.fastq.gz 2
Sample1 Reverse /path/to/Sample1_R1.fastq.gz 1
Sample1 Reverse /path/to/Sample1_R2.fastq.gz 2
Parameter file
Passed to NeatSeq-Flow with the -p argument.
YAML-formatted file with the following three sections.
Tip
The Vars section is recommended but not compulsory.
| Parameter | Description |
|---|---|
Executor |
SGE, Local or SLURM. (Default: SGE) |
Qsub_q |
The cluster queue (or partition) to use. Default value for qsub –q parameter. Required |
Qsub_nodes |
Default nodes on which to execute jobs (Default: All nodes in queue) |
Qsub_opts |
Other parameters to pass to qsub |
Qsub_path |
The full path to qsub. Obtain by running which qsub (default: qsub is in path) |
Default_wait |
Default: 10. Leave as is |
module_path |
List of paths to repositories of additional modules. (Must be a python directory, containing __init__.py |
job_limit |
|
conda |
path and env, defining the path to the environment you want to use and its name (see here). |
setenv |
Setting in global parameters is equivalent to setting setenv in all steps (see section Additional parameters. |
Attention
The default executor is SGE. For SLURM, sbatch is used instead of qsub, e.g. Qsub_nodes defines the nodes to be used by sbatch.
Attention
If NeatSeq-Flow is executed from within a conda environment with both NeatSeq-Flow and it’s modules installed, module_path will automatically include the modules repo. If not, you will have to give the path to the location where the modules were installed.
Replacements to be made in the parameter file. In YAML format. Referred to in other sections by the dot-notification.
Example:
Vars:
paths:
bwa: /path/to/bwa
samtools: /path/to/samtools
genome: /path/to/genomeDir
In parameter section:
| This… | Becomes this… |
|---|---|
{Vars.paths.bwa} |
/path/to/bwa |
{Vars.paths.samtools} |
/path/to/samtools |
{Vars.genome} |
/path/to/genomeDir |
A series of YAML blocks, one per workflow step to perform. Each block takes the following form:
fqc_trimgal:
module: fastqc_html
base: trim_gal
script_path: {Vars.paths.fastqc}
Types of step parameters:
| Parameter | Description |
|---|---|
module |
The name of the module of which this step is an instance. |
base |
The name of the step(s) on which the current step is based (not required for the Import step, which is always first and single) |
script_path |
The full path to the script executed by this step. |
Passed in a qsub_params block.
| Parameter | Description |
|---|---|
node |
A node or YAML list of nodes on which to run the step scripts (overrides global parameter Qsub_nodes) |
queue or -q |
Will limit the execution of the step’s scripts to this queue (overrides global parameter Qsub_q) |
-pe |
Will set the -pe parameter for all scripts for this module (see SGE qsub manual). |
-XXX: YYY |
Set the value of qsub parameter -XXX to YYY. This is a way to define other SGE parameters for all step scripts. |
| Parameter | Description |
|---|---|
tag |
All instances downstream to the tagged instance will have the same tag. All steps with the same tag can be executed with one master script |
intermediate |
Will add a line to scripts/95.remove_intermediates.sh for deleting the results of this step |
setenv |
Set various environment variables for the duration of script execution. A string with format ENV="value for env1" ENV2="new value for env2" |
precode |
Additional code to be added before the actual script. Rarely used |
scope |
Use sample- or project-wise files. Check per-module documentation for whether and how this parameter is defined |
sample_list |
Limit this step to a subset of the samples. See section Sample list. |
conda |
Is used to define step specific conda parameters. The syntax is the same as for the global conda definition (see here). |
arg_separator |
Set the delimiter between program argument and value, e.g. ‘=’ (Default: ‘ ‘) |
local |
Use a local directory for intermediate files before copying results to final destination in data dir. |
Parameters to be redirected to the actual program executed by the step.
Redirected parameters are specified within a redirects: block. The parameter name must include the - or -- required by the program defined in script_path.
The sample list enables limiting the instance scripts to a subset of the samples. It can be expressed in two ways:
A YAML list or a comma-separated list of sample names:
sample_list: [sample1, sample2]
By levels of a category (see section Mapping file):
sample_list: category: Category1 levels: [level1,level2]
For using all but a subset of samples, use exclude_sample_list instead of sample_list.
Mapping file
Passed to NeatSeq-Flow with --mapping.
A tab-separated table with at least two columns:
- Sample ID
- First category name
- Additional categories…
Example:
#SampleID Category1 Category2
Sample1 A C
Sample2 A D
Sample3 B C
Sample4 B D
Flow control
Import
NeatSeq-Flow will attempt to guess all the parameters it requires.
Example:
Merge_files:
module: Import
script_path:
Define source and target slots and how to concatenate the files. Attempts to guess information left out by the user.
| Parameter | Description |
|---|---|
src |
source slot. |
trg |
target slot |
ext |
concatenated file extension. |
scope |
the scope of the file |
script_path |
the code to use for merging, or one of the following values: |
pipe |
a command through which to pipe the file before storing. |
| Value | Description |
|---|---|
..guess.. |
Guess (script_path, trg and ext) |
..import.. |
Do not copy the file, just import it into its slot (only if one file defined for src). |
..skip.. |
Do not import the file type. |
Example:
merge_data:
module: Import
src: [Forward, Reverse, Nucl]
trg: [fastq.F, fastq.R, fasta.nucl]
script_path: [..import.., cat, 'curl -L']
ext: [null, null, txt]
scope: [sample, sample, project]
manage_types
Import raw data files into the data/ directory.
| Value | Possible values | Description |
|---|---|---|
| operation | add | del | mv | cp | The operation to perform on the file type. |
| scope | project|sample | The scope on which to perform the operation. (For ‘mv’ and ‘cp’ this is the source scope) |
| type | The file type on which to perform the operation. (For ‘mv’ and ‘cp’ this is the source type) | |
| scope_trg | project|sample | The destination scope for ‘mv’ and ‘cp’ operations |
| type_trg | The destination type for ‘mv’ and ‘cp’ operations. | |
| Path | For add operation, the value to insert in the file type. |
Example:
manage_types1:
module: manage_types
base: trinity1
script_path:
scope:[project, sample, sample, project]
operation: [mv,del,cp,add]
type: [fasta.nucl, fasta.nucl, fastq.F, bam]
type_trg: [transcripts.nucl, None ,fastq.main, None]
scope_trg: sample
path: [None, None, None, /path/to/mapping.bam]
merge_table
Used for concatenating tables from samples into one project table, or for concatenating tables from sample sub-samples, according to a mapping file. Any text file can be merged in this way.
| Parameter | Description |
|---|---|
| header | The number of header lines the files contain. |
| add_filename | Set to append the source filename to each line in the resulting file. |
| ext | The extension to use in the resulting file. If not specified, uses merged file exts. |
| scope | project or group, if group, you must also specify category. |
Example:
merge_blast_tables:
module: merge_table
base: merge1
script_path:
type: [blast.prot,fasta.nucl]
header: 0
ext: [out,fna]
Reserved words
When writing new modules, the following words are conserved and should not be used for as parameters:
- module
- base
- script_path
- setenv
- redirect
- qsub_params
- tag
- conda
- precode
Module and Workflow Repository
Author: Menachem Sklarz
Detailed documentation of all available modules and workflows, along with installation and usage instructions, is available at the repository web site:
NeatSeq-Flow’s Module and Workflow Repository
NeatSeq-Flow comes with a basic set of modules (marked with an * in the Repository). The complete set of currently available modules and workflows is downloadable from GitHub.
When installing NeatSeq-Flow with conda, all modules are included in the installation.