Table of Contents
Overview
What?
It’s easiest to describe The Mozilla Defense Platform (MozDef) as a set of micro-services you can use as an open source Security Information and Event Management (SIEM) overlay on top of Elasticsearch.
Why?
The inspiration for MozDef comes from the large arsenal of tools available to attackers. Open source suites like metasploit, armitage, lair, dradis and others are readily available to help attackers coordinate, share intelligence and finely tune their attacks in real time.
Open source options for defenders are usually limited to wikis, ticketing systems and manual tracking databases attached to the end of a commercial SIEM.
The Mozilla Defense Platform (MozDef) seeks to automate the security incident handling process and facilitate the real-time activities of incident handlers.
Goals
High level
- Provide a platform for use by defenders to rapidly discover and respond to security incidents
- Automate interfaces to other systems like firewalls, cloud protections and anything that has an API
- Provide metrics for security events and incidents
- Facilitate real-time collaboration amongst incident handlers
- Facilitate repeatable, predictable processes for incident handling
- Go beyond traditional SIEM systems in automating incident handling, information sharing, workflow, metrics and response automation
Technical
- Offer micro services that make up an Open Source Security Information and Event Management (SIEM)
- Scalable, should be able to handle thousands of events per second, provide fast searching, alerting, correlation and handle interactions between teams of incident handlers
MozDef aims to provide traditional SIEM functionality including:
- Accepting events/logs from a variety of systems.
- Storing events/logs.
- Facilitating searches.
- Facilitating alerting.
- Facilitating log management (archiving,restoration).
It is non-traditional in that it:
- Accepts only JSON input.
- Provides you open access to your data.
- Integrates with a variety of log shippers including logstash, beaver, nxlog, syslog-ng and any shipper that can send JSON to either rabbit-mq or an HTTP(s) endpoint.
- Provides easy integration to Cloud-based data sources such as CloudTrail or GuardDuty.
- Provides easy python plugins to manipulate your data in transit.
- Provides extensive plug-in opportunities to customize your event enrichment stream, your alert workflow, etc.
- Provides realtime access to teams of incident responders to allow each other to see their work simultaneously.
Architecture
MozDef is based on open source technologies including:
- Nginx (http(s)-based log input)
- RabbitMQ (message queue and amqp(s)-based log input)
- uWSGI (supervisory control of python-based workers)
- bottle.py (simple python interface for web request handling)
- Elasticsearch (scalable indexing and searching of JSON documents)
- Meteor (responsive framework for Node.js enabling real-time data sharing)
- MongoDB (scalable data store, tightly integrated to Meteor)
- VERIS from verizon (open source taxonomy of security incident categorizations)
- d3 (javascript library for data driven documents)
- dc.js (javascript wrapper for d3 providing common charts, graphs)
- three.js (javascript library for 3d visualizations)
- Firefox (a snappy little web browser)
Frontend processing
Frontend processing for MozDef consists of receiving an event/log (in json) over HTTP(S), AMQP(S), or SQS doing data transformation including normalization, adding metadata, etc. and pushing the data to Elasticsearch.
Internally MozDef uses RabbitMQ to queue events that are still to be processed. The diagram below shows the interactions between the python scripts (controlled by uWSGI), the RabbitMQ exchanges and Elasticsearch indices.

Status
MozDef has been in production at Mozilla since 2014 where we are using it to process over 300 million events per day.
Introduction
Concept of operations
Event Management
From an event management point of view MozDef relies on Elastic Search for:
- event storage
- event archiving
- event indexing
- event searching
This means if you use MozDef for your log management you can use the features of Elastic Search to store millions of events, archive them to Amazon if needed, index the fields of your events, and search them using highly capable interfaces like Kibana.
MozDef differs from other log management solutions that use Elastic Search in that it does not allow your log shippers direct contact with Elastic Search itself. In order to provide advanced functionality like event correlation, aggregation and machine learning, MozDef inserts itself as a shim between your log shippers (rsyslog, syslog-ng, beaver, nxlog, heka, logstash) and Elastic Search. This means your log shippers interact with MozDef directly and MozDef handles translating their events as they make they’re way to Elastic Search.
Event Pipeline
The logical flow of events is:
+–––––––––––+ +––––––––––––––+
| MozDef +––––––––––––––+ |
+––––––––––+ | FrontEnd | Elastic |
| shipper +–––––––+–––––––––––+ | Search |
++++++++++++ | cluster |
++++++++++++ | |
| shipper +–––––––+–––––––––––+ | |
+––––––––––+ | MozDef +-–––––––––––––+ |
| FrontEnd | |
+–––––––––––+ | |
+––––––––––––––+
Choose a shipper (logstash, nxlog, beaver, heka, rsyslog, etc) that can send JSON over http(s). MozDef uses nginx to provide http(s) endpoints that accept JSON posted over http. Each front end contains a Rabbit-MQ message queue server that accepts the event and sends it for further processing.
You can have as many front ends, shippers and cluster members as you with in any geographic organization that makes sense for your topology. Each front end runs a series of python workers hosted by uwsgi that perform:
- event normalization (i.e. translating between shippers to a common taxonomy of event data types and fields)
- event enrichment
- simple regex-based alerting
- machine learning on the real-time event stream
Event Enrichment
To facilitate event correlation, MozDef allows you to write plugins to populate your event data with consistent meta-data customized for your environment. Through simple python plug-ins this allows you to accomplish a variety of event-related tasks like:
- further parse your events into more details
- geoIP tag your events
- correct fields not properly handled by log shippers
- tag all events involving key staff
- tag all events involving previous attackers or hits on a watchlist
- tap into your event stream for ancilary systems
- maintain ‘last-seen’ lists for assets, employees, attackers
Event Correlation/Alerting
Correlation/Alerting is currently handled as a series of queries run periodically against the Elastic Search engine. This allows MozDef to make full use of the lucene query engine to group events together into summary alerts and to correlate across any data source accessible to python.
Incident Handling
From an incident handling point of view MozDef offers the realtime responsiveness of Meteor in a web interface. This allows teams of incident responders the ability to see each others actions in realtime, no matter their physical location.
Demo Instance
Mozilla used to maintain a demo instance of MozDef, however it’s currently offline. Best bet for demo is to clone the repo and use the docker containers to stand up a local instance for yourself. There are some scripts in the https://github.com/mozilla/MozDef/tree/master/examples/demo folder to send sample events into a local docker instance that will generate alerts, attackers, etc and give you a feel for the flow.
First; set up your docker environment with some tweaks to avoid some common pitfalls:
- Allocate it at least 4GB of memory
- Use the aufs filesystem driver ( to avoid issues unpacking tar files on overlayfs)
Once you’ve done that, here’s how to make MozDef go using the provided docker compose files:
- Pull the repo: git clone https://github.com/mozilla/MozDef.git
- Run the containers:
docker-compose -f docker/compose/docker-compose.yml -p mozdef up
- Firefox yourself to http://localhost to see the main UI (when the container starts)
- Login using a locally created account (click login, create and choose a username/password)
Installation
The installation process has been tested on CentOS 7.
Build and run MozDef
You can quickly install MozDef with an automated build generation using docker:
make build
make run
You’re done! Now go to:
- http://localhost < meteor (main web interface)
- http://localhost:9090/app/kibana < kibana
- http://localhost:9200 < elasticsearch
- http://localhost:8080 < loginput
Note
The build system has changed make targets for multiple-* and single-* have been replaced by the above commands (make run, etc.) Just type make to get a list of available targets.
Manual Installation for Yum or Apt based distros
Summary
This section explains the manual installation process for the MozDef system
Create a mozdef user.
On Yum-based systems:
adduser mozdef -d /opt/mozdef
mkdir /opt/mozdef/envs
chown -R mozdef:mozdef /opt/mozdef
On APT-based systems:
useradd -m -d /opt/mozdef -s /bin/bash mozdef
mkdir /opt/mozdef/envs
chown -R mozdef:mozdef /opt/mozdef
Clone repository.
On Yum-based systems:
yum install -y git
su mozdef
cd
git clone https://github.com/mozilla/MozDef.git /opt/mozdef/envs/mozdef
On APT-based systems:
apt-get install -y git
su mozdef
cd
git clone https://github.com/mozilla/MozDef.git /opt/mozdef/envs/mozdef
Web and Workers nodes
This section explains the manual installation process for Web and Workers nodes.
Python
We need to install a python3.6 virtualenv.
On Yum-based systems:
yum install -y epel-release
yum install -y python36 python36-devel python3-pip libcurl-devel gcc
pip3 install virtualenv
su mozdef
cd /opt/mozdef/envs
virtualenv -p /bin/python3 /opt/mozdef/envs/python
On APT-based systems:
apt-get install libcurl4-openssl-dev libssl-dev
apt-get install python3-pip
pip3 install virtualenv
su mozdef
cd /opt/mozdef/envs
virtualenv -p /usr/bin/python3 /opt/mozdef/envs/python
Then:
source /opt/mozdef/envs/python/bin/activate
cd /opt/mozdef/envs/mozdef
PYCURL_SSL_LIBRARY=nss pip install -r requirements.txt
If you’re using Mac OS X:
export PYCURL_SSL_LIBRARY=openssl
export LDFLAGS=-L/usr/local/opt/openssl/lib;export CPPFLAGS=-I/usr/local/opt/openssl/include
pip install -r requirements.txt
Copy the following into a file called .bash_profile for the mozdef user within /opt/mozdef:
[mozdef@server ~]$ vim /opt/mozdef/.bash_profile
# Add the following to the file before "export PATH":
PATH=$PATH:$HOME/.meteor
export PATH
At this point when you launch python from within your virtual environment, It should tell you that you’re using Python 3.6.9.
RabbitMQ
RabbitMQ is used on workers to have queues of events waiting to be inserted into the Elasticsearch cluster (storage).
RabbitMQ does provide a zero-dependency RPM that you can find for RedHat/CentOS here:: https://github.com/rabbitmq/erlang-rpm
For Debian/Ubuntu based distros you would need to install erlang separately.
To install it, first make sure you enabled EPEL repos. Then you need to install an Erlang environment.
If you prefer to install all the dependencies on a Red Hat based system you can do the following:: On Yum-based systems:
sudo yum install erlang
You can then install the rabbitmq server:
sudo rpm --import https://www.rabbitmq.com/rabbitmq-signing-key-public.asc
sudo yum install rabbitmq-server
To start rabbitmq at startup:
systemctl enable rabbitmq-server
On APT-based systems
sudo apt-get install rabbitmq-server
sudo invoke-rc.d rabbitmq-server start
We do advise using rabbitmq and erlang’s latest versions if you plan on using TLS protected connections with Rabbitmq. A simple way of doing this would be to use Bintray’s repo located at: https://www.rabbitmq.com/install-rpm.html#bintray to download both the latest versions of rabbitmq and erlang.
Meteor
Meteor is a javascript framework used for the realtime aspect of the web interface.
We first need to install Mongodb since it’s the DB used by Meteor.
On Yum-based systems:
In /etc/yum.repos.d/mongo.repo, add:
[mongodb-org-3.4]
name=MongoDB Repository
baseurl=https://repo.mongodb.org/yum/redhat/$releasever/mongodb-org/3.4/x86_64/
gpgcheck=1
enabled=1
gpgkey=https://www.mongodb.org/static/pgp/server-3.4.asc
Then you can install mongodb:
sudo yum install mongodb-org
On APT-based systems:
sudo apt-get install mongodb-server
We have a mongod.conf in the config directory prepared for you. To use it simply move it in to /etc:
cp /opt/mozdef/config/mongod.conf /etc/
For meteor installation follow these steps:
sudo -i -u mozdef -g mozdef
curl https://install.meteor.com/?release=1.8 | sh
For node you can exit from the mozdef user:
wget https://nodejs.org/dist/v8.12.0/node-v8.12.0.tar.gz
tar xvzf node-v8.12.0.tar.gz
cd node-v8.12.0
./configure
make
sudo make install
Then from the meteor subdirectory of this git repository (/opt/mozdef/meteor) run as the mozdef user with venv activated:
sudo -i -u mozdef -g mozdef
source envs/python/bin/activate
meteor add iron-router
If you wish to use meteor as the authentication handler you’ll also need to install the Accounts-Password pkg:
meteor add accounts-password
You may want to edit the /meteor/imports/settings.js file to properly configure the URLs and Authentication The default setting will use Meteor Accounts, but you can just as easily install an external provider like Github, Google, Facebook or your own OIDC:
mozdef = {
...
authenticationType: "meteor-password",
...
}
or for an OIDC implementation that passes a header to the nginx reverse proxy (for example using OpenResty with Lua and Auth0):
mozdef = {
...
authenticationType: "OIDC",
...
}
Then start meteor with:
meteor
Node
Alternatively you can run the meteor UI in ‘deployment’ mode using a native node installation.
First install node:
yum install bzip2 gcc gcc-c++ sqlite sqlite-devel
wget https://nodejs.org/dist/v8.12.0/node-v8.12.0.tar.gz
tar xvzf node-v8.12.0.tar.gz
cd node-v8.12.0
./configure
make
sudo make install
Then bundle the meteor portion of mozdef to deploy on another server:
cd <your meteor mozdef directory>
meteor bundle mozdef.tgz
You can then deploy the meteor UI for mozdef as necessary:
scp mozdef.tgz to your target host
tar -xvzf mozdef.tgz
This will create a ‘bundle’ directory with the entire UI code below that directory.
If you didn’t update the settings.js before bundling the meteor installation, you will need to update the settings.js file to match your servername/port:
vim bundle/programs/server/app/imports/settings.js
If your development OS is different than your production OS you will also need to update the fibers node module:
cd bundle/programs/server/node_modules
rm -rf fibers
sudo npm install fibers@1.0.1
Or you can bundle the meteor portion of mozdef to deploy on into a different directory. In this example we place it in /opt/mozdef/envs/meteor/mozdef:
#!/bin/bash
if [ -d /opt/mozdef/meteor ]
then
cd /opt/mozdef/meteor
source /opt/mozdef/envs/python/bin/activate
mkdir -p /opt/mozdef/envs/meteor/mozdef
meteor npm install
meteor build --server localhost:3002 --directory /opt/mozdef/envs/meteor/mozdef/
cp -r node_modules /opt/mozdef/envs/meteor/mozdef/node_modules
else
echo "Meteor does not exist on this host."
exit 0
fi
There are systemd unit files available in the systemd directory of the public repo you can use to start mongo, meteor (mozdefweb), and the restapi (mozdefrestapi). These systemd files are pointing to the bundled alternative directory we just mentioned.
If you aren’t using systemd, or didn’t bundle to the alternative directory, then run the mozdef UI via node manually:
export MONGO_URL=mongodb://mongoservername:3002/meteor
export ROOT_URL=http://meteorUIservername/
export PORT=443
node bundle/main.js
Nginx
We use nginx webserver.
You need to install nginx:
sudo yum install nginx
On apt-get based system:
sudo apt-get nginx
If you don’t have this package in your repos, before installing create /etc/yum.repos.d/nginx.repo with the following content:
[nginx]
name=nginx repo
baseurl=http://nginx.org/packages/centos/7/$basearch/
gpgcheck=0
enabled=1
UWSGI
We use uwsgi to interface python and nginx, in your venv execute the following:
wget https://projects.unbit.it/downloads/uwsgi-2.0.17.1.tar.gz
tar zxvf uwsgi-2.0.17.1.tar.gz
cd uwsgi-2.0.17.1
~/python3.6/bin/python uwsgiconfig.py --build
~/python3.6/bin/python uwsgiconfig.py --plugin plugins/python core
cp python_plugin.so ~/envs/python/bin/
cp uwsgi ~/envs/python/bin/
cd ..
cp -r ~/mozdef/rest ~/envs/mozdef/
cp -r ~/mozdef/loginput ~/envs/mozdef/
cd ~/envs/mozdef/rest
# modify config file
vim index.conf
# modify restapi.ini with any changes to pathing or number of processes you might need for your use case.
vim restapi.ini
cd ../loginput
# modify loginput.ini with any changes to pathing or number of processes you might need for your use case.
vim loginput.ini
Alternatively, if you do not wish to use the systemd unit files for starting these processes you can start the restapi and loginput processes from within your venv via:
cd /opt/mozdef/envs/python
source bin/activate
(mozdef) [mozdef@mozdev mozdef]$ uwsgi --ini rest/restapi.ini
(mozdef) [mozdef@mozdev mozdef]$ uwsgi --ini loginput/loginput.ini
sudo cp nginx.conf /etc/nginx
# modify /etc/nginx/nginx.conf to reflect your server, and any path changes you've made.
sudo vim /etc/nginx/nginx.conf
# move uwsgi_params file into venv.
cp /etc/nginx/uwsgi_params /opt/mozdef/envs/python/bin/
sudo service nginx restart
Supervisord
We use supervisord to run the alerts and alertactions. If you plan on starting services manually, you can skip this step.
To install supervisord perform the following as the user mozdef:
cd /opt/mozdef/envs/python
source bin/activate
cd bin
pip install supervisor
Within the alerts directory there is a supervisord_alerts.ini which is preconfigured. If you’ve changed any directory paths for this installation then modify it to reflect your pathing changes. There are systemd files in the systemdfiles directory that you can use to start the mozdefalerts and mozdefalertactions processes which we cover near the end of this tutorial.
ElasticSearch
This section explains the manual installation process for Elasticsearch nodes (search and storage). MozDef supports Elasticsearch version 5.x
Installation instructions are available on Elasticsearch website. You should prefer packages over archives if one is available for your distribution.
Add the repo in /etc/yum/repos.d/elasticsearch.repo:
[elasticsearch-5.x]
name=Elasticsearch repository for 5.x packages
baseurl=https://artifacts.elastic.co/packages/5.x/yum
gpgcheck=1
gpgkey=https://artifacts.elastic.co/GPG-KEY-elasticsearch
enabled=1
autorefresh=1
type=rpm-md
sudo yum install elasticsearch
Marvel plugin
Marvel is a monitoring plugin developed by Elasticsearch (the company).
WARNING: this plugin is NOT open source. At the time of writing, Marvel is free for 30 days. After which you can apply for a free basic license to continue using it for it’s key monitoring features.
To install Marvel, on each of your elasticsearch node, from the Elasticsearch home directory:
sudo bin/plugin install license
sudo bin/plugin install marvel-agent
sudo service elasticsearch restart
You should now be able to access to Marvel at http://any-server-in-cluster:9200/_plugin/marvel
Kibana
Kibana is a webapp to visualize and search your Elasticsearch cluster data
Create the Repo in /etc/yum/repos.d/kibana.repo:
[kibana-5.x]
name=Kibana repository for 5.x packages
baseurl=https://artifacts.elastic.co/packages/5.x/yum
gpgcheck=1
gpgkey=https://artifacts.elastic.co/GPG-KEY-elasticsearch
enabled=1
autorefresh=1
type=rpm-md
sudo yum install kibana
Now you’ll need to configure kibana to work with your system: You can set the various settings in /etc/kibana/kibana.yml. Some of the settings you’ll want to configure are:
- server.name (your server’s hostname)
- elasticsearch.url (the url to your elasticsearch instance and port)
- logging.dest ( /path/to/kibana.log so you can easily troubleshoot any issues)
Then you can start the service!
service kibana start
Start Services
To use the included systemd files you’ll copy them to your system’s default directory of /etc/systemd/system/. Ensure it has root file permissions so that systemd can start it:
cp /opt/mozdef/systemdfiles/web/mozdefweb.service /etc/systemd/system/
cp /opt/mozdef/systemdfiles/web/mozdefrestapi.service /etc/systemd/system/
cp /opt/mozdef/systemdfiles/web/mongod.service /etc/systemd/system/
cp /opt/mozdef/systemdfiles/consumer/mozdefloginput.service /etc/systemd/system/
cp /opt/mozdef/systemdfiles/consumer/mworker-eventtask.service /etc/systemd/system/
cp /opt/mozdef/systemdfiles/alert/mozdefalerts.service /etc/systemd/system/
cp /opt/mozdef/systemdfiles/alert/mozdefbot.service /etc/systemd/system/
cp /opt/mozdef/systemdfiles/alert/mozdefalertactions.service /etc/systemd/system/
Then you will need to enable them:
systemctl enable mozdefweb.service
systemctl enable mozdefrestapi.service
systemctl enable mozdefloginput.service
systemctl enable mworker-eventtask.service
systemctl enable mozdefalerts.service
systemctl enable mozdefbot.service
systemctl enable mozdefalertactions.service
systemctl enable mongod.service
Reload systemd:
systemctl daemon-reload
Now you can start your services:
systemctl start mongod
systemctl start mozdefalerts
systemctl start mozdefbot
systemctl start mozdefloginput
systemctl start mozdefrestapi
systemctl start mozdefweb
systemctl start mworker-eventtask
systemctl start mozdefalertactions
Alternatively you can start the following services manually in this way from inside the venv as mozdef:
# Eventtask worker
cd ~/MozDef/mq
(mozdef) [mozdef@mozdev mq]$ uwsgi --ini eventtask.ini
# alert worker
(mozdef) [mozdef@mozdev mozdef]$ cd ~/mozdef/alerts
(mozdef) [mozdef@mozdev alerts]$ celery -A lib.tasks worker --loglevel=info --beat
To initialize elasticsearch indices and create sample kibana dashboards:
(mozdef) [mozdef@mozdev mozdef]$ cd ~/mozdef/scripts/setup
(mozdef) [mozdef@mozdev setup$ python initial_setup.py http://<elasticsearch_host>:9200 http://<kibana_host>:5601
To add some sample data:
(mozdef) [mozdef@mozdev mozdef]$ cd ~/mozdef/scripts/demo
(mozdef) [mozdef@mozdev demo]$ python populate_sample_events.py --num-rounds=1
To continously add sample data:
(mozdef) [mozdef@mozdev mozdef]$ cd ~/mozdef/scripts/demo
(mozdef) [mozdef@mozdev demo]$ python populate_sample_events.py
Usage
Web Interface
MozDef uses the Meteor framework for the web interface and bottle.py for the REST API. For authentication, MozDef supports local account creation. Meteor (the underlying UI framework) supports many authentication options including google, github, twitter, facebook, oath, native accounts, etc.
Events visualizations
Since the backend of MozDef is Elastic Search, you get all the goodness of Kibana with little configuration. The MozDef UI is focused on incident handling and adding security-specific visualizations of SIEM data to help you weed through the noise.
Alerts
Alerts are implemented as Elastic Search searches. MozDef provides a plugin interface to allow open access to event data for enrichment, hooks into other systems, etc.
Incident handling
Sending logs to MozDef
Events/Logs are accepted as json over http(s) with the POST or PUT methods or over rabbit-mq. Most modern log shippers support json output. MozDef is tested with support for:
- heka
- beaver
- nxlog
- logstash
- rsyslog
- native python code
- AWS cloudtrail (via native python)
We have some configuration snippets
What should I log?
If your program doesn’t log anything it doesn’t exist. If it logs everything that happens it becomes like the proverbial boy who cried wolf. There is a fine line between logging too little and too much but here is some guidance on key events that should be logged and in what detail.
| Event | Example | Rationale |
|---|---|---|
| Authentication Events | Failed/Success logins | Authentication is always an important event to log as it establishes traceability for later events and allows correlation of user actions across systems. |
| Authorization Events | Failed attempts to insert/update/delete a record or access a section of an application. | Once a user is authenticated they usually obtain certain permissions. Logging when a user’s permissions do not allow them to perform a function helps troubleshooting and can also be helpful when investigating security events. |
| Account Lifecycle | Account creation/deletion/update | Adding, removing or changing accounts are often the first steps an attacker performs when entering a system. |
| Password/Key Events | Password changed, expired, reset. Key expired, changed, reset. | If your application takes on the responsibility of storing a user’s password (instead of using a centralized source) it is important to note changes to a users credentials or crypto keys. |
| Account Activations | Account lock, unlock, disable, enable | If your application locks out users after failed login attempts or allows for accounts to be inactivated, logging these events can assist in troubleshooting access issues. |
| Application Exceptions | Invalid input, fatal errors, known bad things | If your application catches errors like invalid input attempts on web forms, failures of key components, etc creating a log record when these events occur can help in troubleshooting and tracking security patterns across applications. Full stack traces should be avoided however as the signal to noise ratio is often overwhelming. It is also preferable to send a single event rather than a multitude of events if it is possible for your application to correlate a significant exception. For example, some systems are notorious for sending a connection event with source IP, then sending an authentication event with a session ID then later sending an event for invalid input that doesn’t include source IP or session ID or username. Correctly correlating these events across time is much more difficult than just logging all pieces of information if it is available. |
JSON format
This section describes the structure JSON objects to be sent to MozDef. Using this standard ensures developers, admins, etc are configuring their application or system to be easily integrated into MozDef.
Background
Mozilla used CEF as a logging standard for compatibility with Arcsight and for standardization across systems. While CEF is an admirable standard, MozDef prefers JSON logging for the following reasons:
- Every development language can create a JSON structure.
- JSON is easily parsed by computers/programs which are the primary consumer of logs.
- CEF is primarily used by Arcsight and rarely seen outside that platform and doesn’t offer the extensibility of JSON.
- A wide variety of log shippers (heka, logstash, fluentd, nxlog, beaver) are readily available to meet almost any need to transport logs as JSON.
- JSON is already the standard for cloud platforms like amazon’s cloudtrail logging.
Description
As there is no common RFC-style standard for json logs, we prefer the following structure adapted from a combination of the graylog GELF and logstash specifications.
Note all fields are lowercase to avoid one program sending sourceIP, another sending sourceIp, another sending SourceIPAddress, etc. Since the backend for MozDef is elasticsearch and fields are case-sensitive this will allow for easy compatibility and reduce potential confusion for those attempting to use the data. MozDef will perform some translation of fields to a common schema but this is intended to allow the use of heka, nxlog, beaver and retain compatible logs.
Mandatory Fields
| Field | Purpose | Sample Value |
|---|---|---|
| category | General category/type of event matching the ‘what should I log’ section below | authentication, authorization, account creation, shutdown, atartup, account deletion, account unlock, zeek |
| details | Additional, event-specific fields that you would like included with the event. Please completely spell out a field rather an abbreviate: i.e. sourceipaddress instead of srcip. | <see below> |
| hostname | The fully qualified domain name of the host sending the message | server1.example.com |
| processid | The PID of the process sending the log | 1234 |
| processname | The name of the process sending the log | myprogram.py |
| severity | RFC5424 severity level of the event in all caps: DEBUG, INFO, NOTICE, WARNING, ERROR, CRITICAL, ALERT, EMERGENCY | INFO |
| source | Source of the event (file name, system name, component name) | /var/log/syslog/2014.01.02.log |
| summary | Short human-readable version of the event suitable for IRC, SMS, etc. | john login attempts over threshold, account locked |
| tags | An array or list of any tags you would like applied to the event | vpn, audit nsm,zeek,intel |
| timestamp | Full date plus time timestamp of the event in ISO format including the timezone offset | 2014-01-30T19:24:43+06:00 |
| utctimestamp | Full UTC date plus time timestamp of the event in ISO format including the timezone offset | 2014-01-30T13:24:43+00:00 |
| receivedtimestamp | Full UTC date plus time timestamp in ISO format when mozdef parses the event. This is set by mozdef upon receipt of the event | 2014-01-30T13:24:43+00:00 |
Details substructure (mandatory if such data is sent, otherwise optional)
| Field | Purpose | Sample Value |
|---|---|---|
| destinationipaddress | Destination IP of a network flow | 8.8.8.8 |
| destinationport | Destination port of a network flow | 80 |
| sourceipaddress | Source IP of a network flow | 8.8.8.8 |
| sourceport | Source port of a network flow | 42297 |
| sourceuri | Source URI such as a referer | https://www.mozilla.org/ |
| destinationuri | Destination URI as in “wget this URI” | https://www.mozilla.org/ |
| error | Action resulted in an error or failure | true/false |
| success | Transaction failed/ or succeeded | true/false |
| username | Username, email, login, etc. | kang@mozilla.com |
| useragent | Program agent string | curl/1.76 (Windows; 5.1) |
Examples
{
"timestamp": "2014-02-14T11:48:19.035762739-05:00",
"hostname": "somemachine.in.your.company.com",
"processname": "/path/to/your/program.exe",
"processid": 3380,
"severity": "INFO",
"summary": "joe login failed",
"category": "authentication",
"source": "ldap",
"tags": [
"ldap",
"adminAccess",
"failure"
],
"details": {
"username": "joe",
"task": "access to admin page /admin_secret_radioactiv",
"result": "10 authentication failures in a row",
"success": false
}
}
Simple test
If you want to just post some sample json to Mozdef do something like
curl -v --header "Content-Type: application/json" --request POST --data '{"tags": ["test"],"summary": "just a test"}' http://localhost:8080/events
where http://localhost:8080 is whatever is running the ‘loginput’ service. The ‘data’ curl option is what gets posted as json to MozDef. If your post is successful, you should then be able to find the event in elastic search/kibana.
Writing alerts
Alerts allow you to create notifications based on events stored in elasticsearch. You would usually try to aggregate and correlate events that are the most severe and on which you have response capability. Alerts are stored in the alerts folder.
There are two types of alerts:
- simple alerts that consider events on at a time
- For example you may want to get an alert everytime a single LDAP modification is detected.
- aggregation alerts that allow you to aggregate events on the field of your choice
- For example you may want to alert when more than 3 login attempts failed for the same username.
You’ll find documented examples in the alerts folder.
Once you’ve written your alert, you need to configure it in celery to be launched periodically.
If you have a AlertBruteforceSsh class in a alerts/bruteforce_ssh.py file for example, in alerts/lib/config you can configure the task to run every minute:
ALERTS = {
'bruteforce_ssh.AlertBruteforceSsh': crontab(minute='*/1'),
}
MozDef for AWS
What is MozDef for AWS
Cloud based MozDef is an opinionated deployment of the MozDef services created in 2018 to help AWS users ingest CloudTrail, GuardDuty, and provide security services.

Feedback
MozDef for AWS is new and we’d love your feedback. Try filing GitHub issues here in the repository or connect with us in the Mozilla Discourse Security Category.
https://discourse.mozilla.org/c/security
You can also take a short survey on MozDef for AWS after you have deployed it. https://goo.gl/forms/JYjTYDK45d3JdnGd2
Dependencies
MozDef requires the following:
- A DNS name ( e.g. cloudymozdef.security.allizom.org ) which you will need to point at the IP address of the Application Load Balancer
- An OIDC Provider with ClientID, ClientSecret, and Discovery URL
- Mozilla uses Auth0 but you can use any OIDC provider you like: Shibboleth, KeyCloak, AWS Cognito, Okta, Ping (etc.).
- You will need to configure the redirect URI of
/redirect_urias allowed in your OIDC provider configuration.
- An ACM Certificate in the deployment region for your DNS name
- A VPC with three public subnets available
- It is advised that this VPC be dedicated to MozDef or used solely for security automation.
- The three public subnets must all be in different availability zones and have a large enough number of IP addresses to accommodate the infrastructure.
- The VPC must have an internet gateway enabled on it so that MozDef can reach the internet.
- An SQS queue receiving GuardDuty events - At the time of writing this is not required but may be required in future.
Supported Regions
MozDef for AWS is currently only supported in us-west-2 but additional regions will be added over time.
Architecture

Deployment Process
- Launch the one click stack and provide the requisite values.
- Wait for the stack to complete. You’ll see several nested stacks in the CloudFormation console. Once the EC2 instance is running there are still provisioning steps taking place on the instance. Note: This may take a while
- Configure your DNS name to point to the application load balancer
- Navigate to the URL you set up for MozDef. It should redirect you to the single sign on provider. If successful you’ll see the MozDef UI.
- Try navigating to ElasticSearch https://your_base_url:9090
You should see the following:
{
"name" : "SMf4400",
"cluster_name" : "656532927350:mozdef-mozdef-yemjpbnpw8xb",
"cluster_uuid" : "_yBEIsFkQH-nEZfrFgj7mg",
"version" : {
"number" : "5.6.8",
"build_hash" : "688ecce",
"build_date" : "2018-09-11T14:44:40.463Z",
"build_snapshot" : false,
"lucene_version" : "6.6.1"
},
"tagline" : "You Know, for Search"
}
- Test out Kibana at https://your_base_url:9090/_plugin/kibana/app/kibana#/discover?_g=()
Troubleshooting
To view logs on the ec2 instance
Determine the name/IP of the autoscaled EC2 instance via the command line or web console
SSH into that EC2 instance as the
ec2-useruser using the SSH keypair that you set as theKeyNameparameter in CloudFormationList out all the containers with
sudo docker container ls
Tail logs from the container you’d like to examine with
# show both the access logs and the error logs sudo docker logs --follow NAME_OF_CONTAINER # show only the error logs docker logs --follow NAME_OF_CONTAINER >/dev/null
where
NAME_OF_CONTAINERis the container name or ID that you found in the step aboveTo enter the environment for that container run
sudo docker exec --interactive --tty NAME_OF_CONTAINER /bin/bash
To view the environment variables being made available to the containers view the file
/opt/mozdef/docker/compose/cloudy_mozdef.env
Using MozDef
Refer back to our other docs on how to use MozDef for general guidance. Cloud specific instructions will evolve here. If you saw something about MozDef for AWS at re: Invent 2018 and you want to contribute we’d love your PRs.
Advanced Settings
Conf files
MozDef python scripts in almost all cases expect to be given a -c path/to/file.conf command line option to specify configuration/run time options.
These files all follow the same format:
[options]
setting1=value1
setting2=value2
All programs do their best to set reasonable, sane defaults and most will run fine without a conf file. By default programname.py will look for programname.conf as it’s configuration file so if you follow that convention you don’t even need to specify the -c path/to/file.conf option.
You can override any .conf file setting by providing an equivalent environment variable.
Certain environment variables have special meaning to the web ui (meteor):
OPTIONS_METEOR_ROOTURL is "http://localhost" by default and should be set to the dns name of the UI where you will run MozDef
OPTIONS_METEOR_PORT is 80 by default and is the port on which the UI will run
OPTIONS_METEOR_ROOTAPI is http://rest:8081 by default and should resolve to the location of the rest api
OPTIONS_METEOR_KIBANAURL is http://localhost:9090/app/kibana# by default and should resolve to your kibana installation
OPTIONS_METEOR_ENABLECLIENTACCOUNTCREATION is true by default and governs whether accounts can be created
OPTIONS_METEOR_AUTHENTICATIONTYPE is meteor-password by default and can be set to oidc to allow for oidc authentication
OPTIONS_REMOVE_FEATURES is empty by default, but if you pass a comma separated list of features you'd like to remove they will no longer be available.
You can find a list of features in the meteor/private/features.txt file in the git repo.
Special Config Items
Here are some tips for some key settings:
[options]
esservers=http://server1:9200,http://server2:9200,http://server3:9200
is how you can specify servers in your elastic search cluster.
[options]
backup_indices = intelligence,.kibana,alerts,events,complianceitems,.jsp,.marvel-kibana,vulnerabilities
backup_dobackup = 1,1,1,1,1,1,1,1
backup_rotation = none,none,monthly,daily,none,none,none,none
backup_pruning = 0,0,0,20,0,0,0,0
is how you would configure the backupSnapshot.py and pruneIndexes.py programs to backup selected elastic search indexes, rotate selected indexes and prune certain indexes at selected intervals. In the case above we are backing up all indexes mentioned, rotating alerts monthly, rotating events daily and pruning events indices after 20 days.
[options]
autocategorize = True
categorymapping = [{"bruteforce":"bruteforcer"},{"nothing":"nothing"}]
is how you would configure collectAttackers.py to do autocategoization of attackers that it discovers and specify a list of mappings matching alert categories to attacker category.
Development
Alert Development Guide
This guide is for someone seeking to write a MozDef alert
How to start developing your new alert
Run:
make new-alert
This will prompt for information and create two things:
- <The new alert file>
- <The new alert test file>
You can now edit these files in place, but it is recommended that you run unit-tests on the new alert to make sure it passes before editing (instructions below).
How to run tests on your alert
Requirements:
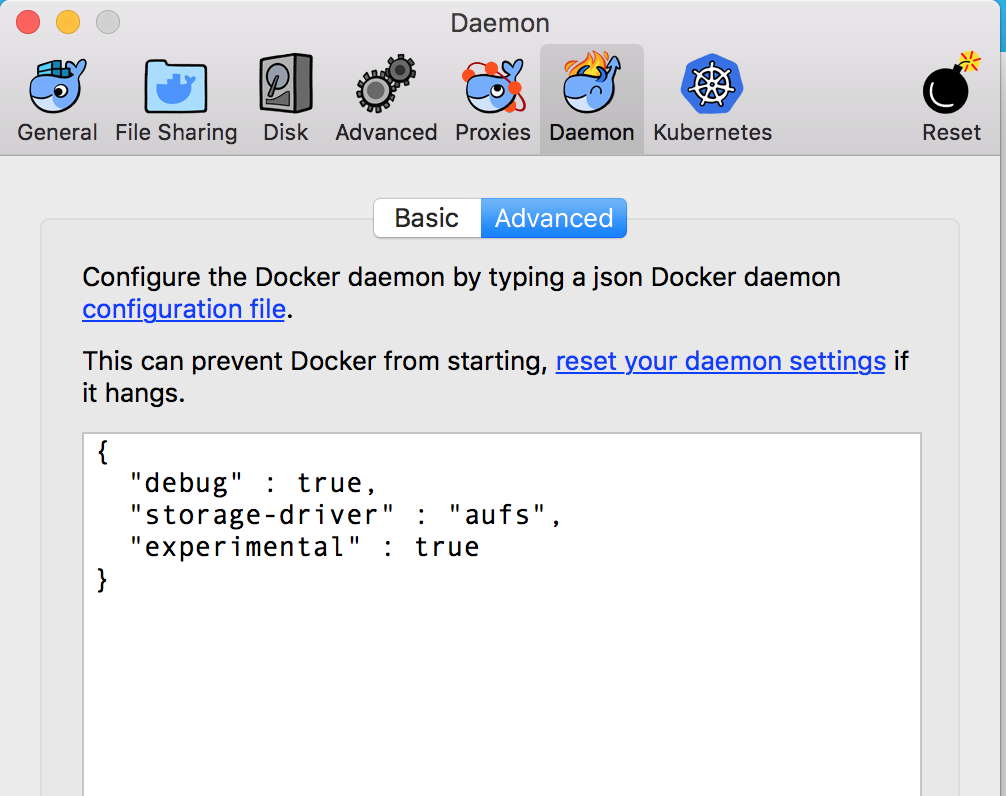
- Make sure you have the latest version of docker installed.
- Known Issues: docker’s overlayfs has a known issue with tar files, so you will need to go to Docker => Preferences => Daemon => Advanced and add the following key pair (“storage-driver” : “aufs”). You may also need to allow more than 2GB for docker depending on which containers you run.
make build-tests
make run-tests TEST_CASE=tests/alerts/[YOUR ALERT TEST FILE].py
This test should pass and you will have confirmed you have a working environment.
At this point, begin development and periodically run your unit-tests locally with the following commands:
make build-tests
make run-tests TEST_CASE=tests/alerts/[YOUR ALERT TEST FILE].py
Background on concepts
- Logs - These are individual log entries that are typically emitted from systems, like an Apache log.
- Events - The entry point into MozDef, a log parsed into JSON by some log shipper (syslog-ng, nxlog) or a native JSON data source like GuardDuty, CloudTrail, most SaaS systems, etc.
- Alerts - These are either a 1:1 events to alerts (this thing happens and alert) or a M:1 events to alerts (N of these things happen and alert).
Alerts in MozDef are mini python programs. Most of the work is done by the alert library so the portions you will need to code fall into two functions:
- main - This is where the alert defines the criteria for the types of events that will trigger the alert.
- onAggregation/onEvent - This is where the alert defines what happens when it sees those events, such as post processing of events and making them into a useful summary to emit as an alert.
In both cases the alert is simple python, and you have all the facility of python at your disposal including any of the python libraries you might want to add to the project.
It’s important to note that when you iterate on the alert to regularly test to ensure that the alert is still firing. Should you run into a situation where it’s not firing, the best way to approach this is to backout the most recent change and review the alert and tests to ensure that the expectations are still in sync.
Example first alert
Let’s step through creating a simple alert you might want to verify a working deployment. For this sub-section it is assumed that you have a working MozDef instance which resides in some MozDefDir and is receiving logs.
First move to to your MozDefDir and issue
make new-alert
You will be asked for a string to name a new alert and the associated test. For this example we will use the string “foo”
make new-alert
Enter your alert name (Example: proxy drop executable): foo
Creating alerts/foo.py
Creating tests/alerts/test_foo.py
These will be created as above in the alerts and tests/alerts directories. There’s a lot to the generated code, but a class called “AlertFoo” is of immediate interest and will define when and how to alert. Here’s the head of the auto generated class.
class AlertFoo(AlertTask):
def main(self):
# Create a query to look back the last 20 minutes
search_query = SearchQuery(minutes=20)
# Add search terms to our query
search_query.add_must([
TermMatch('category', 'helloworld'),
ExistsMatch('details.sourceipaddress'),
])
...
This code tells MozDef to query the collection of events for messages timestamped within 20 minutes from time of query execution which are of category “helloworld” and also have a source IP address. If you’re pumping events into MozDef odds are you don’t have any which will be tagged as “helloworld”. You can of course create those events, but lets assume that you have events tagged as “syslog” for the moment. Change the TermMatch line to
TermMatch('category', 'syslog'),
and you will create alerts for events marked with the category of ‘syslog’. Ideally you should edit your test to match, but it’s not strictly necessary.
Scheduling your alert
Next we will need to enable the alert. Alerts in MozDef are scheduled via the celery task scheduler. The schedule passed to celery is in the config.py file:
Open the file
docker/compose/mozdef_alerts/files/config.py
or simply
alerts/files/config.py
if you are not working from the docker images and add your new foo alert to the others with a crontab style schedule
ALERTS = {
'foo.AlertFoo': {'schedule': crontab(minute='*/1')},
'bruteforce_ssh.AlertBruteforceSsh': {'schedule': crontab(minute='*/1')},
'unauth_ssh.AlertUnauthSSH': {'schedule': crontab(minute='*/1')},
}
The format is ‘pythonfilename.classname’: {‘schedule’: crontab(timeunit=’*/x’)} and you can use any celery time unit (minute, hour) along with any schedule that makes sense for your environment. Alerts don’t take many resources to execute, typically finishing in sub second times, so it’s easiest to start by running them every minute.
How to run the alert in the docker containers
Once you’ve got your alert passing tests, you’d probably like to send in events in a docker environment to further refine, test, etc.
There are two ways to go about integration testing this with docker: 1) Use ‘make run’ to rebuild the containers each time you iterate on an alert 2) Use docker-compose with overlays to instantiate a docker environment with a live container you can use to iterate your alert
In general, the ‘make run’ approach is simpler, but can take 5-10mins each iteration to rebuild the containers (even if cached).
To use the ‘make run’ approach, you edit your alert. Add it to the docker/compose/mozdef_alerts/files/config.py file for scheduling as discussed above and simply:
make run
This will rebuild any container that needs it, use cache for any that haven’t changed and restart mozdef with your alert.
To use a live, iterative environment via docker-compose:
docker-compose -f docker/compose/docker-compose.yml -f docker/compose/dev-alerts.yml -p mozdef up
This will start up all the containers for a mozdef environment and in addition will allow you an adhoc alerts container to work in that loads the /alerts directory as a volume in the container. To run the alert you are developing you will need to edit the alerts/lib/config.py file as detailed above to schedule your alert. You will also need to edit it to reference the container environment as follows
RABBITMQ = {
'mqserver': 'rabbitmq',
...
ES = {
'servers': ['http://elasticsearch:9200']
}
Once you’ve reference the containers, you can shell into the alerts container:
docker exec -it mozdef_alerts_1 bash
Next, start celery
celery -A lib.tasks worker --loglevel=info --beat
If you need to send in adhoc events you can usually do it via curl as follows:
curl -v --header "Content-Type: application/json" --request POST --data '{"tags": ["test"],"category": "helloworld","details":{"sourceipaddress":"1.2.3.4"}}' http://loginput:8080/events
How to get the alert in a release of MozDef?
If you’d like your alert included in the release version of Mozdef, the best way is to propose a pull request and ask for a review from a MozDef developer. They will be able to help you get the most out of the alert and help point out pitfalls. Once the alert is accepted into MozDef master, there is a process by which MozDef installations can make use or ‘enable’ that alert. It’s best to work with that MozDef instance’s maintainer to enable any new alerts.
Customizing the alert summary
On the alerts page of the MozDef web UI each alert is given a quick summary and for many alerts it is useful to have contextual information displayed here. Looking at the example foo alert we see
def onAggregation(self, aggreg):
# aggreg['count']: number of items in the aggregation, ex: number of failed login attempts
# aggreg['value']: value of the aggregation field, ex: toto@example.com
# aggreg['events']: list of events in the aggregation
category = 'My first alert!'
tags = ['Foo']
severity = 'NOTICE'
summary = "Foo alert"
# Create the alert object based on these properties
return self.createAlertDict(summary, category, tags, aggreg['events'], severity)
This is where the alert object gets created and returned. In the above code the summary will simply be “Foo Alert”, but say we want to know how many log entries were collected in the alert? The aggreg object is here to help.
summary = "Foo alert " + aggreg['count']
Gives us an alert with a count. Similarly
summary = "Foo alert " + aggreg['value']
Will append the aggregation field to the summary text. The final list aggreg[‘events’] contains the full log entries of all logs collected and is in general the most useful. Suppose we want one string if the tag ‘foo’ exists on these logs and another otherwise
if 'foo' in aggreg['events'][0]['_source']['tags']:
summary = "Foo alert"
else:
summary = "Bar alert"
All source log data is held within the [‘_source’] and [0] represents the first log found. Beware that no specific ordering of the logs is guaranteed and so [0] may be first, last, or otherwise chronologically.
Questions?
Feel free to file a github issue in this repository if you find yourself with a question not answered here. Likely the answer will help someone else and will help us improve the docs.
Resources
Python for Beginners <https://www.python.org/about/gettingstarted/>
Code
Plugins
Plugins are supported in several places: Event Processing and the REST api.
Event Processing
The front-end event processing portion of MozDef supports python mq plugins to allow customization of the input chain. Plugins are simple python modules than can register for events with a priority, so they only see events with certain dictionary items/values and will get them in a predefined order.
To create a plugin, make a python class that presents a registration dictionary and a priority as follows:
class message(object):
def __init__(self):
'''register our criteria for being passed a message
as a list of lower case strings or values to match with an event's dictionary of keys or values
set the priority if you have a preference for order of plugins to run.
0 goes first, 100 is assumed/default if not sent
'''
self.registration = ['sourceipaddress', 'destinationipaddress']
self.priority = 20
Message Processing
To process a message, define an onMessage function within your class as follows:
def onMessage(self, message, metadata):
#do something interesting with the message or metadata
return (message, metadata)
The plugin will receive a copy of the incoming event as a python dictionary in the ‘message’ variable. The plugin can do whatever it wants with this dictionary and return it to MozDef. Plugins will be called in priority order 0 to 100 if the incoming event matches their registration criteria. i.e. If you register for sourceipaddress you will only get events containing the sourceipaddress field.
If you return the message as None (i.e. message=None) the message will be dropped and not be processed any further. If you modify the metadata the new values will be used when the message is posted to elastic search. You can use this to assign custom document types, set static document _id values, etc.
Plugin Registration
Simply place the .py file in the plugins directory where the esworker.py is located, restart the esworker.py process and it will recognize the plugin and pass it events as it sees them.
REST Plugins
The REST API for MozDef also supports rest plugins which allow you to customize your handling of API calls to suit your environment. Plugins are simple python modules than can register for REST endpoints with a priority, so they only see calls for that endpoint and will get them in a predefined order.
To create a REST API plugin simply create a python class that presents a registration dictionary and priority as follows:
class message(object):
def __init__(self):
'''register our criteria for being passed a message
as a list of lower case strings to match with an rest endpoint
(i.e. blockip matches /blockip)
set the priority if you have a preference for order of plugins
0 goes first, 100 is assumed/default if not sent
Plugins will register in Meteor with attributes:
name: (as below)
description: (as below)
priority: (as below)
file: "plugins.filename" where filename.py is the plugin code.
Plugin gets sent main rest options as:
self.restoptions
self.restoptions['configfile'] will be the .conf file
used by the restapi's index.py file.
'''
self.registration = ['blockip']
self.priority = 10
self.name = "Banhammer"
self.description = "BGP Blackhole"
The registration is the REST endpoint for which your plugin will receive a copy of the request/response objects to use or modify. The priority allows you to order your plugins if needed so that they operate on data in a defined pattern. The name and description are passed to the Meteor UI for use in dialog boxes, etc so the user can make choices when needed to include/exclude plugins. For example the /blockip endpoint allows you to register multiple methods of blocking an IP to match your environment: firewalls, BGP tables, DNS blackholes can all be independently implemented and chosen by the user at run time.
Message Processing
To process a message, define an onMessage function within your class as follows:
def onMessage(self, request, response):
'''
request: https://bottlepy.org/docs/dev/api.html#the-request-object
response: https://bottlepy.org/docs/dev/api.html#the-response-object
'''
response.headers['X-PLUGIN'] = self.description
It’s a good idea to add your plugin to the response headers if it acts on a message to facilitate troubleshooting. Other than that, you are free to perform whatever processing you need within the plugin being sure to return the request, response object once done:
return (request, response)
Plugin Registration
Simply place the .py file in the rest/plugins directory, restart the REST API process and it will recognize the plugin and pass it events as it sees them.
Alert Plugins
The alert pipeline also supports alert plugins which allow you to modify an alert’s properties while the alert is “firing” (before it is saved into Elasticsearch/sent to alert actions).
Create a sample plugin in alerts/plugins:
class message(object):
def __init__(self):
'''
adds a new field 'testing'
to the alert if sourceipaddress is 127.0.0.1
'''
self.registration = "sourceipaddress"
self.priority = 1
This plugin’s onMessage function will get executed every time an alert has “sourceipaddress” as either a key or a value.
Message Processing
To process a message, define an onMessage function within your class as follows:
def onMessage(self, message):
if 'sourceipaddress' in message && message['sourceipaddress'] == '127.0.0.1':
message['testing'] = True
return message
It’s worth noting that this is a blocking mechanism, so if this function is reaching out to external resources, the alert will not “fire” until it’s execution has finished. It may be preferred to use an alert action instead in cases where you don’t need to modify the alert, but want to trigger an API somewhere.
Plugin Registration
Simply place the .py file in the alerts/plugins directory, restart the alerts process and it will recognize the plugin and pass it alerts based on registration.
Actions
Actions are currently supported at the end of the alert pipeline.
Alert Action Processing
Alert actions run at the very end of the alert pipeline after the alert is already created, and are non blocking (meaning they also don’t have the ability to modify alerts inline).
class message(object):
def __init__(self):
'''
triggers when a geomodel alert is generated
'''
self.alert_classname = 'AlertGeomodel'
self.registration = 'geomodel'
self.priority = 1
Alert Trigger
def onMessage(self, message):
print(message)
return message
Plugin Registration
Simply place the .py file in the alert actions directory.
Tests
Our test suite builds and runs entirely in docker, so a Docker daemon is required to be running locally. The test suite requires a local Elasticsearch and RabbitMQ service to run, but will be started automatically as containers as part of the tests make targets.
Run tests
To run our entire test suite, simply run:
make tests
If you want to only run a specific test file/directory, you can specify the TEST_CASE parameter:
make tests TEST_CASE=tests/mq/plugins/test_github_webhooks.py
Note
Note, if you end up with a clobbered ES index, or anything like that which might end up in failing tests, you can clean the environment with make clean. Then run the tests again.
Mozdef_util Library
We provide a library used to interact with MozDef components.
Connecting to Elasticsearch
1 2 | from mozdef_util.elasticsearch_client import ElasticsearchClient
es_client = ElasticsearchClient("http://127.0.0.1:9200")
|
Creating/Updating Documents
Create a new Event
1 2 3 4 | event_dict = {
"example_key": "example value"
}
es_client.save_event(body=event_dict)
|
Update an existing event
1 2 3 4 5 | event_dict = {
"example_key": "example new value"
}
# Assuming 12345 is the id of the existing entry
es_client.save_event(body=event_dict, doc_id="12345")
|
Create a new alert
1 2 3 4 | alert_dict = {
"example_key": "example value"
}
es_client.save_alert(body=alert_dict)
|
Update an existing alert
1 2 3 4 5 | alert_dict = {
"example_key": "example new value"
}
# Assuming 12345 is the id of the existing entry
es_client.save_alert(body=alert_dict, doc_id="12345")
|
Create a new generic document
1 2 3 4 | document_dict = {
"example_key": "example value"
}
es_client.save_object(index='randomindex', body=document_dict)
|
Update an existing document
1 2 3 4 5 | document_dict = {
"example_key": "example new value"
}
# Assuming 12345 is the id of the existing entry
es_client.save_object(index='randomindex', body=document_dict, doc_id="12345")
|
Bulk Importing
1 2 3 | from mozdef_util.elasticsearch_client import ElasticsearchClient
es_client = ElasticsearchClient("http://127.0.0.1:9200", bulk_amount=30, bulk_refresh_time=5)
es_client.save_event(body={'key': 'value'}, bulk=True)
|
- Line 2: bulk_amount (defaults to 100), specifies how many messages should sit in the bulk queue before they get written to elasticsearch
- Line 2: bulk_refresh_time (defaults to 30), is the amount of time that a bulk flush is forced
- Line 3: bulk (defaults to False) determines if an event should get added to a bulk queue
Searching for documents
Simple search
1 2 3 4 5 6 7 8 9 | from mozdef_util.query_models import SearchQuery, TermMatch, ExistsMatch
search_query = SearchQuery(hours=24)
must = [
TermMatch('category', 'brointel'),
ExistsMatch('seenindicator')
]
search_query.add_must(must)
results = search_query.execute(es_client, indices=['events','events-previous'])
|
SimpleResults
When you perform a “simple” search (one without any aggregation), a SimpleResults object is returned. This object is a dict, with the following format:
| Key | Description |
|---|---|
| hits | Contains an array of documents that matched the search query |
| meta | Contains a hash of fields describing the search query (Ex: if the query timed out or not) |
Example simple result:
1 2 3 4 5 6 7 8 9 10 11 12 13 14 15 16 17 18 | {
'hits': [
{
'_id': u'cp5ZsOgLSu6tHQm5jAZW1Q',
'_index': 'events-20161005',
'_score': 1.0,
'_source': {
'details': {
'information': 'Example information'
},
'category': 'excategory',
'summary': 'Test Summary',
'type': 'event'
}
}
],
'meta': {'timed_out': False}
}
|
Aggregate search
1 2 3 4 5 6 | from mozdef_util.query_models import SearchQuery, TermMatch, Aggregation
search_query = SearchQuery(hours=24)
search_query.add_must(TermMatch('category', 'brointel'))
search_query.add_aggregation(Aggregation('source'))
results = search_query.execute(es_client)
|
AggregatedResults
When you perform an aggregated search (Ex: give me a count of all different ip addresses are in the documents that match a specific query), a AggregatedResults object is returned. This object is a dict, with the following format:
| Key | Description |
|---|---|
| aggregations | Contains the aggregation results, grouped by field name |
| hits | Contains an array of documents that matched the search query |
| meta | Contains a hash of fields describing the search query (Ex: if the query timed out or not) |
1 2 3 4 5 6 7 8 9 10 11 12 13 14 15 16 17 18 19 20 21 22 23 24 25 26 27 28 29 30 31 32 33 34 35 36 37 38 39 40 41 42 43 44 45 46 47 48 49 50 51 52 53 54 55 56 57 58 59 60 | {
'aggregations': {
'ip': {
'terms': [
{
'count': 2,
'key': '1.2.3.4'
},
{
'count': 1,
'key': '127.0.0.1'
}
]
}
},
'hits': [
{
'_id': u'LcdS2-koQWeICOpbOT__gA',
'_index': 'events-20161005',
'_score': 1.0,
'_source': {
'details': {
'information': 'Example information'
},
'ip': '1.2.3.4',
'summary': 'Test Summary',
'type': 'event'
}
},
{
'_id': u'F1dLS66DR_W3v7ZWlX4Jwg',
'_index': 'events-20161005',
'_score': 1.0,
'_source': {
'details': {
'information': 'Example information'
},
'ip': '1.2.3.4',
'summary': 'Test Summary',
'type': 'event'
}
},
{
'_id': u'G1nGdxqoT6eXkL5KIjLecA',
'_index': 'events-20161005',
'_score': 1.0,
'_source': {
'details': {
'information': 'Example information'
},
'ip': '127.0.0.1',
'summary': 'Test Summary',
'type': 'event'
}
}
],
'meta': {
'timed_out': False
}
}
|
Match/Query Classes
ExistsMatch
Checks to see if a specific field exists in a document
1 2 3 | from mozdef_util.query_models import ExistsMatch
ExistsMatch("randomfield")
|
TermMatch
Checks if a specific field matches the key
1 2 3 | from mozdef_util.query_models import TermMatch
TermMatch("details.ip", "127.0.0.1")
|
TermsMatch
Checks if a specific field matches any of the keys
1 2 3 | from mozdef_util.query_models import TermsMatch
TermsMatch("details.ip", ["127.0.0.1", "1.2.3.4"])
|
WildcardMatch
Allows regex to be used in looking for documents that a field contains all or part of a key
1 2 3 | from mozdef_util.query_models import WildcardMatch
WildcardMatch('summary', 'test*')
|
PhraseMatch
Checks if a field contains a specific phrase (includes spaces)
1 2 3 | from mozdef_util.query_models import PhraseMatch
PhraseMatch('summary', 'test run')
|
BooleanMatch
Used to apply specific “matchers” to a query. This will unlikely be used outside of SearchQuery.
1 2 3 4 5 6 7 8 9 10 | from mozdef_util.query_models import ExistsMatch, TermMatch, BooleanMatch
must = [
ExistsMatch('details.ip')
]
must_not = [
TermMatch('type', 'alert')
]
BooleanMatch(must=must, should=[], must_not=must_not)
|
MissingMatch
Checks if a field does not exist in a document
1 2 3 | from mozdef_util.query_models import MissingMatch
MissingMatch('summary')
|
RangeMatch
Checks if a field value is within a specific range (mostly used to look for documents in a time frame)
1 2 3 | from mozdef_util.query_models import RangeMatch
RangeMatch('utctimestamp', "2016-08-12T21:07:12.316450+00:00", "2016-08-13T21:07:12.316450+00:00")
|
QueryStringMatch
Uses a custom query string to generate the “match” based on (Similar to what you would see in kibana)
1 2 3 | from mozdef_util.query_models import QueryStringMatch
QueryStringMatch('summary: test')
|
SubnetMatch
Checks if an IP field is within the bounds of a subnet
1 2 3 | from mozdef_util.query_models import SubnetMatch
SubnetMatch('details.sourceipaddress', '10.1.1.0/24')
|
Aggregation
Used to aggregate results based on a specific field
1 2 3 4 5 6 7 8 9 10 | from mozdef_util.query_models import Aggregation, SearchQuery, ExistsMatch
search_query = SearchQuery(hours=24)
must = [
ExistsMatch('seenindicator')
]
search_query.add_must(must)
aggr = Aggregation('details.ip')
search_query.add_aggregation(aggr)
results = search_query.execute(es_client, indices=['events','events-previous'])
|
Continuous Integration and Continuous Deployment
Overview
Each git commit to the master branch in GitHub triggers both the TravisCI automated tests as well as the AWS CodeBuild building. Each git tag applied to a git commit triggers a CodeBuild build.
Travis CI
Travis CI runs tests on the MozDef code base with each commit to master. The results can be seen on the Travis CI MozDef dashboard
The Test Sequence
- Travis CI creates webhooks when first setup which allow commits to the MozDef GitHub repo to trigger Travis.
- When a commit is made to MozDef, Travis CI follows the instructions in the .travis.yml file.
- .travis.yml installs docker-compose in the before_install phase.
- In the install phase, Travis runs the build-tests make target which calls docker-compose build on the docker/compose/docker-compose-tests.yml file which builds a few docker containers to use for testing.
- In the script phase, Travis runs the
tests
make target which
- calls the build-tests make target which again runs docker-compose build on the docker/compose/docker-compose-tests.yml file.
- calls the
run-tests
make target which.
- calls the run-tests-resources make target which starts the docker containers listed in docker/compose/docker-compose-tests.yml.
- runs flake8 with the .flake8 config file to check code style.
- runs py.test tests which runs all the test cases.
AWS CodeBuild
Enabling GitHub AWS CodeBuild Integration
Onetime Manual Step
The steps to establish a GitHub CodeBuild integration unfortunately require a onetime manual step be done before using CloudFormation to configure the integration. This onetime manual step need only happen a single time for a given AWS Account + Region. It need not be performed with each new CodeBuild project or each new GitHub repo
- Manually enable the GitHub integration in AWS CodeBuild using the
dedicated, AWS account specific, GitHub service user.
- A service user is needed as AWS CodeBuild can only integrate with GitHub from one AWS account in one region with a single GitHub user. Technically you could use different users for each region in a single AWS account, but for simplicity limit yourself to only one GitHub user per AWS account (instead of one GitHub user per AWS account per region)
- To do the one time step of integrating the entire AWS account in
that region with the GitHub service user
- Browse to CodeBuild in AWS and click Create Project
- Navigate down to
Sourceand setSource ProvidertoGitHub - For
RepositoryselectConnect with a GitHub personal access token - Enter the persona access token for the GitHub service user. If
you haven’t created one do so and grant it
repoandadmin:repo_hook - Click
Save Token - Abort the project setup process by clicking the
Build Projectsbreadcrumb at the top. This “Save Token” step was the only thing you needed to do in that process
Grant the GitHub service user access to the GitHub repository
- As an admin of the GitHub repository go to that repositories settings, select Collaborators and Teams, and add the GitHub service user to the repository
- Set their access level to
Admin - Copy the invite link, login as the service user and accept the invitation
Deploy CloudFormation stack creating CodeBuild project
Deploy the mozdef-cicd-codebuild.yml CloudFormation template
to create the CodeBuild project and IAM Role
The Build Sequence
- A branch is merged into master in the GitHub repo or a version git tag is applied to a commit.
- GitHub emits a webhook event to AWS CodeBuild indicating this.
- AWS CodeBuild considers the Filter Groups configured to decide if the tag
or branch warrants triggering a build. These Filter Groups are defined in
the
mozdef-cicd-codebuild.ymlCloudFormation template. Assuming the tag or branch are acceptable, CodeBuild continues. - AWS CodeBuild reads the buildspec.yml file to know what to do.
- The install phase of the buildspec.yml fetches
packer and unzips it.
- packer is a tool that spawns an ec2 instance, provisions it, and renders an AWS Machine Image (AMI) from it.
- The build phase of the buildspec.yml runs the cloudy_mozdef/ci/deploy script in the AWS CodeBuild Ubuntu 14.04 environment.
- The deploy script calls the build-from-cwd target of the Makefile which calls docker-compose build on the docker-compose.yml file, building the docker images in the AWS CodeBuild environment. These are built both so they can be consumed later in the build by packer and also for use by developers and the community.
- deploy then calls the
docker-push-tagged
make target which calls
- the tag-images make target which calls the cloudy_mozdef/ci/docker_tag_or_push tag script which applies a docker image tag to the local image that was just built by AWS CodeBuild.
- the
hub-tagged
make target which calls the
cloudy_mozdef/ci/docker_tag_or_push push
script which
- Uploads the local image that was just built by AWS CodeBuild to DockerHub. If the branch being built is master then the image is uploaded both with a tag of master as well as with a tag of latest.
- If the branch being built is from a version tag (e.g. v1.2.3) then the image is uploaded with only that version tag applied.
- The deploy script next calls the
packer-build-github
make target in the
cloudy_mozdef/Makefile
which calls the
ci/pack_and_copy
script which does the following steps.
- Calls packer which launches an ec2 instance, executing a bunch of steps and and producing an AMI
- Shares the resulting AMI with the AWS Marketplace account
- Copies the resulting AMI to a list of additional AWS regions
- Copies the tags from the original AMI to these copied AMIs in other regions
- Shares the AMIs in these other regions with the AWS Marketplace account
- Creates a blob of YAML which contains the AMI IDs. This blob will be used in the CloudFormation templates
- When ci/pack_and_copy calls packer, packer launches an ec2 instance based on
the configuration in
cloudy_mozdef/packer/packer.json
- Within this ec2 instance, packer clones the MozDef GitHub repo and checks out the branch that triggered this build.
- Packer replaces all instances of the word latest in the docker-compose-cloudy-mozdef.yml file with either the branch master or the version tag (e.g. v1.2.3).
- Packer runs docker-compose pull on the docker-compose-cloudy-mozdef.yml file to pull down both the docker images that were just built by AWS CodeBuild and uploaded to Dockerhub as well as other non MozDef docker images.
- After packer completes executing the steps laid out in packer.json inside the ec2 instance, it generates an AMI from that instance and continues with the copying, tagging and sharing steps described above.
- Now back in the AWS CodeBuild environment, the deploy script continues by
calling the
publish-versioned-templates
make target which runs the
ci/publish_versioned_templates
script which
- injects the AMI map yaml blob produced earlier into the mozdef-parent.yml CloudFormation template so that the template knows the AMI IDs of that specific branch of code.
- uploads the CloudFormation templates to S3 in a directory either called master or the tag version that was built (e.g. v1.2.3).
References
Screenshots
Here are a few screen captures of key portions of the MozDef user interface.
Health and Status
MozDef includes an integrated health and status screen under the ‘about’ menu showing key performance indicators like events per second from rabbit-mq and elastic search cluster health.
You can have as many front-end processors running rabbit-mq as you like in whatever geographic distribution makes sense for your environment. The hot threads section shows you what your individual elastic search nodes are up to.
The entire display updates in real time as new information is retrieved.

Alerts
Alerts are simply python jobs run as celery tasks that query elastic search for either individual events, or correlate multiple events into an alert.
The alerts screen shows the latest 100 alerts and allows interactive filtering by category, severity, time frame and free-form regex.
The display updates in real time as new alerts are received and any IP address in an alert is decorated with a menu allowing you to query whois, dshield, CIF, etc to get context on the item. If your facilities include blocking, you can also integrate that into the menu to allow you to block an IP directly from this screen.

Incident Handling
MozDef includes an integrated, real time incident handling facility that allows multiple responders to work collaboratively on a security incident. As they add information to the incident they are able to see each others changes as they happen, in real time.
MozDef includes integration into the VERIS classification system to quickly tag incidents with metadata by dragging tags onto the incident which allows you to aggregate metrics about your incidents.

GeoModel Version 0.1 Specification
The first release version of GeoModel will be a minimum viable product (MVP) containing features that replace the functionality of the existing implementation along with a few new requirements.
Terminology
Locality
The locality of a user is a geographical region from which most of that user’s online activity originates.
Authenticated Actions
An event produced as a result of any user taking any action that required they be authenticated e.g. authenticating to a service with Duo, activity in the AWS web console etc.
Primary Interface
GeoModel v0.1 is an alert built into MozDef that:
- Processes authentication-related events.
- Updates user locality information.
- Emits alerts when some specific conditions are met.
Data Stores
GeoModel interacts with MozDef to both query for events as well as store new alerts.
GeoModel also maintains its own user locality information. Version 0.1 will store this information in the same ElasticSearch instance that MozDef uses, under a configured index.
Functional Components
GeoModel v0.1 can be thought of as consisting of two core “components” that are each responsible for a distinct set of responsibilities. These two components interact in a pipeline.
Because GeoModel v0.1 is implemented as an
Alert in MozDef,
it is essentially a distinct Python program run by MozDef’s AlertTask
scheduler.
Analysis Engine
The first component handles the analysis of events pertaining to authenticated actions made by users. These events are retrieved from MozDef and analyzed to determine locality of users which is then persisted in a data store.
This component has the following responsibilities:
- Run configured queries to retrieve events describing authenticated actions taken by users from MozDef.
- Load locality state from ElasticSearch.
- Remove outdated locality information.
- Update locality state with information from retrieved events.
Alert Emitter
The second component handles the creation of alerts and communicating of those alerts to MozDef.
This component has the following responsibilities:
- Inspect localities produced by the Analysis Engine to produce alerts.
- Store alerts in MozDef’s ElasticSearch instance.
The Alert Emitter will, given a set of localities for a user, produce an alert if and only if both:
- User activity is found to originate from a location outside of all previously known localities.
- It would not be possible for the user to have travelled to a new locality from the one they were last active in.
Data Models
The following models describe what data is required to implement the features that each component is responsible for. They are described using a JSON-based format where keys indicidate the names of values and values are strings containing those values’ types, which are represented using TypeScript notation. We use this notation because configuration data as well as data stored in ElasticSearch are represented as JSON and JSON-like objects respectively.
General Configuration
The top-level configuration for GeoModel version 0.1 must contain the following.
{
"localities": {
"es_index": string,
"valid_duration_days": number,
"radius_kilometres": number
},
"events": {
"search_window": object,
"lucene_query": string,
},
"whitelist": {
"users": Array<string>,
"cidrs": Array<string>
}
}
Using the information above, GeoModel can determine:
- What index to store locality documents in.
- What index to read events from.
- What index to write alerts to.
- What queries to run in order to retrieve a complete set of events.
- When a user locality is considered outdated and should be removed.
- The radius that localities should have.
- Whitelisting rules to apply.
In the above, note that events.queries describes an array of objects. Each of
these objects are expected to contain a query for ElasticSearch using
Lucene syntax. The
username field is expected to be a string describing the path into
the result dictionary your query will return that will produce the username of
the user taking an authenticated action.
The search_window object can contain any of the keywords passed to Python’s
timedelta
constructor.
So for example the following:
{
"events": [
{
"search_window": {
"minutes": 30
},
"lucene_query": "tags:auth0",
"username_path": "details.username"
}
]
}
would query ElasticSearch for all events tagged auth0 and try to extract
the username from result["details"]["username"] where result is one of
the results produced by executing the query.
The alerts.whitelist portion of the configuration specifies a couple of
parameters for whitelisting acitivity:
- From any of a list of users (based on
events.queries.username). - From any IPs within the range of any of a list of CIDRs.
For example, the following whitelist configurations would instruct GeoModel
not to produce alerts for actions taken by “testuser” or for any users
originating from an IP in either the ranges 1.2.3.0/8 and 192.168.0.0/16.
{
"alerts": {
"whitelist": {
"users": ["testuser"],
"cidrs": ["1.2.3.0/8", "192.168.0.0/16"]:
}
}
}
Note however that GeoModel will still retain locality information for whitelisted users and users originating from whitelisted IPs.
User Locality State
GeoModel version 0.1 uses one ElasticSearch Type (similar to a table in a relational database) to represent locality information. Under this type, one document exists per user describing that user’s locality information.
{
"type_": "locality",
"username": string,
"localities": Array<{
"sourceipaddress": string,
"city": string,
"country": string,
"lastaction": date,
"latitude": number,
"longitude": number,
"radius": number
}>
}
Using the information above, GeoModel can determine:
- All of the localities of a user.
- Whether a locality is older than some amount of time.
- How far outside of any localities a given location is.
Alerts
Alerts emitted to the configured index are intended to cohere to MozDef’s preferred naming scheme.
{
"username": string,
"hops": [
{
"origin": {
"ip": string,
"city": string,
"country": string,
"latitude": number,
"longitude": number,
"geopoint": GeoPoint
}
"destination": {
"ip": string,
"city": string,
"country": string,
"latitude": number,
"longitude": number,
"geopoint": GeoPoint
}
}
]
}
Note in the above that the origin.geopoint field uses ElasticSearch’s
GeoPoint
type.
User Stories
User stories here make references to the following categories of users:
- An operator is anyone responsible for deploying or maintaining a deployment of MozDef that includes GeoModel.
- An investigator is anyone responsible for viewing and taking action based on alerts emitted by GeoModel.
Potential Compromises Detected
As an investigator, I expect that if a user is found to have performed some authenticated action in one location and then, some short amount of time later, in another that an alert will be emitted by GeoModel.
Realistic Travel Excluded
As an investigator, I expect that if someone starts working somehwere, gets on a plane and continues working after arriving in their destination that an alert will not be emitted by GeoModel.
Diversity of Indicators
As an operator, I expect that GeoModel will fetch events pertaining to authenticated actions from new sources (Duo, Auth0, etc.) after I deploy MozDef with GeoModel configured with queries targeting those sources.
Old Data Removed Automatically
As an operator, I expect that GeoModel will forget about localities attributed to users that have not been in those geographic regions for a configured amount of time.
AWS re:invent 2018 SEC403 Presentation
- Watch our presentation on MozDef in AWS at AWS re:Invent 2018
- Read the slides
Contributors
Here is the list of the awesome contributors helping us or that have helped us in the past: