Introduction
Welcome to MicroInventor! You are reading a computer science curriculum aimed at developing computational thinking skills in novice middle school students through the use of the Internet of Things (IoT). The curriculum is co-developed in practice by an educational researcher and a middle school science/computer science teacher. It is open and free to use. If you have any questions or suggestions please contact Paul Xu at yang.xu.3#bc.edu.
How to use MicroInventor?
This curriculum is intentionally written as a set of structured “tutorials.” It is designed both for teachers to plan their lessons and for students to follow the instructions in the lessons in class, in case they get stuck. Before using the curriculum, make sure all software and hardware is set up by following the “Get Started” guide on the left. We will be using the Raspberry Pi 3s as our platform for coding. We will also update the stock Node-RED IoT platform installed on Raspberry Pis to the latest version.
What are the goals of MicroInventor?
The first and ultimate goal of the curriculum is to foster computational thinking skills. We want the students to be able to not only understand the key concepts in computational thinking, such as abstraction and automation, but also solve problems by practicing what they have learned. We want the students to apply computational thinking skills more generically in other disciplines and in real life. The progression of computational thinking skills follows the framework being developed in Paul Xu’s doctoral dissertation. The instructional activities will explicitly make connections between what the students are doing in this class and what they could do in other disciplines.
The second goal of this curriculum is to introduce core concepts and ideas in computer science. These include software/hardware, data type/structure, input/output, flow control, and networking. The curriculum goes beyond programming languages and gives the students a brief overview of interconnected computing devices used in application. The students will learn practical skills used by professionals every day in the industry.
The third goal is to prepare students for abstract thinking through concrete and physical learning activities. The key concept is data. The students will learn how computers encode information in 0s and 1s, how they store and manipulate data, and how they transmit data among each other. To that end the course will use the programming paradigm called data-flow. Different from agent-based languages such as NetLogo, Scratch, and Alice, the curriculum will use physical activities to scaffold abstract concepts, so students develop skills critical to new fields in computer science such as data science and machine learning.
How are units structured?
The curriculum is project-based. The students will build and code devices that exchange data between each other and explain how this very idea might be powerful in solving real-world problems. The units are designed to develop skills necessary for them to build their final project. Each unit culminates with a “micro-project,” which also serves as both an assessment and a stepping stone towards the final project. The first micro-project focuses on coding skills, the second focuses on building skills, and the third focuses on putting the previous two microprojects together.
How are lessons structured?
In order to accommodate the needs of different classrooms, each lesson will specify the time required, so that the teachers can have the flexibility in structuring the lesson over different sessions/meetings. Each lesson has instructional goals for computer science skills, cross-discipline skills, and computational thinking skills as higher order goals. The vocabulary and material required will also be listed. There will be an assessment at the end of each lesson to provide feedback to the instructors, so they can plan their lessons accordingly.
Tips on classroom management
The content of this curriculum is likely to be challenging for middle school students. Therefore, we recommend at least two adult be in the classroom to provide the students with ample support. However, while support is important, students need also to develop skills to debug and troubleshoot without relying on adults. We thus recommend that each student get two opportunities to receive support from adults. Active participation is encouraged by additional opportunities of support and disruptive behavior is discouraged by taking away support points.
It is also vital to make sure that the students are on the same page regardless of their progress on the previous day. Therefore, it is a good idea to share code to the students at the beginning of a class, if this class builds on what the students have learned previously.
A third tip on classroom management is to keep students occupied by continuing to challenge them once they have finished a coding task in class. One way to do this is to intentionally break their code and introduce errors on the frequent errors list.
Getting Started with MicroInventor
Todo
Setting up Raspberry Pi and SenseHAT
There are two ways to set up a Raspberry Pi.
From a Custom Image
The easiest way to get Raspberry Pi and SenseHAT to work is to download our custom image from our download page. This image will come with all software and hardware set up and read to go. The only thing you will need to do is to expand your Linux partition by typing this command in the terminal:
$ sudo raspi-config --expand-rootfs
$ sudo reboot
From a Clean Raspbian or NOOBs Installation
If you have a clean installation of Raspbian (or NOOBs) on your Raspberry Pi, you will need to confirm that you are running the latest Raspbian Stretch first:
$ cat /etc/os-release
If your Raspberry Pi is not running Stretch, chances are that you do not have the SenseHAT extension for Stretch, or the Thorny Python IDE. We highly recommend that you upgrade to Stretch. This official guide will show you how to upgrade.
If you already have Raspbian Stretch running, you will need to set up your locale, keyboard, and timezone. You can do this with the raspi-config utility in your terminal, through System Settings, or with an automatic script:
# bash <(curl -SL https://gist.githubusercontent.com/adoyle/71803222aff301da9662/raw/e40f2a447e0ae333801e6fddf5e6bdb7430c289d/raspi-init.sh)
If you need to use VNC, SSH, or i2c, you will have to manually enable them in raspi-config.
You will also need to update your Node-RED after this step. Although Node-RED comes pre-installed on the Raspberry Pi, this version is outdated and you will need to update node.js and Node-RED. Please click next and follow the next tutorial.
Setting up the ESP8266 Board with MicroPython firmware
Flashing the MicroPython firmware
Please follow this official guide on how to flash the MicroPython firmware.
Programming the ESP8266 board with an IDE
The ESP8266 board can be programmed with any computer, including a Raspberry Pi. There are multiple IDEs available for different platforms. We recommend that you use Windows computers to program the ESP8266 boards, because there are two great IDEs available on Windows:
ESPlorer is also an excellent IDE available for all platforms.
Setting up Node-RED
If you are using our custom image, please skip the section below. Node-RED is already set up on your Raspberry Pi.
Setting up Node-RED on Raspberry Pi
The easiest way to set up Node-RED on your Raspberry Pi is to use this command:
$ bash <(curl -sL https://raw.githubusercontent.com/node-red/raspbian-deb-package/master/resources/update-nodejs-and-nodered)
You will also need to install some useful nodes as well:
$ sudo npm install -g node-red-dashboard
$ sudo npm install -g node-red-contrib-python3-function
$ sudo npm install -g node-red-contrib-web-worldmap
Setting up Node-RED on a Server
The benefit of running Node-RED on a Raspberry Pi is that you can create flows that control the SenseHAT. However, sometimes it is easier to have it run on a server. To do this, you need to, first, make sure you have node.js set up on the server. You can use this command to check:
$ node --version
If you are running node.js version 6.x and above, you are ready to install Node-RED. Otherwise, go to the official node.js download page to install the LTS version.
npm will be automatically installed with node.js. On Linux systems, you can run the following command to install Node-RED.
$ sudo npm install -g node-red
$ sudo npm install -g node-red-dashboard
$ sudo npm install -g node-red-contrib-python3-function
$ sudo npm install -g node-red-contrib-web-worldmap
On Windows systems, you can start a command line window with administrative privileges: Start Menu -> Windows System -> right click on Command Line and select run as administrator. Then, run the following commands:
$ npm install -g node-red
$ npm install -g node-red-dashboard
$ npm install -g node-red-contrib-python3-function
$ npm install -g node-red-contrib-web-worldmap
Setting Up Node-RED on the Cloud
There are also benefits running Node-RED on a Cloud Platform. The Node-RED official websites have exellent instructions on setting up Node-RED on different cloud platforms. We recommend that you use the IBM Bluemix platform since IBM has better support for Node-RED.
Running Node-RED
To launch the Node-RED web-based flow editor, go to http://127.0.0.1:1880 in your browser.
Unit 1. Introduction to Python with Raspberry Pi and SenseHAT
The focus of this first unit is to familiarize students with basic skills of programming in Python 3, a high-level programming language that is beginner-friendly. Students will learn the fundamental concepts of text-based programming, and use them to control the sensors and LED matrix on the SenseHAT. The micro-project for this unit is a short Python code that reads data from temperature/humidity sensors, converts the Celsius temperature into Fahrenheit, and display the temperature/humidity information creatively on the LED matrix, based on sensor readings. This micro-project lays the foundation for the next one, which sends sensor readings to other devices.
Lesson 1: Course Overview
| Authors: | Paul Xu, Marcus Penny |
|---|---|
| Date: | Jan 25, 2018 |
| Time: | 1 hour |
Lesson Information
This lesson is an overview of the structure of the course. It takes the form of student-led discussions and gives the students opportunities to write down and talk about their existing understanding of coding and coders. The goal of this lesson is to set up correct expectations of the course, including what the students will have learned by the end of the course, what is to expect from the course, and when and how to seek support.
The purpose of the lesson is to:
- Overview the goal and logistics of the course
- Walk students through the hardware and software systems that they will use in the course
- Explain what Internet of Things (IoT) is and introduce final project
- Establish expectations for the course
Driving Questions:
- What is coding?
- What are the qualities of a good coder?
- What is the Internet of Things (IoT)?
Computer Science Concepts:
Coding, Internet of Things (IoT)
Materials Needed
Blank sheets and marker pens for each group of students. A video clip on IoT (supplied in this lesson plan). Projects from previous students.
Target Skills
Students will be able to
- SWBAT talk about what coding is and what computer programs do
- SWBAT articulate what is to expect when they are coding and what qualities are required to become good coders
- SWBAT know the names of Raspberry Pi, ESP boards, and sensors (not specific ones).
Instructional Plan and Structure
Overview of the lesson (5 minutes)
Welcome the students to the course and explain to the students that this is not just a coding class, but a class on computational thinking.
Do Now! Group Discussion (30 minutes)
Pair students up (temporarily or for the rest of the course), and have the students discuss the following questions. Make sure the students understand that these are open-ended questions and there are no right or wrong answers. Our goal is to understand what they think of coding and computational thinking. They can write down their answers on the blank sheets provided to them.
- What is coding?
- What do computer programs do?
- What makes a good coder/programmer?
- What is computational thinking?
Explain to the students that we will be answering these questions throughout the course. We will revisit these questions at the end of the course and see if their ideas will change. When discussing Question 3, highlight the idea that the most important quality of a good coder is not intelligence, but resiliency. Codes don’t work 99% of the time, and it is important that they don’t give up.
Overview of Final Project (15 minutes)
Ask if the students have heard of “The Internet of Things (IoT).” The following video does a good job in explaining what IoT is:
After finishing this video, replay the video and ask the students write down some of the IoT applications/ideas demonstrated in this video. Discuss these ideas as a class.
Introduce to the students that the final project of the course is building an IoT application. They can design what they want to do with the project. It could be something very similar to what is introduced in the video or an idea of their own. The minimum requirement is one sensor and two devices that talk to each other.
Demonstrate to the students that they will be programming with a Raspberry Pi and an ESP board. Show the students what the students have done in the past.
Review and Assessment
An exit slip (or Google classroom) with the following questions:
- What makes a good coder?
- What is the Internet of Things?
Lesson 2: Get Started with Raspberry Pi
| Authors: | Paul Xu, Marcus Penny |
|---|---|
| Date: | Jan 26, 2018 |
| Time: | 1 hour |
Lesson Information
This lesson introduces students to the Raspberry Pi microcomputer. The goal of the lesson is to familiarize students to their development environment based on Linux. By the end of the class they will have solid understanding of the differences between software and hardware, and will be able to name a few important types of hardware/software as well as a few examples in each category.
The purpose of the lesson is to:
- Familiarize the students with Raspberry Pi
- Distinguish the differences between hardware and software
- Introduce students to Python
Driving Questions:
- What is the Raspberry Pi?
- What are the differences between software and hardware?
- What are some important pieces of software and hardware a computer require to work?
Computer Science Concepts:
Hardware Central Processing Unit (CPU), memory, hard drive, monitor, keyboard and mouse. Software Operating Systems (OS), applications (APPs), websites, programming languages.
Materials Needed:
Raspberry Pi 3s (barebone), this lesson plan
Target Skills:
Students will be able to
- SWBAT understand that Raspberry Pi is a computer that runs linux
- SWBAT differentiate software and hardware
- SWBAT launch the Thonny Python IDE to program Python
Instructional Plan and Structure
Overview of the lesson (5 minutes)
Communicate to the students that we are going to do 3 things today: 1) learn what a Raspberry Pi computer is, 2) get a Raspberry Pi computer to work, and 3) start programming with the Raspberry Pi.
Ask the students what they think a computer might look like and what some of the vital parts are. Then introduce to the students the Raspberry Pi. Highlight the fact that it is small (the size of a credit card), inexpensive (costs only $35, so everyone can buy one), and incredibly powerful and fun to play with. And now we are going to learn what it is and how it works.
Raspberry Pi Unplugged (15 minutes)
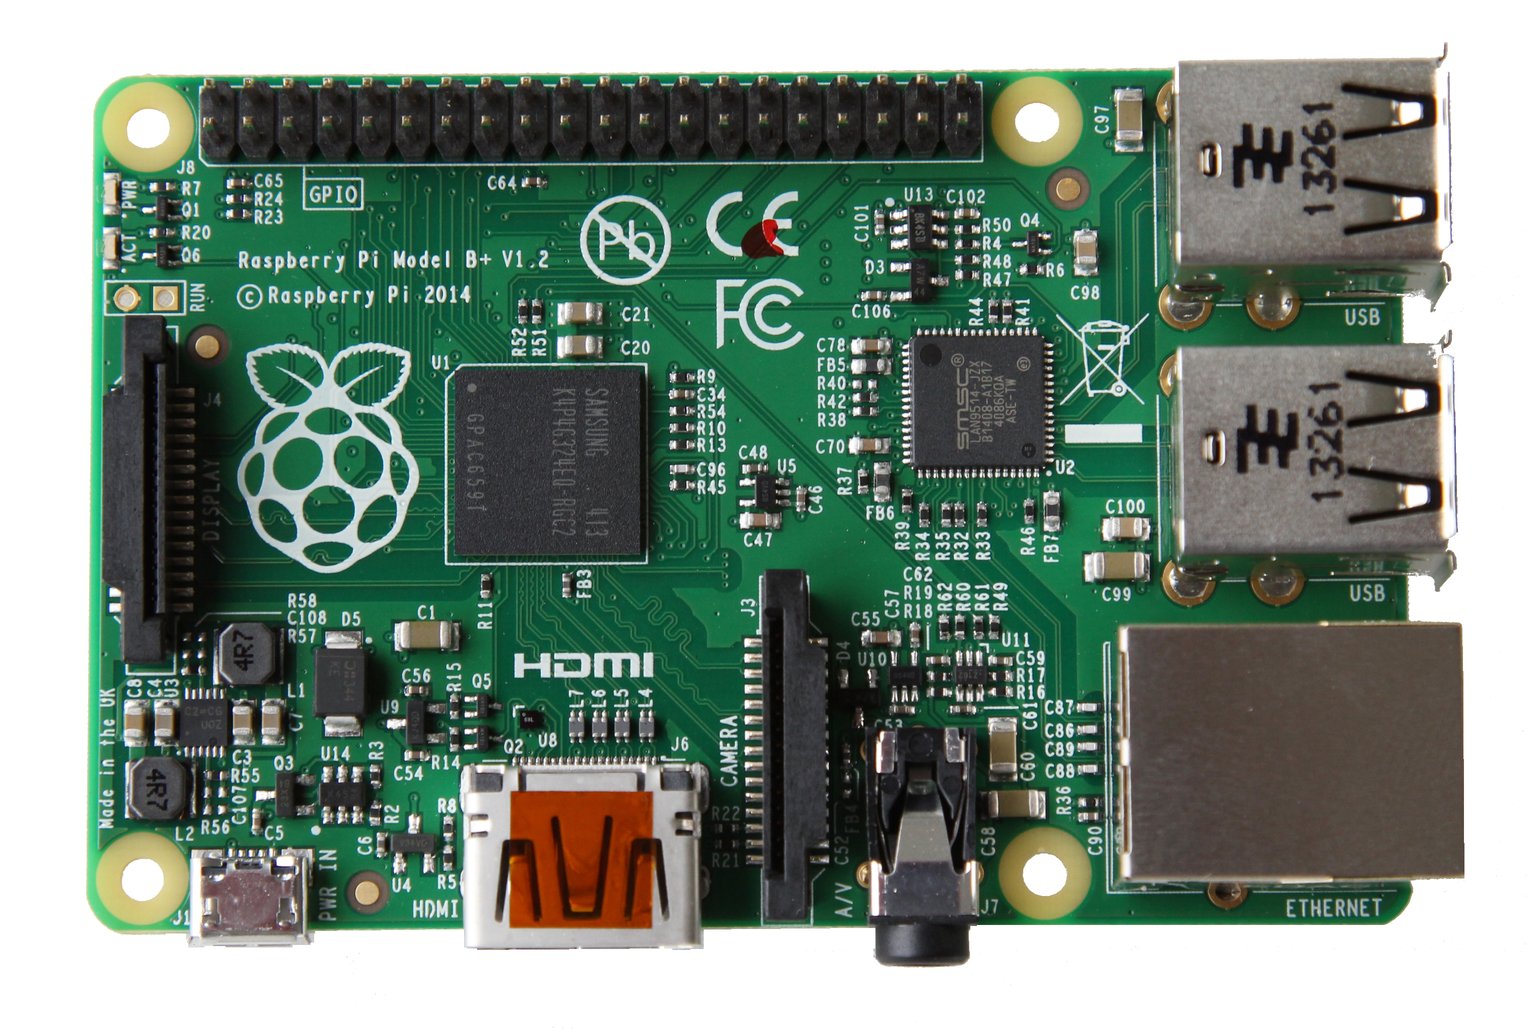
Hand out to the students the barebone Raspberry Pis (Those not in cases, or take the Raspberry Pis out of the cases). Ask the students to discuss what they think each parts are. A print-out of the image below might be very helpful:

Getting the Raspberry Pi to Work (15 minutes)
Now ask the students to assemble the Raspberry Pis. Introduce the cables and port names would be helpful. Those are:
- HDMI port on Raspberry Pi -> DVI port on monitor (secure the DVI port with the screws
- MicroUSB port on Raspberry Pi -> AC Power
- Power cable on monitor -> AC Power
- USB ports on Raspberry Pi - Keyboard and mouse
Raspbian - the Software (15 minutes)
Now that the students Raspberry Pis are up and running, go through the software systems of Raspberry Pi.
- The operating system (OS) of the Raspberry Pi is a version of Linux (No need to know Raspbian but Linux is important). What are the differences between Windows, MacOS, iOS, Android, and Linux OSes?
- Go through some of the software. Raspberry Pi is designed for kids to learn coding, so there are plenty of IDEs. There is a free version of office on Raspberry Pis as well (LibreOffice), and there are also games (Minecraft) and web-browsers (Chromium, a free version of Google Chrome).
- A very important software is called the terminal (which can be launched on the task bar). Open the taskbar and remind the students what computers were like before there were Graphical User Interfaces (GUI).
Get started with Python (5 minutes)
This part serves as a hook to next class’ activities. The students can start programming in Python in two ways:
- Type
python3in the terminal - Start Thonny Python found in the start menu
This starts an interactive programming environment (also called REPL) of Python, indicated by the three arrows >>>. The students can feel free to type whatever they like.
Review and Assessment
Answer the following questions:
- What is Raspberry Pi?
- What are the differences between software and hardware?
- What are some important pieces of software and hardware?
- Name the components of the Raspberry Pi on the picture below.
Lesson 3: A Sophisticated Calculator
| Authors: | Paul Xu, Marcus Penny |
|---|---|
| Date: | Jan 27, 2018 |
| Time: | 1 hour |
Lesson Information
This lesson introduces the students to the basic mathematical and string operations in Python. Although we will not formally formulate the differences between data types, they will have first hand experience of the differences between numeric types and string types. They will also have basic concepts of variables and how to store values in variables. Using interactive programming, the students will use Python to solve mathematical problems in Python and print it out.
The purpose of the lesson is to:
- Introduce students to Python programming using the interactive shell
- Familiarize students with mathematical operations in Python
- Informally introduce the concept of data types and variables
- Use Python to solve mathematical problems
Driving Questions:
- What does computation mean?
- How can we use computation in Python?
- What are the differences between numbers and strings?
- How can we save the result of our computation?
Computer Science Concepts:
Mathematical operators, primitive data types (string and numbers), variables (storing values)
Materials Needed:
Raspberry Pi 3
Target Skills:
Students will be able to
- SWBAT use mathematical operators to work on math problems in Python shell
- SWBAT informally distinguish the differences between data types
- SWBAT understand one reason why we need variables
Instructional Plan and Structure
Overview of the lesson (5 minutes)
Why do we call computers computers? What do we mean by computation? Begin the class by asking the students these questions, and engage them in a brief whole-class discussion. Then, introduce the students to the topic of this class: mathematical computations.
Let’s Code Together! (30 minutes)
Start a Python shell (either in Thonny Python or the terminal), and if possible, also start a Linux calculator on the side or use a real calculator, so students understand that Python can be used as a sophisticated calculator. Start typing in basic math operations, such as 5 + 10 and 1.2-1.0. Addition and subtraction might be easy, but some students might not be familiar with the multiplication * operator, the division / operator, and/or the exponentiation operator **. Make sure they locate these operators on the keyboard. The exponentiation operator can be used to obtain really large numbers, which Python handles well. Make sure the students have the chance to experience that.
Tip
Interesting result
The result of 1.2-1.0 might not be unexpected. It has something to do with the way Python represents floating numbers, and we will get back to that more formally later in this course.
Also, it does NOT matter if there are spaces between values and operators.
Here are the basic mathematical operators in Python:
Python operator Mathematical Operator a + b\(a+b\) a - b\(a-b\) a * b\(a \times b\) a / b\(a \div b\) a ** b\(a^b\)
It is possible to carry out complicated operations. The order in which each operation is performed is exactly the same as what students are familiar in math. It is, of course, possible to change the precedence by using the parenthesis ().
With this knowledge, let’s do some math! The following two questions are taken from 6th Grade MCAS Math released problems.
- At the beginning of the day, a water tank contained 526.8 gallons of water. During the day, some of the water was used to water a garden. At the end of the day, the water tank contained 318.05 gallons of water. What was the total amount of water used that day?
- Which of the following expressions have the largest value?
- \(2^3+2^3\)
- \(2^3+7^1\)
- \(3^2+3^2\)
- \(3^2+7^1\)
Saving the results of our computation (10 minutes)
Just like we want to save the games that we have played for a while, sometimes we want to save the results of operations so that we can use them in the future. We can achieve this by using variables. For example:
>>> a = 2**5
>>> b = (3+10) * 8
The computer will associate these names with the values, and later when we use them, we can just use the name:
>>> a
32
>>> b
104
>>> c = a + b
>>> c
136
Caution
What happens if we write a = a + b?
Numbers and Strings (10 minutes)
What if we want to use texts in Python? Unfortunately, if we use texts directly like this:
>>> Hello, Python!
  File "<stdin>", line 1
    Hello, Python!
                 ^
SyntaxError: invalid syntax
As you can see we encountered an error called SyntaxError. This means Python does not understand what we just wrote. In Python (and most programming languages), texts are put in quotation marks. For example:
>>> "Hello, Python!"
'Hello, Python!'
Tip
Single quotation marks ' or double "?
It doesn’t matter as long as they match.
What if we put numbers in quotation marks?
>>> "123" + "456"
'123456'
We got unexpected results!!! And when we do this:
>>> "123" + 456
Traceback (most recent call last):
  File "<stdin>", line 1, in <module>
TypeError: must be str, not int
We got a TypeError!!! We will discuss that in our next lesson.
Review and Assessment
Answer the following review questions:
- What is computation?
- What is one type of computation Python is really good at?
- Why do we need variables?
Lesson 4. Let’s Go, SenseHAT!
| Authors: | Paul Xu, Marcus Penny |
|---|---|
| Date: | Jan 28, 2018 |
| Time: | 1 hour |
Lesson Information
Having learned the basics of calculations, the students can now get started with writing their first programs with SenseHAT. They will learn how to use sense.show_message() to light up their SenseHAT. They will also learn the differences between different program output channels.
The purpose of the lesson is to:
- Begin writing programs (instead of using the interactive shell)
- Learn how to import libraries and use library functions
- Gain basic understanding of programming flows
Driving Questions:
- What is output? What are the different output channels that we are using?
- What is a function? How to pass function parameters?
- What are programs? How do computers read and execute our programs?
Computer Science Concepts:
functions, parameters, libraries, objects
Materials Needed:
Raspberry Pi 3, SenseHAT addon board
Target Skills:
Students will be able to
- SWBAT tell what a SenseHAT is and what the components of SenseHAT are
- SWBAT write their first programs to control their SenseHAT LED Matrix
- SWBAT write programs to display multiple messages
- SWBAT articulate the differences between output to shell and output to SenseHAT
Instructional Plan and Structure
With initial understanding of variables, data types, and some basic Python syntax, the students are now ready to write their first program to control SenseHAT in Python.
Overview of the lesson (10 minutes)
As a motivation, first run a few existing programs showing the students what they are going to do in the future, in order to pique their interest.
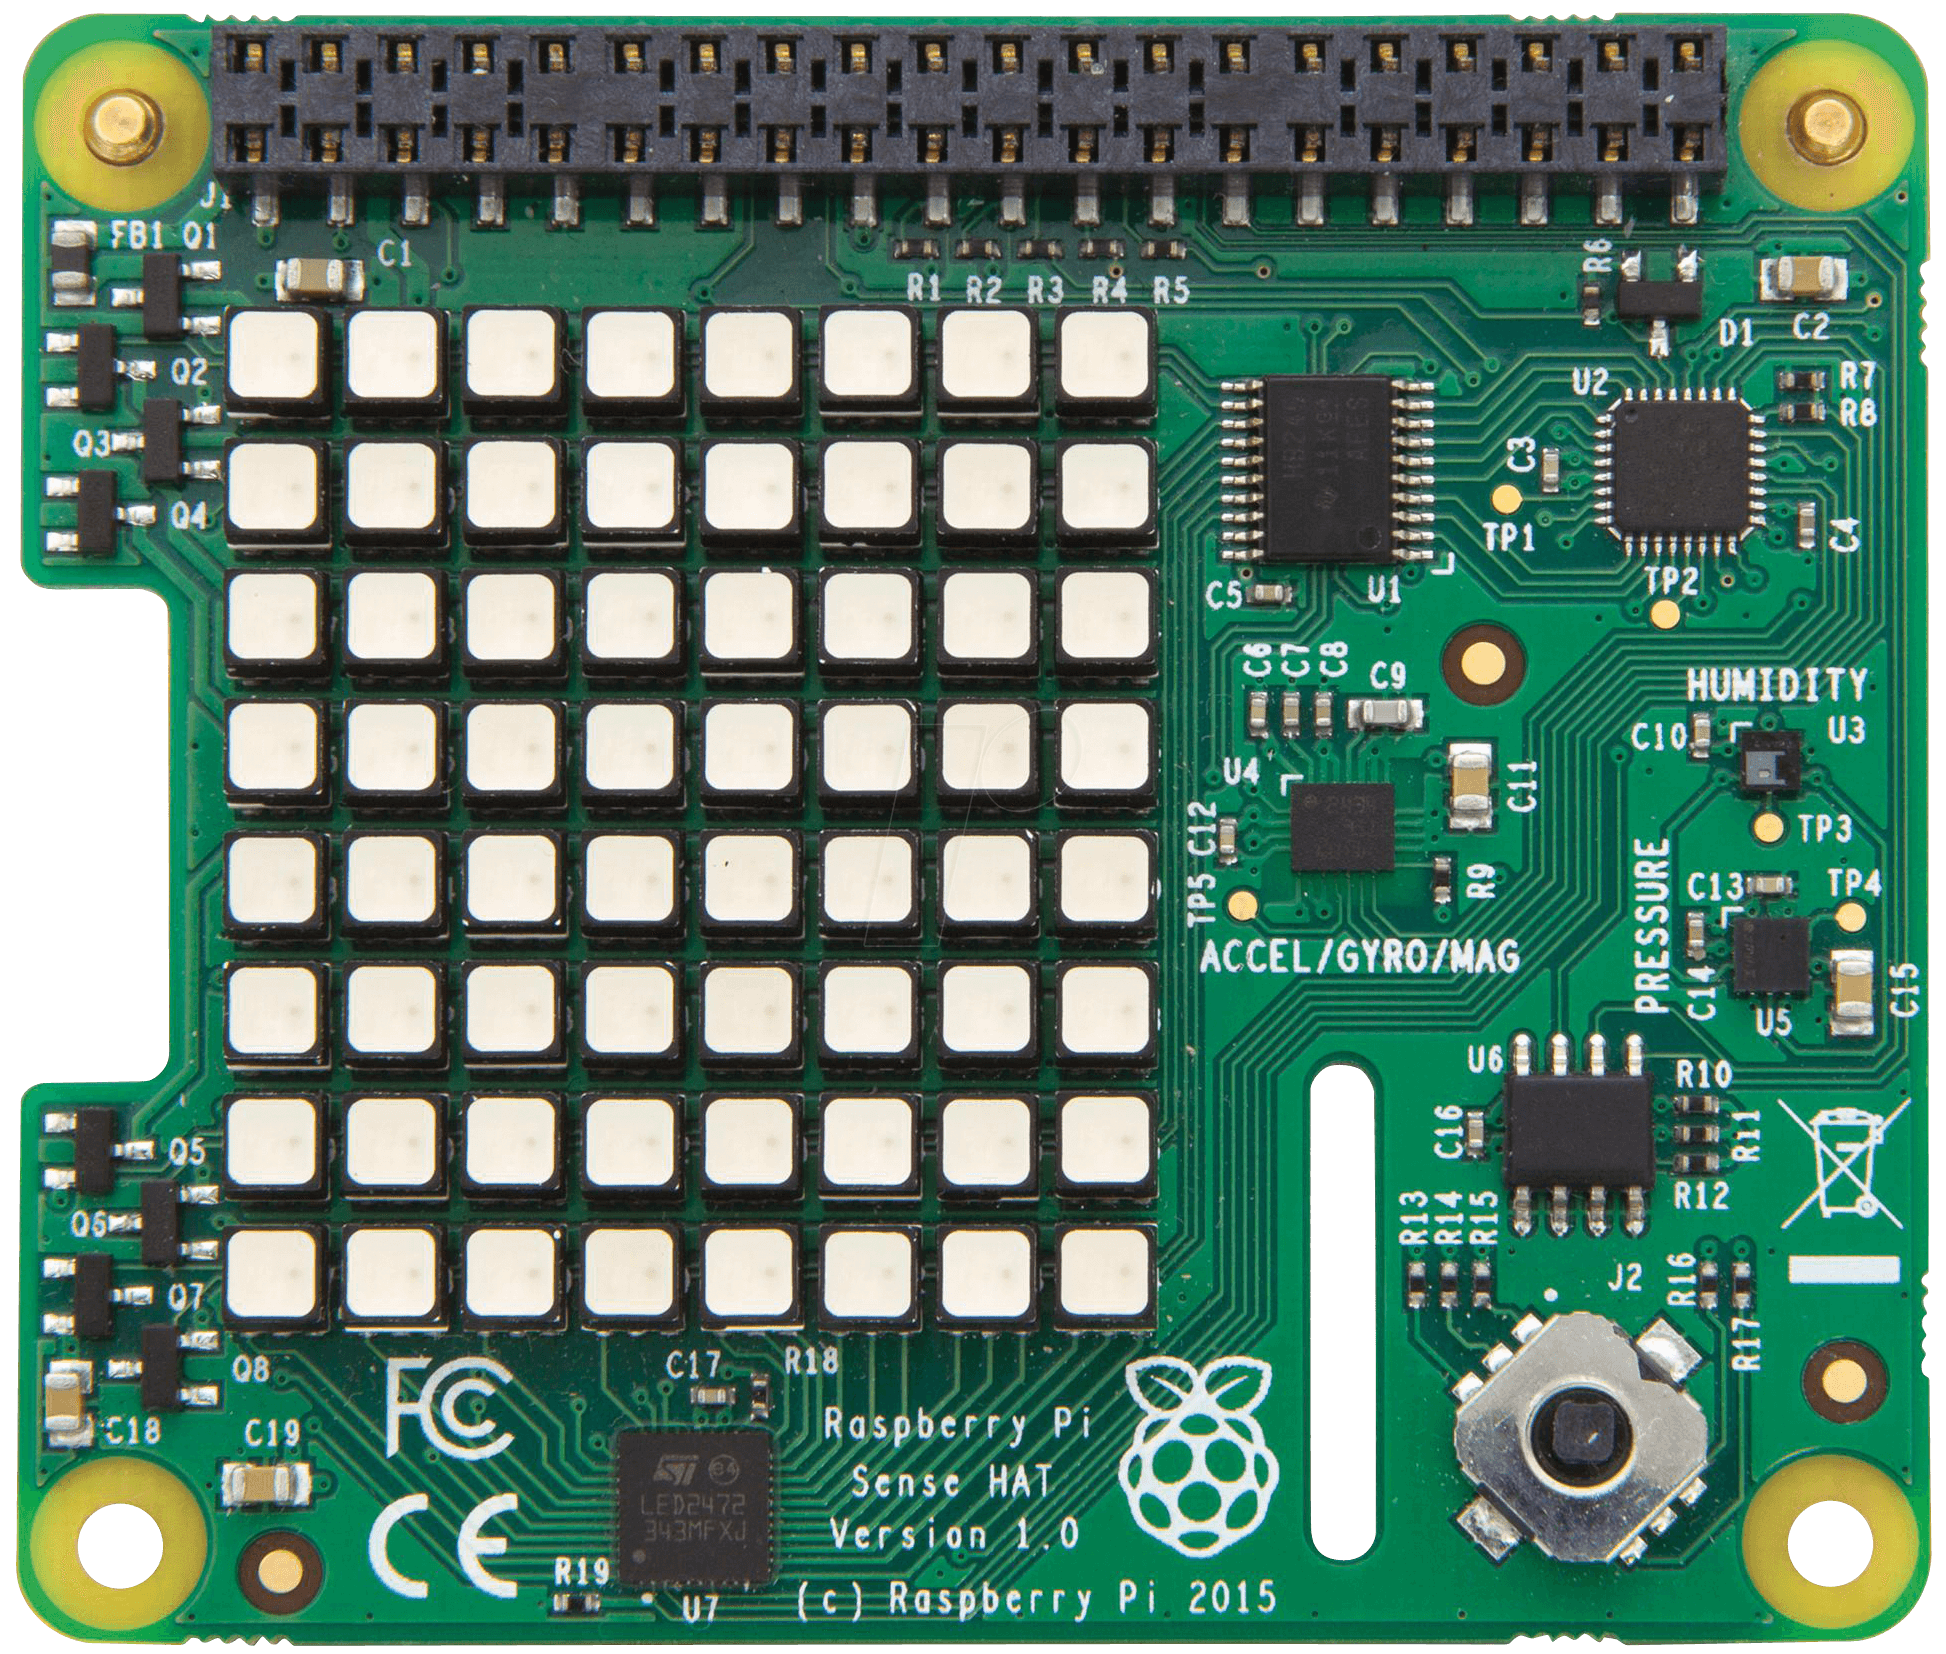
Handout SenseHAT to each pair of students. Briefly introduce a little bit of the SenseHAT’s background and its connection to the Astro Pi Project. Encourage the students to explore what each component of SenseHAT does on their own.
- LED Matrix (8 by 8 dimension)
- Humidity Sensor
- Pressure Sensor (both sensors are capable of sensing temperatures)
- IMU Sensor (used to sense the orientation of SenseHAT)
- Joystick (5 directions)
The following picture could also be helpful:
Light it up! (20 minutes)
Now we will write a simple program to light the SenseHAT up! We will get back to the code and explain what each part does, but for now, simply type in these following three lines into Thonny Python (the upper part of the window, not the shell).
from sense_hat import SenseHat
sense = SenseHat()

sense.show_message("Hello Python!")
Watch for the following errors:
- Capitalization
- Spelling
- Underscore
_insense_hat - Matching parentheses and quotation marks
If you have done everything correctly, the SenseHAT should light up and show a scrolling message “Hello Python!”!
If some students have finished this task, some challenges for them could be:
- Change the contents of the message
- Also print a message to shell
- Have the SenseHat display a series of messages
- Run the program in the terminal
Wrap up and reflection (20 minutes)
We have just written our first program. Our SenseHAT is working, and we have figured out how to display different messages, a series of messages, and show the messages in the different place. Let’s now come back to the code we have just written, and see what exactly is going on:
1 2 3 4 5 6 | from sense_hat import SenseHat # import all SenseHAT related stuff from sense_hat library.
sense = SenseHat() # point all operations to the SenseHAT on this machine
sense.show_message("Hello Python!")
print("Hello Python")
sense.show_message("Goodbye!")
|
First, we imported all SenseHAT related functionalities in Line 1. Then, we created a sense variable. We don’t need to understand what is going on here right now, but we can understand this step as creating a short-cut pointing to the SenseHat on your Raspberry Pi.
Line 3 is the most important. In Python, we use this “dot notation” to express “ask someone to do something”. So, sense.show_message() literally asks the SenseHAT to show a message on the LED matrix. The latter part of this line .show_message() is a function. For now, we can understand functions as “small programs” that does something on the things you give to them. You give (pass) these things, which are called parameters in the parentheses (). Here, you pass the function a string, and this function tells python to put this string on to SenseHAT.
To summarize, a function is a piece of program that has a name (e.g. show_message, print) and a set of parentheses (). You can pass parameters into the parentheses, so the function will do things for you.
We also used the print function on Line 4 to display a message to the shell (terminal). This illustrates that we can control our program to output to different channels. Think of your cellphone. When you play music on your cellphone, you can choose to output the music through your headphones, the speakers on the phone, or a bluetooth speaker. Here we can choose to output the message to the shell or to SenseHAT. You need to use different functions to achieve that. Later we can write program to output the message to other computers.
You also noticed the sequence in which these messages are displayed. Python reads the program just like we do - line by line, and execute the program line by line as it reads it. If we change the order of our code, the order of execution will be different as well.
Review and Assessment
- How does Python read and execute our programs?
- How do we output a message to shell or to SenseHAT?
- What does a function do? How do we pass parameters to functions?
Lesson 5: Customizing SenseHAT Output
| Authors: | Paul Xu, Marcus Penny |
|---|---|
| Date: | Jan 31, 2018 |
| Time: | 1 hour |
Lesson Information
In the previous lesson the students learned how to light up the SenseHAT. In this lesson they will learn how to customize SenseHAT output by passing parameters to functions. They will first encounter complex data structures - lists. They will also learn what some of the common mistakes are and how to debug them.
The purpose of the lesson is to:
- Learn the syntax of passing parameters to functions
- Learn the idea of lists
- Understand and use the Input - Computation - Output Structure
- Understand the basics of debugging
Driving Questions:
- How to customize output message on the SenseHAT LED Matrix?
- What are lists and how to use them?
- How are most computer programs structured?
- What do we do if things go wrong?
Computer Science Concepts:
Functions, Parameters, Input, Computation, Output, Debugging
Materials Needed:
Raspberry Pi 3 with SenseHAT
Target Skills:
Students will be able to
- SWBAT change SenseHAT output by passing parameters to functions
- SWBAT use lists to represent colors
- SWBAT write programs using the Input - Computation - Output structure.
Instructional Plan and Structure
Overview of the lesson (5 minutes)
This part builds on what students wrote in the last session, in which they wrote their first program to use the sense.show_message() function to output a scrolling message of their choice to SenseHAT. In this lesson we will first answer this burning question: how do we change the output?
Changing the scroll speed of the SenseHAT output (10 minutes)
In the last lesson we learned that by passing different strings to the sense.show_message() function, we can change the output message that we show on the SenseHAT. We also learned that functions are small, pre-written programs that accept different parameters to do different things. It turns out that we can also adjust many other things by adding more parameters. When there are two or more parameters, we have a slightly different way of passing them to a function. Here is how:
Parameters are separated by commas. Each parameter has a name. For example, in order to change the speed at which the text scrolls, we can add this parameter (write it down on the whiteboard) scroll_speed=0.05. scroll_speed is the name of the parameter, and like how we assign values to variables, we also use the equal sign = to assign values to parameters. Now you can change the value 0.05 to see how the scroll speed of the text changes.
Tip
We usually omit the name of the first parameter.
Changing the colors of the SenseHAT output (20 minutes)
Let’s go on to passing the function more parameters so we can also customize the colors of the SenseHAT output. But before that, think of this question: How does the computer know different colors?
Computers are not like us. It cannot automatically translate our language to what it understands. However, it can understand numbers. Therefore, computer programmers developed a system called RGB for computers to understand and show us different colors. In the RGB system, R stands for red, G stands for green, and B for blue. For each color, we have 0 to 255, a total of 256 levels of intensity. By mixing different color intensities, we get different colors. It is like using a color palette.
Feel free to use this Online Color Palette to get your own colors. Make sure you write down the colors and the RGB values that you find desirable.
Now, in order for Python to understand the colors you have picked, we need to pass these three values to Python. However, it also needs to understand that these three values need to be understood as a whole. We use lists to do this job. Lists the easiest way in Python to put things together as a whole. To use lists, you put comma-separated values (or variables) into a pair of square brackets. For example, this list means red: [255, 0, 0].
We can now pass these lists to two new parameters text_colour= and back_colour= to change the text color and background color respectively. Note the spelling of colour. Raspberry Pi and SenseHAT are developed by the British so you will see British spelling of words a lot.:
sense.show_message("Hello Python", scroll_speed = 0.05,
                   text_colour = [255, 0, 0], back_colour = [0, 0, 255])
Notice that sometimes code can be too long to be shown on one line. You can break the code into different lines by inserting line breaks (ENTER key) into the brackets of functions right after the commas.
Why isn’t my code working? (20 minutes)
Often the code simply does not work, which can be really frustrating. Here we are going to break our code and see how Python behaves. Sometimes Python will show us exactly where things go wrong, and why things go wrong.
Misspelling sense_hat package name:
1 2 3 4 5 6 7 8 9 | from sensehat import SenseHat
sense = SenseHat()
sense.show_message("Hello Python!")
Traceback (most recent call last):
File "/home/pi/Desktop/sense.py", line 1, in <module>
from sensehat import SenseHat
ImportError: No module named 'sensehat'
|
Misspelling SenseHat class name:
1 2 3 4 5 6 7 8 9 | from sense_hat import Sensehat
sense = SenseHat()
sense.show_message("Hello Python!")
Traceback (most recent call last):
File "/home/pi/Desktop/sense.py", line 1, in <module>
from sense_hat import Sensehat
ImportError: cannot import name 'Sensehat'
|
Missing ()
1 2 3 4 5 6 7 8 9 | from sense_hat import SenseHat
sense = SenseHat
sense.show_message("Hello Python!")
Traceback (most recent call last):
File "/home/pi/Desktop/sense.py", line 4, in <module>
sense.show_message("Hello Python")
TypeError: show_message() missing 1 required positional argument: 'text_string'
|
Misspelling SenseHat() object
1 2 3 4 5 6 7 8 9 | from sense_hat import SenseHat
sense = Sensehat()
sense.show_message("Hello Python!")
Traceback (most recent call last):
File "/home/pi/Desktop/sense.py", line 2, in <module>
sense = Sensehat()
NameError: name 'Sensehat' is not defined
|
Misspelling sense.show_message() function name
1 2 3 4 5 6 7 8 9 | from sense_hat import SenseHat
sense = Sensehat()
sense.show_Message("Hello Python!")
Traceback (most recent call last):
File "/home/pi/Desktop/sense.py", line 4, in <module>
sense.show_Message("Hello Python")
AttributeError: 'SenseHat' object has no attribute 'show_Message'
|
Missing quotation marks around the string
1 2 3 4 5 6 7 8 9 | from sense_hat import SenseHat
sense = Sensehat()
sense.show_message(Hello Python)
File "/home/pi/Desktop/sense.py", line 4
sense.show_message(Hello Python)
^
SyntaxError: invalid syntax
|
Review and Assessment (5 minutes)
- Why do we use lists?
- What is the RGB color system?
- How do we pass a function multiple parameters?
Lesson 6: Input and Output
| Authors: | Paul Xu, Marcus Penny |
|---|---|
| Date: | Feb 1, 2018 |
| Time: | 1 hour |
Lesson Information
In the previous lesson, the students learned how to output a message to the shell and the SenseHAT LED Matrix. This is an example of controlling the output of a program. Later the students will also learn how to output to another machine. In this lesson, we will build on this knowledge and continue to learn the structure of a program: Input - Process - Output, beginning by studying what inputs are and how to use inputs.
The purpose of the lesson is to:
- Formulate the concept of output (between shell and SenseHAT)
- Use pre-defined variables in programs as input
- Reinforce the idea of input using the
input()function - Introduce process chart as a graphical visualization of programs
Driving Questions:
- What are input and output in a program?
- What is the structure of a program?
- What is a process chart and how do we use it?
Computer Science Concepts:
input, output, programming flow
Materials Needed:
Raspberry Pi 3 with SenseHAT
Target Skills:
Students will be able to
- SWBAT differentiate outputs to shell and to SenseHAT
- SWBAT use pre-defined variables as input in their programs
- SWBAT understand process charts
- SWBAT use the
input()function to customize their input.
Instructional Plan and Structure
It should be obvious that most, if not all, programs are devoted to gathering data from outside, processing it, and providing results back to the outside world. That is, input and output are key.
Real World Haskell, Bryan O’Sullivan, Don Steward, & John Goerzen.
Overview of the lesson (10 minutes)
In the previous lesson, we wrote a program like this::
from sense_hat import SenseHat
sense = SenseHat()

sense.show_message("Hello Python", scroll_speed = 0.05,
                   text_colour = [255, 0, 0], back_colour = [0, 0, 255])
Begin the class by reviewing these questions. The students may discuss these questions in groups first and then share these questions with the rest of the class.
- What/where is this program outputting the message to?
- Can we output the message to other places/devices? How can we do so?
- Can you imagine where else we might output this message to?
This image below could help you answer the above questions:

What is a program? (10 minutes)
The above image demonstrates what a program consists of. We can think of programs as the mysterious machine shown in the image. It takes some input, do some processing, and produces some output. In the case of the program we have written, we know that we output the message to the shell/SenseHAT. More formally, a program looks like this:

Then, what is our input in this program? Ask the students to discuss in groups and guess.
The inputs are basically the parameter values that we pass to the sense.show_message() and print() functions. If this is not clear enough, we can actually restructure our program this way so that this structure is clearer.
1 2 3 4 5 6 7 8 9 10 11 12 13 14 15 | # Initiation:
from sense_hat import SenseHat
sense = SenseHat()
# Input:
msg = "Hello Python!"
speed = 0.05
red = [255, 0, 0]
blue = [0, 0, 255]
# Process
# Output
sense.show_message(msg, scroll_speed = speed,
text_colour = red, back_colour = blue)
|
Note
The pound/hashtag sign # starts a comment. You can write your notes in the code this way and Python will ignore it. Other languages may use double slash // to do so. Here we use comments to divide our code into initialization-input-process-output sections. Comments will be greyed out in Thonny Python, which also means that these comments will be ignored.
We only need to initialize the program once. We usually import libraries at the beginning of our code.
Notice that the # Process block. Are there no processing step in our program?
What did we just do in this program?
Well we just defined a few variables at the beginning of program and then passed them to the sense.show_message() function as parameters. Take a look at the Variable panel in your Thonny Python:
TODO: add a Thonny Python screenshot.
When Python reads Line 14, it will automatically look up all these variables and substitute them with their values. So the code will eventually become something we are familiar with::
sense.show_message("Hello Python", scroll_speed = 0.05,
                text_colour = [255, 0, 0], back_colour = [0, 0, 255])

|
Tip
It is better to demonstrate the process of substituting values with variables to the students.
We don’t need to write all programs this way but since we are learning to code, it is a good idea for us to stick to this structure for a while so we understand what is going on.
Restructure your program (15 minutes)
In the previous class we wrote code to have Python output 3 messages to SenseHAT/shell. Rewrite the program using the input-process-output structure provided above and still have Python output three messages.
Hint
You might want to have different variables as inputs, such as msg1, msg2, msg3, etc.
The input() function (15 minutes)
So far we have only pre-defined messages for SenseHAT to print. Can we get this input dynamically from the user using our program? In other words, can we prompt the user to input a message that we can then output to SenseHAT/shell?
The input() function can help us do that:
>>> input("What is your name?\n")
What is your name?
Captain America
'Captain America'
What do you think the function does?
The input() function takes a string. It will display this string in the shell as a prompt, and the user can type in something there. Then the input function will take whatever the user typed in the shell and return it. What is the type of the returned value?
Note
The \n is a newline character, so that you can answer the question on a new line.
We can also save the returned value of this function to a variable so we can use it later:
>>> name = input("What is your name?\n")
What is your name?
Captain America
>>> name
'Captain America'
>>> "my name is " + name
'my name is Captain America'
Of course, we can output result to SenseHAT:
1 2 3 4 5 6 7 8 9 10 11 12 13 14 15 16 | # Initiation:
from sense_hat import SenseHat
sense = SenseHat()
# Input:
name = input("What is your name?\n")
speed = 0.05
red = [255, 0, 0]
blue = [0, 0, 255]
# Process
msg = "Hello Python!" + name
# Output
sense.show_message(msg, scroll_speed = speed,
text_colour = red, back_colour = blue)
|
Challenge:
- Ask two different questions and output those results to SenseHAT. Make the outputs look different by using different colors and speed.
Review and Assessment
- What are input and output?
- How do we use the
input()function? - What is the common structure of a computer program?
Lesson 7: Data Types
| Authors: | Paul Xu, Marcus Penny |
|---|---|
| Date: | Feb 2, 2018 |
| Time: | 2 hours |
Lesson Information
In previous lessons, the students learned to use Python as a calculator, to output messages to SenseHAT, and to use the input() function to get user input from the Python Shell. In this lesson we will write a program that mashes all these together. We formulate the concept of data types and explain in detail why the number 123 is different from the string "123" in Python. Unlike other sessions, this one takes about 2 hours, with ample time for students to complete their project on their own.
The purpose of the lesson is to:
- Deepen the understanding of data types
- Explain how computers handle different data types differently
- Review all students have learned so far
Driving Questions:
- What are data types?
- How do computers handle different data types?
- What are binary numbers?
Computer Science Concepts:
data types, binaries, string concatenation
Materials Needed:
Raspberry Pi 3 with SenseHAT, coins (or other chips),
Target Skills:
Students will be able to
- SWBAT perform simple binary conversion (under 10)
- SWBAT understand the differences between data types
- SWBAT perform data type conversion
Instructional Plan and Structure
This lesson features a task that applies all the skills that the students have learned previously and reintroduces the concept of data types. It is a conceptual review of all of the topics covered in the previous seven lessons.
Overview of the lesson (5 minutes)
Explain to the students that on our first day with Python, we learned how to use Python as a sophisticated calculator (Lesson 3: A Sophisticated Calculator). However, at that time only we could use Python as a calculator. This time we are going to write a calculator that asks someone else for numbers and then do the calculation, so that someone else can use the program as well.
Demonstrate to the students this code without showing them the content::
# Initialization
from sense_hat import SenseHat
sense = SenseHat()

# Input
number1 = input("Give me number 1")
number2 = input("Give me number 2")

number1 = int(number1)
number2 = int(number2)

# Processing
result = number1 + number2
msg = "{0} + {1} is {2}".format(number1, number2, result)

# Output
sense.show_message(msg, text_colour = [255, 0, 0], back_colour = [0, 0, 255])
Figuring it out together (10 minutes)
Ask the students to discuss in groups what they would write to achieve this result. They will likely come up with the input() function, the initialization, and the sense.show_message() function. As they discuss, write this program::
# Initialization
from sense_hat import SenseHat
sense = SenseHat()

# Input
number1 = input("Give me number 1")
number2 = input("Give me number 2")

# Processing

# Output
sense.show_message(number1 + number2, text_colour = [255, 0, 0], back_colour = [0, 0, 255])
Show the students what this program outputs.
How do computers “see” numbers? (20 minutes)
So, rather than adding the numbers together, we only saw on SenseHAT that the computer joined the numbers together. This is weird. Let’s figure out what is going on. Remember in the last class (Lesson 6), when we used the input() function, what is the type of the value that we got from it?
>>> input("What is your name?\n")
What is your name?
Captain America
'Captain America'
Turns out that we got a string from this function. When we added strings together, Python will join, or concatenate, them for us, instead of adding them together.
>>> 123 + 456
579
>>> "123" + "456"
'123456'
Why? It’s because computers see things very differently from us. Computers are only capable of seeing 0 and 1. Those are called binary numbers. For example, computers see 2 as 10, and 3 as 11. How about 7?
We can use this worksheet. Use 7 coins, fill the columns with coins. However, remember, when you are finished, the columns have to be either empty or full. After you are finished, write a 0 under the columns that are empty, and a 1 under those that are full. You should get 111 after this. How about 9?
We can also use the bin() function in Python to get the binary versions of numbers::
>>> bin(7)
'0b111'
>>> bin(123)
'0b1111011'
>>> bin(255)
'0b11111111'
Note
The 0b prefix tells us that this is a binary representation. Actual values come after 0b.
How many ones are in there in the binary version of 255? How about 1023?
How do computers “see” strings? (10 minutes)
How the computers see strings is a completely different story. First, for each character, Python uses a number to represent them. We can use ord() function to get them.:
>>> ord("a")
97
>>> ord("A")
65
>>> ord("1")
49
Then we can use the bin() function to convert them to binary numbers. The last step is to fill the number with preceeding 0s if there are fewer than 0 digits.
>>> bin(49) # "1" is actually 00110001
'0b110001'
We can use the following code to see how computers see 123 and "123":
def int_to_bin(num):
    return bin(num)[2:]

def str_to_bin(string):
    return [bin(ord(ch))[2:].zfill(8) for ch in string]

if __name__ == "__main__":
    print(int_to_bin(123))
    print(str_to_bin("123"))
This is what we get when we run the code::
1111011
['00110001', '00110010', '00110011']
Because computers see data differently like this, they perform different operations on different data types. What type takes more space to store?
Coding using int() and str() functions (60 minutes)
Now that they have deeper understanding of the differences between data types, the students can complete their coding tasks using type conversions. They can begin with the code we wrote earlier::
# Initialization
from sense_hat import SenseHat
sense = SenseHat()

# Input
number1 = input("Give me number 1") # What is the type of number1?
number2 = input("Give me number 2") # What is the type of number2?

# Processing

# Output
sense.show_message(number1 + number2, text_colour = [255, 0, 0], back_colour = [0, 0, 255])
# What is the type of number1 + number2 now?
Challenges:
- Change the program so that instead of doing addition, it does multiplication.
- Unfortunately, if we provide the computer with decimal numbers, the calculations will be off. This is because the
int()function only converts strings to integers (hence the nameint). When we are using decimals, we can convert them usingfloat(). Try to use this function in your program and test what happens.
Review and Assessment
- How do computers see data types differently?
- How do we convert between different data types?