Welcome to OpenAPS’s documentation!
This documentation supports a self-driven Do-It-Yourself (DIY) implementation of an artificial pancreas based on the OpenAPS reference design. By proceeding to use these tools or any piece within, you agree to the copyright for more information; and the full README here and release any contributors from liability, and assume full responsibility for all of your actions and outcomes related to usage of these tools or ideas.
Note
A Note on DIY and the “Open” Part of OpenAPS
This is a set of development tools to support a self-driven DIY implementation. Any person choosing to use these tools is solely responsible for testing and implementing these tools independently or together as a system.
The DIY part of OpenAPS is important. While formal training or experience as an engineer or a developer is not a prerequisite, a growth mindset is required to learn to work with the “building blocks” that will help you develop your OpenAPS instance. Remember as you consider this project that this is not a “set and forget” system; an OpenAPS implementation requires diligent and consistent testing and monitoring to ensure each piece of the system is monitoring, predicting, and controlling as desired. The performance and quality of your system lies solely with you.
This community of contributors believes in “paying it forward,” and individuals who are implementing these tools are asked to contribute by asking questions, helping improve documentation, and contributing in other ways. Have questions? Hop into Gitter and ask anytime!
Danger
IMPORTANT SAFETY NOTICE
The foundation of OpenAPS safety features discussed in this documentation are built on the safety features of the hardware used to build your system. It is critically important that you only use a tested, fully functioning FDA or CE approved insulin pump and CGM for closing an automated insulin dosing loop. Hardware or software modifications to these components can cause unexpected insulin dosing, causing significant risk to the user. If you find or get offered broken, modified or self-made insulin pumps or CGM receivers, do not use these for creating an OpenAPS system.
Additionally, it is equally important to only use original supplies such as inserters, cannulas and insulin containers approved by the manufacturer for use with your pump or CGM. Using untested or modified supplies can cause CGM inaccuracy and insulin dosing errors. Insulin is highly dangerous when misdosed - please do not play with your life by hacking with your supplies.
How A DIY Open Source Closed Loop “Artificial Pancreas” Works
How do you make decisions about your diabetes? You gather data, crunch the numbers, and take action.
A DIY loop is no different. It gathers data from:
- your pump
- your CGM
- any other place you log information, like Nightscout
It then uses this information to do the math and decide how your basal rates might need to be adjusted (above or below your underlying basal rate) in order to keep or bring your BGs in your target range.
How does the closed loop gather data?
With OpenAPS, there is a “rig” that is a physical piece of hardware. It has “brains” on the computer chip to do the math; plus a radio stick to communicate with your pump; plus it can talk to your phone and to the cloud via wifi to gather additional information and report to the world about what it’s doing.
The rig needs to:
- communicate with the pump and read history - what insulin has been delivered
- communicate with the CGM (either directly, or via the cloud) - to see what BGs are/have been doing
The rig runs a series of commands to collect this data, runs it through the algorithm, and does the decision-making math based on the settings (ISF, carb ratio, DIA, target, etc.) in your pump.
How does it control the pump based on its decisions?
When you build an OpenAPS rig, you follow the instructions in this documentation to:
- physically put the pieces of your rig together
- install the open source software on it
- configure it to talk to YOUR devices and use your preferences and safety settings
The open source software is designed to make it easy for the computer to do the work you used to do to calculate what needs to be done. During each “loop” - about every five minutes - the rig collects data from your pump and CGM. It prepares the data and runs the calculations. Then it sends any necessary adjustments to your pump. You can see what it’s doing in the logs of the rig, or by viewing the information on your watch or on Nightscout.
You can learn more about how the system is designed for safety in the OpenAPS Reference Design and read more about the calculations in the ‘How it Works’ section.
How to get your own OpenAPS system up and running
The OpenAPS setup process can be broken up into several parts:
These can be done in parallel:
A. Choose and get your hardware. You have several options for compatible pumps, CGMs, and rig components. While you will likely already have some of the gear you’ll need (e.g., you’ll likely keep using your CGM) it may take a few weeks to choose and find a compatible pump and to collect your rig hardware. Once you have your rig pieces (a computer, a radio board, and a battery) you’ll need to put them together.
B. Prepare to use OpenAPS. You’ll need to set up Nightscout if you haven’t already, and make a few tweaks if you have; review your pump settings; and make sure you’re comfortable using your pump if it’s new to you. You’ll also do some reading to make sure you understand how OpenAPS works, how you’ll use your new closed loop, and what options are available to you.
Install OpenAPS on your rig! There are detailed instructions that walk you through this process. This may take approximately 1-3 hours, but it’s doable regardless of how much of a “tech person” you are.
Customize your system: once you’re comfortable with basic usage of your new closed loop, you can try out advanced features, add integrations, etc. Over time, you may also choose to enable advanced features or update your rig, as more features and algorithm improvements become available.
As with all things new, there is a little bit of a learning curve to building your first OpenAPS rig. Read slowly, double-check your spelling and make sure you don’t skip steps. If you get stuck or are unsure, you can use the screenshots to compare how the resulting screens should look. You can also ask for specific help if you find yourself stuck.
Using this documentation
We recommend bookmarking the link to the docs, as they are frequently updated (sometimes daily!) as we add more information, troubleshooting tips, and more. Anytime we are asked a question on one of the below channels, we try to add it to the documentation. So chances are, your question may already be answered here!
Warning: We do not recommend using a PDF version of this guide. The docs are updated continuously, and with a PDF, you will not get the freshest real-time edits. If you have Internet connectivity, we recommend instead having the docs pulled up in an Internet browser so you can refresh. This is especially true if you are working on a setup over the course of multiple days.
Formatting in this guide
- Wherever you see text that is formatted
like this, it is usually a code snippet. You should copy and paste instead of attempting to type this out; this will save you debugging time for finding your typos. - Wherever there are
<bracketed_components>, these are meant for you to insert your own information. Most of the time, it doesn’t matter what you choose as long as you stay consistent throughout this guide. That means if you choosemyopenapsas your<myopenaps>directory, you must usemyopenapsevery time you see<myopenaps>. Choose carefully when naming things so it’s easy to remember. Do not include the< >brackets in your name.
The docs have their own search function!
See the top left of the docs for the search box. It’s best to search inside the documentation itself, rather than Google, because you’ll stay inside the most up to date version of the documentation. You may want to try a different word or shorter phrase if you don’t get any results for your search phrase, as we may have worded a section differently.

Tips for navigating the documentation
You may notice that the left hand side of the documentation has navigation. It is organized in order of setting up OpenAPS, and has various sections on finding your gear; what you should do before you build a rig; how to setup up your rig; and additional features and tips and tricks for optimizing your looping setup. This navigation is long, you can mouse over the section and scroll down to see all the pages listed in the top-level navigation!


You’ll also notice that there is more content than just these high-level pages! If you click on a link in the left, many of them expand to show the sub-sections include, which make it easy to jump directly to the section you’re looking for. If there is a +, that means there is more content you can expand.

Where to go for help
First check the Troubleshooting section for assistance, and try searching within this documentation for the problem you are having (including text of any error message you are seeing).
There are several ways to communicate with other participants and contributors in the #OpenAPS project. To help get your issue resolved more quickly, you can proactively provide information as described in this blog post for tips on how to best seek help when troubleshooting online.
Note: It’s best practice not to share your pump’s serial number, so make sure not to include it in pictures or pasted text output when seeking help on pump communication. Ditto for Nightscout URL and API secret and other private information that could enable someone to access your setup.
Google Group
A google group focused on #OpenAPS development work can be found here - everyone is encouraged and welcome to join! You can add yourself directly to the group. It’s worth setting your preferences to receive all email from the group; there’s not a huge volume, and this is one of the ways we share updates about hardware or release announcements if you’re not hanging out on Gitter or Facebook or Twitter.
Gitter
Gitter is a messaging/chat service similar to IRC. It provides integration with GitHub and several other services. It’s the best place to get real-time support with anything related to OpenAPS. (Here’s why we often recommend asking questions on Gitter.)
- The nightscout/intend-to-bolus channel is where you will find active #OpenAPS discussions ranging from technical issues with openaps tools to control theory to general information. It is a great place to introduce yourself and get some help from those who are a few steps further down the road.
- For Autotune conversations, use the openaps/autotune channel
Click here to expand a list of tips for using Gitter, from using the search function to tagging someone to posting screenshots or posting logs
Search Gitter has a search function to find old information, but since it isn’t threaded conversations, you may need to spend some time reading the posts after the search result to find the ultimate resolution to the question. So, if you find a particularly useful bit of information that you couldn’t find in the docs...please make a PR to the docs so that the information is permanently stored for others to find.
Tag/mention someone
Tag someone! You can tag particular people if you are responding to them directly by using the @ symbol and then typing their username. This will help notify the person that you are “speaking to them”. If someone asks you for information that shouldn’t be shared in the public channel, you can also private message people by hovering over their profile picture and choosing the “chat privately” button. Please do not abuse the tagging or PM features: most questions are best asked untagged in the appropriate channel, so that anyone can respond to them as soon as they read Gitter and see the question. There are people from all over the world online at all hours who can help with most kinds of questions, and the core developers usually read every message in Gitter a few times per day and try to answer any questions that got missed.

Posting photos or screenshots in Gitter
Gitter has a mobile app which works great for posting text, but does not allow for posting images directly. If you need to post a photo using the mobile app, you’ll have to host your photo file somewhere like Dropbox and post the link to the file location.
Using the desktop application, you can simply drag and drop the file into the Gitter chat window. The file will upload and then display in the chat thread after a short period of time to upload.
Posting logs
Posting copy-paste code from your rig is also another valuable activity for troubleshooting. To post a single line of information, you can use the single-backtick-quote that is found on the key to the left of the number 1 key on the keyboard. (hint: it is under the ~ on the same key). You can also long-press the single quote key on your iPhone keypad to bring up the single-backtick-quote that will work in Gitter. If you start and stop a portion of your text with those single quotes, it will look like this.
Posting multiple lines of copy-paste from your rig will also sometimes be needed. You can do that by:
- start a single line of 3 single quotes (the same one we used in the example above)
- press
control-enterto get a new line started - paste the lines of code that you want to post
- press
control-enteragain to get another new line - enter 3 single quotes to end the section
The copy-pasted lines should have 3 backticks on the line above and the line below. The example below shows, on the bottom, how the formatted text yielded the black box of text in Gitter. Using this format helps troubleshooters read your information easier than unformatted copy and paste.

Facebook
There are multiple DIY closed loop groups on Facebook.
- Everyone in the community is welcome to join the Looped Group. All DIY closed loop users (OpenAPS, AndroidAPS, etc.) chat here. You will need to request membership for the group and respond to a message from the group administrators prior to joining.
There are also numerous country-specific Facebook groups. You will still want to join the main Looped group, but country-specific groups may be helpful regarding local-specific details about access to hardware, supplies, etc. Similar to Looped, you will need to request membership for the group and respond to a message from the group administrators prior to joining any of these groups.
- UK, join Looped UK.
- Germany, join Looped-DE.
- Australia, join Aussie, Aussie, Aussie, Loop, Loop, Loop.
- New Zealand, join Aotearoa DIY Artificial Pancreas Society.
Issues on GitHub
One of the above channels is the best place for real-time or near-time troubleshooting. However, you may occasionally stumble across a new bug or edge case that we want to work on resolving. If you’re asked to “create an issue”, that usually means going to the oref0 repository on Github and logging an issue there. (You may also be asked to create issues for the openaps toolkit or decocare, etc. but usually it’s oref0 related.)
Other online forums
Those in the #OpenAPS community are frequently found in other forums, such as on Twitter (using the #OpenAPS hashtag, as well as #WeAreNotWaiting) and on Facebook in the “CGM In The Cloud” and “Looped”group.
- There is also a Slack channel to discuss communication around other pumps that are being explored and worked on, but aren’t yet DIY loopable.
Find (or start) a local meetup group
Here are some places where there are regular-ish meetups, and how to find out about them:
- Seattle - join the Seattle OpenAPS Google Group to find out about upcoming meetups
- NYC - join the NYC OpenAPS Google Group to find out about upcoming meetups
Hardware overview
This section describes the hardware components required for a ‘typical’ OpenAPS implementation. There are numerous variations and substitutions that can be made but the following items are recommended for getting started.
The basic setup requires:
- a compatible insulin pump
- a CGM
- a small computer (Intel Edison, or Raspberry Pi for example) and a radio board/stick (e.g. Explorer Board for Edison or Explorer HAT for Pi)
- a battery
If you come across something that doesn’t seem to work, is no longer available, or if you have a notable alternative, feel free to edit this documentation with your suggestions.
Note about deprecated hardware setup: Carelink can be used with up to oref0 0.6.2. However, it will not be used with oref0 0.7.0 moving forward. Carelink has poor range and will likely frustrate you. Please see the rig parts page for current hardware recommendations.
Information about compatible insulin pumps

As you can see from the flowchart above, most of the commercial pumps currently available are not compatible with OpenAPS; only a small selection of older Medtronic pumps are compatible. For those pumps which are not compatible, we suggest the advocacy option of calling the pump manufacturer and informing them of the need for availability of pumps for DIY closed looping systems. Thus far, there has not been a receptive pump company to these requests. Omnipod, Animas, T-Slim, and newer Medtronic pumps are still not compatible.
Currently, only the following Medtronic MiniMed models allow us to remotely set temporary basal rate commands, which is required to do OpenAPS:
512/712 (all firmware)
515/715 (all firmware)
522/722 (all firmware)
523/723 (with firmware 2.4A or lower)
554/754 (European Veo, with firmware 2.6A or lower; OR Canadian Veo with firmware 2.7A or lower)
NOTE: For European/WorldWide users who have access to a DANA*R/RS, Roche Accu-chek Combo or Roche Accu-chek Insight insulin pump, you may be able to use AndroidAPS, which leverages OpenAPS’s oref0 algorithm but allows you to interface using an Android phone and Bluetooth to communicate directly with the DANA*R/DANA*RS/Roche Accu-chek Combo/Insight pump. See here for instructions and details related to AndroidAPS.
How to check pump firmware (check for absence of PC Connect)
The firmware version will briefly display after the initial count-up on a new battery insertion. After the pump has been on for a while, you can check the firmware version by using the Esc button on the pump and scroll all the way to the bottom of the screen messages using the down arrow on pump.
A double-check for pump compatibility is to look for the ABSENCE of PC connect in the pump menu. Press the ACT button, scroll down to the “Utilities” menu.
- If there is a “Connect Devices” menu look for a “PC Connect” option.
- This is the case for the 523/723 and 554/754 models.
- If “PC Connect” is present, then the pump will NOT work for looping.
- If “PC Connect” is absent, then the pump should be able to receive temp basal commands and be compatible.
- If there is no “Connect Devices” menu, then the pump should be able to receive temp basal commands and be compatible.
- This is the case for the 512/712, the 515/715 and 522/722 models.
- For 512/712 pumps, certain commands like Read Settings, BG Targets and certain Read Basal Profile are not available, and require creating special files for the missing info to successfully run the loop (Instructions for 512/712 users, click here). 512/712 users are not going to be able to use an advanced feature - (e)SMB - but will be able to do basic looping.
Note that not all possible sellers of pumps will accuratly describe the model number: if they are willing to sell a pump they may not have interest in setting it up for looping, and the distinctions about model numbers and firmware version may not be important to them. It will be for you though! Therefore, it’s prudent to verify the model by seeing pctures and/or videos of the pump in action.
If you have one of the above mentioned pumps, but it has buttons that do not work, use the instructions found on this Imgur photo album to repair your pump. This repair is quite straight-forward and easy.
Why do I need a certain pump firmware?
Due to changes in the firmware, the openaps tools are only able to function in-full on the above pump models. Security features were added after firmware v2.4 in the US that prevent making some remote adjustments via the decoded communications OpenAPS uses.
If you are not based in the US, some later model pumps and firmware may be compatible as listed above. Check for PC Connect absence to determine compatibility.
Can I downgrade my pump firmware?
One of the most frequently asked questions is “I have a 723 pump but it has version 2.5B software version. Has anyone figured out a way to make newer model Medronic pumps compatible? Like flash older version of software onto my 723 2.5B pump?” The answer is “No. The ability to downgrade software versions in the pumps does not exist. It has been investigated and nobody has made any successful progress to that end.”
Tips for finding a compatible pump
If you need to acquire a compatible pump, check CraigsList, ask around local or pay-it-forward Facebook groups, or talk to friends in your local community to see if there are any old pumps lying around in their closets gathering dust. SearchTempest is a great tool for searching Craigslist nationally all at once. In addition to searching for listings, consider posting an offer to Craigslist or ask around local community groups.
If you’re buying a pump online, we recommend you ask the seller to confirm the firmware version of the pump. (You may also want to consider asking for a video of the pump with working functionality before purchasing.)
Other purchasing tips (click here to expand):
- Use Paypal and purchase using the “Goods and Services” payment option. This costs nothing for the buyer, but the seller will lose 2.95% of the sale to Paypal fees. Paypal offers some protection for both buyer and seller in the event of fraud.
- Ask for photos of the pump. Check to make sure the serial number of the pump on the backside matches the serial number of the pump showing in the display menu. Ask for a short video of the pump, or at least a photo of the pump turned on, so that you can see the pump’s firmware and model number. Cracks and some wear on these pumps is expected...these pumps are not usually free of any marks. Many people are successfully looping on pumps that have cracks and rub marks...but you may want to ask if you are concerned about any you see.
- Ask for shipping that includes a tracking number. USPS Priority Mail’s smallest box is a great option. It’s only $7.15 and includes tracking. Ask the seller to add a small bit of packing protection such as bubble wrap around the pump to keep it safe during shipping. Make sure you get a tracking number within a reasonable period of time after you have paid.
Red flags that may indicate a scam:
- Asking for payment through “friends and family” on Paypal, especially if you don’t know the person or have any solid references for them. Paying in that way offers you no buyer protection. It’s just like giving the seller cash, so you had better trust the seller.
- Offering an “almost new” pump is a big red flag. These pumps should be at least 5 years old by now. Do you really think a 5 year old pump should be unused and sitting in shrink wrap at this point? Seems highly suspicious.
- Not able to provide new pictures of the pump when requested. Sure they posted some pictures with the ad, but what if they just downloaded them from other people’s ads? The seller should be able to furnish a couple “new” photos are your request. A good one to ask for is the battery and reservoir tops so you can see the condition of those.
Word of warning: Pump repairs rendering pumps useless for looping
If you need to send your pump away to Medtronic for repair, be aware that during the repair process the firmware will get upgraded. This makes your pump not usable for looping. Ask the community if you run into a pump error - the community has tips for solving several common pump errors.
Tips for longer battery life
If you are new to looping, one of the first things you will notice is that you will go through batteries very quickly. Even known good alkaline batteries may only last a few days of 24/7 looping. Many OpenAPS users recommend Energizer Ultimate Lithium batteries. These should last a week or more. Just ensure you use the correct settings if you are using NightScout - see here for details about alert settings in Nightscout for the different battery types
Information about compatible CGMs
OpenAPS currently primarily supports three different CGM systems:
- the Dexcom G4 Platinum system (with or without the Share functionality),
- the Dexcom G5 system
- the Dexcom G6 system (online connectivity only, for now)
- the Medtronic system (MiniMed Paradigm REAL-Time Revel or Enlite),
- and other CGM or CGM-like devices (Abbott’s FreeStyle Libre) if the data is uploaded to Nightscout and the OpenAPS rig has Internet connectivity.
With Dexcom G4, the Share platform is not required; but is valuable for uploading BG data to the cloud (and into Nightscout, which can then send BGs to the rig). However, without Share, a G4 receiver can instead be plugged in directly to the OpenAPS rig. For Dexcom G5 Mobile you can also use a compatible receiver (software upgraded G4 with Share receiver or a G5 Mobile Receiver), or also pull data from the Dexcom Share servers into Nightscout for use with an Internet-connected OpenAPS rig.
NOTE: You can also pull CGM data from Nightscout as an alternative (including Dexcom G5 to iOS device + Nightscout Bridge plugin), or use xDrip (see below). The Medtronic CGM system communicates directly with the associated pump, so that data can be retrieved using the CareLink USB stick. The Medtronic Minimed 530g Pump’s Enlite CGM Sensors CAN be used with the older OpenAPS compatible Medtronic Pumps (Despite that pump originally being offered with SoftSensor CGM Sensors).
Using the Dexcom receiver CGM
This refers to the Dexcom receiver hardware. Note that your Dexcom should be nearly fully charged before plugging it in to a Raspberry Pi or Edison-based OpenAPS rigs. If, when you plug in your receiver, it causes your WiFi dongle to stop blinking, that is a sign that it is drawing too much power and needs to be charged. Once the receiver is fully charged, it will stay charged when connected to the rig.
Pulling CGM data from the cloud
Your OpenAPS implementation can also pull CGM data from a Nightscout site in addition to pulling from the CGM directly. You can find more documentation about pulling CGM data from a Nightscout site here.
- If you have an Android phone, you can use the xDrip app to get your data from the Dexcom to Nightscout, to then be used in OpenAPS.
- If you have a Share receiver follow these directions to set up your Android uploader and Nightscout website.
- You could also build a DIY receiver. Directions to build the receiver, set up your uploader and Nightscout can be found here.
- You can also use part of the DIY receiver set up - the wixel – directly to the Raspberry Pi. Learn more about the wixel setup here and here.
- If you are using Abbott Freestyle Libre in combination with Sony SmartWatch 3 and xdrip+ (or possibly other combinations of technology to get Libre data up into the cloud), you can also pull CGM data directly from Nightscout.
Using the Medtronic CGM
As the Medtronic pump collects data directly from the Enlite sensors, OpenAPS will retrieve CGM data in addition to your regular pump data from your pump. While you use the same OpenAPS commands to get it, the Medtronic CGM data may need a little special formatting after being retrieved. If so, it will be specified in other areas of the documentation.
Your rig hardware options
You have two main options for hardware:
- The most recommended rig has been an Edison + Explorer Board. Unfortunately Intel stopped making the Edison boards as of 2018. If you can find an Intel Edison (eBay, local stores, etc - this is still very possible), this is still a highly recommmended rig. It is the smallest rig (and easily portable), with better battery life because it is power efficient. Go here for the list of hardware and setup instructions for Edison setups.
- The other option is a Raspberry Pi-based setup, with the new Explorer HAT. This rig setup makes it easier to see information when offline because it has an onboard screen for displaying readouts. Go here for hardware required and setup instructions for Pi/HAT setups. There is also an experimental alternative to an Explorer HAT, RFM69HCW, which can serve as the radio on a Pi-based rig, but will not have the screen, and requires you to solder.
What happens if you have multiple rigs?
If you have multiple OpenAPS rigs, they’re built to be polite to each other. Even if you had two or more rigs in same room, they won’t trip each other up. They “wait for silence” before issuing any commands to the pump. By having multiple rigs throughout a house, you can move from room-to-room without carrying rigs because the rigs will pass-off comms as you moves in and out of the rig’s range. Stationary rigs will not need LiPo batteries and can be plugged directly into a wall charger from the Explorer board.
Just like multiple Edison rigs play well together, an Edison and a Pi rig can also work fine side by side. As always, best practice is to make sure they’re in the same feature set - don’t have one type of rig using SMB’s if the other hardware has an old code version that isn’t aware of SMB’s.
Intel Edison-based setups
Parts you’ll need
The high level parts list (see below for more details, and links):
- Explorer Board Block
- Edison
- Nuts and Bolts to attach the Edison to the Explorer Board Block
- At least one Lithium battery
- 2 USB cables
Explorer Board Block
The recommended board to use is the Explorer Board Block, which was co-designed by this community. It also has the benefits of a built-in radio. It’s only available from Hamshield/Enhanced Radio Devices.
Edison
There are 4 types of Edison’s. All of them work, but Versions 3 and 4 require an extra antenna, so 1 and 2 are preferred (1-EDI2.LPON, 2-EDI2.SPON, 3-EDI2.LPOF, and 4-EDI2.SPOF). If the seller does not specify the Edison model/version, you can see from the picture whether or not it has a white ceramic antenna in the corner. If it does not, then it will require an external antenna, but that version is fairly rare.
- Option 1 - Buy it from places like Ebay, Craiglist, or your nearest store - and follow the instructions to flash it.
- You may need to hunt for an Edison as supplies of them are dwindling - if you get it as part of a “kit” (e.g. breakoutboard + Edison), keep in mind you’ll still need to get the Explorer Board Block from Hamshield.
- Note: If you are doing Option 1 (an Edison from wherever you can find it) - you are getting an UNFLASHED Edison. Not a big deal - flashing it with jubilinux is just a few more steps (~15 minutes) - but remember you’ll need to start with the flashing instructions.
- Option 2 - (previously buy an Edison that is already flashed with jublinux when supplies were available. If you get a pre-flashed Edison, you can start with step 2.
Lithium-ion polymer (LiPo) battery or other battery supply
The Explorer Boards have battery charger circuitry on board, making it easy to use a LiPo battery.
- The example setup uses a 2000mah LiPo battery; also Lithium Ion Battery - 3.7v 2000mAh or Adafruit Battery Packs Lithium Ion Battery 3.7v 2000mAh are similar options. A 2000 mAh LiPo will get you about 12-14 hours of use, assuming you have the standard setup (which is what you get following these docs) running. Many people prefer a higher capacity battery to get a full day from the rig (such as Adafruit Lithium Ion Polymer Battery - 3.7v 2500mAh (PRODUCT ID: 328) and the Adafruit Lithium Ion Cylindrical Battery - 3.7v 2200mAh (PRODUCT ID: 1781)). This battery uses a 2mm 2 pin JST connector to match the Explorer boards’ power plugs.
- For people in the UK, you may find you have to shop around to find the correct battery, as shipping restrictions appears to have reduced the supply somewhat. Pimoroni appear to stock the same Adafruit 2000mAh battery as mentioned above. Another source looks to be Cool Components, but you may find shipping costs expensive. CAUTION: RS Online sell a similar battery, but unfortunately it comes with the wrong JST connector (it comes with a 2.5mm JST XHP-2, and you need a 2mm JST PH). It is possible, however, to buy the right connectors and fit them yourself (numerous ‘how to’ videos on YouTube).
- For people in Australia you can find 2000mAh, 2200mAh and 2500mAh batteries from Little bird electronics, prices are very competitive and shipping is quick. These are the same Adafruit batteries that can be obtained from the US above.
Note: It’s best to buy from a reputable supplier, because if the internal two cells are mismatched the Explorer board cannot charge them separately and they are prone to catching fire. Make sure that it includes a protection circuit to protect over-discharge. NEVER connect the battery to an Explorer board the wrong way round. There is no manufacturing standard so never assume correct polarity. The connector JP1 on the Explorer Block has two terminals. The left side is positive, the right side is negative. The side with the JP1 label is the positive side. Typically a battery’s red wire is the positive wire. Ideally you want a battery that has a 10k ohm thermistor for temperature protection by the Edison too.
You can also use any charger with a USB plug, including a wall power charger. The Explorer boards have pass through charging, so this is also how you will charge the LiPo battery.
Battery safety and care
You should monitor the rig periodically - especially the LiPo battery, checking for swelling or damage. Immediately discontinue use of any battery that shows sign of swelling or damage.
LiPo batteries are great for a lot of things, but taking damage is not one of them. Please treat LiPo batteries with care. Keep them protected from puncture. The Explorer board has some “pointy” parts on the underside, so providing some protection from the board’s squish is a good idea. A small piece of protection (such as a business card or non-conductive thin foam sheet) will help protect the battery from the board above it.
Since there is some warmth with an OpenAPS rig, it is also not recommended to put a rig unprotected in a pocket close to the body. The LiPo battery can become warped from the heat or bent from being in the pocket and potentially compromised. A durable case or waist-belt pouch is a good idea (see here for both hard and soft case ideas).
The connections between the LiPo battery and its red and black wires are fragile and can break easily. Consider taping the wires to the battery with electrical tape as described in SparkFun’s LiPo battery care tutorial. (See the Reinforcing the Power Cables section.) This will stabilize the wires and relieve tension on the connections.
Radio stick (only if not using Explorer board)
We recommend an Explorer Board with a built-in radio (see above), because if you get an Explorer Board, you don’t need an additional radio stick or CC-Debugger.
If you don’t use an Explorer board, you can use a number of radio sticks: a TI-USB-Sticks, running subg_rfspy; Wireless Things ERF; Wireless Things Slice of Radio a Slice of Radio; or a Rileylink. For details about setup with these other stick and board options, the best instructions will be found in the mmeowlink wiki for setting up your board and stick. Note you may also need a CC debugger for these, and also note that it will be more work as the documentation is designed for the Edison/Explorer Board setup as the easiest path forward.
USB Cables
You will need two DATA micro USB cables - with a micro connector on one end and a standard (Type A) connector on the other. Most cables will work fine, but some prefer to select lengths. You may already have one for charging a Dexcom receiver, or an Android phone, lying around at home. If you don’t, here are examples of ones that will work:
- Monoprice Premium USB to Micro USB Charge, Sync Cable - 3ft.
- 3 ft long cable, USB-microB - link
- 6 inch long cable, USB-microB - link
Warning: bad cables cause a lot of headaches during the Edison flashing process, so it may be worth verifying before you start if you have good cables that can transfer data.
Optional: Micro USB to Micro USB OTG Cable for offline looping
You may want to connect your Dexcom receiver (G4 or non-touchscreen G5) to your Explorer Block for offline looping. For this you will need to use a micro USB to micro USB OTG cable (or an OTG adapter). Here is an example of a cable that will work: BestGameSetups Micro USB to Micro USB OTG (On-The-Go) 12” (30cm) Data Cable.
Optional: antenna to increase pump - rig range
The easiest way to increase the range of your rig is to purchase a “wire whip” antenna to add to your rig. Here is one available at Mouser (915MHz only) or for 866/868 MHz also availabe at Mouser. You can buy one at Enhanced Radio Devices as well. You may consider ordering this along with your Explorer Board, or you can wait and see how happy you are with the range without it.
Nuts and Bolts
You will likely want to screw your Edison onto the Explorer Block to stabilize the rig. You will need two M2 screws, two M2 nuts, and two spacers or standoffs to support the 3mm between the Edison and Explorer Board. The Explorer Board is currently being shipped with M2 screws, 3mm spacers, and M2 nuts, but you may want spares (or may have gotten it used). Here are some examples of options:
- M2 cap screws.
- M3 nuts to use as spacers - if using these, or another 3mm spacer option, your M2 screws should be just long enough to fit through the spacers and screw into the M2 nuts on the other side. You can also use a stack of washers or some 3mm nylon spacers.
- M2 nuts
(Note: Sparkfun has discontinued its kits of hardware specifically for the Edison, but for reference here are the specs for the Sparkfun Intel Edison Hardware Pack.)
Cases
You can use a variety of cases, either soft or hard. Make sure to check the case design to make sure it will support your preferred rig setup and battery size/type. Also, be careful with inserting your rig into some 3D-printed cases so you do not harm the board and/or the battery.
Soft Cases
- TallyGear soft case - these are the soft cases Dana uses (see this example). The OpenAPS-sized case can be made any any pattern/fabric she uses elsewhere on the site.
- Custom soft case from Tallygear with a neoprene divider between battery and rig compartments
- JD Burrows SD card case - this is a hard / soft case which fits the rig with a 2500mAh battery perfectly, can also fit a spare AAA pump battery (Australia)
Hard cases
Warning: be careful if you select a hard case. Some may be designed for a certain size/shape battery; and attempting to jam a rig in may harm the board and/or the battery.
Also: a hard case may make you less likely to look at your rig directly. You should monitor the rig periodically - especially the battery, checking for swelling or damage. Immediately discontinue use of any battery that shows sign of swelling or damage.
Generic hard cases:
- RadioShack Project Enclosure (3x2x1 inch)
- Small clear plastic case perfect for larger Sparkfun 2000 mAh battery: #8483
- Small Plastic Clear Case for 2500 mAh battery - Since a Tic-Tac box is too small for the 2500 mAh battery.
Cases for Edison plus battery:
- Ken Stack’s 3D design for a case with the battery next to the board
- Rob Kresha’s design with the battery compartment stacked on-top of the board compartment
- Gustavo’s 3D design
- Sulka Haro’s 3D design
- tazitoo’s 3D design: CAD (or STL for 3D printing)
- danimaniac’s Protective Cases & Accessories
- Luis’s ventilated acrylic simple design
- Robert Silvers and Eric Burt’s case for Explorer and 2500 mAh battery
- Robert Silvers’ case for Explorer and 2000 or 2500 mAh battery
- tynbendad’s case for 18650 battery
Cases for Edison plus G4 receiver:
Other non-case protection options
Building and understanding your Edison-based rig
Putting the Edison and Explorer Board together
The Explorer board is where all the communications are housed for the rig, as well as the battery charger. The Edison is the mini-computer where all the OpenAPS code will be sent and used. In order for this to work, first you have to screw and connect the Edison and Explorer Board together with the nuts and bolts.
The nuts and bolts are tiny, and the spaces are a little tight. I find it really helps to use a set of tweezers and a small Phillips head screwdriver.
It’s easiest to start with the Explorer board and put on 2 nuts and gold screws (nuts on the side with most of the wiring) inside the little outline where the Edison will eventually sit. Gold screws should be placed as shown, with nuts on the backside. Then, lay the Edison board on top, aligning the screw holes. Use a small Phillips head screwdriver to tighten the screws into the gold screws beneath them. The Edison board should not wobble, and should feel secure when you are done. Attach your battery into the explorer board plug. A single red light should appear and stay lit. During the course of your OpenAPS rig use, it’s good practice to periodically check that the nuts and screws stay tightened. If they come loose, the Edison can wobble off the connection to the Explorer board and you will either get looping failures (if it’s loose) or be unable to connect to the Edison (if it comes completely off).

Optional: adding an antenna
If you are adding a wire whip antenna to improve the range of your rig, it simply clips on to the Explorer Board. The picture below shows the antenna clipped on and extended from the board; but you can experiment with wrapping the antenna around your rig to fit in your preferred case to see various impacts to the range.

Where is the power button?
The little black button on the end of the board near the JST connector is the power button. If you want to reboot your rig, the easiest way is to hold down the tiny power button for 10-15 seconds until the power light turns off. Wait a couple seconds and then press and hold the power button again until the light turns back on. Give the loop a couple minutes to get itself going again. Rebooting solves a majority of rig issues.
Where is the radio?
The radio and antenna are down on the end of the Explorer board where you see a little white stick (opposite end of the board from where your battery connects at the JST connector).
What the lights mean and where they are
- The LED between the two ports is the power. If this light is on, your rig is on.
- The LED in the corner is the charging indictator.
- The two next to the microUSBs (one green on the latest boards) are for the cc1110 radio chip. By default they just blink once each when you mmtune or otherwise reset it.
Charging the LiPo Battery
You can use the little white block that comes with an iPhone (or similar charger) and a microB-USB cable. The same cables you used to setup the rig and connect to the computer will work for charging, too. Either one of the USB ports on the Explorer board will work for charging. When charging is active, there is an extra red light on in the corner of the Explorer board. When charging is complete, that corner red light will turn off. It may come back on periodically as the battery “tops off”. You won’t do any damage leaving the rig plugged in for longer than the charge takes.
While the rig is plugged in for charging, the Nightscout battery pill will read approximately 65%. This is because it is reading the charging voltage rather than the battery voltage. Once you disconnect from the charger, the Nightscout battery pill will display the LiPo battery’s voltage and percent again.
Optional: increasing range for North American pumps by cutting radio trace
Another option to increase the range of your rig is to tune the existing on-board antenna by cutting it. The antenna on the Explorer Block is a hidden strip of copper underneath the green outer coating.
The antenna is labeled A1. It will have its maximum power at 868 MHz. The antenna has a line across it at one point with a label that says “915”. The antenna defaults to the 868 MHz range, which is what WW pumps use.
If you have a US pump, mmtune will run and tune to something near 916MHz. Even with the 868 MHz antenna, you should get half a dozen feet or more of range on average. If you want to boost the range of your antenna by a couple more feet, then you cut through the outer coating and the copper on that line. For North American (NA) or Canadian/Australian (CA) pumps (using the 916MHz band), you’re looking to cut near the white line that is between the 1 and the 5 in the “915.” Consider cutting on the 1-side rather than the exact spot where the white “cut” line is drawn because it is so close to the corner where the rest of the copper wire goes.

Before doing this, remember to disconnect any attached battery or power source. To make the cut, use a sharp x-acto blade to cut through the copper just beneath the green surface of board. It will take a few swipes and you’ll hear a small scraping noise when you get through the wire. Make sure you’ve cut all the way through the wire to the green circuit board material on the other side. A single clean cut is sufficient, but if the cut doesn’t look clean you could make two cuts and then dig out the circumscribed piece and then reseal the copper with nail polish. With that cut, the antenna will have maximum power near 915 MHz.
Watch this video for an example.
If you’re unsure whether you need to cut your Explorer Block’s antenna, you probably don’t. And if you decide you need slightly more range after using the Edison+Explorer rig for a few weeks, you can always come back later and do so then.
Pi-based setups with the Explorer HAT
Parts you’ll need
Summary of what you need for a Pi/HAT rig:
HAT:
As of April 2018, there is be a Pi+HAT rig as an option for closing the loop with OpenAPS. The HAT can be ordered from the same place that makes the Explorer Board (click here). We call it the “Explorer HAT”, to differentiate from the Explorer “Board” that goes with the Edison (see below).

PI
You also need a Raspberry Pi. Many users are opting for the “Raspberry Pi Zero WH” - with headers - so you don’t have to solder, and can simply add the HAT onto the Pi. See this PiZeroWH from Adafruit, or from other sellers around the world
As an alternative, you can also use the HAT with a Raspberry Pi 3.
Battery
Lipo batteries are typically used to power the rig on the go because they charge quickly and come in a variety of compact sizes. When choosing a battery, you have a trade-off between a larger battery with longer duration or a smaller battery with shorter duration that is easier to carry around. A 2000 mah battery is roughly the size of the Raspberry Pi0, and can last around 4 hours. You’ll want a “1S” type, which uses a single cell and outputs at 3.7 VDC. It needs a JST connector to plug into the Raspberry Pi. See this battery from HobbyKing.
If you will need to run longer than that while unplugged from wall power, consider a portable charger. These are in widespread use for cell phones and commonly available in a large number of sizes. Here is an example portable charger from Amazon. Using a USB to micro-USB adapter you can power the rig from the portable charger by plugging the charger into the Power port, which is the micro-USB port nearest the corner of the Pi0.
Note: You will probably want to underclock your Raspberry Pi to get a longer battery life. See this for details.
SD card
An 8 GB SD card should provide plenty of space for the linux operating system, OpenAPS code and storage for log files. The ability to use larger and removable storage is one of the advantages of the Raspberry Pi. You can get a MicroSD card and adapter from Adafruit when you order your Pi and Hat. Or you can get an equivalent 8 GB SD card from Amazon or other sellers.
Note about Pi+HAT cases
Because we are still optimizing the software to be as power-efficient as possible, we have not narrowed down on the best recommended battery. You may want to use a soft case for ease of access to the components, flexible arrangement and the ability to use a variety of battery sizes. If you are using the 2000 mah battery above, you can use this 3d printed hard case to protect the rig and battery in a relatively compact package. The design is built in OnShape, which has a free access level subscription for public domain documents. You can make a copy and tweak the design to your liking.
Putting together and using your Pi/HAT rig
If you chose a “Pi Zero WH” (with headers), you will place the HAT on the Pi.
LEDs
The Pi HAT offers 4 LEDs labeled with D1-D4. D1 is the charging LED and works as described above. D2 is the battery low indicator. It turns orange when the LiPo battery voltage goes below 3.6 V or when the rig is plugged and the battery switch is on OFF. D3 and D4 are connected to the CC1110 radio processor and are controlled by the subg_rfspy radio firmware while resetting the radio. That happens repeatedly during wait-for-silence.
Charging
The rig can be charged via microUSB. Like an Edison rig, you can use a single cell (1s) lipo battery or similar; or use wall power.
Note: the charging LED on the board is not working currently (unless you remove the Q3 transistor). Currently, it’s basically just a “plugged into the wall” indicator. The only side effect of removing Q3 is on the binary charging signal to the Pi (which doesn’t work anyway, and we’ve not tried to use). The voltage monitoring should work fine either way, but while the rig is charging will report 4.2V (“fully charged”) any time the battery is more than about 50% charged. So to be sure if it’s charged you should unplug the rig.
2nd Note: make sure the battery plug is switched to ON while the rig is plugged. Otherwise the battery won’t charge.
Building and using your Pi/HAT rig
If you chose a “Pi Zero WH” (with headers), you will place the HAT on the Pi.
Charging and power
The rig can be charged via microUSB. Like an Edison rig, you can use a single cell (1s) lipo battery or similar; or use wall power.
Note: the charging LED on the board is not working currently (unless you remove the Q3 transistor). Currently, it’s basically just a “plugged into the wall” indicator. The only side effect of removing Q3 is on the binary charging signal to the Pi (which doesn’t work anyway, and we’ve not tried to use). The voltage monitoring should work fine either way, but while the rig is charging will report 4.2V (“fully charged”) any time the battery is more than about 50% charged. So to be sure if it’s charged you should unplug the rig.
2nd Note: make sure the battery plug is switched to ON while the rig is plugged. Otherwise the battery won’t charge.
LEDs
The Pi HAT offers 4 LEDs labeled with D1-D4. D1 is the charging LED and works as described above. D2 is the battery low indicator. It turns orange when the LiPo battery voltage goes below 3.6 V or when the rig is plugged and the battery switch is on OFF. D3 and D4 are connected to the CC1110 radio processor and are controlled by the subg_rfspy radio firmware while resetting the radio. That happens repeatedly during wait-for-silence.
Pi-based setups with RFM69HCW (experimental)
The Pi + RFM69HCW is still experimental!
If you are a maker person or a bit into soldering electronics at least, you may also build your rig with a piece of hardware, that is a lot cheaper than the Explorer HAT, although it does not have the screen. You also won’t have LEDs indicating status, no battery charging and there will not be (m)any 3d printable case models. If it’s your only option because you’re on a budget and can’t afford to spend 150 bucks on a rig, please think about this step twice. This one will cost you only 30, but a lot of extra time.
Click here to expand and see pictures of a rig with a Pi0WH and RFM69HCW::


Here’s a rough-and-ready budget version of a rig put together: contents of a 2000mAh powerbank, a plastic housing, a micro USB cable and some more soldering and hot glue. BE AWARE that this case will most likely overheat the Pi after a while. You need to at least drill some venting holes into the lid.


Summary of what you need:
- Raspberry Pi Zero
- RFM69HCW
- [microSD Card]((<../Gear Up/pi-based-rigs#sd-card))
- Bread board
- Jumper wires
- Soldering iron
- Power source via Micro USB
The Raspberry Pi Zero
For this setup, you want a Raspberry Pi Zero WH. (The “H” means it has Header pins). (Also, a regular Raspberry Pi 3 model B works fine.)
RFM69HCW
You can buy this board e.g. here, but you can really buy it wherever you want. These boards are, like the RPi Zero, very common. Just make sure you get the right frequency. 868/915 MHz is correct. All others are wrong.
Breadboard
Any breadboard will do, no special requirements.
Soldering
You need to solder the pin stripe into the RFM69HCW. Insert the pin stripe from the bottom of the board, with the short endings reaching through the holes. Fixate a bit, so you can rest the soldering iron tip on the pins and the board.
Solder the included pin stripe diligently into the 9 holes named VIN GND EN G0 SCK MISO MOSI CS RST
Cut an antenna at your preferred length corresponding to your frequency. This can be a simple piece of isolated, unshielded wire. (I simply took one of the jumper wires for my first try.) Calculate your length here: https://m0ukd.com/calculators/quarter-wave-ground-plane-antenna-calculator/ and just use the value from A (first green box). This should be the length of your antenna, from the soldering point on the board to the tip.
Solder it to the board. It’s the hole near the “o” from Radio. Make sure to not connect the soldering to the ground plates left and right from the hole. This antenna is really only connected to the one hole.
This is your connection scheme for the RPi to RFM69HCW. Stick the RFM69HCW on a bread board, and connect:
Board | Connect | Connect | Connect | Connect | Connect | Connect | Connect | Connect ——|——|——|——|——|——|——|——|—— RPi | 3.3V | GND | MOSI | MISO | SCLK | | CEO_N || RPi PIN | 17 | 25 | 19 | 21 | 23 | 16 | 24 | 18 RFM69HCW | VIN or 3.3V | GND | MOSI | MISO | SCK or CLK | G0 or DIO0 | CS or NSS | RST or RESET

Here is a copy of a a sophisticated schematic. (Press “miniloop v1.0” to see the diagram).
After that, you’re ready to install OpenAPS.
Visualization and Monitoring using Nightscout
Nightscout Introduction
Nightscout (NS) is an open source, DIY project that allows real-time access to CGM data via a personal website, smartwatch viewers, or apps and widgets available for smartphones. Setting up a Nightscout web app is the recommended way to visualize your OpenAPS closed loop. It is required in order to run autotune (highly recommended), which in turn is required if you want to use (e)SMB (an advanced feature of OpenAPS).
Nightscout allows a user to upload CGM data from a variety of sources to an online database and cloud computing service. The information is then processed and displayed visually as a graph. There are plugins that allow more information to be shown about OpenAPS, too. As the data is uploaded to an online website and then retrieved by OpenAPS, it allows OpenAPS a wider range of compatibility with various CGM solutions.
Nightscout is the recommended way to visualize your OpenAPS closed loop.
Even if you don’t choose to share your Nightscout site with another person, it will be helpful for you to visualize what the loop is doing; what it’s been doing; plus generate helpful reports for understanding your data, customized watchfaces with your OpenAPS data, and integration with IFTTT. You can read more about latest Nightscout features here
If you already have a Nightscout site, still review the directions below to change your config variables to prepare for using OpenAPS! See Using your Nightscout site for important details about how to display and interpret OpenAPS-related information.
How Nightscout and OpenAPS work together
OpenAPS is designed to work closely with Nightscout.
What information is passed from rig to NS?
The rig uploads the following information to NS:
- Assuming pump communications are good, the rig will read information from the pump as follows:
- boluses and carbs; entered through either the pump bolus wizard or the easy bolus button
- current temp basal rate and duration/time set
- pump status; bolusing or suspended, reservoir volume, pump battery voltage
- pump notes; time changes, profile changes, battery changes, alarms (these show as grey dots on NS site)
- if a MDT enlite user, BGs will be read directly from the pump
- From OpenAPS looping, the additional information is also uploaded:
- determine-basal information (such as IOB, COB, temp basal enacted, etc) goes to fill out the OpenAPS pill in NS
- rig battery voltage and estimated %
- If (1) a dexcom receiver is connected to the rig and (2) the loop is setup with G4-upload as the CGM type and (3) the rig has internet, then the rig will also upload BGs and/or rawBG directly to NS. This keeps the loop functional even if the Share app fails. For example, if the phone battery dies during the night, and Share App therefore goes down...the rig can read BGs/rawBGs directly from the receiver and use your home wifi to upload to NS still.
What information is passed from NS to rig?
The careportal “treatment” entries and BG data are the two most important items transmitted from NS to the rig.
- Careportal entries transmitted and USED by the loop are:
- carb entries - these are taken into account by OpenAPS to predict your blood glucose curve
- temp BG targets - you can set a “temporary target” from Nightscout which will be used by OpenAPS
- BG values from Dexcom share servers via the NS bridge
Note that insulin logged on Nightscout but not read from the pump (e.g., an injection logged) is not directly used by the loop.
Troubleshooting Nightscout issues
Please see the Nightscout troubleshooting page if you experience problems with the setup process or with communications with Nightscout.
Nightscout Setup with Heroku
- If you plan to use Nightscout with OpenAPS, we recommend using Heroku, as OpenAPS can reach the usage limits of the free Azure plan and cause it to shut down for hours or days. If you end up needing a paid tier, the $7/mo Heroku plan is also much cheaper than the first paid tier of Azure. Currently, the only added benefit to choosing the $7/mo Heroku plan vs the free Heroku plan is a section showing site use metrics for performance (such as response time). This has limited benefit to the average OpenAPS user. In short, Heroku is the free and OpenAPS-friendly option for NS hosting.
- Create an account at Heroku and choose the Primary Development Language to be Node.js when you create your account. You’re going to use a free account, but you will still need to enter credit card information for your account setup before the app will deploy. You’ll need to confirm your Heroku account by clicking a link sent via email.

- Create an account at GitHub
Note: If you already have an existing GitHub account and NS site, you may just need to update your repository by doing a Compare in GitHub. Use https://github.com/yourgithubname/cgm-remote-monitor/compare/master...nightscout:master and replace “yourgithubname” with your GitHub name. Click the big green Create pull request button. Another screen will appear, fill in a title and click button to create the pull request, and then you can Merge pull request, and finally Confirm merge. That process updates your Nightscout repository in GitHub. Once updated, you can skip the “click the Fork Button” step below and start following along with the purple Deploy to Heroku button step from your updated Nightscout cgm-remote-monitor repository.
- Go to the Nightscout cgm-remote-monitor repository
- Click the
Forkbutton in the upper right corner

- Where it says
Branch: master(to the far-left of the green “Clone or download” button), click on it and choosedev. This button should then sayBranch: dev. - Scroll down until you see the purple
Deploy to Herokubutton. Click that button.

- Give your app a name, this will be the prefix of your NS site’s URL. For example,
https://yourappname.herokuapp.com - Fill out the information lines in the
Config VariablesSection of that page. Some of the lines can stay with the default entries already provided.
Click here to expand the list of the
Config Variables you need to enter:
| KEY | VALUE |
|---|---|
| API_SECRET | Create your own API_SECRET. This is like the password to your NS site. Please write it down somewhere safe or commit it to memory, you will be using it in the future. It needs to be at least 12 characters long and should NOT use the `@` or `&` symbols. |
| AUTH_DEFAULT_ROLES | When `readable`, anyone can view Nightscout without a token. Setting it to `denied` will require authentication. Setting it to `denied` requires oref 0.5.0-dev. |
| DISPLAY_UNITS | enter either mg/dl or mmol |
| ENABLE | bridge openaps pump iob basal careportal sage cage maker(Enter all of the words without commas. Just a single space between each word. Make sure autocorrect does not add space between careportal. **Notice we are not including cob here.** If you are use Lookout or Logger, add xdrip-js to enable the CGM status pill If you have other plugins that you would like to enable, please add them here.) |
| DISABLE | Leave blank |
| ALARM_TYPES | simple |
| BG_HIGH | Enter the numeric value of BG you’d like as an urgent high alarm. (Note: For users outside the US, this needs to be set in mgdl. Take your desired mmol number and multiply it by 18). |
| BG_TARGET_TOP | Enter the numeric value of the top of your target BG.(Note: For users outside the US, this needs to be set in mgdl. Take your desired mmol number and multiply it by 18). |
| BG_TARGET_BOTTOM | Enter the numeric value of the bottom of your target BG.(Note: For users outside the US, this needs to be set in mgdl. Take your desired mmol number and multiply it by 18). |
| BG_LOW | Enter the numeric value of the BG you’d like as an urgent low alarm.(Note: For users outside the US, this needs to be set in mgdl. Take your desired mmol number and multiply it by 18). |
| PUSHOVER lines | Can be left blank for now. If you decide to use Pushover later, you can come back and add your info to these lines. |
| CUSTOM_TITLE | This will be the text displayed in the upper left part of the NS website. |
| THEME | change from default to colors |
| BRIDGE_USER_NAME | Enter your Dexcom Share Account login name. This should be the same account name used in the Share2 or G5 Mobile app. |
| BRIDGE_PASSWORD | Enter your Dexcom Share Account password. |
| BRIDGE_MAX_COUNT | Default value is 1. Setting this to 7 will update the last 35 minutes of data. |
The remaining variables can be left at their default values.
Note: for BRIDGE_MAX_COUNT: This value sets the number of BG values to pull from Share per update. Each Dexcom BG value represent 5 minutes. Nightscout defaults to BRIDGE_MAX_COUNT=1. If you lose connectivity with your Dexcom transmitter, your Share app will automatically backfill data points when you regain connectivity. Nightscount does not do this and you will have gaps in the data for when you were out of range. More information here.
You can change the BRIDGE_MAX_COUNT value to pull more samples per query, which will backfill BRIDGE_MAX_COUNT values for you. This change increases your data usage and may affect your Nightscout billing tier. Setting BRIDGE_MAX_COUNT to 7 will update the previous 35 minutes of data and will keep OpenAPS up to date on your current BG trends. If you frequently have larger data gaps and you use autotune, you may consider increasing this number more to backfill data more aggressively.
- Click the purple
Deploybutton at the bottom of screen.

- Wait a little bit while Heroku builds your NS app. You’ll see some text scroll by in the Build App box, and then finally, you will have a message that the NS app was successfully deployed. If the app fails to deploy, it may be that you have not added your credit card information to your account yet. Go add that information in your account billing section, and then come back and press the deploy button again. Don’t worry, your account is still free unless you choose otherwise. The credit card simply gives you added dyno hours on your free account (win-win).

- You can verify your site’s successful build by clicking
View(you should see black site with a profile warning). You will be redirected to a profile set-up page. (If it doesn’t redirect automatically, refresh your webpage).

You do not have to enter all the information in the profile if you are using OpenAPS (since OpenAPS will be providing the information for IOB and COB rather than letting NS calculate them), but you do have to fill out the Basal Profile and TimeZone at a minimum in order to have your temp basals properly display at first. Click Save when you have entered the information. You will be prompted to authenticate, if it is the first time you’ve used the device to make changes in your profile. Click on the Authenticate link at the bottom of the site, and enter your API_SECRET to complete the authentication.

- Assuming your previous browser tab is still open for “Create a new App | Heroku”, let’s go back to that tab. This time instead of choosing the
Viewoption, we are going to select theManage Appbutton. Then, select theSettingstab near the top of the screen on your Heroku app.

- Click on
Reveal Config Vars. Scroll down the bottom of the Config Vars lines until you find the last blank one. You are going to add several additional lines of config vars for OpenAPS use; the DEVICESTATUS_ADVANCED is a required line, the others just make Nightscout more useful when using OpenAPS.

| KEY | VALUE |
|---|---|
| DEVICESTATUS_ADVANCED | true |
| PUMP_FIELDS | battery reservoir clock status |
| PUMP_RETRO_FIELDS | battery reservoir clock status |
| SHOW_FORECAST | openaps |
| SHOW_PLUGINS | openaps pump iob sage cage careportal |
| PUMP_ENABLE_ALERTS | true |
| PUMP_URGENT_BATT_V | 1.3(This is the pump battery voltage that will trigger a red, urgent alert in NS.) |
| PUMP_URGENT_RES | 10(This is the reservoir volume that will trigger a red, urgent alert in NS.) |
| PUMP_URGENT_CLOCK | 30 |
| OPENAPS_ENABLE_ALERTS | true |
| OPENAPS_FIELDS | status-symbol status-label iob meal-assist rssi |
| OPENAPS_RETRO_FIELDS | status-symbol status-label iob meal-assist rssi |
| OPENAPS_WARN | 20(This is the minutes since OpenAPS last successfully looped. This will be a yellow alert in NS.) |
| OPENAPS_URGENT | 60(Same as the alert above, but will be red in color and have a shorter snooze option.) |
If you are using the Nightscout Bridge to bring in CGM data from Dexcom servers (G4 Share2 app or G5 Mobile app) and are outside the US, you will need to add a setting for BRIDGE_SERVER and set the value to EU.
- Click on
Open Appin the top right corner of your Heroku site.

- Click on the settings (those three horizontal lines in upper right corner). Now check that your basal render is selected to either default or icicle (personal preference for how the temp basals show as blue lines in NS site), check the boxes that you’d like display pills in the SHOW PLUGINS (usually all of them), and then press save.

Battery monitoring
Because running OpenAPS requires frequent communication with your pump, your pump battery tends to drain more quickly than you’d experience when not looping. Some users have had good experiences with Energizer Ultimate Lithium AAA batteries (getting ~1.5weeks) rather than alkaline batteries (getting ~2-3 days). Regardless of whether you use alkaline or lithium, you may want to consider a Nightscout alarm to alert you to when the battery is running low. You can do this by setting (in your Nightscout config vars) PUMP_WARN_BATT_V to 1.39 for lithium batteries or 1.2 or 1.25 for alkaline batteries, and adding battery to your PUMP_FIELDS setting so that voltage is displayed on your Nightscout site. The voltage warning will give you many hours (reportedly ~8+ for lithium and ~6+ for alkaline) heads up that you will need to change your battery.
Note: If you don’t change the battery in time and end up with a “low battery” warning on the pump, the pump will still function, but RF communications will be turned off and you will not be able to loop until you put a new battery in.
Your NIGHTSCOUT site is now all set up. Congrats!
Nightscout Migrations
Switching from API_SECRET to token based authentication for your rig
You can secure your Nightscout and CGM data with token based authentication. This requires Nightscout 0.9 (Grilled Cheese) and oref0 0.5.0 or later.
This has the following advantages:
- You can deny public access to your Nightscout.
- Each rig uses its own security token to authenticate to Nightscout.
- With the old
API_SECRETauthentication all the rigs had all the privileges to your Nightscout (similar to root or Administrator users). - The
API_SECRETmethod for authentication rigs/devices is deprecated in Nightscout, and token based authentication is the preferred way. - In case you lose a rig or it gets stolen you can deny access to Nightscout for that one rig. Otherwise you need to change your API_SECRET and reconfigure all the other rigs.
You can migrate each rig independently from API_SECRET authentication to token based authentication.
If you want to secure your Nightscout and CGM data, then all rigs need to have oref0 version 0.5.0+ and all be configured with token based authentication.
Here are the steps you need to follow - click here to expand the instructions:
Visit https://yourappname.herokuapp.com/admin. Replace “yourappname” with the name you chose for your app above, that is, the prefix of your NS site’s URL.
- Add a new Role
Name:
oref0rigPermissions: Add the following 6 permissions. Note that the default window is too small to see them all after you paste them in.
api:devicestatus:create, api:devicestatus:read, api:entries:create, api:entries:read, api:treatments:create, api:treatments:read

Add a new Subject
Name: the name of your rig (same as the hostname of your rig). You will need to add a new Subject for each rig you run. Note: Nightscout will shorten the name to 10 characters in your accesstoken, e.g.,
myedisonhostnamebecomesmyedisonho-0dccda4ae591e763Roles:
oref0rig
Press Save button.
In the Subject - People, Device etc. view you’ll see the access token for your rig, e.g.,
myrigname-27c914cabc506fa3You need your rig to use the token based authentication. This can be done in three different ways:
Using the
cd && ~/src/oref0/bin/oref0-setup.shinteractive setup. Enter the access token (subjectname and hash of 16 characters, e.g.,myrigname-27c914cabc506fa3) Example of the interactive setup:Are you using Nightscout? If not, press enter. If so, what is your Nightscout host? (i.e. https://mynightscout.herokuapp.com)? https://mynightscout.herokuapp.com Ok, https://mynightscout.herokuapp.com it is. Starting with oref 0.5.0 you can use token based authentication to Nightscout. This makes it possible to deny anonymous access to your Nightscout instance. It's more secure than using your API_SECRET. Do you want to use token based authentication y/[N]? y What Nightscout access token (i.e. subjectname-hashof16characters) do you want to use for this rig? myrigname-27c914cabc506fa3
Using the
oref0-setupororef0-runagain.shcommand line. Use--api-secret=token=myrigname-27c914cabc506fa3. Don’t forget to start withtoken=. During install it will connect to your Nightscout site and check if the permissions are ok. If OK you’ll see this in your log:2017-06-10 19:46:14,758 INFO Nightscout host: https://mynightscout.herokuapp.com 2017-06-10 19:46:14,816 INFO Starting new HTTPS connection (1): mynightscout.herokuapp.com 2017-06-10 19:46:15,911 INFO Succesfully got Nightscout authorization token 2017-06-10 19:46:15,925 INFO All permissions in Nightscout are ok
If it’s not ok it will exit the setup script and tell you which permissions are missing.
Change the token in
ns.ini. It’s the third argument of theargs=line:[device "ns"] fields = oper cmd = nightscout args = ns https://mynightscout.herokuapp.com token=myrigname-27c914cabc506fa3
You must also change your
API_SECRETin your crontab, e.g.API_SECRET=token=myrigname-27c914cabc506fa3. Usecrontab -eto edit your crontab.
Test the rig by running
openaps uploadoropenaps upload-ns-statusor just running the pump loop. You should see the update from myrigname in the OpenAPS pill in Nightscout.When all the rigs are 0.5.0 and are all using token based authentication, you can change the environment variables of your Nightscout:
AUTH_DEFAULT_ROLESfromreadable devicestatus-uploadtodeniedif you wish to block read-only access to your Nightscout instance. If you don’t mind your CGM data being accessible to anyone with your Nightscout URL, you can just leaveAUTH_DEFAULT_ROLESabsent, which will default it to the value ofreadable.
Other notes:
- Just like keeping your pump serial number and API_SECRET for yourself, you should not post your authentication token
myrigname-27c914cabc506fa3on the Internet - The authentication is also stored in your
crontab, asAPI_SECRET=token=myrigname-27c914cabc506fa3. When token based authentication is used the API_SECRET on the rig will always start withtoken=instead of a hash. - You must always secure your Nightscout site with secure http (https). Don’t use http://mynightscout.herokuapp.com but rather always use https://mynightscout.herokuapp.com.
- Once you have token auth enabled, you can stop entering your API_SECRET in your browser when authenticating, and keep your API_SECRET as a root/Administrator password that you only use for configuring Nightscout. Instead, you can set up a user (as in steps 1 and 2 above) with the appropriate role. If you wish to be able to enter treatments into NS, you’ll need to create an account with
careportalaccess and authenticate with that in Nightscout. If you set AUTH_DEFAULT_ROLES todeniedin step 5, you’ll also need a user withreadablepermissions for any browsers that should have read-only access.
Switching from Azure to Heroku
- If you are a current OpenAPS user and want to switch from Azure to Heroku, you will need to change your NS URL in both
ns.iniand incron. Alternatively, you can edit your runagain.sh file and run the setup script again. - If you’d like to seamlessly keep all your old Azure NS data showing in your new Heroku NS site, you’ll need to copy and paste your old
MONGODBstring from your Azure site. Find it in either Application Settings or Connection strings in your Azure control panel and then go to Heroku’sMONGODB_URIline. Replace the content with your copied string from Azure. Double check that your Azure collection used the “entries” name…if it doesn’t, then you will need to update that variable in Heroku to match as well.
Note: It’s a good idea to check your deployment connection in Heroku’s dashboard after your deploy (typically this still needs to be manually connected after initial setup). Go your Deploy tab in your Heroku dashboard, click on the GitHub service, and select your GitHub cgm-remote-monitor repository. You can select the cgm-remote-monitor branch you’d like to deploy at the bottom of the screen. Both master and dev branches work for OpenAPS.

Using your Nightscout site
Understanding the OpenAPS pill
The OpenAPS pill box has four states, based on what happened in the last 15 minutes: Enacted, Looping, Waiting, and Warning:
- Waiting is when OpenAPS is uploading, but hasn’t seen the pump in a while
- Warning is when there hasn’t been a status upload in the last 15 minutes
- Enacted means OpenAPS has recently enacted the pump
- Looping means OpenAPS is running but has not enacted the pump
- Unknown means Error or Timeout; OpenAPS has reported a failure, or has reported no status for many hours.
If you click/tap on the pill, you will see more information about the most recent information used and decisions made by OpenAPS, including calculated IOB and COB; predicted eventual BG; any temp basal set; and any problems such as too-old BG data if your CGM is not working.
A note about Nightscout’s COB Pill
If you have the Advanced Meal Assist (AMA) OpenAPS feature turned on, OpenAPS calculates COB dynamically. To see your COB on your Nightscout web app, look inside the OpenAPS pill. (If it says “undefined”, this means you do NOT have AMA turned on.)
Nightscout, however, has its own COB pill, which decays carbs statically, and it is NOT used in OpenAPS calculations.
- We highly recommend NOT using the Nightscout COB pill. We even recommend removing it from your Nightscout ENABLE web app settings as it causes bugs, and great confusion, because it will do a static decay and/or mess up your Nightscout.
- Note also: Nightscout’s Bolus Wizard Preview (BWP) pill also decays carbs statically.
- To avoid confusion: Turn off all other Nightscout pills that use static COB calculations.
The IOB pill
This pill will normally display the IOB reported by your OpenAPS pill. If your loop is failing or NS communications are down because the rig has gone offline, there’s a good possibility that your IOB pill will be displaying an incorrect IOB based on the careportal’s method of calculating IOB (rather than OpenAPS’s way). You can determine the source of your IOB pill’s information by clicking or hovering on the pill. If the pills says “OpenAPS”, then it’s good to use that data. Additionally, it should report the portion of IOB termed “basal IOB”, which is the IOB from of temp basal adjustments and SMBs, if enabled.
The Basal pill
This pill should NOT be used in your NS site. The information on that pill updates so slowly sometimes, that you may incorrectly jump to assumptions that your rig is behaving differently than it actually is. Instead, use the OpenAPS pill to find current information about your current basal rate...or press the ESC button on your pump in order to directly read the current temp basal. Additionally, the basal rendering (the blue lines of the NS display) can sometimes lag by up to 2-5 minutes, depending on loop activities...so again use the OpenAPS pill or pump if you are interested in the most up-to-date information on temp basals.
How to display basal changes (“render basal”)
- In case you missed it during setup: we recommend that you “render”/display the basal rates (the blue lines to show what temp basals have been enacted, if any.) To do so, select “Default” or “Icicle” from the “Render Basal” pull-down menu in the Settings.
How to automatically sync your profile from Autotune
OpenAPS does not read anything from Nightscout’s profile to use for looping (so original basal rates, ISF, carb ratio, targets, etc. come from the pump) . However, if you like your Nightscout profile to accurately reflect what you are looping with and not be out of date, you can use a helper script to upload your rig’s profile - that includes your Autotune results) to Nightscout.
To upload the active oref0 profile to Nightscout, run the following command on the rig:
cd ~/myopenaps; oref0-upload-profile settings/profile.json $NIGHTSCOUT_HOST $API_SECRET
To synchronize the profile OpenAPS obtained from the pump, run the following command on the rig:
cd ~/myopenaps; oref0-upload-profile settings/pumpprofile.json $NIGHTSCOUT_HOST $API_SECRET
Afterward, your profile will probably look something like this:

How to display OpenAPS purple prediction/forecast lines
- Click the three dots next to your timeframe horizon (2HR, 3HR, 6HR, 12HR, 24HR) and then enable “Show OpenAPS Forecasts”. Don’t see this option? Check and make sure you added this variable and that your OpenAPS has successfully run.
Understanding OpenAPS purple predictions/forecast lines
- There are up to four purple prediction lines that you will see: IOBpredBG; ZTpredBG; UAM; and COBpredBG.

Collect your data and get prepared
Store data - CGM, and ideally carbs and insulin
Before getting started, we ask that you store at least 30 days of CGM data. It is always a good idea to record your data before embarking on a new set of experiments. This will be helpful to understand the effects of the system as well as gain a better understanding of your response to different control strategies.
Nightscout is an excellent tool to capture your CGM history, as well as log your carbs and boluses. Your Nightscout site will (in a typical setup) be the source of CGM data for your OpenAPS rig. For instructions on setting up your own Nightscout site (or updating your existing one for OpenAPS use), see here.
By logging and collecting a recent history of your basal, bolus, carb, and BG patterns, you can also take advantage of the Autotune feature which uses Nightscout databases (see below). You can log carbs and boluses using the Nightscout “careportal,” and tell it about your basal insulin using a “profile.”
If you aren’t using Nightscout, you can upload your Dexcom G4 receiver to Dexcom Studio or if you use Dexcom G5 the data is in the cloud at Dexcom Clarity. If you use a Medtronic CGM, upload your CGM data to CareLink. If you use an Animas Vibe, upload your data to Tidepool or Diasend. We suggest you get in the habit of doing this regularly so that you have ongoing data to show trends in your overall estimated average glucose (eAG, a good indicator in trends in A1c) and variations in your “time in range.”
Later in these docs is a link to donate your data to a project called OpenHumans. There is no requirement to share your data or participate in OpenHumans. If you choose to, you can donate your data whether you are looping or not. Individuals within the project who share their data do so willingly and you should do the same only if you feel comfortable.
Practice good CGM habits
A good quality CGM session is a critical part of successful looping. If you’re used to stretching your sensor sessions out until failure, you may want to reconsider this approach as you will have failed looping times, too. One technique that has helped eliminate early sensor jumpiness in a session is to “presoak” a new sensor before the old one dies when you notice the old sensor is getting jumpy or loses calibration. To read more about this presoak technique, check out this blog post.
In addition, be diligent about your sensor calibration habits. Only calibrate on flat arrows and when BGs are steady. Many loopers calibrate once or twice a day only; at bedtime (after dinner has finished digesting) and/or just before getting out of bed. A good guide to sensor calibration - which generally applies regardless of which sensor you have - can be found here.
Optimize your settings with Autotune
You’ve been logging and recording your carbs and boluses in Nightscout, right? You have your CGM data flowing into Nightscout too? Great... now autotune can give you a head start on fine-tuning your basals and ISF. There are some restrictions on autotune still (only a single daily carb ratio and single daily ISF), but there are tips on the autotune page for how to deal with multiple values. You can run autotune before you get your loop setup - it doesn’t have to run on a rig, it just needs your Nightscout data. The easiest way is to run it on AutotuneWeb.
How important are good basals and ISFs? You mean you weren’t convinced already by the amount of work put into autotune itself? Well, autotune is a required step in order to enable the most advanced features (SMB and UAM). OpenAPS will check to see if you have an autotune directory in your rig before the loop will be allowed to actually enact any SMBs (no matter what your preferences say).
Regardless of if you want to use advanced features later, we highly recommend running autotune as part of the rig nightly, or as a one-off and periodically checking the output to see if the settings on the pump that you are using reflect what the data says your body really needs.
Safety note: your carb ratio is unlikely to vary significantly throughout the course of day. If you have carb ratios that vary significantly (such as more than 2x) between different times of day, you may get unexpected results in looping, such as COB reappearing when the CR schedule changes. For safety, we recommend checking your settings against Autotune, which currently uses a single CR for the entire day. If you are using a schedule with widely varying carb ratios or ISFs, that may be compensating for something other than an actual diurnal variation in carb ratio: perhaps different absorption speeds of different foods, or perhaps related to different macronutrient composition (instead of entering carb equivalents for fat/protein), differing basal insulin needs around mealtime, or something else.
Use your gear
Starting a DIY loop system like OpenAPS means you are probably switching pumps, and quite possibly using Nightscout for the first time. It is worth taking some time to get familiar with your new gear and with using Nightscout ahead of adding your DIY closed loop to the mix!
Starting Medtronic pump
Many of us have come from Animas, OmniPods, Roche, or t:slim pumps in order to pump using old Medtronic pumps. The menus will be different and you need to get proficient with the pump’s normal use before complicating things with looping. Become familiar with the reservoir changes and teach your T1D kid, if that’s the person who will be using the pump. Train care-givers on the new pump, as well. Assuming that you’re already familiar with insulin pumping (and you should be before trying to loop) but new to these old Medtronic pumps, these “quick memu” guides will help:
You should definitely test your basals, ISFs, carb ratios, and DIA all over again now that you’ve switched pumps and infusion sets. If those settings aren’t correct, looping isn’t a good idea.
Pump settings
There are a couple areas in the pump that will need to be set specifically in order to allow OpenAPS to loop. Since you are going to be looping soon, you might as well set them correctly in your pump now:
- Set the Temp Basal type to
units per hournot%type. - Set the carb ratios to grams, not exchange units.
- Set the max basal rate to a reasonable value (typically no more than 3-4 times your regular basal).
- Set basal profile, carb ratios, and ISF values.
- Set your DIA. Note: Most people have their DIA for traditional pumping to be too short (e.g. 2 or 3). For looping, OpenAPS will default to using 5. Many people find they actually need it to be 6 or 7 with properly adjusted other settings.
- ISFs over 250 mg/dl per unit will need a special step in loop setup once your setup script is finished (see [here](<../Build Your Rig/step-4-watching-log#temp-basals-6-3-isf-255-or-carb-ratio-25-with-a-x23-or-x54)), even though the pump currently will allow you to set them higher. Just remember, you will need to run a couple extra commands when you setup your loop.
- If you have periods in the day where your pump normally has basal settings of zero - your loop will not work! You can resolve this by setting the lowest possible basal setting your pump will permit. OpenAPS will then issue temp basals of zero, as needed.
Easy Bolus Button
Setting up the Easy Bolus feature for your pump now (and practicing it) may help you avoid a small, annoying pump error later. If you are going to use the (super advanced, not for beginners) SMB (super microbolus) feature, then you need to be aware of the potential for pump error due to remote bolus commands. When the pump is engaged to bolus with a remote bolus command from the rig and another bolus is initiated from the pump manually, the pump will error out with an A52 error. The pump will not deliver the bolus, the reservoir will rewind and the pump time needs to be reset. Put simply, two bolus commands coming in at once cause the pump to error and rewind.
One way to minimize this error is by checking the pump before giving a bolus. Check to see if the rig is giving a SMB by using the OpenAPS pill in Nightscout, checking the pump-loop log in Papertrail, or logging into the rig and looking at the pump loop. If the rig is actively giving a SMB, then try to time your bolus wizard use to be in the 5 minutes between SMBs (SMBs are only enacted every 5 minutes at most). These steps might be a little too complex for young kids or school nurses, depending on the situation. If this error happens frequently, you may need to consider turning off SMBs or try using the Easy Bolus button.
The Easy Bolus button allows you to quickly use the arrow buttons on your pump to give a set increment of insulin. For example, if you setup your Easy Bolus button to have 0.5 unit increments, every click of the up arrow on the pump will increment a bolus of 0.5 units. Push the button 4 times and you are setting up a 2.0 unit bolus. You still have to click the ACT button twice to confirm and start the delivery of the bolus. Since the button presses are usually pretty quick, there’s less likelihood of radio communication interference with a rig’s SMB command. You can use IFTTT buttons to enter the carbs in your Nightscout site (or use Care Portal in Nightscout directly). For example, having IFTTT buttons for 5, 10, and 20g carb entries (or whatever your common meal amounts are) can make entering in food pretty easy. The Easy Bolus method requires the ability to roughly estimate your meal bolus (e.g., total carbs divided by carb ratio). As long as you are close, the loop should be able to make up any amount of bolus that was slightly over/under done by using the Easy Bolus button.
Extended and Dual Wave substitute
Due to the way Medtronic pumps operate, temp basals can only be set when there is no bolus running, including extended (square) and dual wave boluses. If you’re used to extended or dual wave boluses for carb heavy meals (e.g., pizza), which may still be the optimal approach for you, OpenAPS will not be able to provide temp basals during the extended bolus. You won’t be looping during those types of boluses.
But, you don’t need the square/dual wave boluses anymore, as OpenAPS will help simulate the longer tail insulin needed if you’ve entered carbs into the system. Also, many loopers have found they can convert to a split bolus strategy to effectively deal with the same meals. There is a carb+insulin+BG simulator called Glucodyn that can be used to model a split bolus strategy for those meals. By setting different bolus times and bolus amounts, the model allows the user to slide adjustments to minimize early-meal lows as well as late meal rises. For example, you may find that a 20 minute pre-bolus of 50% of the carbs and a later bolus for the remaining 50% will work well, with looping helping to make up the difference that an extended bolus used to provide. You can practice the transition to split bolusing even before you get your loop running.
Some of the super advanced features you’ll learn about later - Unannounced Meals and Supermicrobolus (UAM/SMBs) - also help smooth the transition from extended bolusing. Some users have found that entering in carbs alone can be effective, especially in helping later BG rises from slow-absorping carbs. Once you get your loop running, and are ready for the advanced features, you may be interested in playing with the various techniques available for heavy, slow carb meals.
Loops In Progress
To get you comfortable with submitting a “PR” (stands for pull request), test it out by submitting a PR to this page, adding your name to the list of people who have loops in progress.
New to Github, and PRs? Check out how to submit your first PR.
List of people who are working on closed loops:
- Dana Lewis
- Ben West
- Chris Hannemann
- Sarah Howard
- Mike Stebbins
- Scott Hanselman
- Greg Scull
- Aaron Michelson
- Jayson EWER –Intel Edison w/ TI–cc1111
- Frank Best
- Brooke Armstrong & Matt Pazoles
- David Young
- Paul Martin
- Jarred Yaw
- Shane Mitchell
- Boris and Kayley Raskin
- Andy Pabari
- Rob Kresha - (Papillion, NE, USA)
- Christian Robinson (London, UK)
- Gary Kidd (Wilton, CT)
- Nathan Morse
- Paul Davis (Brighton, UK)
- Marion Barker (Sunnyvale, CA, USA)
- Frank Jungman (San Diego, CA)
- Sophie Thacher
- Luis Betancourt (Veracruz, Mexico)
- Tom Boudreau (Washington DC, USA)
- Ryan Chen
- Katherine Mason
- Garrett Webb (Dallas, TX)
- Brandon Faloona (Seattle, WA / Burbank, CA)
- Keith Burns - for Heather (Richmond, VA)
- Kim St. Dennis (Los Angeles, CA)
- Gabriel and Gideon Arom (Chicago, IL / Los Angeles, CA)
- Arlene Samowich (Nashville, TN)
- Andy Probolus & Marianne Smith (Lancaster, PA)
- Gregg Haroldson (Huntington Beach, CA)
- Gera Yeremin (Santa Rosa , CA)
- Ed Nykaza
- Jeff Waters (Madison, WI)
- Greg Hull (Wheaton, IL)
- Sara and David Goya (Anaheim, CA)
- Rafael Matuk (Chicago, IL)
- Luuc Verburgh (Eindhoven, The Netherlands)
- Iain Cartwright (Adelaide, Australia)
- Julie Raines (Poughkeepsie, NY)
- Brandon Parrish (Augusta, GA)
- Katie Ellison (Bellevue, WA)
- Sarah Easter (Georgetown, TX)
- Terri Lyman (Prescott Valley, AZ)
- Gina Lyon (Laurel, MS) Edison-Explorer Bd, DexG5
- Eric Jensen (Swarthmore, PA)
- John Dodds (Glasgow, UK)
- Lindsey Maguire (Silicon Valley)
- Dan Robinson (Chicago, IL)
- Mitch Phillips - (Pennington, NJ)
- Colin Barlow & Cassie Knox - (San Diego, CA)
- Andrew H (Sydney, Australia)
- Hichame Yessou (Milano, Italy)
- Tim Street (London, UK)
- Neal Harvey (Grants Pass, OR)
- Patrick Metcalfe
- Ken Webster (Hobart, Tas, Australia)
- David Eddy (Madbury, NH)
- Tirzah Heide for Nathanael (St. Louis, MO)
- Tracy Osheroff (Seattle, WA)
- Mike & Jennifer Crawford (Calgary, AB, Canada)
- Matthew Byatt (Cambridge, UK)
- Anna Hassan (New Orleans, LA)
- Tony Zarro (Atlanta, GA)
- Mike Wright (San Jose, CA)
- Derek Rodeback (Loma Linda, CA)
- Joanne Spotten (SLC, UT)
- Sandra Keßler (Kassel, Germany)
- Lukas Ondriga (Svaty Jur, Slovakia)
- Dominic Herrington (Bishops Stortford, UK)
- Taylor Fowler (Brooklyn, NY)
- Mikel Curry
- Aditya Dasnurkar
- Jason Wittmer for Andrew (Clive, IA)
- Kevin Ruess Marshall (Indianapolis, USA)
- Keith Kubischta (Poway, CA)
- Emily Kranz (Greensboro, NC)
- Orla Wilson (Baltimore)
- Jason Pell for Heidi and Mallory (New York, NY)
- Patrick van Gestel (Hilvarenbeek, Netherlands)
- Joe Moran (Los Altos, CA)
- John & Gregory Kelleher (Sligo, Ireland)
- Carine Bruyndoncx (Arendonk, Belgium)
- Jordan Berger (SLC, UT)
- James Henley (Friendswood, TX)
- Amy Andrews (Boston, MA)
- Ann Delano (Seattle, WA)
- Marcus Whitley (Greenbrier, AR)
- Trevor Wood (Santaquin, UT)
- Anne Svejda (Virginia Beach, VA)
- Melody Andrews-Caron (Ontario, Canada)
- Andy Sharrow (Saginaw, MI)
- John Benjamin (Clawson, MI)
- Vince P. for Tristan (Ravenna, OH)
- Anthony Cerrone (Danville, CA)
- Rachel Aumaugher (Davison, MI)
- Joe Greene (Jacksonville, NC)
- Sebastien Lussier (Montreal, Canada)
- Chris Harris (Sydney, Australia)
- Lee Skelton (London, UK)
- Jacqueline Burke (Troy, MI / Baltimore, MD)
- Kate Hainsworth (Austin, TX)
- Brian Rabinovitz (Chapel Hill, NC)
- Stephen G. (Seattle, WA)
- Emily Stunek (Lake Shore, MN)
- Lorenzo Conte (Chicago, IL)
- Alasdair McLay (Derby, UK)
- Ahanu Banerjee (Pittsburgh, PA)
- Ken Huat CHONG (Kuala Lumpur, Malaysia)
- Daniel Bjørnbakk (Norway)
- Katie DiSimone (Paso Robles, CA)
- Rebecca Jervey (Philadelphia, PA)
- Ivica Suran (Pazin, Croatia)
- David Rimmer (Melbourne, Australia)
- Kyle King (Opelika, AL)
- Sonya Neufer
- Sacha M (New Zealand)
- Joe Dunn for Lizzie
- Michele Lawford (Canada)
- parenthetic (diabetic)
- Lorenzo Sandini (Finland)
- Deidra Little (Seattle, WA)
- Tim Mathis (Fort Walton Beach, FL)
- Greg Uhlenkott (Grangeville, ID, USA)
- Song Ming Jie (China)
- Chuck Vanderwist (Western Colorado, USA)
- James Corbett (Greenbrier, TN USA)
- Meghan Rutledge (Dallas, TX)
- Rick Warren (Vancouver, BC, Canada)
- Carl-Johan Wehtje (London, UK)
- Cameron Renwick (Muskoka, Ontario, Canada)
- Cameron Chunn (Huntsville, AL)
- Patrick & Lesly Kelly for Addy (Tempe, AZ)
- Melanie Mason for Toby (Leicester, UK)
- Mohamed Ali Bedair (Cairo, Egypt)
- Hilary Koch (Waterville, ME)
- Eric Feibelman (Alachua, FL)
- Winfried Kuiper (Langballig, Germany)
- Selin Aygün (Ankara,Türkiye)
- Ken Kotch (Boulder, CO, USA)
- Brian Densmore (Clovis, CA, USA)
- Jesse Szypulski (Louisville, KY, USA) Edison / Explorer Board
- Robert Silvers (Norwell, MA)
- Eric Metzler (St. Paul, MN)
- Helene Brashear (Austin, TX)
- Jeremy B. for CM (New York, NY)
- Molly Duerr (Minneapolis, MN)
- Amber K (Ithaca, NY)
- Melanie Shapiro (Gainesville, FL)
- Brandon (Philly)
- Justin W (Charlottesville, VA)
- Chris Creek (Martinsburg, PA)
- Tom Petrillo (San Diego, CA)
- Christian Driver for Lucy (Wilmslow, UK)
- Katie Aldridge
- Darlene Morissette (Winnipeg, MB, Canada)
- Jake Punshon (Saskatoon, SK, Canada)
- Elisa Kelley (Austin, TX)
- Stuart Raphael (Sydney, Australia)
- Dan Durham (Edmonton, AB, Canada)
- Niels Hartvig (Odense, Denmark)
- Dirk Gastaldo (Newbury Park, CA, USA)
- Clayton McCook (Edmond, OK, USA)
- Kris Schmitz (Washington, DC/New Brunswick, NJ)
- Steven Miller (Vancouver, BC, Canada)
- Kyle Larsen (Provo, UT)
- Ben Fowler (Huntsville, AL)
- Giuseppe Acito (Roma, Italy)
- Mark M (Chicago, IL)
- Chris Reilly (Detroit, MI)
- Rod Snyder (Morgantown, WV, USA)
- John Murray (Pinellas Park, FL, USA)
- Shirley Steinmacher (son, Salt Lake City, UT, USA)
- Michael Spradling (Raleigh, NC)
- Tore Bjørndalen (Norway, Oppegård)
- John Young (King of Prussia, PA)
- Kathleen Gagnier (Orlando, FL)
- Kim Goldmacher (Philadelphia, PA)
- Craig Brenner (Seattle, WA)
- Darryl Schick (PA)
- Nadine Pedersen (Vancouver, Canada)
- Beno Schechter (Coral Gables, FL)
- Rami Laakso (Nummela, Finland)
- Steve Lund (PEI, Canada)
- Paul Andrel (Phoenixville, PA)
- Allan Evans (Ottawa, Canada)
- Simon Lewinson (NE Victoria, Australia)
- Angie Kabat (Fairbanks, AK)
- Jacob H (Waterford, MI)
- Jim Van Hook (St. Louis, MO)
- Pedro C (Porto, Portugal)
- Roger Sanftner (San Antonio, TX)
- Gabriela Ezquerro (Mexico City, MEX)
- Jessica Carey (CA)
- Lynne Beard (Kincardineshire, Scotland)
- Carlin Pressnall (Seattle, WA)
- James Brown (Derby, UK)
- Allison Marx (Atlanta, GA)
- David Ashby (Rexburg, ID)
- Andrew Warrington (Alsace, France)
- Kelsey Yearick (Crook, Colorado)
- Marcel Zandvliet (The Hague, The Netherlands)
- Gerard Dwan (Boston, MA)
- Jon Groelz (Captain Cook, HI)
- Christos Alonistiotis (Athens, Greece)
- Chris Lodermeier (MN)
- Tom Beesley (Brighton, UK)
- Robert Sandvik (Stavanger, Norway)
- Eugene Girard (Kitchener, Canada)
- Luke Jenkins for Kyler (Vancouver, WA)
- Brandon Hunnicutt (Denver, Colorado)
- Kate Groves (Oxford, UK)
- Tom Wells (Guildford, UK)
- Kyle Masterman (Perth, Western Australia)
- Virginia Saunders (Ontario, Canada)
- Enda Farrell (Berlin, Germany)
- Carl Robertson (Rochester, NY, USA)
- Ben Ortega (Minneapolis, MN)
- Reza Bolouri (Melbourne, Australia)
- Todd Radel (Doylestown, PA)
- Steve Mann (Bronx, NY)
- Jason Nerothin (Madison, WI)
- Eben Demong (San Ramon, CA)
- Peetu Hongisto (Hollola, Finland)
- Jonathan Cole (St. Louis, MO, USA)
- Laura Ferrara (Hood River, OR, USA)
- Caleb Seekell (Charlestown, RI, USA)
- Dave Rich (Cambridge, ON, CANADA)
- Tracey Berg-Fulton (Pittsburgh, PA)
- Juan Mejías (Seville, Spain)
- Mladen Cvijanovic (Buffalo, NY, USA)
- Kendra Hunter (Rochester, NY)
- Roxana Soetebeer (New Brunswick, Canada)
- Bulbul Ahmed (Charlottesvill, VA, USA)
- Minna Hannula (Finland)
- Mark Orders (UK)
- Alan Ryder (UK)
- Robert Riemann (DE)
- Grant Carlson (Sunnyvale, CA, USA)
- Zachary Christman (Philadelphia, PA, USA)
- Per Winterdijk (the Netherlands)
- Paul Featonby (UK)
- Lisa Morales (California, USA)
- Rob Neu (wife, Utah, USA; sister-in-law, Virginia, USA)
- Nancy Simons ( SW France)
- Jill Gordon (UK)
- Elwin Versluis (Abcoude, The Netherlands)
- Carling Lellock (Pittsburgh, PA, USA)
- Walter Feddern (Ontario, Canada)
- Abigail Cember (Ardmore, PA, USA)
- Megann Fuka (Tulsa, OK, USA)
- Ariane Fleming (Seattle, WA)
- Sarah Withee (Pittsburgh, PA, USA)
- Daniel Noor (TN)
- Raymond Richmond (Edmonton, AB, Canada)
- Hosam El Din Mohamed El Nagar (Cairo, Egypt)
- Mary Anne Patton (Brisbane, Australia)
- Jared Bechard (Overland Park, KS, USA)
- Tyler Duncan (Lethbridge, Alberta, Canada)
- Eran I (Israel)
- Mikko Kesti (Vantaa, Finland) Intel Edison
- Jan Schenk (Munich, Germany)
- Jess Phoenix (London, UK)
- Kelly Polster (Fort Worth, TX)
- Corey Stoerner (Phoenix, AZ)
- Chris Wallis (Brisbane, QLD, Australia)
- Dave Gourley (Kaysville, UT)
- Chris Heywood (Manchester, UK)
- Grahame Cottam (Newcastle upon Tyne, UK)
- Norman Seward (Cardiff, Wales. UK)
- Luminary Xion (Tokyo, Japan)
- Nika Beros (Zagreb, Croatia)
- Katja Jacob (Seattle, WA)
- Paul Benedict (Evergreen, CO)
- Luis Toussaint (Tarragona, ES)
- Dana Sturdivant (Washington, D.C.)
- Jakub Tomaszczyk (Gold Coast, Australia)
- Andrew Hopkins (Newcastle, Australia)
- Robert Clark (Canberra, Australia)
- David Vanier (Saratoga Springs, NY, USA)
- Kirsten Otis (Guelph, Ontario, Canada)
- Natalia Stanichevsky (Ontario, Canada)
- Patrick Gauthier (Toronto, Ontario, Canada)
- Anne Evered (Philadelphia, PA)
- Or Loantz (Israel)
- Marsha Vasserman (Calgary, Alberta, Canada)
- Melanie Ellis (Auckland, New Zealand)
- Kelsey Mosley (Saint Joseph, MN, USA)
- David Klapan (Osijek, Croatia)
- Grant M. Beahlen (Macomb Co., MI,)
- Nobu Aoki(Hyogo,Japan)
Reading list
Before you actually install OpenAPS on your rig - perhaps while you’re waiting for gear to arrive, or while you’re learning to use your new pump or logging data on Nightscout - you should familiarize yourself with the system.
Here are the most important sections to read:
- Make sure you know how you will enter carbs and boluses so OpenAPS knows about them.
- Read and understand how OpenAPS decides on adjustments to your basal insulin.
- Skim the section on monitoring OpenAPS so you’re aware of the various options for monitoring your rig once it’s looping. It’s not necessary to understand all the options in detail, just be aware of them; you’ll probably want to return to that section to set up additional options in the future.
- Skim the section on preferences and safety settings you can set so you’re aware of the things you can easily adjust. You’ll be returning to set these in Step 5 of the installation process.
- Skim the section on your wifi options to understand the various ways you can get your rig online. Again, you don’t need to memorize all the information here, just be aware of the options and ready to return in the future as needed.
Installing OpenAPS on your rig
Getting OpenAPS running on your rig generally takes five steps:
- Jubilinux installation (called “flashing” the Edison - Pi users can skip to step 2). This may already be done for you if you purchased a pre-flashed Edison board.
- Getting first wifi network connection and installing “dependencies” (helper code that make all the OpenAPS code function). This is done using what is called the “bootstrap” script.
- Installing your OpenAPS loop. This is done using what is called the “setup” script.
- Watching the Pump-loop Log. This is an important, required step. You need to be familiar with how to read and access your logs.
- Finish your setup: all the polishing steps to your OpenAPS setup. Things like optimizing your settings, preferences, BT-tethering, IFTTT, etc.
Going through steps 1-2 may take about 1-3 hours depending on your internet connection, whether the edison was pre-flashed, and comfort level with the instructions. At the end of the bootstrap script (step 2), you will be asked if you want to continue on with the set-up script (step 3). If you need to take a break and come back to step 3 later, you can answer “no” to continuing on and come back later.
Before you start, it’s a good idea to have some basic familiarity with using the command line on your computer, via a program like Terminal (on Mac) or Command Line (on Windows). This will be helpful not just for initial installation, but for monitoring and adjusting your setup later. Here’s a good introduction to using Terminal on Mac. You can also reference the generally-useful Linux commands from the troubleshooting guide.
Some conventions used in these docs:
- Wherever you see text that is formatted
like this, it is a code snippet. You should copy and paste those code snippets instead of attempting to type these out; this will save you debugging time for finding your typos. - Double check that your copy-paste has copied correctly. Sometimes a paste may drop a character or two and that will cause an error in the command that you are trying to execute. Sometimes, depending on what step you are doing, you may not see the issue. So, do make a point of double checking the paste before pressing return.
- You will see a $ at the beginning of many of the lines of code. This indicates that it is to be entered and executed at the terminal prompt. Do not type in the dollar sign $.
- Wherever there are
<bracketed_components>in the code, these are meant for you to insert your own information. Most of the time, it doesn’t matter what you choose as long as you stay consistent throughout this guide. That means if you choosemyedisonas your<edisonhostname>, you must usemyedisonevery time you see<edisonhostname>. Do not include the< >brackets in your commands when you enter them. So for the example above, if the code snipped saysssh root@<edisonhostname>.local, you would enterssh root@myedison.local
Step 1: Jubilinux (for Edison rigs only)
This is only necessary for Edison rigs. Pi users can skip to step 2. If you purchased a pre-flashed Edison, you can also skip on down to step 2.
The steps outlined below include instructions for the various build-platforms (Windows PC, Mac, and Raspberry Pi). Linux users in general should be able to follow the steps for the Raspberry Pi.
What is flashing?
The Edison comes with a very limited operating system, called Yocto, that doesn’t work easily with OpenAPS. The first step is to replace the operating system with a new one. This is called “flashing” the Edison.
It’s best to replace this with a custom version of Debian, as this fits best with OpenAPS, and it also means you have the latest security and stability patches. (These setup instructions were pulled from the mmeowlink wiki; if you’re an advanced user and want/need to use Ubilinux instead of the recommended Jubilinux, go here.) The setup instructions also are going to assume you’re using the Explorer Board that has a built in radio stick. If you’re using any other base board and/or any other radio sticks (TI, ERF, Rileylink, etc.), check out the mmeowlink wiki for support of those hardware options.
1. Prerequisites
If you’re using a Raspberry Pi:
To flash the Edison using a Raspberry Pi, you’ll need a large (preferably 16GB+) SD card for your Pi. The Edison image is almost 2GB, so you’ll not only need space for the compressed and uncompressed image, but you’ll also need to enable a large swapfile on your Pi to fit the image into virtual memory while it is being flashed. Using an SD card as memory is very slow, so allow extra time to flash the Edison image using a Pi.
- Run
sudo bash -c 'echo CONF_SWAPSIZE=2000 > /etc/dphys-swapfile'to configure a 2GB swap file. Note: if you don’t have enough space on the SD card for a 2G swap a 1G swap will probably work - Run
sudo /etc/init.d/dphys-swapfile stopand thensudo /etc/init.d/dphys-swapfile startto enable the new swap file. - If you installed
watchdogon the pi, it’s a good idea to stop it since loading the image into memory to flash is intensive
Windows PCs with under 6 GB of RAM
Windows PCs with less than 6 GB of RAM may need to have the size of the page file increased to flash the Edison. Close all unnecessary programs and attempt to flash the device. If the flash operation fails follow these steps to ensure enough swap space is allocated when the computer boots, then restart and try again. Only do this if flashing the device doesn’t work without changing these settings.
Important: Write down the settings in the Virtual Memory window before you make any changes to your system. When you finish the flash process you must return these settings to their original values or Windows may become unstable.
- Go to the Control Panel, click All Control Panel Items, then click System. At top left click the Remote Settings link.
- Select the Advanced tab in the System Properties window, then under Performance click Settings.
- On the Advanced tab click the Change... button to change the page size.
- In the Virtual Memory window uncheck “Automatically manage paging file size for all drives,” click “Custom size,” and set the initial size to at least 4096 MB. If you have already attempted this process at least once continue to increase this number by 1024 MB. Set the maximum size to 2048 MB higher than the initial size you used.
- Click the Set button, then click OK until all windows are closed.
- Reboot and attempt the flash process.
If you’re using a Mac:
Install Homebrew, a tool which allows you to easily install other software packages and keep them up to date. Enter the following command in the Terminal app to install Homebrew:
ruby -e "$(curl -fsSL https://raw.githubusercontent.com/Homebrew/install/master/install)You will be prompted to enter “RETURN” to continue and then enter your passcode for the user account (your computer password). When you type the password, you will not see any letters appear in the Terminal screen–that is normal. Terminal does not show keystrokes for passwords.

It will take about 1-2 minutes for Homebrew to install. You’ll see a bunch of commands scrolling by in Terminal window. Just wait it out until you see the screen showing Installation successful and you’ll be returned to the Terminal prompt.
If you get a message that Homebrew is already installed, that’s also fine!
Install several other utilities by entering the command:
brew install dfu-util coreutils gnu-getopt

- If you are reflashing an Edison, you might see a recommendation to upgrade coreutils, in which case, run
brew upgrade coreutils gnu-getopt - Install lsusb:
brew update && brew tap jlhonora/lsusb && brew install lsusb

The above instructions are based on these instructions which may be useful as a reference.
2. Downloading Jubilinux image
Jubilinux “is an update to the stock ubilinux edison distribution to make it more useful as a server, most significantly by upgrading from wheezy to jessie.” That means we can skip many of the time-consuming upgrade steps that are required when starting from ubilinux.
- Download Jubilinux - the jubilinux-v0.3.0.zip is known to work; jubilinux 0.2.0 runs Debian jessie, which is NOT supported by Debian any longer.
- In the download folder, right-click on file and extract (or use
unzip jubilinux.zipfrom the command line). You will access this directory from a command prompt in the next step. It is a good idea to create the Jubilinux in your root directory to make this easier to access.
Note On Windows, you should see an extract all option when you right-click. However, in some instances, it may not be active for zipped files. If you do not see the extract all option in the right-click menu, right-click the zipped file, choose Properties at the bottom of the context menu. On the General tab, click on the button next to the “opens with” and change it to use Windows Explorer. Apply the change and select OK to save the change. You should now be able to right-click the jubilinux.zip file to extract all.
- Open a Terminal (Mac) or Command Prompt (Windows) window and navigate to the extracted folder:
cd jubilinux. This is your “flash window.” Keep it open for later! - If using Windows, you will need two additional utilities. Download DFU-Util. Extract the two files, libusb-1.0.dll and dfu-util.exe, to the directory where you extracted jublinux.zip. (Alternately, you can download the two files libusb-1.0.dll and dfu-util.exe directly.) When you have successfully moved those two folders into the jubilinux folder, you should see files/folders inside the jubilinux folder like so:

3. Connecting cables to the Explorer Board and starting console
Now we move to the rig. You’ll need to connect two cables from the rig to your computer. Follow the console login directions to get set up.
Once you get to the login prompt, log in using the username “root” (all lowercase) and no password. This will have us ready to reboot from the command line when we are ready. This is your “console window” - keep it open.
If you do not have your Edison password at this point, don’t panic. We are only logging in to reboot the Edison and that can be accomplished via the black button on the explorer board as well. Without the root password you may continue.
4. Flashing image onto the Edison
If you’re using a Raspberry Pi - starting flash:
- In the “flash window” from the Download Image instructions above, run
sudo ./flashall.sh. If you receive andfu-util: command not founderror, you can install dfu-util by runningsudo apt-get install dfu-util
If you’re using a Mac - starting flash:
- In the “flash window” from the Download Image instructions above, run
./flashall.sh.- If you receive an
dfu-util: command not founderror, you can install dfu-util by following the Mac instructions here. - If you receive an
Error: Running Homebrew as root is extremely dangerous and no longer supported. As Homebrew does not drop privileges on installation you would be giving all build scripts full access to your system.see the troubleshooting section below.
- If you receive an
If you’re using a Windows PC - starting flash:
- In the “flash window” from the Download Image instructions above, run
flashall.bat
All platforms:
- The flashall script will ask you to “plug and reboot” the Edison.
- If you have your edison root password: Go back to your console window and type
reboot. - If you do not have your edison root password: Press the black button on the explorer board until the LED between the usb connectors shuts off. Then press it again until the light comes back on.
- If you have your edison root password: Go back to your console window and type
- Switch back to the other window and you will see the flash process begin. You can monitor both the flash and console windows throughout the rest of the flash process. If nothing else works and you are feeling brave, you can try pulling the Edison out and reconnecting it to the board to start the flash process.
- In the console window where you typed
reboot, you should see:
Hit any key to stop autoboot: 0
Target:blank
Partitioning using GPT
Writing GPT: success!
Saving Environment to MMC...
Writing to redundant MMC(0)... done
Flashing already done...
GADGET DRIVER: usb_dnl_dfu
#
DFU complete CRC32: 0x77ccc805
DOWNLOAD ... OK
Ctrl+C to exit ...
######################################################################################################################
And in the flash window, you should see
Using U-Boot target: edison-blankcdc
Now waiting for dfu device 8087:0a99
Please plug and reboot the board
Flashing IFWI
Download [=========================] 100% 4194304 bytes
Download [=========================] 100% 4194304 bytes
Flashing U-Boot
Download [=========================] 100% 245760 bytes
Flashing U-Boot Environment
Download [=========================] 100% 65536 bytes
Flashing U-Boot Environment Backup
Download [=========================] 100% 65536 bytes
Rebooting to apply partition changes
Now waiting for dfu device 8087:0a99
Flashing boot partition (kernel)
Download [=========================] 100% 5980160 bytes
Flashing rootfs, (it can take up to 10 minutes... Please be patient)
- Like it says, it will take about 10 minutes to flash from Mac or Windows. If the step that flashall says should take up to 10 minutes completes in seconds, then the flash did not complete successfully, perhaps because you didn’t set up the virtual memory / swap settings correctly; check the troubleshooting section. If you’re using a Raspberry Pi, it may take up to 45 minutes, and for the first 10-15 minutes it may appear like nothing is happening, but eventually you will start to see a progress bar in the console.
- After flashing is complete and the Edison begins rebooting, watch the console: you may get asked to type
control-Dto continue after one or more reboots. If so, pressCtrl-dto allow it to continue. - The Edison will reboot several times. You may see
[** ] A start job is running for /etc/rc.local Compatibili...14s / no limit)
for a few minutes: that’s fine. You can also expect to see an ugly red:
[FAILED] Failed to start Hostname Service.
That is also fine, and you can ignore it too. Just about when you’ll start to get concerned that it is stuck in a loop, you should get a login prompt. If so, congratulations! Your Edison is flashed. Use login root and password edison to login to your newly flashed Edison.
After logging in, you will notice that the Terminal prompt says root@ubilinux:~#. This is the correct prompt for the jubilinux system. You will not see jubilinux in the prompt. If you bought a pre-flashed Edison, this is how your initial Terminal prompt will look.

If you have any difficulty with flashing, skip down to Troubleshooting
After you’ve flashed your Edison, head on to step 2 - setting up wifi and installing dependencies
Troubleshooting
Troubleshooting the flash process
a) If you get:
dfu-util: Device has DFU interface, but has no DFU functional descriptor
dfu-util: Cannot open DFU device 8087:0a99
that likely means you ran ./flashall.sh without sudo.
b) If you get:
Flashing rootfs, (it can take up to 10 minutes... Please be patient)
dfu-util -v -d 8087:0a99 --alt rootfs -D /home/pi/toFlash/edison-image-edison.ext4 -R 2>&1 | tee -a flash.log | ( sed -n '19 q'; head -n 1; cat >/dev/null )
Rebooting
U-boot & Kernel System Flash Success...
in something closer to 10 seconds than 10 minutes, then you likely didn’t set up swap properly. To verify, cat flash.log and look for dfu-util: Cannot allocate memory of size 1610612736 bytes near the end.
Alternatively, this newer version of DFU Util (DFU Util v0.9) seems to work better on computers with lots of RAM.
c) If you recieve an Error: Running Homebrew as root is extremely dangerous and no longer supported. As Homebrew does not drop privileges on installation you would be giving all build scripts full access to your system. it means that you have a recent copy of homebrew (that’s good) which doesn’t allow sudo to even do a brew list.
- The easiest - but perhaps not so forward compatible - thing is to figure out what the brew command was trying to do and edit the
flashall.shscript accordingly. ** The v0.2.0 version offlashapp.shhas$(brew list gnu-getopt | grep bin/getopt). ** Runningbrew list gnu-getopt | grep bin/getoptfor me (Dec 2017) gave me/usr/local/Cellar/gnu-getopt/1.1.6/bin/getopt - Edit the
flashall.shfrom
:bash
GETOPTS="$(which getopt)"
if [[ "$OSTYPE" == "darwin"* ]] ; then READLINK=greadlink; GETOPTS="$(brew l ist gnu-getopt | grep bin/getopt)"; else READLINK=readlink;fi;
to
GETOPTS="$(which getopt)"
if [[ "$OSTYPE" == "darwin"* ]]
then
READLINK=greadlink
GETOPTS=/usr/local/Cellar/gnu-getopt/1.1.6/bin/getopt
else
READLINK=readline
fi
d) If you have a failed flash or have problems with the reboot, try starting the console and hitting enter a bunch of times while connecting to stop autoboot. You’ll then be at a boot> prompt. Run sudo ./flashall.sh and when it asks you to reboot type and enter run do_flash at the boot> prompt.
e) If you get stuck on an error that says “Ready to receive application” on the Edison the problem is you don’t have enough power to properly boot up the Edison. This can happen if you are powering from your Pi. You should either connect a battery to the Edison board to give it a little boost, or use a powered USB hub between the Pi and the Edison.
f) If Edison reboots correctly but never gets picked up by the flashall.sh script and the flashing process does not start, check that you have DATA micro USB to USB cables - both of them. A large proportion of USB cables are not “data” - just power - and even cables previously used for data can degrade to no longer reliably carry data. How do you know if each cable is for data? One good way is to unplug both cables from the Edison, plug each cable in turn into your computer USB port and the explorer board OTG port. If your folder/window explorer shows Edison as a drive then the cable supports data. You need both to be data cables.
g) If Edison reboots correctly but never gets picked up by the flashall.sh script and the flashing process does not start, and you’ve re-confirmed that the two cables you are using are indeed good data cables, check the Edison device ID. It will probably come out automatically after the flashall.sh script fails with a list of available devices connected to the machine. On Linux, you can run lsusb to get a list of usb devices with their device ID. If the device ID is different from the one expected on flashall.sh, you can edit the script and change lines containing: USB_VID=8087 & USB_PID=0a99 to whatever the Edison has for an ID. Some users have encountered their devices ID to be 8087:0a9e
h) If you have attempted the firmware flash with Jubilinux several times and the flash will not complete successfully, it is highly recommended that you follow the mmeowlink deprecated Ubilinux instructions. Note that those instructions will have notes throughout for steps which are specific to the flash of Ubilinux. Additional steps help to align the Edison’s operating system with Jubilinux. You must do these steps.
If you’re having issues with a Windows flash of Jubilinux, try following along with the videos below. OpenAPS users have cited their instructions in successful flashes of Ubilinux. You will still need to go through the extra Ubilinux configuration steps mentioned in the linked mmeowlink wiki above.
- Flash Ubilinux Onto Intel Edison via Windows, 5 Part Video (Cygwin)
- uCast #21: Installing Ubilinux on the Edison (Windows) (Windows Command Prompt)
i) If none of the above has worked with the Explorer board, try swapping the two microUSB cables, or replacing them with new ones. See “f)” above too.
j) If you’ve attempted all of the troubleshooting steps above but still aren’t successful, it’s worth trying to use a different computer to flash.
Troubleshooting rescue mode
- If your edison boots to a console and says it is in rescue mode (you can hit ctrl-d to continue or enter the root password), you may need to change a u-boot environment variable to make it boot normally. During the boot process you will see:
*** Ready to receive application ***
U-Boot 2014.04 (Feb 09 2015 - 15:40:31)
Watchdog enabled
DRAM: 980.6 MiB
MMC: tangier_sdhci: 0
In: serial
Out: serial
Err: serial
Hit any key to stop autoboot: 0
- Hit any key to drop to a prompt and type:
printenv bootargs_target - If the answer is
bootargs_target=first-installthen type:setenv bootargs_target multi-usersaveenv - And to exit that firmware u-boot prompt:
run do_boot
- If this doesn’t fix the problem, and your boot gets stuck here:
[ OK ] Mounted /home.
Starting Rescue Shell...
[ OK ] Started Rescue Shell.
[ OK ] Reached target Rescue Mode.
You may have an issue with the flashall.sh script. (This seems to only impact mac users). In the “flash window” terminal where you downloaded Jubilinux
- Edit the flashall script
nano flashall.sh - Find the following text (around line 220) Your text may vary slightly, with additional echo statements or such
echo "Flashing U-Boot Environment Backup and rebooting to apply partiton changes"
flash-command --alt u-boot-env1 -D "${VARIANT_FILE}" -R
dfu-wait
- Modify this line to remove the -R and the dfu-wait command
echo "Flashing U-Boot Environment Backup and rebooting to apply partiton changes"
flash-command --alt u-boot-env1 -D "${VARIANT_FILE}"
- Reboot one last time - install should take a good deal longer than previous executions.
Override DNS resolvers
Some users have reported problems with connecting to internet sites. If you are experience poor internet connections, try ‘nano /etc/resolv.conf’ and change the first two nameservers to:
nameserver 8.8.4.4
nameserver 8.8.8.8
Also see the instructions here to add these nameservers to your /network/interfaces file as the resolv.conf file is likely to be overwritten.
Alternatively, add the nameservers you want to see in resolv.conf to /etc/resolvconf/resolv.conf.d/tail and they’ll be automatically added to resolv.conf. (You may need to create the folder by running this command first: mkdir -p /etc/resolvconf/resolv.conf.d)
IP address conflicts (able to ping external but not LAN addresses)
Some users have reported problems where the local router uses the same IP block as that of usb0 config. The default configuration for usb0 in /etc/network/interfaces uses 192.168.2.15, so if your local router also uses 192.168.2.xx you may not be able to properly connect to your Edison using SSH, and external connectivity may intermittently fail.
To check which IP address your router is using, you can run ipconfig on Windows or ifconfig on Mac/Linux. If you’re getting an address starting with 192.168.2.x, you’ll want to edit your Edison’s configuration to use a different subnet for usb0:
Use vi /etc/network/interfaces to edit the static usb0 interface address from 192.168.2.15 to another valid private IP, like 192.168.29.29. The resulting config should look like:
# interfaces(5) file used by ifup(8) and ifdown(8)
auto lo
iface lo inet loopback
auto usb0
iface usb0 inet static
address 192.168.29.29
netmask 255.255.255.0
auto wlan0
iface wlan0 inet dhcp
wpa-conf /etc/wpa_supplicant/wpa_supplicant.conf
Once that looks correct, save the file and reboot your rig for the changes to take effect.


Step 2: Wifi and Dependencies
The directions for this step depend on which type of rig you are using:
Intel Edison instructions
Prep Computer and Login to rig
To get your first wifi connection set up and install OpenAPS, you’ll need to log in to the rig via the console. Follow the console login directions to get a console window open, then the rest of the instructions below.
Bootstrap script
If you’re not already, make sure you’re logged into your rig via root. You should see root@jubilinux on the command prompt.
The box below is the Bootstrap script, which will set up your first wifi network connection and install dependencies. Copy this text (all of it in the box):
#!/bin/bash
(
dmesg -D
echo Scanning for wifi networks:
ifup wlan0
wpa_cli scan
echo -e "\nStrongest networks found:"
wpa_cli scan_res | sort -grk 3 | head | awk -F '\t' '{print $NF}' | uniq
set -e
echo -e /"\nWARNING: this script will back up and remove all of your current wifi configs."
read -p "Press Ctrl-C to cancel, or press Enter to continue:" -r
echo -e "\nNOTE: Spaces in your network name or password are ok. Do not add quotes."
read -p "Enter your network name: " -r
SSID=$REPLY
read -p "Enter your network password: " -r
PSK=$REPLY
cd /etc/network
cp interfaces interfaces.$(date +%s).bak
echo -e "auto lo\niface lo inet loopback\n\nauto usb0\niface usb0 inet static\n address 10.11.12.13\n netmask 255.255.255.0\n\nauto wlan0\niface wlan0 inet dhcp\n wpa-conf /etc/wpa_supplicant/wpa_supplicant.conf" > interfaces
echo -e "\n/etc/network/interfaces:\n"
cat interfaces
cd /etc/wpa_supplicant/
cp wpa_supplicant.conf wpa_supplicant.conf.$(date +%s).bak
echo -e "ctrl_interface=DIR=/var/run/wpa_supplicant GROUP=netdev\nupdate_config=1\nnetwork={\n ssid=\"$SSID\"\n psk=\"$PSK\"\n}" > wpa_supplicant.conf
echo -e "\n/etc/wpa_supplicant/wpa_supplicant.conf:\n"
cat wpa_supplicant.conf
echo -e "\nAttempting to bring up wlan0:\n"
ifdown wlan0; ifup wlan0
sleep 10
echo -ne "\nWifi SSID: "; iwgetid -r
sleep 5
curl https://raw.githubusercontent.com/openaps/oref0/master/bin/openaps-install.sh > /tmp/openaps-install.sh
bash /tmp/openaps-install.sh
)
Copy all of those lines; go back to Terminal/PuTTY and paste into the command line (Paste in PuTTY is just a right mouse click). Then, hit enter. The screenshot below is an example of what the pasted text will look like (highlighted in blue for clarity). (If you have trouble copying from the box, click here and ctrl-a or command-a to copy the text from there.)
Note: This setup script will require you to have an available working internet connection to be successful. If anything fails during the installation, the setup may end early before you get to the setup script questions. In that case, you can just paste the script above into the command line again and try again. (Don’t try to use the up arrow, it probably won’t work.) If you get repeated failures, bring your questions and error messages into Gitter or FB for help with troubleshooting.

The script will do some initial installing, check the wifi, and ask you to hit enter to proceed. It will run for a while again, and then ask you to type in your wifi name and press enter; and type your wifi password and press enter. Pay careful attention to capital letters, spacing, and special characters.

- Change your hostname (a.k.a, your rig’s name). Make sure to write down your hostname; this is how you will log in in the future as
ssh root@what-you-named-it.local - Pick your time zone (e.g., In the US, you’d select
USand then scroll and find your time zone, such asPacific Newif you’re in California).
Now that step 2 is done, the bootstrap script will then continue to run awhile longer (~20+ minutes)...this next part is installing the necessary dependencies (step 3) before you move onto the setup script (step 4). You’ll see an awful lot of lines going by as the process goes on. Eventually, the successful bootstrap ends with this screen below:

At the completion, you will be prompted to press enter if you want to continue the setup script (oref0-setup). If you don’t have time to run the setup script (a fresh install of setup script can take about an hour to run), then you can cancel and come back to it later. Regardless of your answer, you should now return to the Setup Script section for finishing step 3.
Now that you have a wifi connection to your rig, you have the option of logging into it using SSH from a computer on the same network, rather than using a cable.
Manual instructions for Intel Edison
Below are the manual instructions for reference only - it is strongly recommended that you use the bootstrap script above instead.
Initial Edison Setup
Log in as root/edison via serial console.
Type/edit the following:
myedisonhostname=<thehostname-you-want> #Do not type the <>
And then paste the following to rename your Edison accordingly:
echo $myedisonhostname > /etc/hostname
sed -r -i"" "s/localhost( jubilinux)?$/localhost $myedisonhostname/" /etc/hosts
Run these commands to set secure passwords. Make sure you save them somewhere - you will need them! It will ask you to enter your new password for each user 2 times. Type the password in the same both times. To use SSH (which you will need to do shortly) this password needs to be at least 8 characters long. Do not use a dictionary word or other easy-to-guess word/phrase as the basis for your passwords. Do not reuse passwords you’ve already used elsewhere.
passwd root
passwd edison
Set up Wifi:
vi /etc/network/interfaces
A screen similar to the one below will appear. Type “i” to enter INSERT mode for editing on the file.

Type ‘i’ to get into INSERT mode. In INSERT mode
- Uncomment ‘auto wlan0’ (remove the
#at the beginning of the line) - Edit the next two lines to read:
auto wlan0
iface wlan0 inet dhcp
wpa-conf /etc/wpa_supplicant/wpa_supplicant.conf
Comment out (add # at the start of the line) or delete the wpa-ssid and wpa-psk lines.
After editing, your file should look like:
# interfaces(5) file used by ifup(8) and ifdown(8)
auto lo
iface lo inet loopback
auto usb0
iface usb0 inet static
address 192.168.2.15
netmask 255.255.255.0
auto wlan0
iface wlan0 inet dhcp
wpa-conf /etc/wpa_supplicant/wpa_supplicant.conf
Press Esc and then type ‘:wq’ and press Enter to write (save) the file and quit.
To set up a wireless connection, enter
vi /etc/wpa_supplicant/wpa_supplicant.conf
Type ‘i’ to get into INSERT mode and add the following to the end, once for each network you want to add. Be sure to include the quotes around the network name and password. If you have a hidden wifi network add the line scan_ssid=1.
network={
ssid="my network"
psk="my wifi password"
}
The networks you enter here are the wifi networks that your rig will be able to use to stay connected to internet. After getting your initial wireless connection set up, you can return to the instructions for adding additional wireless connections to add more options to your rig at any point.

On a Mac, if you experience any erratic behavior while using the screen editor, such as the cursor overwriting or deleting adjacent words when typing or even when using the cursor arrow keys, this may be due to incorrectly set Mac Terminal window settings. Try going to the “Shell” on the menu bar above and selecting “Show Inspector.” Ensure the Columns setting is set to “80” and the Rows setting is set to “25.”
Press Esc and then type ‘:wq’ and press Enter to write the file and quit.
Run ifup wlan0 to make sure you can connect to wifi. A successful connection should look similar (IP address numbers will be different than mine):

Make sure you see a message showing you are successfully connected, then reboot to apply the wifi changes and (hopefully) get online.
After rebooting, log back in and type iwgetid -r to make sure you successfully connected to wifi. It should print out your network name. If the rig isn’t online, go back and check your /etc/network/interfaces and /etc/wpa_supplicant/wpa_supplicant.conf files above: you probably either missed a step or made a typo.
Note: If you are reflashing an Edison, you might get a scary looking error about “WARNING: POSSIBLE DNS SPOOFING DECTECTED WARNING: REMOTE HOST IDENTIFICATION HAS CHANGED!” that is likely because you are attempting to login to a rig that has the same hostname as a previous rig that has been logged into on the computer. You can delete the history of known hosts for the rig by entering the commands cd .ssh and then rm known_hosts. This will delete the log of known hosts on your computer. There’s no significant downside to removing the known_host log, except that you will need to answer yes to the key fingerprint additions again for the first time you login to old rigs again.

Run ifconfig wlan0 to determine the IP address of the wireless interface, in case you need it to SSH below. Alternatively, if you know how to login to your router, you can also see the Edison’s IP address there.

Leave the serial window open in case you can’t get in via SSH and need to fix your wifi config.
If you need more details on setting up wpa_supplicant.conf, see one of these guides:
- http://weworkweplay.com/play/automatically-connect-a-raspberry-pi-to-a-wifi-network/
- http://www.geeked.info/raspberry-pi-add-multiple-wifi-access-points/
- http://raspberrypi.stackexchange.com/questions/11631/how-to-setup-multiple-wifi-networks
- http://www.cs.upc.edu/lclsi/Manuales/wireless/files/wpa_supplicant.conf
Install packages, ssh keys, and other settings
From a new terminal or PuTTY window, ssh root@myedisonhostname.local. If you can’t connect via youredisonhostname.local (for example, on a Windows PC without iTunes), you can instead connect directly to the IP address you found with ifconfig above.
If you see warnings about the authenticity of host can’t be established, you can say yes to continue and add the new edison to your known hosts list. This message typically appears when you’ve set-up multiple edisons on the same computer.
Log in as root (with the password you just set above), and run these three lines one by one. The first line “dpkg -P ... ” will be quick. Check the printout to see that it ran without error. Then run the apt-get lines one at a time. They may take several minutes.
dpkg -P nodejs nodejs-dev
apt-get update && apt-get -y dist-upgrade && apt-get -y autoremove
apt-get install -y sudo strace tcpdump screen acpid vim python-pip locate
And these three (the first two will be fast, the last line will take you to a screen for setting up your timezone):
adduser edison sudo
adduser edison dialout
dpkg-reconfigure tzdata # Set local time-zone
Use arrow button to choose zone then arrow to the right to make cursor highlight <OK> then hit ENTER

Enter vi /etc/logrotate.conf, press “i” for INSERT mode, and make the following changes:
- set the log rotation to
dailyinstead ofweekly - remove the # from the “#compress” line, in order to enable log compression; this reduces the probability of running out of disk space
Press ESC and then type “:wq” to save and quit

If you’re not using the Explorer board and want to run everything as edison instead of root, log out and log back in as edison (with the password you just set above). (If you’re using an Explorer board you’ll need to stay logged in as root and run everything that follows as root for libmraa to work right.)
If you have an ssh key and want to be able to log into your Edison without a password, copy your ssh key to the Edison (directions you can adapt are here). For Windows/Putty users, you can use these instructions: https://www.howtoforge.com/ssh_key_based_logins_putty.
If you’re not using the Explorer board, are running as the edison users, and want to be able to run sudo without typing a password, run:
$ su -
$ visudo
and add to the end of the file:
edison ALL=(ALL) NOPASSWD: ALL
Raspberry Pi instructions
Note: there are two key ways to setup a Pi rig. One uses Pi Bakery, the other is a manual method. If your Pi Bakery process does not work, just use Option B.
Option A - Use Pi Bakery
There are many ways setup Raspian (the operating system...like jubilinux is for Edison board) microSD card to use in your Raspberry Pi. One easy way for a new user is to use PiBakery, a free application you’ll download from the internet. (Note that if this is not successful, you can switch to Option B below).
Download PiBakery here. Follow the directions for installing PiBakery on your computer (the directions on their site include screenshots that are helpful). The download is fairly large (2.2GB) so it may take a couple minutes to complete.
Once you open PiBakery installer, you will be presented with a choice of installing Raspian Full or Raspian Lite. Unselect the checkbox for Raspian Full, and keep the installation for Raspian Lite. When the installation is done, you will be asked if you want to move the PiBakery installer to the trash. That is fine to do.

When the install has finished, find and open the PiBakery app from your applications folder on the computer. You may be prompted for your computer’s passcode; if so, enter it.
The starting screen for the PiBakery is fairly empty, but we are going to basically use visual boxes to build a puzzle of what we would like to install on our SD card. So start by clicking on the “Startup” selection on left column. Click, drag, and drop the “on first boot” box over to the white area to the right of the window.

Next, click on the Network category and drag over the Setup Wifi box to near the On First Boot box.

You want to have the boxes link together (if you have audio on, you’ll hear a little click noise as the boxes link together). You can drag more wifi network boxes if you already know the wifi networks that you’d like to add already. Don’t worry though, you’ll have the opportunity to add more later...this is just an important step to get started the first time with at least one network.

Note: Raspbian requires a Country Code (such as US, UK, DE, etc) - otherwise wifi will remain disabled on the Pi. This is different than the Edison/Jubilinux setups so be aware! The default country code is GB, because that is where the PiBakery author is from. Most users will need to change this. Wondering what the codes are? You can look up your two letter code here.
Enter in your network name, password, and country code. Capital and lowercase matter. You can leave the type as WPA/WPA2 unless you specifically know your network uses a different connection type.
You can add as many special “recipe ingredients” as you’d like. Advanced users may find ingredients they are specifically interested in. Shown below is a relatively simple setup that will have good utility (one wifi network and setting the OTG port to serial to make future offline-connections easier).

Put your microSD card into a reader for your computer. Once you get your recipe completed in PiBakery, click on the “Write” icon in the upper left of the window. You’ll select your SD card’s name from the menu that appears and the Operating System will be Raspbian Lite. Click the Start Write button. Click yes to the warning about erasing the content of the card to begin the writing process.

Boot up your Pi and connect to it
After a couple minutes, the writing should be done and you can eject the microSD card from your computer, insert it into your Pi (card slot location shown below), and plug in power to the Pi, and turn on the power switch (off/on positions are labeled on the HAT board for ease).

Give the rig a couple minutes to boot up. Once the green LED stops blinking as much, you can try to log in.
On Mac, open Terminal and use ssh pi@raspberrypi.local
On Windows, use PuTTY and establish an SSH connection, with username pi, to hostname raspberrypi.local. If you receive a warning that the rig’s host key is not yet cached, respond YES to add it.
Troubleshooting: If you have problems connecting, try rebooting your router. If you have multiple channels (2.4Ghz vs 5Ghz), you could try redoing the PiBakery setup with the other channel’s network name, if the first one fails.
The default password for logging in as pi is raspberry. The pi username and default password is only used for this initial connection: subsequently you’ll log in as root with a password and rig hostname of your choosing.
Run openaps-install.sh
Once you’re logged in, run the following commands to start the OpenAPS install process:
sudo bash
curl -s https://raw.githubusercontent.com/openaps/oref0/dev/bin/openaps-install.sh > /tmp/openaps-install.sh && bash /tmp/openaps-install.sh
- Change your hostname (a.k.a, your rig’s name). Make sure to write down your hostname; this is how you will log in in the future as
ssh root@whatyounamedit.local - You’ll be prompted to set two passwords; one for root user and one for pi user. You’ll want to change the password to something personal so your device is secure. Make sure to write down/remember your password; this is what you’ll use to log in to your rig moving forward. You’ll type it twice for each user. There is no recovery of this password if you forget it. You will have to start over from the top of this page if you forget your password.
- Pick your time zone (e.g., In the US, you’d select
USand then scroll and find your time zone, such asPacific Newif you’re in California).
The script will then continue to run awhile longer (10 to 30 minutes) before asking you to press enter or control-c for the setup script options. Successful completion of this section should look like below.

If you are installing to a Pi with a legacy radio (Ti-stick, SliceOfRadio, etc.) - Press enter. Jump to finishing the installation
If you are installing to a newer Pi with a HAT or RFM69HCW as radio: Do not press enter! Continue on to Pi-Hat instructions..
Troubleshooting: If your screen stops as shown below or jumps ahead to the interactive portion before successful completion (as shown above), rerun the curl -s command line shown above.

Switch to dev branch for your pi HAT
If you are here - you should be building a rig with a Pi HAT(recommended) or RFM69HCW (experimental). Instead of proceeding with the setup script, press control-c to cancel the setup script.
Reboot your rig by entering reboot. This will end your ssh session. Give your rig time to reboot, reconnect to wifi, and then login to the rig again. This time the rig will be using the rig name you chose before in the setup so use ssh root@yourrigname.local on a Mac. On a Windows PC with PuTTY, the hostname can be either yourrigname or yourrigname.local, and the username will be root.
Now we will select a Raspian-compatible updated branch by using cd ~/src/oref0 && git checkout dev. On your first install you should see a message returned of “Branch dev set up to track remote branch dev from origin. Switched to a new branch ‘dev’”. On subsequent installs or updates you would follow the direction to execute the command “git pull”.
Finish installation
First, update npm to the latest version. Run npm install npm@latest -g.
Next, change to the oref0 directory if you are not in it already. Run cd ~/src/oref0.
Now run npm run global-install. After about 10-15 minutes, the installations will end and you will be dropped off at the root@yourrigname:~/src/oref0# prompt. Successful completion of this step should look like below.

Now you can run the interactive oref0 setup script:
cd && ~/src/oref0/bin/oref0-setup.sh
Answer all the setup questions. A successful setup script will finish asking you if you want to setup cron. Say yes to those two questions. Finally, you’ll see a message about Reboot required. Go ahead and reboot the rig. You’ve finished the loop installation. Login to the rig again.

Troubleshooting: If your rig gets stuck at the point shown below, simply login to the rig again and run the setup script one more time. Usually, running the setup script a second time will clear that glitch.

Once your setup script finishes, make sure to watch the pump loop logs
NOTE: If you are using RFM69HCW as RF module:
If you have connected your RFM69HCW module as described in Soldering RFM69HCW, while running interactive setup use following options:
Are you using an Explorer HAT? [Y]/n n
Are you using mmeowlink (i.e. with a TI stick)? If not, press enter. If so, paste your full port address: it looks like "/dev/ttySOMETHING" without the quotes.
What is your TTY port? /dev/spidev0.0
Ok, TTY /dev/spidev0.0 it is.
Would you like to [D]ownload released precompiled Go pump communication library or install an [U]nofficial (possibly untested) version.[D]/U u
You could either build the Medtronic library from [S]ource, or type the version tag you would like to use, example 'v2018.08.08' [S]/<version> s
Building Go pump binaries from source
What type of radio do you use? [1] for cc1101 [2] for CC1110 or CC1111 [3] for RFM69HCW radio module 1/[2]/3 3
Building Go pump binaries from source with + radiotags + tags.
after running oref0-setup.sh run the following:
$ rm -rf ~/go/src/github.com/ecc1
$ go get -u -v -tags "rfm69 walrus" github.com/ecc1/medtronic/...
$ cp -pruv $HOME/go/bin/* /usr/local/bin/
$ mv /usr/local/bin/mmtune /usr/local/bin/Go-mmtune
This will help in building the right pump communication libraries.
- You’ll want to also delete the openaps-menu folder to avoid error messages in your logs.
rm -rf ~/src/openaps-menu/ - If you experience something like this:
2019/01/14 15:14:25 cannot connect to CC111x radio on /dev/spidev0.0
2019/01/14 15:14:25 cc111x: no response
Usage: grep [OPTION]... PATTERN [FILE]...
Try 'grep --help' for more information.
That means you have probably run the oref-runagain.sh script. Currently, with RFM69HCW, you can’t use the runagain script. Please run the interactive setup script (cd && ~/src/oref0/bin/oref0-setup.sh). Other option would be you didn’t solder diligently enough. Before disassembling and resoldering, try running the interactive script first. It’s less work.
Option B
Download Raspbian and write it to your microSD card
Following the install instructions, download Raspbian Lite (you do not want Raspbian Desktop) and write it to an microSD card using Etcher.
Place your wifi and ssh configs on the new microSD card
Once Etcher has finished writing the image to the microSD card, remove the microSD card from your computer and plug it right back in, so the boot partition shows up in Finder / Explorer.
Create a file named wpa_supplicant.conf on the boot drive, with your wifi network(s) configured. The file must be in a Unix format. If creating the file in Windows, use an editor that allows you to save the file in Unix format instead of DOS format. There are many editors with this ability. Notepad++ is one that works well. The file should look something like:
country=xx
ctrl_interface=DIR=/var/run/wpa_supplicant GROUP=netdev
update_config=1
network={
ssid="MyWirelessNetwork"
psk="MyWirelessPassword"
}
You will need to replace xx after country with the correct ISO3166-1 Alpha-2 country code for your country (such as US, UK, DE, etc) - otherwise wifi will remain disabled on the Pi.
To enable SSH login to the Pi, you will need to create an empty file named ssh (with no file extention).
On Windows, you can make this file appear on your Desktop by opening the command prompt and typing:
cd %HOMEPATH%\Desktop
type NUL > ssh
On a Mac, the equivalent command is:
cd ~/Desktop/
touch ssh
When you are done, copy it from your Desktop to the boot drive of your SD card.
Boot up your Pi and connect to it
Eject the microSD card from your computer, insert it into your Pi, and plug in power to the Pi to turn it on. Give it a couple minutes to boot up. Once the green LED stops blinking as much, you can try to log in.
On Mac, open Terminal and ssh pi@raspberrypi.local
On Windows, use PuTTY and establish an SSH connection, with username pi, to hostname raspberrypi.local.
The default password for logging in as pi is raspberry. The pi username and default password is only used for this initial connection: subsequently you’ll log in as root with a password and rig hostname of your choosing.
Run openaps-install.sh
Once you’re logged in, run the following commands to start the OpenAPS install process:
sudo bash
curl -s https://raw.githubusercontent.com/openaps/oref0/dev/bin/openaps-install.sh > /tmp/openaps-install.sh && bash /tmp/openaps-install.sh
You’ll be prompted to set a password. You’ll want to change it to something personal so your device is secure. Make sure to write down/remember your password; this is what you’ll use to log in to your rig moving forward. You’ll type it twice. There is no recovery of this password if you forget it. You will have to start over from the top of this page if you forget your password.
- Change your hostname (a.k.a, your rig’s name). Make sure to write down your hostname; this is how you will log in in the future as
ssh root@whatyounamedit.local - Pick your time zone (e.g., In the US, you’d select
USand then scroll and find your time zone, such asPacific Newif you’re in California).
The script will then continue to run awhile longer (~10+ minutes) before asking you to press enter to run oref0-setup.
Return to the setup script page to complete oref0-setup.
If you are installing to a Pi with a legacy radio (Ti-stick, SliceOfRadio, etc.) - Press enter. Jump to finishing the installation
If you are installing to a newer Pi with a HAT as radio: Do not press enter! Continue on to Pi-Hat instructions..
Step 3: Setup script
- If you pressed
enterto continuing on with the setup script at the end of the bootstrap script, you do NOT need to specifically enter the command in the box below. By pressingenterto continuing on with setup script, the command was automatically started for you. - If you pressed
control-cto end at the completion of the bootstrap script and did not continue automatically with setup script, this is where you’ll pick back up. At this point, your rig should have your first wifi connection finished and your dependencies installed.
Log in to your rig and run the following command (aka “the setup script”):
`cd && ~/src/oref0/bin/oref0-setup.sh`
If this is your first time logging into the rig since running bootstrap script, you will have to change your rig’s password on this first login. You will enter the default password first of edison and then be prompted to enter your new password twice in a row. If you get an error, it is likely that you forgot to enter edison at the first prompt for changing the password.
Be prepared to enter the following information into the setup script:
The screenshot below shows an example of the questions you’ll be prompted to reply to during the setup script (oref0-setup). Your answers will depend on the particulars of your setup. Also, don’t expect the rainbow colored background - that’s just to help you see each of the sections it will ask you about!
- 6-digit serial number of your pump
- whether you are using an 512/712 model pump (those require special setup steps that other model pumps do not)
- whether you are using an Explorer board
- if not an Explorer board, and not a Carelink stick, you’ll need to enter the mmeowlink port for TI stick. See here for directions on finding your port
- if you’re using a Carelink, you will NOT be using mmeowlink. After you finish setup you need to check if the line
radio_type = carelinkis present in yourpump.inifile.
- CGM method: The options are
g4-upload,g4-local-only,g5,mdt, andxdrip.- Note: OpenAPS also attempts to get BG data from your Nightscout. OpenAPS will always use the most recent BG data regardless of the source. As a consequence, if you use FreeStyle Libre or any other CGM system that gets its data only from Nightscout, you’ll be fine choosing any of the options above.
- Note: For Medtronic 640G (CGM) users, it is recommended that you enter ‘xdrip’ - otherwise the BG values may not be read from your Nightscout. (The reason being, the ‘MDT’ option applies only for the enlite sensor attached to the actual pump you’re looping with)
- Note: G4-upload will allow you to have raw data when the G4 receiver is plugged directly into the rig.
- Nightscout URL and API secret (or NS authentication token, if you use that option)
- BT MAC address of your phone, if you want to pair for BT tethering to personal hotspot (letters should be in all caps)
- Note, you’ll still need to do finish the BT tethering as outlined here after setup.
- Your desired max-iob
- whether you want Autosensitivity and/or Autotune enabled
- whether you want any carbs-required Pushover notifications (and if you do, you’ll need your Pushover API token and User Key)

At the end of the questions, the script will ask if you want to continue. Review the information provided in the “to run again with these same options” area...check for any typos. If everything looks correct, then press y to continue. If you see a typo, press n and then type cd && ~/src/oref0/bin/oref0-setup.sh to start the setup questions over again.
After the setup script finishes building your loop (called myopenaps), it will ask if you want to schedule a cron (in other words, automate and turn on your loop) and remove any existing cron. You’ll want to answer y to both - and also then press enter to reboot after the cron is installed. If your setup script stalls out before those two questions happen, rerun the setup script again.
Log rotate fix
Click here to expand notes about checking log rotate, which was fixed in 0.6.1:
Make sure that at the end of the setup script, your log rotate file is set to daily as described below. Most users will have the compress line properly edited already, but the log rotate file seems to be left at weekly for many users. If you leave the setup at weekly, you will likely get a device full error in your pump logs within a week...so please check this before moving on!
- Enter
vi /etc/logrotate.confthen press “i” for INSERT mode, and make the following changes so that your file matches the one below for the highlighted areas: - set the log rotation to
dailyfromweekly - remove the # from the “#compress” line (if it is present)
- Press ESC and then type
:wqto save and quit
512 and 712 Pump users only - important extra setup steps
If you have one of the x12 model pumps, you can still successfully use OpenAPS for basic looping (but not some advanced featuers like SMB). You’ll need to complete some extra setup tweaks before your loop will be successful, however.
Note: If you have an old rig running oref0 0.5.3 or below, you’ll need to follow historical instructions. The instructions below reflect the adjusted oref0-setup.sh in 0.6.0 and beyond, that does some of this work manually.
Most important step - make sure you said yes (y) in oref0-setup.sh
During the interactive setup script, one early question is about whether you have an x12 pump. This means you, if you have a 512 or 712 pump you’re setting up. Make sure to type Y or y and see the confirmation that you’ll be using an x12 pump.
Edit the three (3) necessary files: basal, settings, and targets
At the end of the oref0-setup.sh script, it will open the most important file for you to edit - your basal profile. Edit this file to match your preferred basal rates and timing.
Note: The "minutes" is "minutes from midnight". e.g., a basal starting at 5:00am
will have a minutes entry of 5 x 60 = 300 minutes and a basal starting at 7:30am
will have a minutes entry of 7.5 x 60 = 450 minutes.
If you have a basal rate less than 1.0 unit/hour,
make sure to include a zero before the decimal point such as `0.55`
After you ctrl-x and hit “y” to save the file, you’ll also see a reminder to further adjust other files with your settings in order to loop off of your information.
- If you need to edit your basal rate file in the future, simply type
nano ~/myopenaps/settings/basal_profile.jsonfrom the command line.
To edit and set your maxBasal or your DIA:
nano ~/myopenaps/settings/settings.json
Finally, to set your targets:
nano ~/myopenaps/settings/bg_targets_raw.json
Examples of the three file types
To see examples of each of these three files, see below.
Sample file for settings.json
notes are added with # on the lines you want to adjust or pay attention to in particular
{
"maxBasal": 1.5, #adjust to your preferred max temp basal rate
"temp_basal": {
"percent": 100,
"type": "Units/hour"
},
"insulin_action_curve": 6 #adjust to your selected duration of insulin action in whole hour increments
}
Sample file for bg-targets-raw.json
Note: the “offset” entry is the minutes since midnight for that particular target to start. The profile always starts with a midnight rate first, offset is 0. The next BG target, in this example, starts at 6 am and therefore has an offset of 360 minutes (6 hours from midnight at 60 minutes per hour). Target range can have the same bg value for high and low, if desired, but be careful not to have a high target set lower than the low target.
You can add or delete bg targets to the sample file below, but pay close attention to syntax. The last bg target range in the profile needs end without a comma after the last }
{
"units": "mg/dL",
"targets": [
{
"high": 120,
"start": "00:00:00",
"low": 110,
"offset": 0,
"i": 0,
"x": 0
},
{
"high": 110,
"start": "06:00:00",
"low": 110,
"offset": 360,
"i": 12,
"x": 1
},
{
"high": 120,
"start": "20:00:00",
"low": 110,
"offset": 1200,
"i": 40,
"x": 2
}
],
"first": 1
}
Sample file for selected-basal-profile.json
Note: The format for the basal rates is the “minutes” value refers to the “minutes from midnight” for whatever rate schedule you are setting. For example, the 6:00 am rate in the example file below is a rate of 1.15 units/hour and 6:00 am is 360 minutes since midnight passed (6 hours x 60 minutes per hour).
If you have a basal rate less than 1.0 unit/hour, make sure to include a zero before the decimal point such as 0.55
You can add or delete basal rates to the sample file below, but pay close attention to syntax. The last basal rate in the profile needs end without a comma after the last }
[
{
"i": 0,
"start": "00:00:00",
"rate": 1.15,
"minutes": 0
},
{
"i": 1,
"start": "02:30:00",
"rate": 1.20,
"minutes": 150
},
{
"i": 2,
"start": "06:00:00",
"rate": 1.15,
"minutes": 360
},
{
"i": 3,
"start": "09:00:00",
"rate": 1.05,
"minutes": 600
},
{
"i": 4,
"start": "11:30:00",
"rate": 1.05,
"minutes": 690
},
{
"i": 5,
"start": "14:00:00",
"rate": 1.05,
"minutes": 840
},
{
"i": 6,
"start": "18:30:00",
"rate": 1.05,
"minutes": 1110
},
{
"i": 7,
"start": "23:00:00",
"rate": 1.05,
"minutes": 1380
}
]
Step 4: Watch your Pump-Loop Log
THIS IS A REQUIRED MUST-LEARN HOW-TO STEP - DO NOT MOVE ON WITHOUT DOING THIS! This is a key skill for monitoring your OpenAPS setup to “check” or “monitor” or “watch” the logs.
It’s easy: simply type the letter l (short for “log”, aka the very important pump-loop.log). (This is a shortcut for the full command, tail -F /var/log/openaps/pump-loop.log.)
What you’ll see while waiting for your first loop (common non-error messages)
If this is your first rig, you are probably (1) going to underestimate how long it takes for the first loop to successfully run and (2) while underestimating the time, you’ll freak out over the messages you see in the pump-loop logs. Let’s go over what are NOT errors:

Click here to expand the explanation of the non-error messages
When your loop very first starts, if you are quick enough to get into the logs before the first BG is read, you will likely see:
Waiting up to 4 minutes for new BG: jq: monitor/glucose.json: No such file or directory
date: invalid date '@'
Don’t worry...once you get a BG reading in, that error will go away.
The next not-error you may see:
ls: cannot access monitor/pump_loop_completed: No such file or directory
Don’t worry about that one either. It’s only going to show because there hasn’t been a completely loop yet. Once a loop completes, that file gets created and the “error” message will stop.
Next frequently confused non-error:
Waiting for silence: Radio ok. Listening.....No pump comms detected from other rigs
Well, hey that’s actually a good message. It’s saying “I don’t hear any interruptions from other rigs, so I won’t be needing to wait my turn to talk to the pump.” That message will continue to show even when your loop is successfully running.
As the pump loop continues:
Refreshed jq: settings/pumphistory-24h-zoned.json: No such file or directory
That message will clear out once the pump history has successfully been read.
Or how about the fact that autotune hasn’t run yet, but you enabled it during setup:
Old settings refresh Could not parse autotune_data
Autotune only runs at 4:05am every morning. So if autotune has not yet run, you must wait for that error message to clear out, or run it manually. You can still loop while that message is showing. Additionally, you’ll have to wait until autotune runs before SMBs can be enacted. (SMBs won’t enact unless an Autotune directory exists.)
And then you may have an issue about the time on your pump not matching your rig’s time:
Pump clock is more than 1m off: attempting to reset it
Waiting for ntpd to synchronize....No!
ntpd did not synchronize.
This synchronization may fail a few times before it actually succeeds...be patient. There’s a script called oref0-set-device-clocks that will eventually (assuming you have internet connection) use the internet to sync the rig and pump’s times automatically when they are more than 1 minute different. (If you don’t have internet connection, you may need to do that yourself on the pump manually.)
How about these daunting messages:
Optional feature meal assist disabled: not enough glucose data to calculate carb absorption; found: 4
and
carbsReq: NaN CI Duration: NaN hours and ACI Duration: NaN hours
and
"carbs":0, "reason": "not enough glucose data to calculate carb absorption"
Advanced meal assist requires at least 36 BG readings before it can begin to calculate its necessary data. So after about three hours of looping these messages will clear out. You can watch the count-up of “found” BG readings and know when you are getting close.
What you’ll see when you are looping successfully ~20+ minutes later!
Finally, you should eventually see colorful indications of successful looping, with a message saying “Starting with oref0-pump-loop” and ending with “Completed oref0-pump-loop”

Reading these should give you an idea for what OpenAPS knows: current BG, changes in BG, information about netIOB (taking into account any temp basals it has set along with any boluses you have done), carbs on board, etc. Plus, it will give you information about the predictions and show you the data points it is using to draw the “purple prediction lines” in Nightscout. It also will tell you what, if anything, is limiting it’s ability to give more insulin - e.g. if you have maxIOB at 0, or it is capped by one of the safety settings, etc. This information is a longer version of the information that will show in the “OpenAPS pill” on Nightscout. And - this is where it will tell you what insulin it thinks you need (more/less and how much) and what temporary basal rate (temp basal) it will try to set next to adjust and bring your eventualBG prediction into your target range. (For more details on how to interpret the OpenAPS math and information, see this page for understanding OpenAPS determine-basal.)
If after 20 minutes, you still have some errors showing instead of the above successful looping information, it may be time to head over to the Troubleshooting oref0-setup tips page for ideas on your error messages and how to resolve them. IF you aren’t able to resolve your errors, please make sure that you have captured the error messages before heading over to Gitter or Facebook to get help. Troubleshooting is far more successful when you come prepared with the error messages.
Done watching the logs? Type control-C to exit the pump-loop log.
Temp basals > 6.3, ISF > 255 or carb ratio > 25 with a x23 or x54?
Expand here for notes:
- If your rig tries and fails to set a temp basal > 6.3 you should see “ValueError: byte must be in range(0, 256)” in the log.
- If your pump ISF setting is > 255 the ISF shown in the log and in the OpenAPS pill in Nightscout will be 256 less than the actual pump setting (257 will show as 1).
- If your pump carb ratio is > 25 and you have a x23 or x54 pump you will see a message about “carb ratio out of bounds” in the log.
To fix these problems you need to update decocare. This is easy. Type control-C to exit the pump-loop log. Then copy the following 3 lines to the terminal window.
cd ~/src && git clone git://github.com/openaps/decocare.git
cd decocare
python setup.py install
Rig Logs and Shortcut commands - bookmark this section!
Checking your pump-loop.log is a great place to start anytime you are having looping failures. Your error may not be in the pump-loop, but the majority of the time, you’ll get a good head start on the issue by looking at the logs first. So, develop a good habit of checking the pump-loop log to get to know what a normal log looks like so that when a real error appears, you can easily see it as out of place and needing to be addressed. Additionally, knowing how to access your pump-loop log is important if you come to Gitter or Facebook looking for troubleshooting help...one of the first questions will usually be “what does your pump-loop log look like?” or “what do the logs say?”
Note: The pump-loop log is not the only log your rig generates. There are also several other loop logs contained within your OpenAPS setup such as:
- Autosens log:
tail -F /var/log/openaps/autosens-loop.log - Nightscout log:
tail -F /var/log/openaps/ns-loop.log - Network log:
tail -F /var/log/openaps/network.log - Autotune log:
tail -F /var/log/openaps/autotune.log(remember Autotune only runs at midnight (or at 4AM starting from 0.6.0-rc1), so there’s not much action in that log)
These logs and other files are things you may frequently access. There are shortcuts built in to help you more easily access key files on the go. The l you type for logs is an example of one of these shortcuts - it’s actually a shortcut for the full command tail -F /var/log/openaps/pump-loop.log. Here are other shortcuts:
--View live logs--
l => tail -F /var/log/openaps/pump-loop.log
autosens-looplog => tail -n 100 -F /var/log/openaps/autosens-loop.log
autotunelog => tail -n 100 -F /var/log/openaps/autotune.log
ns-looplog => tail -n 100 -F /var/log/openaps/ns-loop.log
pump-looplog => tail -n 100 -F /var/log/openaps/pump-loop.log
networklog => tail -n 100 -F /var/log/openaps/network.log
xdrip-looplog => tail -n 100 -F /var/log/openaps/xdrip-loop.log
cgm-looplog => tail -n 100 -F /var/log/openaps/cgm-loop.log
urchin-looplog => tail -n 100 -F /var/log/openaps/urchin-loop.log
* to quit watching, press Ctrl+C
--View settings/logs/info--
cat-pref => cd ~/myopenaps && cat preferences.json
cat-wifi => cat /etc/wpa_supplicant/wpa_supplicant.conf
cat-autotune => cd ~/myopenaps/autotune && cat autotune_recommendations.log
cat-runagain => cd ~/myopenaps && cat oref0-runagain.sh
git-branch => cd ~/src/oref0 && git branch
edison-battery => cd ~/myopenaps/monitor && cat edison-battery.json
cat-reservoir => cd ~/myopenaps/monitor && cat reservoir.json
--Edit settings--
edit-wifi => vi /etc/wpa_supplicant/wpa_supplicant.conf
edit-pref => cd ~/myopenaps && vi preferences.json
edit-runagain => cd ~/myopenaps && nano oref0-runagain.sh
To use these shortcuts, just type in the phrase you see on the left - e.g. edit-wifi and hit enter.
Step 5: Finish your OpenAPS setup
You’re looping? Congrats! However, you’re not done quite done yet.
Shortly after you confirm your loop is running, you should set your preferences. Don’t forget, your preferences are reset to defaults after each run of a setup script, so please remember to check preferences after confirming a loop is successfully run/rerun.
So you think you’re looping? Now keep up to date!
If you’ve gone “live” with your loop, congratulations! You’ll probably want to keep a very close eye on the system and validate the outputs for a while. (For every person, this amount of time varies).
One important final step, in addition to continuing to keep an eye on your system, is letting us know that you are looping.
This is important in case there are any major changes to the system that we need to notify you about. One example where this was necessary is when we switched from 2015 to 2016: the dates were incorrectly reporting as 2000, resulting in incorrect IOB calculations. As a result, we needed to notify current loopers so they could make the necessary update/upgrade.
After you have looped for three consecutive nights:
So that we can notify you if necessary, please fill out this form if you have been looping for 3+ days. Your information will not be shared in any way. You can indicate your preferred privacy levels in the form. As an alternative, if you do not want to input info, please email dana@openaps.org. Again, this is so you can be notified in the case of a major bug find/fix that needs to be deployed.
Note: you only ever need to fill this form out once. If you’re building multiple rigs, or switching between DIY systems, no need to fill this out multiple times. We’re just counting - and wanting to connect with in terms of safety announcements - humans. :)
Optional step: improving the battery life of your Raspberry Pi
!! Important for Enlite users: If you are using Enlite as CGM source, your rig will not work when it’s underclocked, since the loop will not run fast enough! (You will always see the “BG too old” error). We are aware of that issue and try to find a solution...
Version - CPU Clock - Battery Life @ 2500mAh (Li-Po)
- 0.6.2 - 1000 MHz - 8 hours
- 0.7.0-dev - 1000 MHz - 9 hours
- 0.7.0-dev - 500 MHz - 14.5 hours
As you can see, 0.7.0 made some battery life improvements, but under-clocking the CPU makes an even more significant improvement.
To accomplish this, log into your rig via SSH and modify the file /boot/config.txt.
Scroll down to find the line
#arm_freq=1000
and change it to
arm_freq=500
Note the removal of the # at the beginning of the line. Save your change and reboot your rig!
Customizing your closed loop
As your time permits, there’s still more useful and cool things you can do to make looping more efficient and automated.
- First, review some common situations you may encounter and practical advice for using your loop.
- Add more wifi networks to your rig so that when you are away from home, the rig has access to trusted wifi networks
- Set up Papertrail Papertrail will even allow you to remotely track your logs when you are not logged into your rig. Setting up Papertrail and watching your logs will dramatically help you understand your rig and help troubleshoot if you run into problems.
- Set up IFTTT for your phone or watch to allow you to use Nightscout’s temp targets, carb entries, and similar for single button interactions with your rig
- Finish Bluetooth tethering your phone so that when you are away from trusted wifi networks, your rig can automatically access your phone’s mobile hotspot for continued online looping.
- Learn about offline looping for times when your rig is not able to access internet (no wifi, no hotspot).
- Additional access to your rig via other types of mobile apps. Grab some of these other apps, based on your preference, for accessing your rig in different ways.
Remember, the performance of your DIY closed loop is up to you. Make sure you at least look at the rest of the documentation for help with troubleshooting, ideas about advanced features you can implement in the future when you’re comfortable with baseline looping, and more. Plus, the docs are updated frequently, so it’s worth bookmarking and checking back periodically to see what features and preference options have been added.
Logging into your Explorer Board rig via console
Prerequisites for Windows users
- Install the Intel Edison drivers for Windows. Select the “Windows standalone driver” download if available. (Note: Intel has announced the Edison will be discontinued at the end of 2017. As part of this, apparently, the old link to Edison drivers has been removed. We are unsure if this is a temporary issue or long term. Therefore, if the link above for Intel Edison Drivers is not working, you can use this link to download them directly from an OpenAPS user’s dropbox. Obviously screenshots below will be different if Intel has not fixed or repaired their driver downloads page for Edisons.) After it is done downloading, click on the downloaded file and it will execute installation. You do not need to reflash the Edison or setup security or Wi-Fi with this tool because later steps in this process will overwrite those settings.


- Install PuTTY. PuTTY is the program you will normally use to login to your rig in the future from the computer. Creating a desktop shortcut for it is a good idea, since you will likely use it often. Download the installation file that matches your PC’s architecture (32-bit or 64-bit). If you are unsure, you can check your computer’s build and memory in the Control Panel. Example shown is for a 64-bit computer. If unsure, installing the 32-bit version won’t harm anything...it just might be a little slower to use PuTTY.


Plugging in cables and starting console
Your Explorer Board has 2 micro USB connectors. They can both provide power. On the community developed Edison Explorer Board, the port labeled OTG is for flashing, and the one labeled UART provides console login. You must connect both ports to your computer to complete the flash process. If you need to log into the rig using the console in the future, you will only need to connect to the UART port.
You must use DATA micro USB to USB cables. How do you know if your cable is for data? One good way is to plug the cable into your computer USB port and the explorer board OTG port. If your folder/window explorer shows Edison as a drive then the cable supports data. If you don’t… 1) Try unplugging and replugging the existing cables; 2) try different cables. If your USB port is bad and not recognizing the device, you may need to reset your SMC first (it’s not hard to do, takes 2 minutes.)

Note: If you are using a Macbook with a USB-C Hub you may encounter some issues with the flashing process, including unexpected rebooting and the wireless LAN setup not functioning correctly. If you have an option to use a PC or Laptop with directly connected USB cables, it will be easier to do so. Direct USB-C to micro-USB cables are better than a hub and a USB-to-microUSB cable, but still not as good as a regular USB port.
- Connect a USB cable (one that carries data, not just power) to the USB console port. On the Explorer board or Sparkfun base block, this is the port labeled
UART. On the Intel mini breakout board, this is the USB port that is labeled P6 (should be the USB closest to the JST battery connector). Plug the other end into the computer (or Pi) you want to use to connect to console. - Plug another USB cable (one that carries data, not just power) into the USB port labeled OTG on the Explorer board or Sparkfun base block, or the port that is almost in the on the bottom right (if reading the Intel logo) if setting up with the Intel mini breakout board. Plug the other end into the computer (or Pi) you want to flash from.

If you’re using a Raspberry Pi or Mac for console:
- Open a terminal window and type
sudo screen /dev/tty.usbserial-* 115200 - If you do not have screen installed you can install with
sudo apt-get install screen. - If necessary, replace the ‘*‘ with your Edison UART serial number, obtained using lsusb.
- You’ll most likely be asked for your computer password again because you’re using sudo. Enter it.
- Continue with the All platforms section below.
If you’re using a Windows PC for console:
- Once you plug in the cable, you need to determine which COM number it’s using. On your computer, go to Control Panel\All Control Panel Items\Device Manager\Ports\ and look for USB Serial Port COMXX. If you have multiple and are unsure of which is the port you need: Make note of existing ports. Unplug the cable from the Explorer board. Notice which port disappears. This is the port you are looking for. (If only one shows up, that is your Edison’s port.)

Open PuTTY, and change from SSH to Serial. It normally defaults to COM1 and speed of 9600. Change the COM number to the number you found when you plugged into the Explorer board. Change the speed (baud rate) to 115200.

Once you’ve made those changes, Click on OPEN at the bottom of your Putty configuration window.
Continue with the All platforms section below.
All platforms:
- Once the screen comes up, press enter a few times to wake things up. This will give you a “console” view of what is happening on your Edison.
- Now you will see a login prompt for the edison on the console screen.
- Don’t resize your console window: it will likely mess up your terminal’s line wrapping. (Once you get wifi working and connect with SSH you can resize safely.)
If you have a problem getting to the Edison login prompt, and possibly get a warning like “can’t find a PTY”, exit your console window. Then unplug the usb cables from your computer (not from the Edison... leave those ones as is) and swap the USB ports they were plugged into. Then try the above directions again. Usually just changing the USB ports for the cables will fix that “can’t find a PTY” error.
Not sure of your password?
You should have changed your rig’s root password during setup; if not, please [go back and do so now](../Build Your Rig/step-1-flashing). The default password is most likely “edison” without quotes, but check the slip of paper that might have come with your pre-flashed Edison.
Understanding the determine-basal logic
The core, lowest level logic behind any oref0 implementation of OpenAPS can be found in oref0/lib/determine-basal/determine-basal.js. That code pulls together the required inputs (namely, recent CGM readings, current pump settings, including insulin on board and carbohydrates consumed, and your profile settings) and performs the calculations to make the recommended changes in temp basal rates that OpenAPS could/will enact.
Basic diabetes math
OpenAPS follows the same logic that a person with diabetes uses to make dosing decisions. Generally, this means looking at the current BG; subtracting the target; and applying your ISF (correction factor) to determine how much insulin is needed to correct the blood sugar to target. You can subtract any “insulin on board” from the amount needed. You can also add insulin needed to cover carbohydrates.
In OpenAPS, we can do both a positive (more insulin) and a negative (less insulin) correction by making adjustments to your underlying basal rates to adjust insulin up or down to help bring the “eventual” BG into target.
OpenAPS decision inputs
In OpenAPS, we take the same inputs you would use to manually decide what to do, but we also factor other things into our calculation.
This includes:
Blood glucose information
delta= change in BG betweenglucose(most recent BG) and an average of BG value from between 2.5 and 7.5 minutes ago (usually just a single BG value from 5 minutes ago)glucose= most recent BGshort_avgdelta= average rate of change (per 5m) in BG values betweenglucose(most recent BG) and each BG reading from 2.5 to 17.5 minutes agolong_avgdelta= average rate of change (per 5m) in BG values betweenglucose(most recent BG) and each BG reading from 17.5 to 42.5 minutes ago
Past insulin dosing information, pulled from your pump
iob= Units of Insulin on Board (IOB), net of your pre-programmed basal rates. Net IOB takes all pre-programmed basal, OpenAPS temp basal, and bolus insulin into account. Note:iobcan be negative when OpenAPS temp basal rate is below your pre-programmed basal rate (referred to as “low-temping”). This will always be different than pump-calculated IOB, because it only takes into account boluses - ignore pump IOB. This is a high level overview, but you can dive into more detail around how insulin activity is calculated here.basaliob= Units of net basal Insulin on Board (IOB). This value does not include the IOB effects of boluses; just the difference between OpenAPS temp basal rates and your pre-programmed basal rates. As such, this value can be negative when OpenAPS has set a low-temp basal rate.bolusiob= Units of bolus Insulin on Board. Does not take into account any temp basals.
We also add other calculations that we do to better predict and analyze what is happening:
devordeviation= how much actual BG change is deviating from the BGIBGI(Blood Glucose Impact) = the degree to which BG “should” be rising or falling based on insulin activity alone.ISF(Insulin Sensitivity Factor; sometimes known as correction factor) = ISF is anchored from the value in your pump; but if you use autotune and/or autosens, the ISF value shown is what is currently being used by OpenAPS, as modified by the Sensitivity RatioCR(Carb Ratio) = As with ISF, it is anchored from the value in your pump; but if you use autotune and/or autosens, the CR value shown is what is currently being used by OpenAPSEventual BG= what BG is estimated to be by the end of DIAminGuardBG, IOBpredBG, UAMpredBG= eventual BG predictions based on 1) the lowest your BG is estimated to get over DIA; 2) predictions based on IOB only; and 3) predictions based on current deviations ramping down to zero at the same rate they have been recently. These represent the last entry on the purple prediction lines.Sensitivity Ratio= the ratio of how sensitive or resistant you are. This ratio is calculated by “Autosensitivity” (or “autosens”), and this ratio is applied to both basal and ISF to adjust accordingly. <1.0 = sensitive; >1.0 = resistant. If your preferences allow it, sensitivityRatio can also be modified by temp targets.Target= pulled from your pump target; overridden if you have enacted a temporary target running.Carb Impact= we estimate carb impact by looking at what we predict to happen with your carbs entered (predCI) and adding it to our estimate of the remaining carb impact (remainingCI)Safety Threshold=min_bg - 0.5*(min_bg-40)wheremin_bgis your BG target

You may also see information about settings, either from your pump or from your preferences.json file, that are limiting the insulin dosing decisions that OpenAPS would otherwise make. Make sure to read the preferences page before you set up OpenAPS to understand what settings you have by default, and know how to get back to that page if you ever see a setting displayed in your pill. There is also a handy chart with examples to help you understand how settings may impact the dosing output.
OpenAPS decision outputs
After taking into account all of the above, oref0 will put out a recommendation of what needs to be done. This also includes the explanation of the variables above, so you can check and assess if you think it’s doing the right thing. Generally, it will display all of the above values, plus the output of the decision of any temporary basal rates and/or boluses it decides it needs. This is the “reason” field.
- Temp basals will be displayed with the
duration(length of time temp basal will run. A duration of 0 indicates none is running) andrate(units/hr basal rate). - You may also see
insulinReq, showing how much insulin is needed. This usually displays when OpenAPS is prepping to issue SMB’s (an advanced setting).
Understanding the purple prediction lines
Once you enable forecast display in your Nightscout configuration, you will be able to see multiple purple line predictions. To do this, click the three dots next to your timeframe horizon (3HR, 6HR, 12HR, 24HR) and then enable “Show OpenAPS Forecasts”. Once enabled, you will have multiple purple line predictions in Nightscout. These purple lines show you the different predictions based on current carb absorption; insulin only; (optional feature: unannounced meal/effect detection); and showing how long it will take BG to level off at/above target if deviations suddenly cease and we run a zero temp until then.
These purple lines are helpful in understanding, at a glance, why OpenAPS is making the decisions it is, based on your near-term and longer-term BG predictions.

OpenAPS algorithm examples
Scenario 1 - Zero Temp for safety
In this example, BG is rising in the near-term time frame; however, it is predicted to be low over a longer time frame. In fact, it is predicted to go below target and the safety threshold. For safety to prevent the low, OpenAPS will issue a zero temp, until the eventualBG (in any time frame) is above threshold.

Scenario 2 - Zero temp for safety
In this example, BG is predicted to go low in the near-term, although you are predicted to eventually be above target. However, because the near-term low is actually below the safety threshold, OpenAPS will issue a zero temp, until there is no longer any point of the prediction line that is below threshold.

Scenario 3 - More insulin needed
In this example, a near-term prediction shows a dip below target. However, it is not predicted to be below the safety threshold. The eventual BG is above target. Therefore, OpenAPS will restrain from adding any insulin that would contribute to a near-term low (by adding insulin that would make the prediction go below threshold). It will then assess adding insulin to bring the lowest level of the eventual predicted BG down to target, once it is safe to do so. (Depending on your settings and the amount and timing of insulin required, this insulin may be delivered via temp basals or SMB’s).

Scenario 4 - Low temping for safety
In this example, OpenAPS sees that you are spiking well above your target. However, due to the timing of insulin, you already have enough in your body to bring you into range eventually. In fact, you are predicted to eventually be below target. Therefore, OpenAPS will not provide extra insulin so it will not contribute to a longer-timeframe low. Although you are high/rising, a low temporary basal rate is likely here.

Exploring further
For each different situation, the determine-basal output will be slightly different, but it should always provide a reasonable recommendation and list any temp basal that would be needed to start bringing BG back to target. If you are unclear on why it is making a particular recommendation, you can explore further by searching lib/determine-basal/determine-basal.js (the library with the core decision tree logic) for the keywords in the reason field (for example, “setting” in this case would find a line (rT.reason += ", setting " + rate + "U/hr";) matching the output above, and from there you could read up and see what if clauses resulted in making that decision. In this case, it was because (working backwards) if (snoozeBG > profile.min_bg) was false (so we took the else), but if (eventualBG < profile.min_bg) was true (with the explanatory comment to tell you that means “if eventual BG is below target”).
If after reading through the code you are still unclear as to why determine-basal made a given decision (or think it may be the wrong decision for the situation), please join the #intend-to-bolus channel on Gitter or another support channel, paste your output and any other context, and we’ll be happy to discuss with you what it was doing and why, and whether that’s the best thing to do in that and similar situations.
Understanding Insulin on Board (IOB) Calculations
The amount of Insulin on Board (IOB) at any given moment is a key input into the determine-basal logic, which is where all the calculations for setting temporary basal rates or small microboluses (SMBs) takes place. This amount of insulin on board gets passed into oref0/lib/determine-basal/determine-basal.js as part of the iob.json file. That information is then used to project forward blood glucose (BG) trends, which the determine-basal logic then responds to in order to correct course. This piece of the OpenAPS documentation provides an explanation of the assumptions used about how insulin is absorbed and how those assumptions translate into the insulin on board calculations used to project BG trends.
First, some definitions:
- dia: Duration of Insulin Activity. This is the user specified time (in hours) that insulin lasts in their body after a bolus. This value comes from the user’s pump settings.
- end: Duration (in minutes) that insulin is active.
end=dia* 60.
- peak: Duration (in minutes) until insulin action reaches it’s peak activity level.
- activity: This is percent of insulin treatment that was active in the previous minute.”
Insulin Activity
The code in oref0/lib/iob/calculate.js calculates a variable called activityContrib, which has two components: treatment.insulin and a component referenced here as actvity. The unit of measurement for treatment.insulin is units of insulin; the unit of measurement for activity is percent of insulin used each minute and is used to scale the treatment.insulin value to units of insulin used each minute. (There is no variable activity created in oref0/lib/iob/calculate.js. There is, however, a variable called activity created in oref0/lib/iob/total.js, which represents a slightly different concept. See the FINAL NOTE, below, for more details.)
There are three key assumptions the OpenAPS algorithm makes about how insulin activity works in the body:
Assumption #1: Insulin activity increases linearly (in a straight line) until the
peakand then decreases linearly (but at a slightly slower rate) until theend.Assumption #2: All insulin will be used up.
Assumption #3: When insulin activity peaks (and how much insulin is used each minute) depends on a user’s setting for how long it takes for all their insulin to be used up. That setting is their duration of insulin activity (
dia) and generally ranges between 2 and 8 hours. The OpenAPS logic starts off with a default value of 3 hours fordia, which translates into 180 minutes forend, and assumes that insulin activity peaks at 75 minutes. (This is generally in line with findings that rapid acting insluins (Humalog, Novolog, and Apidra, for example) peak between 60 and 90 minutes after an insulin bolus.) This assumption, however, is generalizable to other userdiasettings. That is,peakcan be expressed as a function ofdiaby multiplying by the ratio (75 / 180):peak= f(dia) = (dia* 60 * (75 / 180))So, for example, for a
diaof 4 hours,peakwill be at 100 minutes:100 = (4 * 60 * (75 / 180))
NOTE: The insulin action assumptions described here are set to change with the release of oref0, version 0.6.0. The new assumptions will use exponential functions for the insulin action curves and will allow some user flexibility to use pre-set parameters for different classes of fast-acting insulins (Humalog, Novolog, and Apidra vs. Fiasp, for example). For a discussion of the alternate specifications of insulin action curves, see oref0 Issue #544. When oref0, version 0.6.0 is released and the current assumptions are no longer recommended, this documentation will be updated.
What The Insulin Activity Assumptions Look Like
Given a dia setting of 3 hours, insulin activity peaks at 75 minutes, and between the 74th and 75th minutes, approximately 1.11 percent of the insulin gets used up.

Adding up all the insulin used each minute between 0 and end, will sum to 100 percent of the insulin being used.

The area under the “curve” can be calculated by taking the definite integral for the activity function, but in this simple case the formula for the area of a triangle is much simpler:
Area of a triangle = 1/2 * width * height
= 1/2 * 180 * 1.11
= 99.9 (close enough to 100 -- the actual value for activity is 1.1111111, which gets even closer to 100)
For shorter dia settings, the peak occurs sooner and at a higher rate. For longer dia settings, the peak occurs later and at a lower rate. But for each triangle, the area underneath is equal to 100 percent.

Cumulative Insulin Activity
Given these activity profiles, we can plot cumulative activity curves, which are S-shaped and range from 0 to 100 percent. (Note: This step isn’t taken in the actual oref0/lib/determine-basal/determine-basal.js program, but plotting this out is a useful way to visualize/understand the insulin on board curves.)

Just like how the insulin activity curves shift depending on the setting for dia, the cumulative activity curves do as well.

Insulin on Board
Insulin on board (iob), is the inverse of the cumulative activity curves. Instead of ranging from 0 to 100 percent, they range from 100 to 0 percent. With dia set at 3 hours, about 70 percent of insulin is still available an hour after an insulin dosage, and about 17 percent is still available two hours afterwards.

Similar to how the activity “curves” (triangles) and cumulative actvity curves vary by dia settings, the iob curves also vary by dia setting.

Similar to calculations above, the code in oref0/lib/iob/calculate.js calculates a variable called iobContrib, which has two components: treatment.insulin and and a component referenced here as iob. The unit of measurement for treatment.insulin is units of insulin; the unit of measurement for iob is percent of insulin remaining each minute and is used to scale the treatment.insulin value to units of insulin remaining each minute. (There is no variable iob created in oref0/lib/iob/calculate.js. There is, however, a variable called iob created in oref0/lib/iob/total.js, which represents a slightly different concept. See the FINAL NOTE, below, for more details.)
Finally, two sources to benchmark the iob curves against can be found here and here.
A NOTE ABOUT VARIABLE NAMES: A separate program—
oref0/lib/iob/total.js—
creates variables namedactivityandiob. Those two variables, however, are not the same as theactivityandiobvariables plotted in this documentation page. Those two variables are summations of all insulin treatments still active.
Theactivityandiobconcepts plotted here are expressed in percentage terms and are used to scale thetreatment.insulindosage amounts, so the units for theactivityContribandiobContribvariables are units of insulin per minute and units of insulin remaining at each minute, repectively. Because theactivityandiobvariables in oref0/lib/iob/total.js are just the sums of all insulin treatments, they’re still in the same units of measurements: units of insulin per minute and units of insulin remaining each minute.
Understanding the New IOB Curves Based on Exponential Activity Curves
As mentioned at the top of this page, the next OpenAPS release will have new activity curves available for users to use.
In the new release, users will be able to select between using a “bilinear” (looks like what was plotted above: /) or “exponential” curves. Unlike the bilinear activity curve (which varies only based on dia values in a user’s pump), the new exponential curves will allow users to specify both the dia value to use AND where they believe their peak insulin activity occurs.
A user can select one of three curve default settings:
- bilinear: Same as how the curves work in oref0, version 0.5 – IOB curve is calculated based on a bilinear
activitycurve that varies by user’sdiasetting in their pump. - rapid-acting: This is a default setting for Novolog, Novorapid, Humalog, and Apidra insulins. Selecting this setting will result in OpenAPS to use an exponential
activitycurve withpeakactivity set at 75 minutes anddiaset at 300 minutes (5 hours). - ultra-rapid: This is a default setting for the relatively new Fiasp insulin. Selecting this setting will result in OpenAPS to use an exponential
activitycurve withpeakactivity set at 55 minutes anddiaset at 300 minutes (5 hours).
Note: If rapid-acting or ultra-rapid curves are selected, a user can still choose a custom
peakanddiatime, but subject to two constraints:
diamust be greater than 300 minutes (5 hours); if it’s not, OpenAPS will setdiato 300 minutes.peakmust be set between 35 and 120 minutes; if it’s not, OpenAPS will setpeakto either 75 or 55 minutes, depending on whether the user selected rapid-acting or ultra-rapid default curves.
What Do The Exponential Curves Look Like?
Most commonly, exponential is associated with exponential growth – as in, how quickly bacteria might grow in a petri dish, for example. A little less commonly, exponential is associated with exponential decay – as in, what the radioactive half-life of a particular element might be.
Examples of such exponential growth and exponential decay could look like this:
 (Though the mathematical formulas can be written such that how steep the growth or decay curves can vary quite a bit.)
In the application of exponential curves in modeling how insulin is used in the human body, the trick is to write a mathematical formula that combines some delay in the activity, some rapid growth in the activity to the peak, and then a smooth transition down until all the insulin is used up. (See the Technical Details, below for links to the underlying math.)
With dia set to 5 hours and the peak set to 75 minutes (the default settings for rapid-acting insulins), the exponential activity curves in the OpenAPS dev branch looks like this:

Just like how the bilinear curve in OpenAPS version 0.5.4, the activity curves in version 0.6 will start at zero and end at zero and the area under the curve will sum up to 100 percent of the insulin being used up.

The shape of exponential activity curves can vary by either dia or by peak. Below is what the activity curves look like for three separate peak settings, but holding the dia setting fixed at 5 hours.

A useful way to visualize how the activity curves translate to the iob curves is to first show what the cumulative activity curves look like:

And then the iob curves are just the inverse of the cumulative activity curves:

How Do The Exponential Curves Compare To The Bilinear Curves?
The most important question to a user might be: “Well which set of curves is better for me to use?”
Everyone is different, and their bodies may absorb insulin at different rates. Furthermore, an individual’s insulin absorption may vary from day-to-day or week-to-week for many reasons. But with a lot of parameter settings, finding the best one is often a process of trial-and-error.
That said, the bilinear curve currently used in OpenAPS 0.5.4 is a relatively simple model of how insulin is absorbed. Although it’s a simple model, in many cases it provides decent approximations. The proposed exponential curves are more complex and more closely aligned to how an individual’s body might absorb their insulin. But users may or may not find significant differences in how their OpenAPS performs just by switching to the exponential curves.
You can think of the exponential curve for the default rapid-acting insulin settings (dia = 5 hours, peak = 75 minutes) as being a combination of two bilinear curves. One where dia is set to 3 hours and the peak occurs at 75 minutes; and another one where the dia is set to 5 hours, but the peak occurs at 125 minutes.
 (The area under each of the three curves sums to 100 percent.)
To make a more direct, apples-to-apples, comparison, setting the exponential curve with dia = 5 hours and peak = 125 minutes, the difference between the two curves is a little clearer:
 NOTE: As described above, OpenAPS will NOT allow you to set a
 peak value above 120 minutes. This graph is shown just to make a direct comparison between the two types of curves.
Finally, going back to an exponential curve with dia set to 5 hours and peak set to 75 minutes, the comparison between how the iob curve looks relative to the iob curve using the bilinear activity curve with dia set to 5 hours is probably the most relevant:

The iob curve based on the exponential activity curve has insulin being used up significantly faster than the iob curve based on the bilinear activity curve. After one hour, for example, there is a 13 percent difference in how much insulin is remaining between the two curves, and after 2 hours there is a 17 percent difference between the two curves.
Technical Details
The source for the new functional forms for the exponential curves were calculated by Dragan Macsimovic and can be found as part of a discussion on the LoopKit Github page. There were many others contributing to this discussion, development, and testing of exponential curves for Loop and OpenAPS. The full discussion is very technical, but useful if you want more information on the exponential curves.
Autotune
Autotune is a tool to help calculate potential adjustments to ISF, carb ratio, and basal rates.
This page describes how Autotune works. For information on how to run it, please see Running autotune.
The difference between autotune and autosens
Autosensitivity/resistance mode (aka “autosens”) is a feature in OpenAPS that looks at 24 hours of data and makes adjustments to ISF and targets based on the resulting sensitivity calculations. This can help make global adjustments to your insulin needs for transient changes such as illness, an aging pump site, or variation in activity level.
Autotune, by contrast, is designed to iteratively adjust basals, ISF, and carb ratio over the course of weeks. Because it makes changes more slowly than autosens, autotune ends up drawing on a larger pool of data, and is therefore able to differentiate whether and how basals and/or ISF need to be adjusted, and also whether carb ratio needs to be changed. Whereas we don’t recommend changing basals or ISF based on the output of autosens (because it’s only looking at 24h of data, and can’t tell apart the effects of basals vs. the effect of ISF), autotune is intended to be used to help guide basal, ISF, and carb ratio changes because it’s tracking trends over a large period of time.
Note: Autotune currently tries to tune one ISF and carb ratio throughout the day. Here is the issue if you want to keep track of the work to make autotune work with multiple ISF or carb ratios. If you are running Autotune on an OpenAPS rig and using the results, note that Autotune will only adjust the FIRST ISF and the FIRST carb ratio in your profile. If you have widely-varying ISFs and carb ratios throughout the day, or if Autotune is making relatively large adjustments, this may lead to suboptimal results, as you will be using your original settings the rest of the day. For instance, if Autotune thinks you should receive less basal but use a stronger correction factor (lower ISF), it will make the adjustments to your basal, but the stronger correction factor will be used only during the first segment - which might be say 12am to 4am! Review the output carefully, and consider whether your varying carb ratios and correction factors might be compensating for other variation.
How Autotune works
There are two key pieces: oref0-autotune-prep and oref0-autotune-core. (For more autotune code, you can see oref0-autotune-(multiple files) listed in oref0/bin here - and there are also some autotune files in oref0/lib.
1. oref0-autotune-prep:
- autotune-prep takes three things initially: glucose data; treatments data; and starting profile (originally from pump; afterwards autotune will set a profile)
- It calculates BGI and deviation for each glucose value based on treatments
- Then, it categorizes each glucose value as attributable to either carb sensitivity factor (CSF), ISF, or basals
- To determine if a “datum” is attributable to CSF, carbs on board (COB) are calculated and decayed over time based on observed BGI deviations, using the same algorithm used by Advanced Meal Assist. Glucose values after carb entry are attributed to CSF until COB = 0 and BGI deviation <= 0. Subsequent data is attributed as ISF or basals.
- If BGI is positive (meaning insulin activity is negative), BGI is smaller than 1/4 of basal BGI, or average delta is positive, that data is attributed to basals.
- Otherwise, the data is attributed to ISF.
- All this data is output to a single file with 3 sections: ISF, CSF, and basals.
2. oref0-autotune-core
- autotune-core reads the prepped glucose file with 3 sections. It calculates what adjustments should be made to ISF, CSF, and basals accordingly.
- For basals, it divides the day into hour long increments. It calculates the total deviations for that hour increment and calculates what change in basal would be required to adjust those deviations to 0. It then applies 20% of that change needed to the three hours prior (because of insulin impact time). If increasing basal, it increases each of the 3 hour increments by the same amount. If decreasing basal, it does so proportionally, so the biggest basal is reduced the most.
- For ISF, it calculates the 50th percentile (median) deviation for the entire day and determines how much ISF would need to change to get that deviation to 0. It applies 10% of that as an adjustment to ISF.
- For CSF, it calculates the total deviations over all of the day’s mealtimes and compares to the deviations that are expected based on existing CSF and the known amount of carbs entered, and applies 10% of that adjustment to CSF.
- Autotune limits how far it can adjust (or recommend adjustment, if running autotune outside oref0 closed loop) basal, or ISF or CSF, from what is in the existing pump profile. Autotune uses the same
autosens_maxandautosens_minmultipliers found in your preferences.json for oref0. So if autotune is running as part of your loop, autotune can’t get too far off without a chance for a human to review the changes.
Note: Autotune does not read from the active profile (e.g. Pattern A or Pattern B if set). The Standard Basal Pattern is what will be pulled to be used and tuned by Autotune.
Understanding autotune output
Safety reminders
Autotune is a WIP (work in progress) tool. Do not blindly make changes to your pump settings without careful consideration. You may want to print the output of this tool and discuss any particular changes with your care team. Make note that you probably do not want to make long-term changes based on short term (e.g. 24 hour) data. Most people will choose to make long term changes after reviewing carefully autotune output of 3-4 weeks worth of data.
Example output from autotune
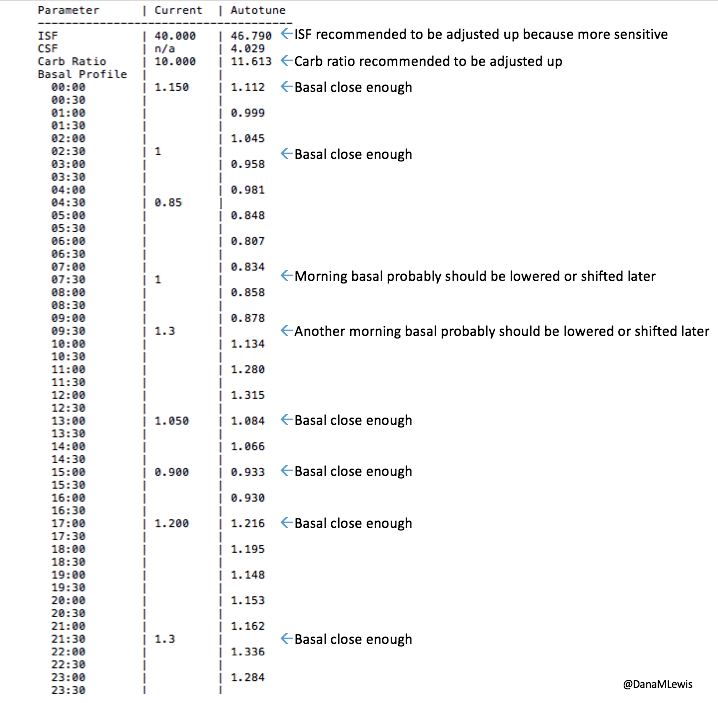
What you’ll see in autotune inputs and outputs
- You might wonder what CSF in the autotune results refers to: Carb Sensitivity Factor is the amount your blood sugar will rise for a given quantity of carbs consumed. An initial value for CSF is calculated from your ISF and carb:insulin ratio (CR), i.e., CSF = ISF / CR (e.g., for an ISF of 42(mg/dL)/U and CR of 14g/U, CSF is 3(mg/dL)/g.) Subsequent autotune estimates for CSF are adjusted for the actual observed post-meal BG rise (relative to what would be expected based on insulin activity) compared to the number of carbs eaten.
- You might wonder what
min_5m_carbimpactin profile.json refers to: It tells autotune how fast to decay carbs when your BG isn’t rising. The default value means to assume 8mg/dL per 5m of carb absorption, even when your BG is falling or rising less than that. - If you only input one basal rate in the profile.json, it will only show one basal in the left hand column, and tune the day around that basal. You can go back and edit the profile.json (and cp again to make all files the same) with your multiple basal rates if you want to appropriately tune and most easily compare the output suggested against what your existing basal schedule is.
If you are DIY closed looping and looking at autotune:
With carbs logged in Nightscout
...you can look at everything that autotune outputs
Without carb information in Nightscout
...you should only look at overnight basals, daytime basals that are not around typical meal times, and (with caution) ISF. Ignore carb ratio.
If you are not DIY closed looping and are looking at autotune:
With all boluses and carb treatments (even rescue, or low carbs) in Nightscout
...you can look at everything that autotune outputs
Without boluses and carb treatments in Nightscout
...don’t use autotune until you log this data.
If you don’t have Nightscout
...it’s probably easiest to set up Nightscout and log some data in order to use autotune. This may change in the future (and let us know if you want to work on ways to bring other data types into autotune).
Auto-sensitivity mode (Autosens)
Wouldn’t it be great if the system knew when you were running sensitive or resistant? That’s what we thought, so we created “auto-sensitivity mode”. Autosens allows the system to analyze historical data on-the-go and make adjustments if it recognizes that you are reacting more sensitively (or conversely, more resistant) to insulin than usual. Autosens will then make temporary adjustments to the basal, ISF, and targets used for calculating temp basals, in order to keep BG closer to your configured target.
The difference between autotune and autosens:
Autosensitivity/resistance mode (aka “autosens”) is an advanced feature in OpenAPS that you can enable that looks at 24 hours of data and makes adjustments to ISF and targets based on the resulting sensitivity calculations. If you have a dying pump site, or have been sick and are resistant, your ISF is likely to be calculated down by autosens and then used in OpenAPS calculations accordingly. The opposite for being more sensitive is true as well. (Here’s a blog post describing autosensitivity during sick days.)
Autosens will make temporary adjustments to whatever basal, ISF, and target profiles are currently set for the loop. If autotune is not enabled, that means autosens will be making on-the-go adjustments based on the settings read from your pump. If autotune is enabled, that means autosens will be using the autotuned-profile as the basis for making adjustments.
Autotune, by contrast, is designed to iteratively adjust basals, ISF, and carb ratio over the course of weeks. Because it makes changes more slowly than autosens, autotune ends up drawing on a larger pool of data, and is therefore able to differentiate whether and how basals and/or ISF need to be adjusted, and also whether carb ratio needs to be changed. Whereas we don’t recommend changing basals or ISF based on the output of autosens (because it’s only looking at 24h of data, and can’t tell apart the effects of basals vs. the effect of ISF), autotune is intended to be used to help guide basal, ISF, and carb ratio changes because it’s tracking trends over a large period of time.
Understanding autosens logs
When you watch your autosens log (shortcut command is autosens-looplog) and sensitivity changes is going to be detected, you might see something like this:
Calculating sensitivity using 8h of non-exluded data
Setting lastSiteChange to Tue Dec 19 2017 09:42:24 GMT-0600 (CST) using timestamp 2017-12-19T09:42:24-06:00
u(xxxxxxxxxxxx11hxxxxxxxxxxxx12h=43g(xxxxxxxxxxxx13hxxxxxxxxxxxx14h=xxx45gxxxxxxxxx15hxxxxxxxxxxx16h=xxxxxxxx17hxxxxxx0gx)u(xxxxx18h=x35g(xx46gxxxxxxxxx19hxxxxxxx38gxxxxx20h=xxxxxxxxxxxx21hxxxxxx-x-x-x-x-x-x-22h=x-x-x-x-x-xxxxxxx23hxx0gx
Using most recent 18 deviations since Tue Dec 19 2017 09:42:24 GMT-0600 (CST)
Adding 15 more zero deviations
36% of non-meal deviations negative (>50% = sensitivity)
Sensitivity normal.
ISF adjusted from 120 to 120
Calculating sensitivity using all non-exluded data (up to 24h)
Setting lastSiteChange to Tue Dec 19 2017 09:42:24 GMT-0600 (CST) using timestamp 2017-12-19T09:42:24-06:00
u(xxxxxxxxxxxx11hxxxxxxxxxxxx12h=43g(xxxxxxxxxxxx13hxxxxxxxxxxxx14h=xxx45gxxxxxxxxx15hxxxxxxxxxxx16h=xxxxxxxx17hxxxxxx0gx)u(xxxxx18h=x35g(xx46gxxxxxxxxx19hxxxxxxx38gxxxxx20h=xxxxxxxxxxxx21hxxxxxx-x-x-x-x-x-x-22h=x-x-x-x-x-xxxxxxx23hxx0gx
Using most recent 18 deviations since Tue Dec 19 2017 09:42:24 GMT-0600 (CST)
Adding 15 more zero deviations
36% of non-meal deviations negative (>50% = sensitivity)
Sensitivity normal.
ISF adjusted from 120 to 120
Using 24h autosens ratio of 1 (ISF 120)
Autosens refreshed: {"ratio":1}
Here’s what each symbol above means:
“x” : deviation is excluded. All deviations are excluded when there is COB through the time that COB drops to zero (carbs are fully absorbed) and deviations go negative once again. This is appropriate to eliminate the impact of rising BG due to carb absorption from sensitivity calcualations and not falsely attribute it to insulin resistance. Deviations may also be excluded becuase of an unexplained high deviation (site failure, etc).
“+” : deviation was above what was expected
“-” : deviation was below what was expected. In addition, if a high temp target is running (e.g. activity mode), a negative deviation is added every 5 minutes, to nudge sensitivityRatio downward to reflect the sensitivity likely to result from activity.
“=” : BGI is doing what we expect. Neutral deviations are also added every 2h to help decay sensitivityRatio back toward 1 if all data is excluded.
“4h” : time stamp to mark hour of day - e.g. 4h = 4am, 22h = 10pm, etc.
“8g” : COB is displayed at any time a new carbs are recorded. Initial carb entry will show as full carbohydrate count followed by “(” with subsequent COB notes (4g) as calculated net COB at any time when additional carbs are entered.
“u” : UAM check is based on total IOB as compared to normal basal rates. If IOB is > 2 hours of basal, UAM will be triggered and will remain until deviations turn negative again (with IOB < 2h basal).
The symbols are in chronological order, moving from oldest to newest. As there are typically CGM readings every 5 minutes, there are usually 12 comparisons each hour
Reviewing autosens adjustments
If you have papertrail setup (or are watching similarly through your rig itself), you can get an idea of how often, how much, and what autosens is adjusting. For example, here’s a screen capture using “adjust” as the search filter for one of my rigs.

As you can see, there are several types of adjustments that have occurred during the day.
- In the morning, autosens was detecting some excess insulin sensitivity...so basals, targets, and ISF were adjusted down (by multiplier of 0.94).
- Later in the day (the blue boxed section), another adjustment was made to her BG targets because of a persistent high. While not an adjustment by autosens itself, this is similar and can be set in preferences.json by setting the “adv_target_adjustments” to true. Basically this preference will automatically lower BG targets (to as low as “eating soon” mode target of 80 mg/dl) for persistent high BGs.
- Later in the day, a couple brief periods of insulin sensitivity were short-lived.
- Finally at night, we had a low-treatment for a BG. We used an IFTTT button to enter our low treatments and at the same time, the IFTTT set up a temp target of 110 mg/dl for 60 minutes to make sure the loop didn’t want to correct much on the recovery. That temp target was respected by autosens and basals and targets were not adjusted (even though autosens might have liked to).
Notes about autosensitivity
- “Autosens” works by reviewing the both the last 8 hours and last 24 hours of data (so it’s a rolling calculation with a moving window of 24 hours) and assessing deviations to determine if you are more sensitive or resistant than expected. If a pattern of such deviations is detected, it will calculate the adjustment that would’ve been required to bring deviations back to normal. It will then use the more conservative between the rolling 8 hour calculation or the 24 hour calculation.
- Autosens does NOT take into account meal/carb deviations; it only is able to assess the impact of insulin, and thus will adjust ISF, basals, and targets to help compensate for changes in sensitivity.
- Most users will notice the changed ISF numbers in their OpenAPS pill, along with autosens-adjusted targets.
- Note that a Nightscout care portal or IFTTT temp target (for activity/exercise as an example) will override the autosens-adjusted target but IT WILL NOT override an advance target adjustment to bring high BG down. This is because in 0.5.x, the temp target is honored, but the advanced target adjustment is applied after the temp target. So, if current BG is high, the advanced target adjustment will be applied starting from the activity temp target, so if BG is high enough it will still reduce the active target to 80 mg/dL / 4,4 mmol/L. Consequently, be cautious of activity periods that follow a high BG; your IOB could be quite significant and cause you to go low quite fast as you start moving. If you do not want OpenAPS to apply advanced target adjustment that can be turned off by editing preferences.json (shortcut command edit-pref) and setting the “adv_target_adjustments” to false. Finally, if you do not want autosens to adjusted target that can be turned off by editing preferences.json (shortcut command edit-pref) and setting the “autosens_adjust_targets” to false. In oref0 0.6.0, adv_target_adjustments is set to false by default, as its functionality has been replaced by instead using the (safer) zero-temp BG predictions to decide when it’s safe to dose additional insulin when high. The 0.6.0 exercise_mode feature also helps improve OpenAPS’ response to high temp targets.
- The reason for autosens automatically adjusting targets in 0.5.x is because the other adjustments it makes can’t be fully applied without creating a feedback loop, so automatically adjusting the target it thinks it’s shooting for lets autosens get BG closer to your actual target most of the time. When autosens needs to adjust basal and ISF, it can very straightforwardly use that for adjusting the temp basal it’s about to set, by assuming a higher or low neutral temp basal to start from, and by calculating a bigger or smaller expected impact of current IOB. What it can’t do is calculate IOB in a way that reflects the adjusted basals and ISF, because doing so would change the autosens result, which would require recalculating IOB again, which would further change the result, in an unpredictable feedback loop. So instead, we simply acknowledge that the IOB calculation doesn’t reflect sensitivity or resistance, and instead adjust the target to compensate. These limitations have been addressed in oref0 0.6.0.
- Autosens is limited by the safety multipliers in preferences.json. The defaults are:
"autosens_max": 1.2, <----multiplier for adjustments during insulin resistance
"autosens_min": 0.7, <----multiplier for adjustments during insulin sensitivity
We do not recommend widening these multipliers; but an easy way to turn “off” autosens after you’ve enabled it is to adjust the safety multipliers to 1. However, note that this will also disable autotune adjustments if you are running autotune.
Entering carbs & doing boluses
How do you enter carbs & do boluses with OpenAPS? You have a variety of ways to do things.
Doing boluses
Boluses always have to be set on the pump for OpenAPS to take them into consideration. For safety reasons, insulin added to Nightscout NOT via the pump - for instance, logging an event when using an insulin pen - will not be taken into account. (If you are briefly away from your pump and using injections, the simplest solution to keep OpenAPS up to date is to bolus into air!)
- Easy bolus button: Previously before OpenAPS, you probably used the easy bolus button to add up a bolus in increments. (E.g. if your pump had increments of 0.5u, you could quickly dial up to a bolus by pressing the up button as many times as needed; hitting enter to confirm it; hitting enter again to deliver the bolus.)
- Bolus wizard: Or, you may have used the bolus wizard, sometimes with BG or carb entry, or just as a bolus.
In OpenAPS, you can still use those same methods for delivering manual doses of insulin (boluses).
Entering carbs into OpenAPS
Before OpenAPS, you may or may not have entered carbs into your pump. With OpenAPS, most people do want the rig to know about carbs.
Carbs can be either entered on the pump (for example, using Bolus Wizard) or into Nightscout (carb entries in Nightscout can either be made directly using the Care Portal) or via IFTTT or XDrip. You have a variety of ways to enter them, depending on whether your rig is online or offline.
Look at this image for the big picture:

Offline carb entry
- You can still use the bolus wizard to enter carbs, although a non-zero amount of bolus must be delivered in order for OpenAPS to record the carbs. If you adjust the bolus recommended by the bolus wizard down to zero and deliver the zero units (as you might ordinarily do if you ate carbs in order to treat a low), the pump may (depending on your pump version) fail to record a bolus wizard record in pumphistory, causing OpenAPS to ignore the carbs as if you hadn’t entered them. In that situation, consider delivering the smallest unit of bolus possible (like 0.05u or 0.1u) so that OpenAPS will record the carbs entered into the bolus wizard.
- Some pumps can use the ‘meal marker’ feature.
- See section on extended and dual wave substitutes for information on how extended boluses are handled in OpenAPS.
SAFETY WARNING ABOUT BOLUS WIZARD: If the pump has a target range high end set lower than the BG input into the Bolus Wizard, the Bolus Wizard will add insulin to cover the carbs as well as bring BG down to the high end. E.g. if your high end is 110 and you enter a 160 BG and 45g of carbs in the Bolus Wizard, the Bolus Wizard will dose 1U to bring BG to 110 and 3U for carbs (assuming 50 (mg/dL)/U and 15g/U factors). The rig will likely have already dosed insulin to bring your BG to your low target, and you are potentially “double dosing”. In these scenarios, you will have too much insulin onboard and can experience a severe low. If you use the Bolus Wizard, ensure the high end of the BG target range is a high number such as 250 mg/dL. OpenAPS default behavior (wide_bg_target_range preference) is to only use the target range lower end. Setting the high end does not impact the OpenAPS algorithms.
Online carb entry
If your rig is online, you have a variety of ways to enter carbs online.
- Nightscout care portal
- AndroidAPS NS Client (Download the app-nsclient-release APK from here.)
- Many options for using IFTTT to get carbs into Nightscout Care portal. (See the IFTTT page here for instructions.)
- Pebble or Apple watch
- Google Calendar
- Siri, Alexa, Google, etc.
- Android users: you can use the Care portal option in NSClient app found here.
Understanding your preferences and safety settings
All of the settings specific to OpenAPS (that can’t be read from the pump) will live in this file, so when running the setup scripts or building your loop, you will have the preferences.json file built for the system to read, in addition to your pump profile settings. Many of these are important safety settings, with reasonable default settings, so other than described below, you likely won’t need to adjust these. If you do decide to adjust a setting, the best practice is to adjust one setting at a time, and observe the impact for 3 days. Changing multiple variables at once is a recipe for a lot of headaches and a lot of painful troubleshooting.
(Note that there are some preferences that show up by default; these are the most commonly adjusted. There are additional preferences available to set that are not used by everyone, and are described below - any of these can also be added to the preferences.json)
Click here to expand a clickable list to jump to each preference:
- Editing your preferences.json
- Commonly-adjusted preferences:
- oref1-related preferences:
- Exercise-mode related preferences:
- Pushover related preferences
- Other preferences:
Editing your preferences.json
Your preferences are found in the directory myopenaps/preferences.json. To edit any of your preferences, you can enter edit-pref (as a shortcut) or cd ~/myopenaps && nano preferences.json
To check your edits when you’re done, use cd ~/myopenaps && cat preferences.json When editing preferences, it’s advised to do so in terminal (not a word processor) in order to ensure ascii characters are used within your preferences file.
IMPORTANT: Any variables that are not true, false, or a number MUST be inclosed in straight (not curly) quotes.
1. "max_iob": 0, <-- Zero is a number, so no quotes necessary.
2. "enableUAM": false, <-- True/False do not require quotes
3. "curve": "rapid-acting" <-- "Rapid-acting" is not true/false or a number, so it must be inclosed in quotes.
Commonly-adjusted preferences:
{
"max_iob": 0,
"max_daily_safety_multiplier": 3,
"current_basal_safety_multiplier": 4,
"autosens_max": 1.2,
"autosens_min": 0.7,
"rewind_resets_autosens": true,
"adv_target_adjustments": true,
"unsuspend_if_no_temp": false,
"enableSMB_after_carbs": false,
"enableSMB_with_COB": false,
"enableSMB_with_temptarget": false,
"enableUAM": false,
"curve": "rapid-acting"
}
max_iob:
max_iob is an important safety setting for your OpenAPS set up. Beginning with oref0 0.6.0 and beyond, max_iob is the maximum amount of insulin on board from all sources – both basal (or SMB correction) and bolus insulin – that your loop is allowed to accumulate to treat higher-than-target BG. Unlike the other two OpenAPS safety settings (max_daily_safety_multiplier and current_basal_safety_multiplier), max_iob is set as a fixed number of units of insulin. Note that, in previous releases, max_iob reflected basal insulin on board only.
In determining your max_iob setting, you should consider both your typical meal bolus size and your current basal rate settings when setting this safety parameter. A good rule of thumb to start out with is for max_iob to be no more than 3 times your highest basal rate PLUS your typical meal bolus. You can start conservatively and change this setting over time as you evaluate how the OpenAPS system works for you. For people using the advanced features such as SMB (especially those using Fiasp and intending for SMB to replace meal boluses), you will likely need to increase your max_iob.
When you run the OpenAPS setup script, it will prompt you to set your max_iob. In previous oref0 releases (0.4.3 or older), the set up script automatically set max_iob to 0 units. This effectively made your initial OpenAPS installation only capable of setting temp basal rates in response to BG levels that were below your target BG levels. (And if your BG level is sufficiently below your target BG level, OpenAPS will set a 30 min. temporary basal rate of 0u/hr., which is often referred to as a “low glucose suspend”.) Again, you can start conservatively and change this setting over time as you evaluate how the OpenAPS system works for you.
The setting you choose during the setup script will be saved in the oref0-runagain script and can be used again if you need to rerun the script.
max_daily_safety_multiplier:
This is an important OpenAPS safety limit. The default setting (which is unlikely to need adjusting) is 3. This means that OpenAPS will never be allowed to set a temporary basal rate that is more than 3x the highest hourly basal rate programmed in a user’s pump, or, if enabled, determined by autotune.
current_basal_safety_multiplier:
This is another important OpenAPS safety limit. The default setting (which is also unlikely to need adjusting) is 4. This means that OpenAPS will never be allowed to set a temporary basal rate that is more than 4x the current hourly basal rate programmed in a user’s pump, or, if enabled, determined by autotune.
Important Note About Safety Multipliers:
max_daily_safety_multiplier and current_basal_safety_multiplier work together, along with your pump’s max basal rate safety setting (set on your pump in the “Basal” menu under “Max Basal Rate”).
OpenAPS will determine maxSafeBasal as the lowest of three values:
- the user’s max basal rate setting (which is set in the user’s pump)
max_daily_safety_multiplier* the highest programmed basal rate (as specified by the basal rates in the user’s pump or, if enabled, determined by autotune)current_basal_safety_multiplier* the user’s current basal rate (as specified by the current basal rate programmed in the user’s pump or, if enabled, determined by autotune)
If the temporary basal rate setting recommended by OpenAPS (as determined in oref0/lib/determine-basal/determine-basal.js) exceeds maxSafeBasal, maxSafeBasal is used instead.
The following message will be reported to the pump-loop.log:
adj. req. rate: X.X to maxSafeBasal: Y.Y
You can also view this message in the Nightscout OpenAPS pill (which pops up a detailed message about recent OpenAPS activity if you hover your mouse over the OpenAPS pill):

A few examples:

- In Example 1, the user’s max basal safety setting is the constraining limit on the OpenAPS recommended temp basal rate.
- In Example 2, 4x the user’s current basal rate is the constraining limit on the OpenAPS recommended temp basal rate.
- In Example 3, the user’s current basal rate is at his/her highest programmed rate, but none of the safety constraints are binding; the OpenAPS recommended temp basal rate is delivered.
- In Example 4, 3x the user’s highest programmed basal rates is the constraining limit on the OpenAPS recommended temp basal rate.
About “sensitivity”
Sensitivity, or the sensitivity ratio, refers to autosens calculation of your current, presumably temporary, sensitivity to your normal insulin basal rates. The sensitivity ratio is relative to basal rates, so when using it for ISF it is inverted. Simply put, current insulin basal rate = normal insulin basal rate * sensitivity ratio, while current ISF = normal ISF / sensitivity ratio. So, for example if autosens detects you are more sensitive to insulin, it will lower your sensitivity ratio, e.g., to 0.8. Then, when determining the basal rate, it will use the sensitivity ratio of 0.8 to calculate your corrected basal rate, as normal basal rate * 0.8 (resulting in a lower basal rate), and your ISF as normal ISF / 0.8 (resulting in a higher ISF, i.e., more BG change per insulin unit). If you are less sensitive to insulin, it will raise your sensitivity ratio, e.g., to 1.2, resulting in basal rate of normal rate * 1.2 (a higher basal rate), and ISF of normal ISF / 1.2 (a lower ISF, i.e., less BG change per insulin unit).
autosens_max:
This is a multiplier cap for autosens (and autotune) to set a 20% max limit on how high the autosens ratio can be, which in turn determines how high autosens can adjust basals, how low it can adjust ISF, and how low it can set the BG target.
autosens_min:
The other side of the autosens safety limits, putting a cap on how low autosens can adjust basals, and how high it can adjust ISF and BG targets.
rewind_resets_autosens:
This feature, enabled by default, resets the autosens ratio to neutral when you rewind your pump, on the assumption that this corresponds to a probable site change. Autosens will begin learning sensitivity anew from the time of the rewind, which may take up to 6 hours. If you usually rewind your pump independently of site changes, you may want to consider disabling this feature.
unsuspend_if_no_temp:
Many people occasionally forget to resume / unsuspend their pump after reconnecting it. If you’re one of them, and you are willing to reliably set a zero temp basal whenever suspending and disconnecting your pump, this feature has your back. If enabled, it will automatically resume / unsuspend the pump if you forget to do so before your zero temp expires. As long as the zero temp is still running, it will leave the pump suspended.
carbsReqThreshold
grams of carbsReq to trigger a pushover. Defaults to 1 (for 1 gram of carbohydrate). Can be increased if you only want to get Pushover for carbsReq at X threshold.
curve: “rapid-acting”
Rapid-acting is the default in 0.6.0 and beyond. You can change this to “ultra-rapid” for Fiasp (see here for other tips on switching to Fiasp), or “bilinear” for using the old curve. Most people prefer the rapid-acting curve over bilinear for Humalog/Novolog. Read more here to understand the differences in the activity curves.
useCustomPeakTime
Defaults to false. Setting to true allows changing insulinPeakTime
insulinPeakTime
Defaults to 75 for rapid acting (Humalog, Novolog). This is the number of minutes after a bolus activity peaks.
Defaults to 55m for Fiasp if useCustomPeakTime: false
Understanding all the ways to monitor your rigs
There are two general groups of ways to monitor your rigs:
- Online, meaning it requires the rig to have internet connectivity (via a wifi or hotspot/tethered connection)
- Offline, meaning the rig does not have any internet connectivity

The main ways of monitoring your rig ONLINE include:
- Papertrail
- Accessing via SSH (either using an app on your phone, or your computer)
- Nightscout
- AndroidAPS NS Client (Download the app-nsclient-release APK from here.)
- Pebble watch (your watchface of choice, such as Urchin)
- Apache Chainsaw
The main ways of monitoring your rig OFFLINE include:
- Connecting via SSH over a serial connection.
- Pancreabble (offline connection to your Pebble watch)
- For Android users: “Hot Button“
- Accessing via SSH over Bluetooth, or by using a mobile router so your phone/rig can connect to the same network offline
- For any phone type: Creating a web page that can be accessed on the phone via the rig’s IP address
Accessing your online rig via SSH
See below for different ways to access your rig:
- If your computer and rig are on the same wifi network
- If your iPhone and rig are on the same wifi network
- Set up an autossh reverse tunnel to access from a different network
If your computer and rig are on the same wifi network
These instructions will work only if your computer and rig are on the same wifi network. If they are on different networks, you will need to connect using a data cable connected to the UART port on the rig to use SSH. See these instructions.

For Mac computers
- Open the Terminal App found in the Utilities folder in Applications.
- Use the command
ssh root@edisonhost.local(or whatever you named your edison host, in the example below, the hostname was edison1). If this is your first time logging in to the rig on the computer, you may get a message about the authenticity of the host and whether you want to add the key fingerprint to the list of known hosts. Go ahead and answer yes. You will be asked for the password for the rig...enter your root password that you setup in Phase 0 (the default was edison). Realize that keystrokes will not appear as you enter the password. A successful login will result in a screen similar to below.

- If you get an error about “could not resolve hostname”, it is likely that your rig is actually connected to a different wifi network than the computer. Try the screen method (directions below) for connecting to your rig.

- If you get an scary looking error about “WARNING: REMOTE HOST IDENTIFICATION HAS CHANGED!” that is likely because you are attempting to login to a rig that has the same hostname as a previous rig that has been logged into on the computer. (This is why you want to use unique hostnames if you are going to have multiple rigs.) You can delete the history of known hosts for the rig by entering the commands
cd .sshand thenrm known_hosts. This will delete the log of known hosts on your computer. There’s no significant downside to removing the known_host log, except that you will need to answer yes to the key fingerprint additions again for the first time you login to old rigs again. After you delete the known hosts, you can use thessh root@edisonhost.localcommand to login, as described above.

For Windows computers
- Open PuTTY program
- Click the SSH radio button and then enter the IP address of the rig on the “Host Name” line in PuTTY.

- If you do not know the IP address of the rig, you can obtain it by first logging on using Serial connection (described below) and using the command
ifconfig.

- Click the “Open” button in the PuTTY window and, if this is your first time logging into the rig using PuTTY using ssh, you may see a warning regarding the server’s host key. Click yes to add the host key to PuTTY’s cache.

- Login using login name
rootand password is whatever you changed it to during setup in Phase 0. The default password was edison. As you type the password, no keystrokes will appear on the screen. Successful login will leave you at a prompt for the root user.

autossh Reverse Tunnel
If you have an ssh server that is always accessible on the Internet, you can use it as a known hop point to ssh into your rig as long as the rig has an Internet connection.
On the rig, install autossh: apt-get install autossh
Your ssh environment must be setup to use key based authentication. (Basic instructions are here.)
On the rig, add the lines below to the /etc/ssh/ssh_config file.
ServerAliveInterval 60
ServerAliveCountMax 5
On the server, add the lines below to the /etc/ssh/sshd_config file.
ClientAliveInterval 60
ClientAliveCountMax 5
The configuration values above ensure when the rig moves from wifi network to wifi network, it will require 5 minutes at most for autossh to establish a new link to the server.
Test the ssh setup by executing autossh on the rig:
autossh -f -M 0 -T -N <Internet server address> -o "ExitOnForwardFailure yes" -R 20201:localhost:22`
Test ssh into the rig from another device by ssh to the internet server address on port 20201 instead of the default port 22.
Once the test are successful, add a line to your rig crontab to launch autossh at boot using the autossh command above: @reboot autossh -f -M 0 -T -N <Internet server address> -o "ExitOnForwardFailure yes" -R 20201:localhost:22
Papertrail remote monitoring of OpenAPS logs (RECOMMENDED)
If you want to remotely view the rig’s logs/loops, you can use Papertrail service. We HIGHLY recommend setting up this service for at least the first month of your OpenAPS use to help remotely and quickly troubleshoot your rig, if you have problems. The first month of Papertrail comes with a very generous amount of free data. If you decide you like the service, you can sign up for monthly plan. Typically, the monthly cost for using Papertrail with OpenAPS is approximately $5-7 depending on how many rigs you use and how long you’d want to save old data.
Get an account at Papertrail
Go to http://papertrailapp.com and setup a new account. Choose to setup a new system. Notice the header at the top of the new system setup that says the path and port that your logs will go to. You’ll need that information later.

System logging
Login to your rig. If you need help with that, please see the Accessing Your Rig section of these docs. Copy and paste the code that is displayed in your new system setup’s shaded box, as shown in the red arrowed area in the screen shot above. This will setup papertrail for just your syslogs. But, we now will need to add more (aggregate) your logs such as pump-loop and ns-loop.
Aggregating logs
- Copy and paste each of these four command lines, one at a time. The screenshot below shows the successful results of each command. The first command will run for a short time and end with similar information to the green box. The remaining three commands will not display anything specific as a result of the command.
For Intel Edison rigs, use:
wget https://github.com/papertrail/remote_syslog2/releases/download/v0.19/remote_syslog_linux_i386.tar.gz
For Raspberry Pi rigs, use:
wget https://github.com/papertrail/remote_syslog2/releases/download/v0.18-beta1/remote_syslog_linux_arm.tar.gz
Then, for either rig type, run:
tar xzf ./remote_syslog*.tar.gz
cd remote_syslog
sudo cp ./remote_syslog /usr/local/bin

- Create the file that will store all the logs you’d like to aggregate:
vi /etc/log_files.yml
- press “i” to enter INSERT mode, and then copy and paste the following (updating your host and port on the lines shown to match what your new system info shows as described above):
files:
- /var/log/openaps/pump-loop.log
- /var/log/openaps/autosens-loop.log
- /var/log/openaps/ns-loop.log
- /var/log/openaps/network.log
- /var/log/openaps/autotune.log
- /var/log/openaps/cgm-loop.log
- /var/log/openaps/pushover.log
destination:
host: logs5.papertrailapp.com # NOTE: change this to YOUR papertrail host!
port: 12345 # NOTE: change to your Papertrail port
protocol: tls
type ESC and ”:wq” to save changes and exit.
- Start a new aggregate
sudo remote_syslog
Now you should be able to see your new logs in your papertrail, but we need to make it so this runs automatically when the rig is restarted.
Install auto restart at reboot
- Create a new file that will restart the papertrail logging at reboot
vi /etc/systemd/system/remote_syslog.service
- press “i” to enter INSERT mode, and then copy and paste the following:
[Unit]
Description=remote_syslog2
Documentation=https://github.com/papertrail/remote_syslog2
After=network-online.target
[Service]
ExecStartPre=/usr/bin/test -e /etc/log_files.yml
ExecStart=/usr/local/bin/remote_syslog -D
Restart=always
User=root
Group=root
[Install]
WantedBy=multi-user.target
type ESC and ”:wq” to save changes and exit.
- enable the reboot service by using these two commands, one at a time.
systemctl enable remote_syslog.service
systemctl start remote_syslog.service
- reboot your rig to test the papertrail
reboot
and then go to your papertrailapp website to see the log

Optimize Papertrail use
To make the most of your Papertrail logs, setting up some of your account settings and filters will help streamline your troubleshooting.
Account Filters
Adding filters to your incoming Papertrail logs will help minimize unuseful data (and help keep you below your data caps) and streamline your review of your relevant OpenAPS logs. You can go to your Papertrail account’s Settings and then choose the Log Destinations. Click on Log Filters to go to the screen where you can add specific filters.

Click on the Add Log Filter button and add three filters for CRON, libmraa, and sudo. Save the changes and within 60 seconds, your logs will be filtered. The CRON, libmraa, and sudo logs usually provide very little help for troubleshooting OpenAPS problems. You can always undo these filters, if you want to see what those provide in the future.

Saved Searches
Unfortunately, Papertrail does not currently have an app for use on mobile devices. Instead, you will be using an internet browser to view your papertrail. Setting up saved searches, in advance, can help you sort through your logs more efficiently. Most OpenAPS troubleshooting will involve either wifi connection issues or pump communications. Some helpful searches to save in order to find those issues fastest are:
pump-loop.logto see just your pump loop...similar to using thelcommand when logged into your rig.networkwill show just your oref0-online results and whether/which wifi network your rig is connected to. If you see results of192.168.1.XX, then your rig is likely connected to a wifi network. If you see results of172.20.10.XXthen your rig is likely connected to your phone’s personal hotspot. If you seeerror, cycling networkresults, you should check out troubleshooting steps.pump-loop.log adjustwill show your basal and ISF adjustments being made by autosens, if enabled.
If you are running multiple rigs, you can also setup these searches to include the hostname of a particular rig, if you want to see results just for that rig. For example, this screenshot below would be saving a search for a particular rig with the hostname of edison1 and only for its pump-loop.log.

Once you get your desired searches saved, it is an easy process to make them more accessible on your mobile device by using its browser’s add to homescreen button. For example, below are the quick links to the saved searches for an OpenAPS user with three rigs...

Troubleshooting using Papertrail
Papertrail can be very valuable to quickly troubleshoot a rig, because it is quite easy to see all the loops that log information about your rig’s actions. BUT, the way that the information comes into Papertrail is based on the time the action took place. So, you’ll be seeing information stream by that may or may not help you troubleshoot WHICH area your issues are.
First, let’s start with messages that ARE NOT ERRORS
- Anything in the first 15 minutes (pretty much) of a new loop setup. Let the loop run for 15 minutes before you start to investigate the messages. Many messages resolve themselves during that time, such as
cat: enact/enacted.json: No such file or directoryis because the loop hasn’t enacted a temp basal suggestion yet...so the file doesn’t exist. Radio ok. Listening: .No pump comms detected from other rigsThis message is NOT an error. This means your rig is checking to make sure it is not interrupting another rig that may already be talking to your pump. It’s being polite.[system] Failed to activate service 'org.freedesktop.hostname1': timed outThis message is NOT an error. Jubilinux does not use the hostname service...so it does not activate.- Many messages that say there are failures, are not really failures for your rig. For example, there are a lot of scary looking messages when your rig is changing networks from wifi to/from BT...an unfiltered papertrail will show every message like this:

But, really, most of those messages are the normal course of the rig telling you what’s going on. Like “Hey, I seem to have disconnected from the wifi...I’m going to look for BT now. Hold on. I need to organize myself. Bringing up my stuff I need to find BT. Ok, found a BT device. Well, I can connect to it, but some of the features I don’t need...like an audio BT connection.” But, the rig doesn’t speak English...it speaks code. So, if you don’t speak code...sometimes a filter for network might help you filter for the English bits of info a little better. Here’s what that same period of time looked like with a network filter applied. It’s a little more clear that my rig was changing from a BT tether to a wifi connection when you filter the results.

Therefore when you start to troubleshoot, USE YOUR FILTERS to narrow down the logs that you are looking at. Here are some specific errors/issues you may find.
PUMP TUNING
Use pump-loop search filter to start with. What messages are you seeing? Poor pump comms are one of the most frequent causes of loops stopping. If you see 916, 0, -99 tuning results, then you know that your rig is not getting a usable communication with your pump. Try moving your pump and rig closer together. Check if your pump battery is good.

Ideally you should be seeing pump tuning somewhat like the filter for mmtune below shows...this is a kid at school, carrying the rig in a purse/backpack. Some periods of time she leaves her rig behind (like PE class) and other shorter times where there’s poor pump comms. But, generally speaking seeing mmtune results in the 70s and 80s will sustain good looping.

GIT LOCK
There are files that get written to in a directory called /root/myopenaps/.git Sometimes a process crashes and causes a file in that directory to get locked and the writing can’t continue. Your loop may fail as a result. This can be a short term issue, and it could resolve on its own...other times it may require you to delete the file that is causing the problem. For example, below is a short-term error. The message says there is a problem in the /root/myopenaps/.git and I may need to remove that file to get things going again. However, you can also see that a few minutes later, the problem resolved on its own.
If you find a .git lock error is causing a long period of time where your loop is failing, you can remove the file, as the error suggests by using rm -rf /root/myopenaps/.git/filename or you can delete the whole .git directory (it will get rebuilt by the loop automatically) with rm -rf /root/myopenaps/.git

FLAKEY WIFI
Having flaky router or wifi issues? Some routers or ISPs (I still haven’t completely determined the cause) will not work nice with the Avahi-daemon. What the means for you...spotty time staying connected to your wifi. Does your rig not loop consistently? Sometimes are you getting kicked out of ssh sessions with your rig? Look for the message shown in the screenshot below:

Or alternatively, if you see this message when you login to your rig:

The solution to this is to login to your rig and use this command systemctl disable avahi-daemon as shown below

AND also make this edit using vi /etc/default/avahi-daemon Change the number on the last line from 1 to 0 so that it reads AVAHI_DAEMON_DETECT_LOCAL=0 as shown in the screenshot below. (remember i to enter INSERT mode for editing, and esc and :wq to save and exit the editor)

reboot your rig after the change to enable the fix.
subg_rfspy state or version??
If your loop is failing, lights are staying on, and you see repeated error messages about “Do you have the right subg_rfsby state or version?” as below, then you need to head to this section of docs to fix that issue. Don’t worry, it is a 5 minute fix. Very straight-forward.


Apache-chainsaw
 If your computer and rig are on the same wifi network you can use Apache Chainsaw2 from a pc (running windows/mac/linux) to watch your logs. Chainsaw2 main advantages are:
- Easy setup.
- Strong filtering capabilities.
- Strong finding capabilities.
- Coloring capabilities.
- Adding marker capabilities.
- Logs can be searched for a long time (kept localy on the rig).
- Can tail new data.
example picture:
To setup appache chainsaw on your computer, follow the following instructons:
Download the following version of appache chainsaw from here: https://github.com/tzachi-dar/logging-chainsaw/releases/download/2.0.0.1/apache-chainsaw-2.0.0-standalone.zip (please note this version was changed to fit the openaps project, other releases of appach chainsaw will not work with a rpii).
Unzip the file.
On ypur pc, create a configuration file called openaps.xml with the following data (for example notepad openaps.xml):
<?xml version="1.0" encoding="UTF-8" ?> <!DOCTYPE log4j:configuration > <log4j:configuration xmlns:log4j="http://jakarta.apache.org/log4j/" debug="true"> <appender name="A2" class="org.apache.log4j.ConsoleAppender"> <layout class="org.apache.log4j.SimpleLayout"/> </appender> <plugin name="VFSLogFileReceiver1" class="org.apache.log4j.chainsaw.vfs.VFSLogFilePatternReceiver"> <param name="fileURL" value="sftp://root:password@192.168.1.20:22/var/log/openaps/openaps-date.log"/> <param name="name" value="sampleVFSLogFileReceiver1"/> <param name="tailing" value="true"/> <param name="timestampFormat" value="yyyy-MM-dd HH:mm:ss"/> <param name="logFormat" value="TIMESTAMP LOGGER MESSAGE"/> <param name="autoReconnect" value="false"/> <param name="group" value="group"/> </plugin> <root> <level value="debug"/> </root> </log4j:configuration>Make sure to replace the password, with your rigs password, and 192.168.1.20 with the ip/hostname of your rig.
run chainsaw by the command: bin\chainsaw.bat (pc) or bin\chainsaw (linux and mac)
From the file menu choose ‘load chainsaw configuration’
Choose use chainsaw configuration file.
press open file.
choose the file openaps.xml
(optional) mark the checkbox “always start chainsaw with this configuration.”
Chainsaw has a welcome tab and a good toturial, use them. Still here are a few highligts:
- To see only pump-loop you can either select ‘focus on openaps.pump-loop.log’ or on the refine focus on field enter ‘logger==openaps.pump-loop’
- To filter only messages that contain the words ‘autosens ratio’ enter on the ‘refine focus’ logger==openaps.pump-loop && msg~=’autosens ratio’
- To highlight lines that contain ‘refine focus’, enter msg~=’autosens ratio’ on the find tab.
Accessing your offline rig
Pancreabble - offline connection to Pebble watch
(TO DO Note - Pancreabble instructions for OpenAPS need to be re-worked to reflect the oref0-setup script way of making it work. Below is notes about Pancreabble setup prior to oref0-setup.sh being in existence.)
Pancreabble is a way to monitor your loop locally, by pairing a Pebble smartwatch directly with the Raspberry Pi or Intel Edison.
In other words, whereas the default setup looks like this:
Raspberry Pi/Intel Edison -> network -> Nightscout server -> network -> smartphone
|
-> laptop
|
-> Pebble watch
And by default, your Pebble is paired thus:
smartphone -> Bluetooth -> Pebble watch
With Pancreabble, the setup looks like this:
Raspberry Pi/Intel Edison -> Bluetooth -> Pebble watch
Using a Pebble watch can be especially helpful during the “open loop” phase: you can send the loop’s recommendations directly to your wrist, making it easy to evaluate the decisions it would make in different contexts during the day (before/after eating, when active, etc.).
See Pancreabble for initial setup instructions.
Once you’ve done the first stages above, you’ll need to do generate a status file that can be passed over to the Pebble Urchin watch face. Fortunately, the core of this is available in oref0.
Go to ~src/oref0/bin and look for peb-urchin-status.sh. This gives you the basic framework to generate output files that can be used with Pancreabble. To use it, you’ll need to install jq using:
apt-get install jq
If you get errors, you may need to run apt-get update ahead of attempting to install jq.
Once jq is installed, the shell script runs and produces the urchin-status.json file which is needed to update the status on the pebble. It can be incorporated into an alias that regularly updates the pebble. You can modify it to produce messages that you want to see there.
When installing the oref0-setup you will need to replace all instances of AA:BB:CC:DD:EE:FF with the Pebble MAC address. This can be found in Settings/System/Information/BT Address. NOTE: Make sure the MAC address is in ALL CAPS.
Once you’ve installed, you will need to pair the watch to your Edison.
Bluetooth setup for Pancreabble
- Restart the Bluetooth daemon to start up the bluetooth services. (This is normally done automatically by oref0-online once everything is set up, but we want to do things manually this first time):
sudo killall bluetoothd
- Wait a few seconds, and run it again, until you get
bluetoothd: no process foundreturned. Then start it back up again:
sudo /usr/local/bin/bluetoothd --experimental &
- Wait at least 10 seconds, and then run:
sudo hciconfig hci0 name $HOSTNAME
- If you get a
Can't change local name on hci0: Network is down (100)error, start over withkillalland wait longer between steps. - Now launch the Bluetooth control program:
bluetoothctl - And run:
power off - then
power on - and each of the following:
discoverable on
scan on
agent on
default-agent
On Your Pebble
Settings/BLUETOOTH to make sure Pebble is in pairing mode
from terminal
trust AA:BB:CC:DD:EE:FF
pair AA:BB:CC:DD:EE:FF
you might need to do this several times before it pairs
you will see on the edison
Request confirmation [agent] Confirm passkey 123456 (yes/no): yes
- (WARNING: You must type in yes not just y to pair)
Once paired, type quit to exit.
Currently the peb-urchin-status.sh has 1 notification and 3 different options for urchin messages.
in you APS directory there is a file called ‘pancreoptions.json’
"urchin_loop_on": true, <--- to turn on or off urchin watchface update
"urchin_loop_status": false, <--- Gives a message on urchin watchface that it's running
"urchin_iob": true, <--- Gives a message on urchin watchface of current IOB
"urchin_temp_rate": false, <--- Gives a message on urchin watchface of current temp basal
"notify_temp_basal": false <--- Notification of temp basal when one shows up in enact/suggested.json
note only one of the messages for the urchin watchface can be true at once
the peb-urchin-status.sh gets called from the crontab and will run automatically.
By default the urchin_loop_on, and urchin_iob is set to true. You must manually change notify_temp_basal to true to start getting temp basal notifications. you can edit this file using nano pancreoptions.json from your APS directory.
Hot Button - for Android users
Purpose
NOTE: The Hotbutton app linked below has disappeared from Google Play. There are several others available if you search “SSH Button”, but the app setup instructions won’t match exactlty.
Hot Button app can be used to monitor and control OpenAPS using SSH commands. It is especially useful for offline setups. Internet connection is not required, it is enough to have the rig connected to your android smartphone using bluetooth tethering.
App Setup
To set up a button you need to long click. Then go to Server Settings. For Server’s IP, add the IP address that your rig has when connected to your phone. Under Server’s Port, add the port number 22. Under Authenication Settings, you need to add your rig’s username, password, and the root password. Be sure that the password for the private key file is blank unless you are setting up a key authentication (which is not necessary). Go back to the previous button setup screen and click “Set as default!”. This will save all your server settings so that you can easily load them onto each new button you make.
Basic commands
For the Command part of the button setup you can write any command which you would run in the ssh session. (If you are running a command that would need to be run with root privileges, be sure to check the box “Execute as root!”) Here are some suggested commands:
To show Automatic Sensitivity ratio, you can set:
cat /root/myopenaps/settings/autosens.json
To show the last enacted loop, you can set:
cat /root/myopenaps/enact/enacted.json
To show your rig’s network name, you can set:
iwgetid -r
To show your rig’s battery status, you can set:
cat /root/myopenaps/monitor/edison-battery.json
To show your pump’s battery status, you can set:
cat /root/myopenaps/monitor/battery.json
After setting up the button, simply click it to execute the command. The results are displayed in the black text area below the buttons. You can change the font size of the text in the box, and you can add more buttons under the main Hot Button menu.
Temporary targets
It is possible to use Hot Button application for setup of temporary targets. The oref0 repo has a script named oref0-append-local-target that sets a temp target locally on the rig.
To set an activity mode target of 130 mg/dL for 60m, run:
oref0-append-local-temptarget 130 60
To set an eating soon mode target of 80 mg/dL for 30m, run:
oref0-append-local-temptarget 80 30
SSH Login Speedup
To speed up the command execution you can add to the /etc/ssh/sshd_config the following line:
UseDNS no
Accessing your offline rig via SSH over Bluetooth
Your phone and rig must be BT paired and connected over BT PAN. See here for BT PAN configuration. When you first open Termius on your mobile device (JuiceSSH and SimpleSSH are also good choices) it will prompt you to add a new host. Click the + button to add a new host. Turn the toggle on for Use SSH and then fill out the following information:
Alias – use an alias name that let’s you know which rig and which connection point this host is for, for example YourRigName on device BT
Hostname – Enter the IP address of the rig as assigned by your BT PAN
Username – click to the left of the little blue man and type root
Password – Enter your rig’s root password (default is “edison” but you should have changed it during setup)
Click Save in the upper right corner. You should now see the host you just created. If you click on that host, you’ll see a message that it is connecting (first time connections will ask if you want to save the rig to known hosts, cick continue and then you’ll be connected to a terminal app screen. You can now issue commands and edit files just like you can over an SSH connection from your computer.
Accessing your offline rig via SSH when your phone and rig are connected to the same network
Just like the trick for getting internet to your rig through a network that requires you to log in via a portal (a “captive” network), a mobile router (e.g. HooToo) or other brand) can create a network that allows your phone and rig both to be connected, allowing you to then SSH into your rig, just as if they were connected via cellular.
You can then use the same methods to SSH in for the phone or computer (that you’re using to SSH) being on the same network as the rig.
Note: you will want to set your mobile router up in advance, and give it the same network name and password as a network already on your rig; or otherwise make sure to add the network and password to your rig before you travel and want to use this offline.
Generally, the steps for getting online with the HooToo, which you should practice with before you travel:
- Plug in the HooToo/turn it on.
- Use your phone or computer and join the HooToo network.
- If you plan to loop offline and just want to SSH in, you should be able to SSH in and see your logs.
For using the HooToo to join plane or hotel wifi, after you’ve joined the HooToo router network:
- Open a browser and type in a URL (e.g.
cnn.com) and hit enter. This should redirect you to the HooToo log in page. - Follow your router’s instructions for how to get to the network page and scan and click to join the right network.
- Open another tab, type a URL again (e.g.
cnn.com) and hit enter. This should take you to the login page (e.g. GoGo or the captive portal of the hotel wifi). Input your credentials or otherwise log in. Once you’re successfully through that step, the router is online and will begin sharing the internet connectivity with the other devices that are joined to the network.
Offline web page from rig - for any phone user
Starting with oref0 0.6.1, you can enable a rig hosted offline webpage that can be accessed over a local LAN. To do this, simply open a web browser and go to your rig’s IP address. In most cases, this will be in the format 192.168.x.x


The box around your current BG will be either green or red, depending on the last time OpenAPS was able to successfully complete a pump-loop. The box functions similarly to the OpenAPS pill in Nightscout. If you tap on it, you will be able to view more info about the current state of your rig and its decision making process.

NOTE: If the webpage does not load, check your crontab. On master (oref0 version 0.6.x) your crontab should contain the line @reboot cd ~/src/oref0/www && export FLASK_APP=app.py && flask run -p 80 --host=0.0.0.0 You can check this by logging into your rig and typing crontab -l. If you need to edit your crontab the command is crontab -e.
Old instructions for an offline webpage. It is HIGHLY recommended that you use the method above for oref0 0.6.0 or greater.
TODO - implement this as a proper oref0 script that can be installed by oref0-setup
This allows you to extract data from the various files that OpenAPS creates and access the locally from the phone that is connected to the rig, giving a full information set.
A. First, you need to set up the script that will do this for you. An example is shown below:
rm ~/myopenaps/enact/index.html
touch ~/myopenaps/enact/index.html
(cat ~/myopenaps/enact/smb-enacted.json | jq -r .timestamp | awk '{print substr($0,12,5)}') >> ~/myopenaps/enact/index.html
(cat ~/myopenaps/enact/smb-enacted.json | jq -r .reason) >> ~/myopenaps/enact/index.html
(echo -n 'TBR: ' && cat ~/myopenaps/enact/smb-enacted.json | jq .rate) >> ~/myopenaps/enact/index.html
(echo -n 'IOB: ' && cat ~/myopenaps/enact/smb-enacted.json | jq .IOB) >> ~/myopenaps/enact/index.html
(echo -n 'Edison Battery: ' && cat ~/myopenaps/monitor/edison-battery.json | jq -r .battery | tr '\n' ' ' && echo '%') >> ~/myopenaps/enact/index.html
(echo -n 'Insulin Remaining: ' && cat ~/myopenaps/monitor/reservoir.json) >> ~/myopenaps/enact/index.html
Create the above script by running nano /root/myopenaps/http.sh , then paste the above, and save it.
You may need to adjust the values in '{print substr($0,12,5)}' - whilst I know these work on the rigs I have set them up on, other’s have had better results with {print substr($0,13,5)}'
B. You will also need to start up the SimpleHTTPserver service that is already installed on jubilinux in the location you will place your file. This is done by adding the following line to your Cron (refer to the resources section for help on editing crontabs):
@reboot cd /root/myopenaps/enact && python -m SimpleHTTPServer 1337
The final thing to do is to make sure the script runs regularly to collect the data and publish it. This requires an additional cron line:
*/5 * * * * (bash /root/myopenaps/http.sh) 2>&1 | tee -a /var/log/openaps/http.log
In this case the script is running from the /root directory and I am publishing to the ~/myopenaps/enact directory.
C. Accessing via your phone
IPHONE USERS: To access this from an iphone browser, enter something like the following: http://172.20.10.x:1337/index.html and you should receive an unformatted html page with the data in it. The value you need will be the ip address you see when you first set up bluetooth on your rig, and can be found using ifconfig bnep0 when your rig is connected to your phone via bluetooth. If you want to improve the output for a browser, the script can be modified to generate html tags that will allow formatting and could provide colouring if various predicted numbers were looking too low.
ANDROID USERS: On Android, you can download http-widget (https://play.google.com/store/apps/details?id=net.rosoftlab.httpwidget1&hl=en_GB) and add a widget to your home screen that will display this data. You will need the IP address that your rig uses. If you are using xdrip as your glucose data source, it is the same as the value you use there.
SAMSUNG GEAR S3 WATCH USERS: If you use a Samsung Gear S3 watch, you can use the above http-widget with Wearable Widgets (http://wearablewidgets.com) to view what OpenAPS is doing locally, without internet connection.
Using your loop: practical advice for common situations
Now that you’ve closed the loop, you probably have a lot of new “first” experiences to deal with. Like much of this looping experience, you’ll figure it out as you go along, and figure out what’s right for you. But here are some common situations and questions you may encounter:
- How can you make adjustments to insulin delivery while on the go? - Optimizing with Temporary Targets
- What do you do with the loop in airport security when you travel
- What do you do with your loop when you travel across timezones? How do you update devices for a time zone change?
- What do you do with the loop when you shower?
- What do you do when you change sites?
- What do you do when you exercise?
- What do you do if you want to be off the pump for long periods during a day when you’re really active? Like for the beach or water park or sporting activity or similar?
- What if I want to turn off the loop for a while?
- How do I open loop?
- How do I switch between insulin types, or switch to Fiasp? What should I change?
How can you make adjustments to insulin delivery while on the go? - Optimizing with Temporary Targets
The use of Temporary Targets can provide additional fine tuning of insulin control on the go, or remotely for parents monitoring children when they are at school or away from home. As described elsewhere in this documentation, an Eating Soon-type (lower than normal) Temporary Target can be used in advance of a meal or activity. Lower Temporary Targets can also be used to force the OpenAPS system to be somewhat more aggressive in correcting a rising blood sugar. Similarly, a higher temporary target can soften a blood sugar drop and help avoid a low, or help limit stacking of insulin that is likely to peak during activity. Temp targets can be set by entering them in Nightscout Care Portal; you can also set up IFTTT buttons to set common temp targets from your watch or phone with a single button.
Temporary Targets can be set in advance by setting a future date/time stamp in Nightscout when you set them. For example, a parent may wish to set a week’s worth of Eating Soon or Activity Modes in advance of a regular school week. This may be particularly helpful for meals or activity (e.g. gym class) which are regularly scheduled but for which you may have difficulty remembering to trigger the Temporary Target at the right time. Scheduled or remotely activated Temporary Targets can also be very useful in supporting children in optimal management at school or other locations where there may not be an adult who is in a position to set the Temporary Target each time it is needed. It’s also helpful even for adult PWDs when traveling; a loved one at home in a different time zone can set temp targets as needed to help direct the rig’s activity while the PWD might be asleep or otherwise occupied.
What do you do with the loop in airport security when you travel
The loop is off the shelf hardware - it’s no different than your phone or other small gadgets, so leave it in your carry-on bag when going through security. (Dana note: I have traveled well over 100 times with my loop, and in some cases with 3-4 Pis and batteries and related accessories, and have never had issues going through security because of my loop.)
What do you do with your loop when you travel across timezones? How do you update devices for a time zone change?
You have a couple of options. If you are traveling briefly, or only across a couple of timezones, and would not normally feel the need to adjust the timing of your basals, then you may choose to simply leave your pump, receiver, and Pi/Edison on your home timezone. But, if you would like to adjust to the new timezone (perhaps for a longer trip or a move), you can adjust your rig’s timezone using sudo dpkg-reconfigure tzdata and then either run killall -g oref0-pump-loop; oref0-set-device-clocks to set the devices to match, or just change your pump and receiver time manually. Make sure to test in your new location to make sure everything is working! We also recommend planning to do this when you have some extra time for troubleshooting, in case you have issues. Also, it’s worth noting that your body only changes about an hour or so of timezone a day, so even if you go abroad, there’s not a rush to change timezones/the time on your devices - you can wait until 2-3 days into your trip to make the swap, at a time when you have some room to update your rigs.
After the timezone change OpenAPS sometimes gets confused about the BG and/or pump data being “in the future”. The pump and CGM data are not timestamped in UTC, so being unsynchronized with the OpenAPS can cause incorrect behavior. When the BG or pump data is “in the future” the software may stop pulling current information from the pump, and stop functioning (until the current time in the system reaches the time when the monitor data is no longer “in the future”). It often makes sense to remove all files from OpenAPS monitor folder after changing the timezone. However, this is sometimes insufficient, as the devices will still have records that are “in the future” from the perspective of your new timezone. As a result, you should expect Nightscout uploads to fail until the system time catches up to the previous device time, particularly when traveling west.
What do you do with the loop when you shower?
Because the pumps aren’t really waterproof, most of us choose to suspend and disconnect our pumps before we shower. You’ll do the same thing even after you’re looping. One trick, though, is to cancel any running temp basal rate and set a temp basal for 30 minutes with a rate of 0.0, and then suspend the pump. This will help OpenAPS accurately track your netIOB while you are off your pump. When you get out of the shower and are ready to reconnect your pump, do so. Make sure to unsuspend it. You can then either manually cancel the zero temp basal or let OpenAPS read and decide what temp basal to issue next.
What do you do when you change sites?
The time required for the typical site change is normally not long enough to appreciably change the netIOB while disconnected. If you want to stay as close as possible to your true netIOB, follow the same process as the shower to put the pump into suspend mode. When it is time to prime, unsuspend and then prime. After priming, you can suspend again after checking to ensure the rig did not enact a temp basal > 0 while you unsuspended. If your site does not require priming after insertion, simply unsuspend the pump. If your site requires priming a canula after insertion, use fix prime to prime the canula after unsuspending. At this point, you can either manually cancel the zero temp basal or let OpenAPS read and decide what temp basal to issue next.
What do you do when you exercise?
This varies from person to person, and depends on the type and length of activity. Here’s a few tidbits from Dana on how she does various activities. (Other loopers, PR into this page with your additional tips and how-to’s.)
- Hiking - Definitely take the loop with! Think about setting a temporary target (you can enter it in Nightscout if you have connectivity) higher for the duration of the exercise. If you’re offline, just change your targets in your pump. The loop will read the adjusted targets and begin looping toward that target. When you’re done with the activity, change your targets back. In this scenario, I might change my loop target from 100 (normal day or nighttime) to 130 or 140 as a target.
- Swimming, Snorkeling, Scuba Diving, etc. (water sports) - You can’t loop while you’re in the water, because the pump is not waterproof. (Unless you’re sitting in a hot tub and have your pump safely above water, along with your CGM sensor being above water so it can transmit to the receiver, which is also not waterproof.) You can try having your sensor on your arm and keeping it above water so it can read every now and then if the receiver is in range. That being said, again, pump is NOT waterproof so you’ll need to apply shower methodology (temp to zero, suspend, take pump off) to best track your netIOB. Some people observe having the CGM, once it gets back into range and reads data after the sensor has been submerged, read falsely high. It’s not a big deal for the loop (because it’s looking at trends, and doses using temp basals in a conservative way), but you’ll likely want to fingerstick and/or wait a while before you’ll be really happy with your CGM results again. See below for another strategy that could work as well if you’re much more active than usual.
- Running - If it is a short run, (<30 minutes), I may not take the loop with me because any adjustments it would make are going to impact me after the run is done. For longer runs, I often now take my small, Edison based rig which can slip into the pocket of my hand-held running drink bottle that holds Gatorade. Before any length run, I try to make sure I don’t have much positive netIOB on board (that’s the biggest key to success). I also turn on activity mode (essentially a temp target of 120-140 or changing my pump targets to 120-140) an hour or so before a run and during the run; especially if I am carrying the loop during the run.
For any exercise or activity or time period, if you do not choose to take your loop (or if you forget it), the loop will pick up again once you get back into range and resume. (This is why it’s important to temp then suspend so it can track the amount of insulin you haven’t been getting.)
What do you do if you want to be off the pump for long periods during a day when you’re really active? Like for the beach or water park or sporting activity or similar?
Let’s face it. There are some days when you just don’t want to be attached to a pump. It’s not uncommon for kids at diabetes camp to take a “pump holiday” where they revert to insulin injections in order to be unencumbered by the pump as they run and play and swim. Unfortunately this means a trade off - giving up the safety of closed loop control. Some have employed a strategy to be off the pump while active for extended periods but still have the advantages of closed loop assistance during less active periods of the day and overnight by using a combination of long acting basal injections in conjunction with the closed loop, in a manner similar to the following. Note that this will only work on days that you’re really, really active (and as such will have significant reductions in your overall basal requirements).
- First - Look at your pump and determine your 24 hour basal insulin dose.
- Second - Create an alternate basal profile (Profile A or B) on your pump with settings for each time period that are half of your normal settings (we’ll call this a “Half Basal” profile). You’ll also want to make a “Half Basal” profile in Nightscout with the new settings, and consider establishing target glucose ranges for the entire 24 hour period that are higher than you might normally use (use values similar to what you would use for activity). For children a reasonable choice might be 140-180 but yours may be different.
- Third - On the morning of the active day, record the time and give an injection of long acting basal insulin at HALF THE USUAL DOSE of your usual 24-hour basal requirement (which you determined above). At the same time switch your pump to the “Half Basal” profile you created. You’ll get half the usual basal dose from the injection, and half from your pump. You should also change your blood sugar targets on your pump to whatever you decided on when you set up your alternate profile above (don’t forget to change them back later). Use the + icon on Nightscout (upper right corner) and choose event Profile Switch to Half Basal (or whatever you called it) in order to assure appropriate visualization of the basal settings via Nightscout when you have connectivity.
- Fourth - During periods when you’re going to be very active, disconnect your pump and set an extended temp basal manually of 0.0 (choose a duration of several hours, or as long as you think you might be off the pump), and then suspend. This will allow the APS to track the negative IOB. Obviously since you’re going to be off the pump (and if in the water, potentially without the benefit of CGM data as well) you’ll want to remember to test more frequently.
- Fifth - Hook back up to the pump for meals to bolus and/or correct for hyperglycemia, and for periods where you’ll be less active during the day. Don’t forget to reset a temp basal of 0.0 when you suspend again in order to track negative IOB
- Sixth - At the end of the day, hook up to the pump, cancel your temp basal of 0.0 and start looping again. If you’ve been in the water, recognize it may take some time before your CGM data regains full accuracy, so you may still want to check more frequently. Check and make sure your pump is setting temp targets appropriately and check Nightscout to make sure all is going as you expect. You should still be on the “Half Basal” profile.
- Overnight - The loop will titrate your basal up or down in response to your CGM data. The caveat is, of course, that even if it lowers your temporary basal to 0.0 you will still be subject to the effects of the dose of long acting subcutaneous insulin you took in the morning. This will render the loop somewhat less effective at avoiding hypoglycemic events, and is in part the reason that higher than usual targets for blood glucose would be appropriate. Recognize also that after intense periods of physicial activity it is likely you will be more insulin sensitive, which could exacerbate the potential for hypoglycemia. Better to be safe and run slightly higher than normal.
- The Next Morning - Around 24 hours after the time you took your long acting insulin dose, switch your pump back to the normal profile, and readjust your glucose targets to your normal values on your pump. Use Profile Switch in Nightscout to switch back to your usual profile. Continue to monitor yourself somewhat more frequently until you’re sure things are completely back to normal and all of the effects of the long acting insulin bolus from the prior day have resolved. Alternatively, if you’re going to have several days of similar activities in a row, you could take another long acting basal dose and go at it again. Use your experience from the prior day to adjust that dose up or down slightly depending on how things went with your first day’s glucose readings.
What if I want to turn off the loop for a while?
If you’re near the rig or pumper, any one of these actions will turn off the loop:
- Power down the rig
- Turn the temp basal type to % on the pump, which blocks temps from being set
- Log in and stop cron
If you’re not near the rig or pumper, any one of these actions will turn off the loop:
- If on same wifi as rig, you can log in and stop cron
- Or change the API secret of NS temporarily, which means OpenAPS can’t pull BGs in and loop anymore (so after last temp basal previously set expires, defaults to normal basal rates).
- (This one needs testing and validation, the low target may get ignored, or set as 80 as that’s the lowest target you can usually set in OpenAPS): use very wide temp targets in your Nightscout website. You can set an wide range from -1000 to 1000 as a temp target for a period of time and it will effectively turn off the loop.
- You can also choose to leave it at home if you are going out and do not want to be looping during that time. It will start looping again when you get back into range and it can successfully read your pump and CGM data again.
How do I open loop?
The easiest way to “open loop” is to set the temp basal type on your pump to be “%” instead of “u/hr”. This means your pump cannot and willnot accept temporary basal rates commands issued by the rig. But, the rig will still be able to read from the pump and your CGM, and make the calculations of what it would otherwise do.
You can then watch the OpenAPS pill in Nightscout, or your logs (l) on the rig to see what OpenAPS would be doing.
How do I switch between insulin types, or switch to Fiasp? What should I change?
The most important setting for switching between insulin types in an OpenAPS rig is the “curve” type for duration of insulin activity. In oref0 0.6.0, most users will use the rapid-acting curve if they are using Humalog, Novolog, or similar. Fiasp users should use the “ultra-rapid” curve type. See the preferences page here for more details on how to change your curve in your preferences.json file (which you can edit with edit-pref).
Additionally, because Fiasp has a slightly faster peak time, you may need to adjust your behavior around meal-time dosing. If you pre-bolus, you may want to consider not pre-bolusing for the first few meals with Fiasp until you understand the differences, to avoid lows during or after the meal.
Some users who switch to Fiasp find that they need to adjust settings. Others do not need to change settings that much, and autosens and/or autotune can help adjust to any variances over time as your body’s needs change related to the difference insulin type. YDMV, as always!
Optimizing your settings
Once you’ve been looping for a while, you may look at your graphs and wonder how to achieve different results. It takes some time to do, but optimizing your settings is one of the keys to improving things, once you have basic looping up and running.
Note: if you’re not familiar with the approach of optimizing settings, it’s very important to understand that you should only change ONE thing at a time, and observe the impact for 2-3 days before choosing to change or modify another setting (unless it’s obviously a bad change that makes things worse, in which case you should revert immediately to your previous setting). The human tendency is to turn all the knobs and change everything at once; but if you do so, then you may end up with further sub-optimal settings for the future, and find it hard to get back to a known good state.
When people start looping, they often have too high basal and too low carb ratio or ISF. What this means is they’re using basal insulin around mealtimes to compensate for not usually giving the amount of insulin needed for food. When you go on a DIY closed loop and the system begins to help with adjusting insulin for BGs, it can become apparent that settings need to be tweaked. Here are a series of general approaches you can take for optimizing your settings, with example patterns:
Using Nightscout reports
If you are new to using Nightscout, you may want to start using the “reports” (via hamburger menu in top right corner) to view aggregate data and look for trends.
Using Autotune
The most powerful tool at your disposal for adjusting settings is Autotune, which you can run nightly as part of your loop, and which will automatically start adjusting your basals, carb ratio, and ISF based on observed trends. If your pump settings are too far from what autotune thinks is necessary, it won’t be able to adjust further without some manual action on your part, so you’ll want to review autotune’s recommendations periodically and consider adjusting pump settings in the recommended direction. As noted before, it’s best to change things gradually, and observe the results before changing additional settings.
In oref0 0.6.0 and beyond, autotune runs every night on your rig automatically. You can cat-autotune to view your autotune recommendations log. Learn more about how autotune works or how to run it.
Frequent negative IOB at the same time every day
Negative IOB happens when you are getting less insulin than your normal basal amount. We created Autotune to help deal with these situations and to automatically tune your basal rates for any recurring patterns where you need more or less basal. However, if you’re not running autotune, and you’re observing patterns of negative IOB (for more than a day or two in a row), indicating a trend, you may need to change your settings. Things to test include:
- Adjusting your DIA. In oref0 0.6.0 and beyond, regardless of what is in your pump, it will default to using a DIA of 5. It is also very common for OpenAPS users to have DIA of 6 or 7 set (in
preferences.json) - Basal rates are too high for the hours preceding the pattern of negative IOB.
- ISF is wrong. (Usually not this; start with testing and tweaking basals and DIA first.)
Hills and valleys / Peaks and troughs / Up and down patterns
Sometimes people observe “roller coasters” in their BG graph. Remember this is all relative - to different people, BG rising and falling by 20 points may or may not be a big deal (but a 50 point rise or drop might feel like a roller coaster).
First, you should eliminate human behaviors that cause these. Usually, it’s things like giving a traditional dose of “fast carbs” (such as 15g+ of sugar, glucose tabs, candy, etc.) that is more than needed for a low or a pending low. Remember the system is reducing insulin, and so you often need way fewer carbs to deal with a low, so you may rise afterward if you do too large of a carb correction. If you’re unsure how large a carb correction is needed, OpenAPS has the ability to send carbsReq notifications via Pushover. Overcorrections like that generally can’t be fixed by changing settings: you have to also change behaviors. Ditto for human-driven drops; e.g. by rage bolusing or otherwise bolusing too much when BG is high. A better approach is to set a low temporary target, which asks OpenAPS to do “more”, but will still keep you in a safe range.
Human behaviors set aside, if you are still seeing hills and valleys in your BG graphs, consider the following:
- ISF may be off, so you may want to raise ISF to make corrections less aggressive. Remember, make small changes (say, 2-5 points for mg/dl, and .5 or less for mmol) and observe over 2-3 days. Before changing ISF or any other setting, check to see what autotune recommends.
- If you’re seeing highs followed by lows after meals, CR may need adjusting. One common mistake is to compensate for rapid post-meal rises with a very aggressive (low) CR, which then causes subsequent low BG. One tool for preventing meal spikes include setting an “eating soon” low temp target before and/or right after a meal, to get more insulin started earlier, and then allow OpenAPS to reduce insulin once the temp target expires, to help prevent a post-meal low. Similarly, a small manual “eating soon” bolus up to an hour before a meal, or a larger prebolus right before a fast-carbs meal, can help match insulin timing to carb absorption without increasing the total amount of insulin delivered (and subsequently causing a post-meal low). (Here are some tips on using temp targets, and you can use IFTTT to make it easy to enter them from your phone or watch or device of choice.)
How to change your settings
To make a change to your basal profile, ISF, or CR, change these values on your pump the way you would normally. Assuming Autotune is enabled to run automatically on your rig, changes to your basal profile within the pump during the middle of the day will NOT cause an immediate change to the basal profile the loop is using. You can either wait until 4am when Autotune runs, or force the adjustment to happen by running Autotune manually in your myopenaps directory. When you re-run Autotune, it will use your pump profile as the starting point.
Nightscout will not automatically reflect the updated pump profile or the adjustments made by Autotune! To upload your new profile to Nightscout, follow these directions.
Running Autotune
There are several ways to run Autotune, depending on whether you are looping and whether you want to use the results automatically.
AutotuneWeb: the easiest way to run Autotune
The easiest way to run Autotune, if you don’t have an OpenAPS rig, is to use “AutotuneWeb”. It’s a website where you enter your Nightscout URL, confirm your profile, and get results emailed directly to you. Click here to go use AutotuneWeb. This is recommended and easiest for non-OpenAPS users.

What to expect when using AutotuneWeb
After you check your Nightscout profile to make sure it’s up to date, and submit your URL, it will take you to the profile page. You should check again and make sure it’s pulling from a current profile. This is where you can tell it what type of insulin you’re using; how many days to run (up to 30, we recommend at least 7 to start); and provide your email address to get the results emailed to you.
- (Also note that if you want to use the generated files and run Autotune yourself over a longer time frame or with more customized options, you can grab the generated profile files here.)

When you get your email (note it may take 20 minutes), it will reference your NS URL at the top of the page and the date range you ran it on. The text will also tell you whether you ran with UAM on for basals.
On the left, you’ll see your starting values from your current NS profile; on the right is the tuned recommendation from Autotune.

Below the ISF and carb ratio, you’ll see the basal report.
- Suggestions higlighted in yellow indicate a suggested change of at least 10%, and red indicates a change of +20% or -30% (the standard limits imposed by Autotune). Please always take care when adopting any changes suggested by Autotune, but especially for these larger highlighted changes.
- The green & red blocks next to each basal suggestion indicate how many days the Autotune algorithm used actual BG data to produce the suggestion (green) and how many days it averaged the surrounding hours due to the data for that hour being dominated by other factors such as carb absorption. This is currently an experimental new feature to try to give an indication of how much trust to place in each suggestion.


If it’s your first time using AutotuneWeb:
- Make sure your Nightscout profile is up to date. This is where the “starting” settings are pulled from.
- If you’ve not read about Autotune, please see below to get an understanding of how Autotune works and how you might use the results.
- Want to run over a different time frame? Keep in mind you can also get a profile generated from AutotuneWeb and then follow the manual instructions below for running Autotune on your own computer.
- Make sure to check out the privacy policy for AutotuneWeb, which includes directions for requesting your data to be deleted.
- Results don’t look like what you expected to see? See here for some suggestions that might contribute to flukey data.
Running Autotune manually in OpenAPS
If you have an OpenAPS rig and want to run autotune manually, you can do so on the command line.
Running manually in your myopenaps directory to use recommendations
If you want to have OpenAPS use your autotune results (e.g. you changed pump settings and just want it to be tuned sooner than 4am), run the following:
oref0-autotune --dir=~/myopenaps --ns-host=https://mynightscout.herokuapp.com --start-date=YYYY-MM-DD
Running manually in a different directory to not use the results automatically
You will want to run Autotune in a different directory on your rig if you do not want OpenAPS to use the autotune settings by default.
- Run this command to create a
newdirectoryand copy over the profile and pump settings files:
mkdir -p ~/newdirectory/settings && cp ~/myopenaps/settings/profile.json ~/newdirectory/settings/autotune.json && cp ~/myopenaps/settings/pumpprofile.json ~/newdirectory/settings/pumpprofile.json
- Then, run Autotune manually, pointing to the new directory:
oref0-autotune --dir=~/newdirectory --ns-host=https://mynightscout.azurewebsites.net --start-date=YYYY-MM-DD
- obviously, sub in your NS url and the start date you want to start with
- If you change your pump settings, you will need to re-copy your pump settings back into
newdirectory
Note: If you did this correctly in your newdirectory, settings will not be used by OpenAPS. You will need to cd ~/newdirectory/autotune && cat autotune_recommendations.log to see your autotune recommendations, and autotune will only run when you manually run it. The recommended behavior is to run Autotune inside of your OpenAPS directory, per Phase B, which is the default and will automatically run every night and have OpenAPS use the settings from Autotune automatically.
Running Autotune automatically in OpenAPS (default OpenAPS behavior)
In oref0 0.6.0 and beyond, autotune will run by default. This means that autotune would be iteratively running (as described in #261) and making changes to the underlying basals, ISF, and carb ratio being used by the loop, making small adjustments from the previously autotuned settings based on each day’s new data. However, there are safety caps (your autosens_max and autosens_min) in place to limit the amount of tuning that can be done at any time compared to the underlying pump profile. The autotune_recommendations will be tracked against the current pump profile, and if over time the tuning constantly recommends changes beyond the caps, you can use this to determine whether to tune the basals and ratios in those directions.
Important When autotune is enabled in your loop to run automatically, changes to your basal profile within the pump during the middle of the day will NOT cause an immediate change to the basal profile the loop is using. The loop will continue to use your autotune-generated profile until a new one is updated just after midnight each night. Each autotune nightly run will pull the current pump profile as its baseline for being able to make adjustments. If you have reason to want a want a mid-day change to your basal program immediately, you should run autotune manually (see directions) to have it re-pull the settings from the pump and tune from the new settings.
How to copy over autotune files from another rig:
If you have multiple rigs and would like to sync up autotune results, or move an existing autotune over to a brand new rig, you’ll want to copy files over.
Log into the NEW rig and run the following command:
scp -r root@my-edison-original.local:~/myopenaps/autotune/ ~/myopenaps/autotune (where “my-edison-original” is substituted for your rig name that you want to copy files from)
- You’ll be asked for your my-edison-original rig’s password (where you are copying FROM).
- This will copy everything in the autotune directory over.
Running Autotune for suggested adjustments without an OpenAPS rig
Note: the easiest way of running Autotune is now “AutotuneWeb”. See the top of this page for instructions on running it via the web service, without having to set it up on your own computer. If you do want to manually set up your own computer to be able to run it over a time period >30 days or other reasons, see below.
Caution for AndroidAPS users: Currently, the master oref0 version with Autotune does not parse AndroidAPS entries correctly. You must set AndroidAPS to upload all temp basals as “absolute” rates, instead of %, and use the dev branch of oref0. If you do not do both of these things, your results will be wrong! Future versions of Autotune will allow using AndroidAPS data as long as the option to upload temp basals as absolute values instead of / in addition to percent is enabled in AndroidAPS.
If you are not running autotune as part of a closed loop, you can still run it as a “one-off”.(OpenAPS/existing oref0 users may want to use the above instructions instead, however, from phase A or phase B on this page.) For more about autotune, you can read Dana’s autotune blog post for some background/additional detail and scroll up in the page to see more details about how autotune works.
Requirements: You should have Nightscout BG and treatment data. If you do not regularly enter carbs (meals) into Nightscout (this happens automatically when you use the “Bolus Wizard” on the Medtronic pump and should not be manually added to Nightscout if you use the Bolus Wizard), autotune will try to raise basals at those times of days to compensate. However, you could still look at overnight basal recommendations and probably even ISF recommendations overall. [Read this page for more details on what you should/not pay attention to with missing data.](../How it works/autotune#if-you-are-diy-closed-looping-and-looking-at-autotune>)
Step 0: Decide where to run Autotune
- (Remember you can use AutotuneWeb if you don’t want to run it on your computer.)
- There are five main ways to run Autotune on your own: via (a) a cloud-based virtual machine (Linux VM through Google Cloud Platform, for example), (b) on via a virtual machine on Windows (e.g., VirtualBox), (c) on a Mac directly, (d) on a Windows 10 computer running the Windows Subsystem for Linux (WSL), or (e) direct on a physical machine running Linux. Instructions for the first four are below.
- Whichever route you are using, we recommend some form of Debian distro (Ubuntu is the most common) for consistency with the Raspbian and jubilinux environments used on the Pi and Edison for OpenAPS.
- If you’re interacting with your VM via its graphical interface, make sure you have installed a browser at your VM (e.g. Firefox) then open the correct page from your VM. You may think that copying from your Windows/iOS and pasting in your Linux terminal would work but is not as simple ...and yes, there is lots of copying / pasting! To make copying and pasting simpler, it is often better to
sshdirectly to your VM, rather than using its graphical interface (or the cloud provider’s console interface).
Step 1: Install dependencies (instructions vary by setup)
Option A: Run via a cloud-based virtual machine
Click here to expand the instructions for building via a cloud-based virtual machine:
- To run a Linux VM on a cloud server, free options include AWS (free for 1 year) and Google Cloud (free trial for a year; about $5/mo after that). If you’re willing to pay up front, Digital Ocean is $5/mo and very fast to set up. AWS may take a day to spin up your account, so if you’re in a hurry, one of the others might be a better option.
- Once signed up to Google Cloud Platform (if you are using that route), click the terminal icon near the top right to activate the cloud shell - a black window will appear at the bottom of the screen. Note that you can easily cut & paste into this terminal without the need to do anything special.
- Make sure your VM is using the same timezone as your pump. You can change timezone using
sudo dpkg-reconfigure tzdata - If your VM is outside the US, particularly in a country that uses
,as a decimal separator, make sure your system locale is set toen_US.utf8or another locale that uses.as the decimal separator. If you think this may be incorrect, you can check it by typinglocale. - If you’re interacting with your VM via its graphical interface, make sure you have installed a browser at your VM (e.g. Firefox) then open the currect page from your VM. You may think that copying from your Windows/iOS and pasting in your Linux terminal would work but is not as simple .. and yes, there is lots of copying / pasting! To make copying and pasting simpler, it is often better to
sshdirectly to your VM, rather than using its graphical interface (or the cloud provider’s console interface). - Now do this:
sudo curl -s https://raw.githubusercontent.com/openaps/docs/master/scripts/quick-packages.sh | bash -. This will take a minute or so. If the install was successful, the last line will say something like:Successfully installed openaps-contrib-0.0.15(although the version number may have been incremented). If you do not see this or see error messages, try running it multiple times. It will not hurt to run this multiple times. - On Google Cloud Shell do:
sudo npm install -g json - On Google Cloud shell at least, you need to set your NightScout API_SECRET as an environment variable. To do this type
sudo env API_SECRET=xxxxxx(where xxxxxx is your API_SECRET, either as the string you gave Nightscout, or astoken=xxxxxwhich you generated in Nightscout admin interface) followed bysudo export API_SECRET - Please note that on Google Cloud Shell, the terminal becomes inactive by default after 30 minutes inactivity, and you need to repeat the above each time you (re)start a new terminal instance.
- Now move to step 2.
Option B: Run via a Windows-based virtual machine
Click here to expand the instructions for building via a Windows-based virtual machine:
- An easy way to start is the VirtualBox as VM and Ubuntu as Linux OS. Step-by-step setup instructions can be found here: https://www.youtube.com/watch?v=ncA85gRAJxk. However skip the instructions for downloading Ubuntu (time stamp 1:15 to 2:12) because those instructions are now outdated. Download the correct 32 bit version from this link: http://releases.ubuntu.com/17.04/ubuntu-17.04-desktop-i386.iso and then go back to the Youtube video to follow the setup instructions for installing Ubuntu on VirtualBox. If you experience problems with this version 17.04 of Ubuntu you can try the LTS version of Ubuntu, which has worked for some. Here is the link for Ubuntu LTS: https://www.ubuntu.com/download/desktop/thank-you?version=16.04.3&architecture=amd64. After downloading the LTS version go back to the Youtube video to follow the setup instructions for installing Ubuntu on VirtualBox.
- Make sure your VM is using the same timezone as your pump. You can change timezone using
sudo dpkg-reconfigure tzdata - If your VM is outside the US, particularly in a country that uses
,as a decimal separator, make sure your system locale is set toen_US.utf8or another locale that uses.as the decimal separator. If you think this may be incorrect, you can check it by typinglocale. - Now do this:
sudo curl -s https://raw.githubusercontent.com/openaps/docs/master/scripts/quick-packages.sh | bash -. This will take a minute or so. If the install was successful, the last line will say something like:Successfully installed openaps-contrib-0.0.15(although the version number may have been incremented). If you do not see this or see error messages, try running it multiple times. It will not hurt to run this multiple times.
Option C: Run on a Mac
Click here to expand the instructions for building via your Mac:
- MAC USERS: Follow these steps instead of 1a / 1b above if you want to run autotune on your Mac. (Mac users can instead do the above instructions if they prefer to create a Linux virtual machine to run it on):
- To run AutoTune using a Mac you will use the Terminal application. Open the Terminal application on your Mac (it is located in the Utilities application folder on your Mac). For more information about using Terminal see here
- After you open a Terminal window, copy and paste the command for each of the Mac install command steps below, and then hit the return key after you paste each command, which will execute it. If you are asked for a password, enter the password for your Mac.
- Tip for New Mac Users: If you typically use a Windows machine and you keep trying to do a control-c (copy) and control-v (paste), remember, on a Mac use command-c (copy) and command-v (paste) instead.
- For example, the first step is to install Homebrew on your Mac. To do this you need to copy and paste the following command from step 1.) of the Mac install commands below and then hit the return key:
/usr/bin/ruby -e "$(curl -fsSL https://raw.githubusercontent.com/Homebrew/install/master/install)"
Mac install commands:
- 1.) Install Homebrew:
/usr/bin/ruby -e "$(curl -fsSL https://raw.githubusercontent.com/Homebrew/install/master/install)" - 2.) Install Coreutils:
brew install coreutils - 3.) Install Node for (NPM):
brew install node - 4.) Install JQ from Homebrew:
brew install jq
Option D: Run on a Windows 10 computer using the Windows Subsystem for Linux (WSL)
Click here to expand the instructions for building via a Windows 10 computer using the Windows Subsystem for Linux (WSL):
- You must be running Windows 10 on your computer to use this option. The Windows Subsystem for Linux (WSL) is a Windows 10 feature that enables you to run native Linux command-line tools directly on Windows, alongside your traditional Windows desktop and modern store apps.
- Open PowerShell as Administrator. To open an elevated PowerShell prompt, in the taskbar search, type powershell. The result “Windows PowerShell” appears on the top. Right-click on “Windows PowerShell” and select Run as Administrator. The User Access Control (UAC) prompt will ask you for your consent.
- In PowerShell run
Enable-WindowsOptionalFeature -Online -FeatureName Microsoft-Windows-Subsystem-Linux. - This instruction is for Windows 10 build 16215 or later. To check your build of Windows 10 navigate to Settings > System > About. Look for the OS Build field. It will need to say 16215 or later for these next instructions to work. If you have a Windows 10 build earlier than 16215 follow these instructions to install Linux: https://docs.microsoft.com/en-us/windows/wsl/install-win10#for-anniversary-update-and-creators-update-install-using-lxrun. Only follow this link if your build of Windows 10 is earlier than 16215.
- Open the Microsoft Store and install Ubuntu using this link: https://www.microsoft.com/en-us/store/p/ubuntu/9nblggh4msv6?rtc=1. On this Ubuntu page click on the blue button that says “Get the app”. The Microsoft Store will open in a new window, showing the Ubuntu app. Click on the blue button that says “Get”. Your computer will start to install the Ubuntu app (“Installing, this may take a few minutes...”). When done it will say, “Installation successful!”.
- You will be asked to “create a default UNIX user account”. Chose whatever name works for you. It doesn’t need to match your Windows username. Enter the name at the prompt, “Enter new UNIX username:”.
- You will be asked for a password: “Enter new UNIX password:”. Your cursor will not move when you type the password you choose. You’ll then be asked to “Retype new UNIX password:”. Make sure you enter the password exactly as you just typed it. Again, your cursor will not move as you retype the password.
- You will now be at a Linux prompt (like the old DOS prompt). It will look something like this, in a green font: “username@DGdesktop: $ _”.
- Make sure you (that is, WSL/Ubuntu) are using the same timezone as your pump. You can change timezone using
sudo dpkg-reconfigure tzdata. WSL/Ubuntu may respond to this command with “[sudo] password for username”. If so enter your password from above. Follow the prompts to select your timezone. You likely will not be able to use your mouse to navigate on the timezone screens. Use your keyboard’s arrow keys to navigate and the Enter key to select. - If your WSL is outside the US, particularly in a country that uses
,as a decimal separator, make sure your system locale is set toen_US.utf8or another locale that uses.as the decimal separator. If you think this may be incorrect, you can check it by typinglocale. - This step could take 10-15 minutes. Type:
sudo curl -s https://raw.githubusercontent.com/openaps/docs/master/scripts/quick-packages.sh | bash -. If the install was successful, one of the last lines will say something like:Successfully installed future-0.16.0 openaps-contrib-0.0.15 parsedatetime-2.4 recurrent-0.2.5(although the version number may have been incremented). - Install the Linux command “bc” by typing:
sudo apt-get install bc.
Step 2: Install oref0
- Install the latest version of oref0:
npm list -g oref0 | egrep oref0@0.5.[5-9] || (echo Installing latest oref0 package && sudo npm install -g oref0)
- If you need the dev version of oref0 (for example, to run autotune with AndroidAPS as of August 2018):
cd ~/src && git clone git://github.com/openaps/oref0.git || (cd oref0 && git checkout dev && git pull)
cd ~/src/oref0 && npm run global-install
Step 3: Create a profile.json with your settings
- A. Create a myopenaps and settings directory.
mkdir -p ~/myopenaps/settings - B. Change into that directory:
cd ~/myopenaps/settings. - C. Create a profile file by typing
nano profile.json. Copy and paste the example below, but input your information from your pump. Change the basal profile times to match yours (update the minutes to match your basal start time; the minutes are number of minutes from midnight to the start of basal, e.g., a basal starting at 5:00am will have a minutes entry of 5 x 60 = 300 minutes and a basal starting at 7:30am will have a minutes entry of 7.5 x 60 = 450 minutes), and add more entries if needed. It’s very common for first-time users to have problems that result from mistakes introduced into this file. Some common ones to check:- Be sure that all of the } lines in basalprofile have a comma after them, except the last one.
- You need to use a 0 before any entries with a decimal point, such as a basal rate of
0.35; without the 0 before the decimal point, your autotune will have an error. - If you don’t like editing in the terminal, you can edit the profile files in a text editor. However be aware that TextEdit will replace normal quotes (”) with curly quotes (“) if you have “smartquotes” enabled in preferences, and this difference will make autotune fail. You can download BBEdit (https://www.barebones.com/products/bbedit/) if you want a simple text editor that works well. The trial version is sufficient, you won’t be using advanced featues.
Every comma, quote mark, and bracket matter on this file, so please double-check carefully.
- Make sure to adjust these settings to match yours:
- dia - Duration of Insulin Action (DIA), in hours (e.g., 4.5, or 3). Usually determined by the type of insulin and its effectiveness on you.
- basal profile - you need at least one basal rate in here. You can create multiple of these for all of your basal rates, which will give you an easier visual comparing your current basals to what autotune recommends (see visual example), but at a minimum you just need one here for autotune to run. But we recommend putting all or most of your basals in, in order for autotune to appropriately cap at the safety limits (and compare to 20% above or below your existing basals). If you do not put your full basal profile in, it will not compare to those with the safety cap because it does not know about it.
- “sensitivity” should be your iSF - in mg/dL/U (if using mmol/L/U multiply by 18)
- “carb_ratio” at the end should be your carb ratio
- Make sure to exit the profile.json when done editing this file - Control-X and hit yes to save.
{
"min_5m_carbimpact": 8.0,
"dia": your_dia,
"basalprofile": [
{
"start": "00:00:00",
"minutes": 0,
"rate": your_basal
},
{
"start": "08:00:00",
"minutes": 480,
"rate": your_basal
},
{
"start": "13:00:00",
"minutes": 780,
"rate": your_basal
},
{
"start": "21:00:00",
"minutes": 1260,
"rate": your_basal
}
],
"isfProfile": {
"sensitivities": [
{
"i": 0,
"start": "00:00:00",
"sensitivity": your_isf,
"offset": 0,
"x": 0,
"endOffset": 1440
}
]
},
"carb_ratio": your_ic_ratio,
"autosens_max": 1.2,
"autosens_min": 0.7
}
- D. Verify your profile.json is valid json by running
jq . profile.json- if it prints a colorful version of your profile.json, you’re good to proceed. If not, go back and edit your profile.json to fix the error. - E. Create a pumpprofile.json that is the same as your profile.json. On the command line run:
cp profile.json pumpprofile.json - F. Create a third file from the command line by running:
cp profile.json autotune.json
Step 4: Run autotune on retrospective data from Nightscout
- Run
oref0-autotune --dir=~/myopenaps --ns-host=https://mynightscout.herokuapp.com --start-date=YYYY-MM-DD
- ^ Sub in your Nightscout URL. Note that you mustn’t use the trailing / on the Nightscout URL or that will cause an error.
- Start with one day to confirm that it works, first. Then run it for one week, and then one month. Compare results and see if the numbers are consistent or changing, and see how that aligns with your gut feeling on whether your basals, ISF, and carb ratio was correct.
- If you want to run dates in the past, add the following: –end-date=YYYY-MM-DD (otherwise, it will just default to ending yesterday). The start date should be the older date, the end date is the more recent date.
- Remember, this is currently based on one ISF and carb ratio throughout the day at the moment. Here is the issue if you want to keep track of the work to make autotune work with multiple ISF or carb ratios.
- If useCustomPeak is not set in preferences.json and –tune-insulin-curve=true is not used, the DIA used by autotune is obtained from the pump and the peak time is obtained from the defaults of the insulin curve selected in preferences.json.
Optional configurations
- For most people, autotune’s UAM detection does a good job of excluding anomalous data from unannounced or imprecisely estimated carbs, stress spikes, etc., and is able to properly tune basals using the non-excluded data. In rare cases, some people’s basal settings are so far below their real basal rates when starting out with autotune that they find the algorithm unable to suggest raising basals because it is classifying all periods when basals are too low as unannounced meals. If you notice this issue, you are certain you have precisely entered carb counts for all carb intake events, and you want autotune to raise basal for abrupt BG rises due to stress etc., then you can force the algorithm to classify unannounced meal periods as basal periods using the –categorize-uam-as-basal=true option. Most people should not need this option, and it should only be used with care. **SAFETY WARNING** If you use this option and treat lows without entering the low treatment carbs, an amplifying cycle will begin with autotune raising basals, treated lows get categorizes as basals being too low, basals are raised causing lows, etc.
- If running 0.7.0 or later, autotune has a –tune-insulin-curve=true option that enables autotune to tune the insulin end time (DIA) and insulin peak. The values listed below are calculated for insulin end times 2 hours less than the current end time to 2 hours more. If they agree in moving the insulin end time in the same direction, the insulin end time is moved by 1 hour. Insulin peak time is tuned similarly in steps of 5 minutes for peak times 10 minutes less than the current peak time to 10 minutes more than the current peak time. **SAFETY WARNING** This tuning method is still very much experimental and not recommended to be run unattended.
- Average deviations observed in the data
- Square root of the average of the squared deviations
Re-Running Autotune
Remember, to initially set-up Autotune follow the instructions above
To subsequently re-run Autotune at a later time:
- Open Ubuntu/your machine of choice and login if necessary
- At command prompt which will start with your username:
cd ~/myopenaps/settings - Then:
nano profile.json(this gets you to the pump settings section)- Now edit your settings (using up / down arrows and backspace) – CR; ISF; basals etc.
- Press Control-X (to save your new settings)
- Press Y (to confirm save new settings)
- Now should see command prompt which will start with your user name again.
- Now follow steps D, E, F from the link above ie:
jq . profile.json(if it prints a colourful version of your profile.json, you’re good to proceed)cp profile.json pumpprofile.jsoncp profile.json autotune.json
- Then to re-run Autotune, subbing in your URL:
oref0-autotune --dir=~/myopenaps --ns-host=https://mynightscout.herokuapp.com --start-date=YYYY-MM-DD
Why Isn’t It Working At All?
(First - breathe, and have patience!) Here are some things to check:
If you get the error ERROR: API_SECRET is not set when calling oref0-autotune.sh and autotune won’t run, try this (note: as of oref 0.5.5, this error has been downgraded to a warning as this will only prevent autotune from running if you have “locked down” your NS to prevent anonymous read access):
- Log into your VM
- At the command prompt, type
cd /etc/and hit enter - Type
sudo nano environmentand hit enter - You are now editing the
environmentfile. Add a new line to the file that says:API_SECRET=yourAPIsecret(Note - replace “yourAPIsecret” with your own) - Hit CTRL-O and enter to save the changes to the file
- Hit CTRL-X and enter to exit the file and go back to the command prompt
- At the command prompt, type
export API_SECRET=yourAPIsecret(Note - replace “yourAPIsecret” with your own)
To test this fix, type echo $API_SECRET and hit enter. If this returns the API Secret that you set in the environment file, then it should work for you to run autotune.
Other things to check:
If you see error like
TypeError: opts.glucose.map is not a functioncheck that you haveAPI_SECRETin the right format, as described in this issue. You either needAPI_SECRET=xxxxwherexxxxis the string you gave Nightscout, orAPI_SECRET=token=xxxxxwherexxxxxis the token you generated in Nightscout admin interface.Does your Nightscout have data? It definitely needs BG data, but you may also get odd results if you do not have treatment (carb, bolus) data logged. See this page with what output you should get and pay attention to depending on data input.
Did you pull too much data? Start with one day, and make sure it’s a day where you had data in Nightscout. Work your way up to 1 week or 1 month of data. If you run into errors on a longer data pull, there may be something funky in Nightscout that’s messing up the data format file and you’ll want to exclude that date by picking a batch that does not include that particular date.
Make sure when you sub in your Nightscout URL you do not include a “/” at the end of the URL
Check your profile.json and make sure it really matches the example - chances are there’s a stray character in there. - “start” time stamps must have the format “HH:MM:SS”. “HH:MM” (e.g. “00:00” instead of “00:00:00”) gives erroneous calculations such as “-Infinity” or “Nan” for the ISF and CR values. This results in the ISF & Carb ratio values being unchanged. Example output (console):
oldCR: 9 fullNewCR: NaN newCR: NaN p50deviation: -0.76 p50BGI 0 p50ratios: -Infinity Old ISF: 44 fullNewISF: -Infinity adjustedISF: 44 newISF: 44Telltale sign is the input and output values for ISF and carb ratio remain unchanged: ```Parameter | Pump | Autotune ------------------------------------- ISF [mg/dL/U] | 44.000 | 44.000 Carb Ratio[g/U]| 9.000 | 9.000 Basals [U/hr] | - | ```Also check your pumpprofile.json and autotune.json - if it worked once or twice but then stopped working, it may have a bad file copy. If needed, follow Steps 3-E and 3-F again to re-copy a good profile.json to pumpprofile.json and autotune.json again.
If VM is already set up, and you are returning to your VM for another session of autotune, double-check that your VM timezone matches your pump:
sudo dpkg-reconfigure tzdataInvalid calculations may be due to the locale settings of your VM (correct settings are
en_US.utf-8or another locale that uses.as the decimal separator). An easy way to overcome such a problem is to addenv LANG=en_US.UTF-8in front of your command for running autotune, it should look like this:env LANG=en_US.UTF-8 oref0-autotune --dir=~/myopenaps --ns-host=https://mynightscout.azurewebsites.net --start-date=YYYY-MM-DDDid you turn on Nightscout authentication with the setting
AUTH_DEFAULT_ROLES? Currently Autotune will only work with thereadablesetting. See issue #397 in Github.If you are using NightScoutLoader to load the Diasend data to your Nightscout site, ensure the Diasend xls date format is the same as the date format selected in the NightScoutLoader Settings. For USA users, the Diasend xls date format is “mm/yy/yyyy HH:mm” format which isn’t supported by NightScoutLoader at this time. The NightScoutLoader app currently only supports {“Default”, “dd/MM/yy hh:mm”, “MM/dd/yy hh:mm”, “dd/MM/yy”, “MM/dd/yy”] formats. “Default” corresponds to your OS date format for the English locale. If none of these formats correspond to your Diasend xls data, as a workaround until NightScoutLoader is remedied, either set your system default date format to correspond to Diasend’s date format or change the date format in the Diasend xls data file for all Times and Dates to correspond to NightScoutLoader Settings. For example, the tabs “Name and glucose”, “CGM”, “Insulin use and carbs”, and “Alarms and events” all have date and time data.
Still not working? Post a question in Gitter. To best help you troubleshoot: Specify if you’re on MDI or using a pump. Specify if you’re using xDrip as a data source, or if you are otherwise logging data into Nightscout in a way that’s not through Care Portal app directly, etc.
What does this output from autotune mean?
Go here to read more about understanding the output, to see an example visual of what the output might look like, and scenarios when you may want to disregard portions of the output based on the data you provide it.
Feedback, issues, and contributing
Please note autotune is still a work in progress (WIP)! We’d love to hear if it worked well, plus any additional feedback - please also provide input via this short Google form and/or comment on this issue in Github for more detailed feedback about the tool. You can also join the discussion in Gitter.
Re-running the setup script
In the future, you may want to run the setup script again (such as when you want to come back and turn on new, advanced features), or if someone asks you to “cat your runagain”, which means to display this file so we can analyze the contents.
First: cd ~/myopenaps && cat oref0-runagain.sh to see what options you have saved in there.
If you want to edit the file: cd ~/myopenaps && nano oref0-runagain.sh to edit, ctrl-x to save when finished. Make sure to change myopenaps to your openaps directory name if you chose something non-standard when you ran oref0-setup originally.
To run again: bash ~/myopenaps/oref0-runagain.sh will run oref0-setup with the options you have saved in the runagain file.
Don’t have a runagain or want to start fresh? cd && ~/src/oref0/bin/oref0-setup.sh
Because you’re re-running, remember you will need to also re-do adjustments to your preferences.json once you finish re-running setup with either of the methods above. You can do that by edit-pref.
Note: The following items are not impacted by re-running the setup script:
- Wifi settings
- Bluetooth tethering (assuming you have not changed the Bluetooth address you entered during the initial setup)
- Papertrail settings (assuming you are update to the openaps directory name used in your intial setup, typically
myopenaps)
How to update oref0 on your OpenAPS rig in the future
You’ve probably heard about all kinds of cool new features that you want to try. If they’re part of the master branch already, you just need to go enable them (usually by re-running the oref0-setup script). You can see notes about what is included in a particular release in the release notes page for oref0.
However, if it’s a brand-new feature that’s being tested or is recently added to master, you’ll need to install the new version of oref0 first. By the way, if you want to check which version of oref0 you are currently running, npm list -g oref0 and if you want to check which branch cd ~/src/oref0 and then git branch.
If you want to view the commit records between the version you are running and the new version (click here):
cd ~/src/oref0git fetchwill update the local git repository. This does not change anything in your working directorygit statuswill tell you which branch your working directory is on and how many commits your working directory is behindgit log origin/master(replacemasterwith the branch you are on) will print the commit descriptions. You only need to review the number of log messages corresponding to the number of commites your working directory is behind.git diff origin/master..(replacemasterwith the branch you are on) will print the individual file differences between your working copy and the new version.
Step 1 (Master): Install the new version
cd ~/src/oref0 && git checkout master && git pull && sudo npm install -g oref0
(If you get a message that you need to commit or stash, use command git stash)
Alternative Step 1a (Dev): To get on “dev” branch to test even more recently added new stuff
Or, if the feature you want hasn’t been released yet, and you want to test the latest untested development version of oref0, run:
cd ~/src/oref0 && git checkout dev && git pullnpm run global-install
Alternative Step 1b (Test a feature branch): Not recommended for initial setup
Not recommended for initial setup, click here to see instructions
In case you want to test even more advanced stuff you’ve read about on gitter channels (intend-to-bolus / openaps/oref0 / openaps/autotune) or on official pull request list you should follow the link, read description and in case you’ve decided to try it out, do:
- Checkout the header of pull request. It will contain author name, the branch to be merged to (dev or master) and the feature branch name that you want to test.
- run
cd ~/src/oref0 && git fetch && git checkout <feature-branch-name> && git pull && npm run global-install
- don’t forget to replace
<feature-branch-name>with the actual name of the feature branch you want to test
Step 2: Re-run oref0-setup
Now that you’ve updated your oref0 version, you will want to run the oref0-setup script (cd && ~/src/oref0/bin/oref0-setup.sh) again. See this section for a guide of what the setup script will be prompting you to enter.
Step 3: Remember to set your preferences!
Reminder! You’ll need to re-set your preferences in preferences.json. See the preferences page to see what preferences might have changed or become available since your last update.
To edit any of your preferences, you can enter edit-pref (as a shortcut) or cd ~/myopenaps && nano preferences.json
How to update Linux on your OpenAPS rig in the future
Along with updating the OpenAPS software on your rig, you will also want to periodically update your operating system. This isn’t the place for a primer on Linux Commands, but the following two are useful to keep your system updated and as secure as they can be from recently-found bugs:
# apt-get update
# apt-get upgrade
The first fetches all of the updated package lists for your system, and the second upgrades all of your installed packages to their most current versions.
Wifi overview
If you want to keep your rig small and portable, using the internet will be important (assuming you are using a Dexcom CGM) to keep BG values flowing to the loop. Ways your rig can stay online and access the internet are:
- Joining known wifi networks
- BT-tethering to your cell phone’s hotspot
- Wifi-tethering to your cell phone’s hotspot
- Wifi-tethering to mifi device
By default, the rig’s programming in OpenAPS is to prefer joining known wifi connections over BT-tethered connections. Basically, the rig will look every minute to see if a wifi connection is available. If it is, the rig will connect to that. When a wifi connection is unavailable, the rig will attempt to BT-tether to your phone’s hotspot (assuming you have done the work to pair the two devicecs as part of your rig’s setup).
Most users prefer a combination of known wifi networks and BT-tethering to maintain internet access for their rig. This minimizes cell phone data use while at the same time requiring no intentional action on the user’s part when they enter/leave their known network areas. The rig will move seamlessly off/on known networks and BT-tethers without needing help. Using wifi-tethers requires the user to manually turn the connections on/off when they get into the range of a preferred wifi network to save cell data, therefore those connections aren’t preferred.
These helpful mobile apps are worth checking out, as they’ll aid you with accessing your rig when it gets connected online.
It is also possible to have your rig loop offline but this requires some additional setup.
Home Wifi
If your home wifi is flaky, your OpenAPS looping will likely be flaky as well. Speed isn’t super important, but reliability of uptime is. If your router is old and hasn’t been updated in awhile, simply updating your router may be a good idea. Routers are about $100 for a new, well-featured router. If you get your router as part of a package from your ISP, you can ask if they have any updated equipment to improve your home wifi network’s stability. Many ISPs tend to forget about their customers’ old equipment until they start complaining about it.
Home router
Have you ever accessed your home wifi’s router to see the devices connected to it? How about to make adjustments to your firewall if one is installed? I highly recommend becoming familiar with logging into your home router...this will let you quickly see (1) if your rig is successfully connected to your home wifi and (2) the MAC address and IP address of your rig.
NOTE IP addresses are assigned to the rig by the device providing the internet access. So when the rig is on your home wifi network, the IP address is assigned by your home’s router. When the rig is on your phone’s hotspot, the IP address is assigned by your phone. The private IP addresses for a wifi network will generally be in the format of 192.168.1.XX or 10.10.1.XX and the private IP addresses for a phone hotspot will generally be in the format of 172.20.10.XX The last two digits will not always be the same every time your rig connects. Most routers, however, will allow you in the Advanced Settings section to configure your LAN settings to always give your rig the same IP address. If you find that you cannot access your rig sometimes, it is a good practice to check if maybe the IP address of the rig has changed since the last time you looked and consider setting your router to assign the rig the same IP address each time.
Most home routers can be accessed by going to the URL http://192.168.1.1 on your computer’s browser while it is connected to the home wifi. Alternatively, check your router for a sticker that includes information about logging into the router (most include a sticker on the bottom of the router). If there is no sticker, and the URL doesn’t work, try googling your router’s manufacturer and model number for login information. Each manufacturer usually has a different combination of default user names and logins, for example:
- NetGear routers have user name as
adminand password ispassword - Linksys routers have no user name and password is
admin - Asus routers have a default for both user and password of
admin
By having access to your home router, you can easily see if you rig is listed as a connected device. You can also bring up the MAC address and IP address of the rig, which may be helpful in other areas of the rig setup that are discussed later.

School wifi networks
School districts vary widely in their wifi structure and access. Start talking to your school district’s IT department well in advance of looping to discuss options for the rig’s access to school wifi.
If you are sending your t1d kid to school with an OpenAPS rig, getting on the school’s wifi network will save you cell phone data and phone battery. Some school districts will need the MAC address of the rig to add it to their “approved” devices list. Other school districts may provide a special login for the rig.
It is common for educational networks not to provide full Internet access, just web - i.e., they allow HTTP(S) but not other protocols like SSH. In this case, your child’s online rig may “work” at school and send/receive data from Nightscout, but will not be accessible via SSH and may not send logs to Papertrail.
If the school district refuses to allow the rig access to the school’s wifi network, you can use BT tethering to your phone’s hotspot to stay online while at school. The downside is that you will be using your cell data during the school day and it will cause added drain on the phone’s battery.
In some cases, schools have let the phone on the school’s wifi but not the rig. Unfortunately though, this won’t help much if your kid uses an iPhone. IPhones do not allow the rig to be on the phone’s hotspot while the phone is also on school’s wifi. So, when the rig connects to the iPhone, the iPhone will disconnect from the school’s wifi. Androids (some of them at least) are able to maintain a wifi connection while the rig is tethered to its hotspot.
Mifi device
If the school won’t allow rig’s wifi access, or you can’t get your rig to use your phone’s hotspot, you could use a mifi device through your cell provider. The mifi is a small box (about half the size of a dex receiver usually) that projects a wifi signal using your cellular data plan. If you use a mifi, the phone could stay connected to the school’s wifi and the rig could stay connected to the mifi.
One downside of a mifi box, however, is that since the rig is using a wifi-tethered connection to the mifi box...the rig will stay connected until you turn the mifi box off. When your kid (and rig) comes back into a known wifi network, your rig will not necessarily automatically move to the known wifi network from the mifi box. And of course, it’s another device to carry.
Known wifi networks
You will want to prepare ahead of your rig-build by gathering the wifi network names and passwords from areas that you will be at frequently (home, friends’ houses, work, etc). By adding known wifi networks to your your rig’s setup, you can save from using your cellular data plan to keep your rig running. As you are gathering the network names and passwords, remember to pay attention to lower vs upper case letter, hypens, or special characters. If the names and passwords do not match exactly, the rig will not be able to connect to the network.
Unknown wifi networks
Unknown wifi networks are pretty frequent during travel. These can be hit or miss for rig connectivity. Networks that require you to click on a terms and conditions (like Starbucks) or enter a last name/room number (like many hotels) will not work for the rig. Sometimes though, you’ll get lucky and a hotel will have an open, easy wifi network. There’s a section later about how to add wifi networks while you are traveling.
How to add new wifi network(s)
Adding a wifi network is pretty easy once your initial loop has been setup. Simply enter edit-wifi (which is a shortcut command for nano /etc/wpa_supplicant/wpa_supplicant.conf.
First check that wpa_supplicant.conf doesn’t contain update_config=1
If it does, delete this from the file as it will interfere with switching between wifi networks.
You can then add wifi networks using the following template:
network={
ssid="my network"
psk="my wifi password"
}
If you want to add open networks to your list, then add:
network={
key_mgmt=NONE
priority=-999
}
Newer versions of the setup script enact the editor vi instead of nano. The important commands to know in vi are i to turn on insert mode on and esc to turn it off. Once insert mode is on, edit your file and when you are done hit esc. To exit vi you have a few choices: :q! will exit and not save any changes, in case you mess up badly. :w will write your changes and keep you in vi. Once you are satisfied with your edits, :wq will write your changes and quit vi.
Older version use nano, which is more intuitive, but doesn’t work well over USB serial console connections, unless your window is exactly 80 characters wide. If you’re using nano, you can save the edits to the file using control-x, y, and enter. If you mess up, you can do control-x and n.
It is a good idea to add your phone’s personal hotspot to the list of wifi networks at least as a backup, even if using Bluetooth tethering. By toggling your hotspot off-on, it will generate a wifi-tether signal for approximately 90 seconds, so that your rig can find it and connect. Since wifi-tethers are similar to a regular wifi connection, your rig will not automatically hop off this connection when it gets to your home wifi network. You will need to remember to turn off your wifi-tether if you want your rig to connect back to your home wifi network. By contrast, a hotspot connection done by BT-tether does not require any toggling and your rig will connect/disconnect as it leaves/comes to a known wifi network in your wp_supplicant list.
Note for iPhone users: It is recommended that you update the name of your iPhone to remove any apostrophes. Apple’s default is to name iPhones with an apostrophe such as “Katie’s iPhone”. This can cause some problems for wifi connections sometimes. You can rename your iPhone by going into your iPhone’s Settings, General, About, and then Name.
Helpful tip: Add a couple “blank” networks to the file (see screenshot below), so that if you ever need to add new wifi networks while on-the-road, the process will be much faster and easier. You’ll only need to edit the network name and password then...instead of needing to type in the whole string of the template.

Some wifi networks may require you to enter a login name and password at an initial screen before allowing access (such as many school wifi networks). Some users have success in using the following wpa network settings for those types of networks:
network={
scan_ssid=1
ssid="network name"
password="wifi password"
identity="wifi username"
key_mgmt=WPA-EAP
pairwise=CCMP TKIP
group=CCMP TKIP WEP104 WEP40
eap=TTLS PEAP TLS
priority=1
}
Other wifi networks require you to accept a terms and conditions (or enter a room number and last name) prior to allowing access. For example, Starbucks coffee shops and many hotels. These networks are termed “captive” networks and connecting your rig to captive networks is currently not an option for a standard rig setup. A device like Hootoo mobile router is an excellent tool in these situations. A Hootoo mobile router will login to the hotel/Starbucks network via an app on your phone, and then the Hootoo “bridge” (non-technical word) the hotel’s network for your rig to be able to connect to once you add the network to the rig.
If you use priority (priority=1) to select among more than one network at a time, just remember that HIGHER numbers are HIGHER priority.
Bluetooth Tethering (optional)
Your cell phone can act as a mobile “hotspot” to allow your rig to access the internet. If you don’t have offline BG data setup, setting up Bluetooth (BT) tethering to allow your rig to connect to the internet through your phone can keep your rig looping as you move around areas without known wifi networks.
A few things to know about using your phone’s hotspot feature:
- Hotspot is a feature of your phone AND cell phone provider. Please check with your cell phone provider and your service contract to confirm that hotspot internet connections and BT tethering are available.
Even though some specific phones are fully capable of bluetooth tethering and the phone OS (eg: Android) fully supports it, providers like T-Mobile may arbitrarily disable it on all of their phones without explanation, even though they fully support Wifi Hotspots. Word to the wise: (1) If you can, purchase your phone from the OEM fully unlocked so the carrier can’t deprovision bluetooth tethering. In the US some are permanently boot locked and can’t be changed. (2) If you get caught in this situation you’ll need to call the carrier’s customer support network as soon as possible (hopefully within the 14 day return policy) to return it. After the 14 days you’ll need to plead your case with them.
Hotspot, when activated, uses your cell phone’s data. Know what your cell phone plan data limits are and consider if you want to change/update based on your frequency of hotspot use. You can get an estimate of cell data use by resetting your cell data use, at the beginning of the day, within your phone.
A device (like your rig) can be connected to your phone’s hotspot in one of three ways:
BT tether: BT tethering (also known as BT PAN Personal Area Network) requires your phone and rig to be BT-paired before they can connect (that’s what this section of the docs is specifically about). The advantage of connecting to your hotspot via BT tether is that it will happen automatically. You do not have to remember to toggle hotspot. Simply leave your hotspot toggled on as usual, leave the house, and within a few minutes (or sooner) your rig will BT tether to the hotspot. (Screenshot below shows what you’ll see in your network logs as you move from known wifi network to BT tether. Oref0-online will automatically find BT tether and connect.) Your rig will then use your cell phone as its internet connection. When your rig comes back into a known wifi network, it will automatically drop the BT tether and connect with the wifi network.
Wifi connection: You need to set up your wpa_supplicant list to include your hotspot information; network name and password. The wifi signal for the hotspot is not constantly broadcast by your phone, however. So when you want to use the wifi connection to your hotspot (for example, you are leaving your home wifi network and traveling), you will need to manually toggle your hotspot on so that the phone will broadcast a wifi signal for the rig to connect to. The other consideration is that since this is a wifi connection, the rig will not automatically disconnect when you come into one of your other known wifi networks. You will have to remember to manually disconnect (toggle hotspot off), if you do not wish to continue using cell data when you are home. Hotspot done by wifi connections also use more phone battery than a BT tether connection.
USB plug: You can plug devices into your cell phone to use hotspot. However, the phone would pull battery power from your rig and would drain your battery fairly quickly. This is not a recommended connection method for openaps use.
Benefit of Using BT Tethering to Your Phone’s Hotspot
- BT tethering automatically picks up when your rig loses wifi (e.g. walking out the door) without you even having to pull your phone out of your pocket
- It also automatically allows the rig to pick back up on wifi when it finds a known wifi network
- It consumes less battery on your phone compared to a wifi connection to your phone’s hotspot
Below is an image that shows how a rig automatically switches from a known wifi network to an internet connection through a BT tether to a phone:

Phone selection for BT Tethering
Certain phones don’t work well using bluetooth tethering with OpenAPS. Various users have experimented, and the list below shows those that have been found to work okay, those that don’t and those with variable effectiveness. If you have something that is not on the list, please feel free to add it.
| Cellphone | Works with Bluetooth Tethering? | Issues/Experiences with BT | Use with xDrip/xDripAPS and Dexcom G5 |
|---|---|---|---|
| Google Pixel 3XL with Android 9 | Yes | Supports tethering to both Wifi and Cellular network. No issues switching. | |
| Google Pixel 2 with Android 8 | Yes | Supports tethering to both Wifi and Cellular network. No issues switching. | |
| LG Nexus 5X with Android 7 | Yes | Supports tethering to both Wifi and Cellular network. No issues switching. | Works well with Dexcom G5 and xDrip. No issues with compatibility. 90%+ capture rate. |
| Google Pixel with Android 7 | Yes | Supports tethering to both Wifi and Cellular network. No issues switching. | Works well with Dexcom G5 and xDrip. No issues with compatibility. 90%+ capture rate. |
| Sony Xperia Z5 Compact with Android 7 | Yes | Works with tethering for network access. It regularly disconnects from the rig (which doesn't seem to affect data flow) and roughly every 24-36 hours this results in complete loss of connectivity and requires a full reboot of the rig and the phone. Doesn't work well with phone swapping between Wifi and mobile - causes BT dropouts that require a reboot of the rig. | No issues running xDrip/xDripAPS alongside the tethered connection. Achieves 90%+ packet collection from Dexcom G5. |
| Xiaomi Redmi 4 with MIUI 8 (Android 6) | No | Tethering can be set up, but it drops regularly requiring rig reboots. When phone switches between Wifi and cellular signal requires rig to be rebooted. | Significant packet drops and data becomes almost unusable. |
| Xiaomi Redmi Note 4(X) -Snapdragon SoC version!!! | Yes | Tethering works in same time with Blukon(Nightrider) and SW3 connected. Also, read Notes for MIUI below* | Excellent coverage. |
| Xiaomi Redmi 3 with MIUI 6 (Android 5) | Yes | No issues seen when tethered to cellular network. Doesn't allow tethering to wifi. | Works fine with Dexcom G5 - 90% collection rate. |
| Xiaomi Mi A1 with AndroidOne (vanilla Android 8.0) | Yes | OpenAPS bluetooth tethering works fine with Blue Car Autotether. | Not tested with Dexcom. |
| Samsung Galaxy S6 (Android 7) | Yes | Tethering to rig and cellular works okay. No data on swapping between cellular and wifi connections. | Use with Dexcom G5 and rig not effective. Significant packet loss. |
| Samsung Galaxy Junior | Yes | Phone tethering switching between wifi and mobile not elegant and causes some issues | Difficulties found when using xDrip with the OpenAPS tethering. Packet loss occurs. |
| iPhone | Yes | Users have experienced various levels of success with the iPhone bluetooth tethering and when the rig switches between wifi and BT | Not Applicable. Experimental version of Loop to do something similar doesn't yet have feedback. |
| Acer Phone | No | Many data drops on the bluetooth connection for rig. Recommended to avoid. | xDrip compatibility is poor - numerous drops throughout the day. |
| Samsumg Galaxy S7 Edge (G935F) Android 7.0 | Yes | Excellent BT tether using apps 'Bt AutoTether' and 'BT Tether' | xDrip+ with G5 > 95% capture. |
| Samsung Galaxy A3 (2016) Android 6 | Yes | Excellent BT tether using app 'Blue Car Tethering' | xDrip+ with G4, reliable capture using xDrip+ and using normal tether when running with Dexcom in G4-upload mode |
| Elephone P9000 Android 7 | Yes | Seems to work well, switching on/off BT tehethering as expected. Using 'Blue Car Tethering' with rig selected. Tested with phone screen off, works fine. | |
| Samsung Galaxy A5 (2017) Android 7.0 | Yes | Excellent BT tether, intermitent disconnecting when the area is flooded with other bluetooth devices. Use 'BT AutoTether' app along side to maintain connection | xDrip+ with G5, works really well with G5 transmitter directly, no compatibility issues and 95%+ consistent capture rate. |
| Samsung Galaxy S8 Android 7.0 | Yes | Excellent BT tether, no need for 3rd party app to keep BT teter alive, can be set in settings | xDrip+ with Libre/RFDuino transmitter, 99%+ capture rate, |
| Motorolo Moto Z Play | Yes | Excellent BT tethering; highly reliable using Blue Car Tethering. | Not tested (using Enlite sensor). |
| Wiko Wim Lite | Intermittent | Works most of the time. Note, several issues with this phone: 1) NSClient has a tendency to crash on this phone and 2) Bluetooth tethering works intermittently with Blue Car Autotether and not at all with BT AutoTether. Note that this phone has a tendency to freeze and reboot on its own, so I think the phone itself is the issue. | Not tested (using Enlite sensor). |
| Xiaomi Mi Mix 2 with LineageOS 15.1 | Yes | Excellent connectivity - has worked almost flawlessly with tethering. Battery life has also been very good. | Works brilliantly with xDrip+ and G6 - capture rate typically more than 95%. |
| Nokia 2.1 with Android 8.1 Oreo Go Edition | Yes | Excellent bluetooth tethering to cellular network. No noted network drops. Works excellent as an offline option with XDripAPS. Awesome battery life(4000mAH) | Works well with Dexcom G5 and xDrip. No issues with compatibility. Generally 95%+ capture rate. |
| OnePlus 6 (A6003) with OxygenOS 9.0 | Yes | Excellent connectivity - Tethering has been good and picks up right away. Battery life very good and really fast charge. | xDrip+ w/ G5 - capture rates generally better than 98% on current nightlies. |
| Samsung S10/S10e with Android Pie | Not on TMobile Native | Both the S10 and S10e are fully capable of bluetooth pairing and tethering, but unlike Verizon, T-Mobile deprovisions bluetooth tethering for unknown and inexplicable reasons. On all of their phones as far as we know. | Verizon and OEM Unlocked phones may work. |
*Notes for MIUI users. MIUI kills processes in background to save battery. To get best results:
- get Xiaomi with SD (Snapdragon) SoC. It works better than it’s MTK counterpart
- install BTAutoTether
- Settings–>Permissions–>Autostart (Turn it on for BTAutoTether)
- Settings–>Permissions–>Other persmissions (Find BTAutoTether and make sure that all permissions are ticked for this app)
- Hit Recents button (left button in bottom row of your phone) and find BTAutoTether, swipe it down and you’ll see Lock and Info icon. Press Lock icon
Configure Bluetooth tethering on Edison running Jubilinux [optional]
This section is completed by the install method found here . If you selected the option of installing Bluetooth at a later time during installation you may skip to Bluetooth Setup, the next section.
Install dependencies
You will need to get the MAC address from your phone or whatever device you are using.
- On Android, go to Settings/About Phone/ Status; you will find your Bluetooth address looking like AA:BB:CC:DD:EE:FF
- On iPhone, go to Settings/General/About; it will be under Bluetooth and will look like AA:BB:CC:DD:EE:FF
Now we need to re-run oref0-setup with the Bluetooth option, replacing AA:BB:CC:DD:EE:FF with what you found above. If you have the “To run again with these same options” command-line from the last time you ran oref0-setup, you can simply run that and append --btmac=AA:BB:CC:DD:EE:FF to the end. If not, you can run it interactively using:
cd && ~/src/oref0/bin/oref0-setup.sh --btmac=AA:BB:CC:DD:EE:FF
NOTE: Make sure the MAC address is in ALL CAPS.
Copy and paste the “To run again with these same options” command into your notes for the next time you need to run oref0-setup.
The first time running the script will take quite a bit longer as it is installing Bluez on your edison. The oref0-setup script may fail after installing Bluez. If so, just reboot your edison and run the setup command you copied to your notes.
You can confirm that Bluez has installed properly by using bluetoothd --version. If Bluez installed properly, a version number of 5.37 or greater will be returned. If it did not install properly, you will likely see 5.28. The procedures below will not work with the outdated version, so make sure you get version 5.37 or greater installed before continuing.
root@edisonhost:~# bluetoothd --version
5.37
Bluetooth setupUsage and maintenance/optimize-your-settings
First, check that your wpa_supplicant.conf file doesn’t contain any content that will interfere with oref0-online.
a) Open the wpa_supplicant.conf file to make sure it is set up to allow oref0-online to change between connections.
nano /etc/wpa_supplicant/wpa_supplicant.confb) Delete the phrase
update_config=1from the file if it is present.
Next, stop cron to make sure oref0-online doesn’t interfere:
sudo service cron stop
3) If you are using Jubilinux 0.3.0 (Debian Stretch) or the Raspberry Pi, please skip to #4. If you are using Jubilinux 0.2.0 (Debian Jessie), you will need to manually initialize bluetooth. (click here to expand instructions)
a) Restart the Bluetooth daemon to start up the bluetooth services. (This is normally done automatically by oref0-online once everything is set up, but we want to do things manually this first time):
sudo killall bluetoothd
b) Wait a few seconds, and run it again, until you get bluetoothd: no process found returned. Then start it back up again:
sudo /usr/local/bin/bluetoothd --experimental &
As shown in the “success” section below, you should see a single line returned with a short string of numbers and then be returned to a clean prompt. If you instead see messages about D-bus Setup failed (as shown in the “Failure” part of screenshot), or otherwise see that you don’t have a clean prompt returned in order to enter the next command...go back to the sudo killall bluetoothd and try again.

c) Wait at least 10 seconds, and then run:sudo hciconfig hci0 name $HOSTNAME
d) If you get a Can't change local name on hci0: Network is down (100) error, run bluetoothctl, then power off and power on, then exit and try sudo hciconfig hci0 name $HOSTNAME again.
- Now launch the Bluetooth control program:
bluetoothctland type each of the following:
power off
power on
discoverable on
scan on
agent on
default-agent

For Android
The adapter is now discoverable for three minutes. Search for bluetooth devices on your phone and initiate pairing. The process varies depending on the phone and the dongle in use. The phone may provide a random PIN and bluetoothctl may ask you to confirm it. Enter ‘yes’. Then click ‘pair’ on the phone.
Remember you need to enable the sharing of your phones internet connection via Bluetooth go to Settings -> More –>Tethering & portable hotspot -> Bluetooth tethering [enable]
For iPhone
Your iPhone must be on the Settings/Bluetooth screen, and then you use the Edison to initiate pairing:
pair AA:BB:CC:DD:EE:FF
If successful, you will see on the Edison:
Request confirmation [agent] Confirm passkey 123456 (yes/no): yes
- (WARNING: You must type in yes not just y to pair)
- On your phone, tap the pair button that popped up.
Troubleshooting note: If after the pair AA:BB:CC:DD:EE:FF command you get a response of Failed to pair: org.bluez.Error.AlreadyExists, that means you likely have already tried to pair previously...but have run into problems getting it to run properly. Double-check that your cell provider allows for personal hotspots and bluetooth tethering. Make sure you have enabled those for your device. If you have confirmed those, you can remove AA:BB:CC:DD:EE:FF and start at the sudo commands again to attempt a fresh pairing.
- Execute the
paired-devicescommand to list the paired devices -
Your paired phone should be listed (in this example, a Samsung Galaxy S7):
paired-devices
Device AA:BB:CC:DD:EE:FF Samsung S7
Now trust the mobile device
trust AA:BB:CC:DD:EE:FFQuit bluetoothctl by typing
quitand then enter.
Testing to make sure it works after you successfully did the above
Make sure your phone’s hotspot is enabled, but don’t let anything connect via wifi (you have to switch on the personal hotspot toggle, but then immediately back out of the personal hotspot screen before anything connects to your hotspot via wifi).
Now, try to establish a Bluetooth Network connection with your phone:
sudo bt-pan client AA:BB:CC:DD:EE:FFYou should see an indicator on your phone (a blue bar on iPhone) that your Bluetooth network connection has established.
Next, to test your Internet connectivity, you’ll need to get an IP address:
sudo dhclient bnep0If that succeeds, you should be able to run
ifconfig bnep0and see something like:
bnep0 Link encap:Ethernet HWaddr 98:4f:ee:03:a6:91
inet addr:172.20.10.4 Bcast:172.20.10.15 Mask:255.255.255.240
(for iPhone, the inet addr will always start with 172.20.10. - Android will likely be different)
To disconnect the connection, you can run:
sudo bt-pan client -d AA:BB:CC:DD:EE:FFNow, re-enable the cron service so oref0-online runs automatically every minute:
sudo service cron startNext, to test that Bluetooth starts up automatically, you can shut down your wifi for 2-3 minutes by running:
iwconfig wlan0 txpower off; sleep 120; iwconfig wlan0 txpower autoAbout 1 min later, your rig should connect to your phone with Bluetooth (blue bar will pop up on the iPhone). If it doesn’t, you should be able to wait 3 minutes and your terminal session should automatically reconnect. If that doesn’t connect, you’ll either need to reboot it or use a serial console connection to your Edison to troubleshoot further.
About a minute after wifi comes back on (terminal session restores), your Edison should automatically disconnect the Bluetooth connection.
Finally, it’s time to take a walk. About a minute after walking out of range of your home wifi, you should see that a device is connected to your phone via Bluetooth. Shortly after that you should see things update on Nightscout. About a minute after you come home, it should reconnect to wifi and automatically disconnect Bluetooth.
Additional App requirement on Android to enable automatic BT Tethering reconnects
On Android, the Bluetooth tether will shutdown if there is no tethering request within 3 minutes. Installing the application “BTAutoTethering” on your phone from the Play store will resolve this issue and allow the rig to switch to your phone when out of wifi range with no manual intervention.
This app has been used by numerous OpenAPS users, and found to work. It can be found here.
Another app which others have found to work better (depending on phone and carrier OS tweaks) is Blue Car Tethering.
Additional Troubleshooting Steps for Some Carriers
If you are able to set up a tethering connection (and even obtain a local IP) but your rig is unable to access the internet through your device’s mobile connection, the following steps may be helpful:
- If you’re using an Android phone, see if your rig can access the internet when your phone is logged into a wifi network. If it can, the issue may be with your carrier.
- Try setting up a tethering connection between your phone and another device (e.g., your laptop) to see if the laptop is able to share the phone’s mobile connection. On at least one carrier (Ting), setting up a connection from a PC resulted in a prompt on the phone to activate sharing the phone’s mobile connection via Bluetooth, which then resolved the issue.
- If all else fails and you have isolated the problem to your mobile connection, consider contacting your mobile carrier’s tech support for help as they may be able to do something on their end.
oref1 (super advanced features)
oref1, the use of “super-microboluses (SMB)” and/or “unannounced meals (UAM)” is different from oref0, the baseline “traditional” OpenAPS implementation that only uses temporary basal rates.
Understanding Super Micro Bolus (SMB)
SMB: Super Micro Bolus
Super Micro Bolus (SMB), like all things in OpenAPS, is designed with safety in mind. (Did you skip reading the updated reference design? Go read that first!) Super Micro Bolus (SMB) is designed to give you reasonably SAFE amounts of bolus needed upfront and use reduced temporary basal rates to safely balance out the peak insulin timing. You are likely to see many long low or zero temps (upwards of 120 minutes long) with Super Micro Bolus (SMB) turned on, while oref1 is administering Super Micro Boluses or waiting until it’s safe to do so.
Single Super Micro Bolus (SMB) amounts are limited by several factors. The largest a single Super Micro Bolus (SMB) bolus can be is the SMALLEST value of:
- 30 minutes of the current regular basal rate (as adjusted by autotune/autosens), or
- 1/2 of the Insulin Required amount, or
- the remaining portion of your maxIOB setting in preferences
It’s important to note that maxIOB will limit Super Micro Bolus (SMB)s from being issued if your Insulin On Board (IOB) (for instance, from an easy bolus you have inputted before a meal) exceeds your maxIOB. So if your maxIOB is relatively low and you are running high post-meal, you may want to examine your logs to see if it is routinely preventing Super Micro Bolus (SMB)s.
In addition, as of 0.6.0-master, using Bolus Wizard to input boluses and meal carbs is no longer recommended because of the possibility of errors when the rig attempts to issue an Super Micro Bolus (SMB) while Bolus Wizard is in use. Instead, many users use IFTTT to notify their rig of upcoming carbs.
(History of Super Micro Bolus (SMB) development: https://github.com/openaps/oref0/issues/262 )
Understanding Unannounced Meals (UAM)
UAM: Unannounced meal Unannounced Meals (UAM) provides an alternative method (in addition to or instead of carb entry) for detecting and safely dosing insulin in response to significant BG rises, whether they are due to meals, adrenaline, or any other reason.
(History of Unannounced Meals (UAM) development: https://github.com/openaps/oref0/issues/297 )
Getting ready to enable oref1
- You should have run oref0 (basic OpenAPS looping) for more than two weeks, and be very aware of all the types of situations in which your rig might fail, before you enable oref1-related features.
- Read the following:
- A. The updated reference design (https://openaps.org/reference-design/) that explains the differences between oref0 and oref1
- B. The following two posts for background on oref1:
- Make sure you understand what Super Micro Bolus (SMB) & Unannounced Meals (UAM) stand for (read the above posts, we know you skipped them!)
- Plan to have a learning curve. You will interact with oref1 differently when on Super Micro Bolus (SMB) and Unannounced Meal (UAM) than how you were interacting with oref0. In particular: do not do correction boluses based on insulinReq; instead use temp targets to give the rig a “nudge”. You are very likely to overshoot if you try to do things manually on top of what Super Micro Bolus (SMB) has already done!
- If running more than one rig, you will want to make sure all rigs are running an Super Micro Bolus (SMB) aware oref0 version (release 0.5.1 or higher) before enabling Super Micro Bolus (SMB) on any of them (even if Super Micro Bolus (SMB) is not enacted on all rigs, all rigs need to know about it).
- Make sure you have your easy bolus button on (details here) and know how to deliver boluses without using the bolus wizard.
- We are requiring that you also have run autotune prior to enabling Super Micro Bolus (SMB). Why? Because if you have wonky ISF settings, for example, you may be more likely to go low or high with Super Micro Bolus (SMB). It will help a lot to have run autotune and be aware if the algorithm is recommending changes to ISF, basal, and/or carb ratio. You are not required to run autotune automatically/nightly as part of your loop with Super Micro Bolus (SMB); but you should at least run it manually and get an idea for how confident you are in your settings being right or not; and keep that in mind when evaluating Super Micro Bolus (SMB) outcomes for yourself. To fulfill this requirement you can do one of the following which will create an autotune directory where it needs to be:
- enable autotune during your OpenAPS setup script and autotune will run automatically as part of your loop
- run autotune as a one-off (single run) on your rig
- You should have basals of > 0.5 U/hr. (Super Micro Bolus (SMB) is not advisable for those with very small basals; since 0.1U is the smallest increment that can be bolused by Super Micro Bolus (SMB). We also added a basal check to disable Super Micro Bolus (SMB) when basals are < 0.3 U/hr. If your “regular” basal in the pump is 0.3 U/hr and autosens or autotune has adjusted your basal rate to below 0.3 U/hr, Super Micro Bolus (SMB)s will be disabled as well.)
- ***Note about Autosens, Autotune, and SMBs**: It is possible that your auto-adjusted basal rate used by the loop may end up being lower than what is programmed in your pump. Since SMBs require a minimum basal rate of 0.3 U/hr, if you expect to see SMBs enacting, but your pump basal rate is very close to 0.3 U/hr... adjustments by autosens and/or autotune may have changed your basal rate to be less than 0.3 U/hr.
Getting started
Super Micro Bolus (SMB) is about front-shifting insulin activity. It is NOT a synonym for no-bolus, although it can enable no-bolus options (with very close monitoring and testing). But you should first test Super Micro Bolus (SMB) with your existing bolus method.
Take steps one by one to turn on Super Micro Boluses; validate that Super Micro Boluses are working and understand if it is working for you; and only then should you approach changing behaviors related to meal-time boluses.
Do not combine turning on Super Micro Bolus (SMB) and trying to do no-bolus or partial-bolus meals at the same time. See this page on optimizing settings for reminders and tips on changing one thing at a time.
Remember that you are choosing to test a still-in-development feature. Do so at your own risk & with due diligence to keep yourself safe. Super Micro Bolus (SMB) may not be for everyone. Like everything else, plan to test it, fall back to previous methods of diabetes treatment if needed, and give yourself a time period for deciding whether or not it works well for you.
How to turn on Super Micro Bolus (SMB)
- In oref0 0.6.0 and later, you will enable Super Micro Bolus (SMB)s by adding the related preferences to your preferences.json. You may want to experiment with turning only one enableSMB option on at a time so you can closely observe the behavior (via both Nightscout and pump-loop.log) in the enabled situation. In addition to testing oref1 in “normal” situations, pay special attention to how it behaves in more extreme situations, such as with rescue carbs (announced or not), post-meal activity, etc.
There are multiple preference toggles for Super Micro Bolus (SMB). Check out the preferences page for more details on all the settings, but the short version is:
enableSMB_with_COBmeans Super Micro Bolus (SMB) will be enabled as long as COB is above zeroenableSMB_after_carbsmeans Super Micro Bolus (SMB) will be enabled for 6h after carb entryenableSMB_with_temptargetmeans Super Micro Bolus (SMB) will be enabled with a low temp target (< 100 mg/dL).
By default, a higher temp target (101 if your target is 100) will disable Super Micro Bolus (SMB).
Troubleshooting
- Make sure you read the above. Super Micro Bolus (SMB) will behave differently than oref0 would. Watch carefully, and use your common sense and do what’s right for you & your diabetes.
- Common errors include:
- Not changing the preferences to be “true” for the relevant settings.
- Not running autotune. Remember, you don’t have to enable it to run as part of your loop at night, but you should run it manually, review the results, and otherwise be VERY confident in your underlying pump settings (basals, ISF, carb ratio) before using oref1.
- Having basals below 0.3u/hour, either in a pump profile or after adjustment by autotune and/or autosens. (This isn’t an error, but will prevent SMBs from being enacted for safety reasons!)
- Pump clock being >1 minute off from rig’s time. This means 60 seconds. Not 61 seconds; 68 seconds; 90 seconds. Needs to be less than 60 seconds apart.
"Checking pump clock: "2017-05-16T15:46:32-04:00" is within 1m of current time: Tue May 16 15:47:40 EDT 2017is an example of a >60 second gap that needs fixing before it will work properly. We added a script to automatically attempt to fix the pump time in case of a >60 second difference, but you may occasionally see this type of error in the logs until the script is able to properly adjust the pump time.
Pushover, Super Micro Bolus (SMB), and OpenAPS
This is for OpenAPS-specific pushovers related to oref1 features about insulin required (insulinReq) and carbs required (carbsReq). Pushover is a way to easily send messages to your phone from another device with simple messages. If you have Pushover set up for Nightscout, you still need to tell your OpenAPS rig your Pushover information to get these rig-driven alerts. Nightscout Pushover alerts are separate and distinct from OpenAPS-generated Pushover alerts. Each can exist with or without the other.
If Pushover API token and User key were added during the setup script and you have oref1 enabled, you can get Pushover alerts in the following situations:
- When OpenAPS thinks carbs are needed to bring eventual BG up, and a 30m low temp won’t be enough to do it

- When Super Micro Bolus (SMB) is active and hitting maxBolus. This is intended to alert you when Super Micro Bolus (SMB) is going “all out”, and will tell you the total amount of insulin OpenAPS thinks you require (insulinReq) if current BG trends continue. DO NOT just blindly bolus for the amount of insulinReq. You will also see that the pushover alert lists the amount it is attempting to Super Micro Bolus (SMB). You should use this notification as a reminder to tell the rig about anything you know it doesn’t (like “oh yea, I want to enter my carbs for this meal”, or “oh, hold on, I need an activity mode, because I’m gonna go for a walk in a few minutes”). You can also decide if a manual meal bolus is appropriate, or if you’d like to manually bolus part of the insulinReq. If you’re just using insulinReq and not doing a normal meal bolus, you should NOT do the full insulinReq as a manual bolus, as oref1 is already attempting to deliver part of it as a Super Micro Bolus (SMB). Super Micro Bolus (SMB) is designed to administer the insulinReq a little at a time, in order to be able to safely react if the BG rise slows or stops, so in cases where you might otherwise consider a correction bolus, it’ll often be best to not do anything at all and let Super Micro Bolus (SMB) safely handle the increased need for insulin. If you do choose to do a small manual correction bolus for a portion of the insulinReq, be sure to subtract out the Super Micro Bolus (SMB) oref1 is already delivering, and round down for safety.

Cautions:
- You are likely to cause yourself a low if you manually administer too much insulin. Be very careful about doing manual boluses based on Pushover alerts; see above about not doubling up on a microbolus that’s just been delivered.
- If the rig attempts to deliver a microbolus AND you have the bolus wizard menu open, it may cause the pump to error (and maybe reset). Recommendation: If you are getting Pushover alerts and decide to manually bolus in addition to the Super Micro Bolus (SMB)s, you may want to use the “easy bolus” (up button arrow) method for bolusing, which is less likely to cause the pump to receive this error. When using the easy bolus, you may not be able to deliver the easy bolus if the rig has sent an Super Micro Bolus (SMB) underneath. In that case, you’ll have to hit escape, wait for the Super Micro Bolus (SMB) to finish delivering, and then perform your manual bolus (adjusting for the insulin just delivered).
If you are new to Pushover:
Pushover is a way to easily send messages to your phone from another device with simple messages. (kind of like getting a text message from your OpenAPS rig), but to use this you must first have Pushover installed on your iPhone or Android (download from your OS’s store).
- Log into https://pushover.net/. From this page you will see your User Key.
- At the bottom of the page you will see “Your Applications (Create an Application/API Token)”. You must first create an API Token:
- Click on the link provided. You must supply a name for your application, such as “OpenAPS”, and change the type to Script
- Then Check the box “By checking this box, you agree that you have read our Terms of Service and our Guide to Being Friendly to our API”
To put these in your setup you must add them to the oref0-setup.sh parameters, either by saying “Yes” to advanced features in the oref0-setup.sh script and entering the info there, or by using edit-runagain and adding --pushover_token=yourpushoverAPItoken --pushover_user=yourpushoveruserkey to the end of your runagain line. Then bash ~/myopenaps/oref0-runagain.sh in order to rerun your script.
Helpful Mobile Apps
Beyond just services, such as IFTTT and Papertrail, there are times where your mobile device can provide more access to your rig. The apps described below can help you login to your rig (both at home and while on the road) to make edits, run commands, troubleshoot, etc.
IP address of rig
In order to connect to your rig wirelessly, sometimes you’ll need it’s IP address. There’s several places you can get your rig’s IP address if you aren’t currently logged in, including:
- Papertrail through doing a search for
networkand reading the rig’s private IP address - Logging into your home router, if rig is on your home network
- using a mobile app on your phone to scan the network for the rig
iNet or NetAnalyzer (iPhone)
There are many scanning apps for iPhone. iNet or NetAnalyzer (lite version...don’t need to pay for this to work) will scan the network that the phone is using for other connected devices and their IP addresses on that same network. So, if you run the scan while your phone is on a wifi network, the scan will be for the wifi network and range will likely be 192.168.1.1 to 192.168.1.254. If you have your rig connected via mobile hotspot, then the scan will be for devices in the mobile hotspot range of 172.10.20.1 to 172.10.20.20. (IP address ranges depend on the type of network being scanned.) Some people have had more success with the NetAnalyzer app over the iNet app, depending on their router settings.
- Open the iNet app and click on the big
NETWORK SCANNER. If using NetAnalyzer app, click on theLANbutton on bottom bar and thenscanbutton in top right corner of app.

- The app will begin scanning the network that the phone is currently connected to. In this example, a home wifi network. Scan the results for your rig’s name. If you don’t see the name, try using the other app. If you still don’t see your rig’s name, it’s possible that the rig is not actually connected to the network being scanned. Check the other options (such as papertrail or your home router) to verify whether the rig is actually online with the same network you are scanning.

Now you have your rig’s IP address...a valuable piece of information.
If the rig is connected to your iPhone’s hotspot, the scan will be performed for the mobile hotspot range. You can always re-do a scan by clicking on the little circle arrow in the bottom left of the iNet screen, or the scan button on the top right of NetAnalyzer app.
Logging into Rig
There are many apps that will allow you to use an ssh command to login to your rig wirelessly. These apps make it super convenient to login to your rig while on the go running errands, laying in bed on a Saturday morning, or other situations where you may not want to get to a computer to login to the rig.
In order to use these apps, your rig and phone must be on the same internet connection or paired and connected over BT PAN So if your rig is on your home wifi network, your phone must also be logged on to your home wifi network. The SSH connection also works when your rig and phone are properly paired and connected over a BT PAN. If they are not on the same network, you will get a login error.
I’ve tried a few apps, both paid and free, and these have been my favorite two iPhone apps; Termius and SimpleSSH. Each has its pros/cons, and therefore I pick which app based on what I’d like to do in the rig.
Termius app has a FAR BETTER file editing ability...as in don’t even bother trying to edit files (like preferences.json or adding wifi networks) in SimpleSSH. However, if you want to navigate files on your rig or issue commands that you’ve preprogrammed, SimpleSSH is better. So, if you’re doing an activity which involves editing files...definitely stick with Termius app.
Termius app (iPhone AND Android)
When you first open the Termius app, it will prompt you to add a new host. Go ahead and click the + button to add a new host. Turn the toggle on for Use SSH and then fill out the following information:
- Alias – use an alias name that let’s you know which rig and which connection point this host is for, for example
YourRigName on home wifior “YourRigName on phone BT” - Hostname – Enter either
YourRigName.localor the IP address of the rig - Username – click to the left of the little blue man and type
root - Password – Enter your rig’s root password (default is “edison” but you should have changed it during setup)
Click Save in the upper right corner. You should now see the host you just created. If you click on that host, you’ll see a message that it is connecting (first time connections will ask if you want to save the rig to known hosts, cick continue and then you’ll be connected to a terminal app screen. You can now issue commands and edit files just like you can using Putty or Terminal app on your computer.

HINT: In portrait orientation, the middle part of the upper keyboard row can be moved/slid left or right using a fingertip drag. The arrow navigation keys may need to be dragged to see them all in that row. Unlock your phone’s orientation, turn your iPhone sideways and the keyboard will be more prominently shown.
To end a terminal session, just type logout
SimpleSSH
SimpleSSH has a few more bells and whistles than Termius app. Namely, you can navigate the folders and files using a touch screen (similar to windows explorer or Mac finder) and you can setup scripts to be run with touch of button (to save yourself typing). However, SimpleSSH has terrible file editing (vi editor will crash and nano editor is pretty much unusable).
SimpleSSH is divided into three pages; Commands, Hosts, and Settings & Info. You can access the different pages by swiping left/right in the app. To start using the app, you’ll need to add your rig as a “host” by clicking on the + in the upper right corner of the Hosts page, and then filling out:
- Name - use a name that let’s you know which rig and which connection point this host is for, for example
YourRigName on home wifi - Host/IP address - Enter either
YourRigName.localor the IP address of the rig. Leave the:22part unchanged - Username - enter
root - Authentication - choose
passwordtype of authentication and enter your rig’s root password.
Click Save in the upper right corner. You should now see the host you just created. Underneath the host, there are two icons; one with a little >_ terminal prompt and the other is a folder with magnifying glass. The first icon is for logging into your rig and using the terminal app (much like the Termius app access provides). The magnifying glass folder is for navigating your rig’s directories and files. If you click on one of those folders, you’ll see a message that it is connecting (first time connections will ask if you want to save the rig to known hosts, cick continue and then you’ll be connected. If you chose the terminal prompt, you’ll be sent to the terminal screen. If you selected the magnifying glass, you’ll be dropped in the rig’s folders/files.
SimpleSSH Commands
One of the best features of SimpleSSH can be found on the Commands page (swipe right on the SimpleSSH home screen to see the Commands page). You can add scripted commands to this page to give you single-button-press access to common rig interactions...like setting up shortcuts. There are pre-scripted commands that come with the app...you can see those by pressing the + in the upper right corner and then selecting New Script Library Command. You can click on the circled down-arrow to the right of the command name to save it to your commands page.

Some useful/fun commands from the Script Library that I’ve added to my Commands Page:
Hardware Information
- Show Disk Status will run
df -hwhich shows available memory on your rig. If you ever have memory errors, this would be a helpful tool to see where your memory has been going. - Show Current Version will run the equivalent of
uname -aand show which version of the Linux kernel your rig is running. This can be useful in determining your Jubilinux version. - Show USB Devices will run
lsusband can help confirm your dexcom receiver is being properly recognized when plugged in. - Show External IP address will run
ifconfigand show your rig’s wifi (wlan0) IP address or hotspot (bnep0) IP address.
System Restart/Shutdown
- Shutdown will turn off your rig
- Reboot will reboot your rig
But, what I’ve found particularly useful is making some of my own custom commands. From your Commands page, press the + in the upper right corner and then choose New Command and fill out the following:
- Name - Pick a name that is useful for your command
- Hosts - I recommend leaving this one blank, and instead you’ll be prompted which rig (aka host) you’d like to run the command on when you use it.
- Command Script - this is where you’ll enter the exact script you’d want to execute (examples below)
- Show Results after execution - toggle this switch
on
These are some of my favorite Commands:
Show current preferences - Sometimes I just want to double check what my preferences.json file has saved to it. Setting up this command gives me a print out of my preferences.json file with just a single button press. For this command, simply enter cat-pref in the command script body.
Show known wifi networks - If I’m headed to a friend’s house or traveling, I may want to double check if I have their wifi network already saved to my rig. This gives me a simple list of the wifi networks I have saved in the rig already, and helps me know if I want to add a new one before I travel. For this command, simply enter cat-wifi in the command script body. (note: if I actually want to add a wifi network, I would switch to Termius app or login on my computer to add a wifi network...SimpleSSH just isn’t a robust editor)
git lock fix - Probably the most common error in a rig is the .git lock error that happens on occasion and by deleting the .git directory, you can get back to looping quickly. For this command, enter rm -rf /root/myopenaps/.git in the command script body.
mmtune - If you want to check how well your pump tune strength is you can use this command script to test it cd ~/myopenaps && sudo service cron stop && killall -g oref0-pump-loop && openaps mmtune && sudo service cron start
Edison temperature - If you are ever concerned that your rig may be overheating, you can use this command to read if your edison cores are reaching critical temperatures. For this command, enter sensors in the command script body.

If you want to run a particular command, just click on the command & confirm which host (rig) you’d like to run the command on. Assuming the rig is on the same network (wifi or BT tethered) as the phone, then the results will be displayed. Below is a few screenshots of some of the custom command outputs:

SimpleSSH file navigation
Perhaps a more slightly advanced-user (or curious-user) feature of SimpleSSH is the ability to use the file/directory navigator. The navigator (accessed using the magnifying glass icon in Hosts page) will allow you to peruse the various directories and files used by your rig and openaps. If you wanted to see your oref0 code, it is stored in the root/src/oref0 folder. Or if you wanted to see your loop directory, you could navigate to your root/myopenaps folder. This can be particularly useful if you are getting troubleshooting help and someone asks “What does your pumphistory.json show?”...you could easily navigate to that file and copy the contents of it. (Note: For further reading about the file structure of your loop and rig, see here For example, here’s the navigation chain to find your pumphistory.json:

SerialBot (Android)
This app is useful for logging into the rig via a terminal session when not near a computer or using offline looping, can be done via USB serial cable, bluetooth or wifi depending on your setup. Simply selecrt the connection method using the drop down box and type in the rigs connection details. For SSH use the format root@yourigname/ipaddress:22 This app will use the same commands as other terminal session apps such as PuTTy.
Nightscout Apps
There are a few useful apps for viewing and maintaining your Nightscout site.
Nightscout app (iPhone)
This one is pretty self-explanatory. You can access your Nightscout site by either using the Nightscout app, or by using your NS URL in a mobile browser.
Glimpse Webpages (Apple Watch)
If you use an Apple watch and want to view your Nightscout site on the watch, give Glimpse Web Pages app a try.
LePhant for Heroku (iPhone)
Logging into your NS site isn’t a frequent need, but sometimes helpful when you need to redeploy your site, restart your dynos, add or change configuration settings, or check NS status. You can use a browser to login to your Heroku account, but an app can make the process simpler by saving your password and providing an easier viewing screen for mobile device. LePhant app costs about $5 in the iPhone app store, but provides a really slick way to access your Heroku controls.
Review Logs
Beside using SSH and reading logs by calling l, there are solutions to review the logs using a browser
Frontail
Frontail is a Node.js application for streaming logs to the browser. It’s a tail -F with UI.
To install frontail, just call npm i frontail -g.
For a test run you have to call frontail /var/log/openaps/pump-loop.log and visit <your rigs name>.local:9001 or <your rigs IP>:9001 in a browser. The browser will show you the same output as the command l does.
To make this serves always available, you have to start frontail on startup in daemon mode.
To do so, add frontail with your desired options to /etc/rc.local bevor the exit call.
Excample for Pi with pump-loop and cgm-loop log files.
#!/bin/sh -e
#
# rc.local
#
# This script is executed at the end of each multiuser runlevel.
# Make sure that the script will "exit 0" on success or any other
# value on error.
#
# In order to enable or disable this script just change the execution
# bits.
#
# By default this script does nothing.
# Print the IP address
_IP=$(hostname -I) || true
if [ "$_IP" ]; then
printf "My IP address is %s\n" "$_IP"
fi
# start frontail deamon
frontail -d -n 200 --ui-highlight /var/log/openaps/pump-loop.log /var/log/openaps/cgm-loop.log
exit 0
IFTTT Integration
Want to be able to set or cancel temp targets from your phone, Pebble, Alexa, Google Assistant, or anything that supports If This, Then That (IFTTT)? Check out the YouTube Video below to see some sample integrations (click on the watchface photo to start video):

You can also create desktop widgets on your Android device to directly enter data into nightscout (just like IFTTT with workflow on Apple devices) using tools like HTTP Request Shortcuts from the play store. Examples toward end of document for this tool.
IFTTT Setup for phones
- First we need to gather one thing called your “hashed API Secret”. This is basically your Nightscout site’s API secret, but scrambled into a confusing long string for safety. Find out what your NS hashed secret key is by running the command to find out:
nightscout hash-api-secret <your_API_secret>while logged into your rig —OR—- - In your internet browser, open a console window while viewing your Nightscout site. Make sure you have “authenticated” your site by using your API secret in the Nightscout settings area (hint: if you see a little padlock in the upper left corner of the site, you haven’t authenticated it). Refresh the site and your hashed secret key will be shown as “apisecrethash: “xxxxxxxxxx...”” For Safari users on Mac, you can open the console window by selecting “Develop” from the Safari top menu, and then “Show Page Source” (if you do not see “Develop” in the top menu, activate it by going to Safari > Preferences... > Advanced, and checking the “Show Develop menu in menu bar” option). If you’re having problems seeing the apisecrethash, click the little grey triangle next to the “status isAuthenticated” line and the objects below it will display (see screenshot). Your hashed API secret can be copied and pasted from that line, as shown below. Save that somewhere easy to get to again, because you will be using it later.

- Get an IFTTT account

- Login to your IFTTT.com account and select the “New Applet” button.

- In the screen that appears, click on the blue “+this” part of the screen

- In the next screen, type “button” in the search field and then click on the red box labelled “ButtonWidget”

- Connect the buttonwidget by clicking on the large red “connect” button. Note: Connect button only appears on the first applet in a new account. Once it is connected it does not need to connect again.

- Click on the large red “button press” box

- Click on the blue “+that” text

- Enter “webhooks” in the search field and click on the Webhooks app

- Connect the Webhooks app. Note: This connect button also only appears on the first applet in a new account. Once it is connected it does not need to connect again.

- Select the blue “Make a Web Request” box

- Now you will have a blank web request template to complete.

The following info should be filled in:
URL: https://yoursite.herokuapp.com/api/v1/treatments.json (change the “yoursite” part to your NS info)
Method: POST
Content Type: application/json
Body: The content of the body will depend on the action that you would like this particular button press to perform. You can only do ONE of the actions per button. Some sample content:
Example IFTTT trigger content
Eating soon
{"enteredBy": "IFTTT-button", "eventType": "Temporary Target", "reason": "Eating Soon", "targetTop": 80, "targetBottom": 80, "duration": 60, "secret": "your_hashed_api_goes_here!!!"}
Activity
{"enteredBy": "IFTTT-button", "eventType": "Temporary Target", "reason": "Activity", "targetTop": 140, "targetBottom": 120, "duration": 120, "secret": "your_hashed_api_goes_here!!!"}
Cancel Temp Target
{"enteredBy": "IFTTT-button", "eventType": "Temporary Target", "duration": 0, "secret": "your_hashed_api_goes_here!!!"}
Low Treatment (change carb amount to match your typical low treatment)
{"enteredBy": "IFTTT-button", "reason": "low treatment", "carbs": 10, "secret": "your_hashed_api_goes_here!!!"}
Low Treatment with a 60 min high target to help recovery
{"enteredBy": "IFTTT-button", "eventType": "Temporary Target", "reason": "low treatment", "carbs": 5, "targetTop": 120, "targetBottom": 120, "duration": 60, "secret": "your_hashed_api_goes_here!!!"}
Pump Site Change
{"enteredBy": "IFTTT-button", "eventType": "Site Change", "duration": 0, "secret": "your_hashed_api_goes_here!!!"}
CGM Sensor Change (new sensor)
{"enteredBy": "IFTTT-button", "eventType": "Sensor Change", "duration": 0, "secret": "your_hashed_api_goes_here!!!"}
CGM Sensor Start (restart current sensor)
{"enteredBy": "IFTTT-button", "eventType": "Sensor Start", "duration": 0, "secret": "your_hashed_api_goes_here!!!"}
Carbs (change carb amount to match your required carb count. Make a button for each carb count required: 5-10-15-etc.)
{"enteredBy": "IFTTT-button", "reason": "low treatment", "carbs": 10, "secret": "your_hashed_api_goes_here!!!"}
Reservoir Change
{"enteredBy": "IFTTT-button", "eventType": "Insulin Change", "duration": 0, "secret": "your_hashed_api_goes_here!!!"}
Understanding the JSON in the Body:
- enteredBy: Will show up on the NS website this way - enter what you want
- eventType: defines what we are doing - leave as is
- reason: will show up on the NS website - enter what you want
- targets: specify the range you want - enter what you want
- duration: you can make them as long or as short as you want - enter what you want
- secret: your hashed API secret key...NOT your regular API secret
- Click the “Create Action” button on the bottom of the screen when you finish.
- Now is your chance to change the title of your Applet now to something meaningful. You can turn on notifications, too, using the slider shown. If you turn on the notifications, you will get an alert on your phone and pebble watch when the button press has been successfully deployed. Finish the IFTTT button by clicking on the Finish button that appears.

- Repeat the setup for New Applets for as many automated actions as you would like to setup.

Enable IFTTT in your Nightscout site
- Find your Maker Key by going to your IFTTT account, Services and then clicking on Maker, then Maker settings.


- You will see your Maker Key as the last part of the URL; copy and paste that last part (the red circled part as shown)

- Login to your Nightscout site host (azure or heroku) and (1) add your Maker Key to the MAKER_KEY line and (2) add “maker” to your ENABLE line.


Install IFTTT app on your iPhone/Android
- Download the IFTTT app on your phone and log in.
- You can add homescreen quick buttons. Click on your IFTTT app and login, click on My Applets in the bottom right corner, and then click on the applet that you’d like to work with. From the middle of the applet, click on the Widget Settings, and then click on the Add button for the Homescreen Icon.

- For iPhone users, if you downswipe from the top of your iPhone screen, you will have the Today view or Notifications showing. They are separate pages; Today view is on the left, Notifications is on the right. You can left/right swipe to go between them. Go into the Today view and scroll to the bottom, click “edit”. This should show a list of existing widgets, followed by a list of “more widgets” with green + signs. Click on the IFTTT’s green circle and the widget will be moved to the top, active widgets area. You can hold your finger on the three left lines of the IFTTT widget row to drag it to the top of your widget panel, if you prefer to have it as the top-most widget.

If you end up with more than four IFTTT applets, they will appear in reverse-order of when they were created...which may not be the same as you’d prefer them to appear on your widget bar. If you’d like to reorder them:
- go into your iPhone’s IFTTT app
- click on My Applets
- click on the gear icon in upper left of screen
- click on Widgets
- click on the pencil icon in upper right of screen
- click and hold the three lines that appear on the right side of the widget that you want to move. Drag the widget to the order in the list that you’d like it to appear in your widget quickscreen.

Workflow to custom enter carbs and temp targets from Today widget on iPhone
Workflow is a helpful app that can be displayed on the Today widget to easily enter custom carb entries (rather than relying on pre-set amounts) and also custom temporary targets on the fly.

Install the Workflow app on your phone from the App Store.
Swipe through the introduction pages, and then you’ll be forced to pick a sample workflow to get started. (Don’t worry, you can delete it at the end of setting up the OpenAPS-related workflows. Just pick one of the samples for now and tap through to allow you to progress through the entry screen. The
Directions Homeone is pretty easy to get through fast. In a few minutes when you are done setting up your OpenAPS-related workflows, simply go back to theMy Workflowsmain view in the app, click on theeditbutton in upper left corner, tap on the sample workflow app that you want to delete, and then click the trashcan icon in the upper right corner.)Click
add widgetto add the widget to your phone and follow the directions to force touch the Workflow app. After you click theAdd Widgetbutton that pops up, click the home button on the iPhone. Swipe left to get into the Today screen. Scroll down to the bottom and click “edit” to see a list of available widgets. TheWorkflowwidget should be on your active widgets list now; you can drag it up to be toward the top, using the three horizontal lines, or wherever you want it placed. ClickDone.
Open the Workflow app on your iPhone. From your iPhone’s browser app (e.g., Safari), open this page and click on one of the below links to download one of the community’s three recommended workflows.
The workflow will open in the Workflow app. Click
Get Workflowand thenOpen.Sign in to
Workflow Syncto connect with IFTTT. (Sign in and/or create a Workflow account as directed.)You’ll then see the workflow in the app. Click on the
Create Appletbutton.
Click
Opento open the IFTTT app. In the IFTTT app clickConnectin the upper right corner; click the greenAuthorizebutton; and then clickOpentoOpen in "IFTTT"?.
Side Note: Steps 9-10 recommend some copy/paste of the body text to make life easier. If you use your iPhone to type in the body text in Step 10, the iPhone will enter ‘curly quotes’ rather than ‘straight quotes’. Curly quotes will break the IFTTT applet and is usually the main cause of setup errors. If you find that copy/paste of the body text is too difficult on the little iPhone screen, you can alternatively start Step 9 by logging into your IFTTT account on a computer and starting a new applet creation there. The actions are very similar to creating the applet on your iPhone, just the copy/paste part might be easier.
Scroll down a bit to where it says
Try making your own Workflow Applet from scratch. Click theNew Appletbutton. On the recipe builder, click the blue+thisand select or searchWorkflow, then selectA workflow is run. SelectEatCarbs,BottomTopDurationortempTargetfrom the drop down for the trigger to use. Click theNextbutton in upper right.
Click the
+thatbutton and search forWebhooks. Select Webhooks and then clickMake a web request. Fill in the web request similar to all the above directions with:- URL:
https://yoursite.herokuapp.com/api/v1/treatments.json(change the “yoursite” part to your NS info) - Method:
POST - Content Type:
application/json - Body (for EatCarbs):
{"enteredBy": "IFTTT-button", "reason": "eat", "carbs": {{ExtraIngredient1}}, "secret": "your_hashed_api_goes_here!!!"}
- Body (for temp target range):
{"enteredBy": "IFTTT-button", "eventType": "Temporary Target", "reason": "Manual", "targetTop": {{ExtraIngredient2}}, "targetBottom": {{ExtraIngredient1}}, "duration": {{ExtraIngredient3}}, "secret": "your_hashed_api_goes_here!!!"}
- Body (for single temp target range):
{"enteredBy": "IFTTT-button", "eventType": "Temporary Target", "reason": "Manual", "targetTop": {{ExtraIngredient1}}, "targetBottom": {{ExtraIngredient1}}, "duration": {{ExtraIngredient2}}, "secret": "your_hashed_api_goes_here!!!"}
- URL:
Click
Nextin the upper right corner. You can edit the title of the applet and then clickFinish. You can test your applet by going back to your iPhone’s Today widgets and clicking on the Workflow button you just created. You can also test inside the Workflow app by pressing the play button at the top of the workflow. You can confirm a successful run by looking at your Nightscout site for the carb entry/temp target bar, or by looking at the activity log of the applet in IFTTT.
WARNING/REMINDER: If you have SMBs turned on, do NOT try with large carb amounts. Only test with 1 carb entries! Ditto for temp targets - test a 99 or 101 mg/dl target or something conservative to not trigger SMBs. You can delete the test entries via the Reports tab in your Nightscout site, choosing the Treatments tab, and finding the recent entry.
ThisButton for the Pebble Watch - pictured at the very top of this page
- Load the ThisButton app from the Pebble Store.
- You need to enter your Maker key in the Settings for ThisButton on your phone when you go into the Pebble App
- Under Events, there are two fields
- Name: what shows up on your watch
- Event: the name of the Maker event to fire. It will have underscores in it like:
eating_soon.
- Enter all the different events you created here and submit them.
- These are seperate events from ones you may have already created for the “Button” app
- You will need to create new IFTTT recipes with THIS as the Webhooks “Receive a web request” trigger.
- THAT will be identical to the THAT which you have probably already set up for “Button”
- Fire up the ThisButton app on your Pebble and try setting a new temp target.
- You can also add the ThisButton app as a short cut on your Pebble. If you don’t have shortcuts already, press and hold either the up, down, or middle button and follow the prompts. If you have both shortcuts programmed and want to change one, go to menu > settings> quick launch and follow prompts.
Note: ThisButton does not work on Pebble Round watches. You can search for IFTTT apps in the pebble store and choose one that is similar, however. The concept of setting up the events is similar.
Alexa integration
Since you have IFTTT/Maker requests working, you can get it to work with anything that supports IFTTT, including Alexa. You will need to add “alexa” to your ENABLE line in your Nightscout host settings (azure) or config vars (heroku). And then repeat the steps above, but instead of using “ButtonWidget” service we started with earlier (the “+if” part of the setup)...you will use the “AmazonAlexa” service.

- Alexa requests do not need underscores, FYI.
Google Assistant integration
- If you don’t have Alexa, you can still use voice with Google Assistant to enter carbs, set or cancel temp targets, log site changes, etc.
- From the ‘THIS’ of the New Applet screen, select Google Assistant. Like the other services, you will have to allow it access.
- To use Google Assistant to enter meal carbs or rescue carbs:
- Select “Say a phrase with a number”
- Under “What do you want to say?” type out what you’ll say when you want to enter carbs and use “#” where you will say the carb amount. For example, “enter # carbs”. If you are going to make a distinction between meal and rescue carbs make sure to do that here. If you think you might occasionally use a different phrase, such as “I’m going to eat # carbs” enter it under “What’s another way to say it?” This is optional.
- Your Google Assistant will say something in response confirming the recipe has run. Put what you’d like it to say under “What do you want the Assistant to say in response?” Example: “entered # carbs”
- Click “Create Trigger”
- From the ‘THAT’ of the New Applet screen, choose the action service called Webhooks. Select “Make a web request.” Your THAT will be ALMOST identical to Webhooks recipes created for the Button (as explained above). Instead of the exact number of carbs you want to enter, under the Body field, click “Add Ingredient” then “NumberField”.
- Then click Create Action and Finish
- Here are some of the examples from above formatted for use with Google Assistant:
Enter Meal Carbs with Google Assistant (or Low treatment without high target to help recovery) EX: Triggered by “Enter # Carbs”
{"enteredBy": "GoogleAssistant", "carbs": {{NumberField}}, "secret": "your_hashed_api_goes_here!!!"}
Custom Low Treatment with a 60 min high target to help recovery. EX: Triggered by “Enter # rescue carbs”
{"enteredBy": "GoogleAssistant", "eventType": "Temporary Target", "reason": "low treatment", "carbs": {{NumberField}, "targetTop": 120, "targetBottom": 120, "duration": 60, "secret": "your_hashed_api_goes_here!!!"}
Google Calendar integration
- Using the Google Calendar Applet with IFTTT is useful to trigger temp targets that may occur on a recurring schedule, although you can also schedule a one-time event in advance as well. If you already have IFTTT/Maker requests working it’s easy to add. Follow the directions for Setup for Phones above, but rather than choosing “Button Widget” type “Google Calendar” in the search field and then click on the box labeled “Google Calendar”.
- You will need make sure to allow the Google Calendar Applet access to your Google Calendar. When you do this it will ask which calendar you want to connect. You can use your main calendar, or a calendar you’ve set up especially for IFTTT events. You’ll need to do this ahead of time using the administrative functions of Google Calendar. To do this click on the gear icon at the upper right of Google Calendar (google.com/calendar, not the Applet in IFTTT), choose settings, choose the calendar tab (upper left) and then click the button to make a new calendar. Call it whatever you want and set permissions as appropriate.
- Once you’ve connected the appropriate calendar, continue your setup in IFTTT and choose “Event from search starts”. Type a phrase that you’ll use on the Google Calendar to denote a temp target (or other event). For example “Eating Soon” or “Activity” and then click the button that says create trigger. Click on the blue “+that” text and continue to follow the directions as above from Setup for Phones above to connect the Maker app and make the appropriate Web request.
- Now on your Google Calendar (make sure you create the event on whichever calendar you’ve connected to the Google Calendar IFTTT applet) you can create recurring events or one-time events to trigger temp targets. Use the same phrase that you used to create the trigger (Eating Soon, Activity, etc). For example, if you get up every day and eat at the same time during the week, schedule Eating Soon on those days at the appropriate time. If you know you’re going to take a day off work or school just remember to delete the event ahead of that date, or change as appropriate. Gym class for a child or sports practice only some days of a month? Sit down and schedule Activity Mode for those dates well in advance so you don’t have to remember at the time and they’ll trigger automatically.
HTTP Request Shortcuts Integration
HTTP Request Shortcuts allows direct posting of data to your nightscout site on your Android Phone without requiring a middle-ware tool like IFTTT. It also supports automation similar to the Workflow app on iOS. This can be valuable as there have been cases of IFTTT becoming unavailable which leads to unpredictable behavior when you start mashing buttons! Setup of this tool is fairly straightforward and will actually incorporate some of the same data as shown above for IFTTT buttons, particularly IFTTT trigger content above.
- Install the HTTP Request Shortcuts app from the Play Store to the device you interact with.
- Open the app and tap the + button on the lower right. That should bring you to a screen that looks similar to this (except your install won’t have 3 shortcuts already defined of course. :) ):

- Press the + button on the lower right to start adding a new shortcut from scratch.

- The example is to setup a shortcut to use to enter carbs into nightscout. The example has URL and API key fields blacked out, simple replace those with your values. You may notice that the values in the body section are almost the same as for the IFTTT examples above. You can create shortcuts for all of those this way simply by changing the body values.

- The one difference with the IFTTT example is that we can insert a variable into the carbohydrate value field to tell HRS to ask you for how many grams of carbs you wish to log. Pressing on the {} to the right of the Body field will bring up a Variable selector. You can see I have 3 defined already, for a new setup, simply select “Edit Variables”. Then select the + sign to start setting up a new variable.

- Here is the setup for the Carb Entry Variable. This variable simply pops up a dialog and a numeric keypad asking you for the carb count when triggered. Once the variable is defined, go back to the Edit Shortcut screen. Delete the 10 (if you are using the IFTTT example data from above, or whatever carb value was defined) and select the new variable you created. It should look like the long Carb Shortcut image a bit above.

Offline looping - aka, running OpenAPS without internet connectivity
Overview
There are a number of ways to have an “offline” OpenAPS rig, and numerous ways to monitor offline (see the monitoring section for information about monitoring offline). Offline refers to situations where your rig moves into an area where it does not have internet access (i.e., the rig does not have a known WiFi network available and the cell phone used with the rig does not have cell coverage/hotspot available). By setting up one of these offline solutions, your rig can still loop while in an offline area. Depending on the setup, the opportunities to visualize or monitor the loop actions (e.g., check what temp basal is actually being set) may vary until you can get back into an online area.
Medtronic CGM users
Medtronic CGM users can, by default, automatically loop offline because the rig will read CGM data directly from the pump.
Note about recovery from Camping Mode/Offline mode for Medtronic CGM users:
If you have been running offline for a significant amount of time, and use a Medtronic CGM, you may need to run
openaps first-upload
from inside your openAPS directory, before your loop will start updating correctly to your nightscout site.
Dexcom CGM users
Dexcom CGM users have a few different alternatives to retrieve blood glucose values locally for offline use. The options to choose from are:
A. xDrip+ for Android users
Android users can use the xDrip+ Android app. The details for setting up offline looping with xDripAPS are described in the section below. The naming can be confusing. xDrip+ (maintained by @jamorham) is the app being actively developed. While Google may lead you to several older versions of the xDrip/xDrip+ Android app, you can always get the latest version here:
- xDrip+: https://github.com/NightscoutFoundation/xDrip
- There is no direct iOS version of xDrip+. Spike is a different app with a different set of features.
B. Plug CGM into rig (easiest)
EASIEST: For either Android or iPhone users, you can plug the CGM receiver directly into your rig via USB. This will pull BGs into the rig directly from the receiver and be used for looping. If you are a G4 user, this should also bring RAW BG data into the rig during sensor restarts or ??? times (although multiple users with pediatric model G4 receivers have reported inability to obtain raw data. This seems to be related to a firmware difference between adult and pediatric G4 receivers). The rig will loop using RAW BGs so long as the BG value is under 150 mg/dl. A few notes about how to make the direct-receiver configuration work:
- Explorer boards built prior to late January of 2017 are not always working well/automatically with a CGM receiver plugged in. These boards can be identified by looking to see if they say “2016” on the board’s label tag, as shown in the photo below. The boards can be fixed to use a CGM receiver by making a single trace cut, but doing so will disable the board’s the ability to re-flash your Edison. Please make sure you have a second Explorer board or another base block or breakout board that you can use to re-flash the Edison if needed before considering this modification. For more details, see this issue, and if you decide to make the cut, see this document for details on how to cut the copper trace from pin 61 of the 70 pin connector. Cut in two places and dig out the copper between. Cut by poking a razor point in. Avoid the narrow trace above the one being cut.
- Explorer Boards that shipped at or after the end of February 2017/first week of March 2017 should enable users to simply plug in the CGM receiver to the OTG port, and a USB battery into the UART port, in order to run offline and pull BGs from the receiver. Those boards will have a label of v1.2 2017.

- The order of the cables and ports is important. The OTG cable must be plugged into the OTG port on the Explorer board. There are two kinds of OTG cables; (1) both ends are micro-USB like the one you can order here or (2) one end is USB and one end is micro-USB like the one you can order here. Both will work, but if you have the second kind, that cable must be the one plugged into the rig directly, and the other non-OTG cable must be plugged into the receiver (as shown in photo below). That port is labeled on the underside of the port, it is the one closest to the lipo battery plug. A USB battery or wall charger must be plugged into the UART port to supply sufficient voltage to the OTG port (the lipo battery alone is not enough to power the OTG port).

- If you are using this configuration for G4 receivers and (1) are online and (2) want to see RAW BGs in NS, then you must remember to add
rawbgto your ENABLE line in your Heroku/Azure settings. You will also have to go to your Nightscout site’s settings and select “always” from the Show RAW BG options. You will also have to selectg4-raw(if on master branch) org4-upload(if on dev branch) as the CGM type in the loop setup script.
C. Send G5 or G6 BGs direct to rig (xdrip-js, Lookout/Logger)
On your OpenAPS rig, the xdrip-js library can read directly from the Dexcom transmitter, similar to xdrip+ on the phone. It replaces the iPhone Dexcom mobile app, or xdrip+ on the phone, they cannot be used simultaneously (and you cannot use more than one rig with xdrip-js at a time). However, you can use a Dexcom receiver at the same time as xdrip-js. (The gitter channel for xdrip-js and related stuff is at https://gitter.im/thebookins/xdrip-js - head there for questions about setup.) There are two ways to use the xdrip-js library (you can only use one at a time on the rig):
Lookout/Logger:
- Lookout - this application runs on your rig and uses the xdrip-js library to read from the G5 or G6 transmitter directly. It uses the transmitter’s built-in calibration algorithm, and you can enter BG calibrations either from the receiver or from a browser on your phone or computer, when connected to a web server that Lookout manages on your rig. The Lookout web pages also allow you to view CGM, pump, and OpenAPS status. Regardless of whether you use the receiver or Lookout to enter calibrations, they will be sent to the transmitter and both devices will report the same resulting BG values (though they may take a reading or two to ‘catch up’ after a calibration). Depending on your phone’s hotspot capabilities, you may be able to access the Lookout web server even when cellular data is not available. Lookout will read Dexcom transmitter BG data and update OpenAPS locally (via xDripAPS), so your rig will continue to loop while offline, as well as send to Nightscout when your rig is online. Since Lookout uses the official transmitter calibration algorithm, it still requires sensor restarts every 7 days, with 2-hour warmups, and cannot be used with transmitters that have reached the Dexcom expiration (105-112 days from their first use).
- Logger (xdrip-js-logger) - this application is restarted regularly from your rig’s crontab, and uses the xdrip-js library to read from the Dexcom G5 or G6 transmitter directly. It can use non-expired or expired transmitters. It leverages both the in transmitter session calibration algorithms and falls back to LSR calibrations automatically when the sensor has an issue or stops (i.e. after 7 days). For LSR calibration, Logger uses the raw filtered/unfiltered values from the Dexcom transmitter, instead of the official calibrated value, and so can be used with transmitters that are past their standard expiration (including those with replaced batteries). Logger also has the ability to reset an expired transmitter to new so that in transmitter calibrations can be used (even for battery replaced transmitters). Calibrations for Logger are entered through nightscout as BG Treatments, or through the pump (e.g., via the Contour Next Link meter that automatically loads to the pump), or through the command line. BG data is sent to both OpenAPS (via xDripAPS) locally, so your rig will continue to loop while offline, and include Nightscout when online. You can use a receiver with Logger, but the BG values will not necessarily match between the two, and the calibrations on the receiver must be entered separately. Nightscout is the user interface for entering calibration and getting sensor status / requests such as “Needs calibration” as Announcements. Nightscout also shows the transmitter battery status, voltages, resistance, temperature every 12 hours as a note. Nightscout is also used to let Logger know that a new sensor has been inserted and to start a sensor. You can set the time back on a start - e.g. 2 hours (if you soaked the sensor). Logger has command line scripts that run on the rig (cgm-reset, cgm-start, cgm-stop, cgm-battery, and calibrate). There is currently no local web browser for entering calibrations or interacting with Logger, so the only way to view its data is through a terminal, xDripAPS web server, or Nightscout. NOTE: for expired transmitters, Logger LSR calibration method is an approximation of what the Dexcom transmitter does internally so caution and serious oversite and testing should be exercised when using.
NOTE: Lookout, Logger (xdrip-js-logger), and xdrip-js library should be considered a WIP (Work In Progress), i.e., do not use if you cannot watch your BG and loop very carefully, and tolerate issues, failures, idiosyncrasies. Also please plan on contributing either through testing and feedback, updates, documentation, etc.
A summary of their features:
| Feature | Lookout | Logger |
|---|---|---|
| Still unfinished, i.e., a work-in-progress? | Yes | Yes |
| Rig continues updating BG and looping while offline using xdripAPS? | Yes | Yes |
| Offline (network) mode supports backfill to Nightscout? | Yes | Yes |
| Offline (away from transmitter times) supports backfill? | Yes | Yes |
| Uses Dexcom official calibration? | Yes | Yes |
| Can use with expired/battery replaced transmitter? | Yes | Yes |
| Can interact with rig-hosted web page? (e.g., for calibration, start/stop sensor) | Yes | No, can use rig cmd line while offline |
| Also able to calibrate and start/stop sensor thru receiver? | Yes | Yes, for non-expired transmitter/session |
| Calibrate through Web/Nightscout? | Yes (local rig Web UI) | Yes |
| Calibrate through pump-connected meter (e.g., Contour Next Link)? | No | Yes |
| Calibrate from command line? | Yes | Yes |
| Linear Squared Regression Calibration | Yes, for > 7 day extension | Yes |
| Single Point Linear Calibration | Yes, for > 7 day extension | Yes |
| Calculate and send Noise with entries | Yes | Yes |
| Calculate glucose trending | Yes | Yes |
| Start Stop Sensor | Yes via UI | Yes via NS/cmd line |
| Reset Expired Transmitter | Yes via UI | Yes via cmd line |
| Support mmol | Yes | Yes, in NS and for Meter-Pump Calibration |
| View transmitter battery/resistance levels | Yes via NS CGM pill | Yes |
- Lookout and Logger (xdrip-js-logger) are documented separately:
Entering carbs while offline
While offline you will not be able to enter carbs and set temporary targets using Nightscout. You have two options to enter carbs while offline. You can use the Medtronic pump’s Bolus Wizard. When using the Bolus Wizard, be careful to avoid an A52 error if you have enabled SMB. By default, use of the Bolus Wizard disables SMB for 6 hours (learn more here). The second option, which as far as we know avoids the A52 risk, is to use the Medtronic pump’s Capture Event feature. To turn on the Capture Event feature, do these steps:
- Go to the CAPTURE EVENT ON/OFF screen: Main > Utilities > Capture Option
- Select On, then press ACT. You will now have a Capture Event option in the MAIN MENU.
To enter carbohydrate information:
- Determine the total units of carbohydrates in the meal or snack that you plan to eat.
- Go to the ENTER FOOD screen: Main > Capture Event > Meal marker
- The ENTER FOOD screen flashes with dashes or with the number of carbohydrate grams you entered last time.
- Enter the carbohydrate grams, then press ACT. A message asks if you want to save the information that is displayed on the screen. The Yes option is selected.
- Make sure the number shown on the screen is correct. If the information is correct, press ACT. The information you entered is saved to the system and can now be used in reports. If the information is not correct, select No, then press ACT. The CAPTURE EVENT menu shows. Repeat the steps above to enter the correct information.
Setting temporary targets offline
You cannot set a temporary target in the Medtronic pump. If you want to change your normal target while offline, you will need to do that using the Bolus Wizard Setup option. IMPORTANT: If you change your target while offline, you’ll need to remember to set it back to its original setting when you are done.
Note that changing the pump target does not have the same effect as setting a temporary target in Nightscout. In particular, setting the pump target higher or lower than normal will not trigger exercise or resistance modes as temporary targets do if you have the appropriate preferences enabled.
To change your target on your Medtronic pump do the following:
- Make sure the EDIT SETTINGS screen is open: Main > Bolus > Bolus Setup > Bolus Wizard Setup > Edit Settings
- Select BG Target, then press ACT, and change your target.
If you wish to set a true temporary target while offline, you can do so by ssh’ing into the rig and running oref0-set-local-temptarget <target> <duration> [starttime]. So for example, to set a 110 local temp target for 60 minutes, you can run oref0-set-local-temptarget 110 60. In the future, we plan to expose this local temp target functionality using the offline web page interface, but for now it only works via ssh.
xDripAPS - offline looping for users of the xDrip+ Android app
Do you use OpenAPS and the xDrip+ Android app? By default, the xDrip+ Android app uploads CGM data to an online Nightscout instance, OpenAPS then downloads this data for use in your online loop.
The xDripAPS code resides on your OpenAPS rig and allows the direct transfer of xDrip+ Android app CGM data to your OpenAPS rig via a “local” network (WiFi hotspot or Bluetooth PAN tethering) without an internet connection. This will make CGM data available to the OpenAPS rig without internet access.
Overview of xDripAPS
With xDripAPS, data flow is as follows:
(1) CGM transmitter –> (2) xDrip+ Android app –> (3) OpenAPS rig (e.g. Edison)
- Usually a Dexcom G5 or G4 plus xDrip wireless bridge. Other sources might work as well, but have not been tested.
- xDrip+ Android app (https://github.com/NightscoutFoundation/xDrip). In the app, the REST API Upload feature is normally used to upload CGM data to Nightscout. We use this feature to upload CGM data to xDripAPS on your OpenAPS rig (further details below).
- Your OpenAPS rig - usually a Raspberry Pi or an Intel Edison.
OpenAPS/xDripAPS will NOT upload CGM data to Nightscout. It is possible to enter two upload destinations in the xDrip+ Android app delimited by a space character - the rig for offline looping and Nightscout for upload when internet access is available. If no CGM data is available to xDripAPS for any reason, OpenAPS will fall back to downloading CGM data online from Nightscout if an internet connection is available.
Logger and Lookout also use xDripAPS on the rig to support offline looping. No xDripAPS setup is required to support Logger or Lookout beyond selecting xdrip CGM source in oref0-setup as described below.
Setup Steps (using oref0-setup.sh script) for xDripAPS
Setting up your OpenAPS rig
Install OpenAPS as per the documentation. While running the oref0-setup script you will be prompted to specify a CGM source. Enter “xdrip” (without the quotes). The setup script takes care of the rest! Follow the remainder of the setup script as normal.
Connecting your Android phone and your OpenAPS rig
In order to allow xDrip+ app on your Android phone to send CGM data directly to xDripAPS on your OpenAPS rig, both need to be connected to the same “personal” network. Note that an internet connection is not required - this solution allows you to loop without internet connectivity.
There are two approaches for establishing a “personal” network between your phone and your OpenAPS rig. The first is to run a WiFi hotspot on your phone and connect your OpenAPS rig to the WiFi network your phone exposes. This is the easiest option, but there are two drawbacks - it drains your phone battery quickly, and most phones cannot connect to a normal WiFi network while the WiFi hotspot is enabled (they can connect to the internet via 3G/4G when coverage is available).
The other option is to enable Bluetooth PAN tethering on your phone and have your OpenAPS rig connect to it. Battery drain is minimal and the phone can still connect to a normal WiFi network for internet access when available as well as to 3G/4G networks when WiFi is not available. (Some users have their OpenAPS rig permanently tethered to their Android phone. The drawback is that connecting to the rig via SSH in this configuration is only possible by using an SSH app on the phone or by connecting it to a computer using a USB cable)
Instructions on both WiFi and Bluetooth tethering can be found in the main OpenAPS documentation.
Configuring the xDrip+ Android app
First, determine your OpenAPS rig’s IP address within your “personal” network. If you can open a terminal session to your rig via serial, then ifconfig wlan0 (when using the WiFi hostpost option) or ifconfig bnep0 (when using bluetooth tethering) will display your IP address. Alternatively, you can use an Android app - there are lots of “Network IP Scanner” apps in the Play store. The Hurricane Electric Network Tools app works with both the WiFi hotspot and BT tethering options.
Next, open xDrip+ and navigate to Settings > Cloud Upload > Nightscout Sync (REST-API) and enable it. In the Base URL setting, configure the following URL
http://<nightscout_api_secret>@<rig_ip_address>:5000/api/v1/
A few notes to clarify:
- enter “http://” NOT “https://
- <nightscout_api_secret> is the plain-text API secret used when creating your online Nightscout instance.
- <rig_ip_address> is the IP address of your OpenAPS rig assigned by your WiFi, WiFi hotspot, or Bluetooth PAN tether connection. It will usually take the form of:
192.168.xxx.xxx.

Entering multiple REST URLs
- If you need to constantly switch between two or more “personal” networks, you would have to edit the
Base URLeach time with the new IP address. To simplify this process, multiple URLs can be added to the REST API UploadBase URLsetting, and xDrip+ will attempt to upload to each URL. NOTE: the URLs must be “space” delimited. For example:
http://<nightscout_api_secret>@<rig_ip_address1>:5000/api/v1/ http://<nightscout_api_secret>@<rig_ip_address2>:5000/api/v1/
- OpenAPS/xDripAPS will NOT upload CGM data to Nightscout. You can enter both your xDripAPS URL and your Nightscout URL, again separated by a space character. For example:
https://<nightscout_api_secret>@<yournnightscoutsite>.herokuapp.com/api/v1/ http://<nightscout_api_secret>@<rig_ip_address2>:5000/api/v1/
Be careful when entering the addresses - xDripAPS uses the http protocol, Nightscout uses the https protocol.
NOTE: To ensure your OpenAPS rig recieves glucose data through XdripAPS please confirm the following setting is UN-CHECKED : Open XDrip + and navigate to Settings > Cloud Upload > Nightscout Sync (REST-API) > Extra options > “Skip LAN uploads”. This setting is checked by default, however does not allow your openaps rig to recieve glucose data when tethered offline.
Known limitations of xDripAPS
- xDripAPS does not process anything other than CGM data. If you use the xDrip+ Android app to enter carbs, these will not be processed by OpenAPS. If you upload to Nightscout simultaneously, OpenAPS will download the carbohydrate entries from Nightscout once it has internet connectivity. For alternative solutions for offline carb entry see above.
- Changing between xDripAPS and Nightscout as sources for CGM data may lead to problems with the calculation of carbohydrate absorption. This can be avoided by leaving the OpenAPS rig tethered to the phone via Bluetooth or WiFi as long as there are carbs on board.
Manual installation steps for xDripAPS
It is strongly recommended that you use the oref0-setup script as described above, rather than installing manually.
- Install SQLite3 -
a. Raspbian -
apt-get install sqlite3
b. Yocto -
cd ~ wget https://sqlite.org/2016/sqlite-tools-linux-x86-3150200.zip unzip sqlite-tools-linux-x86-3150200.zip mv sqlite-tools-linux-x86-3150200 sqlite
- Get dependencies -
pip install flask
pip install flask-restful
- Clone this repo -
cd ~
git clone https://github.com/colinlennon/xDripAPS.git .xDripAPS
- Create directory for database file -
mkdir -p ~/.xDripAPS_data
- Add cron entry to start the microservice at startup -
e.g. -
@reboot python /home/root/.xDripAPS/xDripAPS.py - Configure the xDrip Android app -
xDrip > Settings > REST API Upload > Set Enabled and enter Base URL: http://[API_SECRET]@[Pi/Edison_IP_address]:5000/api/v1/
(Note: Enter your plain-text API_SECRET in the Android app, not the hashed version of it).
- Use the microservice within OpenAPS e.g.
openaps device add xdrip process 'bash -c "curl -s http://localhost:5000/api/v1/entries?count=288"'
openaps report add monitor/glucose.json text xdrip shell
Troubleshooting overview
Even those who follow this documentation precisely are bound to end up stuck at some point. This could be due to something unique to your system, a mistyped command, actions performed out of order, or even a typo in this guide. This section provides some tools to help diagnose the issue as well as some common errors that have been experienced and resolved before. If you get stuck, try re-reading the documentation again and after that, share what you’ve been working on, attempted steps to resolve, and other pertinent details in #intend-to-bolus in Gitter when asking for help troubleshooting. Here is also a good blog post to read with tips on how to best seek help online to troubleshoot.
Introduction to using Linux
Some familiarity with using the Terminal app (Mac computers) or Putty (Windows computers) will go a long way, but is not required for getting started. Terminal (or PuTTY) is basically a portal into your rig, allowing us to use our computer’s display and keyboard to communicate with the little [Edison or Pi] computer in your rig. The active terminal line will show your current location, within the computer’s file structure, where commands will be executed. The line will end with a $ and then have a prompt for you to enter your command.
There are many commands that are useful, but some of the commands you’ll get comfortable with are:
cdmeans “change directory” - you cancd <directorynamewithnobrackets>to change into a directory; andcd ..will take you backward one directory andcdwill take you back to the root directory. If you try tocdinto a file, your computer will tell you that’s not going to happen.lsmeans “list”, is also your friend - it will tell you what is inside a directory. If you don’t see what you expect, you likely want tocd ..to back up a level until you can orient yourself. If you aren’t comfortable with whatcdandlsdo or how to use them, take a look at some of the reference links on the Technical Resources page.catmeans “concatenation” - it will show you the contents of a file if youcat <filename>. Very useful when trying to see what you have in preferences or other oref0 files.viandnanoare both text editors. Using those will bring you into files for the purposes of editing their contents. It is likecatexcept you will be able to edit.- Within
vieditor, you will need to enter the letterito begin INSERT mode (and a little INSERT word will be shown at the bottom of the screen once you do that). While in INSERT mode, you will be able to make edits. To exit INSERT mode, you will pressesc. To save your changes and quit, you need to exit INSERT mode and then type:wq. - Within
nanoeditor, you are automatically in editing mode. You can make your edits and then to exit and save, you’ll usecontrol-x,y(to save the edits), and thenreturnto save the edits to the same filename you started with.
- Within
- Up and Down arrow keys can scroll you back/forward through the previous commands you’ve entered in the terminal session. Very useful if you don’t want to memorize some of the longer commands.
Control-rwill let you search for previous commands.
One other helpful thing to do before starting any software work is to log your terminal session. This will allow you to go back and see what you did at a later date. This will also be immensely helpful if you request help from other OpenAPS contributors as you will be able to provide an entire history of the commands you used. To enable this, just run script <filename> at the beginning of your session. It will inform you that Script started, file is <filename>. When you are done, simply exit and it will announce Script done, file is <filename>. At that point, you can review the file as necessary.
Directories on your rig
ls <myopenaps> will show the following files and subdirectories contained within the directory:
- autotune
- cgm
- cgm.ini
- detect-sensitivity.ini
- determine-basal.ini
- enact
- get-profile.ini
- iob.ini
- meal.ini
- mmtune_old.json
- monitor
- ns-glucose.ini
- ns.ini
- openaps.ini
- oref0.ini
- oref0-runagain.sh
- pebble.ini
- preferences.json
- pump.ini
- pump-session.json
- raw-cgm
- settings
- tz.ini
- units.ini
- upload
- xdrip.ini
ls settings will show the contents of the settings subdirectory; the files which collect longer-term loop data.
- autosens.json
- autotune.json
- basal_profile.json
- bg_targets.json
- bg_targets_raw.json
- carb_ratios.json
- insulin_sensitivities.json
- insulin_sensitivities_raw.json
- model.json
- profile.json
- pumphistory-24h.json
- pumphistory-24h-zoned.json
- pumpprofile.json
- settings.json
- temptargets.json
ls monitor will show the contents of the monitor subdirectory; current data going on right now in your loop.
- battery.json
- carbhistory.json
- clock.json
- clock-zoned.json
- edison-battery.json
- glucose.json
- iob.json
- meal.json
- meal.json.new
- mmtune.json
- pumphistory.json
- pumphistory-zoned.json
- reservoir.json
- status.json
- temp_basal.json
ls enact will show the contents of the enact subdirectory; loop’s suggested and enacted temp basals and changes.
- enacted.json
- suggested.json
Generally useful linux commands
More comprehensive command line references can be found here and here. For the below, since these are basic linux things, also try using a basic search engine (e.g. Google) to learn more about them and their intended use.
ls -alt (List all of the files in the current directory with additional details.)
cd (Change directory)
pwd (Show the present working directory (your current location within the filesystem).)
sudo <command> (Super-user do. Temporarily elevates the current users permission to that of root.)
apt-get install <package> (Aptitude is a package manager, when a package is missing it will (usually) be there and can be installed by issuing ‘apt-get install
tail -f /var/log/syslog
grep LOOP /var/log/syslog (Display lines in file that contain a string, in this example, ‘LOOP’)
df -h (shows available memory on your rig)
ifconfig
cat <filename> (Display the contents of the file.)
nano <filename> (Open and edit the file in the nano text editor.)
stat <filename>
head <filename> (Display the beginning of the file.)
less <filename> (Display the contents of the file, with advanced navigation)
pip freeze
sudo reboot (Reboot the system)
sudo shutdown -h now (The correct way to shut down the Raspberry Pi from the command line. Wait for the green light to stop blinking before removing the power supply.)
dmesg (Displays all the kernel output since boot. It’s pretty difficult to read, but sometimes you see things in there about the wifi getting disconnected and so forth.)
uptime (Shows how long the system has been running and the load average of last minute/5 minutes/15 minutes)
crontab -l (Display cron jobs)
sudo service cron status (Display info on cron service. Also use stop and start)
Common error messages
WARNING: Pay close attention to errors. An error may indicate a serious operational or functional problem with a computer system or component.
These error messages may appear in response to openaps commands in the console, or in the system log (located at /var/log/syslog when using raspbian OS). Some errors can be safely ignored, like timeout errors that occur when the pump is out of range.
Permission not allowed
The command you are running likely needs to be run with root permissions, try the same command again with sudo in front of it
Bash scripts (.sh files) need execute permissions to run. Run this command to grant execute permissions to the owner of a file.
chmod u+x myscript.sh
ValueError: need more than 0 values to unpack
A JSON file did not contain entries. It usually will self-resolve with the next successful pump history read.
Unable to upload to Nightscout
OpenAPS has failed to upload to the configured nightscout website. If you’re using a Medtronic CGM and no BG readings appear in nightscout, connect to your rig and the directory of your openaps app (default is myopenaps) run
openaps first-upload
No JSON object could be decoded
Usually means the file does not exist. It usually will self-resolve with the next successful pump history read. If it recurs, you will need to drill down to find the area where it is not successfully reading.
json: error: input is not JSON
json: error: input is not JSON: Unexpected '<' at line 1, column 1:
<head><title>Document Moved</title></head>
This error usually comes up when you have pulled a file down from Nightscout that was an invalid file. Typically you might see this when trying to pull down treatments. Make sure that you have your HOST and API_KEY set correctly at the top of your cron, in your ~/.profile
TypeError: Cannot read property ‘zzzz’ of undefined
example: TypeError: Cannot read property 'rate' of undefined
Usually is related to a typo if you have manually been editing files. Otherwise, should self-resolve.
Could not parse carbratio date when invoking profile report
Could not parse carbratio_data.
Feature Meal Assist enabled but cannot find required carb_ratios.
This error may occur when you invoke settings/profile.json report.
Check report definition in openaps.ini. If you have line remainder = [] change it to remainder =
Below is correct definition
[report "settings/profile.json"]
use = shell
bg_targets = settings/bg_targets.json
settings = settings/settings.json
basal_profile = settings/basal_profile.json
reporter = text
json_default = True
max_iob = preferences.json
device = get-profile
remainder =
insulin_sensitivities = settings/insulin_sensitivities.json
Could not get subg rfspy state or version ccprog or cannot connect to CC111x radio
Full error is usually:
Could not get subg_rfspy state or version. Have you got the right port/device and radio_type? (ccprog)
Or (on an intel edison):
cannot connect to CC111x radio on /dev/spidev5.1
Basic steps using an Intel Edison with Explorer Board or a Raspberry Pi with Explorer HAT:
- checking with
killall -g oref0-pump-loop; openaps mmtuneto see if it is resolved yet - Make sure the Explorer board or HAT has not become loose and is sitting correctly on the Edison board or Pi
- Check that your rig is in close range of your pump
- Check that your pump battery is not empty
- Reboot, or fully power down and start up your rig
If you are using an Intel Edison with Explorer Board or a Raspberry Pi with Explorer HAT, and that does not resolve your issue, or if the two LEDs next to the microUSB ports on your Explorer board (respectively D1/D2 on Explorer HAT) stay on even after an mmtune, you may need to re-flash your radio chip:
- Stop the reboot loop:
sudo service cron stop && killall -g oref0-pump-loop && shutdown -c - Install ccprog tools on your Edison:
cd ~/src; git clone https://github.com/ps2/ccprog.git - Build (compile) ccprog so you can run it:
cd ccprog; make ccprog - If using a Raspberry Pi with Explorer HAT make sure you’ve installed MRAA (folder
~/src/mraapresent) - Flash the radio chip:
Using an Intel Edision + Explorer Block:
wget https://github.com/EnhancedRadioDevices/subg_rfspy/releases/download/v0.8-explorer/spi1_alt2_EDISON_EXPLORER_US_STDLOC.hex
./ccprog -p 19,7,36 erase
./ccprog -p 19,7,36 write spi1_alt2_EDISON_EXPLORER_US_STDLOC.hex
If you receive an error saying that ccprog is only tested on C1110 chips then reboot the rig and try again. i.e.
reboot
Then:
cd ~/src/ccprog
./ccprog -p 19,7,36 erase
./ccprog -p 19,7,36 write spi1_alt2_EDISON_EXPLORER_US_STDLOC.hex
Using a Raspberry Pi + Explorer HAT:
wget https://github.com/EnhancedRadioDevices/subg_rfspy/releases/download/v0.8-explorer/spi1_alt2_EDISON_EXPLORER_US_STDLOC.hex
./ccprog -p 16,18,7 reset
./ccprog -p 16,18,7 erase
./ccprog -p 16,18,7 write spi1_alt2_EDISON_EXPLORER_US_STDLOC.hex
- Reboot, and try
killall -g oref0-pump-loop; openaps mmtuneto make sure it works
Dealing with npm run global-install errors
If you get an error while running an npm global-install, you may be able to clear it by running the following commands:
rm -rf /usr/lib/node_modules/.staging/ && rm -rf ~/src/oref0 && cd ~/src && git clone git://github.com/openaps/oref0.git || (cd oref0 && git checkout master && git pull)
then run cd ~/src/oref0 && git checkout master && git pull or if you are running dev then cd ~/src/oref0 && git checkout dev && git pull
then run cd ~/src/oref0 && npm run global-install and then re-run oref0-setup.
Dealing with a corrupted git repository
In oref0 versions prior to oref0 0.6.0, OpenAPS used git as the logging mechanism, so it commits report changes on each report invoke. Sometimes, due to “unexpected” power-offs (battery dying, unplugging, etc.),the git repository gets broken. You may see an error that references a loose object, or a corrupted git repository. To fix a corrupted git repository you can run oref0-reset-git, which will first run oref0-fix-git-corruption to try to fix the repository, and in case when repository is definitely broken it copies the .git history to a temporary location (tmp) and initializes a new git repo. In some versions of oref0 (up to 0.5.5), oref0-reset-git is in cron so that if the repository gets corrupted it can quickly reset itself.
If you’re still having git issues, you should cd ~/myopenaps; rm -rf .git ; git init . If you do this, git will re-initialize from scratch. This only applies to 0.5.x (or earlier) or upgrades to dev from master and does not apply to a fresh 0.6.x install.
Warning: do not run any openaps commands with sudo in front of it sudo openaps. If you do, your .git permissions will get messed up. Sudo should only be used when a command needs root permissions, and openaps does not need that. Such permission problems can be corrected by running sudo chown -R pi.pi .git in the openaps directory. If you are using an Intel Edison, run sudo chown -R edison.users .git.
oref0 0.6.x and beyond will not use git and will not have git-related errors to deal with.
Memory or disk space errors
If you are having errors related to disk space shortages as determined by df -h, but you still have some room on your /root drive (i.e., it is not 100% in use), you can use a very lightweight and fast tool called ncdu (a command-line disk usage analyzer) to determine what folders and files on your system are using the most disk space. You can install ncdu as follows: sudo apt-get install ncdu. You can run it by running the following command: cd / && sudo ncdu and follow the interactive screen to find your disk hogging folders.
An alternative approach to disk troubleshooting is to simply run the following command from the base unix directory after running cd /:
du -xh -d 3 | egrep "[1-9][0-9][0-9]M|[0-9]G" (reports disk usage of all directories 3 levels deep from the current directory)
Then, based on which folders are using the most space cd to those folders and run the above du command again until you find the folder that is using up the disk space.
It is common that log files (i.e., the /var/log directory) are the cause for disk space issues. If you determine that log file(s) are the problem, use a command like less to view the last entries in the logfile to attempt to figure out what is causing the logfile to fill up. If you still have some room on your /root drive (i.e., it is not 100% in use according to df /root), you can temporarily free up space by forcing the logfiles to rotate immediately, with the following command:
logrotate -f /etc/logrotate.conf
If your /root drive is 100% in use according to df /root, you may need to free up space by removing log files. It should be safe to remove archived log files with the command rm /var/log/*.[0-9] /var/log/*.gz. Check again with df /root that you have plenty of space - normally your /root drive should have 80% or less space in use. If you have more in use but still less than 100% you can use one of the above techniques to free more space.
If your disk is still 100% full, you may have to remove a live log file. Run the command du /var/log/openaps/* /var/log/*|sort -n |tail -5, which will show the largest 5 log files. Pick the largest file, use the command less to view the last entries to determine if there is a problem, and when you’re sure you don’t need the file any longer you can use the command rm log_file_name to delete it (replace log_file_name with the large log file’s name). You should reboot after removing any of the live log files so the system resumes logging properly.
Errors during openaps report invoke monitor/ns-glucose.json or ns-upload.sh
If you are getting your BG from Nightscout or you want to upload loop status/results to Nightscout, among other things you’ll need to set 2 environment variables: NIGHTSCOUT_HOST and API_SECRET. This is handled in the setup script. If you do not set and export these variables you will receive errors while running openaps report invoke monitor/ns-glucose.json and while executing ns-upload.sh script which is most probably part of your upload-recent-treatments alias.Make sure your API_SECRET is in hashed format. Please see this page or this issue for details. Additionally, your NIGHTSCOUT_HOST should be in a format like http://yourname.herokuapp.com (without trailing slash). For the complete visualization guide use this page from the OpenAPS documentation.
Wifi and hotspot issues
My wifi connection keeps dropping or I keep getting kicked out of ssh
There is a script that you can add to your root cron that will test your connection and reset it if it is down. Note, this does not have to be for an Edison, you can set this up for a Pi, etc as well.
cd ~/src
git clone https://github.com/TC2013/edison_wifi
cd edison_wifi
chmod 0755 /root/src/edison_wifi/wifi.sh
Next, add the script to your root cron. Note this is a different cron that what your loops runs on, so when you open it don’t expect to see your loop and other items you have added. Here is an example that runs every two minutes (odd minutes). You could also do it every 5 minutes or less.
- Log in as root
su root - Edit your root cron
crontab -e - Add the following line
1-59/2 * * * * /root/src/edison_wifi/wifi.sh google.com 2>&1 | logger -t wifi-reset
I forget to switch back to home wifi and it runs up my data plan
You can add a line to your cron that will check to see if <YOURWIFINAME> is available and automatically switch to it if you are on a different network.
- Log in as root
su root - Edit your root cron
crontab -e - Add the following line
*/2 * * * * ( (wpa_cli status | grep <YOURWIFINAME> > /dev/null && echo already on <YOURWIFINAME>) || (wpa_cli scan > /dev/null && wpa_cli scan_results | egrep <YOURWIFINAME> > /dev/null && sudo wpa_cli select_network $(wpa_cli list_networks | grep jsqrd | cut -f 1) && echo switched to <YOURWIFINAME> && sleep 15 && (for i in $(wpa_cli list_networks | grep DISABLED | cut -f 1); do wpa_cli enable_network $i > /dev/null; done) && echo and re-enabled other networks) ) 2>&1 | logger -t wifi-select
I am having trouble consistently connecting to my wifi hotspot when I leave the house
When you turn on your hotspot it will only broadcast for 90 seconds and then stop (even if it is flipped on). So, when you leave your house you need to go into the hotspot setting screen (and flip on if needed). Leave this screen open until you see your rig has connected. It may only take a few seconds or a full minute.
I am not able to connect to my wireless access point on my iPhone
Consider changing your iPhone’s name. In most cases iPhone will set the phone’s SSID to something like “James’s iPhone” By default Apple puts a curly apostrophe (’) into the SSID instead of a straight one (‘). Your choices from here are either paste in the curly apostrophe in wpa_supplicant.conf, or change the name on the phone. To change the name on the iPhone:
- On your iOS device, go to Settings > General > About.
- Tap the first line, which shows the name of your device.
- Rename your device, then tap Done.
Troubleshooting communications issues between the pump and the rig
Basics of communications
If your looping is to be successful, you will need good communications between the pump and rig. They communicate with each other using radio frequency (rf). If you have an North American (Pump Model REF contains NA) or Canadian/Australian pump (CA), the rf band used is 916 MHz. If you have a European (WW) pump, the rf band is 868 MHz. As part of the setup script, you will be telling the rig which type of pump you have (NA or WW) so that it can properly use the right rf band to communicate with the pump. When the rig wants to talk with the pump, it will start by “tuning the rf”... basically it will try several frequencies around the 916 or 868 MHz frequency and choose the exact frequency that has the strongest response. The tuning process for the pump is called “mmtune”.
For example, here’s the results of a pump tune in oref0 0.7.0:
mmtune: 2018/08/19 21:05:58 connected to CC111x radio on /dev/spidev5.1
2018/08/19 21:05:58 setting frequency to 916.700
2018/08/19 21:05:58 model 723 pump
2018/08/19 21:05:58 frequency set to 916.300
2018/08/19 21:05:59 frequency set to 916.350
2018/08/19 21:06:01 frequency set to 916.400
2018/08/19 21:06:03 frequency set to 916.450
2018/08/19 21:06:04 frequency set to 916.500
2018/08/19 21:06:06 frequency set to 916.550
2018/08/19 21:06:07 frequency set to 916.600
2018/08/19 21:06:09 frequency set to 916.650
2018/08/19 21:06:10 frequency set to 916.700
2018/08/19 21:06:11 frequency set to 916.750
2018/08/19 21:06:12 frequency set to 916.800
2018/08/19 21:06:12 frequency set to 916.850
2018/08/19 21:06:14 frequency set to 916.900
2018/08/19 21:06:15 disconnecting CC111x radio on /dev/spidev5.1
{
"scanDetails": [
[
"916.300",
0,
-128
],
[
"916.350",
0,
-128
],
[
"916.400",
0,
-128
],
[
"916.450",
0,
-128
],
[
"916.500",
0,
-128
],
[
"916.550",
0,
-128
],
[
"916.600",
0,
-128
],
[
"916.650",
0,
-128
],
[
"916.700",
5,
-86
],
[
"916.750",
5,
-86
],
[
"916.800",
5,
-86
],
[
"916.850",
0,
-128
],
[
"916.900",
0,
-128
]
],
"setFreq": 916.75,
"usedDefault": false
}
"916.750", 3, -70
The rig scanned frequencies between 916.300 and 916.900 mHz, and set the frequency for pump communications to 916.75 because that exact frequency had the strongest communications. How can you see the strength by looking at these tuning results? The lower the last number is on the tune, the better the strength. Results of 0, -128 indicate NO pump communications in oref0 0.7.0 or later and 0,-99 indicate NO pump communications oref0 prior to 0.7.0. This is an undesirable result. Pump tune results in the 80s or lower are usually strong enough for stable looping. If tune results are in the 90s, the rig will likely experience periodic missed pump-rig communications and looping will be intermittent. In this example, 916.7, 916.75, and 916.8 had equally strong responses at 5, -86; therefore, mmtune selected the mid-point frequency.
How can you see the results of your pump tuning?
You can see the results of rf tunes (mmtune) several different ways:
Login to your rig and use
grep mmtune /var/log/openaps/pump-loop.logto search your pump-loop.log for mmtune results. Sample result:mmtune: "916.750", 3, -78 waiting for 36 second silence before continuing mmtune: "916.650", 2, -91 waiting for 62 second silence before continuing mmtune: "916.700", 3, -92 -- "916.750", 2, -93 waiting for 66 second silence before continuing mmtune: "916.750", 3, -86 waiting for 52 second silence before continuing mmtune: "916.800", 3, -82 -- "916.850", 0, -128 waiting for 90 second silence before continuing mmtune: "916.700", 2, -66 -- "916.750", 3, -66 waiting for 12 second silence before continuing mmtune: "916.700", 3, -69 -- "916.750", 2, -69 waiting for 18 second silence before continuing mmtune: "916.700", 3, -90 -- "916.750", 3, -91 waiting for 62 second silence before continuing mmtune: "916.750", 3, -81 waiting for 42 second silence before continuing mmtune: "916.750", 3, -85 waiting for 50 second silence before continuing mmtune: "916.750", 3, -79 waiting for 38 second silence before continuing mmtune: "916.800", 2, -84 -- "916.850", 0, -128 waiting for 90 second silence before continuing
If you setup Papertrail, search for mmtune. For example, as shown:

If you want to manually preform an mmtune and show the selected frequency of the entire scan in oref0 prior to 0.7.0, login to your rig and execute the command below.
cd ~/myopenaps && sudo service cron stop && killall -g openaps ; killall -g oref0-pump-loop; openaps mmtune && sudo service cron start
If you are running oref0 0.7.0 or later, execute this command.
cd ~/myopenaps && sudo service cron stop && killall -g openaps ; killall -g oref0-pump-loop; oref0-mmtune && sudo service cron start
Here is an example of the results of that command on a rig called edison3:
root@edison3:~# cd ~/myopenaps && sudo service cron stop && killall -g openaps ; killall -g oref0-pump-loop; oref0-mmtune && sudo service cron start openaps: no process found oref0-pump-loop: no process found mmtune: "916.636", 5, -92 root@edison3:~/myopenaps#
If you want to manually perform an mmtune with the full frequency scan displayed in oref0 prior to 0.7.0, execute the command below.
cd ~/myopenaps && sudo service cron stop && killall -g openaps ; killall -g oref0-pump-loop; openaps-use pump mmtune && sudo service cron start
If you are running oref0 0.7.0 or later, execute this command.
cd ~/myopenaps && sudo service cron stop && killall -g openaps ; killall -g oref0-pump-loop; OREF0_DEBUG=1 oref0-mmtune && sudo service cron start
You’ll see results similar to the full scan details as shown at the beginning of this section.
What causes poor tuning results?
There are several situations which may cause poor pump communications:
- Most commonly, poor communications are simply a matter of distance. The farther away your pump and rig are from each other, the weaker the communications are going to be. Bringing the rig closer to the pump may resolve the problem and improve communications. How close you need to be may depend on the following variables below, as well.
- Check for a low pump battery. As pump battery gets lower in voltage, communications may fail more often. Typically pump communications are fairly stable to around 1.3v of pump battery, but that may vary by pump and location. Try changing the battery and see if that helps pump communications.
- Body blocking between pump and rig is another common reason for poor pump communications. The human body is an incredibly effective rf blocker (water, skin, fat...not easy for rf to penetrate). So, if you are prone to sleeping with your pump completely covered by your body, you may end up with more frequent pump communication failures. Or, if you have your rig on one hip and your pump on the other...even that may decrease the strength of your pump communications.
- Noisy RF environments can cause problems with rig-pump communications. If you have lots of equipment nearby all trying to use the same frequency, communications can be laggy and interrupted. What home devices commonly operate on the 900mHz frequency? Some older cordless phone systems, baby monitors, and older home wireless speakers are common sources. Try switching channels on the devices (if available as an option) and using a different frequency, such as 2.4 GHz or 5 GHz. Try temporarily unplugging those devices and seeing if you get improved pump communications. If you are outside of the home, the troubleshooting and mitigation of noisy rf areas may be more problematic.
- Extreme environmental changes can cause the rig-pump communications to be slightly shifted in frequency. For example, going from a heated house to the outside winter snow may cause a change in the strongest tuning frequency. When the rig attempts a fresh mmtune, it will set a new frequency and communications shouldn’t be impacted for long, if at all.
- Explorer board not sitting properly on the Edison The Explorer board could have become loose and lost connection to the Edison board. Disconnect power from the rig and verify the explorer board is securely connected to the Edison. Turn the power on and try again.
- Equipment failure can be another cause. If there is damage to the explorer board’s antenna, you may notice poor or no pump communications. Additionally, some pumps may have poor rf strength...after all these are older pumps and in many cases we don’t know the history. To troubleshoot if the issues are equipment related, try the pump with a new explorer board. Or if you have a backup pump, try setting up OpenAPS with that pump. See if the problem persists.
How often does the rig tune?
The rig does not attempt to tune on every single pump communication. The tuning is done on a random interval, and more frequently if pump communications are failing. So, don’t expect to see an mmtune result every minute or even every 5 minutes. If you rig is looping regularly without failures, you can expect that mmtunes will be done less frequently because they are not needed.
Troubleshooting problems between CGM and the rig
First, know how you get data from BG to your rig
There are a few ways to get your BG data to your rig:
- Medtronic CGM users: you just upload your BG data with the other pump information to the rig.
- Dexcom CGM users:
- G4/G5 -> Share Servers -> Nightscout -> rig
- G4/G5 -> plug the receiver in to the rig with a second power source
- xdrip+ -> Nightscout -> rig
- xdrip+ -> xdripAPS -> rig
Depending on how you’re getting BG to the rig, you’ll need to do some basic troubleshooting.
Second, troubleshoot the specific components of that setup
Medtronic CGM users
- If you haven’t been uploading CGM data for a while, or looping for a while, you may need to run
openaps first-uploadto get Nightscout to show CGM readings again.
If you’re using Nightscout:
- Make sure your BGs are getting TO Nightscout. If you’re using something to upload, check the uploader. If you’re using the Share bridge to Nightscout, the #1 reason BGs don’t get to Nightscout is because of Share. Make sure a) that you are getting BGs from the receiver/transmitter to the Share app; then b) that the Share app is open (e.g. re-open the app after your phone is restarted); then c) make sure the Dexcom follow app is getting data. Checking all of those usually resolves data to Nightscout.
- To get data FROM Nightscout, the most common problem is if your rig is offline. If your rig is not connected to the internet, it can’t pull BGs from Nightscout. Troubleshoot your internet connectivity (e.g. ping google.com and do what you need to do to get the rig online). After that, also make sure your NS URL and API secret are correct. If they’re not, re-run the setup script with those things corrected.
If you’re using xdrip+ or xdripAPS
- For Xdrip+ users If you have no data in Nightscout, first check your uploader phone for data in xdrip+. If your uploader phone has data then there is likely a problem getting data from the uploader phone to Nightscout - check wifi and/or cellular connectivity of the phone/device similarly to the section above outlining getting BGs to Nightscout.
- If you are using a wixel, make sure it has a charge - you should see a flashing red light on the wixel if it is searching to connect to the uploader device.
- If the Xdrip+ app on your uploader shows stale data (greater than 5 minutes since your last data point), go to ‘System Status’ to see the status of the connection between your xbridge-wixel and your uploader phone. If you show ‘connected’, but you do not have data, you may wish to use the ‘Restart Collector’ button and see if your data restarts. Be mindful that your CGM data is broadcast in 5 minute intervals - so you will see data appear on the ‘5’s‘ if reconnect works.
- It is possible that ‘Restart Collector’ button will not work - in this case you will need to ‘Forget Device’ to reset the connection between the phone and your Xbridge-wixel setup. Once forgetting the connection is done, you will need to go into the menu and select ‘Bluetooth Scan’ - you can now SCAN and select your Xbridge-wixel device. In some cases you will need a complete power-off of your wixel to successfully reset your system - this may require you to unplug your battery if you have not installed a power switch on your Xbridge-wixel device. If you wish to do a hard reboot of your system, turn off/unplug your wixel. Turn back on or replug, then rescan via ‘Bluetooth Scan’, select your Xbridge-wixel in blutooth selection window. Once selected, your wixel name will disappear from the bluetooth scan options. You may wish to do a double check of your system status to ensure you have a connection to your wixel device.
- Infrequently, in addition to the above, you may find your uploader phone needs a complete poweroff and restart as well to get you back up and running.
- Finally, increased frequency in difficulties with no data may indicate a troubled wire in your Xbridge-wixel - carefully double check all your soldered joints and ensure they continue to be good.
If you’re plugging a CGM into the rig
- Make sure you plug the CGM cable into the OTG port on the explorer board
- Make sure you have a SECOND power source (another battery, or wall power) plugged in also to the rig.
Troubleshooting Nightscout issues
The major categories of Nightscout troubleshooting include:
Connectivity. The rig and Nightscout are good friends. Information is usually two-way so long as the rig has access to the internet (aka, online use). When rigs go “offline”, NS will go stale until internet is again available. If you’re having issues with NS and it’s a brand new setup, you’ll want to double check per the below that URL, API secret, etc. are correct.
Mlab size is too big and you need to clean it. See below for how to check the size of, and compact if needed, your mlab database, which can influence what displays in Nightscout.
Future data. Sometimes entries will get time stamped incorrectly, or the device time zones are off. See below for how to resolve.

Setting up your NS hosting site
You will need to make sure that you have setup you site configuration settings in your NS hosting site (usually that means Heroku) according to the docs. See the Nightscout Setup page for help in setting up your NS site. If you don’t add the OpenAPS-specific settings to your setup, the communications with the rig will not work properly.
mLab maintenance
Your NS data is stored in a place called an mLab database. This mLab database is free so long as you stay below a 500mb data limit. Inevitably, after several months of OpenAPS use, you may fill that free data storage limit. Typically, you won’t be notified of that issue...instead you’ll start to notice sudden problems with your NS site when you haven’t done anything different. Strange symptoms include, but aren’t limited to:
- OpenAPS and Pump pills not working, but still looping and displaying temp basals (devicestatus collection)
- BG values going stale and dexcom bridge stopping, which may break looping (entries collection)
- temp basals no longer rendered, but looping still works (treatments collection)
- careportal treatments (carbs, boluses) no longer displaying properly (treatments collection)
If you are seeing strange behavior in your previously-working-fine NS site, you’ll want to check your mLab database size. Strange behaviour can include missing bolus or other treatment information. You may also get a 500 error (failed to insert record) message in NightScout when trying to save a treatment, such as logging carbs. To access your mLab database, you will need to click on the mLab integration from within your Heroku dashboard as shown below. Based on which symptoms you’re seeing from the above list, start by checking the size of the referenced collection.

From that screen, you will need to click on the HOME link near the top left of the page.

The resulting screen will show you the important information to direct where you need to take action. There are TWO areas where the 500 MB data limit can be an issue. One issue area is the size on disk, which is the virtual space that your database takes up. As data is written onto your database, sometimes it is written inefficiently and virtually “spreads out” to take up more room than it normally would. The other issue area is the size which is the actual data stored in your database. Depending on where your issue is, you may need to compact data (if size on disk is the issue) or cleanout data (if size is the issue).

Compact data
If size on disk is close to 500mb, you’ll need to compact your database. To begin the compaction process, click on your database name.

Then click on the Tools tab in the screen that opens. Click on the commands button and then select the repairDatabase from the dropdown menu of available commands. At the bottom of the screen, select the Run Command button.

Return to your home screen and you will be able to verify the Size on Disk has decreased.

Note about inability to compact data. Several people have reported that they get a timeout error when following the above compacting instructions and the size on disk is not reduced. Try again and this text may appear. “If after issuing this command your Sandbox database still has a Size on Disk (file size) greater than 496 MB, see our FAQ for possible explanations.” If you run into this issue, you can send an email to mLab support at support@mlab.com and they will compact the database for you.
Cleanout data
NOTE: Before you cleanout your data, please check out the option to upload (or “donate”) your data anonymously to the OpenAPS Data Commons project. The OpenAPS Data Commons was created to enable a simple way to share data sets from the community, both with traditional researchers who will create traditional research studies, and with groups or individuals from the community who want to review data as part of their own research projects. So before you delete or cleanout any data from your mLab, consider doing an upload to OpenAPS Data Commons first.
If your mLab database issue is size, then you will need to cleanout some of the historical data collected by your NS site. There are two methods to cleanout space and delete data in your mLab database:
- mLab direct access
- Nightscout admin tools
mLab Direct Access
- Login to your mLab database, as shown above, by clicking on the mLab logo in your Heroku dashboard. Your various collections are shown, similar to the screen shot above. The amount of data each collection is using is listed to the far right of each collection’s line. Do not cleanout your
profilecollection, that is needed by NS. Additionally, if you use tokens for your NS site, you will want to leave theauth_subjectscollection intact. Theentriescollection are typically BG data from your bridge. Thetreatmentscollection are data from your careportal entries either through NS or uploaded via the rig (e.g., carbs, boluses, temp basals, notes of pump events, and temp targets). Thedevicestatuscollection houses basically all the information that is presented in the OpenAPS pill display (determine-basal, BG predictions, IOB, COB, etc). If you use NS reports for your endo appointments, try to time the data cleanout for after an appointment so that you can rebuild a treatment history before the next appointment. - Click on a collection’s name to open it.

- Click on the button that says “Delete all documents in collection” and then confirm the deletion.

- You can confirm that your cleanout has resolved the problem, by checking that your database size is below 500 MB now. Click on the
Homelink in top left. Then review the size of the database as shown (note: Screenshots are from different databases...they are just to show how to navigate and what results you are looking for. Minor inconsistencies in continuity of the screenshots should be ignored).

Nightscout Admin Tools
If you go to your Nightscout site’s settings (the three horizontal bars in the upper right of your Nightscout site), you will be able to access your Admin Tools for the site. These include some useful quick mLab actions, includig deleting documents from the devicestatus collection similar to the action we took in the steps above. But, it’s worth noting that if you have errant future data in your Nightscout site that is causing problems (usually during time changes or overseas travel), you can clean-out future entries through this portal, too.

Future data: all of a sudden, Nightscout is no longer showing treatments (bolus, carbs, finger BGs) on the graph or rendering my basals.
If you suddenly find that Nightscout is not showing treatments (bolus, carbs, finger BGs etc.) on the graph; and/or that your basals are no longer being rendered in the blue basal line; but otherwise, everything looks normal and you are looping properly:
You probably somehow got a future-dated treatment. Sometimes data gets recorded into your NS site that can be date stamped into the future - for example, if your CGM, BG meter, OpenAPS rig, or pump had the wrong time or date set.
These future-data will cause problems in rendering (displaying) data correctly, and can usually cause loop failures as well.
To remove future treatments:
Check your NS Admin Tools section (click the three horizontal bars in the upper right of your Nightscout site, then Admin Tools) to easily identify and clean out your database of future data points (press the “remove treatments in the future” button). If the future treatments were caused by a time mismatch, you’ll need to resolve that first, or the future dated treatments may simply be re-uploaded.

Every once in a while, however, that future data point tool will not work effectively because the future data will actually be stored within the devicestatus collection’s information. If that is the case, you should try cleaning out the devicestatus collection, as described above in the Cleanout Data section.
No data is being displayed, or no Nightscout pills are displayed
If you are using a “test pump” that has not received sufficient data in some time, Nightscout pills will NOT be displayed onscreen. Nightscout may also not work if it hasn’t had CGM data in a while - so if you haven’t been using a CGM and uploading CGM data to Nightscout for the past few days, the site may be empty as well. If this happens, simply use this pump in tandem with a CGM so glucose values are recorded and eventually uploaded to Nightscout. Once sufficient data has been collected (and OpenAPS plugin is enabled and saved) the OpenAPS pills should appear automatically. Medtronic CGM users may also need to do this to get their CGM data flowing into Nightscout after a gap in uploading data.
Dexcom CGM users should make sure they have “share” enabled and have actively shared their data with at least one follower, before data will begin flowing to Nightscout. If you don’t want to share your data with another person, you can just follow yourself.
Nightscout pill info is incorrect
There are three pills (aka, information boxes) that are noteworthy about your NS display, and that people commonly interpret as “incorrect” despite all the warnings/explanations in these docs.
- IOB pill will normally display the IOB reported by your OpenAPS pill. If your loop is failing or NS communications are down because the rig has gone offline, there’s a good possibility that your IOB pill will be displaying an incorrect IOB based on the careportal’s method of calculating IOB (rather than OpenAPS’s way). You can determine the source of your IOB pill’s information by clicking or hovering on the pill. If the pills says “OpenAPS”, then it’s good to use that data. Additionally, it should report the portion of IOB termed “basal IOB”, which is the IOB from of temp basal adjustments and SMBs, if enabled.
- COB pill should NOT be included on your heroku settings “ENABLE” line. If you go against this advice, you may experience laggy NS performance and see incorrect COB reported in your COB pill on the NS site. Don’t say you haven’t been warned. Until NS dev team can address these issues, the recommendation stands to NOT include COB in your NS site settings.
- BASAL pill should NOT be used in your NS site. The information on that pill updates so slowly sometimes, that you may incorrectly jump to assumptions that your rig is behaving differently than it actually is. Instead, use the OpenAPS pill to find current information about your current basal rate...or press the ESC button on your pump in order to directly read the current temp basal. Additionally, the basal rendering (the blue lines of the NS display) can sometimes lag by up to 2-5 minutes, depending on loop activities...so again use the OpenAPS pill or pump if you are interested in the most up-to-date information on temp basals.
Medtronic Button Error Troubleshooting
Medtronic insulin pumps sometimes develop problems with their buttons; this seems to be the most common type of failure for older Medtronic pumps. If you have a pump which has lost the sticker that covers the buttons, which has a button that doesn’t respond, or which displays a “button error”, it is likely repairable.
NOTE: Before attempting to repair an insulin pump, have a plan for what to do if the repair fails, or if the pump stops working some time later. This may mean carrying a spare pump, or a vial of insulin and syringes. If your pump has failed and you don’t have a backup, don’t try to repair it until you’ve solved the immediate problem by gotting an alternative in place and stabilizing your blood sugar. If a pump has had a button fail and been repaired, it’s much more likely to have another button problem than a pump which has never had a button problem in the first place.
There are two symptoms of button problems: either the button doesn’t respond when you press it, or it registers a press when you didn’t push it. If a button is held for three minutes continuously, the pump will report a Button Error; to clear a button error, you need to press ESC then ACT, which may be difficult if the failing button is one of those two. The ACT button is the one most likely to have a problem, because it gets pressed the most times during normal use. According to Medtronic’s documentation, the pump will not deliver insulin (including basal) until the error is cleared.
The button assembly on a Medtronic pump consists of:
- A brown circuit on the bottom
- Five metal snap-domes resting on each of the five button positions
- A piece of adhesive film (similar to scotch tape), which keeps the domes from moving sideways
- A plastic sticker, which keeps out moisture and provides labels
To make a repair, the first thing you’ll need to do is peel up the sticker. Start from the corner above and to the left of the quick-bolus button; if it doesn’t come off easily, you can stick a knife with a pointed tip in the corner. Next you’ll want to peel up the adhesive film, again starting from the left.
Once the sticker is up, you’re looking for three things: domes that have moved sideways and aren’t centered on the contacts, domes that are crushed and aren’t popping back up, and domes with gunk or corrosion in between them and the contacts. If there is gunk under the buttons, use a Q-tip to clean it off. If that doesn’t work, try isopropyl alcohol.
After being pressed enough times, the metal domes will eventually develop metal fatigue and get crushed, leading to a button error. As a temporary fix, you can peel up the sticker and tape, press on the dome from bottom, popping it back up. However, once this has happened, once, it will keep happening again, so you’ll want to replace the dome. You can replace them with these domes from Digikey.
When the sticker has been peeled up, it might retain enough stickiness to put back, or it might not. If it doesn’t stick back down, applying a thin line of cyanoacrylate glue (aka Krazy Glue) around the perimeter of the sticker will work. Test all the buttons before gluing, as it will be difficult to get the sticker back off once you’ve done this.
If you’ve lost the sticker or the sticker has lost enough of its adhesive to be a problem, you can replace both the film and the sticker with this material. Cut a piece in approximately the shape of the sticker; hold it against the pump to see which edges needs to be trimmed further, and repeat until you have a piece in the same shape as the sticker.
Dealing with the CareLink USB Stick
Note: Generally, the Carelink stick is no longer supported. We highly recommend moving forward with a different radio stick. See the hardware currently recommended in the docs, or ask on Gitter.
The model command is a quick way to verify whether you can communicate with the pump. Test this with openaps use <my_pump_name> model (after you do a killall -g oref0-pump-loop).
If you can’t get a response, it may be a range issue. The range of the CareLink radio is not particularly good, and orientation matters; see range testing report for more information.
Sometimes the Carelink will get into an unresponsive state that it will not recover from without help. You can tell this has happened if the pump is within range of the Carelink and you see a repeating series of “Attempting to use a port that is not open” or “ACK is 0 bytes” errors in pump-loop.log. When this happens the Carelink can be recovered by rebooting or physically unplugging and replugging the CareLink stick.
Once you’re setting up your loop, you may want to detect these errors and recover the Carelink programmatically. This can be done by running oref0-reset-usb (oref0-reset-usb.sh) to reset the USB connection. For example, you could create a cron job that would run openaps use <my_pump_name> model, or tail the 100 most recent lines in pump-loop.log, and grep the output looking for the errors noted above. If grep finds the errors, the cron job would run oref0-reset-usb. Just note that during USB reset you will lose the connection to all of your USB peripherals. This includes your Wi-Fi connection if your rig uses a USB Wi-Fi dongle.
How to donate your data to research with the OpenAPS Data Commons in OpenHumans
About the OpenAPS Data Commons and OpenHumans
Members of the OpenAPS community have frequently expressed the desire to donate their DIY closed loop data for scientific research; or to perform research themselves. The OpenAPS Data Commons was created to enable a simple way to share data sets from the community, both with traditional researchers who will create traditional research studies, and with groups or individuals from the community who want to review data as part of their own research projects. The OpenAPS Data Commons uses the “Open Humans” platform to enable people to easily upload and share their data.
For more background, see the OpenAPS.org Data Commons page.

(Tip: you may want to right click and open any links from this page in new windows.)
How to upload your data to the OpenAPS Data Commons
- A. Create a profile on Open Humans. Keep in mind that your name/username can be public; so you may want to choose a non-name related username.
- Make sure to verify your profile (see Open Humans email confirmation).
- B. (Optional, but recommended method for getting your data into OpenHumans). Use the Nightscout Data Transfer app to upload your data into
- 1. Go to the Nightscout Data Transfer App webpage
- 2a. NEW USERS: Scroll down to the bottom of the page and click “Connect Nightscout Data Transfer”. (Log in to your OH account first if you haven’t already).
- 2b. REPEAT USERS: Go here: https://dataxfer-ns-oh.herokuapp.com/ . (Log in to your OH account first if you haven’t already).
- 3. It will take you to a page and ask for your Nightscout URL. Note the app DOES NOT store your URL but will just use it to fetch the data from Nightscout. Select the date range you want it to fetch data from. Tip: Start with two days or so of data to test that it works; you can then re-upload with a longer time frame of data.
- Warning: if you want to upload ALL of your data (yay!), then don’t put a start date. However, this will take a while, so don’t expect it to be done in minutes, but may take upward of half an hour to an hour depending on how much Nightscout data you have - this is normal.
- It will say “queued” on the page. You can refresh, and it should soon say “initiated”. It may take several minutes to pull even a few days worth of data, so keep refreshing the page or come back later. Once done, it should show you a list of files that it has pulled, and provide download buttons if you want to download a local copy or open it to check that it correctly pulled data. Your screen should look like this:

When completed, after refreshing the status bar should turn green and look something like this:

- You can always go back to the Nightscout Data Transfer app and see what data it has uploaded for you. It should look something like this:

- C. Now that you have data in Open Humans, next click here to go directly to the OpenAPS Data Commons project.
- 1. Scroll down and click “join”. Carefully read the terms & consent to make sure you understand how your data is going to be used. You can also read the OpenAPS Data Commons research criteria here to better understand what criteria research projects are held to before they may be granted access to the data commons data. Note: the data will not be publicly available; it will only be shared privately and securely with individuals or research groups that meet this criteria and are vetted by a volunteer group from our community.
- 2. Agree to share your data with the OpenAPS Data Commons.
- 3. You will then be redirected to a survey to also provide basic data to be added to the data you uploaded – please also fill out this survey information. (This data will be tied to your OpenHumansdata shared with the Data Commons, which should prevent having to answer the same questions (e.g. how long you have had diabetes) on any future research studies that have questionnaires.)
- 4. Hooray! You’ve just added data to the OpenAPS Data Commons.Thank you for contributing your data!
- Please note:
- We may contact you in the future (we will not see your email address) to request to upload a new batch of data or fill out a survey for another research study that is accessing the Data Commons data.
- Per the Terms and Conditions, you can always choose to delete and remove your data from Open Humans, or pull it from the OpenAPS Data Commons. Some data may have already been shared with individual research studies. However, if you contact dana@openaps.org, we will also do our best to remove it from any active/ongoing research studies.
Notes about OpenHumans and other data
You can also donate your data to places like the Nightscout Data Commons, or any other research project you find interesting on Open Humans. Make sure to read the terms and conditions clearly for each of the research studies you donate your data to, and in particular look for what types of data they may be asking you to share. In addition to Nightscout data, you can upload things like Fitbit or Moves data, etc. to Open Humans.
Frequently Asked Questions
- I filled out the survey. What next?
You’re all done! (For now. In the future, studies accessing the OpenAPS Data Commons may choose to send additional surveys to collect things like various QOL metrics, which you can choose to participate in or not.) Thanks for donating your data! - How much data should I donate?
You can donate as much as you want, or as little as you want. However, many of the studies are interested in looking at before/after looping - so at a minimum, I’d suggest a month or two before you started looping. If you don’t have any reason to limit what you share, I’d suggest sharing all of your Nightscout data to make it the most useful to all potential researchers. (This means don’t bother to put a start or end date in the Nightscout Data Transfer tool; just put in your URL and hit upload.) - Who is accessing the data?
Any project from OpenHumans accessing the OpenAPS Data Commons should be listed on the page. We’ll also keep a list going (probably here, on the OpenAPS.org Data Commons page) to reflect the different studies using the data.
Ways to Contribute to OpenAPS
OpenAPS doesn’t require you to be a formally trained engineer/developer/anything to get started or use these tools. The main requirement is interest and willingness to safely DIY new technology that may help improve your life as well as others.
If you’re not sure where to get started, here are some ways to get involved:
- Do a fresh install using this guide and see where you get stuck; if you have to do something off-script, there is a reasonable chance the script is either wrong or your case is “special” and should be accounted for here. Make edits and submit a pull request to change the document and assist others.
- Additionally, this guide needs more work, always. If there is something that is not documented, do one of two things: a) submit a pull request (see above). or b) log an “issue” (go here to see the open issues) about the section or thing that needs more documentation.
- Ask questions on gitter; if your question wasn’t answered in this doc and gets answered there, chances are it should be included here—go ahead and add it to the appropriate section.
- Test the openaps tools for different use cases and report back with your findings. Log files and, if you’re comfortable, associated device data (CareLink CSV files, for example) are extremely helpful for debugging.
- Submit issues on GitHub and work with other contributors to get them resolved.
- Develop a plugin to enhance the functionality or ease-of-use of openaps.
- Spread the word about #OpenAPS and get others involved; the more, the merrier. (You can direct them to OpenAPS.org for more information.)
- Consider calling your device manufacturer and ask about communication protocols in order to understand how your device operates.
If you would like to work on the core openaps code, take a look at the openaps contributing guidelines before getting started. Thank you for your contributions!
Pay it forward to those less fortunate
One of the common questions we also get is how to donate money to further #OpenAPS. As this is an open source project, there is no financial organization behind OpenAPS that makes sense to donate to. Instead, we recommend considering the following:
If you’ve been helped by the generosity of others, please pay it forward by helping those less fortunate than any of us. There are children dying of T1D who could live healthy lives into adulthood with only a very small contribution from each of us. If you haven’t already, please visit https://lfacinternational.org/ and sign up to make a regular monthly donation to Life for a Child. If you can afford to donate $1/day, that is enough to save the life of one child. And if you can’t afford that, please set up whatever monthly donation you feel you can afford right now. If you’re already donating, please consider increasing your donation. With some small adjustments to our lifestyle, all of us can afford to give at least 10% of our income, and/or 10% of our time, to help the least fortunate. If you don’t feel like you can afford that all at once, feel free to start smaller. But also think about what you would be willing to do, if you had to, in order to get insulin for your own child with T1. Every child with T1 deserves to live.
For Clinicians – A General Introduction and Guide to OpenAPS
This page is intended for clinicians who have expressed interest in open source artificial pancreas technology such as OpenAPS, or for patients who want to share such information with their clinicians.
This guide has some high-level information about DIY closed looping and specifically how OpenAPS works. For more details on all of these topics, please view the comprehensive OpenAPS documentation online. If you have questions, please ask your patient for more details, or always feel free to reach out to the community with question. (If you’re not on social media (e.g. Twitter or Facebook), feel free to email Dana@OpenAPS.org). You can also find some of the latest studies & outcomes related data here.
The steps for building a DIY Closed Loop:
When someone builds an OpenAPS rig, the steps are generally to:
- physically put the pieces of the rig together
- load the open source software on it
- configure it to talk to their diabetes devices and specify settings and safety preferences
How A DIY Closed Loop Works
Without a closed loop system, a person with diabetes gathers data from their pump and CGM, decides what to do, and takes action.
With automated insulin delivery, the system does the same thing: it gathers data from the pump, CGM, and anywhere else information is logged (such as Nightscout), uses this information to do the math and decide how much more or less insulin is needed (above or below the underlying basal rate), and uses temporary basal rates to make the necessary adjustments to keep or eventually bring BGs into target range.
If the rig breaks or goes out of range of the pump, once the latest temporary basal rate ends, the pump falls back to being a standard pump with the usual basals runnning.
How data is gathered:
With OpenAPS, there is a “rig” that is a physical piece of hardware. It has “brains” on the computer chip to do the math, plus a radio chip to communicate with the pump. It can talk to a phone and to the cloud via wifi to gather additional information, and to report to the patient, caregivers, and loved ones about what it’s doing and why.
The rig needs to:
- communicate with the pump and read history - what insulin has been delivered
- communicate with the CGM (either directly, or via the cloud) - to see what BGs are/have been doing
The rig runs a series of commands to collect this data, runs it through the algorithm and does the decision-making math based on the settings (ISF, carb ratio, DIA, target, etc.) in your pump.
It will also gather any information about boluses, carbohydrate consumption, and temporary target adjustments from the pump or from Nightscout.
How does it know what to do?
The open source software is designed to make it easy for the computer to do the work people used to do (in manual mode) to calculate how insulin delivery should be adjusted. It first collects data from all the devices and from the cloud, prepares the data and runs the calculations, makes predictions of what BGs will be expected to do in different scenario, and calculates the needed adjustments to keep or bring BG back into target range. Next it attempts to communicate and send any necessary adjustments to the pump. Then it reads the data back, and does it over and over again.
OpenAPS is designed to transparently track all input data it gathers, the resulting recommendation, and any action taken. It is therefore easy to answer the question at any time, “why is it doing X?” by reviewing the logs.
Examples of OpenAPS algorithm decision making:
OpenAPS makes multiple predictions (based on settings, and the situation) representing different scenarios of what might happen in the future. In Nightscout, these are displayed as “purple lines”. In the logs, it will describe which of these predictions and which time frame is driving the necessary actions.
Here are examples of the purple prediction lines, and how they might differ:

Here are examples of different time frames that influence the needed adjustments to insulin delivery:
Scenario 1 - Zero Temp for safety
In this example, BG is rising in the near-term time frame; however, it is predicted to be low over a longer time frame. In fact, it is predicted to go below target and the safety threshold. For safety to prevent the low, OpenAPS will issue a zero temp, until the eventualBG (in any time frame) is above threshold.

Scenario 2 - Zero temp for safety
In this example, BG is predicted to go low in the near-term, but is predicted to eventually be above target. However, because the near-term low is actually below the safety threshold, OpenAPS will issue a zero temp, until there is no longer any point of the prediction line that is below threshold.

Scenario 3 - More insulin needed
In this example, a near-term prediction shows a dip below target. However, it is not predicted to be below the safety threshold. The eventual BG is above target. Therefore, OpenAPS will restrain from adding any insulin that would contribute to a near-term low (by adding insulin that would make the prediction go below threshold). It will then assess adding insulin to bring the lowest level of the eventual predicted BG down to target, once it is safe to do so. (Depending on settings and the amount and timing of insulin required, this insulin may be delivered via temp basals or SMB’s).

Scenario 4 - Low temping for safety
In this example, OpenAPS sees that BG is spiking well above target. However, due to the timing of insulin, there is already enough insulin in the body to bring BG into range eventually. In fact, BG is predicted to eventually be below target. Therefore, OpenAPS will not provide extra insulin so it will not contribute to a longer-timeframe low. Although BG is high/rising, a low temporary basal rate is likely here.

Optimizing settings and making changes
As a clinician who may not have experience with OpenAPS or DIY closed loops, you may find it challenging to help your patient optimize their settings or make changes to improve their outcomes. We have multiple tools and guides in the community that help patients make small, tested adjustments to improve their settings.
The most important thing for patients to do is make one change at a time, and observe the impact for 2-3 days before choosing to change or modify another setting (unless it’s obviously a bad change that makes things worse, in which case they should revert immediately to the previous setting). The human tendency is to turn all the knobs and change everything at once; but if someone does so, then they may end up with further sub-optimal settings for the future, and find it hard to get back to a known good state.
One of the most powerful tools for making settings changes is an automated calculation tool for basal rates, ISF, and carb ratio. This is called “Autotune”. It can also be run independently/manually, and allow the data to guide you or your patient in making incremental changes to settings. It is best practice in the community to run (or review) Autotune reports first, prior to attempting to make manual adjustments to settings.
Additionally, human behavior (learned from manual diabetes mode) often influences outcomes, even with a DIY closed loop. For example, if BG is predicted to go low and OpenAPS reduces insulin on the way down, only a small amount of carbs (e.g. 3-4 carbs) may be needed to bring BG up from 70. However, in many cases, someone may choose to treat with many more carbs (e.g. sticking to the 15 rule), which will cause a resulting faster spike both from the extra glucose and because insulin had been reduced in the timeframe leading up to the low. One feature that aids patients in making behavior changes as they transition to DIY closed loops is to set up Pushover, an app that enables them to get push alerts from the rig that specify if carbs are needed, and if so, how many. They can then make an informed decision about carbs needed to adjust for the BG, and this data is helpful for understanding the cause and effect between the amount of low treatment and the resulting BG levels after that.
Summary
This is meant to be a high-level overview of how OpenAPS works. For more details, ask your patient, reach out to the community, or read the full OpenAPS documentation available online.
Additional recommended reading:
- The OpenAPS Reference Design, which explains how OpenAPS is designed for safety: https://openaps.org/reference-design/
- The full OpenAPS documentation
OpenAPS Overview and Project History
To address some of the challenges of daily life with diabetes, and because #WeAreNotWaiting, several people worked to figure out how to connect up existing FDA-approved medical devices such as the Dexcom G4 CGM and the Medtronic Minimed insulin pump, using commodity computer / mobile phone hardware and open-source software, to create a complete closed loop Artificial Pancreas System (APS). The first public example of this was the #DIYPS closed loop system, created in their spare time by @DanaMLewis and @ScottLeibrand in the fall of 2013 based on their earlier work to build the #DIYPS remote monitoring and decision assist system. #DIYPS used the Nightscout project’s uploader to get Dexcom CGM data off the device. #DIYPS was able to become a closed loop with the help of open-source decoding-carelink project created by @Ben West to communicate with Medtronic insulin pumps, retrieve data and issue insulin-dosing commands to pumps that support it. #DIYPS was the base system that led to #OpenAPS.
In light of the success of #DIYPS closed loop and other simple APS systems built by individuals, Dana and Scott decided to further apply the #WeAreNotWaiting ethos to APS research, believing safe and effective APS technology can be made available more quickly and to more people, rather than just waiting for current APS efforts to complete clinical trials and be FDA-approved and commercialized through traditional processes.
As a result, #OpenAPS is an open reference design for, and a reference implementation of, a self-built closed loop APS system that uses the CGM sensors’ estimate of blood glucose (BG) to automatically adjust basal insulin levels, in order to keep BG levels inside a safe range overnight and between meals.
Over the years, there have been hundreds of individuals worldwide who have self-built their own OpenAPS systems, and dozens of people who have contributed to the further development, helping make OpenAPS what it is today!
Glossary
AP and OpenAPS high-level terminology
APS or AP - Artificial Pancreas System. A term for a closed-loop automated insulin delivery system in which temporary basal adjustments are used to maintain BG levels at a user-specified target range.
Basal - baseline insulin level that is pre-programmed into your pump and mimics the insulin your pancreas would give throughout the day and night
Basal IOB - difference (positive or negative) between amount of insulin on board delivered via basal rates (including any temporary basal rates), and the amount specified by your standard profile basal rate.
BG - Blood Glucose
BGI (Blood Glucose Impact) - The degree to which Blood Glucose (BG) “should” be rising or falling. OpenAPS calculates this value to determine the ‘Eventual Blood Glucose’. This value can be used to make other high/low basal decisions in advanced implementations of OpenAPS.
Bolus - extra insulin given by a pump, usually to correct for a high Blood Glucose (BG) or for carbohydrates
CGM - Continuous Glucose Monitor, a temporary glucose sensor that is injected into your skin (the needle is removed) for and provides BG readings approximately every 5 minutes. Different models exist in the market with various calibration requirements varianing from no calibrations to 2 a day, and official sensor lifetimes varying from 6-10 days.
closed-loop - closed-loop systems make automatic adjustments to basal delivery, without needing user-approval, based on an algorithm.
COB - Carbs-on-board. Describes an estimation of how many Carbs are still active in the body.
COBpredBG - a variable that uses carbs and insulin together in predicting the BG curve. It is represented by a purple prediction line in Nightscout (NS). The default behaviour has changed for carb absorption in oref0 0.6.0 and beyond, with the adoption of a /\ shaped bilenear carb absorption model. This line in your Nightscout (NS) display will show an S-curve shape immediately after entering carbs that starts out flat (in line with current BG trends) and then rises sharply after about an hour before flattening out. A typical meal absorption time of about 3 hours is assumed which is then extended overtime so that Oref0 gradually relies more on actual observed carb absorption as carbs are absorbed. When the carbs are first entered, remainingCATime is set to 3 hours. When 50% of carbs have absorbed, the remainder (that aren’t seen to be absorbing already) are predicted to take another 4.5h. And as COB approaches zero, remainingCATime will approach 6 hours.
CR - Carb Ratio, or carbohydrate ratio - the amount of carbohydrates that are covered by one unit of insulin. Example: 1 u of insulin for 10 carbs.
DIA - Duration of Insulin Action, or how long the insulin is active in your body (Ranges 3-6 hours typically).
IOB - Insulin On Board, or insulin active in your body. Note that most commercially available pumps calculate IOB based on bolus activity only. Usually, but not always, Net IOB is what Nightscout displays as ‘IOB’. While what’s displayed in your Nightscout (NS) IOB pill may match what IOB is in your current loop, it’s probably a good practice to not rely on this pill alone for determining IOB.
IOBpredBG - also a variable reported in your Openaps Pill in Nightscout - this is a predicted BG curve that is based on insulin only. It is represented by the purple prediction lines ISF - insulin sensitivity factor - the expected decrease in BG as a result of one unit of insulin. Example: 1 u of insulin for 40 mg/dL (2.2 mmol/L)
MINpredBG - this variable is the lowest predicted value that Openaps has made for your future BG.
Net IOB - amount of Insulin On Board, taking into account any adjusted (higher or lower) basal rates (see Basal IOB above) plus bolus activity.
NS, or Nightscout - a cloud-based visualization and remote-monitoring tool.
OpenAPS - refers to an example build of the system when used without a hashtag (#)
openaps - the core suite of software tools under development by this community for use in an OpenAPS implementation
#OpenAPS - stands for Open Artificial Pancreas System. It is an open-source movement to develop an artificial pancreas using commercial medical devices, a few pieces of inexpensive hardware, and freely-available software. A full description of the #OpenAPS project can be found at openaps.org. #OpenAPS (with the hashtag) generally refers to the broad project and open source movement.
open-loop - open-loop systems will suggest recommended adjustments to basal delivery, but will require specific user-approval prior to implementing.
oref0 - “reference design implementation version 0” of the OpenAPS reference design. Aka, the key algorithm behind OpenAPS.
Treatments IOB - amount of Insulin On Board delivered via boluses. Reported by some pumps as ‘active insulin’.
UAM Unannounced Meal provides an alternative method (in addition to or instead of carb entry) for detecting and safely dosing insulin in response to significant BG rises, whether they are due to meals, adrenaline, or any other reason.
UAMpredBG’s - this variable represents the impact of ‘floating carbs’ and insulin together in predicting the BG curve, giving a prediction line for the new feature Unannounced Meals (or carbs).
SMB - Super Micro Bolus. An alternetive insulin delivery method introduced in oref1 which allows oref1 to safely dose mealtime insulin more rapidly.
OpenAPS-specific terminology
OpenAPS Nightscout Status Messages appear when the OpenAPS plugin is enabled.
- Looping ↻ - Success; Temp basal rate has been suggested.
- Enacted ⌁ - Success; Temp basal rate has been set.
- Not Enacted x - Success; No action taken on suggested temp basal rate.
- Waiting ◉ - Timeout; No recent status received from OpenAPS.
- Unknown
⚠
- Error or Timeout; OpenAPS has reported a failure, or has reported no status for many hours.
Avg. Delta - average BG delta between 5 min intervals.
Delta - difference between the last two BG values. An asterick (*) is displayed in Nightscout when estimating due to missing BG values.
Eventual BG - BG after DIA hours (or maybe a bit sooner if most of your insulin was awhile ago), considering the current IOB and COB.
Exponential Curves - Most insulin types reach their peak performance and decay along a curve. OpenAPS can calculate active insulin along a rapid-acting, ultra-rapid, or custom curve, or a bilinear non-curve.
- Rapid-acting: This curve, the default, reaches activity peak at 75 minutes by default, and is recommended for use with Apidra, Humalog, Novolog, and Novorapid insulin.
- Ultra-rapid: This curve reaches activity peak at 55 minutes by default, and is recommended for use with Fiasp insulin.
- Bilinear: This is a non-curve insulin activity model that OpenAPS users can set in their preferences file to use an older insulin activity model.
- Custom Insulin Peak Time: Users may set a custom insulin peak time in their preference file with useCustomPeakTime, with legal values of insulinPeakTime from 35 to 120. The value refers to the amount of time until your insulin reaches maximum effect, defined as minutes from bolus to peak.
Exp. Delta - expected BG delta right now, considering all OpenAPS inputs (IOB, COB, etc).
predBGs - predicted Blood Glucose over next N many minutes based on openAPS logic, in 5 minute increments
Making your first PR (pull request)
At some point it will be suggested that you make a PR. PR is short for pull request, and it is a way of adding or editing information stored in GitHub. It’s actually not too hard to do one and it is a great way to contribute. This documentation is here because people like you made PRs. Don’t worry about making a mistake or somehow editing the wrong documents. There is always a review process before changes are merged into the “formal” OpenAPS documentation repository. You can’t mess up the originals through any accidents in the PR process. The general process is:
- Make edits and improvements to code or documentation by editing the existing content.
- Double-check that your edits look good to you.
- Make a few notes of what’s changed so people may understand the edits.
- Create a pull request, which asks the administrators to use your changes.
- They will do a review and either (1)merge your changes, (2)comment back to you about your changes, or (3)start a new document with your changes.
(Side note: If you are a visual learner, there is a YouTube video here showing the PR workflow.)
For our example we are going to make an edit to the openaps docs. This does NOT need to be done in the linux environment on your rig. This can be done on any Windows PC, Mac, etc. (any computer with Internet access).
- Go to https://github.com/openaps/docs and hit Fork in the upper right to make your own copy of the repository.

- Go to http://openaps.readthedocs.io/en/latest/docs/introduction/index.html or similar and navigate to the page you want to edit. Click on the black box at bottom left of page with the green word “v: latest” or similar. In the pop up window that appears, click the word “edit” for editing in GitHub.
 Or you can click on the “Edit in Github” link in the upper right corner, and then click the pencil icon that appears in the top bar of the page contents to be edited.

- one or the other of the options in Step 2 will create a new branch in YOUR repository where your edits will be saved. Make your edits to the file.

- You have been working in the “<>Edit file” tab. Select the “Preview changes” tab for a fresh look to make sure everything you changed looks like you meant it to (typpos sic.). If you see a needed improvement, go back to the edit tab to make more improvements.

- When you have finished your edits, scroll to the bottom of the page. In the box at the bottom, provide your comments in the text field that reads, “Add an optional extended description...”. The default title has the file name. Try to include a sentence explaining the reason for the change. Relating the reason helps reviewers understand what you are attempting to do with the PR.

- Click the green “Propose file changes” or “Commit changes” button. In the page that appears click “Create Pull Request” and again in the next page click “Create Pull Request”.

- That completes the opening of a pull request, PR. GitHub assigns the PR a number, located after the title and a hash mark. Return to this page to check for feedback (or, if you have Github notifications emailed to you, you will get emails notifying you of any activity on the PR). The edit will now be in a list of PR’s that the team will review and potentially give feedback on before committing to the main documentation for openaps! If you want to check on the progress of the PR, you can click on the bell logo in the upper right corner of your GitHub account and see all your PRs.

Congrats, you made your first contribution!
PS, your fork and branch will still be sitting on your own personal GitHub account. After you get a notification that your PR has been merged, you can delete your branch if you are done with it (Step 8’s notification area will provide a link to delete the branch once it has been closed or merged). For future edits, if you follow this procedure the edits will always start with an updated version of the openaps repositories. If you choose to use another method to start a PR request (e.g., editing starting from your forked repo’s master branch as the starting point), you will need to ensure your repo is up-to-date by performing a “compare” first and merging in any updates that have happened since you last updated your fork. Since people tend to forget to update their repos, we recommend using the PR process outlined above until you get familiar with performing “compares”.
Advanced tips for adding multiple images to documentation
If you are planning to make a lot of edits, including adding images to help illustrate parts of the documentation (thank you!), you may want to take the following approach:
- As you go and save screenshots, rename the screenshots to a descriptive name - but try not to use spaces as that confuses Github. Instead, use underscores. E.g. Example_batch_images_upload.png rather than “Example batch images upload.png”.
- You can upload images in batches easily by:
- Navigate to the images folder (https://github.com/openaps/docs/tree/master/docs/docs/Images - but make sure you are in your fork/copy of the docs Images folder to be able to do this (replace “openaps” in the URL with your github username)).
- Click in the upper right corner where it says “Upload files”
- Drag and drop your images into the screen
- Commit these to your branch
- Now, you can look for the URL/relative path of each file (example, you can see this individual image has its own URL and path and use that to refer to when adding images into a page in the documentation.
- To see examples of how to add the images, you can look at the “raw” code of a page to see an example from a page that already has the images embedded successfully. The main thing is to have a plain text description, followed by a link with a relative path to the image, like this:

(That code is exactly how the image below is embedded to be displayed.)

- Now, once done adding images/making adjustments, you can submit a PR back to the master copy of the OpenAPS docs.
Technical Resources
These represent a small selection of guides, tutorials, and quick references for some of the tools used to develop and document OpenAPS.
Useful Apps
Fing (Android and Apple): Identify IP address of devices on a network. Useful for finding the IP address of RPi on new networks.
JuiceSSH (Android): SSH client for Android devices
Markdown syntax
Daring Fireball (John Gruber) Markdown Introduction
Macdown: Open-source Markdown editor for OS X
StackEdit: Online Markdown editor
Tips for switching from another DIY closed loop system to OpenAPS rig (or running both)
Note: This is a high level switchover cheat sheet, and will primarily discuss Loop and OpenAPS comparisons (but may be relevant for helping you understand the differences of OpenAPS from other DIY systems as well). For the purposes of this Loop-to-OpenAPS switchover cheat sheet, we’re going to assume a few things and therefore are not covering all the possible options for setting up an OpenAPS rig. If you want to find out options that exist beyond the assumptions in this page, please refer back to the main OpenAPS documentation pages. In fact, please refer back to the main documentation sections anyway. They really have a lot of information you’ll find helpful. This page is more of a quick cheat sheet to help you get the high levels rather than a thorough setup guide (that’s what the OpenAPS documentation is for). There will be links throughout to the relevant OpenAPS documentation for more details when referenced.
Other things you should know before starting:
- OpenAPS is similar to Loop (they’re both temp basal-based DIY closed loops), but different, even beyond the hardware. The algorithm (looping code) of OpenAPS is referred to as “oref0”. You can look at that code (it’s written to be pretty straight forward - see this example, and the glossary may be helpful as well), but you can also read this plain language “reference design” that guides how OpenAPS was built.
- Paying it forward: OpenAPS is part of the #WeAreNotWaiting movement...built 100% by volunteers...and that also includes the documentation! If you spot something in the documentation that needs fixing or improving, please flag it and/or submit an edit yourself to fix the documentation then and there!
- This is called “making a pull request” or “making a PR”, which presents your edit for someone to review, approve, and update the overall documentation - which means everyone can use your fix moving forward! We all have a responsibility to keep adding to and improving the documentation. You can find a guide to creating a pull request/submitting your edit here, and if you ask, we’re happy to help answer questions as you do your first pull request.
- You can do this.
- One user estimates setting up OpenAPS takes only 20 mouse clicks; 29 copy and paste lines of code; 10 entries of passwords or logins; and probably about 15-20 random small entries at prompts (like your NS site address or your email address or wifi addresses). So if you can copy and paste, you’ll be able to do this!
If you’re coming to try OpenAPS from a Loop system, there’s going to be some pretty obvious differences. And it starts with “building” the system.
Main Hardware Differences:
| Built using | Brains sit | Communications reside | |
|---|---|---|---|
| Loop | xCode on an Apple computer | on your iPhone | on the Rileylink |
| OpenAPS | any computer | on the “rig” (can be multiple kinds of rigs) | on the rig (usually with a built-in radio stick) |
Loop is built using XCode app on an Apple computer. The brains of the system sit on your iPhone. The communications reside in the RileyLink, acting as a communicator between the iPhone and pump.
OpenAPS is built using “script” commands (can be wide variety of computers that are used). The brains and communications of the system reside on a “rig” which acts as a mini-computer.
Assumptions for this Cheat Sheet Guide
- Using an explorer board and Edison
- Using an Apple computer
- Using a Loop-compatible Medtronic pump (note - OpenAPS can actually use an additional set of pumps, the x12 series, although it requires one extra step not documented here. See this page in OpenAPS docs for all compatible pumps.)
High Level Recommended Rig parts list
See this short list for what to buy for an Edison/Explorer Board OpenAPS rig.
Getting started on OpenAPS - the setup links
Installing OpenAPS on your rig
- Follow these instructions (with pictures!)
Nightscout
- We highly recommend Nightscout. Go to nightscout.info if you have not yet setup
- If you’re already on Nightscout, you just need to add openaps, like you did Loop, to enable the OpenAPS pill. You will also want to enable the OpenAPS forecast line(s) when you switch to an OpenAPS rig.
- See this page for more details about Nightscout and OpenAPS
The big differences between Loop and OpenAPS:
Targets and algorithm differences
- Loop pulled targets from the app. OpenAPS pulls targets from the pump. Here’s more detail on the data OpenAPS pulls and how it outputs data for you to understand the algorithm in action.
- Loop has temporary targets available by using the workout mode in the Loop app. OpenAPS can have multiple temp targets (e.g. Eating Soon and Workout, etc., and can be set via the Nightscout Care Portal if the rig is online, and via IFTTT/Alexa/pebble/scheduled in advance/location based triggers.
- OpenAPS has no bolus momentum or safety guard that prevent boluses; but has other key safety settings (see below)
“MaxIOB” and other safety settings
MaxIOB
- This is the max cap of how much IOB you want to allow before OpenAPS stops dosing additional insulin. It is not the same as a max basal rate. The default setting is 0, but if you’re coming from Loop, you’re probably ok starting with something other than 0 for maxIOB. You will want to consider how you are going to use OpenAPS, particularly if you are new to the closed loop community. The most conservative setting would be to set something lower than your typical meal bolus. This is a reasonable place to start if you are new and as you get used to how yours (or your child’s) blood sugar is managed by the algorithims within OpenAPS. This will prevent OpenAPS from adding any additional insulin on top of your meal bolus, until that IOB has decayed down to the configured value.
- Once you have watched the rig for a while, and you have a good understanding of it’s response, you may be considering turning on the advanced feature of SMB, at which point you will want to reconsider your max_iob setting. In this case, you will want to reflect on several factors before you re-set your max_iob. The first important consideration is how you will want SMB to function. If you are intending that SMB will moderate carb counting that was not accurate, or will be used to catch those unexpected BG rises, but you still intend to carb count and fully bolus, then you may not need to make any changes. For new users, it is recommended that you start using this advanced feature in this stepwise way, so you will have a good understanding by watching how it responds in your loop. If you watch in your OpenAPS pill, you will see if you are frequenty hitting the max_iob as a limitation, and then you can begin adjusting accordingly.
- Once you are comfortable with the added functionality of SMB, you may want to have SMB take over some, or all, of the responsibility for dosing insulin for foods and reducing your upfront bolus amount. In this case, you will need to adjust your max_iob rate in consideration of how much you may typically want SMB to be responsible for. Extending the example from above, if your initial max_iob is set to 2.0, then you may find that SMB is unable to be rapidly helpful in the case of foods for which you have not fully bolused, as it will be restricted by the max_iob setting. This will be magnified significantly if you are using Fiasp and intending to have SMB take over all bolus needs. In instances such as this, you will want to increase your max_iob, giving consideration of your regular carb load, your regular bolus ratio and the amount of insulin you would usually need to give that you now want SMB to be responsible for. Of course, as YDMV, this number will be very individual. We strongly encourage you to be conservative, particularly as you start out, as safety should always be the first consideration.
- After you get comfortable with how OpenAPS operates, you can easily (here’s how) update this number later.
Other safety settings
- In addition to maxIOB, there are other basal-related safety caps built into OpenAPS to help protect you. These are to prevent people from getting into dangerous territory by setting excessively high max temp basals before understanding how the algorithm works. There are default values provided when the OpenAPS loop is first built; most people will never need to adjust these and are instead more likely to need to adjust other settings if they feel like they are “running into” or restricted by these safety caps. If you do want to adjust these default values, they are located in the same preferences file as linked in the max-iob discussion above. NOTE: OpenAPS’s loop will use the LOWEST of the following three values to cap your temp basal rate, to make sure you don’t get a disproportionate amount of insulin.
- “Max Basal” refers to the max basal set on the pump. (If you change this, it will be read in the next time your rig pulls pump settings.)
- “Max Daily Safety Multiplier” limits the temp basal set by OpenAPS loop to be a multiplier of your HIGHEST regularly-scheduled basal rate in the pump. The default setting for this multiplier is 3x...meaning no more than three times your maximum programmed basal rate for the day. If someone tells you your basal is capped by the “3x max daily; 4x current” for safety caps, this is what they’d be referring to.
- “Max Current Basal Safety Multiplier”: limits the temp basal set by OpenAPS loop to be a multiplier of your CURRENT regularly-scheduled basal rate in the pump. The default setting for this multiplier is 4x...meaning no more than four times your current programmed basal rate.
- Read about all of the other optional safety settings here.
Parents in particular may want to review the optional settings
- Parents should read this blog post by Katie DiSimone for a parent’s perspective about various pros/cons for parents and kids evaluating DIY closed loop systems.
- Override the high target with the low (see this explanation for enabling this feature)
- This makes it easier for secondary caregivers (like school nurses) to do conservative boluses at lunch/snack time, and allow the closed loop to pick up from there. The secondary caregiver can use the bolus wizard, which will correct down to the high end of the target; and setting this value in preferences to “true” allows the closed loop to target the low end of the target. Based on anecdotal reports from those using it, this feature sounds like it’s prevented a lot of (unintentional, diabetes is hard) overreacting by secondary caregivers when the closed loop can more easily deal with BG fluctuations.
- Carb ratio adjustment ratio (see this explanation for enabling this feature)
- If parents would prefer for secondary caregivers to bolus with a more conservative carb ratio, this can be set so the closed loop ultimately uses the correct carb amount for any needed additional calculations.
Connectivity
- Loop works offline automatically; but may often need tuning and fixing if you go out of range and come back in range.
- OpenAPS needs some tricks to maximize connectivity (see below), but tends to resume working correctly once you come back into range without having to do anything special.
- Bluetooth tethering is one good option; as soon as you walk out of wifi range, it can automatically bluetooth tether to your phone to get connectivity
- Mifi is one good option, if you travel and are without wifi networks, as it will provide a network without draining your iPhone battery. Mifi systems typically use your cell phone data plan and needs cell data coverage (3g or 4g LTE).
- You can add (here’s how) your school or work or as many locations as you have as “known” wifi networks so your rig will automatically connect to the wifi in these places. You may want to contact the school before attempting to connect to their wifi network to see if you need any special accommodations in a 504 plan or IT department involvement to allow the rig to connect.
- OpenAPS will also default to always setting a temp basal (this can be turned off; see description here), which means it’ll be easier to look down at the pump and see if a temp basal is active to know that the loop has been working recently.
- The existing SkyLoop watchface for Pebble watches works seamlessly with OpenAPS looping. No changes are needed if you plan to try OpenAPS or Loop.
Carbs
- Loop requires carb and absorption time inputs through the app AND you must bolus from the Loop app or Apple watch. Carbs can be read from the pump if they are entered by pump’s bolus wizard, but boluses cannot be read from the pump by Loop app.
- OpenAPS: no absorption time entries required for meals. You bolus directly from the pump (either easy bolus button, or using bolus wizard), and carbs can be entered via the pump or via Nightscout Care Portal (or via Pebble, Alexa, etc. if you set that up). Nightscout’s bolus calculator can also serve to calculate a meal bolus as it tracks IOB from temp basals set by OpenAPS (you need to keep your basal profile current for accurate IOB tracking).
Boluses and how OpenAPS gets pump history
- Loop users must bolus from Loop app or Apple watch. Loop tracks IOB through reservoir volume changes as the default, and will fallback to the pump’s event history in the event reservoir readings aren’t continuous.
- OpenAPS users bolus from the pump (either bolus wizard, or easy bolus button). OpenAPS will read the information about the bolus and other insulin activity based on the pump’s event history.
- The pros of this means you won’t have to do anything special for pump rewinds/primes/site changes. OpenAPS will also provide treatment notes on your Nightscout site showing pump events such as suspensions, bolus wizard changes, basal profile edits, and primes.
- The downside of this means you DO need to set a temp basal to 0 unit/hour before suspending, so OpenAPS will know that you didn’t get insulin during the time of suspend (e.g. for shower or taking off the pump to swim, etc.)
Multiple rigs
- Loop uses one RileyLink paired via bluetooth. Typically users keep their RileyLink fairly close to the pump (like using a pants pocket) to help maintain communications.
- If using a single OpenAPS Edison/explorer board rig, you should see significant range improvement compared to a RileyLink, and a phone does not need to be nearby (beyond whatever needed for your dexcom system).
- If you have multiple OpenAPS rigs, they’re built to be polite to each other - so even if you had 2+ rigs in same room, they won’t trip each other up. They “wait for silence” before issuing any commands to the pump. By setting up multiple stationary rigs through a house, kids can move from room-to-room without carrying rigs because the rigs will pass-off comms as the kid moves in and out of the rig’s range. Stationary rigs will not need lipo batteries and can be plugged directly into the wall from the explorer board.
Troubleshooting
- Loop - depending on environment and t1d’s habits, RileyLink may require retuning to get Loop running again (automatically scheduled to retune at 14 minute intervals, but sometimes manual tunes are required).
- OpenAPS - once setup and network connected, there is little required troubleshooting of rig. Most problems should self-resolve in <10 minutes, and if not a power button push usually solves the issue. Also, parents can login to rig remotely to troubleshoot, reboot, etc. (when using the same wifi network as the rig) using an iPhone app.
- Is it looping? (Check on pump to see if temp basal has been set)
- What do the logs say? (Check the OpenAPS logs and/or the OpenAPS pill; it will probably say why it is stuck)
- Reboot the rig (either via logging in, or using the power button on the rig)
- Make sure it’s connected to wifi
- Make sure you’re in range of the rig; CGM data is flowing; etc.
Running multiple kinds of DIY systems
- You can run different DIY systems (like Loop and OpenAPS) side-by-side, if you want to compare algorithms and how they behave.
- For those who like Loop’s capabilities for bolusing from the phone, but don’t want the requirement to enter carb absorption rates by meal, you can set Loop to “open loop” mode and use it for bolusing, and otherwise allow OpenAPS to be the primary closed loop to take advantage of the Advanced Meal Assist (AMA) algorithm, autosensitivity to automatically adjust ISF, etc. However, see the following safety warnings below.
- SAFETY WARNING: If you choose to keep a Loop rig running alongside OpenAPS, you MUST turn off Loop’s ability to write to Nightscout. If you neglect to do this, Nightscout will display double entries of carbs and/or boluses and greatly confuse you in the future. To enter carbs, you can enter directly through Nightscout Care Portal; use the variety of IFTTT configurations to enter carbs to Nightscout via your Pebble watch, Alexa, Siri, etc.; or enter using the pump’s bolus wizard. Even if you’re just using the Loop app in open loop mode, and enter carbs or bolus from the pump bolus wizard for use in OpenAPS, you need to turn off Loop’s ability to write to Nightscout. If you don’t, Loop will read the boluses and carbs entered via the pump, upload them to Nightscout, and the duplicate entries will result in suboptimal post-meal decisions. You can either turn off Loop’s ability to write to Nightscout, or simply close the app, but reopening the app for even a few minutes may still cause it to double enter to Nightscout if uploads are not disabled. If you do not plan to actively use Loop and DO want to bolus from the pump (via bolus wizard or easy bolus button) with OpenAPS, you should either disable Loop’s Nightscout uploads, or plan to close the Loop app and not run them side-by-side.
- Caution: You may want to disable the Nightscout COB pill, especially if you are using multiple DIY closed loop systems, as it will likely cause confusion. You should look to the (DIY closed loop system you are using)’s pill for information about COB. This means looking in the OpenAPS or Loop pill for information about COB.
Where to get help with OpenAPS setup and maintenance:
- See this page for various places for OpenAPS support; the intend-to-bolus Gitter channel is the best place for real-time troubleshooting assistance!
- Don’t hesitate to ask any question, any time. If it gets missed because there’s a lot of activity, feel free to ask again!
- You’ll probably also want to make sure and join the openaps-dev Google Group, where new features and tools are most commonly announced and shared via email, so you’ll know when there are new things available to try.