Documentation for Bronky!
This is Documentation for the Bronky bot by the south doyle robotics team
![]()
- Our team home page : https://soknorobo.com
- Bronky GitHub : https://github.com/Atikul10152002/Bronky
Creating a Project
- First Navigate to RobotMesh Studio
- Click on Create a New Project button
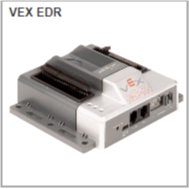
- From the pop up list of target click on VEX EDR and press select button
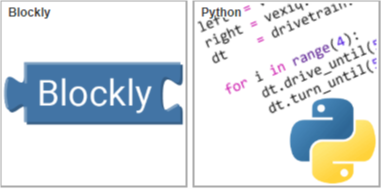
- Now for Language selection you can choose either Blockly or Python [Recommended] and click select
- Now Name your program something that suits your Personality and click Create
Hooray!!!
You have a VEX EDR project you can mess with
Installing plugins
To install the plugins follow the guide at bottom of your screen or you can follow along with the guide
- Click on the “Please install it…” link on your project IDE.

A screen will popup listing components to install
On the popup screen click on the first link to “install the Robot Mesh Connect extension for your browser
[Tested browser: Chrome] <– click for extension
- Click on Add extension to add it to your browser
- Now click on the second link to Download the Robot Mesh Connect installer

Links for Robot Mesh Connect installer: Windows | Mac OSX | Ubuntu 12.04 32-bit | Ubuntu 12.04 64-bit | Ubuntu 14.04 32-bit | Ubuntu 14.04 64-bit | Ubuntu 16.04 32-bit | Ubuntu 16.04 64-bit
- Double click on the downloaded file to run and install the required components
- Refresh your browser tab

You may need to update the cortex firmware and install the drivers
Follow the next OPTIONAL steps if this is your first install
Pair Joystick and Cortex
The Joystick must first be paired to the Cortex Microcontroller before they will work using the VEXnet Keys. Pairing requires a USB A-A Cable and a VEX 7.2V Battery. This process must be completed each time you use a Joystick or Cortex with a new mate. A Joystick can only communicate with a Cortex that it has been paired with. During the Pairing Process, the ID from the Cortex is transferred to the Joystick; thus mating the two units together.
- Start with the Cortex and Joystick turned OFF.
- Connect the Cortex to the Joystick using a USB A-A Cable.
- Connect the 7.2V Robot Battery to the Cortex.
- Power up only the Cortex.
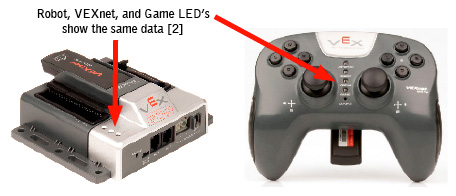
- A successful tether is indicated by a Solid Green VEXnet LED on both the Joystick and the Cortex
- The Solid Green VEXnet LED must remain ON on both units at the same time for a minimum of 5 seconds.
- Disregard the other LEDs as you are only interested in the VEXnet LED.
- Pairing may take up to one minute to complete.
- Once the units have finished pairing, turn OFF the Cortex.
- Disconnect the USB A-A Cable from both units.
- Disconnect the 7.2V Robot Battery from the Cortex.
- Connect the USB KEY and trun on both the Cortex and Joystick to pair them wirelessly.
Download Code to Cortex
- Click the dropdown arrow beside the run button in your RobotMeshStudio IDE
- Select the option - “Download: build program and download only”
- Now click the Download button situated where the run button used to be
RobotMesh API
To program the VEX EDR (Cortex) controller:
- Configure the peripherals connected to the controller in the “config” region. Create device objects in the vex module, passing the port number if necessary.
import sys
import vex
#region config
green_led = vex.DigitalOutput(1) # LED on Digital #1
switch = vex.DigitalInput(2) # Switch on Digital #2
motor = vex.Motor(1) # Motor on Motor #1
#endregion
- Write Python code invoking methods on peripheral objects or the main module.
green_led.on() # Turn the LED on
if switch.is_on(): # Check whether the switch is on
print "Switch is on!"
motor.run(50) # Run the motor at 50% power
sys.sleep(1) # Sleep for 1 sec
- For details, see the full docs for the vex module
Port Errors
For all port errors
- Unplug and re-plug the USB cable
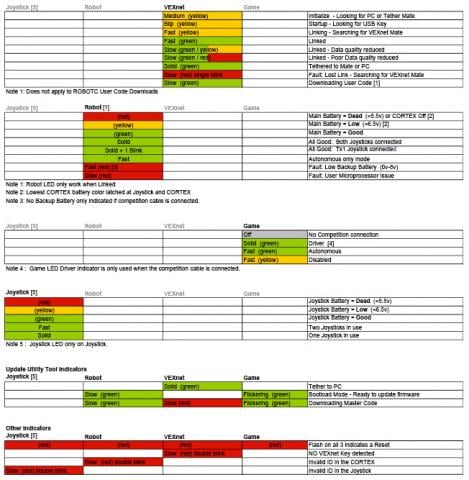
Diagnostics Information
Refer to the following chart for Joystick and Cortex LED patterns and meanings.
General Robot Troubleshooting Flowchart
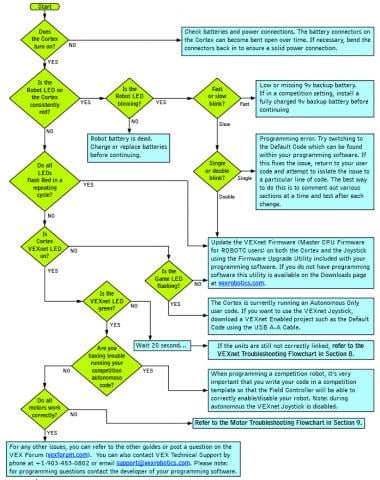
VEXnet Troubleshooting Flowchart

If the issue is still present after following this guide, update both the Cortex and Joystick with the most recent version of the VEXnet Firmware (Master CPU Firmware for ROBOTC users). If this does not resolve the problem, try using a different set of VEXnet keys. If you need further assistance you can post a question on the VEX Forum (https://vexforum.com) or contact VEX Technical Support by phone at +1-903-453-0802 or email support@vexrobotics.com.
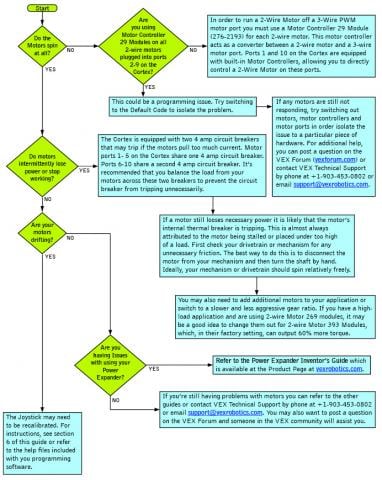
Motor Troubleshooting Flowchart
Still Having Trouble?
If you’re still having trouble,
Refer to VEXnet User’s Guide for further help
Bronky/main.py
main code
-
main.BASE_DRIVE()[source]¶ - Controls the base motors – Arcade driveCalculates the power for the left and right drive
and runs the four base motors
-
main.CLAW_DRIVE()[source]¶ Controls the claw motor
The fuctions acts as a togggle
When the claw is closed it applies continious power to the motor
-
main.WRIST_DRIVE()[source]¶ - Controls the wrist motorsOnly when the buttons are pressed, the Motors receive power.
Bronky/vex.py
Used by autodoc_mock_imports.
-
class
vex.Motor(self, Port#)[source]¶ Takes the port number of the Motor as Parameter.
-
run_raw(self, power_raw)¶ Run at given raw power.
Parameters: -127.0…127.0 (raw power).
-
-
class
vex.Joystick[source]¶ Config VexNet joystick
-
is_partner(self) → bool¶ True if this is a partner joystick, false if it is main joystick.
-
set_deadband(self, value)¶ Set the deadband value for all axes (threshold below which axes would read out zero)
Parameters: value deadband threshold
-
axis1(self) → Returns number [-100...100]¶ Position on axis 1: -100.0 to 100.0.
-
axis2(self) → Returns number [-100...100]¶ Position on axis 2: -100.0 to 100.0.
-
axis3(self) → Returns number [-100...100]¶ Position on axis 3: -100.0 to 100.0.
-
axis4(self) → Returns number [-100...100]¶ Position on axis 4: -100.0 to 100.0.
-
accelX(self) → bool¶ Accelerometer axis X: -100.0 to 100.0.
-
accelY(self) → bool¶ Accelerometer axis Y: -100.0 to 100.0.
-
b5up(self) → bool¶ Button 5 pressed UP: True/False.
-
b5down(self) → bool¶ Button 5 pressed DOWN: True/False.
-
b6up(self) → bool¶ Button 6 pressed UP: True/False.
-
b6down(self) → bool¶ Button 6 pressed DOWN: True/False.
-
b7up(self) → bool¶ Button 7 pressed UP: True/False.
-
b7down(self) → bool¶ Button 7 pressed DOWN: True/False.
-
b7left(self) → bool¶ Button 7 pressed LEFT: True/False.
-
b7right(self) → bool¶ Button 7 pressed RIGHT: True/False.
-
b8up(self) → bool¶ Button 8 pressed UP: True/False.
-
b8down(self) → bool¶ Button 8 pressed DOWN: True/False.
-
b8left(self) → bool¶ Button 8 pressed LEFT: True/False.
-
b8right(self) → bool¶ Button 8 pressed RIGHT: True/False.
-
-
vex.battery_voltage() → number¶ Get main battery voltage, in volts.
-
vex.battery_backup_voltage() → number¶ Get backup battery voltage, in volts.
-
vex.debug_output(debug_output_type)¶ Set debug output type.
debug_output_type: DebugOutput.AUTO|SERIAL|LCD|DISABLED
-
vex.run_driver(function)¶ Run the given function in a separate thread in DRIVER ONLY competition mode.
-
vex.run_autonomous(function)¶ Run the given function in a separate thread in AUTONOMOUS ONLY competition mode.
-
vex.competition_switch() -> enum value (number)¶ Returns state of the competition switch, as one of the constants in CompetitionSwitchState.
\ Sort by:\ best rated\ newest\ oldest\
\\
Add a comment\ (markup):
\``code``, \ code blocks:::and an indented block after blank line