Aywa Documentation
Aywa is an open source peer-to-peer cryptocurrency with a strong focus on the payments industry. Aywa offers a form of money that is portable, inexpensive, divisible and fast. It can be spent securely both online and in person with only minimal transaction fees. Based on the Bitcoin project, Aywa aims to be the most user-friendly and scalable payments system in the world. In addition to Bitcoin’s feature set, Aywa currently also offers instant transactions (InstantSend), private transactions (PrivateSend) and operates a self-governing and self-funding model that enables the Dash network to pay individuals and businesses for work that adds value to the network. This decentralized governance and budgeting system makes it one of the first ever successful decentralized autonomous organizations (DAO).
If you are new to cryptocurrencies, the most important change to understand is that transactions occur directly between two parties without any central authority to facilitate the transaction. This also means that you are responsible for your own security - there is no bank or credit card company to reverse a transaction if your funds are stolen or lost. In this sense, it is similar to cash or gold, but cryptocurrency can be spent locally and internationally with equal ease, if you are confident you are sending funds to the right destination. For these reasons, the Dash documentation has a strong focus on safety and understanding the concepts and features that drive the Dash ecosystem. The videos, links and documentation below can help you get started, or use the table of contents on the left to find a specific topic of interest.
Contents
What is Dash?
Dash aims to be the most user-friendly and scalable payments-focused cryptocurrency in the world. The Dash network features instant transaction confirmation, double spend protection, anonymity equal to that of physical cash, a self-governing, self-funding model driven by incentivized full nodes and a clear roadmap for on-chain scaling to up to 400MB blocks using custom-developed open source hardware. While Dash is based on Bitcoin and compatible with many key components of the Bitcoin ecosystem, its two-tier network structure offers significant improvements in transaction speed, anonymity and governance. This section of the documentation describes these and many more key features that set Dash apart in the blockchain economy.
The videos, links and documentation collected here can help you get started, or use the table of contents on the left to find a specific topic of interest. New users may be interested in getting started with an appropriate wallet, learning about how to buy Dash and where to spend Dash, learning about safety or joining one of the many Dash community sites.
Dash Videos
Dash School
Dash School is a six-part video series produced by Amanda B. Johnson. It explains Dash from a beginner’s level up to descriptions of the more advanced features.
Dash 101
Dash 101 is an eight-part video series produced by Aaron Koenig. It covers unique features and functions only available on the Dash network, and is available in English, French, German, Spanish and Russian.
Whitepaper
The Dash Whitepaper describes the unique value proposition and key innovations in Dash from an academic and theoretical perspective. It is a living document maintained as a GitHub wiki, receiving ongoing updates and frequent community translations as new features are implemented. Various other whitepapers describing particular features in additional detail and (for historical reasons) the original whitepaper are available for download as PDF files.
Roadmap
The Dash Roadmap sets out delivery milestones for future releases of Dash and includes specific technical details describing how the development team plans to realise each challenge. Like the Whitepaper, it is versioned and maintained as a project on GitHub.
Features
Specifications
- First block mined at 11PM EST, 18th January 2014
- No premine
- X11 hashing algorithm, CPU/GPU/ASIC mining available
- 2.6 minute block time, 2MB blocks, ~56 transactions per second
- Block reward decreases by 7.14% per year
- Dark Gravity Wave difficulty adjustment algorithm
- Between 17.74M and 18.92M total coin supply
- Decentralized second-tier masternode network
- Superior transaction anonymity using PrivateSend
- Instant transactions using InstantSend
- Decentralized Governance By Blockchain allows masternode owners to vote on budget proposals and decisions that affect Dash
Masternodes
In addition to traditional Proof of Work (PoW) rewards for mining Dash, users are also rewarded for running and maintaining special servers called masternodes. Thanks to this innovative two tier network, Dash can offer innovative features in a trustless and decentralized way. Masternodes are used to power PrivateSend, InstantSend, and the governance and treasury system. Users are rewarded for running masternodes; 45% of the block reward is allocated to pay the masternode network. You can view practical guides on all topics relating to masternodes here.
Masternodes enable the following services:
- InstantSend allows for near-instant transactions. Dash InstantSend transactions are fully confirmed within two seconds.
- PrivateSend gives financial privacy by obscuring the source of funds on the blockchain.
- Governance and Treasury allows stakeholders in Dash to determine the direction of the project and devotes 10% of the block reward to development of the project and ecosystem (as of May 2018, our annual budget exceeds $30 million).
- Dash Evolution will make using cryptocurrency as easy as using PayPal.
Masternode owners must have possession of 1000 DASH, which they prove by signing a message and broadcasting to the network. Those coins can be moved at any time, but moving them will cause the masternode to fall out of queue and stop earning rewards. Masternode users are also given voting rights on proposals. Each masternode has one vote and this vote can be used on budget proposals or important decisions that affect Dash.
Masternodes cost money and effort to host so they are paid a percentage of the block reward as an incentivize. With current masternode numbers and rewards, masternodes earn approximately a 8% return on 1000 Dash (which means 6.97 Dash or USD1360 in July 2017) for the year of 2017. This tool shows a live calculation of masternode earnings. These rewards decrease by 7% each year, but the rising value of Dash may offset these reductions. As a matter of fact, masternodes were receiving 140 Dash per month at the beginning of 2016, but this was actually less money than today: USD600 per month. There is also the possibility for masternodes to earn money from fees in the future.
PrivateSend
PrivateSend gives you true financial privacy by obscuring the origins of your funds. All the Dash in your wallet is comprised of different “inputs”, which you can think of as separate, discrete coins. PrivateSend uses an innovative process to mix your inputs with the inputs of two other people, without having your coins ever leave your wallet. You retain control of your money at all times.
You can view a practical guide to use PrivateSend here.
The PrivateSend process works like this:
- PrivateSend begins by breaking your transaction inputs down into standard denominations. These denominations are 0.001, 0.01, 0.1, 1 and 10 DASH – much like the paper money you use every day.
- Your wallet then sends requests to specially configured software nodes on the network, called “masternodes”. These masternodes are informed then that you are interested in mixing a certain denomination. No identifiable information is sent to the masternodes, so they never know “who” you are.
- When two other people send similar messages, indicating that they wish to mix the same denomination, a mixing session begins. The masternode mixes up the inputs and instructs all three users’ wallets to pay the now-transformed input back to themselves. Your wallet pays that denomination directly to itself, but in a different address (called a change address).
- In order to fully obscure your funds, your wallet must repeat this process a number of times with each denomination. Each time the process is completed, it’s called a “round”. Each round of PrivateSend makes it exponentially more difficult to determine where your funds originated. The user may choose between 1-16 rounds of mixing.
- This mixing process happens in the background without any intervention on your part. When you wish to make a transaction, your funds will already be anonymized. No additional waiting is required.
Note that PrivateSend transactions will be rounded up so that all transaction inputs are spent. Any excess Dash will be spent on the transaction fee.
IMPORTANT: Your wallet only contains 1000 of these “change addresses”. Every time a mixing event happens, one of your addresses is used up. Once enough of them are used, your wallet must create more addresses. It can only do this, however, if you have automatic backups enabled. Consequently, users who have backups disabled will also have PrivateSend disabled.
InstantSend
Traditional decentralized cryptocurrencies must wait for certain period of time for enough blocks to pass to ensure that a transaction is both irreversible and not an attempt to double-spend money which has already been spent elsewhere. This process is time-consuming, and may take anywhere from 15 minutes to one hour for the widely accepted number of six blocks to accumulate. Other cryptocurrencies achieve faster transaction confirmation time by centralizing authority on the network to various degrees.
Dash suffers from neither of these limitations thanks to its second-layer network of masternodes. Masternodes can be called upon to form voting quorums to check whether or not a submitted transaction is valid. If it is valid, the masternodes “lock” the inputs for the transaction and broadcast this information to the network, effectively promising that the transaction will be included in subsequently mined blocks and not allowing any other spending of these inputs during the confirmation time period.
InstantSend technology will allow for cryptocurrencies such as Dash to compete with nearly instantaneous transaction systems such as credit cards for point-of-sale situations while not relying on a centralized authority. Widespread vendor acceptance of Dash and InstantSend could revolutionize cryptocurrency by shortening the delay in confirmation of transactions from as long as an hour (with Bitcoin) to as little as a few seconds.
You can view a practical guide to use InstantSend here. InstantSend was introduced in a whitepaper called Transaction Locking and Masternode Consensus: A Mechanism for Mitigating Double Spending Attacks.
How Dash ‘InstantSend’ Protects Merchants from Double Spends, Dash Detailed by Amanda B. Johnson, 16 September 2016
Sporks
In response to unforeseen issues with the rollout of the major “RC3” update in June 2014, the Dash development team created a mechanism by which updated code is released to the network, but not immediately made active (“enforced”). This innovation allows for far smoother transitions than in the traditional hard fork paradigm, as well as the collection of test data in the live network environment. This process of multi-phased forking was originally to be called “soft forking” but the community affectionately dubbed it “the spork” and the name stuck.
New features or versions of Dash undergo extensive testing on testnet before they are released to the main network. When a new feature or version of Dash is released on mainnet, communication is sent out to users informing them of the change and the need for them to update their clients. Those who update their clients run the new code, but it is not activated until a sufficient percentage of network participants (usually 80%) reach consensus on running it. In the event of errors occurring with the new code, the client’s blocks are not rejected by the network and unintended forks are avoided. Data about the error can then be collected and forwarded to the development team. Once the development team is satisfied with the new code’s stability in the mainnet environment – and once acceptable network consensus is attained – enforcement of the updated code can be activated remotely by multiple members of the core development team signing a network message together with their respective private keys. Should problems arise, the code can be deactivated in the same manner, without the need for a network-wide rollback or client update. For technical details on individual sporks, see here.
X11 Hash Algorithm
X11 is a widely used hashing algorithm created by Dash core developer Evan Duffield. X11’s chained hashing algorithm utilizes a sequence of eleven scientific hashing algorithms for the proof-of-work. This is so that the processing distribution is fair and coins will be distributed in much the same way Bitcoin’s were originally. X11 was intended to make ASICs much more difficult to create, thus giving the currency plenty of time to develop before mining centralization became a threat. This approach was largely successful; as of early 2016, ASICs for X11 now exist and comprise a significant portion of the network hashrate, but have not resulted in the level of centralization present in Bitcoin. Information on mining with X11 can be found in the Mining section of this documentation.
X11 is the name of the chained proof-of-work (PoW) algorithm that was introduced in Dash (launched January 2014 as “Xcoin”). It was partially inspired by the chained-hashing approach of Quark, adding further “depth” and complexity by increasing the number of hashes, yet it differs from Quark in that the rounds of hashes are determined a priori instead of having some hashes being randomly picked.
The X11 algorithm uses multiple rounds of 11 different hashes (blake, bmw, groestl, jh, keccak, skein, luffa, cubehash, shavite, simd, echo), thus making it one of the safest and more sophisticated cryptographic hashes in use by modern cryptocurrencies. The name X11 is not related to the open source X11 windowing system common on UNIX-like operating systems.
Advantages of X11
The increased complexity and sophistication of the chained algorithm provides enhanced levels of security and less uncertainty for a digital currency, compared to single-hash PoW solutions that are not protected against security risks like SPOF (Single Point Of Failure). For example, a possible but not probable computing breakthrough that “breaks” the SHA256 hash could jeopardize the entire Bitcoin network until the network shifts through a hard fork to another cryptographic hash.
In the event of a similar computing breakthrough, a digital currency using the X11 PoW would continue to function securely unless all 11 hashes were broken simultaneously. Even if some of the 11 hashes were to prove unreliable, there would be adequate warning for a currency using X11 to take measures and replace the problematic hashes with other more reliable hashing algorithms.
Given the speculative nature of digital currencies and their inherent uncertainties as a new field, the X11 algorithm can provide increased confidence for its users and potential investors that single-hash approaches cannot. Chained hashing solutions, like X11, provide increased safety and longevity for store of wealth purposes, investment diversification and hedging against risks associated with single-hash currencies plagued by SPOF (Single Point Of Failure).
Evan Duffield, the creator of Dash and X11 chained-hash, has written on several occasions that X11 was integrated into Dash not with the intention to prevent ASIC manufacturers from creating ASICs for X11 in the future, but rather to provide a similar migratory path that Bitcoin had (CPUs, GPUs, ASICs).
Dark Gravity Wave
DGW or Dark Gravity Wave is an open source difficulty-adjusting algorithm for Bitcoin-based cryptocurrencies that was first used in Dash and has since appeared in other digital currencies. DGW was authored by Evan Duffield, the developer and creator of Dash, as a response to a time-warp exploit found in Kimoto’s Gravity Well. In concept, DGW is similar to the Kimoto Gravity Well, adjusting the difficulty levels every block (instead of every 2016 blocks like Bitcoin) based on statistical data from recently found blocks. This makes it possible to issue blocks with relatively consistent times, even if the hashing power experiences high fluctuations, without suffering from the time-warp exploit.
- Version 2.0 of DGW was implemented in Dash from block 45,000 onwards in order to completely alleviate the time-warp exploit.
- Version 3.0 was implemented on May 14 of 2014 to further improve difficulty re-targeting with smoother transitions. It also fixes issues with various architectures that had different levels of floating-point accuracy through the use of integers.
Emission Rate
Cryptocurrencies such as Dash and Bitcoin are created through a cryptographically difficult process known as mining. Mining involves repeatedly solving hash algorithms until a valid solution for the current mining difficulty is discovered. Once discovered, the miner is permitted to create new units of the currency. This is known as the block reward. To ensure that the currency is not subject to endless inflation, the block reward is reduced at regular intervals, as shown in this calculation. Graphing this data results in a curve showing total coins in circulation, known as the coin emission rate.
While Dash is based on Bitcoin, it significantly modifies the coin emission rate to offer a smoother reduction in coin emission over time. While Bitcoin reduces the coin emission rate by 50% every 4 years, Dash reduces the emission by one-fourteenth (approx. 7.14%) every 210240 blocks (approx. 383.25 days). It can be seen that reducing the block reward by a smaller amount each year offers a smoother transition to a fee-based economy than Bitcoin.

Bitcoin vs. Dash coin emission rate
Total coin emission
Bitcoin’s total coin emission can be calculated as the sum of a geometric series, with the total emission approaching (but never reaching) 21,000,000 BTC. This will continue until 2140, but the mining reward reduces so quickly that 99% of all bitcoin will be in circulation by 2036, and 99.9% by 2048.
Dash’s total coin emission is also the sum of a geometric series, but the ultimate total coin emission is uncertain because it cannot be known how much of the 10% block reward reserved for budget proposals will actually be allocated, since this depends on future voting behavior. Dash will continue to emit coins for approximately 192 years before a full year of mining creates less than 1 DASH. After 2209 only 14 more DASH will be created. The last DASH will take 231 years to be generated, starting in 2246 and ending when emission completely stops in 2477. Based on these numbers, a maximum and minimum possible coin supply in the year 2254 can be calculated to be between:
| 17,742,696 DASH | Assuming zero treasury allocation |
| 18,921,005 DASH | Assuming full treasury allocation |
Block reward allocation
Unlike Bitcoin, which allocates 100% of the block reward to miners, Dash holds back 10% of the block reward for use in the decentralized budget system. The remainder of the block, as well as any transaction fees, are split 50/50 between the miner and a masternode, which is deterministically selected according to the payment logic. Dash features superblocks, which appear every 16616 blocks (approx. 30.29 days) and can release up to 10% of the cumulative budget held back over that budget cycle period to the winning proposals in the budget system. Depending on budget utilization, this results in an approximate coin reward allocation over a budget cycle as follows:
| 45% | Mining Reward |
| 45% | Masternode Reward for Proof-of-service |
| 10% | Decentralized Governance Budget |
This documentation is based on calculations and posts by moocowmoo. Please see this reddit post for more details, or run your own emission calculations using this tool. See this site for live data on current network statistics.
Decentralized Governance
Decentralized Governance by Blockchain, or DGBB, is Dash’s attempt to solve two important problems in cryptocurrency: governance and funding. Governance in a decentralized project is difficult, because by definition there are no central authorities to make decisions for the project. In Dash, such decisions are made by the network, that is, by the owners of masternodes. The DGBB system allows each masternode to vote once (yes/no/abstain) for each proposal. If a proposal passes, it can then be implemented (or not) by Dash’s developers. A key example is early in 2016, when Dash’s Core Team submitted a proposal to the network asking whether the blocksize should be increased to 2 MB. Within 24 hours, consensus had been reached to approve this change. Compare this to Bitcoin, where debate on the blocksize has been raging for nearly three years.
DGBB also provides a means for Dash to fund its own development. While other projects have to depend on donations or premined endowments, Dash uses 10% of the block reward to fund its own development. Every time a block is mined, 45% of the reward goes to the miner, 45% goes to a masternode, and the remaining 10% is not created until the end of the month. During the month, anybody can make a budget proposal to the network. If that proposal receives net approval of at least 10% of the masternode network, then at the end of the month a series of “superblocks” will be created. At that time, the block rewards that were not paid out (10% of each block) will be used to fund approved proposals. The network thus funds itself by reserving 10% of the block reward for budget projects.
You can read more about Dash governance in the Governance section of this documentation.
Sentinel
Sentinel is an autonomous agent for persisting, processing and automating Dash 12.1 governance objects and tasks, and for expanded functions in the upcoming Dash V13 release (Evolution). Sentinel is implemented as a Python application that binds to a local version 12.1 dashd instance on each Dash 12.1 masternode.
A Governance Object (or “govObject”) is a generic structure introduced in Dash Core 12.1 to allow for the creation of Budget Proposals, Triggers, and Watchdogs. Class inheritance has been utilized to extend this generic object into a “Proposal” object to supplant the current Dash budget system.

Diagram highlighting the relationship between Dash Sentinel and Core
“The differences with Sentinel are really architectural and not easy/ interesting to explain to users as they are a bridge from 12.0 towards Evo features (but not fully implementing them), and Sentinel was only a part of 12.1 improvements anyway. Pre-Sentinel, governance functions were ‘hard wired’ into core code. Sentinel abstracts this process because in Evolution there are many Object types from Users to Accounts to Contacts etc, and if we didn’t make this change first, future changes / improvements in Evolution (e.g. adding a new type of Object) would require changing core code. Now Core is agnostic to types of objects and we can take this forward for user experience and not just governance. In terms of documentation, there is no whitepaper specific to Sentinel, but we have various docs for Evo in an on-going RFC process which are used as the basis for Evo development.”
—Andy Freer, Evolution Developer
Fees
Transactions on the Dash network are recorded in blocks on the blockchain. The size of each transaction is measured in bytes, but there is not necessarily a correlation between high value transactions and the number of bytes required to process the transaction. Instead, transaction size is affected by how many input and output addresses are involved, since more data must be written in the block to store this information. Each new block is generated by a miner, who is paid for completing the work to generate the block with a block reward. In order to prevent the network from being filled with spam transactions, the size of each block is artificially limited. As transaction volume increases, the space in each block becomes a scarce commodity. Because miners are not obliged to include any transaction in the blocks they produce, once blocks are full, a voluntary transaction fee can be included as an incentive to the miner to process the transaction. Most wallets include a small fee by default, although some miners will process transactions even if no fee is included.
The release of Dash 0.12.2.0 and activation of DIP0001 saw a simultaneous reduction of fees by a factor of 10, while the block size was increased from 1MB to 2MB to promote continued growth of low-cost transactions even as the cost of Dash rises. Dash also supports InstantSend and PrivateSend transactions, which operate on a different and mandatory fee schedule. Dash 0.13.0.0 introduced InstantSend autolocks, which causes masternodes to automatically attempt to lock any transaction with 4 or fewer inputs — which are referred to as “simple” transactions — and removes the additional fee for InstantSend. The fee schedule for Dash 0.13.x as of December 2018 is as follows:
| Transaction type | Recommended fee | Per unit |
|---|---|---|
| Standard transaction | .00001 DASH | Per kB of transaction data |
| InstantSend autolock | .00001 DASH | Per kB of transaction data |
| InstantSend | .0001 DASH | Per transaction input |
| PrivateSend | .001 DASH | Per 10 rounds of mixing (average) |
As an example, a standard and relatively simple transaction on the Dash network with one input, one output and a possible change address typically fits in the range of 200 - 400 bytes. Assuming a price of US$100 per DASH, the fee falls in the range of $0.0002 - $0.0004, or 1/50th of a cent. Processing a simple transaction using InstantSend at the same price is free of charge, while more complex InstantSend transactions may cost around 1-2 cents per transaction, depending on the number of inputs. These fees apply regardless of the Dash or dollar value of the transaction itself.
PrivateSend works by creating denominations of 10, 1, 0.1, 0.01 and 0.001 DASH and then mixing these denominations with other users. Creation of the denominations is charged at the default fee for a standard transaction. Mixing is free, but to prevent spam attacks, an average of one in ten mixing transactions are charged a fee of 0.0001 DASH. Spending inputs mixed using PrivateSend incurs the usual standard or InstantSend fees, but to avoid creating a potentially identifiable change address, the fee is always rounded up to the lowest possible denomination. This is typically .001 DASH, so it is important to deduct the fee from the amount being sent if possible to minimise fees. Combining InstantSend and PrivateSend may be expensive due to this requirement and the fact that a PrivateSend transaction may require several inputs, while InstantSend charges a fee of 0.0001 DASH per input. Always check your fees before sending a transaction.
Evolution
Dash Evolution is the code name for a decentralized currency platform built on Dash blockchain technology. The goal is to provide simple access to the unique features and benefits of Dash to assist in the creation of decentralized technology. Dash introduces a tiered network design, which allows users to do various jobs for the network, along with decentralized API access and a decentralized file system.
Dash Evolution will be released in stages. Dash Core releases 12.1 through to 12.4 will lay the groundwork for the decentralized features behind the scenes. An alpha version of Evolution is expected in the first half of 2018, including a basic implementation of DashDrive, Primitives, DAPI and a simple T3 wallet. This will be released together with a series of Dash Improvement Proposals (DIPs), followed by a testnet phase with most basic functionality, and a first stable release in summer 2018.
Included below is our current work on Evolution, that adds many components such as:
- DashDrive: A decentralized shared file system for user data that lives on the second tier network
- DAPI: A decentralized API which allows third tier users to access the network securely
- DashPay Decentralized Wallets: These wallets are light clients connected to the network via DAPI and run on various platforms
- Second Tier: The masternode network, which provides compensated infrastructure for the project
- Budgets: The second tier is given voting power to allocate funds for specific projects on the network via the budget system
- Governance: The second tier is given voting power to govern the currency and chart the course the currency takes
- Quorum Chain: This feature introduces a permanent stable masternode list, which can be used to calculate past and present quorums
- Social Wallet: We introduce a social wallet, which allows friends lists, grouping of users and shared multisig accounts.
Evolution Previews
The following videos featuring Dash Founder Evan Duffield and Head of UI/UX Development Chuck Williams describe the development process and upcoming features of the Dash Evolution platform.
Evolution Demo #1 - The First Dash DAP, 16 March 2018
Evolution Demo #2 - Mobile Evolution, 25 April 2018
Evolution Demo #3 - Dashpay User Experience, 15 May 2018
Chuck Williams on Evolution, Dash Conference London, 14 September 2017
Evan Duffield on the Evolution Roadmap, Dash Force News, 28 June 2017
How To Buy
Dash can be purchased and sold in several ways, each with different advantages and disadvantages. The following options are available:
- Exchanges are one of the most popular ways to trade cryptocurrency. A wide range of exchanges exist, each offering slightly different features. Some serve different markets, some are in direct competition, some have cheaper fees, and some are subject to more or less strict regulatory requirements. Most exchanges are centralized, meaning they are operated by a single company, which may be obliged by the laws of the jurisdiction in which it operates to collect data on its customers. Others are decentralized, but as a result have higher escrow requirements since you are dealing peer-to-peer instead of with a trusted entity. Exchanges can be broadly broken down into two categories: exchanges which accept national currency (fiat money) and exchanges which deal in cryptocurrencies only. For safety, exchanges should not be used as wallets. Exchanges are for trading, not for savings.
- Instant exchanges perform a similar function to normal exchanges, but without the requirement to log in. They effectively convert one currency to another, with some limits on the amount to be exchanged and usually at a less advantageous rate. Others may even offer to sell cryptocurrency as a credit card purchase.
- Over the counter exchanges have recently appeared to facilitate sale of Dash directly from a company to the individual at a specified price, or peer-to-peer between individuals at a negotiated price. Volume may be limited compared to exchanges, but these services are usually much easier to use. More advanced peer-to-peer sites offer escrow services for a fee to prevent cheating during the sale between two parties who have never met.
- ATMs accepting card and cash payments in return for crypto are widely available. Mapping services can show the specific location of these machines, or you can even set one up at your own business and earn a percentage of sales.
DISCLAIMER: This list is provided for informational purposes only. Services listed here have not been evaluated or endorsed by Dash Core and no guarantees are made as to the accuracy of this information. Please exercise discretion when using third-party services.
Exchanges
Cryptocurrency exchanges exist to convert national currency, also known as fiat money, into cryptocurrency. Many exchanges do not accept fiat money, and exchange between various cryptocurrencies only. Trades are handled on markets, and trades are created between pairs of currencies, identified by their ticker codes. Dash is widely accepted on exchanges and many pairs exist against both fiat money and cryptocurrency. This means it is possible to exchange EUR for DASH, or DASH for BTC, for example. The volume traded on an exchange provides a good indication of how quickly a buy or sell order you place will be filled. This section introduces some of the most popular exchanges for trading Dash.
Marketplace comparison websites
- Cryptoradar

https://cryptoradar.co/buy-dash
Cryptoradar is a real-time cryptocurrency marketplace price comparison and review platform. The website compares dozens of Dash markets based on prices, fees, payment methods, reviews and more.
- CoinMarketCap

https://coinmarketcap.com/currencies/dash/#markets
CoinMarketCap lists all cryptocurrencies by their market capitalization. Clicking one of these currencies allows you to view price charts, and clicking Markets allows you to view the markets available and the trading pairs they offer.
Dash.org markets

https://www.dash.org/exchanges
The official Dash website also provides a list of major exchanges offering Dash.
List of exchanges
The exchanges listed here are for informational purposes only and do not indicate endorsement or affiliation with any particular platform.
- Poloniex

Poloniex is a US-based pure-crypto exchange offering high volume DASH pairs for BTC, XMR and USDT. Leveraged margin trading and lending is also available for DASH.
- Bittrex

Bittrex is a US exchange working with cryptocurrencies only, although USD wire transfers have been intermittently supported in the past. DASH trading pairs are available for BTC, ETH and USDT.
- Bitfinex

Bitfinex is a cryptocurrency exchange based in Hong Kong offering high volume BTC and USD trading pairs for DASH, as well as leveraged trading.
- Kraken

Kraken is a high-volume US-based exchange offering fiat currency deposits in EUR, USD, JPY and GBP. DASH can be traded against EUR, USD and BTC.
- Binance

Binance is a pure-crypto with a focus on ICOs and the Chinese market. DASH is available for funding and can be traded against BTC.
- HitBTC

HitBTC offers facilities to major investors to credit USD, EUR and GBP, as well as BTC, ETH and USDT trading pairs against DASH for normal users.
- Bithumb

Bithumb is the largest cryptocurrency exchange in South Korea. It accepts fiat deposits in South Korean Won only, and offers high volumes of DASH trading.
- Huobi

Huobi is a major Chinese exchange offering high volume DASH trading against BTC. A native app is available for both iOS and Android.
- CEX.IO

CEX.IO is a UK-based exchange with over one million users and offers DASH exchange pairs for fiat currencies including GBP, EUR and USD.
- DigiFinex

Based in Singapore, DigiFinex offers Dash trading against USDT, BTC and ETH. DigiFinex supports InstantSend, with clear benefits for arbitrage traders and consumers.
- YoBit

YoBit is an exchange focusing on Ethereum tokens, but also supports BTC, USD and RUB trading pairs for DASH.
- Chaoex

Based in Hong Kong and available in English and Traditional Chinese, Chaoex is a pure crypto exchange offering trading with a focus on new assets and supports mobile apps for both Android and iOS.
- Bit-Z

Bit-Z is a cryptocurrency exchange with a focus on offering OTC funding options to Chinese traders. DASH is available for trade against BTC.
- Koineks

Koineks serves the Turkish market and offers trading pairs for DASH against the Turkish Lira and Bitcoin.
- Sistemkoin

Sistemkoin serves the Turkish market and offers trading pairs for DASH against the Turkish Lira and Bitcoin.
- Ovis

Ovis serves the Turkish market and offers trading pairs for DASH against the Turkish Lira and Bitcoin.
- Exmo

Exmo is a UK-registered exchange offering fiat deposits in USD, EUR, USD and UAH (Ukrainian Hryvnia). DASH trading pairs exist for BTC, USD and RUB.
- BitBay

BitBay is based in Poland and accepts fiat deposits in EUR, USD and PLN. DASH can be traded against all three fiat currencies and BTC.
- Livecoin

Livecoin offers fiat deposits in EUR, USD and RUB, and DASH trading pairs for BTC, USD and some other low volume cryptocurrencies.
- xBTCe

xBTCe is an exchange based in St. Kitts and Nevis with a focus on providing fiat currency trading pairs. Various deposit methods are available for currencies including CNH (Chinese Offshore Yuan), EUR, GBP, JPY, IDR and RUB. DASH trading pairs include BTC, USD and CNH.
- IDAX

Based in Mongolia, IDAX is a high volume exchange with a focus on the Chinese and Korean markets. Dash transactions support InstantSend, and trading is available for against BTC.
- Upbit

UPbit is a Korean exchange allowing deposits in KRW and offering DASH trading pairs for KRW, ETH, BTC and USDT.
- CoinEx

CoinEx is a Hong Kong based exchange with a focus on Bitcoin Cash trading. DASH is available for trading against both BCH and BTC.
- Trade by Trade

Trade By Trade is registered in Vanuatu and provides a trading platform for over 60 cryptocurrencies with a range of tools to manage your trades.
- Bitinka

Bitinka is the premiere exchange in Latin America, and offers BTC, LTC, ETH, XRP and DASH in exchange for over 10 national currencies from America and Europe.
- eToro

With legal entities in the UK, Israel and Cyprus, eToro offers a social trading platform where you can copy top performing accounts. DASH and a number of other cryptocurrencies, forex and stocks are available.
- Liqui

Liqui is headquartered in Ukraine and offers a modern interfaced for leveraged trading of many cryptocurrencies, including a DASH/BTC pair.
- Bitbns

Bitbns offers DASH trading against the Indian Rupee (INR) for Indian citizens with bank deposits supported from many major Indian banks.
- Coinome

Coinome is an Indian exchange offering DASH trading against the Indian Rupee (INR).
- WazirX

WazirX is an Indian exchange offering DASH trading against BTC and USDT, and funding in the Indian Rupee (INR).
- Coinsquare

Coinsquare is a Canadian exchange offering DASH trading against BTC and CAD.
- Lykke

Incorporated in Switzerland, Lykke is an open source exchange, online/mobile wallet service, idea accelerator and ICO platform. DASH is available for both trading and investment.
- Liquid

Liquid serves the Asian market with funding support for HKD, AUD, CNY, INR, JPY, PHP, IDR, UDS, SGD and EUR, and trading against ETH, BTC, BCH and DASH.
- BitcoinVN

BitcoinVN is a Vietnamese exchange offering BTC, BCH, LTC and DASH for trading against Vietnamese đồng.
- Ginero

Ginero is a peer-to-peer exchange operating in Vietnam and offeringexchange offering BTC, BCH, LTC, ETH, GIN and DASH for trading against Vietnamese đồng.
- ZB.com

With a focus on the Chinese market, ZB.com offers trading from specialized applications for macOS, Windows, Android and iOS. Crypto deposits and DASH trading against QC, USDT and BTC.
- Coinfield

Coinfield is a Canadian exchange offering funding in CAD and quick market purchases or advanced trading against DASH.
- Bitshares

BitShares is a decentralized exchange (DEX) offering DASH trading pairs for BTC and BTS, as well as the bit assets bitUSD, bitCNY and bitBTC.
- Cryptopia

Cryptopia is a New Zealand cryptocurrency exchange with a reputation for supporting a large number of low-volume altcoins. It offers DASH trading pairs for BTC, LTC, DOGE and USDT.
- ACX

ACX is an Australian exchange accepting fiat deposits from Australian bank accounts. DASH is available to trade against BTC.
- OKEX

OKEX, previously known as OKCoin, is an exchange focused on the Chinese market offering DASH trading pairs against BTC. Funding with CNY and futures trading is also available.
- Bitexbook

Bitexbook promises the fastest possible deposit and withdrawal times and responsive customer support. Deposits are available in USD and RUB, and credit cards are supported.
- MoneyPolo

MoneyPolo offers currency exchange and transfer, prepaid cards and the ability to hold accounts in a range of currencies. Deposits and withdrawals are available in DASH, BTC, ETH, LTC, BCH and BTG, and it is possible to transfer value to a prepaid card or any worldwide bank account.
- Coinapult

Coinapult is an asset exchange headquartered in Panama City and providing exchange services between BTC, DASH, USD, GBP and EUR, as well as gold and silver.
- Panda.exchange

Based in Latin America, Panda.exchange specializes in making digital assets such as Dash available in Latin America and, through a branch in Portugal, the EU market.
- Whaleclub

Based in Hong Kong, Whaleclub offers an advanced platform that allows highly leveraged trading of cryptocurrency including DASH against other cryptocurrencies, forex, metals, stocks and bonds.
- Golix

Based in Zimbabwe, Golix is a digital currency exchange that helps people in Sub-Saharan Africa buy and sell DASH and other cryptocurrencies.
- Bisq

Bisq is a decentralized exchange running on the Tor network and offers complete privacy, but trades are manual, require escrow and must be settled between users.
- Coincheck

Coincheck is a Japanese exchange allowing deposits in JPY and USD for trading against DASH and other cryptocurrencies.
- Coindeal

Coindeal allows deposits in EUR and offers a range of trading pairs, including DASH. The exchange is focused on obtaining a FINMA license in Switzerland to be able to accept a broader range of fiat deposits.
- BuyUcoin

BuyUcoin is a large Indian exchange offering DASH and many other cryptocurrencies in exchange for Indian Rupees (INR).
- BitMEX

BitMEX is a pure-crypto derivates exchange offering trading with up to 100x leverage. DASH is available to trade against BTC.
- MBAex

MBAex is a pure crypto exchange with a focus on the Chinese market. DASH can be traded against BTC, USDT and MDP.
- KuCoin

KuCoin is a pure crypto exchange with a focus on the Chinese market. DASH can be traded against BTC, USDT, ETH and KCS.
- BTCC

Based in the UK Hong Kong and available in English and Chinese, BTCC offers DASH trading against BTC and USD.
- Bibox

With a focus on the Asian market, Bibox offers DASH trading against BTC, ETH and USDT.
- DigiFinex
-
DigiFinex is a Chinese exchange allowing trading of DASH against USDT and BTC.
- OOOBTC

OOOBTC offers DASH trading against BTC and ETH, with a user interface available in Russian, Arabic and many East Asian languages.
- ABCC

ABCC offers web and app-based trading of Dash against BTC, ETH and USDT.
- Indodax

Indodax allows funding in IDR and offers a DASH/BTC trading pair.
- ALFAcashier

ALFAcashier, incorporated in Belize, provides electronic exchange and fiat services. DASH trading pairs are available for BTC, XRP, XMR, XEM, ETH, LTC, BCH, USD, EUR, CNY, CAD and RUB.
- CoinSuper

Registered in Hong Kong and with a focus on the Chinese market, CoinSuper allows fiat deposits in USD and offers DASH trading against BTC, ETH and USD.
- Exrates

Exrates allows crypto and USD deposits, and offers DASH trading against BTC and USD.
- Bleutrade

Registered in Brazil, Bleutrade offers DOGE and BTC trading pairs for DASH.
- LBank

Available in English and Chinese, LBank has a focus on token trading. DASH is available to trade against BTC.
- Coinroom

Registered in Poland, Coinroom has a strong focus on trading against fiat currencies. Deposits are available in CHF, CZK, DKK, EUR, GBP, NOK, PLN and USD. DASH can be traded against USD, BTC, EUR, PLN and GBP.
- CoinSpot

CoinSpot is an Australian exchange offering DASH, BTC, LTC and ETH in exchange for AUD.
- Holy Transaction

Holy Transaction offers DASH trading pairs for BTC, USD and EUR, as well as over ten other altcoins.
- RealExchange

RealExchange is a Brazil-based exchange offering support for a handful of currencies including Dash, Bitcoin, Litecoin, and SmartCash. The exchange also supports fiat trading pairs with the Brazilian real.
- NegocieCoins

https://www.negociecoins.com.br
Based in Brazil, NegocieCoins offers deposits in Brazilian real and Dash trading pairs. A premium service with higher withdrawal limits is available.
- Bitcointoyou

Based in Brazil, Bitcointoyou has been in operation since 2010 and offers trading of a number of cryptocurrencies, including Dash, against the Brazilian real.
- Miami Crypto Exchange

Miami Crypto Exchange (MCEX), operated by Dash partner Mercury Cash, is a legal and fully compliant crypto gateway between the U.S. and the world, with a specific focus on Latin America and the Caribbean. DASH can be traded against USD and BTC.
- SatoWallet

SatoWallet is a multi-coin crypto wallet with built-in exchange functionality. Dash is available for trade against Nigerian Naira (NGN), USD, BTC and ETH.
- OmniTrade

Based in Brazil, OmniTrade accepts deposits in Brazilian real through a partnership with Neon Bank, which can then be traded against Dash.
- Braziliex

Based in Brazil, Brazilies accepts deposits in Brazilian real, and offers trading of real, Bitcoin and USDT against Dash.
- WEX

WEX, previously known as BTC-e until it was shut down by authorities, has resumed business under a new name. DASH trading pairs exist for BTC, USD, RUB, EUR, LTC and ETH.
- Ovis
-
Ovis serves the Turkish market and offers trading pairs for DASH against the Turkish Lira and Bitcoin.
- Lescovex

Registered in Switzerland, Lescovex offers deposits and withdrawals in a wide range of fiat currencies (EUR, USD, CAD, GBP, CHF, SEK, RON) for trading against DASH and other cryptocurrencies. The platform is designed to assist in the creation of tokens and cryptographic contracts.
- AvaTrade

Headquartered in Ireland, with offices around the world and boasting over 200,000 registered customers globally, AvaTrade is committed to empowering people to invest and trade, with confidence, in an innovative and reliable environment. AvaTrade offers Dash trading as well as traditional Forex, CFD and options trading.
- SouthXchange

Based in Argentina, SouthXchange offers DASH for USD and BTC.
- Coinrail

Coinrail is a Korean exchange offering DASH trading against KRW.
- Cashierest

Cashierest is a Korean exchange offering DASH trading against KRW, BTC and ETH.
- Tidex

Tidex is an exchange focusing on tokens on the WAVES and Ethereum blockchains, but also offers trading against fiat currencies. DASH can be traded against ETH, BTC, WAVES and Waves pegged currencies.
- LiteBit

LiteBit is a service based in The Netherlands selling cryptocurrency including Dash for EUR.
- Laissez Faire

Laissez Faire offers incentivized trading which includes DASH.
- Bitsane

Bitsane (and its altcoin sister site Anybits) offer trading pairs for Dash and allows deposits in EUR and USD.
Instant exchanges
- Changelly

Changelly is a broker service offering a range of cryptocurrency, including Dash, for instant exchange against other cryptocurrencies without needing to create an account. Be sure to check the fees and rates before purchasing.
- ShapeShift

ShapeShift allows users to directly exchange one crypto asset for another without creating any account, albeit with a higher markup than most exchanges. ShapeShift supports Dash and over 70 other cryptocurrencies.
- SimpleSwap

SimpleSwap is a simple and easy-to-use platform for cryptocurrency exchanges that works without registration and limits. It is possible to exchange Dash with over 60 other cryptocurrencies.
- AirTM

AirTM allows rapid exchanges between a range of cryptocurrencies, traditional banks and proprietary regional payment schemes such as Alipay, Western Union or Skrill.
- Godex

Godex allows users to directly exchange one crypto asset for another without creating any account, albeit with a higher markup than most exchanges. Godex supports Dash and over 120 other cryptocurrencies.
- Flyp.me

Flyp.me is developed by the team at HolyTransaction, the first multicurrency web wallet. It offers instant exchange services between 18 different cryptocurrencies without creating an account.
- CoinSwitch

CoinSwitch is a crypto to crypto exchange aggregate with more than 300 different coins and tokens listed. Also offers purchases through credit/debit cards.
- MorphToken

MorphToken is an instant exchange allowing users to instantly convert between Dash, Bitcoin, Bitcoin Cash, Ethereum, Litecoin and Monero. It is even possible to convert into more than one cryptocurrency in a single exchange.
- changeNOW

changeNOW is a non-custodian exchange service based in the Netherlands, with low commissions and quick service. Offers crypto to crypto exchanges, as well as purchases through credit/debit cards.
- Guarda

Guarda offers an entire blockchain ecosystem consisting of desktop, web and mobile wallets, OTC crypto sales and instant crypto exchange. Dash is supported throughout the ecosystem, making it an easy and convenient way for new users to get started.
- BlockTrades

BlockTrades is a decentralized exchange designed to facilitate free movement between the Steemit, BitShares, Bitcoin and Dash blockchains. The system is designed to find the best possible instant conversion rate between any two given cryptocurrencies.
Over the Counter
- Uphold

Uphold accounts may be funded with over 30 national currencies by bank account or credit card to purchase and spend multiple cryptocurrencies including Dash.
- WeSellCrypto

WeSellCrypto is a broker service offering a range of cryptocurrency, including Dash, paid using Paypal. Be sure to check the fees and rates before purchasing.
- Kraken
-
Kraken offers private, personalized OTC service with deep liquidity to institutions and high net-worth individuals needing to fill orders in excess of $100,000. Simply send an email to otc@kraken.com to get started.
- Koi Trading

Based in San Francisco with satellite offices in Hong Kong and Europe, Koi Trading offers a reliable, efficient, and compliant OTC pathway for institutions and high net-worth individuals to engage with cryptocurrency. Brokerages, exchanges, miners and funds worldwide trust Koi Trading for its professional, high-touch services and robust cryptocurrency liquidity.
- Bitpanda

https://www.bitpanda.com https://www.bitpanda.com/togo
Bitpanda is a broker service offering Bitcoin, Ethereum, Litecoin and Dash both online and at over 400 Post branches and about 1300 Post partners throughout Austria. Pay with cash, credit card or bank transfer.
- Bitnovo

Bitnovo is a broker service offering Bitcoin and Dash both on their website and at tens of thousands of physical locations throughout Europe. They also offer reloadable cards, vouchers and cryptocurrency wallets.
- Bitit

Bitit is a broker service offering Bitcoin, Dash and several other cryptocurrencies for sale online. Payment in a range of currencies is support using both direct banking, credit cards and vouchers.
- buycrypto

Buycrypto is a peer-to-peer cryptocurrency-fiat exchange geared towards giving Greeks easier access to economically sound money. Dash is available for purchase and sale against the Euro.
- Coinfinity

Coinfinity offers Dash and Bitcoin broker services in Austria and Germany, as well as through their coupon-based Bitcoinbon service.
- Bitcoin Meester

https://www.bitcoinmeester.nl https://www.bitladon.com
Bitcoin Meester, and it’s international sister site Bitladon, allows you to buy and sell Dash (and other cryptocurrencies) OTC in exchange for Euro.
- Coinvertit

Based in Romania, Coinvertit is an easy way to buy and sell Dash in exchange for BTC, LTC, BCH and Romanian Leu (RON).
- eBitpoint

eBitpoint is a secure online peer to peer platform with escrow service for buying, selling, storing Dash and other digital currencies at competitive exchange rates in Ghana.
- eBitcoinics

eBitcoinics is a cryptocurrency exchange and education platform for the African market. Dash is available for exchange against Nigerian Naira (NGN) and Ghanaian Cedi (GHS).
- Kurecoinhub

Kurecoinhub offers DASH and other cryptocurrencies for sale OTC for the Nigerian Naira. Dividend bearing bank deposits, loans against Dash collateral and merchant services are also available from this innovative platform.
- Gredo E-currency

https://www.gredoe-currency.com
Gredo E-currency offers OTC sale of Dash and other cryptocurrencies for Nigerian Naira (NGN).
- TruexGOLD

TruexGOLD offers OTC sale of Dash in Nigeria for Nigeria Naira (NGN).
- Cryptomate

Cryptomate sells a range of cryptocurrencies, including Dash, for GBP. Cryptomate’s goal is to make buying and selling cryptocurrency as simple as possible for people who want a pain-free experience and the fastest transactions - coins can be in your wallet as soon as 5 minutes after ordering.
- BitPrime

BitPrime operates a secure and compliant platform for easy retail trading in New Zealand. Dash is available OTC for both purchase and sale together with many other cryptocurrencies.
- Mercury Cash

Mercury Cash is an online/mobile wallet and licensed money transmitter with integration for merchant services. Balances can be held in both Ethereum and Dash, and deposited or withdrawn in local currencies through a number of methods, including credit cards.
- cryptomonster

https://www.cryptomonster.co.uk
cryptomonster have created an easy to use platform where you can buy DASH and other digital assets within minutes. All you need is a UK bank account and a wallet address. cryptomonster pride themselves on a next-level service and regard themseleves as the leading digital assets platform in the UK.
- Changelly
-
Changelly is a popular instantaneous crypto to crypto exchange platform with more than 100 different coins and tokens listed. Also offers purchases via credit/debit cards.
- Cryptobuyer

Cryptobuyer is a direct purchasing service with a focus on the Latin American market and Venezuela in particular. It can be linked with a bank account to purchase Dash, Litecoin and Bitcoin directly. The company also operates a network of ATMs and merchant integrations.
- BasiChange

BasiChange offers exchange, trading and OTC crypto sales with a focus on Venezuela and Colombia.
- CryptoWay

On CryptoWay, you can buy and sell Dash, Bitcoin, Ethereum, Litecoin and Doge peer-to-peer (P2P) with Venezuelan bolivars on a secure, fast and simple platform. You can also link your bank account for efficient processing of deposits and withdrawals.
- Stratum CoinBR

CoinBR is a Brazil-based cryptocurrency company offering a variety of services including an exchange, mining, bill payment, point-of-sale, and more. Dash is available for purchase at over 13,000 locations around Brazil.
- Wall of Coins

Wall of Coins allows user to post offers to buy or sell Dash and Bitcoin within their region or country. The service, which is available in over 20 countries, then holds the coins in escrow while the buyer completes payment.
- Liberalcoins

Liberalcoins allows users to arrange trades to buy or sell Dash, Monero, Bitcoin and Litecoin directly with one another.
- QCashPay

QCashPay is a Hong Kong company specialising in direct sale of cryptocurrency, including Dash, for USD and CNY using various bank and third party payment schemes.
- MegaChange

MegaChange offers direct sale and exchange of various digital forms of currency in a simple market system. It supports Dash and multiple methods of adding fiat currency, including USD, RMB and RUB.
- Dashous

Dashous allows user to post offers to buy or sell Dash and Bitcoin within their region or country. The users then arrange the deal between themselves.
- Magnetic Exchange

Magnetic Exchange offers Bitcoin, Ethereum, Litecoin and Dash in exchange for USD or EUR through various payment services.
- AnycoinDirect

AnycoinDirect.eu is a broker service offering 14 cryptocurrencies, including Dash, for sale online. Pay by bank transfer or various national instant payment schemes.
- Dash Nearby

Dash Nearby allows users to arrange direct trades of cryptocurrency or local currency between one another.
- Coindirect

Coindirect offers OTC and P2P services to buy and sell many cryptocurrencies, including Dash. Verified users can create offers in their local currency to buy and sell with other users. Online wallets and exchange services are available for most currencies as well.
- Graviex

Graviex is a part of the Gravio ecosystem, a blockchain-based communication platform. It offers extremely low rates and fees for trading. DASH can be traded against BTC, ETH, LTC and DOGE.
- Bitqist

Bitqist is a service based in The Netherlands offering over 140 for purchase and sale. While not strictly an exchange in the sense of offering order books, it is possible to buy and sell each currency at near the market price.
- SlithEx

Based in Malaysia and funded by the Dash Treasury, SlithEx (and its payment processor, RocketPay) offer exchange, wallet and sale/trading of Dash against the Malaysian ringgit.
ATMs
ATMs are a popular method of buying cryptocurrency at businesses to encourage adoption and spending in these currencies. A number of ATMs support Dash, and the mapping services listed on this page can help you find one near you. It is also possible to operate your own ATM to sell Dash on-site at your business - simply contact the companies listed on this page.
- General Bytes

General Bytes offers a range of two-way cash ATM and Point of Sale solutions integrating Dash.
- Coin ATM Radar

Various coin ATMs are available around world. Coin ATM Radar helps you find one close to you.
- Lamassu

Lamassu offers modular one-way and two-way cash ATMs integrating Dash.
- CoinFlip

CoinFlip operates a network of ATMs across the USA and offers hosted ATMs for businesses.
- Trovemat

Focusing on the European market, Trovemat provides a risk-free solution to sell cryptocurrency from a physical device.
- TigoCTM

TigoCTM offers simple ATM solutions integrated with a management blockchain.
Safety
If you are new to cryptocurrencies, the most important change to understand in comparison with the traditional banking system is that transactions occur directly between two parties without any central authority to facilitate the transaction. This also means that you are responsible for your own security - there is no bank or credit card company to reverse a transaction if your funds are stolen or lost. If you forget or lose your wallet file, recovery phrase or PIN, you will permanently and irrevocably lose access to your funds.
Dash is designed from the ground up to be fast, secure, fungible and private. In this sense, it is similar to cash or gold, but cryptocurrency can be spent locally and internationally with equal ease, if you are confident you are sending funds to the right destination. For these reasons, the Dash documentation has a strong focus on safety and understanding the concepts and features that drive the Dash ecosystem.
A few general safety guidelines:
- Do not trust any online service or person because they sound or look reputable. Always use an escrow service if you are buying peer-to- peer.
- Store your Dash on a hardware wallet if possible. If not, then store your coins in the official Dash Core Wallet or the official Dash Electrum Wallet.
- Do not use exchanges as wallets. Exchanges are for trading, not for savings.
- Mobile wallets should be used for day-to-day purchases, but do not keep large amounts of funds in them. Transfer funds as necessary.
A list of known scams, fake wallets and Ponzi or pyramid schemes can be seen below. Do NOT trust them.
Scams
There are many “fake” Dash/Darkcoin pages on the internet attempting to trick users into sending Dash or other cryptocurrencies or “open a wallet”. Other scams include selling fake mining hardware, fake Dash or altcoins with a similar name, and Ponzi schemes (see below). Please be careful and do NOT trust any third parties listed here!!
List of known Dash-related scams:
- dash-wallet dot com is a known scam!
- electrumdash dot org is a fake clone of the official site!
- dashcoinmining dot com is not affiliated with Dash!
- dashcrypto dot info is not affiliated with Dash!
- onclooud dot com is not affiliated with Dash!
- as-shop dot su is selling fake Baikal miners!
- minershop dot biz is selling fake Baikal miners!
- dashcoinclub dot com is a Ponzi scheme not affiliated with Dash!
- dash-coin dot net is a fake web wallet, do not send them money!
- coinvert dot io is a fake exchange!
Beware of fake Twitter accounts impersonating Dash! The official Twitter account is: https://twitter.com/Dashpay
Please report these and any others scams you encounter as follows:
- Report phishing and scams to Google: https://www.google.com/safebrowsing/report_phish
- Look up the registrar of the domain and send a complaint: https://www.whois.com/whois
- Report phishing to Netcraft: https://www.netcraft.com
- Report scams to the BadBitcoin Project: http://www.badbitcoin.org
- If in doubt, use Crypto Scam Checker to see if already report and report there as well: https://fried.com/crypto-scam-checker
Feel free to report any new scams you find on the forum in our “swat team” thread: https://dashtalk.org/threads/www-dash-wallet-com-is-a-scam-website.8267
Ponzi Schemes
A Ponzi scheme, Pyramid scheme or Multi-level marketing are a fraudulent investment operations where the operator provides fabricated reports and generates returns for older investors through revenue paid by new investors. More and more users must constantly join the scheme in order for it to continue operation, with ever greater numbers of people losing money to the originators of the scheme.
If you encounter a Ponzi scheme, follow the same reporting steps as above for scam websites!
List of known Ponzi schemes (there are many more - stay vigilant!):
- OneCoin
- http://themerkle.com/dr-ruja-flees-sinking-ship-as-regulators-crack-down-on-onecoin/
- http://siliconangle.com/blog/2016/09/29/dodgy-cryptocurrency-onecoin-under-police-investigation-accused-of-being-a-ponzi-scheme/
- https://cointelegraph.com/news/one-coin-much-scam-onecoin-exposed-as-global-mlm-ponzi-scheme
- http://www.makemoneyexpert.com/online/network-marketing/reviews/onecoin/
- https://pageone.ng/2016/11/05/beware-onecoin-ponzi-scheme/
- SwissCoin
- The Billion Coin
- Sustaincoin
- E-Dinar
- DasCoin
- BitConnect
- HashOcean
- CryptoDouble
Links and Information
Links
Official sites
- Website: https://www.dash.org
- User documentation: https://docs.dash.org
- Protocol documentation: https://dash-docs.github.io
- Foundation: https://www.dashfoundation.io
- GitHub: https://github.com/dashpay
- GitHub (Evolution): https://github.com/dashevo
- Roadmap: https://github.com/dashpay/dash-roadmap
- DIPs: https://github.com/dashpay/dips
Community sites
- https://www.dashnexus.org
- https://www.dashwatch.org
- https://www.dashboost.org
- https://dashroots.fund
- https://www.dashcentral.org
- https://www.dashninja.pl
- https://www.dashforcenews.com
- http://www.dashnation.com
- https://dashvotetracker.com
- https://www.dashspain.org
- http://www.dashhaiti.com
- http://thedashbrain.com
Forums
- Dash Forum: https://www.dash.org/forum
- BitcoinTalk thread: https://bitcointalk.org/index.php?topic=421615.0
- Cryptocurrencytalk.com: https://cryptocurrencytalk.com/forum/693-dash
- 巴比特 (8BTC) Forum: http://8btc.com/forum-115-1.html
- 百度贴吧 达世币吧 (Baidu Tieba): https://tieba.baidu.com/f?kw=达世币
- 彩云比特 达世币 (CYBTC Dash): http://www.cybtc.com/forum-123-1.html
Chat
- Dash Nation Discord: https://discordapp.com/invite/9z8zX5j
- Dash Talk Discord: https://discordapp.com/invite/PXbUxJB
- Dash English Telegram: https://t.me/dash_chat
- Dash Brasil Telegram: https://telegram.me/dashbrasil
- Dash Russia Telegram: https://telegram.me/Dash_Ru
- Dash en Español Telegram: http://unete.dashespanol.com
- Dash Embassy D-A-CH auf Deutsch Telegram: https://t.me/dashembassydach
- Dash Telegram News Bot: https://telegram.me/dashnews
- QQ 达世币官方群 DASH.China: 419967021
- Freenode IRC: #dashpay
Facebook
- English (Official): https://www.facebook.com/DashPay
- Dash News En Español: https://www.facebook.com/DashNewsEspanol
- Dash Embassy Thailand: https://www.facebook.com/DashEmbassyThailand
- Brazil: https://www.facebook.com/DashBrazil
- Denmark: https://www.facebook.com/DashDenmark
- Germany: https://www.facebook.com/dashgermany
- Greece: https://www.facebook.com/DashGreece
- Poland: https://www.facebook.com/Dash.Polska
- Russia: https://www.facebook.com/Dash.Russia
- Thailand: https://www.facebook.com/groups/1127359790623640
- Venezuela: https://www.facebook.com/groups/DarkcoinVenezuela
- Vietnam: https://www.facebook.com/dashvietnam
Twitter
- Dash Official Account: https://twitter.com/dashpay
- Ryan Taylor, CEO of Dash Core Group: https://twitter.com/RTaylor05
- Dash Force News: https://twitter.com/DashForceNews
- Joël Valenzuela, Chief Editor, Dash Force News: https://twitter.com/TheDesertLynx
- Mark Mason, Director of Media & PR, Dash Force News: https://twitter.com/StayDashy
- Amanda B. Johnson, Dash Superfan and DAO-funded contractor: https://twitter.com/AmandaB_Johnson
- Tao of Satoshi, Dash Nation Founder and DAO-funded contractor: https://twitter.com/Dash_Nation
- とみ三(Samurai33), Dash Japan: https://twitter.com/samurai3311
- Dash Vietnam: https://twitter.com/dashvietnam
News
- Dash Force News: https://www.dashforcenews.com
- Dash News En Español: https://dashnewsespanol.com
- Dash News En Español (YouTube): https://www.youtube.com/channel/UCG6Cuh8Q2eUt4NlZu4K-u8g
- Dash News Korea: https://dashnewskorea.com
- Cointelegraph: https://cointelegraph.com/tags/dash
- 巴比特 (8BTC): http://www.8btc.com/dash
- 比特时代 (BTC38): http://www.btc38.com/altcoin/dash
- Dash Embassy D-A-CH: http://www.dash-embassy.org/
- Dash News Germany: https://dash-news.de
- Dash Vietnam: https://dashvn.blogspot.com
- Dash France: https://dashfrance.com/
- Dash News China (Wechat): dashnews (or scan QR below)

Blogs
- Evan Duffield’s blog: https://medium.com/@eduffield222
- Dashdot: https://dashdot.io/alpha/
Inactive
- Bitcoin.com forum: https://forum.bitcoin.com/dash-f67
- Crypto-city.com page: https://www.crypto-city.com/index.php/dash-dash-coin
- Bitco.in forum: https://bitco.in/forum/threads/dash-digitalcash.891
Tools
Block explorers, statistics and visualizations
- https://explorer.dash.org
- https://insight.dash.org/insight
- https://chainz.cryptoid.info/dash
- https://www.coinexplorer.net/dash
- https://bitinfocharts.com/dash/explorer
- https://dashblockexplorer.com
- https://live.blockcypher.com/dash
- https://dash.holytransaction.com
- https://dashradar.com
- http://explorer.coinpayments.net/index.php?chain=7
- http://udjinm6.github.io/bitlisten
- http://insight.dash.crowdnode.io
Treasury tools
Masternode management
Price monitoring and statistics
Dash Community project
DarkNet pages
- Dash (Mirror of Main Page): http://dashorg64cjvj4s3.onion
- The Hidden Wiki: http://zqktlwi4fecvo6ri.onion/wiki/Dash_-_DigitalCash
Mobile Apps
iOS
- Dash Wallet: https://itunes.apple.com/app/id1206647026
- Edge Wallet: https://itunes.apple.com/app/id1344400091
- Jaxx Wallet: https://itunes.apple.com/app/id1084514516
- Coinomi Wallet: https://itunes.apple.com/app/id1333588809
- Dashy: https://itunes.apple.com/app/id1033268631
- CoinCap: https://itunes.apple.com/app/id1074052280
- Blockfolio: https://itunes.apple.com/app/id1095564685
- Cryptonaut: https://itunes.apple.com/app/id1312756405
- Quoinex: https://itunes.apple.com/app/id1140955992
- Abra: https://itunes.apple.com/app/id966301394
Android
- Dash Wallet: https://play.google.com/store/apps/details?id=hashengineering.darkcoin.wallet
- Edge Wallet: https://play.google.com/store/apps/details?id=co.edgesecure.app
- Jaxx Wallet: https://play.google.com/store/apps/details?id=com.kryptokit.jaxx
- Coinomi Wallet: https://play.google.com/store/apps/details?id=com.coinomi.wallet
- Cryptonator Wallet: https://play.google.com/store/apps/details?id=com.aev.cryptonator
- DashCentral: https://play.google.com/store/apps/details?id=net.paregov.android.dashcentral
- CoinCap: https://play.google.com/store/apps/details?id=io.coinCap.coinCap
- Blockfolio: https://play.google.com/store/apps/details?id=com.blockfolio.blockfolio
- Cryptonaut: https://play.google.com/store/apps/details?id=org.cryptonaut.app
- Quoinex: https://play.google.com/store/apps/details?id=mobi.quoine
- Abra: https://play.google.com/store/apps/details?id=com.plutus.wallet
- Bitcoin Ticker Widget: https://play.google.com/store/apps/details?id=st.brothas.mtgoxwidget
Glossary
- 51% Attack
- A condition in which more than half the computing power on a cryptocurrency network is controlled by a single miner or group of miners. That amount of power theoretically makes them the authority on the network. This means that every client on the network believes the attacker’s hashed transaction block.
- Address
- A Dash address is used to Send/Receive a Payment on the Dash network. It contains a string of alphanumeric characters, but can also be represented as a scannable QR code. A Dash address is also the public key in the pair of keys used by Dash holders to digitally sign transactions (see Public key).
- Algorithm
- In mathematics and computer science, an algorithm is a self-contained step-by-step set of operations to be performed. Algorithms perform calculation, data processing, and/or automated reasoning tasks.
- Altcoin
- Since Bitcoin was the first cryptocurrency and has the largest market capitalization, it is considered as the reference. An altcoin, or alternative coin, is any cryptocurrency other than Bitcoin.
- AML
- Anti-Money Laundering techniques are used to stop people from making illegally obtained funds appear as though they have been earned legally. AML mechanisms can be legal or technical in nature. Regulators frequently apply AML techniques to Dash exchanges.
- API
In computer programming, an application programming interface (API) is a set of routines, protocols, and tools for building software and applications.
An API expresses a software component in terms of its operations, inputs, outputs, and underlying types, defining functionalities that are independent of their respective implementations, which allows definitions and implementations to vary without compromising the interface. A good API makes it easier to develop a program by providing all the building blocks, which are then put together by the programmer.
- ASIC
- An application-specific integrated circuit (ASIC), is an integrated circuit (IC) customized for a particular use, rather than intended for general-purpose use. For example, a chip designed to run in a digital voice recorder or for high-efficiency Dash mining is an ASIC.
- ATM / BTM
- A Dash ATM is a physical machine that allows a customer to buy Dash with cash. There are many manufacturers, some of which enable users to sell Dash for cash. They are also sometimes called ‘BTMs’ or ‘Dash AVMS.’ Dash is supported on several ATMs.
- Backlog
- Backlog generally refers to an accumulation over time of work waiting to be done or orders to be fulfilled.
- Backup
- The process of making copies of a computer file to ensure its integrity in case of loss, theft, or damage. Dash allows users to make backup copies of their digital wallets. This protects against losing one’s money in the event of a computer crashing or losing one’s mobile device. This would be the equivalent of being able to backup the cash in your wallet, so that if you lost it, you could restore the cash from a backup.
- Bitcoin 2.0
- This is a term explaining the next new level of Bitcoin projects which started as a fork of Bitcoin but extended their code into the next level of Blockchain Projects (Smart Contracts, Decentralised Voting,….)
- Blockchain
- A blockchain is a distributed database that maintains a continuously-growing list of data records hardened against tampering and revision. It consists of data structure blocks — which exclusively hold data in initial blockchain implementations, and both data and programs in some of the more recent implementations — with each block holding batches of individual transactions and the results of any blockchain executables. Each block contains a timestamp and information linking it to a previous block.
- Blocks
- Transactions on the Blockchain are collected in “blocks” which record and confirm when and in what sequence transactions enter and are logged in the block chain. Blocks are created by users known as “miners” who use specialized software or equipment designed specifically to create blocks.
- Budget System / DGBB
- The development of Dash and the Dash ecosystem is self-funded by the network. Each time a block is discovered, 45% of the block reward goes to miners and 45% goes to masternodes. Ten percent is withheld by the network and used to fund projects that are approved by the masternode network. This process is known as Decentralized Governance by Blockchain (DGBB). For a fee, anybody can submit a proposal to the network, and will be paid directly by the blockchain if approved by the masternodes. The Budget System is sometimes called the Treasury System; the two terms are interchangeable.
- ChainLock
- Defined in DIP8, ChainLocks are a method of using an LLMQ to threshold sign a block immediately after it is propogated by the miner in order to enforce the first-seen rule. This is a powerful method of mitigating 51% mining attacks, which are associated with double spending.
- Cloud Wallet
- Third parties that will store your Dash on their servers for you, so that you can access your funds from any device connected to the internet. If their website is hacked or if their servers are damaged, you run the risk of losing your Dash. Any online wallets should be secured with strong passphrases and 2FA. You cannot make backup copies of your online wallet, because you do not have access to the private keys. We do not recommend that you store large quantities of funds in online wallets.
- Coinbase transaction
- The first transaction in a block. Always created by a miner, it includes a single input which constitutes the block reward. This is split between the miner and a deterministically chosen masternode.
- Cold Storage
- A method of generating and storing private keys completely offline. One could use a desktop or laptop computer disconnected from the internet, a dedicated hardware wallet, a USB stick, or a paper wallet.
- Confirm(ed) Transaction
- When a Dash transaction is made, a miner must verify that the transaction is valid. When the inputs and outputs are verified, the transaction is included in a block in the blockchain. The transaction can then be considered complete and irreversible. The confirmation number increases as more blocks are added to the blockchain.
- Confirmation Number
- The number of confirmations for a specific Dash transaction. Zero confirmations means that the transaction is unconfirmed. One confirmation means that the transaction is included in the latest block in the blockchain. Two confirmations means the transaction is included in two blocks, three confirmations for three blocks, and so on. The probability of a transaction being reversed (double spent) diminishes exponentially with every block and subsequent confirmation. Six confirmations is usually considered “safe” and irreversible.
- Confirmed Transactions
- Transactions that are processed by miners and considered irreversible, usually after six confirmations. In the case of InstantSend, funds can be considered irreversible after a few seconds, but must still be written to the blockchain (and thus “confirmed”).
- CPU
- A central processing unit (CPU) is the electronic circuitry within a computer that carries out the instructions of a computer program by performing the basic arithmetic, logical, control and input/output (I/O) operations specified by the instructions. The term has been used in the computer industry at least since the early 1960s. Traditionally, the term “CPU” refers to a processor, more specifically to its processing unit and control unit (CU), distinguishing these core elements of a computer from external components such as main memory and I/O circuitry.
- Cryptocurrency
- A cryptocurrency (or crypto currency or crypto-currency) is a medium of exchange using cryptography to secure the transactions and to control the creation of new units.
- Cryptography
- Cryptography or cryptology (from Greek κρυπτός kryptós, “hidden, secret”; and γράφειν graphein, “writing,” or -λογία -logia, “study,” respectively) is the practice and study of techniques for secure communication in the presence of third parties called adversaries. More generally, cryptography is about constructing and analyzing protocols that prevent third parties or the public from reading private messages; various aspects in information security such as data confidentiality, data integrity, authentication, and non- repudiation are central to modern cryptography. Modern cryptography exists at the intersection of the disciplines of mathematics, computer science, and electrical engineering. Applications of cryptography include ATM cards, computer passwords, and electronic commerce.
- DAP
- Decentralized Application Protocol. This term describes an application running on top of the Dash DAPI platform.
- DAP Client
- An HTTP Client that connects to DAPI and enables Dash blockchain users to read and write data to their DAP Space.
- DAP Schema
- A Dash Schema document extending the Dash System Schema to define consensus data and rules within a DAP contract.
- DAP Space
- The part of a DAP State that is owned by a specific blockchain user. Data in a DAP Space can only be changed by the owner.
- DAP State
- The total set of data stored in a DAP. This data consists of user DAP Spaces.
- DAPI
- Decentralized Application Programming Interface. See above for a definition of API. DAPI will perform the same functions as an API, but with quorums of masternodes acting as the endpoints for API communication.
- Dark Gravity Wave
- In concept, Dark Gravity Wave (DGW) is similar to Kimoto Gravity Well, adjusting the difficulty levels every block (instead of every 2016 blocks like Bitcoin) by using statistical data of the last blocks found. In this way block issuing times can remain consistent despite fluctuations in hashpower. However it doesn’t suffer from the time-warp exploit.
- Darkcoin
- Dash was initially launched as XCoin and then rebranded to Darkcoin and finally Dash.
- Dash
- Originally launched as Xcoin and later renamed to Darkcoin, the currency was later renamed “Dash” to avoid association with the darknet markets. Dash is a portmanteau of “Digital Cash.” Dash is an open source peer-to- peer cryptocurrency that solves many of Bitcoin’s problems. Dash’s features include PrivateSend, InstantSend, Decentralized Governance by Blockchain (DGBB), a 2nd tier network (referred to as the masternode network). See the Features page for a full list of Dash’s features.
- DashDrive
- Dash network data storage backend service used by masternodes for off-chain data relating to Evolution. DashDrive implements IPFS, a type of distributed file storage system.
- Dash Client
- Dash clients are software programs used to interface with the Dash network. They store the private keys needed to conduct Dash transactions as well as a copy of the entire blockchain. A Dash client connects to the Dash network and becomes a node in the network. A node shares and propagates new transactions with the rest of the network, creating a robust decentralized infrastructure.
- Dash Core Wallet
- The Dash Core Wallet (known also as the QT wallet) is the “official” Dash wallet that is compiled by the Dash Core Team and allows both PrivateSend and InstantSend. The DashCore wallet will download the entire blockchain and serve it over the internet to any peers who request it.
- Dash Evolution
- This is a 3 tier network Dash developers are presently building. It will make Dash as easy to use as PayPal, while still remaining decentralized. See the Evolution page for more information.
- Dash Schema
- A JSON-based language specification for defining and validating consensus data in Evolution.
- DDoS
- A distributed denial of service attack uses large numbers of computers under an attacker’s control to drain the resources of a central target. They often send small amounts of network traffic across the Internet to tie up computing and bandwidth resources at the target, which prevents it from providing services to legitimate users. Dash exchanges have sometimes been hit with DDoS attacks.
- Decentralized
- Decentralized computing is the allocation of resources, both hardware and software, to each individual workstation or office location. In contrast, centralized computing exists when the majority of functions are carried out or obtained from a remote centralized location. Decentralized computing is a trend in modern-day business environments. This is the opposite of centralized computing, which was prevalent during the early days of computers. A decentralized computer system has many benefits over a conventional centralized network. Desktop computers have advanced so rapidly that their potential performance far exceeds the requirements of most business applications. This results in most desktop computers remaining nearly idle most of the time. A decentralized system can use the potential of these systems to maximize efficiency. However, it is debatable whether these networks increase overall effectiveness.
- Desktop Wallet
- A wallet is a piece of software that stores your Dash. There are many different wallet options, but it is imperative to choose a secure one. We recommend any of the following: Dash Core Wallet / Dash Electrum Wallet / Hardware Wallets
- Difficulty
- This number determines how difficult it is to hash a new block. It is related to the maximum allowed number in a given numerical portion of a transaction block’s hash. The lower the number, the more difficult it is to produce a hash value that fits it. Difficulty varies based on the amount of computing power used by miners on the Dash network. If large numbers of miners leave a network, the difficulty would decrease. Dash’s increasing popularity and the availability of specialized ASIC miners have caused the difficulty to increase over time.
- Digital Wallet
See this link for full documentation on wallets.
A digital wallet is similar to a physical wallet except that it is used to hold digital currency. A Dash wallet holds your private keys, which allow you to spend your Dash. You are also able to make backups of your wallet in order to ensure that you never lose access to your Dash. Digital wallets can exist in many different forms and on many devices:
- Desktop Wallet (Dash Electrum Wallet, Dash Core Wallet): Wallet programs that you install on a laptop or desktop computer. You are solely responsible for protecting the wallet file and the private keys it contains. Make backup copies of your wallet files to ensure that you don’t lose access to your funds.
- Mobile Wallet (Android, iOS): These wallets can be downloaded through Google Play or Apple (iTunes) App Stores. Mobile wallets allow you to use Dash on-the-go by scanning a QR code to send payment. Make backup copies of your mobile wallet files to ensure that you don’t lose access to your funds. Due to security issues with mobile phones, it is advised that you don’t store large amounts of funds on these wallets.
- Online/Cloud/Web Wallet (Exodus, MyDashWallet): Third parties that will store your Dash on their servers for you or provide an interface to access your Dash with you providing the keys, so that you can access your Dash from any device connected to the internet. If their website is hacked or if their servers are damaged, you run the risk of losing your Dash. Any online wallets should be secured with strong passphrases and 2FA. You cannot make backup copies of your online wallet, because you do not have access to the private keys. We strongly urge that you NEVER store large amounts of Dash in any online wallet or cryptocurrency exchange.
- Hardware Wallets (Trezor, KeepKey, Ledger, Nano): A hardware wallet is a specialized, tamper-proof, hardware device that stores your private keys. This device is able to sign transactions with your private key without being connected to the internet. However, you must have an internet connection to send the transaction to the Dash network. This allows your private keys to be accessed easily while still keeping them securely protected. This is widely regarded to be the safest form of storage for your Dash.
- Offline/Cold Storage (Paper wallet): A special wallet that is created offline and is never exposed to the internet. Accomplished by using software to generate a public and private key offline and then recording the generated keys. They keys can be printed out on paper or even laser-etched in metal. Copies can be made and stored in a personal safe or bank deposit box. This is an extremely secure way to store Dash. There is no risk of using software wallet files, which can become corrupt, or web wallets, which can be hacked. NOTE: USB sticks are not safe for long-term (multi-year) storage because they degrade over time.
- DKG
- Defined in DIP6, Distributed Key Generation (DKG) is a method of generating a BLS key pair for use in an LLMQ to perform threshold signing on network messages. It is based on BLS M-of-N Threshold Scheme and Distributed Key Generation, which is an implementation of Shamir’s Secret Sharing.
- Digital Signature
- A digital signature is a mathematical mechanism that allows someone to prove their identity or ownership of a digital asset. When your digital wallet signs a transaction with the appropriate private key, the whole network can see that the signature matches the address of the Dash being spent, without the need to reveal the private key to the network. You can also digitally sign messages using your private key, to prove for instance that you are the owner of a certain Dash address.
- Electrum Wallet
- Dash Electrum Wallet is a lightweight wallet that does not require you to download or sync the entire blockchain, making the wallet lighter and faster. However, it is missing certain features such as PrivateSend and InstantSend.
- Encryption
- In cryptography, encryption is the process of encoding messages or information in such a way that only authorized parties can read it. Encrypted messages which are intercepted by a third-party are indecipherable gibberish without the private key. In an encryption scheme, the plaintext message is encrypted using an encryption algorithm, generating ciphertext that can only be read if decrypted by the intended recipient. For technical reasons, an encryption scheme usually uses a pseudo-random encryption key generated by an algorithm. Increases in computing power have “broken” many past encryption algorithms, but a well-designed modern system such as AES-256 is considered essentially “uncrackable.”
- Escrow Services
An escrow is:
- a contractual arrangement in which a third party receives and disburses money or documents for the primary transacting parties, with the disbursement dependent on conditions agreed to by the transacting parties; or
- an account established by a broker for holding funds on behalf of the broker’s principal or some other person until the consummation or termination of a transaction; or
- a trust account held in the borrower’s name to pay obligations such as property taxes and insurance premiums.
A trusted escrow service is often used when purchasing cryptocurrency or other goods/services over the internet. Both the buyer and seller will choose a trusted third-party, the seller will send the item (or currency) to the escrow agent, and the buyer will send the purchasing funds to the escrow agent as well. Once the escrow agent is satisfied that both parties have satisfied the terms of the agreement, he/she will forward the funds and the product (or currency) being purchased to the appropriate party.
- Evan Duffield
- Founder and first Lead Developer of Dash. Inventor of X11, InstantSend and PrivateSend. Before creating Dash, Evan was a financial advisor and holds a Series 65 license.
- Exchange
- The current price of one Dash compared to the price of other currencies, like the US dollar, Yen, Euro, or Bitcoin. Because most trading volume takes place on the BTC/DASH markets, price is often quoted in fractions of a bitcoin. For instance, the price of one Dash at the end of March 2017 was 0.08 (bitcoins per Dash). An excellent site for following the exchange rate of Dash is CoinMarketCap. Businesses wishing to reduce the risk of holding a volatile digital currency can avoid that risk altogether by having a payment processor do an instant exchange at the time of each transaction.
- Faucet
- Faucets are a reward system, in the form of a website or app, that dispenses rewards in the form of a microdash or Duff, which is a hundredth of a millionth Dash, for visitors to claim in exchange for completing a captcha or task as described by the website.
- Fiat Gateway
Fiat money has been defined variously as:
- Any money declared by a government to be legal tender.
- State-issued money which is neither convertible by law to any other thing, nor fixed in value in terms of any objective standard.
- Intrinsically valueless money used as money because of government decree.
Examples include the US dollar, the Euro, the Yen, and so forth.
- Fintech
- Financial technology, also known as FinTech, is an economic industry composed of companies that use technology to make financial services more efficient. Financial technology companies are generally startups trying to make financial processes more efficient or eliminate middle- men. Recently many fintech companies have begun utilizing blockchain technology, which is the same technology that underpins Dash and Bitcoin.
- Fork
When the blockchain diverges or splits, with some clients recognizing one version of the blockchain as valid, and other clients believing that a different version of the blockchain is valid. Most forks resolve themselves without causing any problems, because the longest blockchain is always considered to be valid. In time, one version of the blockchain will usually “win” and become universally recognized as valid. Forks can, however, be extremely dangerous and should be avoided if possible.
Forking is most likely to occur during software updates to the network. Dash uses a Multi-Phased Fork (“Spork”) system for greater flexibility and safety.
- Full Nodes
- Any Dash client that is serving a full version of the blockchain to peers. This can be a user running a Dash Core wallet on his/her desktop, or it could be a masternode. Full nodes promote decentralization by allowing any user to double check the validity of the blockchain.
- Fungible
- Every unit of the currency is worth the same as any other unit.
- Genesis Block
- The very first block in the block chain.
- GPU
- A graphics processing unit (GPU), also occasionally called visual processing unit (VPU), is a specialized electronic circuit designed to rapidly manipulate and alter memory to accelerate the creation of images in a frame buffer intended for output to a display. GPUs are used in embedded systems, mobile phones, personal computers, workstations, and game consoles. Modern GPUs are very efficient at manipulating computer graphics and image processing, and their highly parallel structure makes them more efficient than general- purpose CPUs for algorithms where the processing of large blocks of data is done in parallel. In a personal computer, a GPU can be present on a video card, or it can be embedded on the motherboard or — in certain CPUs — on the CPU die. Certain cryptocurrencies use mining algorithms which are most efficiently run on GPUs.
- Hardware Wallet
- Hardware wallets are among the safest type of wallet for storing your Dash. Your private key is protected inside a piece of hardware, and is never exposed to the internet. You are still able to sign transactions as normal, making it both safe and convenient.
- Hash
- A mathematical process that takes a variable amount of data and produces a shorter, fixed-length output. A hashing function has two important characteristics. First, it is mathematically difficult to work out what the original input was by looking at the output. Second, changing even the tiniest part of the input will produce an entirely different output.
- Hashrate
- The number of hashes that can be performed by a Dash miner in a given period of time (usually a second).
- Insight
- Blockchain information server used to power block explorers and respond to transaction queries.
- InstantX
- See InstantSend
- InstantSend
- InstantSend technology uses the masternode network to “lock” transaction inputs, preventing Dash from being double-spent. Unlike Bitcoin, where it takes an hour or longer for transactions to fully confirm, transactions using InstantSend are “locked” and irreversible after only a few seconds.
- Liquidity
- The ability to buy and sell an asset easily, with pricing that stays roughly similar between trades. A suitably large community of buyers and sellers is important for liquidity. The result of an illiquid market is price volatility, and the inability to easily determine the value of an asset.
- LLMQ
- Defined in DIP6, A Long- Living Masternode Quorum (LLMQ) is a deterministic subset of the global deterministic masternode list. Such a quorum is formed with the help of a distributed key generation (DKG) protocol and is supposed to be active for a long time (e.g. days). Multiple quorums are kept alive at the same time, allowing load balancing between these quorums. The main task of a LLMQ is to perform threshold signing of consensus related messages.
- Masternode
A masternode is special type of full node that performs services for the network and is paid a portion of the block reward. Masternodes require proof of ownership of 1000 DASH.
Masternodes serve as the second tier of the Dash network, and power InstantSend, PrivateSend, the Budget System.
- Mining
- Miners process transactions on the Dash network and publish them on the blockchain. As a reward for doing this, miners are paid 45% of the block reward.
- Mobile Wallet
- These are wallets available on mobile devices (iOS + Android).
- MultiSig
- Multi-signature addresses provide additional security by requiring multiple people to sign a transaction with their private key before the transaction can be sent. For example, in 2 of 3 multisig, two out of three possible signatories have to sign a transaction for it to be processed. Multi-signature addresses are commonly used by exchanges and other organizations that are in possession of large sums of cryptocurrency, since it makes theft much more difficult.
- Node
- A node is any device running Dash wallet software. Full nodes are software clients that have downloaded the entire blockchain and serve it to other clients on Dash’s peer-to-peer network.
- OTC
- Over the counter (OTC) trades are trades that occur off exchanges. In an OTC trade, a buyer and seller trade with each other directly, or through an intermediary. OTC trading is useful when a person wants to either buy or sell a large amount of cryptocurrency and is afraid that a large buy or sell order will move the price (called “slippage”).
- P2P
- Peer-to-peer. Decentralized interactions that happen between at least two parties in a highly interconnected network. An alternative system to a ‘hub-and-spoke’ arrangement, in which all participants in a transaction deal with each other through a single mediation point.
- Paper Wallet
- Paper wallets are offline wallets, printed on paper for safety. If properly secured and stored they are considered the safest way to store cryptocurrency.
- Privacy
- Privacy is the ability of an individual or group to seclude themselves, or information about themselves, and thereby express themselves selectively. The boundaries and content of what is considered private differ among cultures and individuals, but share common themes. When something is private to a person, it usually means that something is inherently special or sensitive to them. The domain of privacy partially overlaps security (confidentiality), which can include the concepts of appropriate use, as well as protection of information. Dash includes PrivateSend, which allows users to maintain financial privacy.
- Private Key
- A private key is a long alphanumeric passcode that allows Dash to be spent. Every Dash wallet contains one or more private keys which are saved in the wallet file. The private keys are mathematically related to all Dash addresses generated for the wallet. Because the private key is the “ticket” that allows someone to spend Dash, it is important that these are kept secure and secret.
- PrivateSend
- PrivateSend obscures the source of funds in order to maintain financial privacy between users. It can be turned on or off at the users’ discretion.
- Proof of Service - PoSe
- Consensus mechanism used in Dash to verify that a masternode has provided uninterrupted service meeting a minimum quality level to the network. Maintaining this service allows a masternode to enter and move up through the global list and eventually into the selection pool to receive payment.
- Proof of Stake - PoS
- Consensus mechanism that relies on ownership of a cryptocurrency to maintain the blockchain. In Proof of Stake systems, each owner of the currency can use their wallet to “stake,” and there’s a small chance that they will be chosen to create the next block and add it to the chain. In this way consensus is maintained across all nodes. Proof of Stake saves electricity and does not require specialized computer hardware. It does however suffer from several pitfalls, including the “nothing at stake” problem. Since no electricity is consumed, in the event of an attack it is actually beneficial for Proof of Stake nodes to “vote” to accept both the legitimate chain and the attacker’s chain.
- Proof of Work - PoW
- Consensus mechanism that keeps all nodes honest by requiring computational power to be expended in order to create new blocks. Miners must use expensive equipment and burn electricity to add blocks to the blockchain. Without a consensus mechanism of some sort, any node could add blocks to the chain and the network’s nodes would never agree on which chain was valid.
- Public Key
- The public key is derived from the private key but is not secret and can be revealed to anybody. When a private key is used to sign messages, the public key is used to verify that the signature is valid.
- Pump and dump
- Inflating the value of a financial asset that has been produced or acquired cheaply, often using aggressive publicity and misleading statements. The publicity causes others to acquire the asset, forcing up its value. When the value is high enough, the perpetrator sells their assets, cashing in and flooding the market, which causes the value to crash. This is particularly common in markets with low liquidity, such as some altcoins.
- Quorum
- Group of masternodes signing or voting on some action, with the formation of the group determined by some determiniation algorithm.
- QR Code
- A two-dimensional graphical block containing a monochromatic pattern representing a sequence of data. QR codes are designed to be scanned by cameras, including those found in mobile phones, and are frequently used to encode Dash addresses.
- Satoshi Nakamoto
- Satoshi Nakamoto is the name used by the person or people who designed Bitcoin and created its original reference implementation.
- SDK
- Software Development Kit. A set of tools, code and documentation used by developers to create apps targeting a specific hardware or software platform.
- State View
- The current state of all data objects once all changes from state transitions have been applied. Used in Evolution to determine what should be displayed in a given social wallet, for example.
- Spork
- The Dash development team created a mechanism known as a “spork” by which updated code is released to the network, but not immediately made active (or “enforced”). Communication is sent out to users informing them of the change and the need for them to update their clients. Those who update their clients run the new code, but in the event of errors occurring with that new code, the client’s blocks are not rejected by the network and unintended forks are avoided. Data about the error can then be collected and forwarded to the development team. Once the development team is satisfied with the new code’s stability in the mainnet environment – and once acceptable network consensus is attained – enforcement of the updated code can be activated remotely. Should problems arise, the code can be deactivated in the same manner, without the need for a network-wide rollback or client update.
- Tainted Coins
- Taint is a measure of correlation between two (wallet) addresses. It is only important if the user is trying to remain anonymous.
- tDash
- Test Dash, used on testnet.
- Testnet
- Testnet is a network only for testing (parallel to the mainnet), test wallets, test coins, test masternodes, test miners, and test users all simulate their mainnet counterparts in a safe environment where errors or forks are not harmful.
- Tor
- An anonymous routing protocol used by people wanting to hide their identity online.
- Transaction
- Some movement of data on the distributed blockchain ledger. Transactions may be divided into classical and special transactions. Similar to Bitcoin, classical transactions move balances between addresses on the blockchain. Special transactions contain an extra payload in the format defined by DIP2, and can be used to manage blockchain users, for example.
- Transaction Block
- A collection of transactions on the Dash network, gathered into a block that can then be hashed and added to the blockchain.
- Transaction Fee
- A small fee imposed on some transactions sent across the Dash network. The transaction fee is awarded to the miner that successfully hashes the block containing the relevant transaction.
- Unconfirmed Transactions
- Transactions that are not yet processed by miners or held via InstantSend are “unconfirmed on the blockchain.” Unconfirmed transactions can be reversed and should not be considered as “final.”
- Vanity Address
- A Dash address with a desirable pattern, such as a name.
- Virgin Dash
- Dash received as a reward for mining a block or running a masternode. These have not yet been spent anywhere and are “virgin.”
- Volatility
- The measurement of price movements over time for a traded financial asset (including Dash).
- Wallet
- A method of storing Dash for later use. A wallet holds the private keys associated with Dash addresses. The blockchain is the record of the Dash balances (and transactions) associated with those addresses.
- Whitepaper
- A white paper is an authoritative report or guide that informs readers concisely about a complex issue and presents the issuing body’s philosophy on the matter. It is meant to help readers understand an issue, solve a problem, or make a decision.
- X11
- X11 is a hashing algorithm created by Dash Core developer Evan Duffield.
- Zero Confirmations
- This is a transaction without any confirmations from the blockchain. It is technically reversible (unless InstantSend was used).
- vin
- A transaction (tx) consists of one or more inputs and one or more outputs. The vin is the list of inputs to the transaction, and vout is the list of outputs. Masternodes require a 1000 DASH vin (exactly that amount) in order to work.
- VMN
- Virtual Masternode - a standalone masternode emulator in JavaScript that simulates Layer 1-3 Evolution functions for DAP design, development and testing.
Wallets
Whenever you are storing objects with a market value, security is necessary. This applies to barter systems as well as economies using currency as a medium of exchange. While banks store balances on a private ledger, cryptocurrencies store balances under unique addresses on a distributed public ledger. The cryptographic private keys to access the balance stored on each public address are therefore the object of value in this system. This section of the documentation discusses different practical methods of keeping these keys safe in wallets, while still remaining useful for day-to-day needs.
For safety, it is not recommended to store significant funds on exchanges or software wallets. If you are holding cryptocurrency worth more than the device you use to store it, you should purchase a hardware wallet.
Dash Core Wallet
Dash Core Wallet is the full official release of Dash, and supports all Dash features as they are released, including InstantSend and PrivateSend, as well as an RPC console and governance features. Dash Core Wallet (sometimes known as the QT wallet, due to the QT software framework used in development) is a professional or heavy wallet which downloads the full blockchain (several GB in size) and can operate as both a full node or masternode on the network. Because of the requirement to hold a full copy of the blockchain, some time is required for synchronisation when starting the wallet. Once this is done, the correct balances will be displayed and the functions in the wallet can be used. Dash Core Wallet is available for macOS, Linux, Raspberry Pi and Windows.
Features:
- PrivateSend
- InstandSend
- Wallet encryption
- Coin control and fee control
- QR code generation and address book
- Masternode commands and voting
- Automated backup
- Debug console
Available documentation:
Installation
Installing Dash Core is as simple as going to https://www.dash.org/ and downloading the appropriate file for your system, then following the appropriate installation steps for your system. Detailed guides are available for Linux, macOS and Windows operating systems below.
It is also possible to compile Dash Core from source code.
Linux Installation Guide
This guide describes how to download, verify, install and encrypt the Dash Core wallet for Linux. The guide is written for Ubuntu 16.04 LTS, but the steps should be similar for other Linux distributions.
Visit https://www.dash.org/get-dash to download the latest Dash Core wallet. In most cases, the website will properly detect which version you need. Click the blue Dash Core button to download the package directly.

The website properly detects the wallet appropriate for your system
If detection does not work, you will need to manually choose your operating system and whether you need a 32 or 64 bit version. If you are unsure whether your version of Linux is 32 or 64 bit, you can check in Ubuntu under the System menu > About This Computer. For details on how to check this in other versions of Linux, see here.

Ubuntu System Overview. This is a 64 bit system.
Once you know which version you need, download Dash Core to your computer from https://www.dash.org/wallets.

Manually selecting and downloading Dash Core
Save the file you downloaded to your Downloads folder.
This step is optional, but recommended to verify the integrity of the file you downloaded. This is done by checking its SHA256 hash against the hash published by the Dash Core development team. To view the published hash, click the Hash file button on the wallet download page.

Downloading the Dash Core hash file
Once both the Dash Core file and the hash file have downloaded, double-click the hash file or view it in your browser and find the hash value for the Dash Core file you downloaded.

Viewing the Dash Core hash file
This hash value should correspond with the hash value of the file you have downloaded to ensure it is authentic and was not corrupted during transit. To do this, open Terminal, browse to the location where you saved the file, and run the sha256sum command.

Generating an SHA256 hash for the downloaded file
If the hashes match, then you have an authentic copy of Dash Core for Linux.
Dash Core for Linux is distributed as a compressed archive and not an installer. This is because this same archive also contains other files built for running a masternode on a server, for example. In this guide, we will extract the executable file with a graphical user interface (GUI) designed for use by end users as a wallet.
Begin by creating a folder for the Dash Core executable file on the Desktop. Browse to the Desktop (or the location of your choice) and create the folder.

Creating a folder on the Desktop

Renaming the folder to Dash
Next, open the archive by double-clicking on it. The Archive Manager will appear. Browse to the dashcore-0.12.1/bin/ folder and extract the dash-qt file to the Dash folder you created on the Desktop by drag and drop.

The dash-qt file in Archive Manager

The dash-qt file in the Dash folder on the Desktop
To run Dash Core for the first time, open Terminal and browse to the
Dash folder on the Desktop, or where you chose to extract the file. Type
./dash-qt to run the file.

Running Dash Core from the Terminal
The first time the program is launched, you will be offered a choice of where you want to store your blockchain and wallet data. Choose a location with enough free space, as the blockchain can reach 10GB+ in size. It is recommended to use the default data folder if possible.

Choosing the Dash Core data folder
Dash Core will then start up. This will take a little longer than usual the first time you run it, since Dash Core needs to generate cryptographic data to secure your wallet.

Starting Dash Core
Once Dash Core is successfully installed and started, you will see the wallet overview screen. You will notice that the wallet is “out of sync”, and the status bar at the bottom of the window will show the synchronization progress.

Dash Core begins synchronizing with the Dash network
During this process, Dash Core will download a full copy of the Dash blockchain from other nodes to your device. Depending on your internet connection, this may take a long time. If you see the message “No block source available”, check your internet connection. When synchronization is complete, you will see a small blue tick in the lower right corner.

Dash Core synchronization is complete
You can now begin to use your wallet to send and receive funds.
After your wallet has synchronized with the Dash network, it is strongly advised to encrypt the wallet with a password or passphrase to prevent unauthorized access. You should use a strong, new password that you have never used somewhere else. Take note of your password and store it somewhere safe or you will be locked out of your wallet and lose access to your funds.
To encrypt your wallet, click Settings > Encrypt wallet.

Encrypting the Dash wallet with a password
You will be asked to enter and verify a password.

Entering a password

Confirm you want to encrypt your wallet
When the encryption process is complete, you will see a warning that past backups of your wallet will no longer be usable, and be asked to shut down Dash Core. When you restart Dash Core, you will see a small blue lock in the lower right corner.

Fully encrypted and synchronized Dash Core wallet
Ubuntu allows you to add third-party repositories to install and update software using the apt command line utility. Dash Core team maintains such a repository, although the software version included here may be older than what is available on the website. To install Dash Core from the repository, open the Terminal and enter the following commands:
sudo add-apt-repository ppa:dash.org/dash
sudo apt update
sudo apt install dashd dash-qt
macOS Installation Guide
This guide describes how to download, install and encrypt the Dash Core wallet for macOS. The guide is written for macOS Sierra, but the steps should be similar for other versions.
Visit https://www.dash.org/get-dash to download the latest Dash Core wallet. In most cases, the website will properly detect which version you need. Click the blue Dash Core button to download the installer directly.

The website properly detects the wallet appropriate for your system
If detection does not work, you will need to manually choose your operating system. Go to https://www.dash.org/wallets and select the OSX tab, then click Download DMG.

Manually selecting and downloading an installer
Save the file you downloaded to your Downloads folder.
This step is optional, but recommended to verify the integrity of the file you downloaded. This is done by checking its SHA256 hash against the hash published by the Dash Core development team. To view the published hash, click the Hash file button on the wallet download page.

Downloading the Dash Core hash file
Once both the Dash Core file and the hash file have downloaded, double-click the hash file or view it in your browser and find the hash value for the Dash Core file you downloaded.

Viewing the Dash Core hash file
This hash value should correspond with the hash value of the file you have downloaded to ensure it is authentic and was not corrupted during transit. To do this, open Terminal, browse to the location where you saved the file, and run the following command, replacing the version with the specific version of the file you downloaded:
shasum -a 256 dashcore-version-osx.dmg

Generating an SHA256 hash for the downloaded file
If the hashes match, then you have an authentic copy of Dash Core for macOS.
Open Finder and browse to your Downloads folder. Then double-click on the .dmg file you downloaded to decompress it. A window appears showing the contents of the file.

Opening the Dash Core .dmg file
Drag the Dash Core application file into your Applications folder to install Dash Core.

Installing Dash Core
To run Dash Core for the first time, either open Launchpad or browse to your Applications folder in Finder. Double-click Dash Core or Dash-Qt to start the application. You may see a warning about opening an app from an unidentified developer. To resolve this problem, simply Control-click the app icon and choose Open from the shortcut menu, then click Open again in the dialog box. The app is saved as an exception to your security settings, and you can open it in the future by double-clicking it just as you can any registered app.


Unblocking macOS from running Dash Core
The first time the program is launched, you will be offered a choice of where you want to store your blockchain and wallet data. Choose a location with enough free space, as the blockchain can reach 10GB+ in size. It is recommended to use the default data folder if possible.

Choosing the Dash Core data folder
Dash Core will then start up. This will take a little longer than usual the first time you run it, since Dash Core needs to generate cryptographic data to secure your wallet.

Starting Dash Core
Once Dash Core is successfully installed and started, you will see the wallet overview screen. You will notice that the wallet is “out of sync”, and the status bar at the bottom of the window will show the synchronization progress.

Dash Core begins synchronizing with the Dash network
During this process, Dash Core will download a full copy of the Dash blockchain from other nodes to your device. Depending on your internet connection, this may take a long time. If you see the message “No block source available”, check your internet connection. When synchronization is complete, you will see a small blue tick in the lower right corner.

Dash Core synchronization is complete
You can now begin to use your wallet to send and receive funds.
After your wallet has synchronized with the Dash network, it is strongly advised to encrypt the wallet with a password or passphrase to prevent unauthorized access. You should use a strong, new password that you have never used somewhere else. Take note of your password and store it somewhere safe or you will be locked out of your wallet and lose access to your funds.
To encrypt your wallet, click Settings > Encrypt Wallet.

Encrypting the Dash wallet with a password
You will be asked to enter and verify a password.

Enter a password

Confirm you want to encrypt your wallet
When the encryption process is complete, you will see a warning that past backups of your wallet will no longer be usable, and be asked to shut down Dash Core. When you restart Dash Core, you will see a small blue lock in the lower right corner.

Fully encrypted and synchronized Dash Core wallet
You can now begin to use your wallet to safely send and receive funds.
Windows Installation Guide
This guide describes how to download, install and encrypt the Dash Core wallet for Windows. The guide is written for Windows 10, but the steps should be similar for Windows XP, Vista, 7 and 8.
Visit https://www.dash.org/get-dash to download the latest Dash Core wallet. In most cases, the website will properly detect which version you need. Click the blue Dash Core button to download the installer directly.

The website properly detects the wallet appropriate for your system
If detection does not work, you will need to manually choose your operating system and whether you need a 32 or 64 bit version. If you are unsure whether your version of Windows is 32 or 64 bit, you can check in Windows 10 under Start > Settings > System > About. For details on how to check this in other versions of Windows, see here.

In Windows Settings, click System

Under the System section, click About to view the System type. This is a 64 bit system.
Once you know which version you need, download the Dash Core Installer to your computer from https://www.dash.org/wallets

Manually selecting and downloading an installer
Save the file you downloaded to your Downloads folder.
This step is optional, but recommended to verify the integrity of the file you downloaded. This is done by checking its SHA256 hash against the hash published by the Dash Core development team. To view the published hash, click the Hash file button on the wallet download page.

Downloading the Dash Core hash file
Once both the Dash Core file and the hash file have downloaded, open the hash file in a text editor or your browser and find the hash value for the Dash Core file you downloaded.

Viewing the Dash Core hash file
This hash value should correspond with the hash value of the file you have downloaded to ensure it is authentic and was not corrupted during transit. To do this, open Command Prompt, browse to the location where you saved the file, and run the following command, replacing the version with the specific version of the file you downloaded.
certutil -hashfile <dashcore-version-windows>.exe SHA256

Generating an SHA256 hash for the downloaded file
If the hashes match, then you have an authentic copy of Dash Core for Windows.
Double-click the file to start installing Dash Core.

The Dash Core installer in the Downloads folder
At this point, you may see a warning from Windows SmartScreen that the app is unrecognized. You can safely skip past this warning by clicking More info, then Run anyway.


Bypassing Windows SmartScreen to run the app. This warning is known as a “false positive”.
The installer will then guide you through the installation process.

The Dash Core installer welcome screen
Click through the following screens. All settings can be left at their default values unless you have a specific reason to change something.

Select the installation location

Select the Start menu folder

Dash Core is being installed

Installation is complete
Once installation is complete, Dash Core will start up immediately. If it does not, click Start > Dash Core > Dash Core to start the application. The first time the program is launched, you will be offered a choice of where you want to store your blockchain and wallet data. Choose a location with enough free space, as the blockchain can reach 10GB+ in size. It is recommended to use the default data folder if possible.

Choosing the Dash Core data folder
Dash Core will then start up. This will take a little longer than usual the first time you run it, since Dash Core needs to generate cryptographic data to secure your wallet.

Starting Dash Core
Once Dash Core is successfully installed and started, you will see the wallet overview screen. You will notice that the wallet is “out of sync”, and the status bar at the bottom of the window will show the synchronization progress.

Dash Core begins synchronizing with the Dash network
During this process, Dash Core will download a full copy of the Dash blockchain from other nodes to your device. Depending on your internet connection, this may take a long time. If you see the message “No block source available”, check your internet connection. When synchronization is complete, you will see a small blue tick in the lower right corner.

Dash Core synchronization is complete
You can now begin to use your wallet to send and receive funds.
After your wallet has synchronized with the Dash network, it is strongly advised to encrypt the wallet with a password or passphrase to prevent unauthorized access. You should use a strong, new password that you have never used somewhere else. Take note of your password and store it somewhere safe or you will be locked out of your wallet and lose access to your funds.
To encrypt your wallet, click Settings > Encrypt Wallet.

Encrypting the Dash wallet with a password
You will be asked to enter and verify a password.

Enter a password

Confirm you want to encrypt your wallet
When the encryption process is complete, you will see a warning that past backups of your wallet will no longer be usable, and be asked to shut down Dash Core. When you restart Dash Core, you will see a small blue lock in the lower right corner.

Fully encrypted and synchronized Dash Core wallet
You can now begin to use your wallet to safely send and receive funds.
Video installation guides
These videos show how to download, verify the checksum and install the Dash Core Wallet on Linux, macOS and Windows systems. While they are somewhat out of date, the procedure is still largely the same. The main difference is that the official Dash website is now https://www.dash.org/ rather than https://www.dashpay.io/ as stated in the videos, although the old site will redirect you to the new one. Also, in later versions of Dash Core, application data such as the blockchain is now stored in the “DashCore” rather than “Dash” folder.
How to Install DashQT Wallet on Linux
How to Verify the CheckSum of DashQT Wallet for Linux
How to Install DashQT Wallet on macOS
How to Verify the CheckSum of DashQT Wallet for macOS
How to Install DashQT Wallet on Windows
How to Verify CheckSum of DashQT Wallet for Windows
How to Encrypt/Decrypt Your DashQT Wallet
Interface
The Dash Core Wallet is an application that runs on your computer and allows you to make transactions on the Dash network. Most transactions are for sending or receiving Dash, but it is also possible to create signed messages or control a masternode, for example. The Dash Core Wallet interface is described in detail in the following sections.
The Main Window

The Dash Core Wallet
The Dash Core window is broken up into several areas:
- The menu bar
- The tab bar
- The main area
- The status bar
The tab bar is used to quickly switch between the main areas of the Dash Core. The content in the main area of Dash Core changes depending on which tab you have selected. The following tabs are available:
The overview tab offers quick access to your balance and most recent transactions, as well as the PrivateSend feature and options for coin mixing.

The Dash Core Overview tab
The left part of the main area is divided into two areas. The upper area shows your balances:
- Available
- This shows your current liquid balance. This is the amount of Dash you can spend now.
- Pending
- This shows funds waiting for a transaction to complete.
- Immature
- This shows funds from masternode or mining payments which have not yet reached the required number of confirmations.
- Total
- This is simply your available and pending funds added together.
The lower area shows the status of PrivateSend and allows you to mix your funds using the Dash Masternode Network.
The right part of the screen shows your recent transactions. These are identified by icons as follows:
- Recent incoming transactions appear black, prefixed by a + sign
- Recent outgoing transactions appear red, prefixed by a – sign
- Incoming mining or masternode payments also appear black
For more details on your transaction history, see the Transactions tab.
The Send tab allows you to send funds to another address on the Dash network. It contains fields to enter the recipient’s address, a label for the address, and the amount of Dash you wish to send. Options related to the transaction fee, InstantSend and PrivateSend are also available. A quick view of your total balance is also available in the lower right corner.

The Send tab
The Receive tab allows you to create addresses to receive Dash. You can create a request for a specific amount of Dash or include a specific message, and send it to another user as a link or QR code.

The Receive tab
The transactions tab shows the entire transaction history for all addresses associated with your wallet. This appears as a table showing the time, type, label and amount of Dash for each transaction. You can also export the transaction history as a CSV file by clicking the Export button in the bottom right corner of the window.
The icons in the leftmost column indicate the status of the transaction. A tick indicates that the recommended number of confirmations has been passed, while a clock indicates that the transaction has yet to reach six confirmations.

The transactions tab
The status bar shows a synchronization progress bar and a row of status icons which indicate the status of your connection to the Dash network.
This bar shows the synchronization status of Dash Core with the Dash network. Each time you open Dash Core, it will begin downloading the blocks which have been created on the blockchain in the time since you last opened the app. These blocks are downloaded from other Dash users and masternodes. If you have never opened the app before, this could mean several years’ worth of blocks need downloading. The following statuses are possible:
- No block source available
- This occurs if your internet connection is down, or if the ports required by Dash Core are blocked by a firewall.
- Synchronizing with network
- Dash Core is downloading blocks from the network.
- Synchronizing masternodes/masternode payments/governance objects
- Dash Core is synchronizing other data with the second layer network.
Once synchronization is complete, the progress bar will disappear and a tick will appear on the right of the status bar.

The lock icons indicate the status of your wallet: either locked or unlocked. You need to unlock your wallet to send funds or perform certain other actions.
These icons indicate the quality of your connection to the Dash network. If you cannot connect because of network problems, you will see the icon on the left. More bars indicate more connections to your peers on the network.

These icons show the synchronization status of Dash Core with the network. Once synchronization is complete, the refresh icon will become a blue tick.

These icons indicate whether your wallet is running in hierarchical deterministic (HD) mode or standard mode.
The Options Dialog
This documentation describes the functionality of the Dash Core Options dialog, available under the Settings > Options menu in Dash Core.
The Main tab of the Options dialog contains settings related to startup and performance of the Dash Core app.

The Main tab of the Dash Core Options dialog
- Start Dash Core on system login
- This option causes Dash Core to start automatically when the current user logs in. On most computers there is only one main user account which is logged in automatically when the computer turns on, so this option is effectively the same as starting Dash Core together with the operating system.
- Size of database cache
- This option specifies the size of the database cache in memory. A higher value will result in increased performance when adding new blocks at the cost of higher memory usage. The default value is 100MB and it should not be set lower than this level.
- Number of script verification threads
- This option sets the number of script verification threads, ranging from -4 to 16. Script verification is the process of following instructions recorded in the blockchain to ensure the transactions are valid. 0 means automatic and will allow script verification to scale to the number of cores available on your processor. Setting a positive number specifies that Dash Core should use that number of processor cores, while setting a negative number will leave that number of processor cores free.
The Wallet tab of the Options dialog contains settings related to how addresses are managed in the Dash Core app. The first time you run Dash Core, it will generate a new wallet containing 1000 unique Dash addresses. This tab allows you to configure how these addresses are used as inputs with the Coin Control, PrivateSend and Masternode features.

The Wallet tab of the Dash Core Options dialog
- Enable coin control features
- Your Dash Core wallet balance is actually the sum total of all addresses holding balance that are associated with your wallet. When you spend Dash, Dash Core will withdraw from as many inputs as necessary to make up the desired amount of Dash to be transferred. This behavior may be undesirable if you want to keep a certain balance on one address. The most common use case is the requirement to maintain 1000 Dash on a single address as collateral for a masternode. Enabling this option will add a button labelled Inputs on the Send tab. This provides access to the Coin selection dialog, which can be used to lock, unlock and prioritize different addresses in your wallet. See here for a more detailed explanation of Coin Control.
- Show Masternodes tab
- Enabling this option causes Dash Core to display an additional Masternodes tab to the right of the Transactions tab. This option requires you to restart the Dash Core app. The Masternodes tab can be used to manage interactions (start, stop, check status, etc.) with masternodes controlled by this wallet. This tab is an advanced feature not required by users that do not operate a masternode on the Dash network.
- Enable advanced PrivateSend interface
- Enabling this option changes the PrivateSend mixing interface on the Overview tab of the Dash Core wallet to include more options, such as Try Mix and percentage completion. See here for a full explanation of how to use PrivateSend.
- Warn if PrivateSend is running out of keys
- Enabling this option will cause Dash Core to display a warning when your original set of 1000 addresses is running out, which may affect PrivateSend mixing. Every time a mixing event happens, up to 9 of your addresses are used up. This means those 1000 addresses last for about 100 mixing events. When 900 of them are used, your wallet must create more addresses. It can only do this, however, if you have automatic backups enabled. Consequently, users who have backups disabled will also have PrivateSend disabled.
- Enable PrivateSend multi-session
- Normally PrivateSend mixing is completed in several consecutive rounds, each using a single masternode. Enabling this option allows multi-session, which means you can use multiple masternode servers at the same time, greatly increasing the speed of the mixing process at the cost of creating more addresses and thus requiring more frequent wallet backups. This feature is experimental as of Dash Core 12.1.5.
- Spend unconfirmed change
- When this option is enabled, the Dash Core wallet permits you to immediately spend change from previous transactions that has been transferred internally between addresses associated with the same wallet. This is possible even if the transaction has not yet been confirmed because the wallet knows it will eventually be confirmed since it created the internal transaction itself. Leaving this option enabled allows you to create new transactions even if previous transactions have not yet been confirmed.
- PrivateSend rounds to use
- Use this option to control the number of rounds of PrivateSend mixing to be carried out for your chosen balance. Each round of mixing uses a new masternode. The higher the number of rounds, the more difficult it becomes to trace the Dash to its original address. This is at the expense of more time required for mixing and potentially higher fees. See here for a full explanation of how to use PrivateSend.
- Amount of Dash to keep anonymized
- This option allows you to specify how much Dash should be kept on balance in a ready-to-use anonymized state, meaning it has already passed through the PrivateSend mixing process. If you do not have sufficient Dash available in your balance of unlocked inputs, the amount will be automatically reduced to the available balance and shown in red in the PrivateSend interface on the Overview tab.
This tab includes options related to how your connection to the Dash network is made.

The Network tab of the Dash Core Options dialog
- Map port using UPnP
- This option causes Dash Core to automatically attempt to open and map the client port on your router using UPnP (Universal Plug and Play). This feature is supported by most modern home routers and will allow you to connect to the Dash network without making any special settings on your router.
- Allow incoming connections
- This option causes your client to accept external connections. Since Dash is a peer-to-peer network and Dash Core is considered a full client because it stores a copy of the blockchain on your device, enabling this option helps other clients synchronize the blockchain and network through your node.
- Connect through SOCKS5 proxy (default proxy)
- These options allow users on an intranet requiring a proxy to reach the broader internet to specify the address of their proxy server to relay requests to the internet. Contact your system administrator or check out the network settings in your web browser if you are unable to connect and suspect a proxy may be the source of the problem.
- Use separate SOCKS5 proxy to reach peers via Tor hidden services
- These options allow you to specify an additional proxy server designed to help you connect to peers on the Tor network. This is an advanced option for increased privacy and requires a Tor proxy on your network. For more information about Tor, see here.
This option contains options governing behavior of the Dash Core app window under Microsoft Windows.

The Window tab of the Dash Core Options dialog
- Hide tray icon
- When this option is enabled, Dash Core will not display an icon in the system tray. This option cannot be selected at the same time as Minimize to the tray instead of the taskbar.
- Minimize to the tray instead of the taskbar
- When this option is enabled and the Dash Core window is minimized, it will no longer appear in your taskbar as a running task. Instead, Dash Core will keep running in the background and can be re-opened from the Dash icon in the system tray (the area next to your system clock). This option cannot be selected at the same time as Hide tray icon.
- Minimize on close
- When this option is enabled, clicking the X button in the top right corner of the window will cause Dash Core to minimize rather than close. To completely close the app, select File > Exit.
This tab contains options relating to the appearance of the Dash Core app window.

The Display tab of the Dash Core Options dialog
- User interface language
- Select your preferred language from this drop-down menu. Changing the language requires you to restart the Dash Core app.
- User interface theme
- You can use this option to select a different theme governing the appearance of the Dash Core window. All functionality is identical under the different themes, although the default Dash-light theme is most recent and most likely to work without any display artifacts.
- Unit to show amounts in
- This allows you to change the default unit of currency in Dash Core from DASH to mDASH, µDASH or duffs. Each unit shifts the decimal separator three places to the right. Duffs are the smallest unit into which Dash may be separated.
- Decimal digits
- This option allows you to select how many decimal digits will be displayed in the user interface. This does not affect internal accounting of your inputs and balance.
- Third party transaction URLs
- This option allows you to specify and external website to inspect a particular address or transaction on the blockchain. Several blockchain explorers are available for this. To use this feature, enter the URL of your favorite blockchain explorer, replacing the %s with the transaction ID. You will then be able to access this blockchain explorer directly from Dash Core using the context menu of any given transaction.
The Tools Dialog
This documentation describes the functionality of the Dash Core Tools dialog, available under the Tools menu in Dash Core.

The Information tab of the Dash Core Tools dialog
- General
- This section displays information on the name and version of the client and database, and the location of the current application data directory.
- Network
- This section displays information and statistics on the network to which you are connected.
- Block chain
- This section shows the current status of the blockchain.
- Memory pool
- This section shows the status of the memory pool, which contains transactions that could not yet be written to a block. This includes both transactions created since the last block and transactions which could not be entered in the last block because it was full.
- Open debug log file
- This button opens debug.log from the application data directory. This file contains output from Dash Core which may help to diagnose errors.
The Console tab provides an interface with the Dash Core RPC (remote
procedure call) console. This is equivalent to the dash-cli command
on headless versions of Dash, such as dashd running on a masternode.
Click the red – icon to clear the console, and see the detailed
documentation on RPC commands to learn about the possible commands you can
issue.

The Console tab of the Dash Core Tools dialog
The Network Traffic tab shows a graph of traffic sent and received to peers on the network over time. You can adjust the time period using the slider or Clear the graph.

The Network Traffic tab of the Dash Core Tools dialog
The Peers tab shows a list of other full nodes connected to your Dash Core client. The IP address, version and ping time are visible. Selecting a peer shows additional information on the data exchanged with that peer.

The Peers tab of the Dash Core Tools dialog
The Wallet Repair tab offers a range of startup commands to restore a wallet to a functional state. Selecting any of these commands will restart Dash Core with the specified command-line option.

The Wallet Repair tab of the Dash Core Tools dialog
- Salvage wallet
- Salvage wallet assumes wallet.dat is corrupted and cannot be read. It makes a copy of wallet.dat to wallet.<date>.bak and scans it to attempt to recover any private keys. Check your debug.log file after running salvage wallet and look for lines beginning with “Salvage” for more information on operations completed.
- Rescan blockchain files
- Rescans the already downloaded blockchain for any transactions affecting accounts contained in the wallet. This may be necessary if you replace your wallet.dat file with a different wallet or a backup - the wallet logic will not know about these transactions, so a rescan is necessary to determine balances.
- Recover transactions
- The recover transactions commands can be used to remove unconfirmed transactions from the memory pool. Your wallet will restart and rescan the blockchain, recovering existing transactions and removing unconfirmed transactions. Transactions may become stuck in an unconfirmed state if there is a conflict in protocol versions on the network during PrivateSend mixing, for example, or if a transaction is sent with insufficient fees when blocks are full.
- Upgrade wallet format
- This command is available for very old wallets where an upgrade to the
wallet version is required in addition to an update to the wallet
software. You can view your current wallet version by running the
getwalletinfocommand in the console. - Rebuild index
- Discards the current blockchain and chainstate indexes (the database of unspent transaction outputs) and rebuilds it from existing block files. This can be useful to recover missing or stuck balances.
Sending and receiving
Your Dash Core Wallet is associated with a number of unique addresses that can be used to send and receive Dash. Each address holds its own balance, and the sum of all your balances is what appears on the Overview tab. When you send Dash, your wallet will automatically transfer funds from as many of your addresses as necessary to the destination address, which is controlled by another Dash user and associated with their wallet. You can control which addresses you use using the Coin Control feature.
When you confirm a transaction, Dash Core will enter the transaction in a block, which will then be added to the blockchain for other clients to confirm. A transaction is generally considered confirmed once six blocks have been added after the block containing your transaction, although masternode and mining payments are only released after 101 blocks. Note that a different process is used for InstantSend and PrivateSend transactions.
Dash addresses are 34 characters long and begin with an uppercase X.
Sending Dash
You can use Dash Core to send Dash from your balance to another user. The receiving user will provide you with a Dash address to which you should send the funds. Click the Send tab in the tab bar and enter the destination address in the Pay To field.
The Dash Core Send tab
You can also use the three icons  to the right of the Pay
To field to select a previously used address, paste an address from
the clipboard, or clear the current address. If this is a new address,
you can enter a name for the address in the Label field to help
identify it again later. Finally, enter the amount of Dash you want to
transfer in the Amount field.
to the right of the Pay
To field to select a previously used address, paste an address from
the clipboard, or clear the current address. If this is a new address,
you can enter a name for the address in the Label field to help
identify it again later. Finally, enter the amount of Dash you want to
transfer in the Amount field.
The other options relate to fees and PrivateSend/InstantSend. You can choose if you want to pay the network fee in addition to the amount sent, or subtract it from the amount sent. You can also increase your fee to encourage nodes on the network to prioritize your transaction. Choosing InstantSend has a similar effect, but actually relies on a different mechanism in the second layer network to speed up the transaction time. Choosing PrivateSend will send Dash from an address that has previously been mixed. You can find out more about PrivateSend and InstantSend here.
Let’s try an example. Say you have received an invoice which you now want to pay with Dash. The writer of the invoice has included a Dash address, which can be seen in the following window beginning with Xpa. The invoice is for 2.45 Dash, which you fill in the Amount field.

The Send tab filled out for a transaction
Once you have entered the destination address and the amount, click the Send button. If you have encrypted your wallet, you will now be required to enter your password to unlock the wallet.

Entering the password to unlock the wallet
Finally, you are given one final confirmation and chance to cancel your send transaction before Dash Core processes the transaction on the blockchain.

Final confirmation window
If you respond with Yes, your transaction will be processed. Your operating system may display a notification, and the transaction will appear on the Transactions tab, where you can monitor its progress.

The Windows 10 sent transaction confirmation notification
Note that the amount of the transaction increased by .000045 Dash. This is the transaction fee. In the next section, we will see what this procedure looks like from the receiving side.
Receiving Dash
To receive Dash, you must first create a receiving address to give to the sending party. To do this, click File > Receiving addresses. The Receiving addresses window appears.

The Receiving addresses window
Either copy an existing address by clicking on the address and then the Copy button, or create a new address by clicking the New button. You can also edit an existing address by right clicking and selecting Edit address from the context menu. Give this address to the person who will send you Dash. Your wallet does not need to be open to receive funds, but if it is, you can watch the transaction arrive in real time. This is because your wallet constantly watches for new blocks on the blockchain when it is open, and will recognize a new transaction involving your receiving address when it occurs.

The Windows 10 received transaction confirmation notification
Once you have been paid, you can see the balance both on the Overview tab and on the Transactions tab.

The received transaction
How to Create New Receiving Addresses in DashQT
PrivateSend and InstantSend
PrivateSend
This documentation describes how to use Dash Core to send Dash anonymously. PrivateSend, released as DarkSend in RC4 of the DarkCoin client and rebranded to PrivateSend in May 2016, is a trustless method of running a sequence of transactions (known as “mixing”) such that an external observer is unable to determine the source of funding when a PrivateSend transaction is created. This gives your Dash the same anonymous properties as cash withdrawn from an ATM, for example. The mixing and denomination process is seamless, automatic, and requires no intervention on the part of the user. The current implementation of PrivateSend in the Dash Core wallet allows any amount of Dash to be mixed for later use in PrivateSend transactions. As of December 2018, PrivateSend is not currently available in other Dash wallets.
Knowledge of the exact number of rounds of PrivateSend mixing used in any given PrivateSend transaction has a quantifiable effect on the confidence an adversary may have when attempting to guess the source of a PrivateSend transaction. For this reason, the recommended (and default) number of rounds of PrivateSend mixing is set to four.
You can read more about PrivateSend theory and processes here.
Open your Dash Core wallet, go to Settings and select Options. Go to the Wallet tab.

Next to PrivateSend rounds to use, enter a value between 1-16. Each round of PrivateSend performs one denominated fund mixing transaction. Higher numbers of rounds increase your overall level of anonymity while decreasing the chance of detection via node collusion. 16 is the highest number of rounds currently available.
NOTE: To prevent system abuse, an average of one in ten rounds of masternode mixing incurs a fee of .0001 DASH.
Enter a target value for Amount of Dash to keep anonymized. This value provides a lower boundary on the final amount of funds to be anonymized. Depending on how the client splits your wallet balance, you may end up with denominated inputs whose sum total is greater than the target amount. In this case the client will use all existing denominated inputs in the PrivateSend process. The final anonymized amount may be higher than your target, but should be close.
Click OK to save settings.
PrivateSend is disabled by default when you open the wallet. It will only start after you set the number of rounds and number of Dash to mix under settings and click Start Mixing on the Overview tab of your wallet.
The PrivateSend process is initiated by clicking the Start Mixing button on the Overview tab of the Dash Core wallet. Mixing is possible once the following conditions have been met:
- The wallet contains sufficient non-anonymized funds to create the minimum required denominated values
- The user has not disabled PrivateSend in the Options dialog
- The target value for anonymized Funds in the Options dialog is greater than zero
If your wallet is encrypted (highly recommended), you will be asked to enter your wallet passphrase. Enable the Only for mixing via PrivateSend checkbox to unlock the wallet for mixing only.

Entering a password for PrivateSend mixing only
This will unlock your wallet, and the PrivateSend mixing process will begin. The wallet will remain unlocked until PrivateSend mixing is complete, at which point it will be locked automatically.

PrivateSend interface after clicking the Start Mixing button. Note the Status is Enabled.
PrivateSend will begin creating transactions and your PrivateSend balance will gradually increase. This process can take some time, so be patient. You can monitor the process in more detail as described in the following section.
Any of the following actions will interrupt the mixing process. Because the transactions are atomic (they either take place completely, or do not take place at all), it should be possible to safely interrupt PrivateSend mixing at any time.
- Clicking the Stop Mixing button on the Overview tab
- Closing the client before PrivateSend mixing is completed
- Sending PrivateSend funds from the wallet before PrivateSend rounds are completed
- Disabling PrivateSend before the process is complete
If you want to monitor PrivateSend in more detail, you need to enable some advanced features of the wallet. Go to Settings, select Options and go to the Wallet tab. Check the boxes next to the Enable coin control features and Enable advanced PrivateSend interface options.

Enabling advanced options for PrivateSend in the Dash Core wallet settings
This will allow you to monitor progress and see which individual operations PrivateSend is carrying out in the background.

Monitoring PrivateSend progress
Since PrivateSend mixing creates a lot of new address keys to send and receive the anonymized denominations, you may receive a warning when the number of remaining keys runs low. This is nothing to be worried about, since the wallet will simply create more keys as necessary. However, these keys will not exist in any previous backups of your wallet. For this reason, it is important to backup your wallet again after mixing is complete.
You can also monitor PrivateSend progress by viewing the transactions created by the mixing process on the Transactions tab.

Transactions created by PrivateSend on the Transactions tab
The following table describes the PrivateSend-related transactions displayed in the Type column of the Transactions tab:
| PrivateSend Transaction Type | Transaction Description |
|---|---|
| PrivateSend Make Collateral Inputs (Mixing) | Wallet funds were moved to collateral inputs that will be used to make collateral payments. This is done to minimize traceability of collaterals. |
| PrivateSend Create Denominations (Mixing) | Wallet funds were broken into PrivateSend denominations (Step 1 here) |
| PrivateSend Denominate (Mixing) | A transaction was sent to a masternode in order to participate in a mixing session (Step 3 here) |
| PrivateSend Collateral Payment (Mixing) | The mixing session collateral was claimed. This fee is charged in ~10% of mixing sessions to prevent spam attacks. |
| PrivateSend (Spending) | Mixed funds were used to send a payment to someone. Note: Unlike the previous 4 transaction types, this is not a mixing process transaction. |
You can also use the coin control feature to view which addresses hold mixed denominations ready to be used for PrivateSend transactions. Go to the Send tab of your wallet and click Inputs to view the possible input addresses for your transactions. You can see how each address holds given denominations of mixed Dash, and how many rounds of mixing have been completed. This is to ensure that an efficient combination of addresses can be used as inputs in PrivateSend transactions without too much change, since amount in a PrivateSend transaction must be rounded up to completely spend all inputs. The current minimum balance for an input used in a PrivateSend transaction is 0.00100010 DASH.

Coin Selection dialog showing addresses holding PrivateSend mixed balances in different denominations
You can only use PrivateSend for payments once you have mixed enough Dash to make up the amount you are trying to send. Because the mixing process takes time, it must be done in advance before you create the send transaction. A PrivateSend transaction is effectively the same as any other transaction on the blockchain, but it draws only from input addresses where the denomination has previously been mixed to ensure anonymity of funds. Because several input addresses are usually required to make up the amount you are trying to send, a PrivateSend transaction will usually take up more space (in kilobytes) on the blockchain, and therefore will be charged a slightly higher fee.
To send a payment using PrivateSend, go to the Send tab of the Dash Core wallet and enable the PrivateSend option. The balance displayed will change to show your PrivateSend balance instead of the total balance. You can then enter the Pay To address, Label, Amount and click Send as usual. Your payment will be rounded up to completely spend the lowest possible denomination of mixed balance available (currently to the nearest 0.001 DASH). You will be prompted to enter your password and receive a detailed breakdown of the fee structure for PrivateSend before sending.

Dash Core ready to send a PrivateSend transaction. Note PrivateSend is enabled and the amount to be sent is less than the available PrivateSend balance
InstantSend
This documentation describes how to use InstantSend to instantly send funds to any other Dash user around the world. Dash InstantSend is supported by many wallets and vendors, including (but not limited to) the following:
- Dash Core Wallet
- Dash Android Wallet
- Dash iOS Wallet
- My Dash Wallet
- Kraken
- Bitrefill
- and many more…
You can read more about InstantSend theory and processes here.
InstantSend functions by setting a flag on the transaction, causing deterministic selection of a quorum of 10 masternodes for each input spent in an InstantSend transaction. The masternodes examine the input, and if a majority determines it has at least six confirmations, they then accept the transaction. The input is then locked until the transaction has been confirmed in six mined blocks, at which point the output can be used as an input in another InstantSend transaction. This differs from inputs used in normal transactions, which can be spent after just one confirmation regardless of whether the Dash was received using InstantSend or not. A higher fee will be charged for InstantSend transactions with more than four inputs, according to the fee schedule. Note that the receiving wallet must also be aware of InstantSend in order to be able to immediately continue with the transaction or display an appropriate notification that the transaction should be considered locked. If the receiving wallet is not aware of InstantSend, it will simply appear as a normal transaction and you will need to wait for standard block confirmations.
To pay with InstantSend, simply check the relevant checkbox in your app. The following screenshots indicate where this setting can be found in the Dash Core, iOS and Android wallets.


Dash Wallets showing InstantSend option
Wallet backup and restore
Backup
This documentation describes how to safely back up your wallet file for safe storage in case your computer or laptop is damaged or lost. Dash Core stores all data necessary to control your Dash addresses in a single file called wallet.dat. This wallet is in the Berkeley DB format and stores the pairs of private/public cryptographic keys used to manage your balances on the Dash blockchain. Dash Core makes most of these operations transparent and even generates automatic backups of your wallet file in case it is corrupted, but the user is responsible for ensuring that these backups are stored in a safe place. If you lose access to your wallet file, you will permanently lose access to your Dash.
It is important to consider that if you have not encrypted your wallet using the Settings > Encrypt Wallet menu item, anyone with access to the backed up wallet.dat file will immediately have full access to your Dash. If you do choose to encrypt your wallet, do not store the password in the same place as the wallet.dat file, particularly if you are saving the backup to the cloud.
Firstly, never copy your wallet.dat file while Dash Core is open. Always use the File > Backup Wallet menu if the wallet is open. When you select this menu item, a dialog box will appear to specify where the file should be saved. Enter a name for the file, select a location and click Save. The example below shows saving the file to a USB stick. Keep this file in a physically separate location to your computer.


Backing up the Dash Core wallet from the File menu
If Dash Core is not running, you can also backup your wallet by simply copying the wallet.dat file to another location. This file is located in the DashCore data folder. You were given the option to specify the location of this folder during installation, but by default the folder is in the following locations on different operating systems:
Windows
C:\Users\YourUserName\Appdata\Roaming\DashCore
You can access this folder directly by Windows Key + R and typing
%APPDATA%\DashCoreLinux
/home/YourUserName/.dashcore
You can access this folder directly by typing
cd ~/.dashcoreat the terminal or~/.dashcorein the path bar using the Go > Enter Location… menu item in FilesmacOS
/Users/YourUserName/Library/Application Support/DashCore
You can access this folder by typing
cd ~/Library/Application Support/DashCoreat the terminal or~/Library/Application Support/DashCorein dialog at the Go > Go To Folder menu item in Finder
Ensure Dash Core is not running, then simply copy the wallet.dat file from this folder to another folder in the normal way for your operating system. The example below shows copying the file to a USB stick using simple drag and drop while holding down Ctrl on a Windows system. On most operating systems, you can also right click on the file and select Copy, then select Paste in the target folder. Keep this file in a physically separate location to your computer. Be careful to copy (not move) the file!

Backing up wallet.dat by copying to another folder
Every time you open Dash Core, it will automatically create a backup
copy of wallet.dat in the dashcore/backups folder. Up to 10
backups can be kept here by default, and the oldest backup will be
deleted as each additional new backup is created. You can modify the
number of backups kept here using the -createwalletbackups=n
parameter at the command line or in dash.conf. Setting this value to 0
completely disables backups.
You can view the automatic backups folder by browsing to DashCore folder at the location specified above for wallet.dat and opening the backups folder, or by selecting Tools > Show Automatic Backups from the menu in Dash Core. Since these files are not active when Dash Core is running, you can safely copy them at any time. They are also a handy backup if the original files in the DashCore folder become corrupted due to improper shutdown of the Dash Core app.
Restore
To restore a backup, install Dash Core on the target system (or stop it, if already installed) and rename the existing wallet.dat file in the DashCore folder.

Renaming the old wallet.dat file to wallet.old in the DashCore folder
Then copy the backup wallet file to the DashCore folder and ensure it is named wallet.dat. Now, when you start Dash Core again, it will load the new wallet. Do not replace wallet.dat while Dash Core is running, since this will result in data corruption!


Copying the backup file into the DashCore folder and renaming it to wallet.dat
Backup storage considerations
Any backup depends to some extent on the existence of software capable of reading the data at some future point in time. As such, it is good practice to store a copy of the software used to create the backup together with the backup file itself. In this case, this would be a copy of the version of Dash Core you used to create the backup.
The wallet.dat file itself should be encrypted using a password set from the Settings > Encrypt Wallet menu item. However, this only prevents someone with access to the file from creating transactions, not from opening the file. You could additionally store the file in another encrypted container, such as a USB stick using BitLocker in Windows, LUKS in Linux or FileVault on macOS. It is also possible to create disk images or zip files with password encryption - the choice is yours. For further reading on encrypted containers, see here.
Where you store this file is then up to you. It could be in your home, in a safe deposit box at a bank, a waterproof or fireproof container, or on cloud storage such as Google Drive, Dropbox or iCloud. Consider where you will store any passwords needed to restore access to the wallet (in your head, on paper, in a password manager, etc.) and who may need access to the password in the future.
Finally it is important to understand that wallet.dat itself is a relatively dangerous way to store large amounts of funds - it is simply a database file storing private keys. While the convenience of storing a wallet file directly is fine for smaller holdings, it is more secure to to store large amounts of Dash on a single predefined address in a way that you are guaranteed access through any software supporting the protocol, rather than a specific implementation of that protocol. If you are interested in this, read more about paper wallets, where the private key can be printed directly or also encrypted using BIP38 for safe storage.
Verifying backups
There is no fixed procedure to verify your backup, but you should test restoring it at least once to make sure it works. If you have a simple copy of the file, try to restore it to your current DashCore folder and start Dash Core to make sure it opens without any errors. If you decided to store the file in an encrypted zip file, make sure you can unzip it and that it opens correctly in Dash Core. In short, make sure that you (or the person you are trusting to eventually go through this process for you) can actually reverse your backup process to get access to your Dash, instead of relying on the fact that this process should theoretically be reversible.
Arguments and commands
All command-line options (except for -datadir and -conf) may be
specified in a configuration file, and all configuration file options
may also be specified on the command line. Command-line options override
values set in the configuration file. The configuration file is a list
of setting=value pairs, one per line, with optional comments
starting with the # character.
The configuration file is not automatically created; you can create it
using your favorite plain-text editor. By default, dash-qt (or dashd)
will look for a file named dash.conf in the dash data directory, but
both the data directory and the configuration file path may be changed
using the -datadir and -conf command-line arguments.
| Platform | Path to data folder | Typical path to configuration file |
|---|---|---|
| Linux | ~/ | /home/username/.dashcore/dash.conf |
| macOS | ~/Library/Application Support/ | /Users/username/Library/Application Support/DashCore/dash.conf |
| Windows | %APPDATA% | (Vista-10) C:\Users\username\AppData\Roaming\DashCore\dash.conf (2000-XP) C:\Documents and Settings\username\Application Data\DashCore\dash.conf |
Note: if running Dash in testnet mode, the sub-folder testnet3 will
be appended to the data directory automatically.
Command line arguments
These commands are accurate as of Dash Core version 0.12.2.1.
Dash Core Daemon
- dashd [options]
- Start Dash Core Daemon
| --help | This help message |
| --version | Print version and exit |
| --alerts | Receive and display P2P network alerts (default: 1) |
| --alertnotify=<cmd> | |
| Execute command when a relevant alert is received or we see a really long fork (%s in cmd is replaced by message) | |
| --blocknotify=<cmd> | |
| Execute command when the best block changes (%s in cmd is replaced by block hash) | |
| --assumevalid=<hex> | |
| If this block is in the chain assume that it and its ancestors are valid and potentially skip their script verification (0 to verify all, default: 00000000000000b4181bbbdddbae464ce11fede5d0292fb63fdede1e7c8ab21c, testnet: 00000ce22113f3eb8636e225d6a1691e132fdd587aed993e1bc9b07a0235eea4) | |
| --conf=<file> | Specify configuration file (default: dash.conf) |
| --daemon | Run in the background as a daemon and accept commands |
| --datadir=<dir> | |
| Specify data directory | |
| --dbcache=<n> | Set database cache size in megabytes (4 to 16384, default: 100) |
| --loadblock=<file> | |
| Imports blocks from external blk000??.dat file on startup | |
| --maxorphantx=<n> | |
| Keep at most <n> unconnectable transactions in memory (default: 100) | |
| --maxmempool=<n> | |
| Keep the transaction memory pool below <n> megabytes (default: 300) | |
| --mempoolexpiry=<n> | |
| Do not keep transactions in the mempool longer than <n> hours (default: 72) | |
| --par=<n> | Set the number of script verification threads (-1 to 16, 0 = auto, <0 = leave that many cores free, default: 0) |
| --pid=<file> | Specify pid file (default: dashd.pid) |
| --prune=<n> | Reduce storage requirements by pruning (deleting) old blocks. This mode is incompatible with -txindex and -rescan. Warning: Reverting this setting requires re-downloading the entire blockchain. (default: 0 = disable pruning blocks, >945 = target size in MiB to use for block files) |
| --reindex-chainstate | |
| Rebuild chain state from the currently indexed blocks | |
| --reindex | Rebuild chain state and block index from the blk*.dat files on disk |
| --sysperms | Create new files with system default permissions, instead of umask 077 (only effective with disabled wallet functionality) |
| --txindex | Maintain a full transaction index, used by the getrawtransaction rpc call (default: 1) |
| --addressindex | Maintain a full address index, used to query for the balance, txids and unspent outputs for addresses (default: 0) |
| --timestampindex | |
| Maintain a timestamp index for block hashes, used to query blocks hashes by a range of timestamps (default: 0) | |
| --spentindex | Maintain a full spent index, used to query the spending txid and input index for an outpoint (default: 0) |
| --addnode=<ip> | Add a node to connect to and attempt to keep the connection open |
| --banscore=<n> | Threshold for disconnecting misbehaving peers (default: 100) |
| --bantime=<n> | Number of seconds to keep misbehaving peers from reconnecting (default: 86400) |
| --bind=<addr> | Bind to given address and always listen on it. Use [host]:port notation for IPv6 |
| --connect=<ip> | Connect only to the specified node(s) |
| --discover | Discover own IP addresses (default: 1 when listening and no -externalip or -proxy) |
| --dns | Allow DNS lookups for -addnode, -seednode and -connect (default: 1) |
| --dnsseed | Query for peer addresses via DNS lookup, if low on addresses (default: 1 unless -connect) |
| --externalip=<ip> | |
| Specify your own public address | |
| --forcednsseed | Always query for peer addresses via DNS lookup (default: 0) |
| --listen | Accept connections from outside (default: 1 if no -proxy or -connect) |
| --listenonion | Automatically create Tor hidden service (default: 1) |
| --maxconnections=<n> | |
| Maintain at most <n> connections to peers (temporary service connections excluded) (default: 125) | |
| --maxreceivebuffer=<n> | |
| Maximum per-connection receive buffer, <n>*1000 bytes (default: 5000) | |
| --maxsendbuffer=<n> | |
| Maximum per-connection send buffer, <n>*1000 bytes (default: 1000) | |
| --onion=<ip:port> | |
| Use separate SOCKS5 proxy to reach peers via Tor hidden services (default: -proxy) | |
| --onlynet=<net> | |
| Only connect to nodes in network <net> (ipv4, ipv6 or onion) | |
| --permitbaremultisig | |
| Relay non-P2SH multisig (default: 1) | |
| --peerbloomfilters | |
| Support filtering of blocks and transaction with bloom filters (default: 1) | |
| --port=<port> | Listen for connections on <port> (default: 9999 or testnet: 19999) |
| --proxy=<ip:port> | |
| Connect through SOCKS5 proxy | |
| --proxyrandomize | |
| Randomize credentials for every proxy connection. This enables Tor stream isolation (default: 1) | |
| --seednode=<ip> | |
| Connect to a node to retrieve peer addresses, and disconnect | |
| --timeout=<n> | Specify connection timeout in milliseconds (minimum: 1, default: 5000) |
| --torcontrol=<ip:port> | |
| Tor control port to use if onion listening enabled (default: 127.0.0.1:9051) | |
| --torpassword=<pass> | |
| Tor control port password (default: empty) | |
| --upnp | Use UPnP to map the listening port (default: 0) |
| --whitebind=<addr> | |
| Bind to given address and whitelist peers connecting to it. Use [host]:port notation for IPv6 | |
| --whitelist=<netmask> | |
| Whitelist peers connecting from the given netmask or IP address. Can be specified multiple times. Whitelisted peers cannot be DoS banned and their transactions are always relayed, even if they are already in the mempool, useful e.g. for a gateway | |
| --whitelistrelay | |
| Accept relayed transactions received from whitelisted peers even when not relaying transactions (default: 1) | |
| --whitelistforcerelay | |
| Force relay of transactions from whitelisted peers even they violate local relay policy (default: 1) | |
| --maxuploadtarget=<n> | |
| Tries to keep outbound traffic under the given target (in MiB per 24h), 0 = no limit (default: 0) | |
| --disablewallet | |
| Do not load the wallet and disable wallet RPC calls | |
| --keypool=<n> | Set key pool size to <n> (default: 1000) |
| --fallbackfee=<amt> | |
| A fee rate (in DASH/kB) that will be used when fee estimation has insufficient data (default: 0.0002) | |
| --mintxfee=<amt> | |
| Fees (in DASH/kB) smaller than this are considered zero fee for transaction creation (default: 0.0001) | |
| --paytxfee=<amt> | |
| Fee (in DASH/kB) to add to transactions you send (default: 0.00) | |
| --rescan | Rescan the block chain for missing wallet transactions on startup |
| --salvagewallet | |
| Attempt to recover private keys from a corrupt wallet.dat on startup | |
| --sendfreetransactions | |
| Send transactions as zero-fee transactions if possible (default: 0) | |
| --spendzeroconfchange | |
| Spend unconfirmed change when sending transactions (default: 1) | |
| --txconfirmtarget=<n> | |
| If paytxfee is not set, include enough fee so transactions begin confirmation on average within n blocks (default: 2) | |
| --maxtxfee=<amt> | |
| Maximum total fees (in DASH) to use in a single wallet transaction; setting this too low may abort large transactions (default: 0.20) | |
| --usehd | Use hierarchical deterministic key generation (HD) after bip39/bip44. Only has effect during wallet creation/first start (default: 0) |
| --mnemonic | User defined mnemonic for HD wallet (bip39). Only has effect during wallet creation/first start (default: randomly generated) |
| --mnemonicpassphrase | |
| User defined mnemonic passphrase for HD wallet (bip39). Only has effect during wallet creation/first start (default: empty string) | |
| --hdseed | User defined seed for HD wallet (should be in hex). Only has effect during wallet creation/first start (default: randomly generated) |
| --upgradewallet | |
| Upgrade wallet to latest format on startup | |
| --wallet=<file> | |
| Specify wallet file (within data directory) (default: wallet.dat) | |
| --walletbroadcast | |
| Make the wallet broadcast transactions (default: 1) | |
| --walletnotify=<cmd> | |
| Execute command when a wallet transaction changes (%s in cmd is replaced by TxID) | |
| --zapwallettxes=<mode> | |
| Delete all wallet transactions and only recover those parts of the blockchain through -rescan on startup (1 = keep tx meta data e.g. account owner and payment request information, 2 = drop tx meta data) | |
| --createwalletbackups=<n> | |
| Number of automatic wallet backups (default: 10) | |
| --walletbackupsdir=<dir> | |
| Specify full path to directory for automatic wallet backups (must exist) | |
| --keepass | Use KeePass 2 integration using KeePassHttp plugin (default: 0) |
| --keepassport=<port> | |
| Connect to KeePassHttp on port <port> (default: 19455) | |
| --keepasskey=<key> | |
| KeePassHttp key for AES encrypted communication with KeePass | |
| --keepassid=<name> | |
| KeePassHttp id for the established association | |
| --keepassname=<name> | |
| Name to construct url for KeePass entry that stores the wallet passphrase | |
| --zmqpubhashblock=<address> | |
| Enable publish hash block in <address> | |
| --zmqpubhashtx=<address> | |
| Enable publish hash transaction in <address> | |
| --zmqpubhashtxlock=<address> | |
| Enable publish hash transaction (locked via InstantSend) in <address> | |
| --zmqpubhashgovernancevote=<address> | |
| Enable publish hash of governance votes in <address> | |
| --zmqpubhashgovernanceobject=<address> | |
| Enable publish hash of governance objects (like proposals) in <address> | |
| --zmqpubhashinstantsenddoublespend=<address> | |
| Enable publish transaction hashes of attempted InstantSend double spend in <address> | |
| --zmqpubrawblock=<address> | |
| Enable publish raw block in <address> | |
| --zmqpubrawtx=<address> | |
| Enable publish raw transaction in <address> | |
| --zmqpubrawtxlock=<address> | |
| Enable publish raw transaction (locked via InstantSend) in <address> | |
| --zmqpubrawinstantsenddoublespend=<address> | |
| Enable publish raw transactions of attempted InstantSend double spend in <address> | |
| --uacomment=<cmt> | |
| Append comment to the user agent string | |
| --debug=<category> | |
| Output debugging information (default: 0, supplying <category> is optional). If <category> is not supplied or if <category> = 1, output all debugging information.<category> can be: addrman, alert, bench, coindb, db, http, libevent, lock, mempool, mempoolrej, net, proxy, prune, rand, reindex, rpc, selectcoins, tor, zmq, dash (or specifically: gobject, instantsend, keepass, masternode, mnpayments, mnsync, privatesend, spork). | |
| --gen | Generate coins (default: 0) |
| --genproclimit=<n> | |
| Set the number of threads for coin generation if enabled (-1 = all cores, default: 1) | |
| --help-debug | Show all debugging options (usage: –help -help-debug) |
| --logips | Include IP addresses in debug output (default: 0) |
| --logtimestamps | |
| Prepend debug output with timestamp (default: 1) | |
| --minrelaytxfee=<amt> | |
| Fees (in DASH/kB) smaller than this are considered zero fee for relaying, mining and transaction creation (default: 0.0001) | |
| --printtoconsole | |
| Send trace/debug info to console instead of debug.log file | |
| --printtodebuglog | |
| Send trace/debug info to debug.log file (default: 1) | |
| --shrinkdebugfile | |
| Shrink debug.log file on client startup (default: 1 when no -debug) | |
| --testnet | Use the test chain |
| --litemode=<n> | Disable all Dash specific functionality (Masternodes, PrivateSend, InstantSend, Governance) (0-1, default: 0) |
| --masternode=<n> | |
| Enable the client to act as a masternode (0-1, default: 0) | |
| --mnconf=<file> | |
| Specify masternode configuration file (default: masternode.conf) | |
| --mnconflock=<n> | |
| Lock masternodes from masternode configuration file (default: 1) | |
| --masternodeprivkey=<n> | |
| Set the masternode private key | |
| --enableprivatesend=<n> | |
| Enable use of automated PrivateSend for funds stored in this wallet (0-1, default: 0) | |
| --privatesendmultisession=<n> | |
| Enable multiple PrivateSend mixing sessions per block, experimental (0-1, default: 0) | |
| --privatesendrounds=<n> | |
| Use N separate masternodes for each denominated input to mix funds (2-16, default: 2) | |
| --privatesendamount=<n> | |
| Keep N DASH anonymized (default: 1000) | |
| --liquidityprovider=<n> | |
| Provide liquidity to PrivateSend by infrequently mixing coins on a continual basis (0-100, default: 0, 1=very frequent, high fees, 100=very infrequent, low fees) | |
| --enableinstantsend=<n> | |
| Enable InstantSend, show confirmations for locked transactions (0-1, default: 1) | |
| --instantsendnotify=<cmd> | |
| Execute command when a wallet InstantSend transaction is successfully locked (%s in cmd is replaced by TxID) | |
| --bytespersigop | |
| Minimum bytes per sigop in transactions we relay and mine (default: 20) | |
| --datacarrier | Relay and mine data carrier transactions (default: 1) |
| --datacarriersize | |
| Maximum size of data in data carrier transactions we relay and mine (default: 83) | |
| --mempoolreplacement | |
| Enable transaction replacement in the memory pool (default: 0) | |
| --blockminsize=<n> | |
| Set minimum block size in bytes (default: 0) | |
| --blockmaxsize=<n> | |
| Set maximum block size in bytes (default: 750000) | |
| --blockprioritysize=<n> | |
| Set maximum size of high-priority/low-fee transactions in bytes (default: 10000) | |
| --server | Accept command line and JSON-RPC commands |
| --rest | Accept public REST requests (default: 0) |
| --rpcbind=<addr> | |
| Bind to given address to listen for JSON-RPC connections. Use [host]:port notation for IPv6. This option can be specified multiple times (default: bind to all interfaces) | |
| --rpccookiefile=<loc> | |
| Location of the auth cookie (default: data dir) | |
| --rpcuser=<user> | |
| Username for JSON-RPC connections | |
| --rpcpassword=<pw> | |
| Password for JSON-RPC connections | |
| --rpcauth=<userpw> | |
| Username and hashed password for JSON-RPC connections. The field <userpw> comes in the format: <USERNAME>:<SALT>$<HASH>. A canonical python script is included in share/rpcuser. This option can be specified multiple times | |
| --rpcport=<port> | |
| Listen for JSON-RPC connections on <port> (default: 9998 or testnet: 19998) | |
| --rpcallowip=<ip> | |
| Allow JSON-RPC connections from specified source. Valid for <ip> are a single IP (e.g. 1.2.3.4), a network/netmask (e.g. 1.2.3.4/255.255.255.0) or a network/CIDR (e.g. 1.2.3.4/24). This option can be specified multiple times | |
| --rpcthreads=<n> | |
| Set the number of threads to service RPC calls (default: 4) | |
Dash Core QT GUI, use same command line options as dashd with additional options for UI as described below.
- dash-qt [command-line options]
- Start Dash Core QT GUI
| --windowtitle=<name> | |
| Wallet window title | |
| --debug=<category> | |
| Output debugging information (default: 0, supplying <category> is optional). If <category> is not supplied or if <category> = 1, output all debugging information.<category> can be: addrman, alert, bench, coindb, db, http, libevent, lock, mempool, mempoolrej, net, proxy, prune, rand, reindex, rpc, selectcoins, tor, zmq, dash (or specifically: gobject, instantsend, keepass, masternode, mnpayments, mnsync, privatesend, spork), qt. | |
| --choosedatadir | |
| Choose data directory on startup (default: 0) | |
| --lang=<lang> | Set language, for example “de_DE” (default: system locale) |
| --min | Start minimized |
| --rootcertificates=<file> | |
| Set SSL root certificates for payment request (default: -system-) | |
| --splash | Show splash screen on startup (default: 1) |
| --resetguisettings | |
| Reset all settings changed in the GUI | |
Dash Core RPC client
- dash-cli [options] <command> [params]
- Send command to Dash Core
- dash-cli [options] help
- List commands
- dash-cli [options] help <command>
- Get help for a command
| --help | This help message |
| --conf=<file> | Specify configuration file (default: dash.conf) |
| --datadir=<dir> | |
| Specify data directory | |
| --testnet | Use the test chain |
| --regtest | Enter regression test mode, which uses a special chain in which blocks can be solved instantly. This is intended for regression testing tools and app development. |
| --rpcconnect=<ip> | |
| Send commands to node running on <ip> (default: 127.0.0.1) | |
| --rpcport=<port> | |
| Connect to JSON-RPC on <port> (default: 9998 or testnet: 19998) | |
| --rpcwait | Wait for RPC server to start |
| --rpcuser=<user> | |
| Username for JSON-RPC connections | |
| --rpcpassword=<pw> | |
| Password for JSON-RPC connections | |
| --rpcclienttimeout=<n> | |
| Timeout during HTTP requests (default: 900) | |
Dash Core dash-tx utility
- dash-tx [options] <hex-tx> [commands]
- Update hex-encoded dash transaction
- dash-tx [options] -create [commands]
- Create hex-encoded dash transaction
| --help | This help message |
| --create | Create new, empty TX. |
| --json | Select JSON output |
| --txid | Output only the hex-encoded transaction id of the resultant transaction. |
| --testnet | Use the test chain |
| --regtest | Enter regression test mode, which uses a special chain in which blocks can be solved instantly. This is intended for regression testing tools and app development. |
- delin=N
- Delete input N from TX
- delout=N
- Delete output N from TX
- in=TXID:VOUT
- Add input to TX
- locktime=N
- Set TX lock time to N
- nversion=N
- Set TX version to N
- outaddr=VALUE:ADDRESS
- Add address-based output to TX
- outdata=[VALUE:]DATA
- Add data-based output to TX
- outscript=VALUE:SCRIPT
- Add raw script output to TX
- sign=SIGHASH-FLAGS
- Add zero or more signatures to transaction. This command requires JSON registers:prevtxs=JSON object, privatekeys=JSON object. See signrawtransaction docs for format of sighash flags, JSON objects.
- load=NAME:FILENAME
- Load JSON file FILENAME into register NAME
- set=NAME:JSON-STRING
- Set register NAME to given JSON-STRING
RPC commands
This documentation lists all available RPC commands as of Dash version 0.12.2.1, and limited documentation on what each command does. For full documentation of arguments, results and examples, type help ( “command” ) to view full details at the console. You can enter commands either from Tools > Debug console in the QT wallet, or using dash-cli for headless wallets and dashd.
- getaddressbalance
- Returns the balance for an address(es) (requires addressindex to be enabled).
- getaddressdeltas
- Returns all changes for an address (requires addressindex to be enabled).
- getaddressmempool
- Returns all mempool deltas for an address (requires addressindex to be enabled).
- getaddresstxids
- Returns the txids for an address(es) (requires addressindex to be enabled).
- getaddressutxos
- Returns all unspent outputs for an address (requires addressindex to be enabled).
- getbestblockhash
- Returns the hash of the best (tip) block in the longest block chain.
- getblock “hash” ( verbose )
- If verbose is false, returns a string that is serialized, hex-encoded data for block ‘hash’. If verbose is true, returns an Object with information about block <hash>.
- getblockchaininfo
- Returns an object containing various state info regarding block chain processing.
- getblockcount
- Returns the number of blocks in the longest block chain.
- getblockhash index
- Returns hash of block in best-block-chain at index provided.
- getblockhashes timestamp
- Returns array of hashes of blocks within the timestamp range provided.
- getblockheader “hash” ( verbose )
- If verbose is false, returns a string that is serialized, hex-encoded data for blockheader ‘hash’. If verbose is true, returns an Object with information about blockheader <hash>.
- getblockheaders “hash” ( count verbose )
- Returns an array of items with information about <count> blockheaders starting from <hash>. If verbose is false, each item is a string that is serialized, hex-encoded data for a single blockheader. If verbose is true, each item is an Object with information about a single blockheader.
- getchaintips ( count branchlen )
- Return information about all known tips in the block tree, including the main chain as well as orphaned branches.
- getdifficulty
- Returns the proof-of-work difficulty as a multiple of the minimum difficulty.
- getmempoolinfo
- Returns details on the active state of the TX memory pool.
- getrawmempool ( verbose )
- Returns all transaction ids in memory pool as a json array of string transaction ids.
- getspentinfo
- Returns the txid and index where an output is spent.
- gettxout “txid” n ( includemempool )
- Returns details about an unspent transaction output.
- gettxoutproof [“txid”,…] ( blockhash )
- Returns a hex-encoded proof that “txid” was included in a block.
- gettxoutsetinfo
- Returns statistics about the unspent transaction output set. Note this call may take some time.
- verifychain ( checklevel numblocks )
- Verifies blockchain database.
- verifytxoutproof “proof”
- Verifies that a proof points to a transaction in a block, returning the transaction it commits to nd throwing an RPC error if the block is not in our best chain.
- debug ( 0 | 1 | addrman | alert | bench | coindb | db | lock | rand | rpc | selectcoins | mempool | mempoolrej | net | proxy | prune | http | libevent | tor | zmq | dash | privatesend | instantsend | masternode | spork | keepass | mnpayments | gobject )
- Change debug category on the fly. Specify single category or use comma to specify many.
- getinfo
- Deprecated. Returns an object containing various state info.
- help ( “command” )
- List all commands, or get help for a specified command.
- stop
- Stop Dash Core server.
- getgovernanceinfo
- Returns an object containing governance parameters.
- getpoolinfo
- Returns an object containing mixing pool related information.
- getsuperblockbudget index
- Returns the absolute maximum sum of superblock payments allowed.
- gobject “command”…
Manage governance objects. Available commands:
- check
- Validate governance object data (proposal only)
- prepare
- Prepare governance object by signing and creating tx
- submit
- Submit governance object to network
- deserialize
- Deserialize governance object from hex string to JSON
- count
- Count governance objects and votes
- get
- Get governance object by hash
- getvotes
- Get all votes for a governance object hash (including old votes)
- getcurrentvotes
- Get only current (tallying) votes for a governance object hash (does not include old votes)
- list
- List governance objects (can be filtered by signal and/or object type)
- diff
- List differences since last diff
- vote-alias
- Vote on a governance object by masternode alias (using masternode.conf setup)
- vote-conf
- Vote on a governance object by masternode configured in dash.conf
- vote-many
- Vote on a governance object by all masternodes (using masternode.conf setup)
- masternode “command”…
Set of commands to execute masternode related actions. Available commands:
- count
- Print number of all known masternodes (optional: ‘ps’, ‘enabled’, ‘all’, ‘qualify’)
- current
- Print info on current masternode winner to be paid the next block (calculated locally)
- genkey
- Generate new masternodeprivkey
- outputs
- Print masternode compatible outputs
- start-alias
- Start single remote masternode by assigned alias configured in masternode.conf
- start-<mode>
- Start remote masternodes configured in masternode.conf (<mode>: ‘all’, ‘missing’, ‘disabled’)
- status
- Print masternode status information
- list
- Print list of all known masternodes (see masternodelist for more info)
- list-conf
- Print masternode.conf in JSON format
- winner
- Print info on next masternode winner to vote for
- winners
- Print list of masternode winners
- masternodebroadcast “command”…
Set of commands to create and relay masternode broadcast messages. Available commands:
- create-alias
- Create single remote masternode broadcast message by assigned alias configured in masternode.conf
- create-all
- Create remote masternode broadcast messages for all masternodes configured in masternode.conf
- decode
- Decode masternode broadcast message
- relay
- Relay masternode broadcast message to the network
- masternodelist ( “mode” “filter” )
- Get a list of masternodes in different modes
- mnsync [status|next|reset]
- Returns the sync status, updates to the next step or resets it entirely.
- privatesend “command”
Available commands:
- start
- Start mixing
- stop
- Stop mixing
- reset
- Reset mixing
- sentinelping version
- Sentinel ping.
- spork <name> [<value>]
- <name> is the corresponding spork name, or ‘show’ to show all current spork settings, active to show which sporks are active<value> is a epoch datetime to enable or disable spork. Requires wallet passphrase to be set with walletpassphrase call.
- voteraw <masternode-tx-hash> <masternode-tx-index> <governance-hash> <vote-signal> [yes|no|abstain] <time> <vote-sig>
- Compile and relay a governance vote with provided external signature instead of signing vote internally.
- generate numblocks
- Mine blocks immediately (before the RPC call returns).
- getgenerate
- Return if the server is set to generate coins or not. The default is false. It is set with the command line argument -gen (or dash.conf setting gen). It can also be set with the setgenerate call.
- setgenerate generate ( genproclimit )
- Set ‘generate’ true or false to turn generation on or off. Generation is limited to ‘genproclimit’ processors, -1 is unlimited. See the getgenerate call for the current setting.
- getblocktemplate ( “jsonrequestobject” )
- If the request parameters include a ‘mode’ key, that is used to explicitly select between the default ‘template’ request or a ‘proposal’. It returns data needed to construct a block to work on.
- getmininginfo
- Returns a json object containing mining-related information.
- getnetworkhashps ( blocks height )
- Returns the estimated network hashes per second based on the last n blocks. Pass in [blocks] to override # of blocks, -1 specifies since last difficulty change. Pass in [height] to estimate the network speed at the time when a certain block was found.
- prioritisetransaction <txid> <priority delta> <fee delta>
- Accepts the transaction into mined blocks at a higher (or lower) priority.
- submitblock “hexdata” ( “jsonparametersobject” )
- Attempts to submit new block to network. The ‘jsonparametersobject’ parameter is currently ignored. See https://en.bitcoin.it/wiki/BIP_0022 for full specification.
- addnode “node” “add|remove|onetry”
- Attempts add or remove a node from the addnode list. Or try a connection to a node once.
- clearbanned
- Clear all banned IPs.
- disconnectnode “node”
- Immediately disconnects from the specified node.
- getaddednodeinfo dummy ( “node” )
- Returns information about the given added node, or all added nodes (note that onetry addnodes are not listed here).
- getconnectioncount
- Returns the number of connections to other nodes.
- getnettotals
- Returns information about network traffic, including bytes in, bytes out, and current time.
- getnetworkinfo
- Returns an object containing various state info regarding P2P networking.
- getpeerinfo
- Returns data about each connected network node as a json array of objects.
- listbanned
- List all banned IPs/Subnets.
- ping
- Requests that a ping be sent to all other nodes, to measure ping time. Results provided in getpeerinfo, pingtime and pingwait fields are decimal seconds. Ping command is handled in queue with all other commands, so it measures processing backlog, not just network ping.
- setban “ip(/netmask)” “add|remove” (bantime) (absolute)
- Attempts add or remove a IP/Subnet from the banned list.
- setnetworkactive true|false
- Disable/enable all p2p network activity.
- createrawtransaction [{“txid”:”id”,”vout”:n},…] {“address”:amount,”data”:”hex”,…} ( locktime )
- Create a transaction spending the given inputs and creating new outputs. Outputs can be addresses or data. Returns hex-encoded raw transaction. Note that the transaction’s inputs are not signed, and it is not stored in the wallet or transmitted to the network.
- decoderawtransaction “hexstring”
- Return a JSON object representing the serialized, hex-encoded transaction.
- decodescript “hex”
- Decode a hex-encoded script.
- fundrawtransaction “hexstring” includeWatching
- Add inputs to a transaction until it has enough in value to meet its out value. This will not modify existing inputs, and will add one change output to the outputs.
- getrawtransaction “txid” ( verbose )
- Return the raw transaction data. If verbose=0, returns a string that is serialized, hex-encoded data for ‘txid’. If verbose is non-zero, returns an Object with information about ‘txid’.
- sendrawtransaction “hexstring” ( allowhighfees instantsend )
- Submits raw transaction (serialized, hex-encoded) to local node and network. Also see createrawtransaction and signrawtransaction calls.
- signrawtransaction “hexstring” ( [{“txid”:”id”,”vout”:n,”scriptPubKey”:”hex”,”redeemScript”:”hex”},…] [“privatekey1”,…] sighashtype )
- Sign inputs for raw transaction (serialized, hex-encoded). The second optional argument (may be null) is an array of previous transaction outputs that this transaction depends on but may not yet be in the block chain. The third optional argument (may be null) is an array of base58-encoded private keys that, if given, will be the only keys used to sign the transaction.
- createmultisig nrequired [“key”,…]
- Creates a multi-signature address with n signature of m keys required. It returns a json object with the address and redeemScript.
- estimatefee nblocks
- Estimates the approximate fee per kilobyte needed for a transaction to begin confirmation within nblocks blocks.
- estimatepriority nblocks
- Estimates the approximate priority a zero-fee transaction needs to begin confirmation within nblocks blocks.
- estimatesmartfee nblocks
- WARNING: This interface is unstable and may disappear or change! Estimates the approximate fee per kilobyte needed for a transaction to begin confirmation within nblocks blocks if possible and return the number of blocks for which the estimate is valid.
- estimatesmartpriority nblocks
- WARNING: This interface is unstable and may disappear or change! Estimates the approximate priority a zero-fee transaction needs to begin confirmation within nblocks blocks if possible and return the number of blocks for which the estimate is valid.
- validateaddress “dashaddress”
- Return information about the given dash address.
- verifymessage “dashaddress” “signature” “message”
- Verify a signed message.
- abandontransaction “txid”
- Mark in-wallet transaction <txid> as abandoned. This will mark this transaction and all its in-wallet descendants as abandoned which will allow for their inputs to be respent.
- addmultisigaddress nrequired [“key”,…] ( “account” )
- Add a nrequired-to-sign multisignature address to the wallet. Each key is a Dash address or hex-encoded public key. If ‘account’ is specified (DEPRECATED), assign address to that account.
- backupwallet “destination”
- Safely copies wallet.dat to destination, which can be a directory or a path with filename.
- dumphdinfo
- Returns an object containing sensitive private info about this HD wallet.
- dumpprivkey “dashaddress”
- Reveals the private key corresponding to ‘dashaddress’. Then the importprivkey can be used with this output
- dumpwallet “filename”
- Dumps all wallet keys in a human-readable format.
- encryptwallet “passphrase”
- Encrypts the wallet with ‘passphrase’. This is for first time encryption. After this, any calls that interact with private keys such as sending or signing will require the passphrase to be set prior the making these calls. Use the walletpassphrase call for this, and then walletlock call. If the wallet is already encrypted, use the walletpassphrasechange call. Note that this will shutdown the server.
- getaccount “dashaddress”
- DEPRECATED. Returns the account associated with the given address.
- getaccountaddress “account”
- DEPRECATED. Returns the current Dash address for receiving payments to this account.
- getaddressesbyaccount “account”
- DEPRECATED. Returns the list of addresses for the given account.
- getbalance ( “account” minconf addlocked includeWatchonly )
- If account is not specified, returns the server’s total available balance. If account is specified (DEPRECATED), returns the balance in the account. Note that the account “” is not the same as leaving the parameter out. The server total may be different to the balance in the default “” account.
- getnewaddress ( “account” )
- Returns a new Dash address for receiving payments. If ‘account’ is specified (DEPRECATED), it is added to the address book so payments received with the address will be credited to ‘account’.
- getrawchangeaddress
- Returns a new Dash address, for receiving change. This is for use with raw transactions, NOT normal use.
- getreceivedbyaccount “account” ( minconf addlocked )
- DEPRECATED. Returns the total amount received by addresses with <account> in transactions with specified minimum number of confirmations.
- getreceivedbyaddress “dashaddress” ( minconf addlocked )
- Returns the total amount received by the given dashaddress in transactions with specified minimum number of confirmations.
- gettransaction “txid” ( includeWatchonly )
- Get detailed information about in-wallet transaction <txid>
- getunconfirmedbalance
- Returns the server’s total unconfirmed balance.
- getwalletinfo
- Returns an object containing various wallet state info.
- importaddress “address” ( “label” rescan p2sh )
- Adds a script (in hex) or address that can be watched as if it were in your wallet but cannot be used to spend.
- importelectrumwallet “filename” index
- Imports keys from an Electrum wallet export file (.csv or .json)
- importprivkey “dashprivkey” ( “label” rescan )
- Adds a private key (as returned by dumpprivkey) to your wallet.
- importpubkey “pubkey” ( “label” rescan )
- Adds a public key (in hex) that can be watched as if it were in your wallet but cannot be used to spend.
- importwallet “filename”
- Imports keys from a wallet dump file (see dumpwallet).
- instantsendtoaddress “dashaddress” amount ( “comment” “comment-to” subtractfeefromamount )
- Send an amount to a given address. The amount is a real and is rounded to the nearest 0.00000001
- keepass <genkey|init|setpassphrase>
- Keepass settings.
- keypoolrefill ( newsize )
- Fills the keypool.
- listaccounts ( minconf addlocked includeWatchonly)
- DEPRECATED. Returns Object that has account names as keys, account balances as values.
- listaddressgroupings
- Lists groups of addresses which have had their common ownership made public by common use as inputs or as the resulting change in past transactions.
- listlockunspent
- Returns list of temporarily unspendable outputs. See the lockunspent call to lock and unlock transactions for spending.
- listreceivedbyaccount ( minconf addlocked includeempty includeWatchonly)
- DEPRECATED. List balances by account.
- listreceivedbyaddress ( minconf addlocked includeempty includeWatchonly)
- List balances by receiving address.
- listsinceblock ( “blockhash” target-confirmations includeWatchonly)
- Get all transactions in blocks since block [blockhash], or all transactions if omitted
- listtransactions ( “account” count from includeWatchonly)
- Returns up to ‘count’ most recent transactions skipping the first ‘from’ transactions for account ‘account’.
- listunspent ( minconf maxconf [“address”,…] )
- Returns array of unspent transaction outputs with between minconf and maxconf (inclusive) confirmations. Optionally filter to only include txouts paid to specified addresses.
- lockunspent unlock [{“txid”:”txid”,”vout”:n},…]
- Updates list of temporarily unspendable outputs. Temporarily lock (unlock=false) or unlock (unlock=true) specified transaction outputs.
- move “fromaccount” “toaccount” amount ( minconf “comment” )
- DEPRECATED. Move a specified amount from one account in your wallet to another.
- sendfrom “fromaccount” “todashaddress” amount ( minconf addlocked “comment” “comment-to” )
- DEPRECATED (use sendtoaddress). Sent an amount from an account to a dash address.
- sendmany “fromaccount” {“address”:amount,…} ( minconf addlocked “comment” [“address”,…] subtractfeefromamount use_is use_ps )
- Send multiple times. Amounts are double-precision floating point numbers.
- sendtoaddress “dashaddress” amount ( “comment” “comment-to” subtractfeefromamount use_is use_ps )
- Send an amount to a given address.
- setaccount “dashaddress” “account”
- DEPRECATED. Sets the account associated with the given address.
- settxfee amount
- Set the transaction fee per kB. Overwrites the paytxfee parameter.
- signmessage “dashaddress” “message”
- Sign a message with the private key of an address.
- walletlock
- Removes the wallet encryption key from memory, locking the wallet. After calling this method, you will need to call walletpassphrase again before being able to call any methods which require the wallet to be unlocked.
- walletpassphrase “passphrase” timeout ( mixingonly )
- Stores the wallet decryption key in memory for ‘timeout’ seconds. This is needed prior to performing transactions related to private keys such as sending dashs
- walletpassphrasechange “oldpassphrase” “newpassphrase”
- Changes the wallet passphrase from ‘oldpassphrase’ to ‘newpassphrase’.
Advanced topics
Coin Control
Coin Control allows users of the Dash Core Wallet to specify which addresses and Unspent Transaction Outputs (UTXOs) should be used as inputs in transactions. This allows you to keep a specific balance on certain addresses in your wallet, while spending others freely. In Dash Core Wallet, click Settings > Options > Wallet > Enable coin control features. Now, when you go to the Send tab in your wallet, a new button labelled Inputs… will appear. Click this button to select which UTXOs can be used as input for any transactions you create. The following window appears:

Coin Selection window in Dash Core wallet, showing two masternodes (testnet)
Right click on the transaction(s) you do not want to spend, then select Lock unspent. A small lock will appear next to the transaction. You can click the Toggle lock state button to invert the locked/unlocked state of all UTXOs. When you are ready to continue, click OK. You can now safely create transactions with your remaining funds without affecting the locked UTXOs.


Locking UTXOs in Dash Core wallet
HD Wallets
Since version 0.12.2.0, Dash Core has included an implementation of
BIP39/BIP44 compatible hierarchical deterministic (HD) key generation.
This functionality is only available from the command line by specifying
the usehd option when starting Dash Core for the first time. Use
this function with care, since the mnemonic seed and keys will be stored
in plain text until you specify a wallet passphrase. Note that the
wallet passphrase is different to the mnemonic passphrase, which is
often also referred to as the “25th word” or “extension word”. The
wallet passphrase encrypts the wallet file itself, while the mnemonic
passphrase is used to specify different derivation branches from the
same mnemonic seed.
We will use the Windows GUI wallet in this example, but the commands are
similar if using dash-qt or dashd on other operating systems.
Enter the following command to get started with a randomly generated HD
wallet seed and no mnemonic passphrase:
dash-qt.exe --usehd=1
A new HD wallet will be generated and Dash Core will display a warning
informing you that you must encrypt your wallet after verifying it works
correctly. Open the console from Tools -> Debug console or issue the
following RPC command from dash-cli to view the mnemonic seed:
dumphdinfo
Dash Core will display the HD seed in both hexadecimal and as a BIP39
mnemonic. To restore an existing HD wallet, or define your own
separately generated mnemonic and/or passphrase, ensure no
wallet.dat file exists in the datadir and enter the following
command:
dash-qt.exe --usehd=1 --mnemonic="enter mnemonic" --mnemonicpassphrase="optional mnemonic passphrase"
The HD wallet will be restored and your balance will appear once sync is complete.
Multisignature
This section presents a worked example to demonstrate multisig functionality in Dash Core. While the transactions are no longer visible on the current testnet blockchain and some address formats or RPC responses may differ slightly from the version shown here, the principle and commands are the same. The example demonstrates how to set up a 2-of-3 multisig address and create a transaction. The example parties involved are a buyer, a seller and an arbiter. This example is based on:
- https://people.xiph.org/~greg/escrowexample.txt
- https://gist.github.com/gavinandresen/3966071
- https://bitcoin.org/en/developer-examples#p2sh-multisig
Seller:
seller@testnet03:~$ ./dash-cli getnewaddress
n18cPEtj4ZfToPZxRszUz2XPts4eGsxiPk
seller@testnet03:~$ ./dash-cli validateaddress n18cPEtj4ZfToPZxRszUz2XPts4eGsxiPk
{
"isvalid" : true,
"address" : "n18cPEtj4ZfToPZxRszUz2XPts4eGsxiPk",
"ismine" : true,
"isscript" : false,
"pubkey" : "02a862b412ff9e3afd01a2873a02622897f6df92e3fc85597788b898309fec882e",
"iscompressed" : true,
"account" : ""
}
seller@testnet03:~$ ./dash-cli dumpprivkey n18cPEtj4ZfToPZxRszUz2XPts4eGsxiPk
cVQVgBr8sW4FTPYz16BSCo1PcAfDhpJArgMPdLxKZQWcVFwMXRXx
Buyer:
buyer@testnet03:~$ ./dash-cli getnewaddress
mp5orHuaFaHCXFSCeYvUPL7H16JU8fKG6u
buyer@testnet03:~$ ./dash-cli validateaddress mp5orHuaFaHCXFSCeYvUPL7H16JU8fKG6u
{
"isvalid" : true,
"address" : "mp5orHuaFaHCXFSCeYvUPL7H16JU8fKG6u",
"ismine" : true,
"isscript" : false,
"pubkey" : "0315617694c9d93f0ce92769e050a6868ffc74d229077379c0af8bfb193c3d351c",
"iscompressed" : true,
"account" : ""
}
buyer@testnet03:~$ ./dash-cli dumpprivkey mp5orHuaFaHCXFSCeYvUPL7H16JU8fKG6u
cP9DFmEDb11waWbQ8eG1YUoZCGe59BBxJF3kk95PTMXuG9HzcxnU
Arbiter:
arbiter@testnet03:~$ ./dash-cli getnewaddress
n1cZSyQXhach5rrj2tm5wg6JC7uZ3qPNiN
arbiter@testnet03:~$ ./dash-cli validateaddress n1cZSyQXhach5rrj2tm5wg6JC7uZ3qPNiN
{
"isvalid" : true,
"address" : "n1cZSyQXhach5rrj2tm5wg6JC7uZ3qPNiN",
"ismine" : true,
"isscript" : false,
"pubkey" : "0287ce6cf69b85593ce7db801874c9a2fb1b653dbe5dd9ebfa73e98b710af9e9ce",
"iscompressed" : true,
"account" : ""
}
arbiter@testnet03:~$ ./dash-cli dumpprivkey n1cZSyQXhach5rrj2tm5wg6JC7uZ3qPNiN
cUbDFL81a2w6urAGZf7ecGbdzM82pdHLeCaPXdDp71s96SzDV49M
This results in three keypairs (public/private):
seller: 02a862b412ff9e3afd01a2873a02622897f6df92e3fc85597788b898309fec882e / cVQVgBr8sW4FTPYz16BSCo1PcAfDhpJArgMPdLxKZQWcVFwMXRXx
buyer: 0315617694c9d93f0ce92769e050a6868ffc74d229077379c0af8bfb193c3d351c / cP9DFmEDb11waWbQ8eG1YUoZCGe59BBxJF3kk95PTMXuG9HzcxnU
arbiter: 0287ce6cf69b85593ce7db801874c9a2fb1b653dbe5dd9ebfa73e98b710af9e9ce / cUbDFL81a2w6urAGZf7ecGbdzM82pdHLeCaPXdDp71s96SzDV49M
The createmultisig command takes as variables the number n
signatures of m keys (supplied as json array) required. In this example,
2 of 3 keys are required to sign the transaction.
Note: The address can be created by anyone, as long as the public keys and their sequence are known (resulting address and redeemScript are identical, see below).
Seller:
seller@testnet03:~$ ./dash-cli createmultisig 2 '["02a862b412ff9e3afd01a2873a02622897f6df92e3fc85597788b898309fec882e","0315617694c9d93f0ce92769e050a6868ffc74d229077379c0af8bfb193c3d351c","0287ce6cf69b85593ce7db801874c9a2fb1b653dbe5dd9ebfa73e98b710af9e9ce"]'
{
"address" : "2MuEQCZh7VB8pNrT4bj1CFZQh2oK7XZYLQf",
"redeemScript" : "522102a862b412ff9e3afd01a2873a02622897f6df92e3fc85597788b898309fec882e210315617694c9d93f0ce92769e050a6868ffc74d229077379c0af8bfb193c3d351c210287ce6cf69b85593ce7db801874c9a2fb1b653dbe5dd9ebfa73e98b710af9e9ce53ae"
}
Buyer:
buyer@testnet03:~$ ./dash-cli createmultisig 2 '["02a862b412ff9e3afd01a2873a02622897f6df92e3fc85597788b898309fec882e","0315617694c9d93f0ce92769e050a6868ffc74d229077379c0af8bfb193c3d351c","0287ce6cf69b85593ce7db801874c9a2fb1b653dbe5dd9ebfa73e98b710af9e9ce"]'
{
"address" : "2MuEQCZh7VB8pNrT4bj1CFZQh2oK7XZYLQf",
"redeemScript" : "522102a862b412ff9e3afd01a2873a02622897f6df92e3fc85597788b898309fec882e210315617694c9d93f0ce92769e050a6868ffc74d229077379c0af8bfb193c3d351c210287ce6cf69b85593ce7db801874c9a2fb1b653dbe5dd9ebfa73e98b710af9e9ce53ae"
}
Arbiter:
arbiter@testnet03:~$ ./dash-cli createmultisig 2 '["02a862b412ff9e3afd01a2873a02622897f6df92e3fc85597788b898309fec882e","0315617694c9d93f0ce92769e050a6868ffc74d229077379c0af8bfb193c3d351c","0287ce6cf69b85593ce7db801874c9a2fb1b653dbe5dd9ebfa73e98b710af9e9ce"]'
{
"address" : "2MuEQCZh7VB8pNrT4bj1CFZQh2oK7XZYLQf",
"redeemScript" : "522102a862b412ff9e3afd01a2873a02622897f6df92e3fc85597788b898309fec882e210315617694c9d93f0ce92769e050a6868ffc74d229077379c0af8bfb193c3d351c210287ce6cf69b85593ce7db801874c9a2fb1b653dbe5dd9ebfa73e98b710af9e9ce53ae"
}
This works the same as a usual transaction.
Buyer:
buyer@testnet03:~$ ./dash-cli sendtoaddress 2MuEQCZh7VB8pNrT4bj1CFZQh2oK7XZYLQf 777.77
a8b3bf5bcace91a8dbbddbf9b7eb027efb9bd001792f043ecf7b558aaa3cb951
The seller/arbiter can trace the transaction by its txid in the block explorer. Or from the console as follows.
Buyer:
seller@testnet03:~$ ./dash-cli getrawtransaction a8b3bf5bcace91a8dbbddbf9b7eb027efb9bd001792f043ecf7b558aaa3cb951 1
{
"hex" : "010000001a2e514dd90f666e3de4cddd22682ae1ca7225988656369d98228c742482fee16b010000006b48304502200ea8dddd404aac644fd382d3089480f2c9a6ce753a3c4fc0b12ac81afe8ffa3b022100d88f698a0d9fefbbf76240790530fe7e23bf6b354a1feedb4effa99813405b00012103954bfa8b6b1b0f1f5624ea2925b18cd1477fde2087eada1a51323a6617172689ffffffff3181c52614be8742c36665b6a287a2d6c7970494b0a341ff9595c1c9a8f23aa2010000006b483045022041ee176da4df13adc782c9ff2afdb24c4e1b61b450895486388431bf1a88b81f02210082be1b3bd20d3f121c971fb745cba52523f6b8093ec93df5987c9beb302c19ac012103954bfa8b6b1b0f1f5624ea2925b18cd1477fde2087eada1a51323a6617172689ffffffff332356f7d5e4264302ca4cc0f38d2a75a9b4c1df4bc4f94044f8a8fab81b7e1b010000006b483045022100dc322074961ae5e2e8cb11828301b1e083eff9ed6078aa064c52ed70d52737410220776b99c8552bbc2e644c7450ef8502d3497c3de7196b176f1c49cca18d1ff09f012103954bfa8b6b1b0f1f5624ea2925b18cd1477fde2087eada1a51323a6617172689ffffffff388b56a8a74338ce10e931dc198ed25fa4cb7213e0ea9905d32a3e902366661f010000006b48304502206d2cdfe9af498e9e46f88d0bd881746bf2dae182664d03f7a635ff599bdee84b022100bf3a7b88ed80b30d8915a2ae34d546defbc9a660ebf941afb4aa29461e0b4c95012103954bfa8b6b1b0f1f5624ea2925b18cd1477fde2087eada1a51323a6617172689ffffffff44578d7579bef2a204359f8c878993480b306193d954ee735c53f8b3e076c3ea010000006c4930460221008a67da5764934392437fa9e05483e4b29204fd5d78dea01f744d4a23c403881b022100c77e58307f58953b578de568138659b4efd2fadaec51917c2270fab0bd4a57a6012103954bfa8b6b1b0f1f5624ea2925b18cd1477fde2087eada1a51323a6617172689ffffffff4a3b7b666ce8f249ef4f253b7f718fb5cc2f21f899608d319bcc04c75ec47353010000006b48304502203ca5a0559647ee0d1790714296396ca0bca27a3ef3e68f76706c63da9cd3684f0221008c9529f7a54d89440f8dca89c1c47725821012670d05a70681b57f182b069a74012103954bfa8b6b1b0f1f5624ea2925b18cd1477fde2087eada1a51323a6617172689ffffffff4ab5d98908e4424929bfdba3d6402e6b45db60a622b4df8c73da1b37bdb949a4010000006b48304502210094da4e007ba94cdb47a8c4805dab4b93dc475a44340a9b6f6d7956d49749e3d3022077b94861995ffe3f59429bf5b873914d3c1157f23f018697650bc3bd2dc2de1f012103954bfa8b6b1b0f1f5624ea2925b18cd1477fde2087eada1a51323a6617172689ffffffff4cd58c1ad5b0ffd8556deff402854d94a79222799916be8e0f88d0cca3c38c85010000006b483045022030e72eec0386c83489efff8f3c71aed8eec0265565cddeb1492aab6644cc63220221008d6df06656dae12dae573b860d65045f088e4df5e2127902231d8edd4196ef1d012103954bfa8b6b1b0f1f5624ea2925b18cd1477fde2087eada1a51323a6617172689ffffffff501ff2345fc47b9b7749afcc32e790fdbe5d22fd96b2c5d0522d4cad0cd5566f010000006a47304402204e9bc23796974fdf323c49399ca7db76e2238630add4c617631549f4595af4a80220658038b14884c1a0d730de79c7e2769d4d28135ed7896e7aff01ca94c8edf7bb012103954bfa8b6b1b0f1f5624ea2925b18cd1477fde2087eada1a51323a6617172689ffffffff5020fe72d4c1038213cc3e1b99f5b313c4b2d57f1e0d9abba90860dc5c38630a010000006a473044022071b7cca6a7d72fef4b46ad425c23c37f28c72501e5e61821f00e022c4c8ef49502200d8ba406fe336d64a8ae909cad20d0ffe302cd977900013ea72b37c488550625012103954bfa8b6b1b0f1f5624ea2925b18cd1477fde2087eada1a51323a6617172689ffffffff59f32023d4225cc193182e81444f00f6d95652a9458daa08f4324ab4bdac7bed010000006b4830450221009e0f701840c01c2c37e2baec0ea2c43d517126107ef874c3d68f32dfa2e4f05f02206d1306dee274267598d5ab8d7c4c26346d25d8118b30a6921b9b238307916d6e012103954bfa8b6b1b0f1f5624ea2925b18cd1477fde2087eada1a51323a6617172689ffffffff05b5b8ecaf7bcbd5fdfc64fd7dbd6ebfee18dcaf57e00b6711ba0abe4329eb23010000006a47304402200515822e6d9641c72f1af7968ba63d47463caffeca03733750b0866ef123fe00022071fd40bac12aa1d36244fc5391162b70ec306a5ed2dffef3a3d4995524317a10012103954bfa8b6b1b0f1f5624ea2925b18cd1477fde2087eada1a51323a6617172689ffffffff09cc372e4409bcbacd85adb17918ca5b20427dc280b44bd4f234fb698ac07fc6010000006b483045022051e5c430110e8b0d85693c421031f14abf89bee1a14702e6655a1eaa2663927c0221009a54781fddd4093032507f12fe8a97ce926a743851a1a56c2ca70026ce98b7e6012103954bfa8b6b1b0f1f5624ea2925b18cd1477fde2087eada1a51323a6617172689ffffffff0963f2cc80666835ae8c5939ac3011d2962ae88e872cdc13257cfb0188f83c7a010000006b483045022032fd819b1cdb8f506e27f26b3e46330c498b965386c3e96c34dceeff2a517cf7022100a4c34d77ed25116dc05ca7d783bd6cb91c1e38db0541878dac72f2d63d4b7c11012103954bfa8b6b1b0f1f5624ea2925b18cd1477fde2087eada1a51323a6617172689ffffffff14cff38ccbdd840ffc491614e9b5167edb6ad6b9eeaf8e3dc30feaeefa39d820010000006c493046022100f4d6dfce7778acee6bdcf9f2ec39dbf902b6ca977b8622c886eadddefa01bf5502210089b3c2d23b5fc5b03d2d6ea4bf28f04b98342b02dd7d2020a6466bddd85c3d50012103954bfa8b6b1b0f1f5624ea2925b18cd1477fde2087eada1a51323a6617172689ffffffff63750bbce93657a59fe3472fce714eafa09791fcf7f687f30a923162f2ba5196010000006c493046022100bbbf84829fcc2ec70bc6d77cfc69f512c1a14359958eee46243001908dc2a0ab0221008f1fbda61fcfccb78fe6d4e6385e8f508035676ef82654425bb704727f1e59b4012103954bfa8b6b1b0f1f5624ea2925b18cd1477fde2087eada1a51323a6617172689ffffffff6466da482404f4a719f7eb16798d05878af2c36ad7174e2b68964693f39e954b010000006a47304402204d57344da5a1a29ea800215d19ada89787b1026f7e47c2f2f1ea0ef82bec5b6d02203039bd98546843a99d9e6749819875a4d996a682c57a192d9e5cef9b694a028b012103954bfa8b6b1b0f1f5624ea2925b18cd1477fde2087eada1a51323a6617172689ffffffff8b0b4a84522fded19446eef3fdd94cc0f7449c71b6e0080837d5f240c78ce03b010000006c493046022100c152177ec49bb572d70976b53c10d0c4be55584975d657c43e87fbaac8c081ec0221009dd150697257cf769c3e90afbde88fbbe5f95c17c561883546537644ed628f6f012103954bfa8b6b1b0f1f5624ea2925b18cd1477fde2087eada1a51323a6617172689ffffffff8d7078622b75fc2c3ea1094d07099b0e460a7f7a4c53cf225d066f919f17daf6010000006b483045022100e440d404867748cfba792119faae12d286b265a185cec86215fe2737ec1e7ca402207770447154f81564f7022b375943c2b7eaf3d05a3281c6f5c70328b098423d7d012103954bfa8b6b1b0f1f5624ea2925b18cd1477fde2087eada1a51323a6617172689ffffffff98c23cc59412943bfedba3b4a48bb2f97f58c119946e5c492031c43a36dd576e010000006c493046022100910cf6fb057269e5e02fa44fc2ba03925d9e0e3232d3d5a66aac440db9627f9f022100b656d982dec47000de616f21a331b1fb5e19d1ab312c5845f5f1538dac4dd301012103954bfa8b6b1b0f1f5624ea2925b18cd1477fde2087eada1a51323a6617172689ffffffff9d4851f00e3c2fa22816adc55703fcb539ae0fe218f369f23af079964a6225fc020000006c4930460221009918ee137e4aead4760c79dbe940556ae1ecb7935a653543b486f4198f16cc6a022100f82e04cd970f2c5fd8dd48813e38f87c10ed8fa7b45eec1854562948f9d43a1b012103954bfa8b6b1b0f1f5624ea2925b18cd1477fde2087eada1a51323a6617172689ffffffffa13c3221f0e08289657208bccf7b466ea5795c591751065a20b16f00892bd598010000006b483045022073d9fed13def14a655fd423f5c4fa63e46eeea76668cdf8bb89d96630890760d022100f70edce3513c9cbc671f92dc0b4d97c5edc0d9d26f4e726bb2d66776a3b9e411012103954bfa8b6b1b0f1f5624ea2925b18cd1477fde2087eada1a51323a6617172689ffffffffcac4f229bd19c47cd15ee9355af8383531a960ba0e0f3e8e4fa0a607ab2000d9010000006b483045022100967624e60a7670e849eb7500cf185620fd65de10d1e5f7cef9131d3c6403cb5f022005182af16fba1b7dbdd27a8935205b439c6034d566c6f14950aba6bb328cbf79012103954bfa8b6b1b0f1f5624ea2925b18cd1477fde2087eada1a51323a6617172689ffffffffcbf8cb94ee2bcda1c9ceb54feaf6815441f722b70c4f7569525cc9dee7cbbdc2010000006b4830450221008cfcfdc62f0a398e2419ebd56cf067e2abadf8116936250939b9fa763dd428680220052c6d316189d5f7164d2423aae99e97d05165f3e5c7d138e2858f0adab4ebba012103954bfa8b6b1b0f1f5624ea2925b18cd1477fde2087eada1a51323a6617172689ffffffffdbad6da5900987f77e5bcf714c935889fbea2d3ff388586a331fe42e0a82efe0010000006c493046022100e80d73130bcd25faa73764f4ff6c05e1b401f3960b7ef30b4244daaf5fce953a022100b99a55caaaa312df54c7d743791052c3e8392725becf91d2aa886d2e8259af10012103954bfa8b6b1b0f1f5624ea2925b18cd1477fde2087eada1a51323a6617172689fffffffffdc2d56fd131ae16837fc86e3015c9e78077dd36b6a2591cf1d500c584bbcc6a010000006b483045022100d13e5a55a4a71e039603bd2d3d76a757c63b1d199bcf340e3f2eeb5bed10897c022046a43ecc6cd8295981bde38c34c29708e402db59fc93e657196fc3032858d967012103954bfa8b6b1b0f1f5624ea2925b18cd1477fde2087eada1a51323a6617172689ffffffff0240d6de1b1200000017a91415c85c2472f5941b60a49462a2cfd0d17ab49d1c87c02fdf67000000001976a914b8d899f7193a7b3278be037b006c8f08998ebef388ac00000000",
"txid" : "a8b3bf5bcace91a8dbbddbf9b7eb027efb9bd001792f043ecf7b558aaa3cb951",
"version" : 1,
"locktime" : 0,
[...]
"vout" : [
{
"value" : 777.77000000,
"n" : 0,
"scriptPubKey" : {
"asm" : "OP_HASH160 15c85c2472f5941b60a49462a2cfd0d17ab49d1c OP_EQUAL",
"hex" : "a91415c85c2472f5941b60a49462a2cfd0d17ab49d1c87",
"reqSigs" : 1,
"type" : "scripthash",
"addresses" : [
"2MuEQCZh7VB8pNrT4bj1CFZQh2oK7XZYLQf"
]
}
},
[...]
],
"blockhash" : "000000034def806f348cadf6a80660aed1cfc30ccbd1492a8ea87062800ea94d",
"confirmations" : 3,
"time" : 1409224896,
"blocktime" : 1409224896
}
Now we assume the deal is complete, the buyer got the goods and everyone is happy. Now the seller wants to get his Dash. As a 2-of-3 multisig was used, the transaction must be signed by 2 parties (seller + buyer or arbiter). The seller creates a transaction (we will reuse his public address from above).
Seller:
seller@testnet03:~$ ./dash-cli createrawtransaction '[{"txid":"a8b3bf5bcace91a8dbbddbf9b7eb027efb9bd001792f043ecf7b558aaa3cb951","vout":0}]' '{"n18cPEtj4ZfToPZxRszUz2XPts4eGsxiPk":777.77}'
010000000151b93caa8a557bcf3e042f7901d09bfb7e02ebb7f9dbbddba891ceca5bbfb3a80000000000ffffffff0140d6de1b120000001976a914d728be76cd74b5d148eba2a49246b80dac12f73e88ac00000000
And partially signs it, using the redeemScript, scriptPubKey and his private key
Seller:
seller@testnet03:~$ ./dash-cli signrawtransaction '010000000151b93caa8a557bcf3e042f7901d09bfb7e02ebb7f9dbbddba891ceca5bbfb3a80000000000ffffffff0140d6de1b120000001976a914d728be76cd74b5d148eba2a49246b80dac12f73e88ac00000000' '[{"txid":"a8b3bf5bcace91a8dbbddbf9b7eb027efb9bd001792f043ecf7b558aaa3cb951","vout":0,"scriptPubKey":"a91415c85c2472f5941b60a49462a2cfd0d17ab49d1c87","redeemScript":"522102a862b412ff9e3afd01a2873a02622897f6df92e3fc85597788b898309fec882e210315617694c9d93f0ce92769e050a6868ffc74d229077379c0af8bfb193c3d351c210287ce6cf69b85593ce7db801874c9a2fb1b653dbe5dd9ebfa73e98b710af9e9ce53ae"}]' '["cVQVgBr8sW4FTPYz16BSCo1PcAfDhpJArgMPdLxKZQWcVFwMXRXx"]'
{
"hex" : "010000000151b93caa8a557bcf3e042f7901d09bfb7e02ebb7f9dbbddba891ceca5bbfb3a800000000b500483045022051a7f0e95a5066859ce37fe64a6e7ab6e30bfe9a68d9d3f1453064052eab5625022100c0067a33d2ee02478d89fc1a71f3a93c883db022e970886181c50ca9afc3dfa4014c69522102a862b412ff9e3afd01a2873a02622897f6df92e3fc85597788b898309fec882e210315617694c9d93f0ce92769e050a6868ffc74d229077379c0af8bfb193c3d351c210287ce6cf69b85593ce7db801874c9a2fb1b653dbe5dd9ebfa73e98b710af9e9ce53aeffffffff0140d6de1b120000001976a914d728be76cd74b5d148eba2a49246b80dac12f73e88ac00000000",
"complete" : false
}
Note that the output hex is getting longer, but complete flag is “false” as the transaction needs another signature. So now either the buyer or the arbiter can complete the signature of the transaction, using the output from above and their private key. Let’s assume the buyer is completing the signature.
Buyer:
buyer@testnet03:~$ ./dash-cli signrawtransaction '010000000151b93caa8a557bcf3e042f7901d09bfb7e02ebb7f9dbbddba891ceca5bbfb3a800000000b500483045022051a7f0e95a5066859ce37fe64a6e7ab6e30bfe9a68d9d3f1453064052eab5625022100c0067a33d2ee02478d89fc1a71f3a93c883db022e970886181c50ca9afc3dfa4014c69522102a862b412ff9e3afd01a2873a02622897f6df92e3fc85597788b898309fec882e210315617694c9d93f0ce92769e050a6868ffc74d229077379c0af8bfb193c3d351c210287ce6cf69b85593ce7db801874c9a2fb1b653dbe5dd9ebfa73e98b710af9e9ce53aeffffffff0140d6de1b120000001976a914d728be76cd74b5d148eba2a49246b80dac12f73e88ac00000000' '[{"txid":"a8b3bf5bcace91a8dbbddbf9b7eb027efb9bd001792f043ecf7b558aaa3cb951","vout":0,"scriptPubKey":"a91415c85c2472f5941b60a49462a2cfd0d17ab49d1c87","redeemScript":"522102a862b412ff9e3afd01a2873a02622897f6df92e3fc85597788b898309fec882e210315617694c9d93f0ce92769e050a6868ffc74d229077379c0af8bfb193c3d351c210287ce6cf69b85593ce7db801874c9a2fb1b653dbe5dd9ebfa73e98b710af9e9ce53ae"}]' '["cP9DFmEDb11waWbQ8eG1YUoZCGe59BBxJF3kk95PTMXuG9HzcxnU"]'
{
"hex" : "010000000151b93caa8a557bcf3e042f7901d09bfb7e02ebb7f9dbbddba891ceca5bbfb3a800000000fdff0000483045022051a7f0e95a5066859ce37fe64a6e7ab6e30bfe9a68d9d3f1453064052eab5625022100c0067a33d2ee02478d89fc1a71f3a93c883db022e970886181c50ca9afc3dfa401493046022100dc3f61fdb7b8ea7ec729682d355646c922f5512054c4985534e6b91040c5bd660221008b48c117ec95814f573d33bca981cb703fdd9fa6e52aa8fe67423e06cad87215014c69522102a862b412ff9e3afd01a2873a02622897f6df92e3fc85597788b898309fec882e210315617694c9d93f0ce92769e050a6868ffc74d229077379c0af8bfb193c3d351c210287ce6cf69b85593ce7db801874c9a2fb1b653dbe5dd9ebfa73e98b710af9e9ce53aeffffffff0140d6de1b120000001976a914d728be76cd74b5d148eba2a49246b80dac12f73e88ac00000000",
"complete" : true
}
The signature is complete now, and either of the parties can transmit the transaction to the network.
Buyer:
buyer@testnet03:~$ ./dash-cli sendrawtransaction 010000000151b93caa8a557bcf3e042f7901d09bfb7e02ebb7f9dbbddba891ceca5bbfb3a800000000fdff0000483045022051a7f0e95a5066859ce37fe64a6e7ab6e30bfe9a68d9d3f1453064052eab5625022100c0067a33d2ee02478d89fc1a71f3a93c883db022e970886181c50ca9afc3dfa401493046022100dc3f61fdb7b8ea7ec729682d355646c922f5512054c4985534e6b91040c5bd660221008b48c117ec95814f573d33bca981cb703fdd9fa6e52aa8fe67423e06cad87215014c69522102a862b412ff9e3afd01a2873a02622897f6df92e3fc85597788b898309fec882e210315617694c9d93f0ce92769e050a6868ffc74d229077379c0af8bfb193c3d351c210287ce6cf69b85593ce7db801874c9a2fb1b653dbe5dd9ebfa73e98b710af9e9ce53aeffffffff0140d6de1b120000001976a914d728be76cd74b5d148eba2a49246b80dac12f73e88ac00000000
cf1a75672006a05b38d94acabb783f81976c9e83a8de4da9cbec0de711cf2d71
Again, this transaction can be traced in a block explorer. And the seller is happy to receive his coins at his public address as follows.
Seller:
seller@testnet03:~$ dash-cli listtransactions "" 1
[
{
"account" : "",
"address" : "n18cPEtj4ZfToPZxRszUz2XPts4eGsxiPk",
"category" : "receive",
"amount" : 777.77000000,
"confirmations" : 17,
"blockhash" : "000000067a13e9bd5c1d5ff48cb4b9f8414a6adcc470656262731bfd013510dd",
"blockindex" : 9,
"blocktime" : 1409228449,
"txid" : "cf1a75672006a05b38d94acabb783f81976c9e83a8de4da9cbec0de711cf2d71",
"time" : 1409227887,
"timereceived" : 1409227887
}
]
Multiple wallets
It is possible to select between different Dash wallets when starting
Dash Core by specifying the wallet argument, or even run multiple
instances of Dash Core simultaneously by specifying separate data
directories using the datadir argument.
To begin, install the Dash Core wallet for your system according to the
installation instructions. When you get
to the step Running Dash Core for the first time, you can decide
whether you want to maintain separate wallet.dat files in the
default location (simpler if you do not need to run the wallets
simultaneously), or specify entirely separate data directories such as
e.g. C:\Dash1 (simpler if you do want to run the wallets
simultaneously).
For this scenario, we will create two shortcuts on the desktop, each
using a different wallet file. Navigate to the binary file used to start
Dash Core (typically locatd at C:\Program Files\DashCore\dash-qt.exe
or similar) and create two shortcuts on the desktop. Then open the
Properties window for each of these shortcuts.

Creating desktop shortcuts using Windows 10
Modify the Target property of each shortcut to point to a different
wallet file by specifying the wallet argument when starting the
wallet. If you do not specify a wallet argument, wallet.dat will
be used by default. The specified wallet file will be created if it does
not exist. The following example demonstrates two wallets named
workwallet.dat and homewallet.dat:
- Wallet Target 1:
"C:\Program Files\DashCore\dash-qt.exe" -wallet=workwallet.dat - Wallet Target 2:
"C:\Program Files\DashCore\dash-qt.exe" -wallet=homewallet.dat

Specifying separate wallet files
You can now use the two icons to quickly and easily open different wallets from your desktop. Note that you cannot open both wallets simultaneously. To do this, you will need two separate data directories, as described below.
Start Dash Core and allow it to synchronize with the network, then close
Dash Core again. You can now create two directories at e.g. C:\Dash1
and C:\Dash2 and copy the blocks and chainstate directories
from the synchronized data directory into the new directories. Each of
these will serve as a separate data directory, allowing you to run two
instances of Dash Core simultaneously. Create two (or more) shortcuts on
your desktop as described above, then specify arguments for datadir
as shown below:
- Datadir Target 1:
"C:\Program Files\DashCore\dash-qt.exe" -datadir=C:\Dash1 -listen=0 - Datadir Target 2:
"C:\Program Files\DashCore\dash-qt.exe" -datadir=C:\Dash2 -listen=0

Specifying separate datadirs
You can now use the two icons to quickly and easily open different wallets simultaneously from your desktop. Both wallets maintain separate and full copies of the blockchain, which may use a lot of drive space. For more efficient use of drive space, consider using an SPV or “light” wallet such as Dash Electrum to maintain multiple separate wallets without keeping a full copy of the blockchain.

Two instances of Dash Core running simultaneously
KeePass
Since version 0.11.0, Dash Core has supported integration with KeePass, the popular open source password manager. This guide describes how to configure the association between Dash Core and KeePass, and how to save a Dash Core wallet passphrase in KeePass using the integration. When this is done, KeePass can be used to unlock the wallet.
You will need the following:
- KeePass 2: http://keepass.info
- KeePassHttp plugin: https://github.com/pfn/keepasshttp
- Dash Core: https://www.dash.org
If not already installed, install these packages according to the instructions linked below:
The following KeePass RPC commands are available in the Dash Core client console or server:
- keepass genkey
- Generates a base64 encoded 256 bit AES key that can be used for communication with KeePassHttp. This is only necessary for manual configuration. Use init for automatic configuration.
- keepass init
- Sets up the association between Dash and KeePass by generating an AES key and sending an association message to KeePassHttp. This will trigger KeePass to ask for an ID for the association. Returns the association and the base64 encoded string for the AES key.
- keepass setpassphrase
- Updates the passphrase in KeePassHttp to a new value. This should match the passphrase you intend to use for the wallet. Please note that the standard RPC commands walletpassphrasechange and the wallet encryption from the QT GUI already send the updates to KeePassHttp, so this is only necessary for manual manipulation of the password.
The following new arguments are available for dashd and dash-qt:
- keepass
- Use KeePass 2 integration using KeePassHttp plugin (default: 0)
- keepassport=<port>
- Connect to KeePassHttp on port <port> (default: 19455)
- keepasskey=<key>
- KeePassHttp key for AES encrypted communication with KeePass
- keepassid=<name>
- KeePassHttp id for the established association
- keepassname=<name>
- Name to construct url for KeePass entry that stores the wallet passphrase
Dash Core Wallet
Dash Electrum Wallet
Dash Electrum is a light wallet which uses powerful external servers to index the blockchain, while still securing the keys on your personal computer. Transactions are verified on the Dash blockchain using a technique called Secure Payment Verification (SPV), which only requires the block headers and not the full block. This means that wallet startup is almost instant, while still keeping your funds secure and mobile. It does not currently support advanced InstantSend and PrivateSend features.
Dash Electrum is a fork of the Electrum wallet for Bitcoin. While this documentation focuses on using Dash Electrum, full documentation of all Bitcoin Electrum features (mostly identical in Dash Electrum) is available at the official documentation site.
Installation
Download
You can download Dash Electrum from the official Dash website or the Dash Electrum minisite.
Dash Electrum is developed by community member akhavr and is released through his GitHub account.
You can optionally verify the integrity of your download by running the following commands (example for Linux):
wget https://github.com/akhavr/electrum-dash/releases/download/3.2.3.1/Dash-Electrum-3.2.3.1.tar.gz
sha256sum https://github.com/akhavr/electrum-dash/releases/download/3.2.3.1/Dash-Electrum-3.2.3.1.tar.gz
wget https://github.com/akhavr/electrum-dash/releases/download/3.2.3.1/SHA256SUMS.txt.asc
cat SHA256SUMS.txt.asc
You can also optionally verify the authenticity of your download as an
official release by akhavr. All releases of Dash Electrum are signed by
akhavr using GPG with the key 64A3 BA82 2F44 9D50, verifiable here
on Keybase. Import the key, download the
ASC file for the current release of Dash Electrum and verify the
signature as follows:
curl https://keybase.io/akhavr/pgp_keys.asc | gpg --import
gpg --verify SHA256SUMS.txt.asc
Dash Electrum for Linux is available from a PPA for Ubuntu and Linux Mint, and as a source tarball for other systems. As of version 3.0.6, it requires Python 3 to run. Enter the following commands to install from PPA:
sudo add-apt-repository ppa:akhavr/dash-electrum
sudo apt update
sudo apt install electrum-dash
Enter the following commands (changing the version number to match the current version as necessary) in the terminal to install Dash Electrum from the source tarball:
sudo apt install python3-pyqt5 python3-pip python3-setuptools
wget https://github.com/akhavr/electrum-dash/releases/download/3.0.6.3/Electrum-DASH-3.0.6.3.tar.gz
tar -zxvf Electrum-DASH-3.0.6.3.tar.gz
cd Electrum-DASH-3.0.6.3
sudo python3 setup.py install
Simply download and run the DMG file. You may need to grant permission to install, depending on your security settings. Click through the installation wizard and run Dash Electrum from your Applications folder when complete.
Simply download and run the installer file to set up Dash Electrum. You may need to grant permission to install, depending on your security settings. Click through the installation wizard and run Dash Electrum from the Start menu when complete.
Download and run the APK file from https://electrum.dash.org to set up Dash Electrum. You may need to grant permission to install from unknown sources, depending on your security settings. Click through the installation wizard and run Dash Electrum when complete.
Creating a New Wallet
Dash Electrum gathers configuration data when run for the first time. For more on the concepts behind this process, skip to the later sections of this guide discussing backups, security, and addresses. When setting up Dash Electrum for the first time, a wizard will guide you through the process of creating your first wallet. The first screen asks how you would like to connect to the remote server. Select Auto connect and click Next to continue. You will see a notice that no wallet currently exists. Enter a name for your wallet (or accept the default name) and click Next to create your wallet.


Selecting the server and naming your first wallet
You will be asked what kind of wallet you want to create. Choose between Standard wallet, Multi-signature wallet and Watch Dash addresses. If you are unsure, select Standard wallet and click Next to continue. You will then be asked how you want to store/recover the seed. If stored safely, a seed can be used to restore a lost wallet on another computer. Choose between Create a new seed, I already have a seed, Use public or private keys or Use a hardware device. If you are using Electrum Dash for the first time and not restoring an existing wallet, choose Create a new seed and click Next to continue.


Selecting the wallet type and keystore
Electrum Dash will generate your wallet and display the recovery seed. Write this seed down, ideally on paper and not in an electronic format, and store it somewhere safe. This seed is the only way you can recover your wallet if you lose access for any reason. To make sure you have properly saved your seed, Electrum Dash will ask you to type it in as a confirmation. Type the words in the correct order and click Next to continue.


Generating and confirming the recovery seed
A password optionally secures your wallet against unauthorized access. Adding a memorable, strong password now improves the security of your wallet by encrypting your seed from the beginning. Skipping encryption at this point by not selecting a password risks potential theft of funds later, however unlikely the threat may be. Enter and confirm a password, ensure the Encrypt wallet file checkbox is ticked and click Next to continue.

Entering and confirming a wallet encryption password
Your Dash Electrum wallet is now set up and ready for use.

Dash Electrum after setup is complete
Sending and receiving
You may own Dash stored in another software wallet, or on an exchange such as Bittrex or Kraken, or simply want to send or receive funds as a wage or business transaction. Funds can be transferred between these source and the Electrum wallet using Dash addresses. Your wallet contains multiple addresses, and will generate new addresses as necessary. Since the Dash blockchain is transparent to the public, it is considered best practice to use a new address for each transaction in order to maintain your privacy.
Sending
Click the Send tab to make a payment. Enter the destination address in the Pay to field, either manually or by pasting from the clipboard. Optionally enter a Description for to appear in your transaction history, followed by the Amount to be sent. The total amount of the transaction is the sum of the sent amount and transaction fee, which is calculated automatically. Dash Electrum issues a warning if the total transaction amount exceeds the wallet balance.

Transaction ready to send in Dash Electrum wallet
The wallet will request your password, then broadcast the transaction to the network and display a confirmation dialog with your transaction ID.


Password prompt and transaction confirmation in Dash Electrum wallet
Receiving
You can view your receiving addresses by clicking the Receive tab. Double-click the Receiving address, then copy it to the clipboard by clicking the Copy to clipboard icon. If you intend to use the address repeatedly, you can also enter a description click Save to store the address in the Requests list. Clicking an address in the list will display the stored information in the top area, together with a QR code containing the same information.

Transaction ready to send in Dash Electrum wallet
Enter this address in the software sending the funds, send it to the person transferring funds to you or scan it directly from your mobile wallet. Once the transaction is complete, the balance will appear in the lower left corner of your wallet, and the indicator in the Requests table will change from Pending to Paid.

Successfully received payment in Dash Electrum wallet
Once you have used an address, you can either continue using it or click New to generate a new address.
Monitoring transactions
The History tab lists all current and pending transactions. A transaction to an address in your wallet will appear in the list soon after it is made. Initially, this transaction will be marked as Unconfirmed, followed by a clock indicator on the left. As the Dash network processes the transaction, the status will update in the transaction history list. The network confirms transactions with a new block roughly every 2.5 minutes, and a transaction is considered confirmed (and therefore spendable) after six confirmations. These processed transactions are denoted with a green checkmark and the timestamp at which the transaction was made.


Dash Electrum wallet History tab immediately after receiving a transaction and after confirmation is complete
To view additional transaction details, right click a transaction on the History tab and select Details from the context menu. You can also use this menu to copy the transaction ID to the clipboard (this can be used as proof that a given transaction occurred), edit the transaction description for your records or view the transaction on an external block explorer.

Transaction details in Dash Electrum wallet
Wallet security
Change password
To change the wallet’s password, select the Wallet > Password option from the main menu, or click on the lock icon in the lower right of the main window. Enter and confirm a new secure password. Should you forget your wallets’ password, all is not lost. Your wallet can be restored in its entirety using the backup procedure described here.
Backup
In Dash Electrum, a seed is a complete backup of all addresses and transactions. Access your wallet’s seed through the seed icon in the lower right of the main screen, or the Wallet > Seed main menu option. When prompted, enter the secure password you chose when setting up the Dash Electrum wallet.

Displaying the wallet recovery seed in Dash Electrum
Hand-copy the twelve words found in the box to a piece of paper and store it in a safe location. Remember, anyone who finds your seed can spend all of the funds in your wallet.

Viewing the recovery seed
Alternatively, a backup file can be saved using the File > Save Copy main menu option. This file stores the wallet’s encrypted seed along with any imported addresses. Restoring this backup will require the wallet password.
Restore
The only thing needed to recover a Dash Electrum wallet on another computer is its seed. You can test wallet recovery with your current installation of Dash Electrum by selecting the File > New/Restore menu item. A dialog will appear asking you to name your new wallet. Enter a name, select Standard wallet as the wallet type and then choose I already have a seed.

Restoring a wallet from an existing seed
Next, copy the twelve word seed into the text field.

Entering the recovery seed
If your seed was entered correctly, Dash Electrum gives you the option to add a password for your wallet. After restoring your wallet, Dash Electrum will list any existing transactions from this wallet. This process may take a few minutes, and the transactions may appear as Not Verified. This problem disappears after restarting the program.

Unverified transactions after recovery
To restore a wallet file without using the recovery seed, copy the file to the application data folder according to your operating system:
- Linux: Open Files, select Go > Go to folder, copy the path
~/.electrum-dashand paste it into the dialog box. - macOS: Open Finder, select Go > Go to Folder, copy the path
~/.electrum-dashand paste it into the dialog box. - Windows: Open Explorer, copy the path
%APPDATA%\Electrum-DASHand paste it in to the address bar.
Frequently Asked Questions
How does Dash Electrum work?
Dash Electrum focuses on speed, low resource usage and providing a simple user experience for Dash. Startup times are instant because it operates in conjunction with high-performance servers that handle the most complicated parts of the Dash system.
Does Dash Electrum trust servers?
Not really; the Dash Electrum client never sends private keys to the servers. In addition, it verifies the information reported by servers using a technique called Simple Payment Verification.
What is the Seed?
The seed is a random phrase that is used to generate your private keys. Example:
constant forest adore false green weave stop guy fur freeze giggle clock
Your wallet can be entirely recovered from its seed. To do this, select the I already have a seed option during startup.
How secure is the seed?
The seed created by Dash Electrum has 128 bits of entropy. This means that it provides the same level of security as a Dash private key (of length 256 bits). Indeed, an elliptic curve key of length n provides n/2 bits of security.
What are change addresses?
The Dash Electrum wallet design and workflow are based on a concept called a “wallet generation seed”. This seed is a unique, randomly- selected list of twelve words. A Dash Electrum wallet uses its seed as a template for generating addresses.
To understand the problem that seeds solve, browse to the Electrum Receive tab. Next, open the collapsible entry marked Change.

Receiving and change addresses in Dash Electrum
Notice that the total balance does not only show the sum of all receiving addresses, but also the separately listed Change addresses. Where did these new change addresses come from and why does the first one now hold funds?
Dash is an electronic cash system, meaning that it shares much in common with the process of using paper banknotes. Although some cash payments involve exact change, many do not. You tend to “overpay” when using cash, and expect to receive the difference as change. Perhaps surprisingly, this is how Dash transactions work as well. If the entire balance of an address is not required for any given transaction, the remainder is sent to a new and unused address under control of the same wallet. This address is generated deterministically (rather than randomly) from the wallet seed, which means that any other wallet will also regenerate the change addresses in the same order from the same recovery seed, and have access to the balances.
Spending the entire balance and sending any remainder to a change address is considered good practice because it prevents the transaction recipient from linking transactions by browsing the blockchain, thus compromising your privacy. If privacy is not a concern, change addresses can be disabled via the Tools > Electrum preferences menu option.
How can I send the maximum available in my wallet?
Type an exclamation mark (!) in the Amount field or simply click the Max button. The fee will be automatically adjusted for that amount.
How can I send Dash without paying a transaction fee?
You can create a zero fee transaction in the GUI by following these steps:
- Enable the Edit fees manually option
- Enter 0 in the Fee field
- Enter the amount in the Amount field
Note that transactions without fees might not be relayed by the Dash Electrum server, or by the Dash network.
Is there a way to enter amounts in USD in Dash Electrum?
Yes, go to Tools > Prefernce > Fiat and select a Fiat currency to display the current exchange rate from the chosen Source.

Entering values in fiat currency in Dash Electrum
What does it mean to “Freeze” an address in Dash Electrum?
When you freeze an address, the funds in that address will not be used for sending Dash. You cannot send Dash if you don’t have enough funds in your non-frozen addresses.
How is the wallet encrypted?
Dash Electrum uses two separate levels of encryption:
- Your seed and private keys are encrypted using AES-256-CBC. The private keys are decrypted only briefly, when you need to sign a transaction; for this you need to enter your password. This is done in order to minimize the amount of time during which sensitive information is unencrypted in your computer’s memory.
- In addition, your wallet file may be encrypted on disk. Note that the wallet information will remain unencrypted in the memory of your computer for the duration of your session. If a wallet is encrypted, then its password will be required in order to open it. Note that the password will not be kept in memory; Dash Electrum does not need it in order to save the wallet on disk, because it uses asymmetric encryption (ECIES).
Wallet file encryption is activated by default since version 2.8. It is intended to protect your privacy, but also to prevent you from requesting Dash on a wallet that you do not control.
I have forgotten my password but still have my seed. Is there any way I can recover my password?
It is not possible to recover your password. However, you can restore your wallet from its seed phrase and choose a new password. If you lose both your password and your seed, there is no way to recover your money. This is why we ask you to save your seed phrase on paper.
To restore your wallet from its seed phrase, create a new wallet, select the type, choose I already have a seed and proceed to input your seed phrase.
Does Dash Electrum support cold wallets?
Yes. See the cold storage section.
Can I import private keys from other Dash clients?
In Dash Electrum 2.0, you cannot import private keys in a wallet that has a seed. You should sweep them instead.
If you want to import private keys and not sweep them you need to create a special wallet that does not have a seed. For this, create a new wallet, select Use public or private keys, and instead of typing your seed, type a list of private keys, or a list of addresses if you want to create a watching-only wallet. A master public (xpub) or private (xprv) will also work to import a hierarchical deterministic series of keys. You will need to back up this wallet, because it cannot be recovered from seed.

Importing a list of private keys to create a wallet
Can I sweep private keys from other Dash clients?
Sweeping private keys means to send all the Dash they control to an existing address in your wallet. The private keys you sweep do not become a part of your wallet. Instead, all the Dash they control are sent to an address that has been deterministically generated from your wallet seed.
To sweep private keys go to Wallet > Private Keys > Sweep. Enter the private keys in the appropriate field. Leave the Address field unchanged. This is the destination address from your existing Dash Electrum wallet. Click on Sweep. Dash Electrum then takes you to the Send tab where you can set an appropriate fee and then click on Send to send the coins to your wallet.
Where is my wallet file located?
The default wallet file is called default_wallet and is created when you first run the application. It is located under the /wallets folder.
- Linux: Open Files, select Go > Go to folder, copy the path
~/.electrum-dashand paste it into the dialog box - macOS: Open Finder, select Go > Go to Folder, copy the path
~/.electrum-dashand paste it into the dialog box - Windows: Open Explorer, copy the path
%APPDATA%\Electrum-DASHand paste it in to the address bar
Can I do bulk payments with Dash Electrum?
You can create a transaction with several outputs. In the GUI, type each address and amount on a line, separated by a comma.

Creating a transaction with multiple outputs in Dash Electrum
Amounts are in the current unit set in the client. The total is shown in the GUI. You can also import a CSV file in the Pay to field by clicking on the folder icon.
Can Dash Electrum create and sign raw transactions?
Dash Electrum lets you create and sign raw transactions right from the user interface using a form.
Dash Electrum freezes when I try to send Dash
This might happen if you are trying to spend a large number of transactions outputs (for example, if you have collected hundreds of donations from a Dash faucet). When you send Dash, Dash Electrum looks for unspent coins that are in your wallet in order to create the new transaction. Unspent coins can have different values, much like physical coins and bills.
If this happens, you should consolidate your transaction inputs by sending smaller amounts of Dash to one of your wallet addresses; this would be the equivalent of exchanging a stack of nickels for a dollar bill.
What is the gap limit?
The gap limit is the maximum number of consecutive unused addresses in your deterministic sequence of addresses. Dash Electrum uses it in order to stop looking for addresses. In Dash Electrum 2.0, it is set to 20 by default, so the client will get all addresses until 20 unused addresses are found.
How can I pre-generate new addresses?
Dash Electrum will generate new addresses as you use them, until it hits the gap limit.
If you need to pre-generate more addresses, you can do so by typing wallet.create_new_address() in the console. This command will generate one new address. Note that the address will be shown with a red background in the address tab, to indicate that it is beyond the gap limit. The red color will remain until the gap is filled.
WARNING: Addresses beyond the gap limit will not automatically be recovered from seed. To recover them will require either increasing the client’s gap limit or generating new addresses until the used addresses are found.
If you wish to generate more than one address, you may use a ‘for’ loop. For example, if you wanted to generate 50 addresses, you could do this:
for x in range(0, 50):
print wallet.create_new_address()
How to upgrade Dash Electrum?
Warning: always save your wallet seed on paper before doing an upgrade.
To upgrade Dash Electrum, just install the most recent version. The way to do this will depend on your OS. Note that your wallet files are stored separately from the software, so you can safely remove the old version of the software if your OS does not do it for you.
Some Dash Electrum upgrades will modify the format of your wallet files. For this reason, it is not recommended to downgrade Dash Electrum to an older version once you have opened your wallet file with the new version. The older version will not always be able to read the new wallet file.
The following issues should be considered when upgrading Dash Electrum 1.x wallets to Dash Electrum 2.x:
- Dash Electrum 2.x will need to regenerate all of your addresses during the upgrade process. Please allow it time to complete, and expect it to take a little longer than usual for Dash Electrum to be ready.
- The contents of your wallet file will be replaced with a Dash Electrum 2 wallet. This means Dash Electrum 1.x will no longer be able to use your wallet once the upgrade is complete.
- The Addresses tab will not show any addresses the first time you launch Dash Electrum 2. This is expected behaviour. Restart Dash Electrum 2 after the upgrade is complete and your addresses will be available.
- Offline copies of Dash Electrum will not show the addresses at all because it cannot synchronize with the network. You can force an offline generation of a few addresses by typing the following into the Console: wallet.synchronize(). When it’s complete, restart Dash Electrum and your addresses will once again be available.
Advanced functions
Dash Electrum is based on Electrum, a Bitcoin wallet. Most functions are identical, which means it is not necessary to reproduce the entirety of the Electrum documentation here. The following sections describe some frequently used advanced functions. For further details on other advanced functions in Electrum for both Bitcoin and Dash, please click the links below.
- Electrum documentation
- Electrum seed version system
- Electrum protocol specification
- Serialization of unsigned or partially signed transactions
- Simple Payment Verification
- The Python Console
- Using Electrum Through Tor
Masternodes in Dash Electrum
Dash Electrum supports masternode creation through an interface called the Masternode Manager. The functionality is available starting from the protocol version 70201.
The Masternode Manager can be accessed either from the Wallet > Masternodes menu or by pressing Ctrl+M. This manager displays the status of your masternode(s). A wallet with no masternodes will begin with a default masternode for which you can fill in the necessary information.
The manager displays the following data about each masternode you have set up:
- The alias (name) of the masternode.
- The status of the masternode (e.g. whether it has been activated).
- The collateral payment of the masternode.
- The private delegate key.
- The IP address and port that your masternode can be reached at.
- The protocol version that your masternode supports.
A masternode requires a “delegate” key, which is known to both Dash Electrum and your masternode. Your masternode will use this key to sign messages, and the Dash network will know that you authorized it to. A delegate key can either be one of your Dash Electrum keys, or an imported key. Either way, your masternode and Dash Electrum will both need to know the private key.
To use one of your Dash Electrum keys as a delegate key, put its private key in the Masternode Private Key field of the View Masternode tab.
Certain information about your masternode is required. The IP address and port that your masternode uses must be supplied. Also, the protocol version that your masternode supports is required. This information is filled in automatically if you import a “masternode.conf” file.

Entering IP and protocol information
To start a masternode, you must have a 1000 DASH payment available in your wallet. You can scan your wallet for 1000 DASH payments in the Choose Collateral tab of the Masternode Manager.
After scanning, a list of available 1000 DASH collateral payments will be displayed. Selecting one of them will cause the selected masternode’s data to be filled in, though these changes won’t be saved until you click the Save button in the lower-right corner of the tab.

Entering IP and protocol information
After selecting a collateral payment and specifying a delegate key, you can activate your masternode. Do this by clicking Activate Masternode in the Activate Masternode tab of the Masternode Manager. If the Activate Masternode button cannot be clicked, look at the message in the Status bar. It will show you why your masternode cannot be activated.
Activation will require your password if your wallet is encrypted, because a message must be signed. After waiting for Dash Electrum to sign and broadcast your masternode announcement, you will be presented with a message detailing the result. The status of your masternode will be updated in the table and the View Masternode tab.

Entering IP and protocol information
You can import a masternode.conf file using the Masternode.conf tab of the Masternode Manager. This is the recommended way of setting up masternodes, as it allows you to configure masternodes for Dash Core and Dash Electrum in the same way. Importing a masternode.conf file will automatically set up one or more masternode configurations in the Masternode Manager.
Multisig wallets
This tutorial shows how to create a 2 of 2 multisig wallet. A 2 of 2 multisig consists of 2 separate wallets (usually on separate machines and potentially controlled by separate people) that have to be used in conjunction in order to access the funds. Both wallets have the same set of addresses.
- A common use-case for this is if you want to collaboratively control funds: maybe you and your friend run a company together and certain funds should only be spendable if you both agree.
- Another one is security: one of the wallets can be on your main machine, while the other one is on a offline machine. That way you make it very hard for an attacker or malware to steal your coins.
Each cosigner needs to do this: In the menu select File > New, then select Multi-signature wallet. On the next screen, select 2 of 2.

Selecting x of y signatures for a multi-signature wallet
After generating and confirming your recovery seed, you will be shown the xpub address for this wallet.

xpub key of the first wallet
After generating a seed (keep it safely!) you will need to provide the master public key of the other wallet. Of course when you create the other wallet, you put the master public key of the first wallet.

Entering xpub from the second wallet in the first wallet
You will need to do this in parallel for the two wallets. Note that you can press cancel during this step, and reopen the file later.
Check that both wallets generate the same set of Addresses. You can now send to these Addresses (note they start with a “7”) with any wallet that can send to P2SH Addresses.
To spend coins from a 2-of-2 wallet, two cosigners need to sign a transaction collaboratively. To accomplish this, create a transaction using one of the wallets (by filling out the form on the Send tab). After signing, a window is shown with the transaction details.

Partially signed 2-of-2 multisig transaction in Dash Electrum
The transaction now has to be sent to the second wallet. Several options are available for this:
You can transfer the file on a USB stick
You can save the partially signed transaction to a file (using the Save button), transfer that to the machine where the second wallet is running (via USB stick, for example) and load it there (using Tools > Load transaction > From file)
You can use QR codes
A button showing a QR code icon is also available. Clicking this button will display a QR code containing the transaction, which can be scanned into the second wallet (Tools > Load Transaction > From QR Code)
With both of the above methods, you can now add the second signature to the transaction (using the Sign button). It will then be broadcast to the network.

Fully signed 2-of-2 multisig transaction in Dash Electrum
Sweep a paper wallet
You may have received a paper wallet as a gift from another Dash user, or previously stored one in a safe deposit box. Funds are swept from a paper wallet into a live wallet by importing its private key, which is a long sequence of characters starting with the number “7” or the capital letter “X”. The example below displays a private key (WIF format).

Public address and associated private key produced by Dash Paper Wallet Generator
Funds from paper wallets are swept into an Dash Electrum Wallet by creating a transaction using the private key and sending it to a new address from your wallet. This is necessary because it is not possible to add new public or private keys to an existing deterministic series of addresses derived from a seed phrase.
Begin by selecting the Wallet > Private Keys > Sweep menu item. The Sweep private keys dialog will appear, where you can paste your private key(s). An unused address controlled by your Dash Electrum wallet appears in the lower field, and can be changed by clicking the Address button. Once you have pasted your private key, click the Sweep button.

Entering the private key
Dash Electrum then prepares a transaction using the private key you just imported to derive the public address for the transaction input and the address from your wallet as the output, and signs the message. Click Broadcast to enter the transaction on the blockchain. The balance will then appear in your wallet under the specified address. The address you swept is left with zero balance.

Broadcasting the sweep transaction
Cold storage
This section shows how to create an offline wallet that holds your Dash and a watching-only online wallet that is used to view its history and to create transactions that have to be signed with the offline wallet before being broadcast on the online one.
Create a wallet on an offline machine, as per the usual process (File > New). After creating the wallet, go to Wallet -> Master Public Keys.

Master Public Key of a new offline wallet
The Master Public Key of your wallet is the string shown in this popup window. Transfer that key to your online machine somehow.
On your online machine, open Dash Electrum and select File > New/Restore. Enter a name for the wallet and select Use public or private keys. Paste your master public key in the box. Click Next to complete the creation of your wallet. When you’re done, you should see a popup informing you that you are opening a watching-only wallet.

Master Public Key of a new offline wallet
The transaction history of your cold wallet should then appear.
Go to the Send tab on your online watching-only wallet, input the transaction data and click Send. A window will appear to inform you that a transaction fee will be added. Continue. In the window that appears up, click Save and save the transaction file somewhere on your computer. Close the window and transfer the transaction file to your offline machine (e.g. with a USB stick).
On your offline wallet, select Tools > Load transaction -> From file in the menu and select the transaction file created in the previous step. Click Sign. Once the transaction is signed, the Transaction ID appears in its designated field. Click Save, store the file somewhere on your computer, and transfer it back to your online machine.
On your online machine, select Tools -> Load transaction -> From file from the menu. Select the signed transaction file. In the window that opens up, click Broadcast. The transaction will be broadcast over the Dash network.
Command line
Dash Electrum has a powerful command line available when running under Linux or macOS. This section will show you a few basic principles.
To see the list of Dash Electrum commands, type:
electrum help
To see the documentation for a command, type:
electrum help <command>
The arguments passed to commands may be one of the following magic words: ! ? : -.
The exclamation mark ! is a shortcut that means ‘the maximum amount available’. Note that the transaction fee will be computed and deducted from the amount. Example:
electrum payto Xtdw4fezqbSpC341vcr8u9HboiJMFa9gBq !
A question mark ? means that you want the parameter to be prompted. Example:
electrum signmessage Xtdw4fezqbSpC341vcr8u9HboiJMFa9gBq ?
Use a colon : if you want the prompted parameter to be hidden (not echoed in your terminal). Note that you will be prompted twice in this example, first for the private key, then for your wallet password:
electrum importprivkey :
A parameter replaced by a dash - will be read from standard input (in a pipe):
cat LICENCE | electrum signmessage Xtdw4fezqbSpC341vcr8u9HboiJMFa9gBq -
You can use DNS aliases in place of bitcoin addresses, in most commands:
electrum payto ecdsa.net !
Command outputs are either simple strings or json structured data. A very useful utility is the ‘jq’ program. Install it with:
sudo apt-get install jq
The following examples use it.
We may use a variable to store the signature, and verify it:
sig=$(cat LICENCE| electrum signmessage Xtdw4fezqbSpC341vcr8u9HboiJMFa9gBq -)
And:
cat LICENCE | electrum verifymessage Xtdw4fezqbSpC341vcr8u9HboiJMFa9gBq $sig -
The listunspent command returns a list of dict objects, with various fields. Suppose we want to extract the value field of each record. This can be achieved with the jq command:
electrum listunspent | jq 'map(.value)'
Incoming transactions have a positive ‘value’ field:
electrum history | jq '.[] | select(.value>0)'
The following command selects transactions that were timestamped after a given date:
after=$(date -d '07/01/2015' +"%s")
electrum history | jq --arg after $after '.[] | select(.timestamp>($after|tonumber))'
Similarly, we may export transactions for a given time period:
before=$(date -d '08/01/2015' +"%s")
after=$(date -d '07/01/2015' +"%s")
electrum history | jq --arg before $before --arg after $after '.[] | select(.timestamp>($after|tonumber) and .timestamp<($before|tonumber))'
First we need the public key of a wallet address:
pk=$(electrum getpubkeys Xtdw4fezqbSpC341vcr8u9HboiJMFa9gBq| jq -r '.[0]')
Encrypt:
cat | electrum encrypt $pk -
Decrypt:
electrum decrypt $pk ?
Note: this command will prompt for the encrypted message, then for the wallet password.
The following command will export the private keys of all wallet addresses that hold some Dash:
electrum listaddresses --funded | electrum getprivatekeys -
This will return a list of lists of private keys. In most cases, you want to get a simple list. This can be done by adding a jq filer, as follows:
electrum listaddresses --funded | electrum getprivatekeys - | jq 'map(.[0])'
Finally, let us use this list of private keys as input to the sweep command:
electrum listaddresses --funded | electrum getprivatekeys - | jq 'map(.[0])' | electrum sweep - [destination address]
Using cold storage with the command line
This section will show you how to sign a transaction with an offline Dash Electrum wallet using the command line.
With your online (watching-only) wallet, create an unsigned transaction:
electrum payto Xtdw4fezqbSpC341vcr8u9HboiJMFa9gBq 0.1 --unsigned > unsigned.txn
The unsigned transaction is stored in a file named ‘unsigned.txn’. Note that the –unsigned option is not needed if you use a watching-only wallet.
You may view it using:
cat unsigned.txn | electrum deserialize -
The serialization format of Dash Electrum contains the master public key needed and key derivation used by the offline wallet to sign the transaction. Thus we only need to pass the serialized transaction to the offline wallet:
cat unsigned.txn | electrum signtransaction - > signed.txn
The command will ask for your password, and save the signed transaction in ‘signed.txn’.
Send your transaction to the Dash network, using broadcast:
cat signed.txn | electrum broadcast -
If successful, the command will return the ID of the transaction.
How to accept Dash on a website using Dash Electrum
This tutorial will show you how to accept dash on a website with SSL signed payment requests. It is updated for Dash Electrum 2.6.
- A webserver serving static HTML
- A SSL certificate (signed by a CA)
- Electrum version >= 2.6
Create a wallet on your web server:
electrum create
You can also use a watching only wallet (restored from xpub), if you want to keep private keys off the server. Once your wallet is created, start Dash Electrum as a daemon:
electrum daemon start
You should have a private key and a public certificate for your domain. Create a file that contains only the private key:
-----BEGIN PRIVATE KEY-----
your private key
-----BEGIN END KEY-----
Set the path to your the private key file with setconfig:
electrum setconfig ssl_privkey /path/to/ssl.key
Create another file that contains your certificate and the list of certificates it depends on, up to the root CA. Your certificate must be at the top of the list, and the root CA at the end:
-----BEGIN CERTIFICATE-----
your cert
-----END CERTIFICATE-----
-----BEGIN CERTIFICATE-----
intermediate cert
-----END CERTIFICATE-----
-----BEGIN CERTIFICATE-----
root cert
-----END CERTIFICATE-----
Set the ssl_chain path with setconfig:
electrum setconfig ssl_chain /path/to/ssl.chain
This directory must be served by your webserver (eg Apache):
electrum setconfig requests_dir /var/www/r/
By default, Dash Electrum will display local URLs, starting with ‘file://‘ In order to display public URLs, we need to set another configuration variable, url_rewrite. For example:
electrum setconfig url_rewrite "['file:///var/www/','https://electrum.org/']"
electrum addrequest 3.14 -m "this is a test"
{
"URI": "dash:Xtdw4fezqbSpC341vcr8u9HboiJMFa9gBq?amount=3.14&r=https://electrum.org/r/7c2888541a",
"address": "Xtdw4fezqbSpC341vcr8u9HboiJMFa9gBq",
"amount": 314000000,
"amount (DASH)": "3.14",
"exp": 3600,
"id": "7c2888541a",
"index_url": "https://electrum.org/r/index.html?id=7c2888541a",
"memo": "this is a test",
"request_url": "https://electrum.org/r/7c2888541a",
"status": "Pending",
"time": 1450175741
}
This command returns a json object with two URLs:
- request_url is the URL of the signed BIP70 request.
- index_url is the URL of a webpage displaying the request.
Note that request_url and index_url use the domain name we defined in url_rewrite. You can view the current list of requests using the listrequests command.
Let us open index_url in a web browser.

Payment request page in a web browser
The page shows the payment request. You can open the dash: URI with a wallet, or scan the QR code. The bottom line displays the time remaining until the request expires.

Wallet awaiting payment
This page can already be used to receive payments. However, it will not detect that a request has been paid; for that we need to configure websockets.
Get SimpleWebSocketServer from here:
git clone https://github.com/ecdsa/simple-websocket-server.git
Set websocket_server and websocket_port in your config:
electrum setconfig websocket_server <FQDN of your server>
electrum setconfig websocket_port 9999
And restart the daemon:
electrum daemon stop
electrum daemon start
Now, the page is fully interactive: it will update itself when the payment is received. Please notice that higher ports might be blocked on some client’s firewalls, so it is more safe for example to reverse proxy websockets transmission using standard 443 port on an additional subdomain.
Commands to the Dash Electrum daemon can be sent using JSONRPC. This is useful if you want to use Dash Electrum in a PHP script.
Note that the daemon uses a random port number by default. In order to use a stable port number, you need to set the rpcport configuration variable (and to restart the daemon):
electrum setconfig rpcport 7777
With this setting, we can perform queries using curl or PHP. Example:
curl --data-binary '{"id":"curltext","method":"getbalance","params":[]}' http://127.0.0.1:7777
Query with named parameters:
curl --data-binary '{"id":"curltext","method":"listaddresses","params":{"funded":true}}' http://127.0.0.1:7777
Create a payment request:
curl --data-binary '{"id":"curltext","method":"addrequest","params":{"amount":"3.14","memo":"test"}}' http://127.0.0.1:7777
Dash Electrum Wallet
Dash Android Wallet
Dash offers a standalone wallet for Android, with development supported by the Dash budget. The Dash Android Wallet supports advanced Dash features, including contact management and InstandSend. You can scan and display QR codes for quick transfers, backup and restore your wallet, keep an address book of frequently used addresses, pay with NFC, sweep paper wallets and more.
Installation
From APK
Some Android phone do not have access to the Google Play Store because the phone software, network provider or country may not allow it. You can install the app manually by first enabling installation of external sources (if you have not already done so) and then downloading and installing an APK file. Follow these instructions:
- Ensure your Android version is at least 4.0.3 by going to Settings → About phone and checking the version number.
- Enable Unknown sources by going to Settings → Security → Unknown sources. Read and accept the warning.
- Using your phone, download the latest version of the APK from this link.
- If you cannot use your phone to go online, download the APK using your PC instead and copy it to your phone using a cable or Bluetooth. You may need a file browser to find the copied file. ES File Explorer is recommended for this.
You can also install an APK file directly from your computer using the Android Debug Bridge (ADB). Follow these instructions:
Ensure your Android version is at least 4.0.3 by going to Settings → About phone and checking the version number.
Ensure you have a copy of ADB on your PC. This is included in the Android SDK Platform Tools for Mac, Windows or Linux.
Enable Unknown sources by going to Settings → Security → Unknown sources. Read and accept the warning.
Enable USB debugging by going to Settings → Developer options → USB debugging. If Developer options is not available, go to About phone instead, scroll down, and tap on the Build number seven times.
Using your PC, download the latest version of the APK from this link.
Connect your phone to the PC, open a terminal/command prompt window and type:
adb install <<path to .apk file>>
From source
The source code for the Dash Android wallet is available on GitHub. The following
instructions describe how to compile an APK from source under an up-to-
date installation of Ubuntu 18.04 LTS with a single non-root user. Note
that NDK version 12b is required, instead of installing the latest
version using sdkmanager. Begin by installing dependencies and
downloading the latest Android SDK Tools:
sudo apt install openjdk-8-jdk-headless unzip make
mkdir android-sdk-linux
cd android-sdk-linux
wget https://dl.google.com/android/repository/sdk-tools-linux-3859397.zip
wget https://dl.google.com/android/repository/android-ndk-r12b-linux-x86_64.zip
unzip sdk-tools-linux-3859397.zip
unzip android-ndk-r12b-linux-x86_64.zip
Next, update the SDK Tools and download the necessary SDK platform bundles and dependencies, then add and load the appropriate environment variables:
./tools/bin/sdkmanager --update
./tools/bin/sdkmanager "platforms;android-15" "platforms;android-25" "build-tools;25.0.2"
echo 'export ANDROID_HOME=$HOME/android-sdk-linux' >> ~/.bashrc
echo 'export ANDROID_NDK_HOME=$ANDROID_HOME/android-ndk-r12b' >> ~/.bashrc
source ~/.bashrc
cd ~
Now that the build environment is ready, download and build the Dash Android Wallet source:
git clone https://github.com/HashEngineering/dash-wallet.git
cd dash-wallet
./gradlew clean build -x test
The built APK files are now available in the
~/dash-wallet/wallet/build/outputs/apk folder.
Getting started
Creating a new wallet
When you first start your Dash Wallet, it will automatically generate a new wallet for you. It will then ask you to enter a PIN to protect spending from the wallet. The first thing you should do after setting a PIN is back up the wallet by tapping the menu button in the top left corner and selecting Safety > View recovery phrase. You will need this phrase to recover the funds later if you lose or damage your phone or need to transfer the account to another device. Write the phrase down and store it in a safe place - if you lose this, you will also lose access to your funds forever. If you prefer, you can also back up a password protected wallet file by selecting Safety > Back up wallet.


Viewing the recovery phrase for a new wallet in Dash Wallet for Android
Restoring from backup
If you already have an existing Dash Wallet for Android, you can restore it at this point by tapping the menu button in the top left corner and selecting Safety > Restore from recovery phrase. Carefully enter your recovery phrase and tap Restore. Your wallet may restart, and it will take some time for any past transactions and balances to appear.


Restoring an existing wallet from recovery phrase in Dash Wallet for Android
Receiving
Tap the Request coins button at the bottom left of the screen to receive Dash. The wallet will generate and display a QR code for the other device to scan, and you can optionally enter the dash or dollar value of the transaction to save the payer time. You can tap the menu button in the top right corner and select Copy address to copy and paste it in another app to send it to a person paying you remotely. You will receive a notification when the transfer occurs, and you can view the confirmation status on the main screen and the balance in the top right corner. Dash Wallet for Android considers a transaction spendable after 1 block confirmations has taken place (approx. 2.5 minutes), or 6 block confirmations if you want to generate InstantSend transactions.


Receiving Dash and viewing your transactions and balance in Dash Wallet for Android
Sending
Tap the Send coins button at the bottom right of the screen to send Dash. You will be prompted to type, paste or scan (by tapping the round QR button) a Dash address, the amount to pay and whether to use InstantSend. Note that this information may already be included if you are scanning a QR code. The automatically determined network fee is displayed. Tap Send to complete the transaction.


Sending Dash and viewing your transactions and balance in Dash Wallet for Android
Buying
Since version 6.1.0, it has been possible to link your Android wallet with Uphold to purchase Dash using any funding methods available to you in Uphold. To get started, tap the menu button, select Uphold account and then Link Uphold account. Enter your username and password and complete two-factor authentication (if enabled for your account). Your Uphold balance will appear. Tap Buy Dash to add funds and convert them to Dash using Uphold. Tap Transfer from Uphold enter the amount, tap Transfer and confirm the transaction details to move funds from Uphold into your Dash wallet. For more information on using Uphold, see the Uphold documentation.


Logging in to Uphold and purchasing Dash


Transferring Dash from Uphold to your Dash Android wallet
Advanced functions
Address book
Your Android wallet allows you to manage frequently used addresses by adding a label to help you identify the owner. You can also label your own addresses in the wallet in order to keep track of regular incoming payments. You can access the address book by tapping the Menu button, then Address book. This will display a screen where you can swipe left and right between your own addresses and the addresses to which you frequently send Dash, such as family members for example. Tap the More options button to Paste from clipboard or to Scan address from a QR code, or tap an existing address to Send Dash or Edit the label.


Accessing the address book and adding an address
You can also add labels directly from the main transaction history screen by tapping the More options button for the transaction (three vertical dots) and selecting either Add label to your address, Edit label of your address, Add sending address or Edit label of sending address.


Adding and editing address labels in transaction view
Exchange rates
Dash Wallet for Android allows you to display the equivalent value of your Dash balance and in transactions by selecting a default fiat currency. To select a default currency, tap the Menu button, then Exchange rates. Find your preferred fiat currency, then tap the More options button for that currency and select Set as default. The exchange rate for this currency will appear when sending Dash, and you can also tap in the fiat currency field to enter the value in the fiat currency directly, instead of in Dash.


Selecting a fiat exchange rate and creating a transaction denominated in USD
Sweep paper wallet
Sweeping a paper wallet is a method of transferring the value stored on an address you may have received as a paper wallet or from an ATM into your own wallet. You must have access to the private key for an address to use this function. In this process, all Dash stored on the address will be sent to a new address that has been deterministically generated from your wallet seed. The private keys you sweep do not become a part of your wallet.
To sweep a paper wallet, tap the Menu button and select Sweep paper wallet. Tap the Scan button and scan the QR code from your paper wallet. Once the private key has been identified, tap Sweep to create the transaction moving the Dash into your own wallet. Once this transaction is confirmed, the paper is worthless and should be destroyed.


Sweeping a paper wallet with 0.10 DASH into the Android Wallet
Network monitor
The Dash Android Wallet is a light wallet and functions in SPV mode, meaning it does not download a full copy of the blockchain. The network monitor allows you to view details about the full nodes to which you are connected. You can also swipe left to view blocks as they are created on the blockchain.


Viewing peers and blocks to monitor network activity
Settings


The Settings menu in Dash Android Wallet
The settings menu contains a range of options to control the behavior of the Dash Android Wallet. To access the settings, tap the Menu button, then Settings. You can then choose between Settings, Diagnostics and About, which displays wallet version, copyright, license and source code information.
- Denomination and precision
- Select the number of decimal places to show for DASH denominations, or switch to mDASH or µDASH denominations
- Own name
- Enter a short name to be included in your QR codes when displaying to other users for scanning. The short name will then appear as a label in their wallet to verify the recipient and simplify address management.
- Auto-close send coins dialog
- Specify whether or not to close the send dialog once a payment is complete.
- Connectivity indicator
- Enables display of an indicator in the Android notification area to be able to quickly verify connectivity.
- Trusted peer
- Enter the IP address or hostname of a single peer to connect to.
- Skip regular peer discovery
- Enabling this option prevents automatic peer discovery and forces connection to the one specified trusted peer only.
- Block explorer
- Allows you to select which block explorer you want to use for functions linking to a block explorer.
- Data usage
- Links to the Android Data usage function to view and/or restrict data usage for the app.
- Balance reminder
- Enables an Android system notification to remind you of any unspent Dash if you don’t open the app in that time.
- Enable InstantSend
- Enables functionality to use InstantSend to send and receive Dash.
- Enable Lite Mode
- Enabling lite mode reduces bandwidth usage.
- Show disclaimer
- Enables or disables various disclaimers and warning messages in the app.
- BIP70 for scan-to-pay
- Enables use of the BIP70 payment protocol to add further verification and security features when scanning QR codes.
- Look up wallet names
- Enables use of DNSSEC to attempt to identify a wallet name when creating transactions.
- Report issue
- Allows you to gather a range of information related to your wallet in order to send a bug report to developers for troubleshooting.
- Show xpub
- Displays the extended public key for the seed used to generate addresses in your wallet. Providing your xpub to a third party will allow them to view your entire transaction history, but not make new transactions.
- Reset block chain
- Resets data stored on your device relating to the blockchain. This data will need to be collected again from full nodes, similar to when setting up a new wallet. This process may take some time.


Dash Android Wallet
Dash iOS Wallet
Dash offers a standalone wallet for iOS, with development supported by the Dash budget. The official Dash Wallet supports advanced Dash features such as InstandSend. You can scan and display QR codes for quick transfers, backup your wallet using a recovery phrase and even pay to Bitcoin addresses through native integration with ShapeShift.
Installation
App Store
The easiest way to install the Dash Wallet for iOS is from the App Store. While older versions of iOS are supported, you will need to be using iOS 10.0 or newer to use the latest version.

Compiling from source
The source code for the wallet is available here. The following steps describe how to download and compile the wallet from source.
Install Xcode from the App Store. The download is about 5GB, so this step may take some time.
Open Xcode, agree to the terms and conditions, then close the app.
Open the Terminal app and enter the following commands:
cd ~/Documents mkdir src cd src git clone https://github.com/QuantumExplorer/dashwallet.git
Open Xcode again and click File -> Open
Navigate to
~/Documents/src/dashwallet/DashWallet.xcodeprojand click Open.Click Product > Run to build and run the app in Simulator.

Dash iOS wallet running in Simulator after compiling in Xcode
You can also make modifications to the code and sideload the app onto your iOS device. For details, see this post on Reddit.
Getting started
Creating a new wallet
When you first start your Dash Wallet, you will be prompted to choose between creating a new wallet or recovering an existing wallet. Choose New Wallet to create a new wallet unless you have existing funds stored in another wallet using a recovery phrase. Your new wallet will be generated, and a recovery phrase will appear so you can recover the funds later if you lose or damage your phone or need to transfer the account to another device. Write the phrase down and store it in a safe place - if you lose this, you will also lose access to your funds forever.


Creating a new wallet and generating the recovery phrase in iOS Dash Wallet
You may also be asked to specify a PIN or link the app with your TouchID. You can tap the Dash logo at the top of the app to view your balance. You will need to unlock your wallet for this, as well as to view your transaction history or send Dash.
Receiving
Once you have set up your wallet, you will have two screens available to send and receive Dash. You can swipe left and right between the screens. To receive Dash, the app will generate an address which appears at the bottom of the screen. You can tap this to copy and share, or scan the QR code directly. Once the transfer is complete, you can view your balance, transaction history and the status of any pending transactions by clicking the menu button at the top left.


Receiving Dash and viewing your balance in iOS Dash Wallet
Sending
The Send DASH screen gives you two options to enter the payment address: Scan QR Code or Pay Address From Clipboard. You can choose to use InstandSend for instant confirmation, or disable this to send a normal transaction which will require more time for confirmation. Depending on the code you are scanning, the amount of Dash requested may be included, or you can enter it yourself. A confirmation screen will appear to explain the fee structure and request your unlock code (PIN or TouchID). The transaction will then be sent.


Sending Dash from iOS Dash Wallet
Sending to a Bitcoin address
You can also send from your Dash Wallet directly to a Bitcoin address using services provided by ShapeShift that are integrated directly in the wallet. If you scan or enter a Bitcoin address, you will be asked to enter the amount to be send in Bitcoin instead of Dash. Once you have entered the amount, click the Shapeshift! button shown an additional confirmation screen to confirm the ShapeShift fees before the transaction is processed. Make sure your destination Bitcoin address on this screen is correct. (If you see an error message about the value being too low, tap the greyed out Dash amount at the top to specify the amount to be transferred in Dash instead of Bitcoin.) Once your transaction is accepted, the Dash Wallet for iOS will display Shapeshift in progress until the transaction is complete.


Sending Dash to a Bitcoin address via ShapeShift from iOS Dash Wallet
Advanced functions
URL Scheme
iOS allows apps to communicate with one another through URL schemes. The Dash Wallet for iOS implements the dashwallet:// scheme, allowing you to call the wallet to complete a transaction denominated in Dash. This page documents the methods available using the URL scheme.
Payment request URL format:
dashwallet://pay=<address>&amount=<amount>&(req-)IS=<0/1>&sender=<sender>
Notes:
senderis both your callback URL and the name of the app that you show to the user. This is to prevent 3rd party apps from phishing.req-can be added before IS to force use of InstantSend for the transaction. If the user doesn’t have InstantSend enabled and doesn’t want to enable it, he will not be offered the option to send as a normal transaction.
The user will see something similar to this:

Payment request in iOS
If the user enters the correct passcode, then the transaction is sent and the user is returned to the sender app following the callback URL.
Callback URL format:
<sender>://callback=payack&address=<example:XiUsEXvLjqhuz1Gunbymtw7JUwtkQXQHaa>&txid=<example:09855ac1c57725d8be2c03b53f72d1cb00ecb7b927bc9e7f5aed95cb3a985d76>
Master public key request format:
dashwallet://request=masterPublicKey&account=0&sender=<sender>
Note: account is optional and corresponds to BIP32/BIP44 account, most
of the time this should be 0. If account is not specified, we use
account 0. This will send back both the extended public key at
44’/5’/<account>’ and <account>’
Callback:
<sender>://callback=masterPublicKey&masterPublicKeyBIP32=<example:xpub68GSYNiJZ7k1beEHGmkMUjPsawFvhM7adhbXgnaY1zj5iucUgKPJNDh5iCB8KV2A9FFAGKcGZp5JtQ1XNmT7j2ErRnf8eb4Mt4wjLG6uRcN>&masterPublicKeyBIP44=<example:xpub6DTuSViCnkd1jcgoiQLcghtTAAntBX4zWhfwNMSsmcD94JATNaWZ1tC4NEv6bxcD1YA4474S2BzCDsBA97sM52jiJcmFPBiXcH9JzZSLQJm>&account=0&source=dashwallet
dashwallet://request=address&sender=<sender>
Callback:
<sender>://callback=address&address=<example:XjkMY3GiK5aHwbpg9Uaw7QCPk3QE63Nh5i>&source=dashwallet


Dash iOS Wallet
Dash Copay Wallet
The Dash Copay wallet is a modern and feature-rich wallet available for both mobile and desktop devices. It supports advanced Dash features including InstantSend, HD address generation, user-friendly address books, multiple wallets in one app and easy to use multi-signature wallets. Dash Copay is a light wallet, meaning that even though a full copy of the blockchain is not required for use, the private keys to your addresses are stored securely on your device and under your control at all times.
Getting Started
This documentation describes how to use the most common features of the Dash Copay wallet. Since the functionality is similar across all supported platforms (Android, iOS, Windows, macOS, Linux), the instructions and screenshots will reference the Android software, highlighting differences between the platforms where necessary.
The easiest way to install the Dash Copay for Android is from the Google Play Store.

Dash Copay for iOS is available through Apple TestFlight. To join the list of testers, send an email to elizabeth.robuck@dash.org with your Apple Account ID. For other platforms, or to view and compile the source code yourself, please see the instructions on GitHub.
Installation
When you first start your Dash Copay Wallet, you will be prompted to choose between creating a new wallet or restoring an existing wallet from backup. Choose Get Started to create a new wallet, unless you have existing funds stored in another wallet using a recovery phrase. When prompted, enter and confirm a spending password to encrypt your wallet keys. You will need this password every time you want to send Dash from your wallet. At this point, you will be offered a chance to back up your wallet using a recovery phrase. It is highly recommended to do this immediately by tapping the Backup wallet button. Acknowledge the warnings, enter your password and write down the displayed recovery phrase on paper. Do not take a screenshot, since your device will likely make a copy on cloud storage, which is not necessarily under your personal control. Confirm the recovery phrase and terms of use. Your Dash Copay wallet is now ready to go!


Creating a new wallet and generating the recovery phrase in Dash Copay wallet
If you want to restore an existing Dash Copay wallet, simply tap Restore from backup and enter the 12 word recovery phrase. File/text backups are also supported.
Receiving
Simply tap the Receive icon at the bottom of the screen to receive Dash. The wallet will generate and display a QR code for the other device to scan, or you can tap the displayed address to copy it to the clipboard so you can paste it in another app. If you have multiple wallets, you can see the name of the wallet at the bottom of the screen, and tap it to switch between wallets. The receiving address will change and you will receive a notification when you receive the transfer.


Receiving dash and viewing your balance in Dash Copay wallet
Sending
Depending on how your payee has provided their receiving address to you, you can send Dash by tapping either the Scan icon to use the device camera to scan a QR code, or the Send icon to paste a copied address or select an address from your Dash Copay address book. Once you have entered the address, it may be possible or necessary to enter the amount of Dash to be sent or an optional label for the recipient, and to decide if you want to send with InstantSend on or off (off by default). If you have multiple wallets, you must also choose which wallet you will use to send the funds. Once the transaction is complete, you will see a payment confirmation screen.


Sending Dash from Dash Copay wallet
Viewing transactions and balances
Your recent transactions appear on the Home screen. You can tap any transaction to view more details or enter a Memo to help you remember the purpose of the transaction. Tap View on blockchain to open the Insight blockchain explorer to view full transaction details. All the wallets you have created and their respective balances appear below the recent transactions on the Home screen. You can tap any wallet to view the balance and transaction history associated with that wallet only.


Home screen, transaction details and wallet details in Dash Copay wallet
Shared Wallets
Normal transactions in Dash only need to be approved by the person sending the funds. The Dash Copay wallet supports multisig, short for multisignature, meaning that it is possible to require more than one key to approve a transaction. This can be used like a joint checking account, or in situations where majority approval from a board is required to create a transaction. This documentation describes how to set up and use shared wallets.
Before you create a shared wallet, think about how many people should have access to it, and how many of those people will be required to authorise a transaction. Is it just one or two? Or a majority, or even everyone? Shared wallets allow you to specify a total number of copayers and a required number of signatures to create a transaction. These are often referred to as M-of-N transactions, where for example 2-of-3 signatures are required to transact. In practice, this is used to share responsibility for the funds between several people. It is not possible require a certain person, such as the manager, to be one of the copayers (although adding a password only the manager knows can have the same effect). Shared wallets are inherently risky because if more than the minimum required number of people involved lose access to their keys, the funds will be inaccessible forever. Make sure everyone understands the risks and responsibilities of shared wallets before committing significant funds.
Creating a shared wallet
Funds and addresses in shared wallets are managed separately from your personal wallets, so you will need to create a new wallet and then add copayers before you can begin creating transactions. From the Home screen, click the + button at the top right to add a new wallet. Select Create shared wallet and enter a name for the wallet, your own name, the total number of copayers and the required number of signatures for a transaction. Tap the Create m-of-n wallet button to create the wallet. The wallet will appear with your other wallets, listed as Incomplete until the copayers have joined.


Creating a 2-of-3 shared wallet in Dash Copay
Tap the incomplete shared wallet when you are ready to add users. A QR code will be displayed. Have your copayers scan the code or share it to them by email or instant message by tapping the Share invitation button. Once everyone has scanned the code and entered their name, the wallet is ready for use. Simply tap the wallet to display addresses for receiving funds, but note that the addresses begin with 7 instead of X to indicated they are multisig addresses. It is possible to receive Dash to a shared wallet in exactly the same way as a normal wallet. Only sending Dash requires participation from the copayers.


Adding copayers to a 2-of-3 shared wallet in Dash Copay
Dash Copay Wallet
Dash Paper Wallet
The Dash Paper Wallet generator allows you to generate, encrypt and secure the keys to a single Dash address on a clean computer without ever connecting to the internet. Perfect for long term secure storage.
Introduction
A paper wallet is a method of storing a private key to access funds stored on a single address. It can be generated on a computer that has never been connected to the internet, and printed out for air-gapped offline storage. As such, they are suitable for storing large amounts of Dash, but care must be taken not to lose the private key, since there is no way of recovering funds if it is ever lost. To use the key, it must be imported or “swept” into an online wallet and should not be used again. Paper wallets are extremely secure but somewhat inconvenient for everyday use compared to hardware wallets, which also offer a high degree of security.
Paper wallets use random user and machine input to create a set of keys/addresses which you then print. You can never regenerate a paper wallet once you turn off the machine. What you print is all you get. For this reason, paper wallets are somewhat vulnerable and require special care because they can get damaged, lost, destroyed or stolen. Even if you encrypt them with BIP38 (which you should), a sufficiently motivated adversary (e.g. robbery/home invasion) could bypass this encryption using the proverbial “$5 wrench attack”.
The $5 wrench attack. Credit: xkcd.com
Nevertheless, together with appropriate planning, paper wallets are a highly convenient and user-friendly way to store Dash long term.
Security
While you can create a paper wallet using a machine that is connected to the internet, wallets that will be used to store significant funds should be generated using an offline computer running a single-use operating system to ensure that all generated data will be permanently wiped from memory once the process is complete.
A simple method of doing this is to burn a live Linux CD. Ubuntu Desktop is recommended because it will have the most drivers and is simple to use, while Tails and Kali Linux are popular choices for extremely strong security. Booting from an actual CD is most secure since it is mounted read-only, but a USB stick is generally fine as well. Both laptops and desktops can be used if you can ensure that all networking hardware is disabled when you get to the stage of actually generating your keys.
Boot from the CD and download/install your tools (or download them ahead of time to a USB drive). Disconnect from the internet, generate your keys/addresses/printouts, and power off the machine. You are now the only person with access to these addresses.
Death plan
Whichever type of cold storage you choose, make a plan to pass on the necessary data to regenerate the keys to your loved ones in the event of an accident - it will happen to us all eventually. Write down your paper wallet BIP38 decryption password or brain wallet passphrase. Then write down instructions on how to use it, and keep them separate with a clear procedure on how they can be accessed when necessary.
Tools
A Dash paper wallet can be generated in several ways.
- Using the generator at https://paper.dash.org
- Using the generator at https://walletgenerator.net/?currency=Dash
- Offline using the Dash Paper Wallet source code from GitHub at https://github.com/dashpay/paper.dash.org/releases/latest
- Offline using the same code which powers both sites, by viewing the GitHub project or downloading directly
Since the source code for all three options is largely similar, this guide will use https://paper.dash.org as an example. The websites listed here run entirely in your web browser without sending any of the data generated to an external server, but the most secure option is to download the wallet generator and run it on a computer with a freshly installed operating system that is not connected to the internet.
This guide is based on the guide available from https://walletgenerator.net. Please donate if you find this project useful!
Address generation
Go to https://paper.dash.org in your web browser (or open index.html if you downloaded the wallet generator). Select your language and choose Dash as the currency if necessary. The following screen will appear:

The Dash Paper Wallet Generator at paper.dash.org
Some random data is required to ensure the generated address and key are unique. Move our mouse around and/or type random characters into the text box until the process reaches 100% and the following screen appears:

Generating randomness for the Dash Paper Wallet Generator

A Dash address and private key generated using Dash Paper Wallet Generator
Once your public address and private key (shown in Wallet Import Format or WIF) are visible on the Single Wallet tab, you should immediately click Print to print the data and store it securely. If you leave the page without somehow recording the dash address and private key, all data will be irretrievably lost, together with any funds you have sent to the address.
Encryption
The information shown on the Single Wallet tab does not have a passphrase and is not encrypted. You can print this paper wallet as it is and use it, but it is not protected from being stolen if someone finds it. You should keep it safe the same way you would jewels or cash.
If you decide that you need the additional security of a password for this address, click Paper Wallet. A different address/key pair will appear. To create an encrypted wallet, select BIP38 Encrypt? and enter a passphrase. Tick the box Hide Art? and change to 1 the field Addresses to Generate and then click on Generate. A new wallet will be generated where the private key (WIF) is encrypted using the password you specified, resulting in a BIP38 key. You now need both this BIP38 key and the password to control funds on the address, so be sure to click Print and store both safely. If you are unsure about how to use BIP38 encryption, it is highly recommended to test the workflow with a low amount of Dash before storing significant funds on an encrypted paper wallet. If you forget the password or lose the encrypted key, you will permanently lose access to your funds.
A Dash WIF address can be easily identified because it always begins with “7”. A BIP38 format encrypted key can be identified because it always begins with “6P”. See here to learn more about BIP38.

Encrypted paper wallet generated using Dash Paper Wallet Generator
Sending to a paper wallet and viewing the balance
You can send Dash to a paper wallet address in the same way as to any other Dash address. See the documentation for your wallet if you do not know how to do this. For this example, 0.05 Dash (minus transaction fee) has been sent to the paper wallet address. Anyone with knowledge of the public address is able to see the balance of the wallet using a block explorer, but only someone with knowledge of the private key can access the funds. You can make as many deposits and send as many coins to the same address as you’d like. Just make sure you test your wallet with small amounts first to learn how it works.

Viewing the balance of the paper wallet using the Dash Block Explorer at explorer.dash.org
Spending from a paper wallet
In order to access the funds stored on the paper wallet address, you will need the following:
- The public address
- The private key in WIF
If you encrypted the wallet, you will additionally need the following to convert the BIP38 key into the WIF key:
- The encrypted private key in BIP38 format
- The passphrase you used to encrypt the key
Optional: Decrypt BIP38 key to WIF
If you encrypted your paper wallet, you will first need to decrypt the BIP38 key. You can skip this step if your private key was not encrypted.
Go to the Wallet Details tab, enter the encrypted key in the Enter Private Key field and click View Details. You will be asked to Enter BIP38 Passphrase in the field. Enter the passphrase and click Decrypt BIP38. A range of information derived from the key will appear, the information required to access the funds on the public address appears under Private Key WIF. Copy the Private Key WIF and use it in the next step.

Dash Paper Wallet Generator displaying information derived from an encrypted private key
Importing the private key to your live wallet
When you are ready to spend the balance on the paper wallet, you will need to import the private key used to control the address printed on the wallet into another Dash wallet that is connected to the internet. We will use the Dash Core Wallet in this example, although Dash Electrum and mobile wallets are also supported. Open Dash Core Wallet, click Settings and Unlock Wallet. Enter your wallet passphrase. Then click Tools and select Debug Console. The console appears. Enter the following command:
importprivkey <your private key in WIF>

Dash Core Wallet importing a private key
This process requires rescanning the entire downloaded blockchain for transactions involving this address, and will therefore take some time. Be patient. Once the process is complete, any transactions involving the imported address will appear in your list of transactions. If you use Coin Control, you can also enable or disable the address for spending there.


Paper wallet address successfully imported into Dash Core Wallet from WIF private key
Since the paper wallet public address still holds the funds, it can also be imported again into a second wallet if it is not destroyed. It is recommended to transfer the balance from the paper wallet to an internal wallet address or another address where you have exclusive control over the private key. This will prevent a third party from obtaining unauthorised access to the same address from the paper wallet before you do. You can then spend your balance as usual.
Once the paper wallet is empty and you are sure it will not be receiving any further deposits, you can destroy the paper.
Dash Paper Wallet
Hardware Wallets
A hardware wallet is a type of device which stores private keys for a blockchain in a secure hardware device, instead of in a database file such as wallet.dat used with common software wallets. This offers major security advantages over software wallets, as well as practical benefits over paper wallets. To date, there is no verifiable evidence of hardware wallets being compromised by viruses, and they are also immune to keylogger attacks that could be used to steal passwords to unlock the private keys used with software wallets.
Hardware wallets function by storing your private keys in a protected area of a microcontroller. It is impossible for the private key to leave the device in plain text - only the signed output of the cryptographic hash is ever transmitted to the device interacting with the blockchain, such as your computer or smartphone. Most hardware wallets feature a screen which allows you to independently confirm the address you are sending to is correct.
This section lists the most common commercial hardware wallets supporting Dash, although some other enthusiast projects may also be available.
Introduction
Hardware wallets offer you the security of storing your keys in secure device while still allowing you to make simple transactions through a web interface. Three major manufacturers of hardware wallets currently exist, with Dash supported on all of them.
Trezor
Developed by Czech startup SatoshiLabs, the $99 device is essentially a USB dongle designed to add an extra authentication layer to all outbound bitcoin transactions. Trezor has supported Dash since January 2017 with the release of firmware version 1.4.2.
By virtue of its design, Trezor can be used to sign transactions on ‘unsafe’ computers and is impervious to keyloggers and many other vectors of attack, so even if your host PC is compromised, the attacker has no way of getting your private key. That’s also where the device gets its name, as ‘trezor’ translates into ‘vault’ in most Slavic languages, including Czech. A kind of ‘vault’ for your private bitcoin key, Trezor claims to use a number of clever tricks to maintain security even on compromised and unsafe machines.
- Site: https://trezor.io
- Review: https://www.dashforcenews.com/trezor-hardware-wallet-review
- Shop: https://shop.trezor.io
- Wallet: https://wallet.trezor.io
It is also possible to operate a Dash masternode using your Trezor. See here for details.
Getting Started
Once you have bought your Trezor from https://shop.trezor.io or an authorized reseller, you will need a wallet to use it with. Trezor supports the following Dash wallets:
- Trezor Wallet (documentation)
- Dash Electrum Wallet (documentation)
- Dash Masternode Tool (documentation)
This documentation describes how to get started using the official Trezor web wallet at https://wallet.trezor.io. Always confirm the URL is correct and SSL encryption is enabled when working with the Trezor Wallet. Follow these steps when setting up your Trezor for the first time:
- Inspect the packaging for tampering. There should be two seals and the flaps should be glued shut. It should be impossible to remove the device without totally destroying the packaging.
- Go to https://trezor.io/start/ and watch the video to introduce the concepts of a shifting PIN layout and recovery seed.
- Go to https://wallet.trezor.io/ to begin the setup process.
- If not already installed, install the Trezor Bridge application from https://wallet.trezor.io/#/bridge
- Connect the Trezor to your computer when prompted.
- If this is the first time you connect your Trezor, you will be prompted to install firmware. Click the Install button, wait for the download and confirm on the device.
- When complete, the device will display a fingerprint. Verify that this matches the fingerprint shown on the screen. Note that this is hexadecimal and therefore not case-sensitive.
- After verification is complete, disconnect and reconnect your device. Enter a device label on the screen that appears.
- Enter and confirm a PIN by clicking on the squares according to the mapping shown on the device.
- Your Trezor device will now display a sequence of 24 words on the screen. This is your recovery seed. Write the words down in the order they appear on the recovery card. Never store your recovery seed in any digital format, including photos or text.
- Verify the seed against what you have written down and store it in a safe place.
- You will be asked to enter your PIN again.
- The Trezor Wallet will appear with a message that your device is ready for use. Your device name will appear on the device.
- Switch to the Dash wallet using the menu at the top left. You can now use your Trezor to send and receive Dash.

Trezor Web Wallet for Dash ready for first use
Receiving Dash
We will now create a Dash receiving address and attempt to receive 1.0 DASH.
- In the Trezor Dash wallet, click Account #1, then click Receive.
- A Dash address will appear. Click Show full address to verify the address on the Trezor device.

- Send 1 DASH to this address using an exchange or another wallet.
- Once the transaction is confirmed, it will appear on the Transactions tab of your Trezor Wallet.

Trezor Web Wallet after receiving Dash
Sending Dash
We will now send the Dash (minus transaction costs) to an external address.
- In the Trezor Dash wallet, click Account #1, then click Send.
- Enter the Dash address and amount in the fields.

- Enter your PIN.
- Confirm the address on the device, then confirm the action.

- The transaction will be transmitted to the network and the recipient receives the funds.

Trezor Web Wallet after sending Dash
Advanced Functions
Your PIN is your primary form of security when using your hardware wallet. It is considered secure because the layout of the PIN keypad changes each time you use it. If you suspect your PIN has been compromised, change it using the following instructions. For extra security, or if you believe you may be subjected to duress at some point in the future, you can add a passphrase to reveal further wallets which only appear when you enter your passphrase. Since the passphrase acts as a cryptographic salt, there is no “correct” passphrase - a different wallet will be displayed for each passphrase you enter. Be absolutely sure you understand passphrases before using them. For more information, see here.
You can change your Trezor PIN from both the Trezor wallet and DMT.
From Trezor: Go to https://wallet.trezor.io and click the cog icon next to your username. Then click Change PIN. You will need to confirm you want to change your PIN on the hardware device, then enter your existing PIN and the new PIN twice.

From DMT: Open DMT and click Tools > Hardware Wallet PIN/Passphrase configuration. The following window will appear. Click Change. You will need to confirm you want to change your PIN on the hardware device, then enter your existing PIN and the new PIN twice.

You can add a passphrase to your Trezor from both the Trezor wallet and DMT. Before you add a passphrase, you should be fully aware of how it functions as a “25th word” to your seed, and the risks of forgetting your passphrase. Note that you do not need to enter a passphrase - blank is perfectly acceptable and will reveal your normal wallet.
From Trezor: Click Advanced, confirm you understand the risks and click Enable passphrase encryption. This enables a prompt to enter a passphrase each time you use your Trezor.

From DMT: Open DMT and click Tools > Hardware Wallet PIN/Passphrase configuration. The following window will appear. Click Enable. This enables a prompt to enter a passphrase each time you use your Trezor.
Your Trezor allows you to change the homescreen image from the default Trezor logo. A range of existing images can be selected, you can generate one yourself using the Trezor Homescreen Editor, or you can create and upload your own 128x64px black and white image. To change your homescreen image:
- Go to https://wallet.trezor.io and open your wallet
- Click the small cog icon next to your device name
- Click the Homescreen tab
- Select the new homescreen, then click the Set as homescreen button at the top
- Confirm the change on the Trezor device
A few sample images are available for Dash:


While losing a Trezor is not a security threat (unless someone knows your PIN and/or passphrase), it is a moderately expensive device that can be damaged by pressure or water, for example. For this reason, Dash community member tungfa has shared photos of a custom-made Trezor case. The following materials are required:
- Pelican Case 1010 Micro Case
- Foam
- Trezor + Cable
- USB Stick (for wallet.dat files + blockchains of all portfolios)
- Notepad


KeepKey
The $129 KeepKey hardware wallet features a large screen and 100% open source firmware to guarantee the security of your private keys. KeepKey has supported Dash since firmware version 4.2.10, released on March 28, 2017, and added support for InstantSend in firmware version 5.7.2, released on September 5, 2018. Follow these instructions to begin using Dash on your KeepKey device.
- Site: https://www.keepkey.com
- Review: https://coincentral.com/keepkey-wallet-review
- Shop: https://keepkey.myshopify.com/
- Product video: https://vimeo.com/133811189
It is also possible to operate a Dash masternode using your KeepKey. See here for details.
Ledger
Founded in 2014, French startup Ledger markets enterprise and consumer blockchain security solutions, including the €58 Ledger Nano S and upcoming Ledger Blue. Ledger Nano S has supported Dash since November 2016 and firmware version 1.2. Follow these instructions to add Dash support to the device.
- Site: https://www.ledgerwallet.com
- Review: https://www.dashforcenews.com/ledger-nano-s-review
- Shop: https://www.ledgerwallet.com/products
Product video:
It is also possible to operate a Dash masternode using your Ledger. See here for details.
Trezor Web Wallet
Third Party Wallets
These wallets have been developed by external developers to support Dash. Many third party wallets support multiple different cryptocurrencies at the same time, or integrate instant cryptocurrency exchanges.
Introduction
The Dash protocol and many Dash products such as Dash Core and the mobile wallets are entirely open source, which makes it easy for third parties to integrate Dash with their existing cryptocurrency wallet solutions. This section describes some of the third party wallets available and the functions they offer. Please note that Dash does not provide support for any of these wallets, and any listing here should not be considered an endorsement or recommendation. Contact the software vendor for support.
Abra

Abra is a multi-cryptocurrency wallet supporting Dash amongst other currencies. It is designed for investment and can be funded from your bank account, credit/debit card, cash (in the Philippines), Bitcoin, Bitcoin Cash, or Litecoin. Dash deposits and withdrawals are currently not supported.
Documentation
Abra offers detailed documentation of all functions at https://abra.zendesk.com

Abra wallet running on iOS
Atomic Wallet

Atomic Wallet is a multi-asset custody-free wallet with atomic swap exchange and decentralized orderbook functionality. It provides a powerful, secure service that transparently and reliablly allows users to reduce effort spent on managing and exchanging crypto assets.
Installation
All Atomic Wallet releases are available from https://atomicwallet.io - simply download and install the appropriate package for your system.
Documentation
Atomic Wallet offers detailed documentation of all functions at https://atomicwallet.freshdesk.com and a few quick links are also collected here:
- Getting started with Atomic Wallet
- How to install Atomic Wallet
- How to create a wallet
- Getting started with Atomic Swaps

Atomic Wallet Portfolio screen
Cobo

Cobo is a multi-currency mobile wallet supporting Dash with options to either register a cloud wallet (private keys backed up on the cloud) or generate your own HD wallet seed (private keys encrypted on your device), giving you maximum control over how you handle the crypographic keys to all assets in the wallet. The wallet offers a unique “staking” feature where users can pool their Dash to set up masternodes and enjoy weekly returns.
Installation


Cobo is available from the Google Play Store for Android and the Apple App Store for iOS.
Documentation
Cobo offers detailed documentation of all functions at https://support.cobo.com

Cobo wallet
Coinomi

Coinomi is an open-source multi-currency mobile wallet available for iOS and Android. Your private keys never leave your device, and strong wallet encryption guarantees that your funds are always under your control only. Instant exchange is available directly in the wallet through ShapeShift and Changelly integrations.
Download
Coinomi is available from the Google Play Store for Android and the Apple App Store for iOS.
Documentation
Coinomi offers detailed documentation of all functions at https://coinomi.freshdesk.com

Coinomi wallet running on Android
Cryptonator

Cryptonator offers a web/mobile wallet which can be accessed using a simple username/password combination. It supports multiple currencies including Dash, and offers instant exchange between the various currencies. It also support Euro-denominated SEPA payments directly from within the account.
Download
Cryptonator is available from the Google Play Store for Android and online at https://www.cryptonator.com
Documentation
Cryptonator offers detailed documentation of all functions at https://cryptonator.zendesk.com/hc

Cryptonator wallet running on Android
Edge

Edge is a secure multi-currency wallet for iOS and Android. It offers a unique login system to store your encrypted HD seed on the cloud while still performing all sensitive operations requiring a private key on your device. Edge is fast and simple to use, allowing you to scan QR codes and sign transactions using your fingerprint ID or a simple PIN code. ShapeShift is also integrated to facilitate exchange between different cryptocurrencies.
Installation
Edge is available from the Google Play Store for Android and the Apple App Store for iOS.
Documentation
Edge offers detailed documentation of all functions at https://support.edgesecure.co and a few quick links are also collected here:
- Getting started
- How do I create a new wallet?
- How do I send money?
- How do I receive money into my account?
- What is ShapeShift and how does it work?

Edge Welcome, Receive Dash and Balance screens
Ethos

The Ethos Universal Wallet allows you to store Dash and over 100 other cryptocurrencies. It features a single recovery phrase, known as the SmartKey, with which you can restore all balances on another device. Features include human-readable usernames, ShapeShift coin conversion and a portfolio tracker.
Installation
Ethos Universal Wallet is available from the Google Play Store for Android and the Apple App Store for iOS.
Documentation
Ethos offers detailed documentation of all functions at https://support.ethos.io and a few quick links are also collected here:
- How to Create and Ethos Account
- How to Create Your SmartKey and First SmartWallet
- How to Add Coins to a SmartWallet
- How to Receive Cryptocurrency to a SmartWallet
- How to Send Cryptocurrency from the SmartWallet

Ethos Universal Wallet on Android
Evercoin

Evercoin is a multi-currency mobile wallet combined with the full power of an instant exchange, all in one app. Advanced features like limit orders allows you to execute advantageous trades without having to copy addresses around and use complicated online exchanges. Private keys are stored on the device and backed up using a typical 12-word phrase. An Evercoin hardware wallet is also due to launch soon.
Installation
Evercoin is available from the Google Play Store for Android and the Apple App Store for iOS.
Documentation
Read the FAQ or visit the Evercoin site to chat with the support team directly.

Evercoin wallet running on Android
Exodus

The Exodus wallet features an engaging visual design and can simultaneously store multiple currencies. It is available for Windows, Mac and Linux. It is also fully integrated with Shapeshift to offer exchange between the different currencies.
Installation
All Exodus releases are available from https://www.exodus.io/releases - simply download and install the appropriate package for your system.
Documentation
Exodus offers detailed documentation of all functions at http://support.exodus.io and a few quick links are also collected here:

Exodus wallet Portfolio screen
Guarda

Guarda offers an entire blockchain ecosystem consisting of desktop, web and mobile wallets, OTC crypto sales and instant crypto exchange. Dash is supported throughout the ecosystem, making it an easy and convenient way for new users to get started. All keys are held by the user, ensuring the safety of your funds.
Installation
Guarda desktop wallets are available from https://guarda.co/desktop for Linux, macOS and Windows, or you can use web wallet at https://guarda.co/app to create new or restore existing wallets.
Documentation
Guarda offers detailed documentation of all functions at https://guarda.freshdesk.com and a few quick links are also collected here:

Guarda wallet
Jaxx

Jaxx supports multiple currencies in one wallet, including Dash. It is available for almost all platforms including Android, iOS, macOS, Windows, Linux and also as a Chrome extension. Jaxx is open source software.
Installation
All Jaxx releases are available from https://jaxx.io/downloads.html - simply download and install the appropriate package for your system.
Documentation
Jaxx offers detailed documentation of all functions at https://decentral.zendesk.com and a few quick links are also collected here:

Jaxx wallet running on various devices
Mobi

Mobi is a multi-currency mobile wallet linked to your phone number. As a hosted wallet, Mobi holds the private keys to your funds on your behalf, meaning you can restore your funds simply by receiving a text message and entering your PIN. However, you must trust Mobi to act responsibly with these private keys, and you will lose access to your funds if you lose access to your phone number. A web interface is also available, and you can use fiat currency to buy cryptocurrency in the app.
Installation
Mobi is available from the Google Play Store for Android and the Apple App Store for iOS.
Documentation
Read the FAQ, join the Mobi Telegram group or send an email to support@mobi.me for support with Mobi.

Mobi wallet running on Android
Paytomat

Paytomat offers a multicurrency wallet for Android and iOS which integrates a loyalty program to incentivize retailers and consumers to transact in Dash.
Installation
Paytomat is available from the Google Play Store for Android and coming soon on the Apple App Store for iOS.
Documentation
Join the Paytomat Telegram group or send an email to support@paytomat.com for support with Paytomat.

Paytomat wallet running on Android
Edge Wallet
Web Wallets
Web wallets are services which keep a Dash balance for you, while maintaining control of the private keys on your behalf. Any Dash stored on exchanges falls under this category, but there are also some services able to store Dash for you through simple Google/Facebook login systems. Be extremely careful with web storage, as your Dash is only as secure as the reputation of the company storing it for you. A particular exception is MyDashWallet.org, which provides a secure web interface to the Dash blockchain while leaving you with full control of your private keys.
MyDashWallet

MyDashWallet is a web interface to the Dash blockchain, inspired by MyEtherWallet and created by DeltaEngine.net. It is explicitly not an online wallet, meaning you maintain control over your private keys at all times. Unlike many other light wallets, MyDashWallet also supports advanced Dash features such as InstantSend and PrivateSend. The project is non-profit, open source and free to use. You can load a wallet and transact in a variety of wallet formats:
- Keystore wallet (file-based)
- Ledger hardware wallet
- Trezor hardware wallet
- Private key
- BIP39/44 HD recovery phrase (coming soon)
- BIP32 HD recovery phrase (coming soon)
MyDashWallet offers complete and detailed documentation for all functions.
- Getting started
- How to Create a Wallet via Keystore file
- Using the Ledger Hardware Wallet on MyDashWallet
- Using the Trezor Hardware Wallet on MyDashWallet
- How to does DASH InstantSend work on MyDashWallet?
- How to does DASH PrivateSend work on MyDashWallet?


My Dash Wallet
Text Wallets
Text wallets (or SMS wallets) allow users without smartphones or internet access to transact in Dash using text messages on simple feature phones. Innovative shortcodes, usually in collaboration with national mobile service providers, make it relatively simple to create transactions to both send and receive Dash.
Introduction
Text message (SMS) wallets allow you to easily transact in Dash using a simple feature phone. An internet connection is not required. Because text wallets require access to text messages, they generally only support specific regions. See below for details.
CoinText

CoinText is a for-purpose project to make cryptocurrency easy to use to expand economic freedom around the world. It makes it possible to transact in Dash without internet, apps, accounts or complicated addresses. CoinText currently supports Dash transactions in the USA and Canada and aims to expand to over 50 countries in coming months. It is possible to denominate the amount to be sent in both Dash and the local currency, and send Dash to both phone numbers and Dash addresses.
Instructions
Simply text START to the CoinText phone number for your region. For more the list of supported regions and more detailed instructions on how to send and receive payments, see the links below:
DashText

DashText is a service available in Venezuela to allow users to transact in Dash using text messages. The only fees are the cost of a standard SMS, incurred by the network operator. Users can send Dash to innovative shortcodes to securely confirm transactions.
Instructions
Simply text CREATE to the DashText phone number to get started. Further instructions and links will appear here once the project is ready for mass market.

Dash CoinText
Wallet Guides
Documentation in this section describes common tasks and questions relating to all wallets.
Wallet Recovery
Long-time users of cryptocurrency sometimes find old wallet files on USB drives or cloud storage that they have forgotten about. Others may have a backup, but can’t remember the software they used to create it, or have forgotten the password. Other users may have an old version of Dash Core that no longer works because the network has upgraded. This documentation is intended to help these users restore access to their funds.
Determining the backup format
The first step is to determine the format of your backup. In most cases, this will either be a file, probably named wallet.dat, or a phrase of words. In some cases, you may have stored the private key for a Dash address directly. The following list shows the possibilities and methods to restore your wallet in order of probability.
- Backup is stored in an older version of Dash Core that no longer works
- Follow instructions for restoring wallet files using Dash Core
- Backup is a file
- If file name is similar to wallet.dat, try to restore using Dash Core
- If file name is similar to dash-wallet-backup or includes the word ‘mobile’, try to restore using Dash Wallet for Android
- Backup is a phrase of words
- If 12 words long, try to restore using Dash Electrum wallet or Dash wallet for Android or iOS, depending what you used to create the backup
- If 13 words long, try to restore using Dash Electrum wallet
- If 12, 18 or 24 or 25 words long, try to restore with the hardware wallet you used to create the recovery phrase
- Backup is a long string of random characters or a QR code
- If 34 characters long and starting with X, this is a public address and cannot be used to restore access to lost funds. You need the private key.
- If 51 characters long and starting with 7, this is a private key in WIF, import using Dash Core
- If 58 characters long and starting with 6P, this is a BIP38 encrypted private key, decrypt using paper wallet then import using Dash Core
Once you have determined your backup format, follow the links to view the restore guide for that format.
File Backups
One of the most common wallet backup formats is a wallet.dat file from Dash Core wallet. Before you begin, make absolutely sure that you have a copy of this file stored somewhere safe in case the restore process accidentally corrupts your wallet file! In most cases, wallet.dat backups will also be protected by a password, which you will need to know to regain access to your Dash funds. If you already have Dash Core installed, first ensure it has been updated to the latest version by clicking Help > About Dash Core. Compare this with the latest available version of Dash Core on the website as follows:


Comparing the installed version of Dash Core with the latest version available on the website
Update Dash Core to the latest version according to the installation instructions. If you have only a wallet file and no existing installation of Dash Core, simply install Dash Core according to the installation instructions and start it once to create the DashCore folder. Then close Dash Core and copy the wallet.dat file you want to restore to the DashCore folder in the location specified below, replacing or renaming the existing file.
| Platform | Path to data folder | How to navigate |
|---|---|---|
| Linux | ~/ | Go to your home folder and press Ctrl+H to show hidden files, then open .dashcore |
| macOS | ~/Library/Application Support/ | Press Shift + Control + G, type ~/Library/Application Support, then open DashCore |
| Windows | %APPDATA% | Press Windows Key + R and type %APPDATA%, then open DashCore |
If your existing version of Dash Core is older than v0.12.1.x, you may
need to rename your data folder from Dash to DashCore.
To repair a broken installation, navigate to the DashCore folder and delete all .log and .dat files except wallet.dat. The following files can be safely deleted:
- banlist.dat
- budget.dat
- db.log
- debug.log
- fee_estimates.dat
- governance.dat
- mncache.dat
- mnpayments.dat
- netfulfilled.dat
- peers.dat
Leave .conf files and the folders (such as backups, blocks,
chainstate, etc.) intact, since they will help you get started
faster by providing a copy of the blockchain and your settings.
Now open Dash Core and wait for blockchain synchronization to complete. Your wallet will be restored/upgraded and all balances should be displayed. You should ensure you have the correct password by trying to unlock your wallet from Settings > Unlock Wallet to make sure you can actually create transactions using your balances. If you have any problems with your balance not appearing, try to force a rescan of the blockchain by going to Tools > Wallet Repair and selecting Rescan blockchain files. Rebuild index may also help. Dash Core will restart and perform a full scan of the blockchain.


Forcing Dash Core to rescan the blockchain
At this stage, recovery is complete and you should make another backup using File > Backup Wallet or following the instructions here. If you have any further problems, try asking on the forum, Reddit or the #dash-support-desk channel at Dash Nation Discord.
Similar to Dash Core wallet, Dash Wallet for Android can back up your
wallet to a file. To restore this wallet on another device, simply copy
the backup file to the /Downloads folder of your device using either
a computer connected by USB or a file manager app on the device. Ensure
your Dash wallet is fully updated in the Play Store, then open Dash. If
you have an existing balance, either make another backup or transfer it
to an external address, because restoring a wallet will replace your
existing wallet!
Click the menu button in the top left corner, select Safety > Restore wallet and select the appropriate file from the list. Enter your password and click Restore. This may take some time, and your balance will be displayed when complete.


Restoring a file backup using Dash Wallet for Android
Recovery Phrases
If you have a 12-word phrase and feel certain your backup was made on an iOS or Android mobile device, follow these instructions.
Ensure your Dash wallet is fully updated in the Play Store, then open Dash. If you have an existing balance, either make another backup or transfer it to an external address, because restoring a wallet will replace your existing wallet! Click the menu button in the top left corner, select Safety > Restore from recovery phrase and enter your 12-word phrase.


Restoring a 12-word recovery phrase using Dash wallet for Android
Ensure your Dash wallet is fully updated in the App Store, then open Dash. If this is the first time you are opening the app, you can enter your recovery phrase directly by selecting Recover wallet on the start screen. If you have an existing balance, either make another backup or transfer it to an external address, because restoring a wallet will replace your existing wallet!
Click the menu button in the top left corner, select Settings > Start/recover another wallet. Enter your current wallet recovery phrase, then the app will reset and you will see the option to Recover wallet again.


Restoring a 12-word recovery phrase using Dash wallet for iOS
Ensure you are using the latest version of Dash Electrum according to the installation instructions here. Dash Electrum supports multiple simultaneous wallets, so you can safely restore to a new wallet file without losing your old wallet. Click File > New/Restore and enter a file name to store your new wallet. Then select I already have a seed and enter your 12/13-word recovery phrase. Enter a new password for your wallet and click Next to recover your addresses from the recovery phrase.


Restoring a 12-word recovery phrase using Dash Electrum
If your 12, 18 or 24-word recovery phrase was generated by a hardware wallet, follow these instructions:
You can use your Dash iOS recovery phrase with Dash Electrum to recover funds if you lose access to your iOS device for any reason. However, since the wallet derivation paths are not identical, the process only works in one direction, meaning it is not possible to restore a Dash Electrum wallet using the Dash iOS wallet. Also, because the import process uses an xprv key rather than the recovery phrase directly, it will not be possible to display the recovery phrase in Dash Electrum. It is therefore recommended to move the funds (either to a standard Dash Electrum wallet or some other wallet) once recovery is successful to ensure that standard backup procedures work as expected.
Recovery takes place in two steps. First, we will convert the Dash iOS recovery phrase into an xprv key. In the second step, we will import the xprv key into Dash Electrum.
Go to the BIP39 Mnemonic Code Converter page. This is a useful tool for manipulating/displaying BIP32/39 seed data. If you are not comfortable performing this procedure online, an offline version is available by downloading the file described in these instrutions. Once the tool is loaded in your browser, complete the following steps:
- Enter your 12 word seed phrase in the BIP39 Mnemonic field.
- Leave BIP39 Passphrase blank.
- Set coin to Dash.
- Under Derivation Path, click the BIP44 tab.
- Copy the value shown in Account Extended Private Key.
- Open Dash Electrum and click File -> New/Restore.
- Type a name for your wallet.
- Select Standard wallet.
- Select Use public or private keys.
- Paste in your value from Account Extended Private Key.
- Optionally enter a password.
Dash Electrum should now detect your Dash iOS balance and you should have complete access to your funds. The seed phrase won’t be available in Dash Electrum , so you will just need to follow the steps above again if you want to restore this wallet from the recovery phrase again. It is recommended to send your funds to a new Dash Electrum wallet instead and follow standard backup procedures.
Older versions of the Dash iOS wallet used BIP32 addresses under the
m/0' derivation path. The wallet should migrate these funds over to
BIP44 addresses during normal use, but some residual balance may be
under this derivation path, so restoring the BIP32 Extended Private
Key may be helpful in some situations. Please see this forum thread
for further discussion on this process.
Private Keys
Most wallets offer a function to import an address from a private key, see the documentation for your wallet for specific instructions. While private keys can be stored in many ways, in this example we will work through the process of restoring a private key from a paper wallet using Dash Core. If you only have a QR code and not the key, use a barcode scanning app (Android or iOS) to read the code first.
First, start Dash Core and unlock your wallet by selecting Settings > Unlock Wallet. Enter your password, then open the debug console by selecting Tools > Debug Console. In the console, type the following, replacing the example private key with your key:
importprivkey 7rPQWnMrh3oWLtZrzt1zLRSCVyuBbwnt7fRBXPp2EwcPhtzXSzp

Importing a private key using the debug console in Dash Core wallet
Dash Core will rescan the blockchain for transactions involving the public address of this key and enter the transactions and balance in your wallet.
The private key must be in wallet import format (WIF). If your key is encrypted using BIP38 (key begins with 6P instead of 7), you must first decrypt it to view the key in WIF. To do so, go to https://paper.dash.org/ and click Wallet Details. Enter the encrypted private key in the field and click View Details. You will be prompted for the password, and your keys will be decrypted. Find the key named Private Key WIF and import this into your wallet.


Decrypting a BIP38 encrypted key to WIF for import in Dash Core wallet
Forgotten Passwords
In most cases, if you selected a strong password and have forgotten or lost it, there is practically no hope of recovery. The encryption used by the Dash wallets is extremely strong by design, and a well-chosen password should defeat most brute force cracking attempts. If you can recall some details of the password, particularly its length or sequences of characters that may be included, then brute force password cracking techniques may be worth attempting. Several services exist to do this, or you can attempt it yourself. Because Dash Core is based on Bitcoin Core, most approaches to apply brute force to crack a Bitcoin wallet will also work for Dash wallets.
Signing and Verifying Messages
Dash wallets function by securely storing the private keys used to create transactions using publicly visible addresses on a distributed ledger called a blockchain. In some cases, it may be necessary to verify an address to demonstrate control of the funds that it holds, that you can receive using the address, or even to verify your identity to an exchange that has previously seen a transaction from that address. To avoid phishing attacks, take great care when sending signed messages to parties you do not trust, since ambiguously worded messages could be used to impersonate your identity.
Signing messages requires a private key. Verifying messages requires a public address. In this way, you can write an arbitrary message and generate a signature that could only have been created by a user with control of the private key for this address. Any user with the message, the public address and the signature can easily verify that only you could have created the signature. Messages are not stored on the blockchain. Instead, you must send these three text snippets (message, address and signature) to your intended recipient using another communication channel, such as email. As an example, you can test the following message and signature and verify that it was signed by the given address:
Message: Documentation test signature
Address: XwHihwiQzheVKbT76e7ZhPkujDCQGEZC6P
Signature: IKaEt7MTb4Y57WIde5TLUkm1vbVsjk/L9eG+TE2tdQhMeK9vGgTsqcVOTmXXQ6QA0/WQtxqPURH2qZG27YR2VE0=
Signing a Message
The following screenshots show how to sign a message using the Dash Core wallet (File > Sign message), Trezor web wallet (Sign & Verify > Sign message) and DMT (Tools > Sign message with HW for current masternode’s address):


Signing messages in Dash Core, Trezor web wallet and DMT
Verifying a Message
The following screenshots show how to verify a message using the Dash Core wallet (File > Sign message) and Trezor web wallet (Sign & Verify > Sign message):


Verifying messages in Dash Core and Trezor web wallet. Notice that the message verified by Dash Core was generated in Trezor, and vice versa
Earning and Spending
Dash is designed from the ground up to function as digital cash. This documentation discusses how and where Dash users can manage all of their personal finances using Dash.
Earning
A range of services and businesses are available to convert your wage to and from Dash as you receive it. It is of course easiest to receive payment from your employer in Dash directly, however this may not always be an option. Uphold allows you to instantly and automatically convert any received deposits to and from Dash. Building on this functionality, Bitwage allows you to invoice and receive payment from any employer, practically anywhere in the world, and have a percentage of your wage immediately converted to Dash. You can then withdraw your wage to any Dash wallet for spending or saving. For more information, see the following blog posts:
Spending
Merchant Directory
Dash can be spent in hundreds of stores and services both online and in physical locations.

Discover Dash lists businesses around the world accepting Dash, sorted by category. It’s easy to add your business to the list, and also features a short introduction for new Dash users. The site is maintained by Dash Force, and has been featured on Dash Force News.
Debit Cards
Debit cards work by prepaying in Dash to load the account, then withdrawing cash from an ATM or spending online or anywhere debit/credit cards are supported. The Dash is either exchanged at the time of purchase or in advance. For an overview and review of all available and upcoming cards, including cards funded by the Dash budget system, see this article on Dash Force News.
The rapidly evolving approach to regulation of cryptocurrencies such as Dash and instant exchange solutions such as ShapeShift means that availability of debit cards cannot be guaranteed in any or all jurisdictions. Check with the following providers for updates on the availability of Dash debit cards.
Disclaimer: This list is provided for informational purposes only. Dash Core is not liable for any funds transmitted in error to these providers, or for the accuracy of information on this page.
- Shakepay

Shakepay is a virtual (Android & iOS) and plastic card backed by VISA and usable in Canada. The card can be loaded with Bitcoin, Dash and Ethereum, and balances tracked in USD, CAD and EUR. See here for a review by Dash Force News.
- Wirex

Wirex offers a cryptocurrency wallet, money transfer and cryptocurrency sales, with a physical card potentially available again soon. On October 2, 2017 Wirex announced a partnership with Dash and integration of Dash funding on Wirex cards.
- FuzeX

The FuzeX Card & FuzeX Wallet strive to offer an all in one payment solution that provides a smarter way to pay. The card offers real-time exchange of cryptocurrency at the time of purchase. The goal is to make paying with cryptocurrency secure, fast and a seamless process for everyday use.
- Paycent

Paycent provides Android and iOS wallets that can be funded using both fiat and cryptocurrency. Users can transact with one another within the app, identified by their mobile numbers, or order physical debit cards to spend their balance. Dash is the preferred network partner of Paycent.
- SpectroCoin

Spectrocoin offers an exchange, wallet and POS service, with a physical card potentially available again soon. Dash, Bitcoin and Ethereum are supported, as well as over 20 major fiat currencies.
- MoneyPolo

MoneyPolo offers currency exchange and transfer, prepaid cards and the ability to hold accounts in a range of currencies. Deposits and withdrawals are available in DASH, BTC, ETH, LTC, BCH and BTG, and it is possible to transfer value to a prepaid card or any worldwide bank account.
- Bitwala

Bitwala is currently preparing legal documentation to re-launch it’s card service in Europe, and has supported Dash in the past.
- TenX

TenX is in discussions with regulatory authorities to launch an integration of Dash with their wallet app and physical cards.
Tax
Taxation law is different depending on where you qualify as a resident for tax purposes. The following services are available to help you calculate your tax obligations.
Getting Started
Dash welcomes new merchants and supports integration through a standardised onboarding process. It’s easy to begin accepting payments in Dash and enjoy the following benefits:
- Settlement within seconds and clearance within minutes
- Ability to accept payments from any market around the world
- Irreversible transactions to prevent fraud
- Advanced privacy for both customers and merchants
- Lowest fees in the industry
A three-part course on why Dash is a popular choice for payments and how integration takes place is available in English and Spanish on DashAcademy.com. To get started with an integration in your sales system, simply select an online or point of sale payment solution from the lists below. If you are unsure, GoCoin is a popular choice due its support for InstantSend, while CoinPayments supports the largest range of online shop software. Anypay is an incredibly simple solution for retail stores, and also supports InstantSend. Larger integrations may require some customisation or cooperation with a specialist payment processor such as ePaymints. This documentation also describes the administrative and technical steps required to integrate various Dash services.
Any Dash received in payment can be automatically converted to the fiat currency of your choice using services such as Uphold. Simply select the card for the target currency and click Add funds -> With cryptocurrency. Any cryptocurrency deposited to this address will immediately be converted to the target fiat currency at the time of deposit.
Many major merchants accept Dash - check out Bitrefill or CheapAir for examples of what merchant integration can look like. Once you are up and running accepting Dash, consider adding your business to the directory maintained at Discover Dash for increased visibility.
Payment Processors
This section lists known payment processors supporting Dash and the business platforms they support. Please conduct thorough research before choosing a payment provider to ensure your needs will be met.
For more advanced payment processing needs, such as for high risk merchant accounts in industries challenged with high levels of chargebacks, it is recommended to contact Dash partner ePaymints.
Online Stores
Due to the wide range of platforms for online stores, the following table is intended to help you select an appropriate payment processor for your existing store.
| CoinPayments | GoCoin | PayBear | Coingate | GoURL | |
|---|---|---|---|---|---|
| Blesta | ✓ | ✓ | |||
| BoxBilling | ✓ | ||||
| Easy Digital Downloads | ✓ | ✓ | |||
| Ecwid | ✓ | ||||
| Jigoshop | ✓ | ||||
| Magento | ✓ | ✓ | ✓ | ✓ | |
| OpenCart | ✓ | ✓ | ✓ | ✓ | |
| osCommerce | ✓ | ✓ | ✓ | ||
| PrestaShop | ✓ | ✓ | ✓ | ✓ | |
| Shopify | ✓ | ||||
| Tomato Cart | ✓ | ||||
| Ubercart | ✓ | ✓ | |||
| VirtueMart | ✓ | ✓ | |||
| WHMCS | ✓ | ✓ | ✓ | ||
| WooCommerce | ✓ | ✓ | ✓ | ✓ | ✓ |
| WP eCommerce | ✓ | ✓ | |||
| ZenCart | ✓ | ✓ | ✓ |
Point of Sale
A range of Point of Sale systems are available. Many function as an app or simple website serving a checkout interface and QR code generator, while others support custom features such as NFC or a rewards scheme. QR.cr, Spark Payments and Anypay are supported by the community and are particularly widespread.
| Name | App? | Web? | Hardware? | NFC? | Notes |
|---|---|---|---|---|---|
| 34 Bytes | ✓ | Hardware terminal capable of printing receipts. | |||
| Alt36 | Full stack system. Supports integration of suppliers and employees. | ||||
| Anypay | ✓ | ✓ | Popular solution for smartphones with web interface and backend. | ||
| CDPay | ✓ | ||||
| CoinPayments | ✓ | ✓ | |||
| CopPay | ✓ | ||||
| EletroPay | ✓ | POS device with ePaper display for unique QR codes and built-in receipt printer. | |||
| Festy | ✓ | NFC wristband payments for festivals. | |||
| GB CortexPay | ✓ | Professional hardware terminal with multiple payment options. | |||
| Paytomat | Token rewards for crypto payments. | ||||
| QR.cr | ✓ | ✓ | Cheap solution with many features to use a mobile phone as a POS terminal. | ||
| QuikWallet | ✓ | ✓ | India only. Also supports SMS payment. | ||
| SetGetGo | ✓ | ✓ | Available for Android, web and Android APIs, payment buttons, competitive fees | ||
| Spark Payments | ✓ | ✓ | Available for Android, Windows, macOS, Linux. 94 exchange rates and Uphold.com supported |
Installation Examples
This section contains worked examples of how to install, configure and process your first payment using the payment processors listed in this documentation.
WooCommerce and GoCoin
If your online store is built on WooCommerce, you can simply install GoCoin as an additional payment gateway and immediately begin accepting Dash. This guide assumes you have already installed Wordpress, installed WooCommerce and created at least one product in your store.
Go to the gocoin-woocommerce GitHub Releases page and download a zip file of the latest version of the plugin, as shown below. In your WordPress administration backend, select Plugins -> Add New and then click Upload Plugin. Click Choose File and select the file you just downloaded, then click Install Now and Activate Plugin.


Next, go to the GoCoin merchant sign up page and create an account. Once you are logged in, go to Preferences, select Dash and click Add DASH Address to add a payment withdrawal address. You will receive an email with a link to confirm the address. Next, go to Developers and copy the Merchant ID into a temporary text file. Next, click Get Key to display a valid API key. Copy this key into your temporary text file as well. Finally, you can optionally add a Dash logo to your checkout by Profile section and clicking Logo -> Upload.


Back in the WordPress plugins section, click the Settings button for the WooCommerce plugin and navigate to Checkout -> GoCoin section. Ensure the GoCoin plugin is enabled here, then enter the Merchant ID and API Key in the appropriate fields as shown below, modifying the other fields as necessary. Click Save changes when you are ready.

Your customers will now see an option to pay with Dash when completing the checkout process for an order. The payment will be processed by GoCoin, and you will receive emails detailing each purchase procedure. You can choose how often you want to withdraw your payments, to which Dash address and various other options in the GoCoin administration section. See the GoCoin Documentation for more information.


Completing payment through the GoCoin payment processor
WooCommerce and CoinPayments.net
If your online store is built on WooCommerce, you can simply install CoinPayments as an additional payment gateway and immediately begin accepting Dash. This guide assumes you have already installed Wordpress, installed WooCommerce and created at least one product in your store. A video of the process to install the CoinPayments payment processor is also available.
In your WordPress administration backend, select Plugins -> Add New and type “coinpayments.net” into the search box. A plugin named CoinPayments.net Payment Gateway for WooCommerce should appear. Click Install Now to install the plugin. Alternatively, you can download the plugin from the WordPress website as a zip file and upload it using the Upload Plugin button. Once the plugin is installed, click Activate to begin configuration.

Installing the CoinPayments.net WooCommerce plugin
Next, go to CoinPayments.net and sign up to create an account. Once you are logged in, go to Account -> Coin Acceptance Settings and enable Dash, as well as optionally entering a withdrawal address. Next, go to Account -> Account Settings and copy Your Merchant ID from the Basic Settings area into a text file. Then navigate to the Merchant Settings section and enter a long, random series of characters for the IPN Secret. Copy this code to your temporary file as well.
Back in the WordPress plugins section, click the Settings button for the WooCommerce plugin and navigate to Checkout -> CoinPayments.net section. Ensure the CoinPayments plugin is enabled here, then enter the Merchant ID, IPN Secret and Description in the appropriate fields as shown below. Click Save Changes when you are ready.

Configuring the CoinPayments.net WooCommerce plugin
Your customers will now see an option to pay with Dash when completing the checkout process for an order. The payment will be processed by CoinPayments.net, and you will receive emails detailing each purchase procedure. You can choose how often you want to withdraw your payments, to which Dash address and various other options in the CoinPayments administration section. See the CoinPayments Documentation or Merchant Tools for more information.


Completing payment through the CoinPayments.net payment processor
Point-of-Sale with Anypay
Anypay.global allows you to quickly start accepting point-of-sale payments in Dash at a physical store. The service functions as a simple website that you load on any internet- connected and touch-enabled device, such as a smartphone or tablet.
Begin by registering an account with Anypay. You will be asked to specify an email address and password. Once you are signed in, you must add a Dash payment withdrawal address.


Setting up Anypay
Once this has been set up, you can begin processing payments immediately. Simply log in to https://pos.anypay.global or tap Merchant Point of Sale App in the admin area using your device. A keypad will appear. Enter the invoice amount in USD or DASH and press the COLLECT button at the bottom of the screen. The app will generate a QR code for your customer to scan. Once payment is complete, you will be able to create a new invoice by tapping Next Payment, or view the status of your invoices by tapping the menu button in the top left corner of the keypad, or checking the Invoices section of the administration backend. Withdrawals are processed to the address you specified shortly after payment is complete.


Point-of-Sale with Spark
Spark Payments allows you to quickly start accepting point-of-sale payments in Dash at a physical store. The system works as an app, and is available for Android, macOS, Windows and Linux, with an iOS progressive web app (PWA) in development.
The project is an external terminal application for processing Dash payments in brick and mortar stores. The merchant types the sale amount in their local currency (94 currencies supported), the application will generate a QR code sale for the proper amount of Dash for the customer to scan. Then the terminal will provide feedback on the status of the payment (received, timed out, partial, instantsend or regular), and if set up - fiat conversion through uphold.com. A guide on how to set up Spark with Uphold to convert payments to fiat currency is available in English and German.
To use Spark, open the app on your device. If this is the first time you are using the app, you will need to specify a Dash address to receive payments from the system, as well as your chosen fiat currency. You can change this information at any time from the menu. To generate a payment invoice, enter the amount in fiat currency. Spark will generate a QR code containing your specified address and the requested amount, denominated in Dash. The customer scans the QR code, and the app will display a visual indication when payment is complete.

Configuring and receiving payment using Spark Payments
Payment systems like Anypay and Spark can be integrated with your existing terminal and/or accounting software (such as Square Register, by recording sales invoiced in Dash as an Other Payment Type in the system. This allows you to keep track of your Dash income as easily as if you were accepting cash.
Administrative Processes
It’s easy to get started integrating Dash, but you will need to make some decisions about whether you plan to convert your income earned in Dash into your local fiat currency, or if you prefer to hold some or all of it in Dash. Most payment processors offer a range of fiat conversion options, although various fees and limits may be applicable.
Onboarding Process
New merchants typically go through the following steps when joining the Dash ecosystem:
- Set up a Dash wallet
- Identify an appropriate payment processor
- Decide on how and when to convert funds
- Implementation and testing
- Release and marketing
- Integration on DiscoverDash
Promoting Dash
A wide range of ready-to-go visual products are available to help you promote Dash as a payment method to your customers. This includes promotional graphics and stickers, fonts for consistent visual design and guidelines on how to use the Dash visual identity. See the Marketing section for more information.
The reduced fees may also offer an additional incentive for your customers to pay with Dash, particularly in businesses with high cash handling fees or where it is necessary to add a fee to process credit card transactions.
Currency Conversion
Cryptocurrency is a relatively recent development, and rapid development in the ecosystem coupled with various barriers to access and heavy trading mean that fiat-denominated value is subject to considerable fluctuation. As a merchant, you will need to make decisions about how much of your income taken in cryptocurrency should actually be held in cryptocurrency, and how much should be converted back to a fiat currency (such as USD) directly. Different payment processors offer different solutions to this problem.
Services such as GoCoin are able to convert a specified percentage of received payments into a range of fiat currencies for withdrawal. Others such as CoinPayments offer the ability to diversify your payments into a range of different cryptocurrencies, but require you to set up automatic withdrawals to an exchange for conversion to fiat currency. Finally, services such as Uphold allow you to convert your Dash payments between various currencies and commodities very easily, and even offer automated investment services.
Note that these listing are not endorsements, and you must complete your own due diligence and/or seek advice from a tax and investment specialist before investing.
Legal considerations
Tax, legal and regulatory considerations may be applicable in some jurisdictions.
Technical Guides
Dash Wallet Integration
This documentation is also available as a PDF.
Dash Core is a fork of Bitcoin and the majority of functionality included in the Dash Core Daemon can be integrated in a similar manner. Key differences relate to customizations to existing JSON-RPC commands to support unique functionalities such as InstantSend. These differences, as well as more general information, are summarized below.
General Information: Dash is a “Proof of Work” blockchain with attributes similar to that of Bitcoin.
- Block Time: ~2.6 Minutes per Block
- Blockchain Confirmations: 6 Confirmations (or 1 in the case of InstantSend)
- Github Source: https://github.com/dashpay/dash
- Release Link: https://github.com/dashpay/dash/releases
JSON-RPC Interface: The majority of Bitcoin JSON-RPC commands are unchanged making integration into existing systems relatively straightforward. For a complete listing of RPC commands see the Developer Guide.
It’s worth noting that several key Transaction-related JSON-RPC commands have been modified to support InstantSend through the addition of an “InstantLock” field and are listed below:
Block Hashing Algorithm: Dash uses the “X11” algorithm in place of SHA256 used in Bitcoin. It’s important to note, however, that this only affects the hashing of the Block itself. All other internals utilize SHA256 hashes (transactions, merkle root, etc) which allows for most existing libraries to work in the Dash ecosystem.
Supporting Libraries: Due to the aforementioned differences in Hashing Algorithm only minor adjustments are required before using Bitcoin libraries on the Dash network. The most popular libraries have already been ported to Dash which has enabled support for most major programming languages. These resources are outlined in the SDK Resources section of this document.
v0.13.0 Integration Notes
This documentation is also available as a PDF.
Dash 0.13.0 implements DIP002 Special Transactions, which form a basis for new transaction types that will provide on-chain metadata to assist various consensus mechanisms. The following special transaction types exist:
| Release | Version | Type | Payload Size | Payload | Payload JSON | Transaction Purpose |
|---|---|---|---|---|---|---|
| v0.13.0 | 3 | 0 | n/a | n/a | n/a | Standard Transaction |
| v0.13.0 | 3 | 1 | <variable int> | <hex> | proRegTx | Masternode Registration |
| v0.13.0 | 3 | 2 | <variable int> | <hex> | proUpServTx | Update Masternode Service |
| v0.13.0 | 3 | 3 | <variable int> | <hex> | proUpRegTx | Update Masternode Operator |
| v0.13.0 | 3 | 4 | <variable int> | <hex> | proUpRevTx | Masternode Revocation |
| v0.13.0 | 3 | 5 | <variable int> | <hex> | cbTx | Masternode List Merkle Proof |
| v0.13.0 | 3 | 6 | <variable int> | <hex> | qcTx | Quorum Commitment |
Integration notes:
- DIP002 Special Transactions are a foundational component of Dash Core v0.13.0 and introduce a new Transaction Version and related “Payload” to the network.
- Integrated Systems must be able to serialize and deserialize these new Transaction Types in order to accurately encode and decode Raw Transaction data.
- From a backwards compatibility
perspective, the 4 byte (32-bit)
versionfield included in Legacy Transactions has been split into two fields:versionandtype(each consisting of 2 bytes). - InstantSend
status and Payload JSON (e.g.
proRegTx) is included in the JSON-RPC response, please note that this data is not part of the calculated hash and is provided for convenience.
Legacy transaction structure:
{
"txid": <string>,
"size": <int>,
"version": 2,
"locktime": 0,
"vin": [],
"vout": [ … ]
}
Updated transaction structure:
{
"txid": <string>,
"size": <int>,
"version": 3,
"type": <int>,
"locktime": 0,
"vin": [ … ],
"vout": [ … ],
"extraPayloadSize": <variable int>,
"extraPayload": …
}
See the Special Transactions developer documentation
for additional detail on these data types, e.g. <variable int>. See
the v0.13.0 transaction types integration documentation (PDF)
for worked examples of each transaction type.
API Services
This documentation is also available as a PDF.
Several API services exist to facilitate quick and easy integration with the Dash network for services including:
- Transaction broadcasting
- Exchange rates
- Currency conversion
- Invoice generation
API Services are typically leveraged to eliminate that requirement of running your own infrastructure to support blockchain interactions. This includes mechanisms such as:
- Forming and Broadcasting a Transaction to the network.
- Address generation using HD Wallets.
- Payment Processing using WebHooks.
There are a variety of options for supporting these methods, with the key differentiator being the pricing model included and supported features. The following list of API Providers attempts to outline these key features/differentiators and also includes a link to related documentation.
Insight

https://github.com/dashevo/insight-api
The open-source Insight REST API provides you with a convenient, powerful and simple way to read data from the Dash network and build your own services with it. A practical guide to getting started with the Insight API and Insight UI block explorer is available here.
- Features: Transaction Broadcast, WebSocket Notifications.
- Pricing Model: Free / Open Source
- Documentation: https://github.com/dashevo/insight-api
BlockCypher

BlockCypher is a simple, mostly RESTful JSON API for interacting with blockchains, accessed over HTTP or HTTPS from the api.blockcypher.com domain.
- Features: Transaction Broadcast, HD Wallet / Address Generation, WebSocket and WebHook Callbacks as well as Payment Forwarding. BlockCypher does not handle Private Keys.
- Pricing Model: Per API Call, 5000 Requests -> $85.00 per month (https://accounts.blockcypher.com/plans)
- Documentation: https://www.blockcypher.com/dev/dash/
ChainRider

ChainRider is a cloud service providing a set of REST APIs for digital currency management and exploration.
- Features: Blockchain queries, Event Notifications, Transaction Broadcast, Payment Processing, etc.
- Pricing Model: Free trial, pay per API call
- Documentation: https://www.chainrider.io/docs/dash
GoCoin

The GoCoin platform makes taking Dash as easy as installing a plugin. Payment processing is already implemented for every major shopping platform. GoCoin is focused on helping merchants in privacy-related niches and specific industries, and handles all transaction risk for all payments from your customers.
- Features: Invoicing, Exchange Rates, WebHook Callbacks. GoCoin holds Private Keys on their server allowing the merchant to withdraw funds in Cryptocurrency or convert to Fiat.
- Integrations: WooCommerce, Magento, Prestashop, VirtueMart, ZenCart, OpenCart, OSCommerce, UberCart, nopCommerce, WHMCS, NATS4, Shopify.
- Pricing Model: 1% Processing Fee (https://gocoin.com/fees)
- Documentation: https://gocoin.com/docs
CoinPayments

CoinPayments is an integrated payment gateway for cryptocurrencies such as Dash. Shopping cart plugins are available for all popular webcarts used today. CoinPayments can help you set up a new checkout, or integrate with your pre-existing checkout.
- Features: Invoicing, Exchange Rates, WebHook Callbacks. CoinPayments holds Private Keys on their server allowing merchant to withdraw funds in Cryptocurrency or convert to Fiat.
- Integrations: aMember Pro, Arastta, Blesta, BoxBilling, Drupal, Ecwid, Hikashop, Magento, OpenCart, OSCommerce, PrestaShop, Tomato Cart, WooCommerce, Ubercart, XCart, ZenCart
- Pricing Model: 0.5% Processing Fee (https://www.coinpayments.net/help-fees)
- Documentation: https://www.coinpayments.net/apidoc
SDK Resources
This documentation is also available as a PDF.
SDKs (Software Development Kits) are used to accelerate the design and development of a product for the Dash Network. These resources can either be used to interface with an API provider or for the creation of standalone applications by forming transactions and/or performing various wallet services.
Dash Developer Guide
https://dash-docs.github.io/en/developer-guide
The Dash Developer Guide aims to provide the information you need to understand Dash and start building Dash-based applications. To make the best use of this documentation, you may want to install the current version of Dash Core, either from source or from a pre-compiled executable.
- Documentation: https://dash-docs.github.io/en/developer-guide
NodeJS/JavaScript: Bitcore (Dashcore)

Dashcore is a fork of Bitcore and operates as a full Dash node — your apps run directly on the peer-to-peer network. For wallet application development, additional indexes have been added into Dash for querying address balances, transaction history, and unspent outputs.
- Platform: NodeJS / Javascript
- Documentation: https://bitcore.io/api/lib
- Repository lib: https://github.com/dashevo/dashcore-lib
- Repository node: https://github.com/dashevo/dashcore-node
PHP: Bitcoin-PHP
https://github.com/Bit-Wasp/bitcoin-php
Bitcoin-PHP is an implementation of Bitcoin with support for Dash using mostly pure PHP.
- Platform: PHP
- Documentation: https://github.com/Bit-Wasp/bitcoin-php/blob/master/doc/Introduction.md
- Repository: https://github.com/Bit-Wasp/bitcoin-php
Python: PyCoin
https://github.com/richardkiss/pycoin
PyCoin is an implementation of a bunch of utility routines that may be useful when dealing with Bitcoin and Dash. It has been tested with Python 2.7, 3.6 and 3.7.
- Platform: Python
- Documentation: https://pycoin.readthedocs.io/en/latest/
- Repository: https://github.com/richardkiss/pycoin
Java: DashJ

https://github.com/HashEngineering/dashj
DashJ is a library for working with the Dash protocol. It can maintain a wallet, send/receive transactions (including InstantSend) without needing a local copy of Dash Core, and has many other advanced features. It’s implemented in Java but can be used from any JVM compatible language: examples in Python and JavaScript are included.
- Platform: Java
- Documentation: https://bitcoinj.github.io/getting-started
- Example application: https://github.com/tomasz-ludek/pocket-of-dash
.NET: NBitcoin
https://github.com/MetacoSA/NBitcoin
NBitcoin is the most complete Bitcoin library for the .NET platform, and has been patched to include support for Dash. It implements all most relevant Bitcoin Improvement Proposals (BIPs) and Dash Improvement Proposals (DIPs). It also provides low level access to Dash primitives so you can easily build your application on top of it.
- Platform: .NET
- Documentation: https://programmingblockchain.gitbooks.io/programmingblockchain/content/
- Repository: https://github.com/MetacoSA/NBitcoin
BlockCypher
BlockCypher also offers client SDKs.
- Platform: Ruby, Python, Java, PHP, Go, NodeJS
- Repositories: https://www.blockcypher.com/dev/dash/#blockcypher-supported-language-sdks
InstantSend
This documentation is also available as a PDF.
InstantSend is a feature provided by the Dash network that allows for 0-confirmation transactions to be safely accepted by Merchants and other service providers. Secured by the Masternode Network, this mechanism eliminates the risk of a “Double Spend” by locking transaction inputs for a given transaction at a protocol level.
InstantSend Transactions vs. Standard Transactions
From an integration perspective there are only minor differences between an InstantSend Transaction and a Standard Transaction. Both transaction types are formed in the same way and are signed using the same process; the key difference is the fee structure and input requirements for InstantSend.
- Fee Structure: InstantSend utilizes a “per-input” fee of 0.0001 DASH per Input.
- Input Requirements: All inputs for an InstantSend transaction must have at least 6 confirmations.
In the event that a given transaction does not meet both criteria it will revert to a standard transaction.
Receiving InstantSend Transactions
InstantSend transactions are handled in the same way as a Standard Transaction, typically through JSON-RPC, Insight API, or an internal notification script / service that is configured at a server level.
JSON-RPC: The following RPC commands will include InstantSend-related information. Within the response you’ll find an “InstantLock” field the status of a given Transaction. This true/false (boolean) value will indicate whether an InstantSend has been observed.
- GetTransaction: https://dash-docs.github.io/en/developer-reference#gettransaction
- ListTransactions: https://dash-docs.github.io/en/developer-reference#listtransactions
- ListSinceBlock: https://dash-docs.github.io/en/developer-reference#listsinceblock
Insight API: Insight API can be used to detect InstantSend transactions and to push notifications to clients using WebSockets. The API can also be manually polled to retrieve Transaction information including InstantSend status.
- Web Socket: https://github.com/dashevo/insight-api#web-socket-api
- Transaction API: https://github.com/dashevo/insight-api#instantsend-transactions
Script Notify: The Dash Core Daemon can be configured to execute an external script whenever an InstantSend transaction relating to that wallet is observed. This is configured by adding the following line to the dash.conf file:
instantsendnotify=/path/to/concurrent/safe/handler %sNote that only addresses imported to the wallet will be monitored for InstantSend Transactions.
Broadcasting InstantSend Transactions
InstantSend Transactions can be constructed and broadcast using an approach similar to Standard Transactions. Provided the InstantSend Fee Structure and Input Requirements are met, an InstantSend can be broadcast using JSON-RPC or Insight API as a Raw Transaction.
JSON-RPC: The “SendRawTransaction” RPC command can be utilized to broadcast a raw transaction using InstantSend. When utilizing this command be sure to set both optional parameters as “true”
sendrawtransaction "hexstring" ( allowhighfees instantsend )sendrawtransaction "hexstring" true trueMore Information: https://dash-docs.github.io/en/developer-reference#sendrawtransaction
Insight API: Raw Transactions can also be broadcast as an InstantSend using Insight API. In this case all that is required is to POST the raw transaction using the
/tx/sendixroute.More Information: https://github.com/dashevo/insight-api#instantsend-transaction
Additional Resources
The following resources provide additional information about InstantSend and are intended to help provide a more complete understanding of the underlying technologies.
Vending Machines
Community member moocowmoo has released code to help merchants build their own vending machine and set it up to receive Dash InstantSend payments. The Dashvend software can also be used to create any sort of payment system, including point-of-sale systems, that can accept InstantSend payments.
Price Tickers
You can add a simple price ticket widget to your website using the simple code snippet generator from CoinGecko.
Similar widgets with different designs are available from CoinLib, WorldCoinIndex and Cryptonator, while an API providing similar information is available from DashCentral.
QR Codes
Many wallets are capable of generating QR codes which can be scanned to simplify entry of the Dash address. Printing these codes or posting the on your website makes it easy to receive payment and tips in Dash, both online and offline.
- In Dash Core, go to the Receive tab, generate an address if necessary, and double-click it to display a QR code. Right click on the QR code and select Save Image to save a PNG file.
- In Dash for Android, tap Request Coins and then tap the QR code to display a larger image. You can screenshot this to save an image.
- In Dash for iOS, swipe to the left to display the Receive Dash screen. A QR code and address will appear. You can screenshot this to save an image.
- To generate a QR code from any Dash address, visit CWA QR Code Generator and simply paste your Dash address to generate an image.
Governance
Decentralized Governance by Blockchain, or DGBB, is Dash’s attempt to solve two important problems in cryptocurrency: governance and funding. Governance in a decentralized project is difficult, because by definition there are no central authorities to make decisions for the project. In Dash, such decisions are made by the network, that is, by the owners of masternodes. The DGBB system allows each masternode to vote once (yes/no/abstain) for each proposal. If a proposal passes, it can then be implemented (or not) by Dash’s developers. A key example is early in 2016, when Dash’s Core Team submitted a proposal to the network asking whether the blocksize should be increased to 2 MB. Within 24 hours, consensus had been reached to approve this change. Compare this to Bitcoin, where debate on the blocksize has been raging for nearly three years and has resulted in serious splits within the community and even forks to the Bitcoin blockchain.
The DGBB also provides a means for Dash to fund its own development. While other projects have to depend on donations or premined endowments, Dash uses 10% of the block reward to fund its own development. Every time a block is mined, 45% of the reward goes to the miner, 45% goes to a masternode, and the remaining 10% is not created until the end of the month. During the month, anybody can make a budget proposal to the network. If that proposal earns the net approval of at least 10% of the masternode network, then at the end of the month the requested amount will be paid out in a “superblock”. At that time, the block rewards that were not paid out (10% of each block) will be used to fund approved proposals. The network thus funds itself by reserving 10% of the block reward for budget projects.
In late 2016, IOHK prepared a detailed report on version 0.12.1 of the Dash governance system, including formal analysis of weaknesses and areas for improvement. You can view the report here.
You can learn more about Dash Governance in the following sections:
Understanding Dash Governance
One of the greatest challenges of building a cryptocurrency platform is ensuring you create a decentralized system of governance to manage, fund, maintain and expand the project. This key element has been absent in every major currency to date, so the natural response is to create a not-for-profit foundation that is tasked with maintaining the core protocol and promoting the coin, but is not really connected to the coin holders in any meaningful way. This approach has a few issues that have been made evident from the experience of older crypto currency platforms.
Current crypto foundations are not related to the currency itself by any mechanism that is included in the protocol and are not designed to outlive early adopters when they lose interest. The foundation then struggles to maintain funding until it implodes and core development of the protocol is left scrambling for funding or depending on charity that can’t be counted on and does not allow for proper budgeting and planning. Donations are also unfair to donors because there are always free riders that benefit from the effort done by others without contributing. Other projects have financed themselves by premining coins or running prelaunch sales, which is not a great solution either because control of the funds is centralized and at that stage it is impossible to quantify the future needs of the project.
Through the network of full nodes and the collateral requirement, Dash already has a decentralized network of masternode operators that are heavily invested in the future of the currency, and that as a group can act as stewards of the core protocol development and promotion. We propose a decentralized management system based on the masternode voting mechanism. Masternode operators are not the only ones interested in the success of Dash, but they are the most stable ones because, unlike miners, they can’t reuse their asset for any other purpose or coin.
In the budget system, a portion of the block reward is held in escrow by the network itself, in the name of the operators, to be executed in the development and expansion of the ecosystem according to the vote of the masternodes in different budget proposals. These funds are directed to supporting development and promotion of the coin. Masternode operators vote on specific budgets and projects to be funded, thus defining the direction the coin is taking. This is done in a completely transparent way through a public portal where new initiatives are proposed and masternodes can vote on them. Functioning like a decentralized Kickstarter or Lighthouse, the budget can be used for anything that creates value within the ecosystem.
This is a 100% decentralized system powered by the masternodes, where budgets are set and paid directly from the blockchain. The blockchain hires core developers in this way and introduces a new concept of paid blockchain contractors, where people work for and are directly compensated by the network, through the decentralized votes of all masternode operators. One advantage of this model is it can survive early adopters. If early masternode operators sell their coins, the new owner can set up a masternode and with it acquire the right to vote on the budgets and projects. This guarantees there is a working system of maintenance as people come and go, making the network capable of sustaining itself on its own without depending on specific actors.
Note that if you do not operate a masternode, you may still be able to vote on DashBoost proposals. See https://www.dashboost.org for more information.
Budgets and masternode voting
The system works as a decentralized voting mechanism set up in the rules governing the blockchain, where budgets for specific projects are proposed, then the masternodes as a whole vote on them. Each project, if it passes, is added to the total budget and paid directly from the blockchain to the person doing the work. This allows Dash to hire core developers and pay them directly after approval of the work in a decentralized fashion.
A masternode votes on a proposal (technically a governance object on the blockchain) using the example command “masternode vote yes”, “masternode vote no” or “masternode vote abstain”. The votes then propagate across the network, and are tallied according to instructions followed by the network itself. Budgets under discussion and voting progress can be viewed using the example command “masternode budget show”.
A well defined decentralized system of governance allows a cryptocurrency network to endure and survive its original creators. In this way, later generations of masternode operators have a clear way to support the system as defined by the protocol itself, applying wisdom of the crowd techniques and the bond of trust established by the masternode collateral to create a decentralized management system. This creates incredible value within the currency, allowing us to be more agile and compete with other payment systems, such as Bitcoin and credit cards, on a global scale.
As the system has developed, a strong team of productive contractors paid from blockchain rewards has arisen and become established. This includes the core development team, escrow providers, news and reporting staff, experimental development labs, partnerships with universities, hiring of marketing and PR firms and integrations with third party exchanges and payment platforms. The market recognizes the value of the stability of the network as a whole, and that the possibility of reliable and sufficient funding results in faster and more coherent implementation of the Dash roadmap and core Dash services.
Reward schedule
To guarantee long term sustainability of the blockchain, the network keeps a portion of the block rewards back as new blocks are created, with the masternode operators tasked to act as stewards and invest in the maintenance and expansion of the network by voting. This results in faster development and promotion, creating a virtuous cycle that benefits all actors, including miners, masternode operators, investors and users. More importantly, this gives the blockchain itself a self- preservation mechanism that is beyond the control of any individual.
| Mining reward for Proof-of-Work | 45% |
| Masternode reward for Proof-of-Service | 45% |
| Decentralized governance budget | 10% |
Masternodes and miners take 45% of the mining reward each, at the time it is created. The remaining 10% is disbursed monthly by the masternode operators once the results of their votes are tallied, creating the first self-sustaining decentralized cryptocurrency platform organized as a Decentralized Autonomous Organization (DAO). The masternode operators establish a social contract with the network they benefit from and are bound to act as caretakers, dedicating their time, due diligence work and a portion of the network rewards to furthering the ecosystem. This has a ripple effect that benefits all parties involved - especially the end users.
The value generated by work done implementing proposals is expected to be greater than allocating 100% of rewards to mining because the network has needs beyond only cryptographically securing the blockchain. The expected result is greater net benefit not only for proposal winners, but also masternode operators, miners and normal users. In fact, the introduction of the decentralized governance budget itself was decided by a masternode vote, making the first distributed decision the actual creation of the system, similar to establishing a constitution.
This approach of distributing the normal block reward in a way that considers all critical elements a cryptocurrency needs for its long term viability, e.g. mining, full nodes, development and promotion, is revolutionary as it is done without changing the emission or creating any additional inflation for investors. The network simply distributes the available resources in a way that is of greater net benefit to all parties.
Contractors and proposals
Contractors of the blockchain can be developers, outreach professionals, team leaders, attorneys or even people appointed to do specific tasks. Proposals generally begin life as simple pre-proposal forum posts on the Dash Forum, where feedback and suggestions are solicited from the general community. Once the proposal owner decides they have a reasonable chance of passing their proposal, it is created as a governance object on the blockchain. A fee of 5 DASH is associated with this action to prevent spam and ensure only serious proposals make it to this stage. Several tools exist to allow masternode operators to comfortably review and vote on proposals. The net total of yes votes must exceed 10% of the total masternode count at the time votes are tallied in order to pass. If there are more passing proposals than the available block reward can provide for, the proposals with the most yes votes will pass first, creating a cut-off point for less popular proposals. The same process is then repeated every month, and the total amount of Dash available for proposals decreases by approximately 7.14% per year, together with the overall block reward.
The following video by Tao of Satoshi includes advice for proposal owners entering proposals during periods of high competition for the available budget funds:
Proposal websites
The community has gathered around DashCentral as a website to facilitate discussion and voting on proposals formally entered on the Dash blockchain. Other websites, such as Dash Ninja and Dash Nexus are available to monitor progress over time and gather more detailed statistics. Dash Masternode Tool also allows for voting without the need to share masternode private keys with a third party service.

A typical view of proposal discussion and voting on Dash Central
Each proposal includes a description of the proposal goals, details of what work will be done and a breakdown of the requested budget. Many proposals also link to their own website or the pre-proposal discussion, or include a video to validate the identity and sincerity of the proposal owner. Discussion on Dash Central occurs below this information, and masternode owners have the option to verify their ownership of a masternode and ability to cast a vote by signing a message from the masternode collateral address. Masternodes can vote at any time, and also change their vote at any time until the cutoff block is mined and voting stops. This occurs 1662 blocks prior to the superblock. After voting stops, the blockchain executes a decentralized tally and validates all votes. Once consensus is reached, the results are broadcast and the budget is allocated soon after in a superblock.

Proposal details and voting buttons on Dash Central
Once passed, proposals are able to report back to the network on the Dash Forum or via published public channels and social media. Since it is possible to create proposals that pay out over several months, it is also possible to revoke funding from a project by changing the vote if development or spending of already allocated funds is unsatisfactory. This encourages proposal owners to work honestly and diligently to win the trust and approval of the network. Ongoing discussion and gradual improvement over time results in a close bond between the network and those working for the network in supporting roles.
Voting on proposals is updated in real time every 2.5 minutes as blocks are mined, so current winning proposals and the total allocation of the available budget are always open and visible to everyone. Dash Nexus is a popular site used for this purpose.

Monitoring budget allocation on Dash Nexus
Finally, Dash Watch (which was itself funded through a budget proposal) exists to monitor the ability of blockchain contractors to deliver on their promises with respect to delivery dates and the total amounts of budget allocated over multiple voting periods. A team of dedicated staff routinely interact with proposal owners to track progress of the various projects and provide reports to voting masternodes in a single location. While providing data on the performance of your proposal to Dash Watch is optional, many masternode owners take advantage of the data they make available to make their voting decisions. The Dash Watch team may be contacted at team@dashwatch.org email address or through their website.

Proposal monitoring on Dash Watch
Budget allocation
The total budget of the network can be calculated by taking 10% of the
reward over the period of time between two superblocks, which occur
every 16616 blocks or approximately 30.29 days. A voting cutoff occurs
1662 blocks before the superblock, and the final votes are tallied at
this point. A proposal must satisfy the condition (YES votes - NO
votes) > (Total Number of Masternodes / 10) in order to be considered
passing. Then, in the superblock, the winning proposals are awarded in
the order of the margin by which they are passing until either the
entire budget is allocated or no more passing proposals exist. This
allows for completely trustless and decentralized allocation of the
budget.
If a proposal has passed the voting threshold but insufficient funds remain to pay the full amount requested, it will not receive partial funding. Instead, any smaller proposals which have also passed the threshold that will fit in the budget will be funded, even if they have lower net approval than the larger proposal. Proposals requesting payment over multiple budget periods will remain in the treasury system for the duration of their validity, even if they do not pass the voting threshold, and even if insufficient budget is available for funding as described above. Any unallocated budget is simply never created in the superblock, reducing unnecessary inflation.
Due to the decentralized nature of the masternode system, it is sometimes necessary to form funded organisations, such as committees or companies, to be responsible for some project or task. These are submitted in the same way, but the committee itself receives the funds. Another alternative is to place trusted escrow services between the budget allocation event and the actual submitter of the proposal to ensure that work is paid for in stages, as it is delivered. Some oversight over blockchain contractors is sometimes needed. Each budgeted item requires either a team manager or a committee responsible for implementation of the work. Periodically, this manager is expected to report on budget expenditure and completed work to show the value created from the allocated funds. This allows repeat proposal submitters to build up a reputation and gain trust from the community. Proposals which do not provide regular reports and cannot answer questions about their budget allocation will soon be defunded if it is part of a regular monthly proposal cycle. The result is a kind of self-policing system.
Scaling and future uses
As the number of blockchain contractors increases, a point is reached where masternode operators cannot be realistically expected to evaluate the volume of proposals. At this point funding organizations can be created to act as contractors for the distribution of funds to many smaller decentralized projects, according to current needs. Dash Core Group, Inc. is one example of such an organization.
The existence of the decentralized budget system puts the power of determining where Dash goes in the future in the hands of the masternode network itself. All core development and several peripheral developers are already funded from the budget, and other projects not even conceivable at this time will likely arise in the future. This decouples the survival and value of the blockchain from the current userbase and developers, making Dash the first blockchain designed to outlive its original users, a self sustainable decentralized cryptocurrency network that can still operate cohesively and bring added value services to end users in a consistent way.
Conclusion
Every masternode operator establishes a bond of trust and a social contract with the network in which she is bound to contribute to the development and maintenance of the ecosystem she benefits from. Under this model, a portion of the funds that the operator is bound to receive are in a sense allocated in custody, not in ownership, and are held in escrow by the network to be executed by the operators for the benefit of the ecosystem. Everyone contributes equally and proportionately to the benefits they are receiving and the risks they are taking, there are no privileges and no loopholes. This is complemented by the full node voting mechanism that allows for a distributed group to vote on a continuous basis on practical matters without the need to forfeit their right to decide to others, every few years, like with traditional governments or cooperative corporations.
We envision a future in which this model of transparent, unbreakable and verifiable contribution to the common good, in combination with continuous participation of the crowd through active voting, is utilized to manage organizations that are owned or operated jointly by its members, who share the benefits and responsibilities of those collectives, like governments, cooperative corporations, unions, DAOs, cryptocurrencies, etc. We call this model decentralized governance by blockchain.
Using Dash Governance
Dash’s Decentralized Governance by Blockchain (DGBB) is a novel voting and funding platform. This documentation introduces and details the theory and practice to use the system.
Understanding the process
Introduction
- DGBB consists of three components: Proposals, Votes, and Budgets
- Anyone can submit a proposal for a small fee
- Each valid masternode can vote for, against or abstain on proposals
- Approved proposals become budgets
- Budgets are paid directly from the blockchain to the proposal owner
Proposals
- Proposals are a request to receive funds
- Proposals can be submitted by anyone for a fee of 5 Dash. The proposal fee is irreversibly destroyed on submission.
- Proposals cannot be altered once submitted
Votes
- Votes are cast using the registered voting address
- The voting address can be delegated to a third party
- Votes can be changed at any time
- Votes are counted every 16616 blocks (approx. 30.29 days)
Budgets
- Budgets are proposals which receive a net total of yes votes equal to or greater than 10% of the total possible votes (for example over 448 out of 4480)
- Budgets can be nullified at any time if vote totals (cast or re-cast) fall below the approval threshold
- Budgets are processed (paid) in order of yes minus no votes. More popular budgets get payment priority.
- Approximately 6176 dash (in 2018) are available for each budget cycle, decreasing by 7.14% every 210240 blocks (approx. 383.25 days).
Object structure
The following information is required to create a proposal:
- proposal-name: a unique label, 20 characters or less
- url: a proposer-created webpage or forum post containing detailed proposal information
- payment-count: how many cycles the proposal is requesting payment
- block-start: the requested start of proposal payments
- dash-address: the address to receive proposal payments
- monthly-payment-dash: the requested payment amount
Persistence
- Proposals become active one day after submission
- Proposals will remain visible on the network until they are either disapproved or the proposal’s last payment-cycle is reached
- Approval occurs when yes votes minus no votes equals 10% or more of the total available votes.
- Disapproval occurs when no votes minus yes votes equals 10% or more of the total available votes.
- The total available votes is the count of online and responding
masternodes and can be seen by running the command
masternode countin the Dash Core wallet debug window. A graph of the total masternode count can be found here
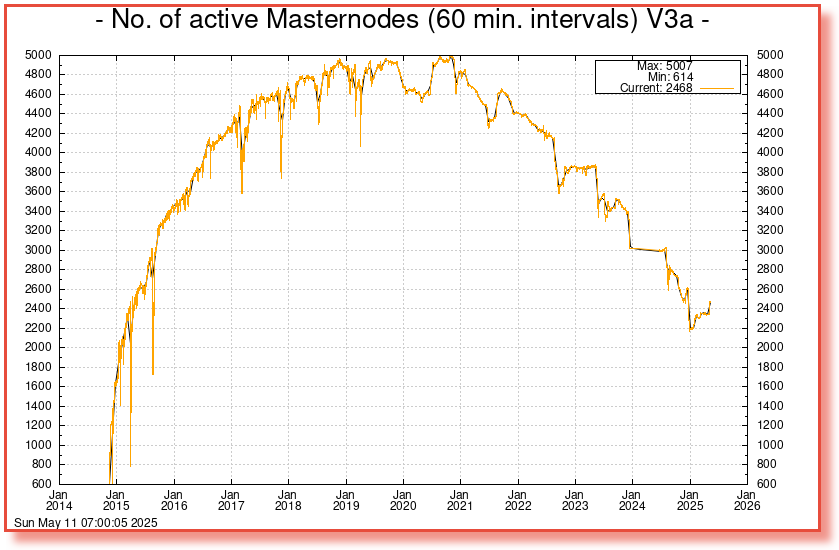
Templates
The following two Microsoft Word templates are available from Dash Core Group to help facilitate standardized proposal submission and updates. Usage is recommended, but not required.
Budget cycles
When preparing a proposal, be aware of when the next cycle will occur and plan accordingly. It is recommended to choose your proposal payment start block at least one cycle in the future to allow time for discussion and gathering support and votes. Note that votes will no longer be tallied 1662 blocks (approximately 3 days) prior to the superblock.
| Block height | Approximate date |
|---|---|
| 996960 | Tue Jan 1 06:33:26 UTC 2019 |
| 1013576 | Thu Jan 31 13:38:28 UTC 2019 |
| 1030192 | Sat Mar 2 20:43:30 UTC 2019 |
| 1046808 | Tue Apr 2 03:48:32 UTC 2019 |
| 1063424 | Thu May 2 10:53:34 UTC 2019 |
| 1080040 | Sat Jun 1 17:58:36 UTC 2019 |
| 1096656 | Tue Jul 2 01:03:38 UTC 2019 |
| 1113272 | Thu Aug 1 08:08:40 UTC 2019 |
| 1129888 | Sat Aug 31 15:13:42 UTC 2019 |
| 1146504 | Mon Sep 30 22:18:44 UTC 2019 |
| 1163120 | Thu Oct 31 05:23:46 UTC 2019 |
| 1179736 | Sat Nov 30 12:28:48 UTC 2019 |
| 1196352 | Mon Dec 30 19:33:50 UTC 2019 |
You can view the source code for this calculation at this GitHub gist
Creating proposals
Once you have prepared the text of your proposal and set up a website or forum post, it is time to submit your proposal to the blockchain for voting. While all tasks involved with creating a budget proposal can be executed from the Dash Core wallet console, several tools providing a user interface have been developed to simplify this procedure.
Dash Budget Proposal Generator
The Dash Budget Proposal Generator supports creating budget proposals on both mainnet and testnet. In the first step, you must enter a short, clear and unique name for the proposal as it will appear on the blockchain. Proposal names are limited to 40 characters. You can then provide a link to the forum or DashCentral where your proposal is described in more detail (use a URL shortening service if necessary), as well as select the amount of payment you are requesting, how often the payment should occur, and the superblock date on which you are requesting payment. This allows you to control in which budget period your proposal will appear, and gives you enough time to build support for your proposal by familiarising voters with your project. Note that the payment amount is fixed and cannot be modified after it has been submitted to the blockchain.


Steps 1 & 2: Creating your proposal and preparing the command
Next, the proposal generator will provide you with a command to run from the console of your Dash Core wallet to prepare your budget proposal governance object. Running this command will cost you 5 DASH, which will be “burnt” or permanently removed from circulation. This one-time fee protects the governance system from becoming overwhelmed by spam, poorly thought out proposals or users not acting in good faith. A small transaction fee is charged as well, so make sure slightly more than 5 DASH is available in your wallet. Many budget proposals request reimbursement of the 5 DASH fee.
First unlock your wallet by clicking Settings > Unlock wallet, then open the console by clicking Tools > Debug console and paste the generated command. The transaction ID will appear. Copy and paste this into the proposal generator response window. As soon as you do this, the system will show a progress bar as it waits for 6 confirmations as follows:


Step 3: Creating the proposal transaction and waiting for 6 confirmations of the transaction ID
Once 6 block confirmations exist, another command will appear to submit the prepared governance object to the network for voting. Copy and paste this command, and your governance object ID will appear as follows:


Step 4: Submitting the governance object to the network
You can use this ID to track voting on the proposal until the budget closes and you receive your payout. You can also submit the ID to DashCentral to claim your proposal and enable simplified voting for masternodes using DashCentral voting services.
DashCentral Proposal Generator
DashCentral also includes a tool to create budget proposals, or claim existing proposals so you can add a description on DashCentral and begin discussion with the community. The steps to be taken are almost identical to the procedure described above, and documentation is available here.
Voting on proposals
You must vote at least three days before the superblock is created or your vote will not be counted. The exact deadline is 1662 blocks before the superblock.
Note that if you do not operate a masternode, you may still be able to vote on DashBoost proposals. See https://www.dashboost.org for more information.
Voting on DGBB proposals is an important part of operating a masternode. Since masternodes are heavily invested in Dash, they are expected to critically appraise proposals each month and vote in a manner they perceive to be consistent with the best interests of the network. Each masternode may vote once on each proposal, and the vote can be changed at any time before the voting deadline. The following sites and tools are available to view and manage proposals and voting:
For information on how to create a proposal, see here.
DashCentral
Many masternode operators store their password-protected masternode private key on DashCentral to enable simple voting with a user-friendly interface. The popularity of this site has made it a common place for discussion of the proposals after they are submitted to the governance system. To vote from the DashCentral web interface, first add your masternode private key to your account according to the instructions here. Note that the masternode private key is not the same as the private key controlling the 1000 DASH collateral, so there is no risk of losing your collateral. A separate password is required to unlock the masternode private key for voting, so the risk of the site operator voting in your name is minimal.
When you are ready to vote, go to the budget proposals page. Simply click to view the proposals, then click either Vote YES, Vote ABSTAIN or Vote NO.

Voting interface on DashCentral
Dash Masternode Tool (DMT)
If you started your masternode from a hardware wallet using DMT, you can also use the tool to cast votes. Click Tools > Proposals and wait for the list of proposals to load. You can easily see the voting status of each proposal, and selecting a proposal shows details on the Details tab in the lower half of the window. Switch to the Vote tab to Vote Yes, Vote No or Vote Abstain directly from DMT.

Voting interface in DMT
Dash Core wallet or masternode
If you started your masternode using the Dash Core Wallet (not
recommended), you can vote manually from Tools > Debug console, or
directly from your masternode via SSH using dash-cli. First click on
the proposal you want to vote on at either DashCentral or Dash Ninja. You will see a command
for manual voting below the proposal description. Copy and paste the
command and modify it as necessary. As an example, take this proposal
from Dash Ninja (or
DashCentral).
The voting code for Dash Core Wallet is as follows:
gobject vote-many 6ed7418455e07f4b30b99f0d4a24a2b83282e12b26fe3415673ecbea04ff6c9d funding yes
gobject vote-many 6ed7418455e07f4b30b99f0d4a24a2b83282e12b26fe3415673ecbea04ff6c9d funding no
gobject vote-many 6ed7418455e07f4b30b99f0d4a24a2b83282e12b26fe3415673ecbea04ff6c9d funding abstain
Note that to vote from your masternode directly, you need to prefix the
command with dash-cli, which is usually found in the .dashcore
folder. The command should be similar to the following:
~/.dashcore/dash-cli gobject vote-many 6ed7418455e07f4b30b99f0d4a24a2b83282e12b26fe3415673ecbea04ff6c9d funding yes
~/.dashcore/dash-cli gobject vote-many 6ed7418455e07f4b30b99f0d4a24a2b83282e12b26fe3415673ecbea04ff6c9d funding no
~/.dashcore/dash-cli gobject vote-many 6ed7418455e07f4b30b99f0d4a24a2b83282e12b26fe3415673ecbea04ff6c9d funding abstain
Note this command will trigger a vote from all masternodes configured in
dash.conf. If you have multiple masternodes each with its own .conf
file, or if you want to vote with only some of your masternodes, you
must change the command from vote-many to vote. If your vote was
successful, you should see a confirmation message reading Voted
successfully.

Voting from the debug console in Dash Core Wallet
You can also view a list of proposals in JSON format from the console to copy and paste the proposal hash for voting as follows:
gobject list
8 Steps to a Successful Proposal
Proposals in the Dash governance system are subject to voting by masternodes. So, like any voting, you need to convince the voters that your proposal should pass. Here are some key points to consider in every proposal:
- Keep your proposal clear
- Your proposal should have a clear title, followed by a short and simple description of the objectives. Explain early in your proposal exactly how it will benefit the Dash network, how much Dash you are requesting, how you arrived at this value, and finally who you are and how you plan to do the work. Masternodes should be able to immediately get an idea of what you are proposing from the first few lines of your proposal.
- Run a pre-proposal discussion
- Get feedback from the community before you post your proposal to the blockchain. A discussion period of around two weeks will help you find out if someone has proposed something similar in the past, and whether it succeeded or failed. There are pre-proposal channels on the forum and Dash Nation Discord, and Reddit also attracts a lot of views - consider the discussion on these channels to be the research phase of your proposal. Later, you can post a link to the forum discussion when your proposal goes live to show you are including community feedback in your work.
- Manage your identity and reputation
- The Dash community is one of the network’s strongest features, and newcomers are always welcome. However, because of the way proposals work, there needs to be reasonable trust that the work promised in the proposal will be completed if it passes. If you are new, consider starting with a smaller proposal first to prove your ability to deliver on time and budget. Attaching your real name or Keybase identity to a proposal also helps build trust. If you are a making a large proposal, get a team together and nominate (or hire) one person to serve as community liaison, since posting from multiple accounts can be confusing.
- Run an enthusiastic campaign for your proposal
- Proposals with a video or website have a far greater chance of succeeding! Uploading a video gives your proposal a human touch and a chance to convey your enthusiasm in a way that isn’t always possible in text. Post your video to the forum and DashCentral, become a regular on Discord or run a webinar to explain the proposal and answer questions. Put some work in before you ask for funding to demonstrate your involvement with Dash - but don’t be annoying and spam many channels asking for votes.
- Demonstrate your commitment to the network
- If you are asking for significant funding to start up or expand a for-profit business built on Dash, you need to explain why and for how long this funding is required, and what you are offering in return. It can be very helpful to show you have skin in the game by matching the contribution provided in Dash with funds from your own business or investors. Equity or exclusivity agreements can be reached with Dash Core Group, Inc., but must be clarified in writing before the proposal is posted.
- Post your proposal early and make yourself available for questions
- The voting window closes 1662 blocks (or just under 3 days) before the superblock. To give the masternode operators enough time to consider, discuss and vote on your proposal, you must post it well in advance of the voting deadline - it’s better to wait for the next superblock than to rush! Most masternodes will see your proposal for the first time once it appears on the blockchain or when you claim it on DashCentral. The first few hours of discussion between masternode owners typically bring up a lot of questions and can be critical to influence opinion and voting, so make yourself available during this time.
- Keep the community updated when your proposal passes
- Your proposal should include details of how you plan to keep the community and network informed of your work. Meet your commitments and post regular reports so your output is clear, and make yourself available on social channels to answer questions. Remember, your ability to pass future proposals depends on your demonstrated ability to deliver and communicate.
- Consider arrangements for large requests
- If you are requesting a significant amount of funding, there is an understandable concern that you will deliver on your promises to the network. Reach out to trusted intermediaries such as Dash Core Group, Inc. or Green Candle, Inc. in advance for advice on escrow, and make the conditions for escrow release public and part of the proposal. If your proposal is so large that uses a significant percentage of the budget, there is a risk that approving your proposal will bump smaller proposals out of the budget. Consider breaking your proposal into smaller monthly payments instead.
See this documentation for specific instructions on how to create a proposal when you are ready. Good luck!
For an example of good reporting, reputation management and use of a video to request funding in a pre-proposal, see this video from Amanda B. Johnson’s extremely popular DASH: Detailed proposal:
A few additional points:
- It is currently not possible to pay a budget proposal to a multisig address, or to change the payment address after the proposal is posted to the blockchain.
- To avoid accusations of favouritism and inside trading, Dash Core cannot promote your proposal for you. If your proposal is an integration, reach out to the business development team in advance. Once your product is live, it may be possible to announce it from Dash Core channels.
- If your proposal is for news, promotion or marketing, make sure you synchronise your efforts with major existing organisations such as Dash Force News or marketing firms contracted by Dash Core.
- You are responsible for your own planning to hedge against price volatility. If your proposal involves significant payments to third parties in fiat currency, reach out to Dash Core Group, Inc. or Green Candle, Inc. for advice on escrow, price maintenance, converting currencies and hedging against volatility.
- For the same reason, it is not recommended to request funding for period of longer than three months. Masternodes don’t want to see and vote on the same proposal without updates several months in a row, and price volatility makes it a risky proposition both to the network and yourself.
- Before entering your budget proposal on the blockchain, check how many proposals already exist for the current budget cycle. If it is likely to become very crowded or if some proposals are requesting a significant portion of the budget, voting is likely to be very competitive with weaker projects being forced out of the budget, even if they collect sufficient votes to pass the 10% threshold. See here for more details.
Masternodes
Dash is best known as the first cryptocurrency with a focus on anonymity and transaction speed. What many people do not know is that these features are implemented on top of a network of dedicated servers known as masternodes, which gives rise to many exciting features not available on conventional blockchains. These features include anonymous and instant transactions, as well as governance of the development of the Dash network through a monthly budget and voting. This in itself is a first in the crypto world, and the masternodes are necessary to achieve the privacy and speed that Dash offers.
This documentation focuses on understanding the services masternodes provide to the network, but also includes guides on how to run a masternode, using either a hosting provider or by setting up and maintaining your own hosting solution. The primary requirement to run a masternode on the Dash network is 1000 DASH. This is known as the collateral, and cannot be spent without interrupting operation of the masternode. The second requirement is the actual server running the Dash masternode software.
Option 1: Hosted masternode
Since operating your own server requires a certain level knowledge of blockchains and Linux server operating systems, several community members offer dedicated hosting solutions for a fee. Taking advantage of these services means the user only needs to provide the masternode collateral and pay the hosting fee in order to receive payment from the block reward. See these pages for information on how to set up a hosted masternode.
Option 2: Self-operated masternode
Users with a deeper understanding (or curiosity) about the inner workings of the Dash network may choose to operate their own masternode on their own host server. Several steps are required, and the user must assume responsibility for setting up, securing and maintaining both the server and collateral. See these pages for information on how to set up a self-operated masternode.
Understanding Masternodes
Masternodes, once unique to the Dash network, are now becoming popular as the technology is forked into other blockchains. This section of the documentation describes the principles and mechanisms of masternodes and the services they provide to the Dash network specifically.
Simply put, a masternode is a server with a full copy of the Dash blockchain, which guarantees a certain minimum level of performance and functionality to perform certain tasks related to block validation, as well as PrivateSend and InstantSend, as the anonymity and instant transaction features in Dash are called. The masternodes are paid for this service, using a concept known as Proof of Service. This is in addition to the Proof of Work done by miners to secure the blockchain. Masternodes are also allowed to vote on governance and funding proposals, with each masternode receiving one vote (yes/no/abstain) on each proposal submitted to the system.
Anyone can run a masternode. The objective is to have enough decentralization to ensure that no single person controls a significant fraction of the masternodes. However, to avoid bloating the network with unnecessary masternodes or encouraging reckless operators, there is one condition that needs to be fulfilled: proof of ownership of 1000 Dash. The coins don’t need to be in the masternode, but they need to be kept in a certain way that is transparent to the entire network. If the owner moves or spends those coins, the masternode stops working and payment ceases.
Masternodes are paid by the network for the PrivateSend, InstantSend and governance services they provide. 45% of the block reward is paid out to the masternodes, 45% to miners and 10% to the budget. In practice, half of the reward from a normal block goes to the miner and half to the masternode. Then, every 16,616 blocks (approximately 30.29 days), a superblock is created that contains the entire 10% payout to the budget proposal winners. Masternodes are selected for payment in each block (approximately every 2.6 minutes) from a deterministic masternode list, and moved to the back of the list after payment. As more masternodes are created, the duration between payments increases. If the collateral behind a masternode is spent, or if a masternode stops providing services to the network for more than one hour, it is removed from the list until normal service resumes. In this way, masternodes are given incentive to provide efficient and reliable services to the network.
Having so many servers holding a full copy of the blockchain and working for the coin can be extremely useful. Thanks to the reward system, there is no risk of not having enough masternodes, and the developers can rely on them quickly deploying any new decentralized feature they want to implement. This is where the true strength of Dash lies - an incentivized system of thousands of distributed servers working 24x7 means that Dash can scale more efficiently and deploy services more quickly than a blockchain run entirely by unpaid volunteers. The more masternodes, the better and safer the Dash network.
As of November 2018, the Dash network has over 5000 masternodes located in over 45 countries and hosted on over 140 ISPs. The block reward is approximately 3.34 Dash, so the selected masternode receives 1.67 Dash per payment or approximately 6 Dash per month. The block reward decreases by 7.14% approximately once per year, so the annual earnings for a masternode owner is approximately 7% of the collateral, and will decrease over time as calculated here. See this tool to calculate real-time payment rates, and this site for various real-time statistics on the masternode network.
DIP003 Masternode Changes
Dash 0.13.0 implements DIP003, which introduces several changes to how a Dash masternode is set up and operated. A list of available documentation appears below:
- DIP003 Deterministic Masternode Lists
- DIP003 Masternode Changes (you are here)
- Dash 0.13 Upgrade Procedure
- Full masternode setup guide
- Information for users of hosted masternodes
- Information for operators of hosted masternodes
Important concepts and changes:
- It is possible to upgrade an existing masternode in-place without starting a new server and without moving your 1000 DASH collateral.
- A masternode was previously “started” using the
masternode start-aliascommand based on amasternode.conffile. Under DIP003, this file is no longer used, and masternodes are “registered” instead of “started”. Masternodes begin offering services when a ProRegTx special transaction containing a particular key is written to the blockchain. - As before in
masternode.conf, the ProRegTx references the transaction id (txid) and index holding the collateral. The IP address and port of the masternode are also defined in this transaction. - The ProRegTx contains 2 Dash addresses (also called public keys) and
one BLS public key, which represent 3 different roles in the
masternode and define update and voting rights. The keys are:
ownerKeyAddr: This is a Dash address (public key) controlled by the masternode owner. It is different from the address used for the collateral. Because the owner uses the private key associated with this address to issue ProUpRegTx transactions, it must be unique for each masternode.operatorPubKey: This is the BLS public key of the masternode operator. Only the operator is allowed to issue ProUpServTx transactions. Because the operator key is used during live masternode operation to sign masternode-related P2P messages, quorum-related messages and governance trigger votes, the BLS key must be unique for each masternode.votingKeyAddr: This is a Dash address (public key) used for proposal voting. Votes signed with this key are valid while the masternode is in the registered set.
- Masternode payments were previously sent to the address holding the collateral. Under DIP003, the owner should specify a different address to receive payments in the ProRegTx. The owner may optionally specify a non-zero percentage as payment to a separate masternode operator, if applicable.
- The masternode configuration can later be updated using ProUpServTx, ProUpRegTx and ProUpRevTx transactions. See Updating Masternode Information in DIP003 and Updating Masternode Information in this documentation for more details.
- All functions related to DIP003 will only take effect once Spork 15 is
enabled on the network. Until then, it is necessary to set up the
masternode following the old process
and then work through the upgrade procedure. In
this state, the masternode will continue to function in compatibility
mode, and all DIP003 related functions, such as payments to a separate
address or percentage payments to operators, will not yet have any
effect. The
ownerKeyAddrandvotingKeyAddrmust also be identical until Spork 15 is enabled.
The process of setting up or upgrading a masternode is as follows:
- Set up your server and operating system
- Install the Dash software and synchronize the blockchain
- Generate a BLS key pair and enter the private key on the masternode
- Prepare a ProRegTx transaction
- Sign the ProRegTx transaction
- Submit the signed ProRegTx transaction
Step 1 can be omitted if you have an existing server. Steps 2 and 3 require direct access to the masternode. Steps 3 and 4 require access to a Dash Wallet (or DMT). Step 5 requires access to the wallet actually holding the collateral. Step 6 requires a Dash balance to pay the transaction fee.
Masternodes vs. mining
Dash, like Bitcoin and most other cryptocurrencies, is based on a decentralized ledger of all transactions, known as a blockchain. This blockchain is secured through a consensus mechanism; in the case of both Dash and Bitcoin, the consensus mechanism is Proof of Work (PoW). Miners attempt to solve difficult problems with specialized computers, and when they solve the problem, they receive the right to add a new block to the blockchain. If all the other people running the software agree that the problem was solved correctly, the block is added to the blockchain and the miner is rewarded.
Dash works a little differently from Bitcoin, however, because it has a two-tier network. The second tier is powered by masternodes (Full Nodes), which enable financial privacy (PrivateSend), instant transactions (InstantSend), and the decentralized governance and budget system. Because this second tier is so important, masternodes are also rewarded when miners discover new blocks. The breakdown is as follows: 45% of the block reward goes to the miner, 45% goes to masternodes, and 10% is reserved for the budget system (created by superblocks every month).
The masternode system is referred to as Proof of Service (PoSe), since the masternodes provide crucial services to the network. In fact, the entire network is overseen by the masternodes, which have the power to reject improperly formed blocks from miners. If a miner tried to take the entire block reward for themselves or tried to run an old version of the Dash software, the masternode network would orphan that block, and it would not be added to the blockchain.
In short, miners power the first tier, which is the basic sending and receiving of funds and prevention of doublespending. Masternodes power the second tier, which provide the added features that make Dash different from other cryptocurrencies. Masternodes do not mine, and mining computers cannot serve as masternodes. Additionally, each masternode is “secured” by 1000 DASH. Those DASH remain under the sole control of their owner at all times, and can still be freely spent. The funds are not locked in any way. However, if the funds are moved or spent, the associated masternode will go offline and stop receiving rewards.
Payment logic
Masternode paymentss in Dash version 0.13.0 are entirely deterministic and based on a simple list sort algorithm. For documentation of version 0.12.0 payment logic, see the legacy masternode payment documentation. Dash version 0.13.0 implements DIP003 and defines two sets of masternodes.
- The full set, which contains all registered masternodes that have not spent their collateral funding transactions.
- The valid set, a subset of the full set which contains all masternodes which are not marked as Proof of Service (PoSe) banned.
Each masternode in the set of valid masternodes is identified by the block at which it was last paid. If it has never received payment or was banned for failing to meet the PoSe requirements, then the block at which it was first registered or at which PoSe was restored is used instead. The list is sorted in ascending order, and the first entry is paid. If this results in more than one masternode, then the hash of the masternode ProRegTx is sorted to break the tie.
Quorum selection
InstantSend transactions in Dash version 0.13.0 are secured using a consensus of deterministically selected masternodes. This set of masternodes is informally termed a quorum and must be in a majority agreement, at least six out of ten, for a successful lock of the transaction inputs. Multiple quorums are self-selected for each input in an InstantSend transaction using the mathematical distance between the hash of each input and of the set of masternode funding transactions.
Each masternode receiving the InstantSend transaction lock request compares the hash of the masternode’s funding transaction to the hash of the input requesting the lock. After validating the inputs are not spent, the ten masternodes furthest from this hash broadcast their acceptance of the lock.
All InstantSend inputs must be at least six blocks old or the transaction will be rejected.
Masternode requirements
- 1000 Dash: Arguably the hardest part. Dash can be obtained from exchanges such as Poloniex, Bittrex, Kraken and LiveCoin. Shapeshift’s service is also an excellent way.
- A server or VPS running Linux: Most recent guides use Ubuntu 16.04 LTS. We recommend VPS services such as Vultr and DigitalOcean, although any decent provider will do. Generally an instance with low to average specifications will do, although performance requirements will increase according to this roadmap.
- A dedicated IP address: These usually come with the VPS/server.
- A little time and (heart): Masternodes used to require complex setup, but tools such as dashman now greatly simplify the process.
In addition to the 1000 Dash held in collateral, masternodes also have minimum hardware requirements. As of version 12.1, these requirements are as follows:
| Minimum | Recommended | |
|---|---|---|
| CPU | 1x 1 GHz | 1x 2 GHz |
| RAM | 2 GB | 4 GB |
| Disk | 20 GB | 40 GB |
| Network | 400 GB/mth | 1 TB/mth |
Masternode bandwidth use ranges between 300-500 GB per month and will grow as the network does.
Dash Evolution
The exact hardware requirements for Dash Evolution masternodes have yet to be determined, although some pointers can be taken from the roadmap and this blog post. It should be possible to run Dash masternodes on normal VPS servers until the block size reaches approximately 20 MB, after which custom hardware such as GPUs and eventually ASICs may be required.
Hosting Services
Several Dash community members offer masternode hosting services. This service can be realized securely without the customer ever giving up control of the 1000 DASH required for collateral. For security reasons, it is highly recommended to keep the collateral on a hardware wallet when taking advantage of a hosting service. A list of currently available masternode hosting services is available below.
List of hosting services
Disclaimer: Dash Core may be affiliated with these community members, but is not involved in the provision of any of these services.
CrowdNode

Splawik’s Hosting Service

AllNodes

Node40

Masternode.me

币舫 (Bifun)

Masternodehosting
Registering a hosted masternode
Dash 0.13.0 implements DIP003, which introduces several changes to how a Dash masternode is set up and operated. A list of available documentation appears below:
- DIP003 Deterministic Masternode Lists
- DIP003 Masternode Changes
- Dash 0.13 Upgrade Procedure
- Full masternode setup guide
- Information for users of hosted masternodes (you are here)
- Information for operators of hosted masternodes
It is highly recommended to first read at least the list of changes before continuing in order to familiarize yourself with the new concepts in DIP003.
Registering a hosted masternode is done in several steps:
- Send 1000 DASH to an address you control in a single transaction and wait for 15 confirmations
- Correspond with your hosting provider to determine who will generate the operator BLS keys, whether their fee will be paid by an operator reward percentage or according to a separate contract, and whether the masternode will be set up before or after the registration transaction
- Prepare, sign and broadcast the registration transaction using Dash Core or DMT
It is highly recommended to store the keys to your masternode collateral on a hardware wallet for added security against hackers. Since the hardware wallet is only used to sign a transaction, there is no need to ever connect this wallet to the internet. However, a Dash Core wallet with balance (for the transaction fee) is required to submit the registration transaction. The masternode registration process closely follows the setup guide, beginning from the registration step.
Operator transactions
This documentation is intended for operators managing nodes on behalf of
owners. If you provide an IP address and port of a synchronized full
node with your masternodeblsprivkey entered in the dash.conf
file as descibed here to the masternode owner,
it will appear in the DIP003 valid set immediately after they submit the
protx register_submit command as described above. If the full node
is not running, or if the owner submits 0 for the ipAndPort,
then the node will be registered in a PoSe-banned state. In this case,
the operator will need to issue a ProUpServTx transaction to update the service features and register the
masternode.
The ProRegTx submitted by the owner also specifies the percentage reward for the operator. It does not specify the operator’s reward address, so a ProUpServTx is also required to claim this reward by specifying a Dash address. If the reward is not claimed, it will be paid to the owner in full.
Setup
Setting up a masternode requires a basic understanding of Linux and blockchain technology, as well as an ability to follow instructions closely. It also requires regular maintenance and careful security, particularly if you are not storing your Dash on a hardware wallet. There are some decisions to be made along the way, and optional extra steps to take for increased security.
Commercial masternode hosting services are available if you prefer to delegate day-to-day operation of your masternode to a professional operator. When using these hosting services, you retain full control of the 1000 DASH collateral and pay an agreed percentage of your reward to the operator. It is also possible to delegate your voting keys to a representative, see the governance documentation for more information.
Before you begin
This guide assumes you are setting up a single masternode for the first time. If you are updating a masternode, see here instead. If Spork 15 is not yet enabled, it is not possible to directly set up a DIP003 masternode. You will need to set up the masternode following the old process and then work through the upgrade procedure. You will need:
- 1000 Dash
- A wallet to store your Dash, preferably a hardware wallet, although Dash Core wallet is also supported
- A Linux server, preferably a Virtual Private Server (VPS)
Dash 0.13.0 implements DIP003, which introduces several changes to how a Dash masternode is set up and operated. A list of available documentation appears below:
- DIP003 Deterministic Masternode Lists
- DIP003 Masternode Changes
- Dash 0.13 Upgrade Procedure
- Full masternode setup guide (you are here)
- Information for users of hosted masternodes
- Information for operators of hosted masternodes
It is highly recommended to first read at least the list of changes
before continuing in order to familiarize yourself with the new concepts
in DIP003. This documentation describes the commands as if they were
entered in the Dash Core GUI by opening the console from Tools > Debug
console, but the same result can be achieved on a masternode by
entering the same commands and adding the prefix
~/.dashcore/dash-cli to each command.
Set up your VPS
A VPS, more commonly known as a cloud server, is fully functional installation of an operating system (usually Linux) operating within a virtual machine. The virtual machine allows the VPS provider to run multiple systems on one physical server, making it more efficient and much cheaper than having a single operating system running on the “bare metal” of each server. A VPS is ideal for hosting a Dash masternode because they typically offer guaranteed uptime, redundancy in the case of hardware failure and a static IP address that is required to ensure you remain in the masternode payment queue. While running a masternode from home on a desktop computer is technically possible, it will most likely not work reliably because most ISPs allocate dynamic IP addresses to home users.
We will use Vultr hosting as an example of a VPS, although DigitalOcean, Amazon EC2, Google Cloud, Choopa and OVH are also popular choices. First create an account and add credit. Then go to the Servers menu item on the left and click + to add a new server. Select a location for your new server on the following screen:

Vultr server location selection screen
Select Ubuntu 18.04 x64 as the server type. We use this LTS release of Ubuntu instead of the latest version because LTS releases are supported with security updates for 5 years, instead of the usual 9 months.

Vultr server type selection screen
Select a server size offering at least 2GB of memory.

Vultr server size selection screen
Enter a hostname and label for your server. In this example we will use
dashmn1 as the hostname.

Vultr server hostname & label selection screen
Vultr will now install your server. This process may take a few minutes.

Vultr server installation screen
Click Manage when installation is complete and take note of the IP address, username and password.

Vultr server management screen
Set up your operating system
We will begin by connecting to your newly provisioned server. On
Windows, we will first download an app called PuTTY to connect to the
server. Go to the PuTTY download page
and select the appropriate MSI installer for your system.
On Mac or Linux you can ssh directly from
the terminal - simply type ssh root@<server_ip> and enter your
password when prompted.

PuTTY download page
Double-click the downloaded file to install PuTTY, then run the app from your Start menu. Enter the IP address of the server in the Host Name field and click Open. You may see a certificate warning, since this is the first time you are connecting to this server. You can safely click Yes to trust this server in the future.

PuTTY security alert when connecting to a new server
You are now connected to your server and should see a terminal
window. Begin by logging in to your server with the user root and
password supplied by your hosting provider.

Password challenge when connecting to your VPS for the first time
You should immediately change the root password and store it in a safe place for security. You can copy and paste any of the following commands by selecting them in your browser, pressing Ctrl + C, then switching to the PuTTY window and right-clicking in the window. The text will paste at the current cursor location:
passwd root
Enter and confirm a new password (preferably long and randomly
generated). Next we will create a new user with the following command,
replacing <username> with a username of your choice:
adduser <username>
You will be prompted for a password. Enter and confirm using a new password (different to your root password) and store it in a safe place. You will also see prompts for user information, but this can be left blank. Once the user has been created, we will add them to the sudo group so they can perform commands as root:
usermod -aG sudo <username>
Now, while still as root, we will update the system from the Ubuntu package repository:
apt update
apt upgrade
The system will show a list of upgradable packages. Press Y and Enter to install the packages. We will now install a firewall (and some other packages we will use later), add swap memory and reboot the server to apply any necessary kernel updates, and then login to our newly secured environment as the new user:
apt install ufw python virtualenv git unzip pv
(press Y and Enter to confirm)
ufw allow ssh/tcp
ufw limit ssh/tcp
ufw allow 9999/tcp
ufw logging on
ufw enable
(press Y and Enter to confirm)
fallocate -l 4G /swapfile
chmod 600 /swapfile
mkswap /swapfile
swapon /swapfile
nano /etc/fstab
Add the following line at the end of the file (press tab to separate each word/number), then press Ctrl + X to close the editor, then Y and Enter save the file.
/swapfile none swap sw 0 0
Finally, in order to prevent brute force password hacking attacks, open the SSH configuration file to disable root login over SSH:
nano /etc/ssh/sshd_config
Locate the line that reads PermitRootLogin yes and set it to
PermitRootLogin no. Directly below this, add a line which reads
AllowUsers <username>, replacing <username> with the username
you selected above. The press Ctrl + X to close the editor, then
Y and Enter save the file.
Then reboot the server:
reboot now
PuTTY will disconnect when the server reboots.
While this setup includes basic steps to protect your server against attacks, much more can be done. In particular, authenticating with a public key instead of a username/password combination, installing fail2ban to block login brute force attacks and enabling automatic security updates is advisable. More tips are available here. However, since the masternode does not actually store the keys to any Dash, these steps are considered beyond the scope of this guide.
Send the collateral
A Dash address with a single unspent transaction output (UTXO) of exactly 1000 DASH is required to operate a masternode. Once it has been sent, various keys regarding the transaction must be extracted for later entry in a configuration file and registration transaction as proof to write the configuration to the blockchain so the masternode can be included in the deterministic list. A masternode can be started from a hardware wallet or the official Dash Core wallet, although a hardware wallet is highly recommended to enhance security and protect yourself against hacking. This guide will describe the steps for both hardware wallets and Dash Core.
Option 1: Sending from a hardware wallet
Set up your Trezor using the Trezor wallet at https://wallet.trezor.io/ and send a test transaction to verify that it is working properly. For help on this, see this guide - you may also choose to (carefully!) add a passphrase to your Trezor to further protect your collateral. Create a new account in your Trezor wallet by clicking Add account. Then click the Receive tab and send exactly 1000 DASH to the address displayed. If you are setting up multiple masternodes, send 1000 DASH to consecutive addresses within the same new account. You should see the transaction as soon as the first confirmation arrives, usually within a few minutes.

Trezor Wallet Receive tab showing successfully received collateral of 1000 DASH
Once the transaction appears, click the QR code on the right to view the transaction on the blockchain. Keep this window open as we complete the following steps, since we will soon need to confirm that 15 confirmations exist, as shown in the following screenshot.

Trezor blockchain explorer showing 15 confirmations for collateral transfer
While we are waiting for 15 confirmations, download the latest version of the Dash Masternode Tool (DMT) from the GitHub releases page here. Unzip and run the file. The following window appears.

Dash Masternode Tool startup screen
Click the third button from the left Check Dash Network Connection in the top left corner of the main window to verify that the connection is working. Then connect your Trezor device and click the next button Test Hardware Wallet Connection to verify the Trezor connection is working.


Dash Masternode Tool successful connection confirmations
We will now use DMT to extract the transaction ID and legacy masternode key (necessary for successful startup during the DIP003 transition period). Carry out the following sequence of steps as shown in this screenshot:

Dash Masternode Tool configuration steps
- Click the New button.
- Ensure you are on the settings page for a Non-deterministic masternode and click Generate new to generate a legacy masternode key. Copy this key into a text editor.
- Click Alter configuration to deterministic
- Enter a name for your masternode. The host name you specified for your VPS above is a good choice.
- Enter the IP address of your masternode. This was given to you by the VPS provider when you set up the server.
- Enter the TCP port number. This should be 9999.
- Click Locate collateral to view unused collateral funding transactions available on the connected hardware wallet. The Collateral address, index and Collateral TX hash fields should be filled automatically

Dash Masternode Tool with configuration ready to start masternode
Leave DMT open and continue with the next step: installing Dash Core on your VPS.
Option 2: Sending from Dash Core wallet
Open Dash Core wallet and wait for it to synchronize with the network. It should look like this when ready:

Fully synchronized Dash Core wallet
Click Tools > Debug console to open the console. Type the following two commands into the console to generate a legacy masternode key (necessary for successful startup during the DIP003 transition period) and a new Dash address for the collateral:
masternode genkey
93PAqQsDjcVdYJHRfQPjsSt5338GCswMnUaSxoCD8J6fiLk4NHL
getnewaddress
yiFfzbwiN9oneftd7cEfr3kQLRwQ4kp7ue
Take note of the legacy masternode private key and collateral address, since we will need it later. The next step is to secure your wallet (if you have not already done so). First, encrypt the wallet by selecting Settings > Encrypt wallet. You should use a strong, new password that you have never used somewhere else. Take note of your password and store it somewhere safe or you will be permanently locked out of your wallet and lose access to your funds. Next, back up your wallet file by selecting File > Backup Wallet. Save the file to a secure location physically separate to your computer, since this will be the only way you can access our funds if anything happens to your computer. For more details on these steps, see here.
Now send exactly 1000 DASH in a single transaction to the new address you generated in the previous step. This may be sent from another wallet, or from funds already held in your current wallet. Once the transaction is complete, view the transaction in a blockchain explorer by searching for the address. You will need 15 confirmations before you can start the masternode, but you can continue with the next step at this point already: installing Dash Core on your VPS.
Trezor blockchain explorer showing 15 confirmations for collateral transfer
Install Dash Core
Dash Core is the software behind both the Dash Core GUI wallet and Dash masternodes. If not displaying a GUI, it runs as a daemon on your VPS (dashd), controlled by a simple command interface (dash-cli).
Open PuTTY or a console again and connect using the username and password you just created for your new, non-root user. There are two options to install Dash Core, an automated option using a script utility called dashman by Dash Core Team member moocowmoo, and a more complicated option which will allow you to understand all of the key steps involved in preparing your masternode.
Option 1: Automated installation using dashman
To install Dash using dashman, enter the following commands after logging in:
cd ~
git clone https://github.com/moocowmoo/dashman
~/dashman/dashman install
(press Y and Enter to confirm)
dashman will download the latest version of Dash Core for your system, as well as an initial snapshot of the blockchain to speed up the bootstrapping process. Next download and install Sentinel, which is required for masternodes at version 0.12.1 or higher:
~/dashman/dashman install sentinel
Your system is now running as a standard Dash node, and is busy completing synchronisation with the blockchain. Since dashman does not automatically restart your masternode in the event of a system error, add a check function to crontab to make sure it checks every minute to ensure your masternode is still running:
crontab -e
Choose nano as your editor and enter the following line at the end of the file, after the line for sentinel:
* * * * * pidof dashd || ~/.dashcore/dashd
Press enter to make sure there is a blank line at the end of the file, then press Ctrl + X to close the editor and Y and Enter save the file. Check the sync status and wait until all blockchain synchronisation and the 15 confirmations for the collateral transaction are complete:
~/dashman/dashman status

dashman status output showing masternode ready to be started
Continue with the next step to register your masternode.
Option 2: Manual installation
To manually download and install the components of your Dash masternode,
visit the GitHub releases page
and copy the link to the latest x86_64-linux-gnu version. Go back to
your terminal window and enter the following command, pasting in the
address to the latest version of Dash Core by right clicking or pressing
Ctrl + V:
cd /tmp
wget https://github.com/dashpay/dash/releases/download/v0.13.0.0-rc10/dashcore-0.13.0.0-rc10-x86_64-linux-gnu.tar.gz
Verify the integrity of your download by running the following command
and comparing the output against the value for the file as shown in the
SHA256SUMS.asc file:
wget https://github.com/dashpay/dash/releases/download/v0.13.0.0-rc10/SHA256SUMS.asc
sha256sum dashcore-0.13.0.0-rc10-x86_64-linux-gnu.tar.gz
cat SHA256SUMS.asc
You can also optionally verify the authenticity of your download as an
official release by Dash Core Team. All releases of Dash are signed
using GPG by UdjinM6 with the key 8359 2BD1 400D 58D9, verifiable
here on Keybase. Import the key, download
the ASC file for the current release of Dash and verify the signature as
follows:
curl https://keybase.io/udjinm6/pgp_keys.asc | gpg --import
gpg --verify SHA256SUMS.asc

Downloading the PGP key and verifying the signed binary
Create a working directory for Dash, extract the compressed archive and copy the necessary files to the directory:
mkdir ~/.dashcore
tar xfv dashcore-0.13.0.0-rc10-x86_64-linux-gnu.tar.gz
cp -f dashcore-0.13.0/bin/dashd ~/.dashcore/
cp -f dashcore-0.13.0/bin/dash-cli ~/.dashcore/
Create a configuration file using the following command:
nano ~/.dashcore/dash.conf
An editor window will appear. We now need to create a configuration file specifying several variables. Copy and paste the following text to get started, then replace the variables specific to your configuration as follows:
#----
rpcuser=XXXXXXXXXXXXX
rpcpassword=XXXXXXXXXXXXXXXXXXXXXXXXXXXX
rpcallowip=127.0.0.1
#----
listen=1
server=1
daemon=1
maxconnections=64
#----
masternode=1
masternodeprivkey=XXXXXXXXXXXXXXXXXXXXXXX
externalip=XXX.XXX.XXX.XXX
#----
Replace the fields marked with XXXXXXX as follows:
rpcuser: enter any string of numbers or letters, no special characters allowedrpcpassword: enter any string of numbers or letters, no special characters allowedmasternodeprivkey: this is the legacy masternode private key you generated in the previous stepexternalip: this is the IP address of your VPS
The result should look something like this:

Entering key data in dash.conf on the masternode
Press Ctrl + X to close the editor and Y and Enter save the file. You can now start running Dash on the masternode to begin synchronization with the blockchain:
~/.dashcore/dashd
You will see a message reading Dash Core server starting. We will now install Sentinel, a piece of software which operates as a watchdog to communicate to the network that your node is working properly:
cd ~/.dashcore
git clone https://github.com/dashpay/sentinel.git
cd sentinel
virtualenv venv
venv/bin/pip install -r requirements.txt
venv/bin/python bin/sentinel.py
You will see a message reading dashd not synced with network! Awaiting full sync before running Sentinel. Add dashd and sentinel to crontab to make sure it runs every minute to check on your masternode:
crontab -e
Choose nano as your editor and enter the following lines at the end of the file:
* * * * * cd ~/.dashcore/sentinel && ./venv/bin/python bin/sentinel.py 2>&1 >> sentinel-cron.log
* * * * * pidof dashd || ~/.dashcore/dashd
Press enter to make sure there is a blank line at the end of the file, then press Ctrl + X to close the editor and Y and Enter save the file. We now need to wait for 15 confirmations of the collateral transaction to complete, and wait for the blockchain to finish synchronizing on the masternode. You can use the following commands to monitor progress:
~/.dashcore/dash-cli mnsync status
When synchronisation is complete, you should see the following response:
{
"AssetID": 999,
"AssetName": "MASTERNODE_SYNC_FINISHED",
"Attempt": 0,
"IsBlockchainSynced": true,
"IsMasternodeListSynced": true,
"IsWinnersListSynced": true,
"IsSynced": true,
"IsFailed": false
}
Continue with the next step to construct the ProTx transaction required to enable your masternode.
Register your masternode
DIP003 introduces several changes to how a masternode is set up and operated. These are described briefly under DIP003 Masternode Changes in this documentation, or in full detail in DIP003 itself. It is highly recommended to first read at least the brief documentation before continuing in order to familiarize yourself with the new concepts in DIP003.
Option 1: Registering from a hardware wallet
Go back to DMT and ensure that all fields from the previous step are still filled out correctly. Click Generate new for the three private keys required for a DIP003 deterministic masternode:
- Owner private key
- Operator private key
- Voting private key

Dash Masternode Tool ready to register a new masternode
Then click Send ProRegTx and confirm the following two messages:


Dash Masternode Tool confirmation dialogs to register a masternode
The BLS secret key must be entered in the dash.conf file on the
masternode. This allows the masternode to watch the blockchain for
relevant Pro*Tx transactions, and will cause it to start serving as a
masternode when the signed ProRegTx is broadcast by the owner, as we
just did above. Edit the configuration file on your masternode as
follows:
nano ~/.dashcore/dash.conf
The editor appears with the existing masternode configuration. Add this line to the end of the file, replacing the key with your BLS secret key generated above:
masternodeblsprivkey=21e27edbabf70a677303d527d750b502628e1c51d66d3bfd2b4583f690fbd14e
Press enter to make sure there is a blank line at the end of the file, then press Ctrl + X to close the editor and Y and Enter save the file. We now need to restart the masternode for this change to take effect. Enter the following commands, waiting a few seconds in between to give Dash Core time to shut down:
~/.dashcore/dash-cli stop
~/.dashcore/dashd
At this point you can monitor your masternode using
dashman/dashman status, by entering
~/.dashcore/dash-cli masternode status or using the Get status
function in DMT. The final result should appear as follows:

dash-cli masternode status output showing successfully started masternode
At this point you can safely log out of your server by typing exit.
Congratulations! Your masternode is now running.
Option 2: Registering from Dash Core wallet
If you used an address in Dash Core wallet for your collateral transaction, you now need to find the txid of the transaction. Click Tools > Debug console and enter the following command:
masternode outputs
This should return a string of characters similar to this:
{
"ad308ec104bdf113444be609eb3dce9474a5550424204c6538843e3ccd3d4e78" : "1",
}
The first long string is your transaction hash, while the last number is the index.
A public/private BLS key pair is required for the operator of the masternode. If you are using a hosting service, they may provide you with their public key, and you can skip this step. If you are hosting your own masternode or have agreed to provide your host with the BLS private key, generate a BLS public/private keypair as follows:
bls generate
{
"secret": "28a85abb5aa8e820f65e33974cef0ab0bf06195f61454d2feb7fa578612d2228",
"public": "144cbf4d472716b9504a54c7ca26906a3346253b787ffeb1a4999325049f5b2c51ef2e7c215d85f0a9142ec1c78db99b"
}
These keys are NOT stored by the wallet and must be kept secure,
similar to the value provided in the past by the masternode genkey
command.
The public key will be used in following steps. The private key must be
entered in the dash.conf file on the masternode. This allows the
masternode to watch the network for relevant Pro*Tx transactions, and
will cause it to start serving as a masternode when the signed ProRegTx
is broadcast by the owner (final step below). Log in to your masternode
using ssh or PuTTY and edit the configuration file on your
masternode as follows:
nano ~/.dashcore/dash.conf
The editor appears with the existing masternode configuration. Add this line to the end of the file, replacing the key with your BLS secret key generated above:
masternodeblsprivkey=28a85abb5aa8e820f65e33974cef0ab0bf06195f61454d2feb7fa578612d2228
Press enter to make sure there is a blank line at the end of the file, then press Ctrl + X to close the editor and Y and Enter save the file. We now need to restart the masternode for this change to take effect. Enter the following commands, waiting a few seconds in between to give Dash Core time to shut down:
~/.dashcore/dash-cli stop
~/.dashcore/dashd
We will now prepare the transaction used to register a DIP003 masternode on the network.
First, we need to get a new, unused address from the wallet to serve as the owner address. This is different to the collateral address. It must also be used as the voting address if Spork 15 is not yet active. Generate a new address as follows:
getnewaddress
yMwR1zf2Cv9gcMdHULRVbTTMGw7arvpbM5
Then either generate or choose an existing second address to receive the owner’s masternode payouts:
getnewaddress
yLqyR8PHEB7Fp1ue8nSuLfuxQhrj5PSTDv
You can also optionally generate and fund a third address to pay the
transaction fee. The private key to this address must be available to
the wallet submitting the transaction to the network. We will now
prepare an unsigned ProRegTx special transaction using the protx
register_prepare command. This command has the following syntax:
protx register_prepare collateralHash collateralIndex ipAndPort ownerKeyAddr
operatorPubKey votingKeyAddr operatorReward payoutAddress (feeSourceAddress)
Open a text editor such as notepad to prepare this command. Replace each argument to the command as follows:
collateralHash: The txid of the 1000 Dash collateral funding transactioncollateralIndex: The output index of the 1000 Dash funding transactionipAndPort: Masternode IP address and port, in the formatx.x.x.x:yyyyownerKeyAddr: The new Dash address generated above for the owner/voting addressoperatorPubKey: The BLS public key generated above (or provided by your hosting service)votingKeyAddr: The new Dash address generated above, or the address of a delegate, used for proposal votingoperatorReward: The percentage of the block reward allocated to the operator as paymentpayoutAddress: A new or existing Dash address to receive the owner’s masternode rewardsfeeSourceAddress: An (optional) address used to fund ProTx fee.payoutAddresswill be used if not specified.
Note that the operator is responsible for specifying their own
reward address in a separate update_service
transaction if you specify a non-zero operatorReward. The owner of
the masternode collateral does not specify the operator’s payout
address.
Example (remove line breaks if copying):
protx register_prepare
ad308ec104bdf113444be609eb3dce9474a5550424204c6538843e3ccd3d4e78
1
140.82.59.51:10004
yMwR1zf2Cv9gcMdHULRVbTTMGw7arvpbM5
144cbf4d472716b9504a54c7ca26906a3346253b787ffeb1a4999325049f5b2c51ef2e7c215d85f0a9142ec1c78db99b
yMwR1zf2Cv9gcMdHULRVbTTMGw7arvpbM5
0
yLqyR8PHEB7Fp1ue8nSuLfuxQhrj5PSTDv
Output:
{
"tx": "0300010001784e3dcd3c3e8438654c20240455a57494ce3deb09e64b4413f1bd04c18e30ad0000000000feffffff01cccfa204000000001976a9141ea44ced396667eb7d1c5b3699e04b5b3046ecfb88ac00000000d1010000000000784e3dcd3c3e8438654c20240455a57494ce3deb09e64b4413f1bd04c18e30ad0100000000000000000000000000ffff8c523b33271411c59262c9633a1bb810a7fc2b833c43cfa852ab144cbf4d472716b9504a54c7ca26906a3346253b787ffeb1a4999325049f5b2c51ef2e7c215d85f0a9142ec1c78db99b11c59262c9633a1bb810a7fc2b833c43cfa852ab00001976a91405c5fed6a3eb0b92ea5119039efae7a8dee5456488ac4e6cc5451440a6044dbd04d33a11f4cddc9021532ede3012ebbc31c0bb4ceb9c00",
"collateralAddress": "yiFfzbwiN9oneftd7cEfr3kQLRwQ4kp7ue",
"signMessage": "yLqyR8PHEB7Fp1ue8nSuLfuxQhrj5PSTDv|0|yMwR1zf2Cv9gcMdHULRVbTTMGw7arvpbM5|yMwR1zf2Cv9gcMdHULRVbTTMGw7arvpbM5|4e00de34ee03d28adb4e1fdaec966ae239c11da7e6115f566fc4b3f75c8a5503"
}
Next we will use the collateralAddress and signMessage fields to
sign the transaction, and the output of the tx field to submit the
transaction.
We will now sign the content of the signMessage field using the
private key for the collateral address as specified in
collateralAddress. Note that no internet connection is required for
this step, meaning that the wallet can remain disconnected from the
internet in cold storage to sign the message. In this example we will
again use Dash Core, but it is equally possible to use the signing
function of a hardware wallet. The command takes the following syntax:
signmessage address message
Example:
signmessage yiFfzbwiN9oneftd7cEfr3kQLRwQ4kp7ue yLqyR8PHEB7Fp1ue8nSuLfuxQhrj5PSTDv|0|yMwR1zf2Cv9gcMdHULRVbTTMGw7arvpbM5|yMwR1zf2Cv9gcMdHULRVbTTMGw7arvpbM5|4e00de34ee03d28adb4e1fdaec966ae239c11da7e6115f566fc4b3f75c8a5503
Output:
H3ub9BATtvuV+zDGdkUQNoUGpaYFr/O1FypmrSmH5WJ0KFRi8T10FSew0EJO/+Ij+OLv4r0rt+HS9pQFsZgc2dE=
We will now submit the ProRegTx special transaction to the blockchain to register the masternode. This command must be sent from a Dash Core wallet holding a balance, since a standard transaction fee is involved. The command takes the following syntax:
protx register_submit tx sig
Where:
tx: The serialized transaction previously returned in thetxoutput field from theprotx register_preparecommandsig: The message signed with the collateral key from thesignmessagecommand
Example:
protx register_submit 0300010001784e3dcd3c3e8438654c20240455a57494ce3deb09e64b4413f1bd04c18e30ad0000000000feffffff01cccfa204000000001976a9141ea44ced396667eb7d1c5b3699e04b5b3046ecfb88ac00000000d1010000000000784e3dcd3c3e8438654c20240455a57494ce3deb09e64b4413f1bd04c18e30ad0100000000000000000000000000ffff8c523b33271411c59262c9633a1bb810a7fc2b833c43cfa852ab144cbf4d472716b9504a54c7ca26906a3346253b787ffeb1a4999325049f5b2c51ef2e7c215d85f0a9142ec1c78db99b11c59262c9633a1bb810a7fc2b833c43cfa852ab00001976a91405c5fed6a3eb0b92ea5119039efae7a8dee5456488ac4e6cc5451440a6044dbd04d33a11f4cddc9021532ede3012ebbc31c0bb4ceb9c00 H3ub9BATtvuV+zDGdkUQNoUGpaYFr/O1FypmrSmH5WJ0KFRi8T10FSew0EJO/+Ij+OLv4r0rt+HS9pQFsZgc2dE=
Output:
b823338301e47875493c20361a23aef034578030c639480203b394669ab05e09
Your masternode is now registered and will appear on the Deterministic
Masternode List after the transaction is mined to a block. You can view
this list on the Masternodes -> DIP3 Masternodes tab of the Dash
Core wallet, or in the console using the command protx list valid,
where the txid of the final protx register_submit transaction
identifies your DIP003 masternode. Note again that all functions related
to DIP003 will only take effect once Spork 15 is enabled on the network.
You can view the spork status using the spork active command.
At this point you can go back to your terminal window and monitor your
masternode using dashman/dashman status, by entering
~/.dashcore/dash-cli masternode status or using the Get status
function in DMT. The final result should appear as follows:

dashman status output showing successfully started masternode
At this point you can safely log out of your server by typing exit.
Congratulations! Your masternode is now running.
Maintenance
Masternodes require regular maintenance to ensure you do not drop off the payment queue. This includes promptly installing updates to Dash, as well as maintaining the security and performance of the server. In addition, masternodes should vote on proposals and perform other tasks in the interest of the network and the value of the Dash they hold.
Masternode Software Update
The Dash Core software requires regular updates in order to remain consistent with the current network consensus. Depending on whether you installed Dash manually or using dashman, you must follow the procedure appropriate for your masternode, as described below.
Option 1: Updating from dashman
To update Dash using dashman, log in to your server and enter the following commands:
~/dashman/dashman sync
~/dashman/dashman update
Check the status of your masternode:
~/dashman/dashman status
The Dash software on the masternode is now updated.
Option 2: Manual update
To update Dash manually, log in to your server using ssh or PuTTY. If
your crontab contains an entry to automatically restart dashd, invoke
crontab -e and comment out the appropriate line by adding the #
character. It should look something like this:
# * * * * * pidof dashd || ~/.dashcore/dashd
Then stop Dash running:
~/.dashcore/dash-cli stop
Visit the GitHub releases page and copy the link to the latest x86_64-linux-gnu version. Go back to your terminal window and enter the following command, pasting in the address to the latest version of Dash Core by right clicking or pressing Ctrl + V:
cd /tmp
wget https://github.com/dashpay/dash/releases/download/v0.13.0.0-rc10/dashcore-0.13.0.0-rc10-x86_64-linux-gnu.tar.gz
Verify the integrity of your download by running the following command
and comparing the output against the value for the file as shown in the
SHA256SUMS.asc file:
sha256sum dashcore-0.13.0.0-rc10-x86_64-linux-gnu.tar.gz
Extract the compressed archive and copy the new files to the directory:
tar xfv dashcore-0.13.0.0-rc10-x86_64-linux-gnu.tar.gz
cp -f dashcore-0.13.0/bin/dashd ~/.dashcore/
cp -f dashcore-0.13.0/bin/dash-cli ~/.dashcore/
Restart Dash:
~/.dashcore/dashd
You will see a message reading “Dash Core server starting”. We will now update Sentinel:
cd ~/.dashcore/sentinel/
git checkout master
git pull
Finally, uncomment the line to automatically restart Dash in your
crontab by invoking crontab -e again and deleting the #
character.
The Dash software on the masternode is now updated.
Updating Masternode Information
Periodically, it may be necessary to update masternode information if any information relating to the owner or operator changes. Examples may include a change in IP address, change in owner/operator payout address, or change in percentage of the reward allocated to an operator. It is also possible to revoke a masternode’s registered status (in the event of a security breach, for example) to force both owner and operator to update their details.
ProUpServTx
A Provider Update Service Transaction (ProUpServTx) is used to update information relating to the operator. An operator can update the IP address and port fields of a masternode entry. If a non-zero operatorReward was set in the initial ProRegTx, the operator may also set the scriptOperatorPayout field in the ProUpServTx. If scriptOperatorPayout is not set and operatorReward is non-zero, the owner gets the full masternode reward. The ProUpServTx takes the following syntax:
protx update_service proTxHash ipAndPort operatorKey (operatorPayoutAddress)
Where:
proTxHash: The hash of the initial ProRegTxipAndPort: IP and port in the form “ip:port”operatorKey: The operator BLS private key associated with the registered operator public keyoperatorPayoutAddress(optional): The address used for operator reward payments. Only allowed when the ProRegTx had a non-zerooperatorRewardvalue.
Example:
protx update_service d6ec9a03e1251ac8c34178f47b6d763dc4ea6d96fd6eddb3c7aae2359e0f474a 140.82.59.51:10002 4308daa8de099d3d5f81694f6b618381e04311b9e0345b4f8b025392c33b0696 yf6Cj6VcCfDxU5yweAT3NKKvm278rVbkhu
fad61c5f21cf3c0832f782c1444d3d2e2a8dbff39c5925c38033730e64ecc598
The masternode is now removed from the PoSe-banned list, and the IP:port and operator reward addresses are updated.
ProUpRegTx
A Provider Update Registrar Transaction (ProUpRegTx) is used to update information relating to the owner. An owner can update the operator’s BLS public key (e.g. to nominate a new operator), the voting address and their own payout address. The ProUpRegTx takes the following syntax:
protx update_registrar proTxHash operatorKeyAddr votingKeyAddr payoutAddress
protx update_registrar proTxHash operatorKeyAddr votingKeyAddr payoutAddress (feeSourceAddress)
Where:
proTxHash: The transaction id of the initial ProRegTxoperatorKeyAddr: An updated BLS public key, or 0 to use the last on-chain operator keyvotingKeyAddr: An updated voting key address, or 0 to use the last on-chain operator keypayoutAddress: An updated Dash address for owner payments, or 0 to use the last on-chain operator keyfeeSourceAddress: An (optional) address used to fund ProTx fee.payoutAddresswill be used if not specified.
Example to update payout address:
protx update_registrar cedce432ebabc9366f5eb1e3abc219558de9fbd2530a13589b698e4bf917b8ae 0 0 yi5kVoPQQ8xaVoriytJFzpvKomAQxg6zea
ProUpRevTx
A Provider Update Revocation Transaction (ProUpRevTx) is used by the operator to terminate service or signal the owner that a new BLS key is required. It will immediately put the masternode in the PoSe-banned state. The owner must then issue a ProUpRegTx to set a new operator key. After the ProUpRegTx is mined to a block, the new operator must issue a ProUpServTx to update the service-related metadata and clear the PoSe- banned state (revive the masternode). The ProUpRevTx takes the following syntax:
protx revoke proTxHash operatorKey reason
Where:
proTxHash: The transaction id of the initial ProRegTxoperatorKey: The operator BLS private key associated with the registered operator public keyreason(optional): Integer value indicating the revocation reason
Example:
protx revoke 9f5ec7540baeefc4b7581d88d236792851f26b4b754684a31ee35d09bdfb7fb6 565950700d7bdc6a9dbc9963920bc756551b02de6e4711eff9ba6d4af59c0101
DashCentral voting, verification and monitoring
DashCentral is a community-supported website managed by community member Rango. It has become a de facto site for discussion of budget proposals and to facilitate voting from a graphical user interface, but also offers functions to monitor masternodes.
Adding your masternode to DashCentral
Dashcentral allows you to vote on proposals from the comfort of your browser. After completing registration, go to the masternodes page and click the Add masternode now button. Enter your collateral address on the following screen:

Adding a masternode to DashCentral
Click Add masternode. Your masternode has now been added to DashCentral.
Enabling voting from DashCentral
Click Edit under Voting privkeys to enter your masternode private key to enable voting through the DashCentral web interface. Enter a voting passphrase (not the same as your login password, but equally important to remember!) and enter the private key (the same key you used in the dash.conf file on your masternode) on the following screen:

Adding voting privkeys to DashCentral
It is important to note that the private key to start your masternode is unrelated to the private keys to the collateral address storing your 1000 DASH. These keys can be used to issue commands on behalf of the masternode, such as voting, but cannot be used to access the collateral. The keys are encrypted on your device and never stored as plain text on DashCentral servers. Once you have entered the key, click Store encrypted voting privkeys on server. You can now vote on proposals from the DashCentral web interface.
Verifying ownership
You can also issue a message from your address to verify ownership of your masternode to DashCentral. Click Unverified under Ownership and the following screen will appear:

Verifying ownership of your masternode to DashCentral
Instructions on how to sign your collateral address using a software wallet appear. If you are using a hardware wallet other than Trezor, you will need to use the DMT app to sign the address. If you are using the Trezor hardware wallet, go to your Trezor wallet, copy the collateral address and click Sign & Verify. The following screen will appear, where you can enter the message provided by DashCentral and the address you wish to sign:

Signing a message from the Trezor Wallet
Click Sign, confirm on your Trezor device and enter your PIN to sign the message. A message signature will appear in the Signature box. Copy this signature and paste it into the box on DashCentral and click Verify ownership. Verification is now complete.

Masternode ownership has been successfully verified
Installing the DashCentral monitoring script
DashCentral offers a service to monitor your masternode, automatically restart dashd in the event of a crash and send email in the event of an error. Go to the Account settings page and generate a new API key, adding a PIN to your account if necessary. Scroll to the following screen:

Setting up the DashCentral monitoring script
Copy the link to the current version of the dashcentral script by right- click and selecting Copy link address. Open PuTTY and connect to your masternode, then type:
wget https://www.dashcentral.org/downloads/dashcentral-updater-v6.tgz
Replace the link with the current version of dashcentral-updater as necessary. Decompress the archive using the following command:
tar xvzf dashcentral-updater-v6.tgz
View your masternode configuration details by typing:
cat .dashcore/dash.conf
Copy the values for rpcuser and rpcpassword. Then edit the
dashcentral configuration by typing:
nano dashcentral-updater/dashcentral.conf
Replace the values for api_key, your masternode collateral address,
rpc_user, rpc_password, daemon_binary and daemon_datadir
according to your system. A common configuration, where lwhite is
the name of the Linux user, may look like this:

DashCentral updater configuration file
################
# dashcentral-updater configuration
################
our %settings = (
# Enter your DashCentral api key here
'api_key' => 'api_key_from_dashcentral'
);
our %masternodes = (
'masternode_collateral_address' => {
'rpc_host' => 'localhost',
'rpc_port' => 9998,
'rpc_user' => 'rpc_user_from_dash.conf',
'rpc_password' => 'rpc_password_from_dash.conf',
'daemon_autorestart' => 'enabled',
'daemon_binary' => '/home/<username>/.dashcore/dashd',
'daemon_datadir' => '/home/<username>/.dashcore'
}
);
Press Ctrl + X to exit, confirm you want save with Y and press Enter. Test your configuration by running the dashcentral script, then check the website. If it was successful, you will see that an update has been sent:
dashcentral-updater/dcupdater

Manually testing the DashCentral updater

DashCentral updater has successfully sent data to the DashCentral site
Once you have verified your configuration is working, we can edit the crontab on your system to schedule the dcupdater script to run every 2 minutes. This allows the system to give you early warning in the event of a fault and will even restart the dashd daemon if it hangs or crashes. This is an effective way to make sure you do not drop off the payment queue. Type the following command:
crontab -e
Select an editor if necessary and add the following line to your crontab after the line for sentinel, replacing lwhite with your username on your system:
*/2 * * * * /home/lwhite/dashcentral-updater/dcupdater

Editing crontab to run the DashCentral updater automatically
Press Ctrl + X to exit, confirm you want save with Y and press Enter. The dcupdater script will now run every two minutes, restart dashd whenever necessary and email you in the event of an error.
Masternode monitoring tools
Several sites operated by community members are available to monitor key information and statistics relating to the masternode network.
Block Explorers
Since Dash is a public blockchain, it is possible to use block explorers to view the balances of any Dash public address, as well as examine the transactions entered in any given block. Each unique transaction is also searchable by its txid. A number of block explorers are available for the Dash network.
- CryptoID offers a Dash blockchain explorer and a function to view and map Dash masternodes.
- BitInfoCharts offers a page of price statistics and information and a blockchain explorer.
- CoinCheckup offers a range of statistics and data on most blockchains, including Dash.
- CoinPayments offers a simple Dash blockchain explorer.
- Dash.org includes two blockchain explorers at explorer.dash.org and insight.dash.org.
- Trezor operates a blockchain explorer powered by a Dash fork of insight, an advanced blockchain API tool
Dash Masternode Tool
https://github.com/Bertrand256/dash-masternode-tool
Written and maintained by community member Bertrand256, Dash Masternode Tool (DMT) allows you to start a masternode from all major hardware wallets such as Trezor, Ledger and KeepKey. It also supports functions to vote on proposals and withdraw masternode payments without affecting the collateral transaction.
DASH Ninja
DASH Ninja, operated by forum member and Dash Core developer elbereth, offers key statistics on the adoption of different versions of Dash across the masternode network. Several features to monitor governance of the Dash, the masternode payment schedule and the geographic distribution of masternodes are also available, as well as a simple blockchain explorer.
DashCentral
DashCentral, operated by forum member rango, offers an advanced service to monitor masternodes and vote on budget proposals through an advanced web interface. An Android app is also available.
Masternode.me
Masternode.me, operated by forum member and Dash Core developer moocowmoo, offers sequential reports on the price, generation rate, blockchain information and some information on masternodes.
Dash Masternode Information
http://178.254.23.111/~pub/Dash/Dash_Info.html
This site, operated by forum member and Dash Core developer crowning, offers a visual representation of many key statistics of the Dash masternode network, including graphs of the total masternode count over time, price information and network distribution.
Dash 0.13 Upgrade Procedure
Dash 0.13.0 implements DIP003, which introduces several changes to how a Dash masternode is set up and operated. A list of available documentation appears below:
- DIP003 Deterministic Masternode Lists
- DIP003 Masternode Changes
- Dash 0.13 Upgrade Procedure (you are here)
- Full masternode setup guide
- Information for users of hosted masternodes
- Information for operators of hosted masternodes
It is highly recommended to first read at least the list of changes before continuing in order to familiarize yourself with the new concepts in DIP003. This documentation describes the upgrade procedure in two steps:
- Update the masternode software
- Register the DIP003 masternode
Step 1 should be done immediately as soon as Dash 0.13.0 is released. Once miners have updated and DIP003 has activated on the network, it will become possible to complete Step 2 and register a DIP003 masternode. After enough masternodes have completed this step, Spork 15 will be enabled and all new network functions will take effect.
Masternode Software Update
Begin by updating the Dash software on your masternode. Depending on whether you installed Dash manually or using dashman, you must follow the procedure appropriate for your masternode, as described below.
Option 1: Updating from dashman
To update Dash using dashman, log in to your server and enter the following commands:
~/dashman/dashman sync
~/dashman/dashman update
Check the status of your masternode:
~/dashman/dashman status
The Dash software on the masternode is now updated. Since Dash 0.13 also
updates the protocol version, it is necessary to issue a masternode start
from Dash Core or DMT command to keep your masternode in the payment
list during the transition period. See the 0.12.3 documentation
for more details.
Option 2: Manual update
To update Dash manually, log in to your server using ssh or PuTTY. If
your crontab contains an entry to automatically restart dashd, invoke
crontab -e and comment out the appropriate line by adding the #
character. It should look something like this:
# * * * * * pidof dashd || ~/.dashcore/dashd
Then stop Dash running:
~/.dashcore/dash-cli stop
Visit the GitHub releases page and copy the link to the latest x86_64-linux-gnu version. Go back to your terminal window and enter the following command, pasting in the address to the latest version of Dash Core by right clicking or pressing Ctrl + V:
cd /tmp
wget https://github.com/dashpay/dash/releases/download/v0.13.0.0-rc10/dashcore-0.13.0.0-rc10-x86_64-linux-gnu.tar.gz
Verify the integrity of your download by running the following command
and comparing the output against the value for the file as shown in the
SHA256SUMS.asc file:
sha256sum dashcore-0.13.0.0-rc10-x86_64-linux-gnu.tar.gz
Extract the compressed archive and copy the new files to the directory:
tar xfv dashcore-0.13.0.0-rc10-x86_64-linux-gnu.tar.gz
cp -f dashcore-0.13.0/bin/dashd ~/.dashcore/
cp -f dashcore-0.13.0/bin/dash-cli ~/.dashcore/
Restart Dash:
~/.dashcore/dashd
You will see a message reading “Dash Core server starting”. We will now update Sentinel:
cd ~/.dashcore/sentinel/
git checkout master
git pull
Finally, uncomment the line to automatically restart Dash in your
crontab by invoking crontab -e again and deleting the #
character.
The Dash software on the masternode is now updated. Since Dash 0.13 also
updates the protocol version, it is necessary to issue a masternode start
from Dash Core or DMT command to keep your masternode in the payment
list during the transition period. See the 0.12.3 documentation
for more details.
Masternode Registration from DMT
This documentation describes the procedure to register an existing masternode for the DIP003 masternode list if the collateral is held on a hardware wallet. DIP003 must be activated and DMT 0.9.21 or higher is required. You can update DMT by downloading the version appropriate for your system from the DMT Releases page. Open DMT and ensure your existing masternode configuration appears.
Configuration
Click the Send ProRegTx button to get started. The Masternode migration wizard appears.

The DMT Masternode migration wizard
All fields are prefilled with suggested values.
- It should not be necessary to change the Collateral Tx or IP/Port fields if you are using your existing collateral and server.
- You can optionally modify the Payout address to any valid existing or new Dash address, since it is no longer mandatory to receive payouts at the collateral address.
- If your masternode is hosted by an external operator, you can specify the percentage of the reward to allocate to the operator in the Operator reward field.
- The three masternode keys (owner, operator, voting) are newly generated and do not need to be changed.
Click Next when you are ready to continue. DMT will verify the collateral is in place and prepare to create the ProRegTx special transaction to register the masternode on the blockchain. This command must be sent from a Dash Core wallet holding a balance, since a standard transaction fee is involved. You can choose to send this from the DMT developer’s remote RPC node (automatic method), or use your own Dash Core wallet to submit the transaction (manual method). Click Continue when you are ready.
Option 1: Automatic method
Note that because Trezor does not yet support Dash special transactions, it is
necessary to transmit your owner private key (NOT the collateral private
key) to the remote server to sign the registration transaction. Only use
the automatic method if you are connected to your own Dash RPC client,
or if you trust the operator of the node. You can see the name of the
node you are connected to in the lower right corner of the main DMT
window. The default nodes in DMT (named alice, luna and
suzy) are maintained by the author of DMT, who has kindly offered to
cover the transaction fees for the DIP003 upgrade.
DMT will prepare a ProTx message and prompt you to confirm signing the message on your hardware wallet. The signed message will be registered on the blockchain immediately. A window appears with the final configuration information. Click Save to a file and enter a new file name. This file contains various private and public keys related to the ownership, operation and voting for the masternode, so keep it in a secure location. Continue below with the final step of entering the BLS key on the masternode.
Option 2: Manual method
The following window appears:

Manual registration commands in the DMT Masternode migration wizard
Open Dash Core, wait for the blockchain to synchronise and then click Tools -> Debug console. Complete the following steps:
- Copy and paste the command from Step 1 into the Dash Core debug console and press Enter.
- Copy and paste the output back into the Step 2 field of the DMT Masternode migration wizard.
- Click Sign message with hardware wallet and confirm signing the message on your hardware wallet.
- Copy and paste the command from Step 3 into the Dash Core debug console and press Enter. Dash Core will create a registration transaction on the blockchain.
- Copy and paste the transaction hash back into the Step 4 field of the DMT Masternode migration wizard and click Continue.
A window appears with the final configuration information. Click Save to a file and enter a new file name. This file contains various private and public keys related to the ownership, operation and voting for the masternode, so keep it in a secure location.
Enter the BLS key on the masternode
Finally, it is necessary to enter the BLS private key generated by DMT
on the masternode itself, or send it to your hosting operator. If you
are operating the masternode yourself, log in to your masternode using
ssh or PuTTY and edit the configuration file on your masternode as
follows:
nano ~/.dashcore/dash.conf
The editor appears with the existing masternode configuration. Add this line to the end of the file, replacing the key with your BLS secret key generated above:
masternodeblsprivkey=6708c32427c464fc360d76d36b73585b158b46a1f2e24dfce19db4f48d47270b
Press enter to make sure there is a blank line at the end of the file, then press Ctrl + X to close the editor and Y and Enter save the file. We now need to restart the masternode for this change to take effect. Enter the following commands, waiting a few seconds in between to give Dash Core time to shut down:
~/.dashcore/dash-cli stop
~/.dashcore/dashd
Your masternode is now upgraded to DIP003 and will appear on the
Deterministic Masternode List. You can view this list on the
Masternodes -> DIP3 Masternodes tab of the Dash Core wallet, or in
the console using the command protx list valid, where the txid of
the final transaction in Step 5 identifies your DIP003 masternode. Note
again that all functions related to DIP003 will only take effect once
Spork 15 is enabled on the network. You can view the spork status using
the spork active command.
Masternode Registration from Dash Core
This documentation describes the procedure to register an existing
masternode for the DIP003 masternode list if the collateral is held in
the Dash Core software full wallet. DIP003 must be activated. The
commands are shown as if they were entered in the Dash Core GUI by
opening the console from Tools > Debug console, but the same result can
be achieved on a masternode by entering the same commands and adding the
prefix ~/.dashcore/dash-cli to each command.
Generate a BLS key pair
A public/private BLS key pair is required for the operator of the masternode. If you are using a hosting service, they will provide you with their public key, and you can skip this step. If you are hosting your own masternode, generate a BLS public/private keypair as follows:
bls generate
{
"secret": "565950700d7bdc6a9dbc9963920bc756551b02de6e4711eff9ba6d4af59c0101",
"public": "01d2c43f022eeceaaf09532d84350feb49d7e72c183e56737c816076d0e803d4f86036bd4151160f5732ab4a461bd127"
}
These keys are NOT stored by the wallet and must be kept secure,
similar to the value provided in the past by the masternode genkey
command.
Add the private key to your masternode configuration
The public key will be used in following steps. The BLS secret key must
be entered in the dash.conf file on the masternode. This allows the
masternode to watch the blockchain for relevant Pro*Tx transactions, and
will cause it to start serving as a masternode when the signed ProRegTx
is broadcast by the owner (final step below). Log in to your masternode
using ssh or PuTTY and edit the configuration file on your
masternode as follows:
nano ~/.dashcore/dash.conf
The editor appears with the existing masternode configuration. Add this line to the end of the file, replacing the key with your BLS secret key generated above:
masternodeblsprivkey=565950700d7bdc6a9dbc9963920bc756551b02de6e4711eff9ba6d4af59c0101
Press enter to make sure there is a blank line at the end of the file, then press Ctrl + X to close the editor and Y and Enter save the file. We now need to restart the masternode for this change to take effect. Enter the following commands, waiting a few seconds in between to give Dash Core time to shut down:
~/.dashcore/dash-cli stop
~/.dashcore/dashd
We will now prepare the transaction used to register a DIP003 masternode on the network.
Prepare a ProRegTx transaction
First, we need to get a new, unused address from the wallet to serve as the owner address. This is different to the collateral address. It must also be used as the voting address if Spork 15 is not yet active. Generate a new address as follows:
getnewaddress
yc98KR6YQRo1qZVBhp2ZwuiNM7hcrMfGfz
Then either generate or choose an existing second address to receive the owner’s masternode payouts:
getnewaddress
ycBFJGv7V95aSs6XvMewFyp1AMngeRHBwy
You can also optionally generate and fund a third address to pay the
transaction fee. The private key to this address must be available to
the wallet submitting the transaction to the network. We will now
prepare an unsigned ProRegTx special transaction using the protx
register_prepare command. This command has the following syntax:
protx register_prepare collateralHash collateralIndex ipAndPort ownerKeyAddr
operatorPubKey votingKeyAddr operatorReward payoutAddress (feeSourceAddress)
Open a text editor such as notepad to prepare this command. Replace each argument to the command as follows:
collateralHash: The txid of the 1000 Dash collateral funding transactioncollateralIndex: The output index of the 1000 Dash funding transactionipAndPort: Masternode IP address and port, in the formatx.x.x.x:yyyyownerKeyAddr: The new Dash address generated above for the owner/voting addressoperatorPubKey: The BLS public key generated above (or provided by your hosting service)votingKeyAddr: The new Dash address generated above, or the address of a delegate, used for proposal votingoperatorReward: The percentage of the block reward allocated to the operator as paymentpayoutAddress: A new or existing Dash address to receive the owner’s masternode rewardsfeeSourceAddress: An (optional) address used to fund ProTx fee.payoutAddresswill be used if not specified.
Note that the operator is responsible for specifying their own
reward address in a separate update_service
transaction if you specify a non-zero operatorReward. The owner of
the masternode collateral does not specify the operator’s payout
address.
Example (remove line breaks if copying):
protx register_prepare
2c499e3862e5aa5f220278f42f9dfac32566d50f1e70ae0585dd13290227fdc7
1
140.82.59.51:19999
yc98KR6YQRo1qZVBhp2ZwuiNM7hcrMfGfz
01d2c43f022eeceaaf09532d84350feb49d7e72c183e56737c816076d0e803d4f86036bd4151160f5732ab4a461bd127
yc98KR6YQRo1qZVBhp2ZwuiNM7hcrMfGfz
0
ycBFJGv7V95aSs6XvMewFyp1AMngeRHBwy
Output:
{
"tx": "030001000191def1f8bb265861f92e9984ac25c5142ebeda44901334e304c447dad5adf6070000000000feffffff0121dff505000000001976a9149e2deda2452b57e999685cb7dabdd6f4c3937f0788ac00000000d1010000000000c7fd27022913dd8505ae701e0fd56625c3fa9d2ff47802225faae562389e492c0100000000000000000000000000ffff8c523b334e1fad8e6259e14db7d05431ef4333d94b70df1391c601d2c43f022eeceaaf09532d84350feb49d7e72c183e56737c816076d0e803d4f86036bd4151160f5732ab4a461bd127ad8e6259e14db7d05431ef4333d94b70df1391c600001976a914adf50b01774202a184a2c7150593442b89c212e788acf8d42b331ae7a29076b464e61fdbcfc0b13f611d3d7f88bbe066e6ebabdfab7700",
"collateralAddress": "yPd75LrstM268Sr4hD7RfQe5SHtn9UMSEG",
"signMessage": "ycBFJGv7V95aSs6XvMewFyp1AMngeRHBwy|0|yc98KR6YQRo1qZVBhp2ZwuiNM7hcrMfGfz|yc98KR6YQRo1qZVBhp2ZwuiNM7hcrMfGfz|54e34b8b996839c32f91e28a9e5806ec5ba5a1dadcffe47719f5b808219acf84"
}
Next we will use the collateralAddress and signMessage fields to
sign the transaction, and the output of the tx field to submit the
transaction.
Sign the ProRegTx transaction
Now we will sign the content of the signMessage field using the
private key for the collateral address as specified in
collateralAddress. Note that no internet connection is required for
this step, meaning that the wallet can remain disconnected from the
internet in cold storage to sign the message. In this example we will
again use Dash Core, but it is equally possible to use the signing
function of a hardware wallet. The command takes the following syntax:
signmessage address message
Example:
signmessage yPd75LrstM268Sr4hD7RfQe5SHtn9UMSEG ycBFJGv7V95aSs6XvMewFyp1AMngeRHBwy|0|yc98KR6YQRo1qZVBhp2ZwuiNM7hcrMfGfz|yc98KR6YQRo1qZVBhp2ZwuiNM7hcrMfGfz|54e34b8b996839c32f91e28a9e5806ec5ba5a1dadcffe47719f5b808219acf84
Output:
IMf5P6WT60E+QcA5+ixors38umHuhTxx6TNHMsf9gLTIPcpilXkm1jDglMpK+JND0W3k/Z+NzEWUxvRy71NEDns=
Submit the signed message
We will now create the ProRegTx special transaction to register the masternode on the blockchain. This command must be sent from a Dash Core wallet holding a balance, since a standard transaction fee is involved. The command takes the following syntax:
protx register_submit tx sig
Where:
tx: The serialized transaction previously returned in thetxoutput field fromprotx register_preparein Step 2sig: The message signed with the collateral key from Step 3
Example:
protx register_submit 030001000191def1f8bb265861f92e9984ac25c5142ebeda44901334e304c447dad5adf6070000000000feffffff0121dff505000000001976a9149e2deda2452b57e999685cb7dabdd6f4c3937f0788ac00000000d1010000000000c7fd27022913dd8505ae701e0fd56625c3fa9d2ff47802225faae562389e492c0100000000000000000000000000ffff8c523b334e1fad8e6259e14db7d05431ef4333d94b70df1391c601d2c43f022eeceaaf09532d84350feb49d7e72c183e56737c816076d0e803d4f86036bd4151160f5732ab4a461bd127ad8e6259e14db7d05431ef4333d94b70df1391c600001976a914adf50b01774202a184a2c7150593442b89c212e788acf8d42b331ae7a29076b464e61fdbcfc0b13f611d3d7f88bbe066e6ebabdfab7700 IMf5P6WT60E+QcA5+ixors38umHuhTxx6TNHMsf9gLTIPcpilXkm1jDglMpK+JND0W3k/Z+NzEWUxvRy71NEDns=
Output:
9f5ec7540baeefc4b7581d88d236792851f26b4b754684a31ee35d09bdfb7fb6
Your masternode is now upgraded to DIP003 and will appear on the
Deterministic Masternode List after the transaction is mined to a block.
You can view this list on the Masternodes -> DIP3 Masternodes tab of
the Dash Core wallet, or in the console using the command protx list
valid, where the txid of the final protx register_submit
transaction identifies your DIP003 masternode. Note again that all
functions related to DIP003 will only take effect once Spork 15 is enabled
on the network. You can view the spork status using the spork active
command.
Advanced Topics
Installing Dash on Fedora Linux
Dash developer t0dd has developed packages and written an excellent guide on installing and running Dash as a node, masternode or on testnet.
Installing Dash on Ubuntu Linux
Dash binaries are under development for distribution through the Ubuntu Linux Launchpad repository system. Check back here for details once a release announcement is made.
Mining
Mining in the context of cryptocurrency such as Dash refers to the process of searching for solutions to cryptographically difficult problems as a method of securing blocks on the blockchain. The process of mining creates new currency tokens as a reward to the miner. Mining is possible on a range of hardware. Dash implements an algorithm known as X11, which the miner must solve in order to earn rewards.
The simplest and most general hardware available for mining is the general purpose CPU present in every computer. A CPU is designed to be versatile but offers less efficiency than a GPU, which is designed to rapidly calculate millions of vectors in parallel. While specific CPU instruction enhancements related to cryptography such as AES or AVX can provide a decent boost, GPUs offer a significant performance increase due to their multiple pipelines capable of processing the predictably repetitive calculations associated with cryptocurrency mining. Finally, ASICs are relatively inflexible and can only process the specific function(s) for which they were designed, but at an even faster rate than the more general purpose GPUs and CPUs. A number of X11 ASICs are now available on the market, which have quickly made CPU and GPU mining uneconomic due to the increased difficulty of hashing arising from the rapidly increasing hash rate. The result is a currency which is more secure against brute force attacks on the Dash blockchain.
The profitability of mining is determined by the hashrate of your mining device, the current network difficulty and the costs of your hardware and electricity. The following links provide up to date information:
Masternodes vs. Mining
Dash, like Bitcoin and most other cryptocurrencies, is based on a decentralized ledger of all transactions, known as a blockchain. This blockchain is secured through a consensus mechanism; in the case of both Dash and Bitcoin, the consensus mechanism is Proof of Work (PoW). Miners attempt to solve difficult problems with specialized computers, and when they solve the problem, they receive the right to add a new block to the blockchain. If all the other people running the software agree that the problem was solved correctly, the block is added to the blockchain and the miner is rewarded.
Dash works a little differently from Bitcoin, however, because it has a two-tier network. The second tier is powered by masternodes (Full Nodes), which enable financial privacy (PrivateSend), instant transactions (InstantSend), and the decentralized governance and budget system. Because this second tier is so important, masternodes are also rewarded when miners discover new blocks. The breakdown is as follows: 45% of the block reward goes to the miner, 45% goes to masternodes, and 10% is reserved for the budget system (created by superblocks every month).
The masternode system is referred to as Proof of Service (PoSe), since the masternodes provide crucial services to the network. In fact, the entire network is overseen by the masternodes, which have the power to reject improperly formed blocks from miners. If a miner tried to take the entire block reward for themselves or tried to run an old version of the Dash software, the masternode network would orphan that block, and it would not be added to the blockchain.
In short, miners power the first tier, which is the basic sending and receiving of funds and prevention of doublespending. Masternodes power the second tier, which provide the added features that make Dash different from other cryptocurrencies. Masternodes do not mine, and mining computers cannot serve as masternodes. Additionally, each masternode is “secured” by 1000 DASH. Those DASH remain under the sole control of their owner at all times, and can still be freely spent. The funds are not locked in any way. However, if the funds are moved or spent, the associated masternode will go offline and stop receiving rewards.
Mining Pools
Mining Dash in pools is more likely to generate rewards than solo mining directly on the blockchain. Mining dash using P2Pool is strongly encouraged, since it is a good way to distribute, rather than centralize, the hashing power. The following site lists Dash P2Pool mining pools near you, simply choose a pool with favourable fees and ping time and enter your Dash payment address as username and anything as password.
If you would like to set up your own P2Pool, documentation of the process is available here and the code for p2pool-dash is available on GitHub.
Other pools are also available and may be advantageous for different reasons such as ping latency, uptime, fee, users, etc.:
- https://coinfoundry.org
- https://dash.suprnova.cc
- https://www.nicehash.com
- https://www.coinotron.com
- https://dash.miningpoolhub.com
- https://www.multipool.us
- https://dash.miningfield.com
- https://www.f2pool.com
- https://dash.miningfield.com
- https://www2.coinmine.pl/dash
- https://aikapool.com/dash
- https://www.antpool.com
- https://avalon-life.io
- https://www.genesis-mining.com
- https://pool.viabtc.com/pool/dash/state
- http://dash.cybtc.info
- http://zpool.ca
DISCLAIMER: This list is provided for informational purposes only. Services listed here have not been evaluated or endorsed by the Dash developers and no guarantees are made as to the accuracy of this information. Please exercise discretion when using third-party services. If you’d like to be added to this list please reach out to leon.white@dash.org
In addition to joining a pool, you will also need to create a Dash address to receive your payout. To do this in Dash Core wallet, see here.
Dash P2Pool Node Setup
This guide describes how to set up a Dash P2Pool node to manage a pool of miners. Unlike centralized mining pools, P2Pool is based on the same peer-2-peer (P2P) model as Dash, making the pool as a whole highly resistant to malicious attacks, and preserving and protecting the decentralized nature of Dash. When you launch a P2Pool node, it seeks out, connects with, and shares data with a decentralized network of other P2Pool nodes (also known as peers). P2Pool nodes share a cryptographic chain of data representing value, similar to Dash’s blockchain. The P2Pool version is called the sharechain. The decentralized and fair nature of this mining model means mining with P2Pool is strongly encouraged. P2Pool for Dash uses the p2pool-dash software on GitHub, which is a fork of p2pool for Bitcoin. For more information, see here.
Because of the way P2Pool manages difficulty adjustments on the sharechain, it is important to maintain low latency between the miners and the P2Pool node to avoid miners submitting shares too late to enter the sharechain. When setting up your node, you need to consider its physical and network location relative to the miners you intend to connect to the node. If you operate a mining farm, your P2Pool node should probably be a physical machine on the same local network as your miners. If you plan to operate a public node, it may be best to set up your P2Pool node as a virtual machine in a data center with a high speed connection so geographically close miners can mine to your pool with relatively low latency.
This following section describes the steps to setup an Ubuntu Server running P2Pool for Dash. It has been tested with Ubuntu 16.04 LTS and 18.04 LTS and Dash 0.12.2.3. While a reasonable effort will be made to keep it up to date, it should be possible to modify the instructions slightly to support different versions or operating systems as necessary.
Setting up the host server
Download a copy of Ubuntu Server LTS from
https://www.ubuntu.com/download/server and install it on your system
according to the steps described here. If you are using a VPS such as Vultr or AWS, your provider
will most likely provide an option to install this system during
provisioning. Ensure you enable OpenSSH server during setup so you can
control your server from a remote console. Once you have access to your
server, create a new non-root user if you have not already done so using
the following command, replacing <username> with a username of your
choice:
adduser <username>
You will be prompted for a password. Enter and confirm using a new password (different to your root password) and store it in a safe place. You will also see prompts for user information, but this can be left blank. Once the user has been created, we will add them to the sudo group so they can perform commands as root:
usermod -aG sudo <username>
Reboot your server and log in as the new user. At this point it is recommended to connect remotely using PuTTY (for Windows) or ssh (for Linux and macOS) if you have not already done so.
Setting up port forwarding
If you are on a private network behind a router, you will need to set up port forwarding for at least port 8999 (UDP/TCP) for access to the sharechain, as well as port 7903 (UDP/TCP) if you want your node to be accessible to the public. How this is done depends on your particular network router and is therefore beyond the scope of this documentation. An example from the popular DD-WRT open source router distribution is shown below. Guides to setting up port forwarding can be found here and here.
Take note of your IP address either from your router management interface or by visiting https://www.whatismyip.com

Setting up port forwarding under DD-WRT
Option 1: Automated script setup
Dash community member dracocephalum has generously donated a script to automatically deploy everything required to run a p2pool-dash node under Ubuntu Server 16.04 and higher. For more details, see this forum post, or simply follow these instructions to get the script. To get fetch the script and get started, type:
sudo apt install git
git clone https://github.com/strophy/p2pool-dash-deploy
The files will be created in the p2pool-dash-deploy folder. We now need to configure a few variables specific to your system:
nano ./p2pool-dash-deploy/p2pool.deploy.sh
Scroll down to the section labeled #Variables and enter the
following information, replacing the <xxx> placeholders after the
= sign. Note that it may also be necessary to update the
DASH_WALLET_URL, DASH_WALLET_ZIP and DASH_WALLET_LOCAL
values if they do not match the current version of Dash:
PUBLIC_IP= your public IP address from the previous stepEMAIL= your email addressPAYOUT_ADDRESS= your DASH wallet address to receive feesUSER_NAME= linux user nameRPCUSER= enter a random alphanumeric rpc user nameRPCPASSWORD= enter a random alphanumeric rpc password
Press Ctrl + X to close the editor and Y and Enter save the file. Then run the script:
bash ./p2pool-dash-deploy/p2pool.deploy.sh
The script will carry out all steps necessary to set up P2pool on Ubuntu Server and start dashd synchronisation. When setup is complete, you should see a message reading Installation Completed. You can now run a second script to start p2pool-dash:
bash ~/p2pool.start.sh
Your P2Pool node is now running. If you see errors similar to Error
getting work from dashd or -10 Dash Core is downloading blocks…
then you must wait until Dash finishes synchronisation. Once this is
done, you can point your miners to <ip_address>:7903 to begin
mining.


Example configuration showing a single Bitmain Antminer D3 connected to a p2pool-dash node on the local network
Option 2: Manual setup
First update your operating system as follows:
sudo apt update
sudo apt upgrade
P2Pool requires a full Dash node to be running to get block and transaction data. To download and install Dash, visit https://www.dash.org/wallets on your computer to find the link to the latest Dash Core wallet. Click Linux, then right-click on Download TGZ for Dash Core Linux 64 Bit and select Copy link address. Go back to your terminal window and enter the following command, pasting in the address to the latest version of Dash Core by right clicking or pressing Ctrl + V:
cd ~
wget https://github.com/dashpay/dash/releases/download/v0.12.2.3/dashcore-0.12.2.3-linux64.tar.gz
Verify the integrity of your download by running the following command and comparing the output against the value for the file as shown on the Dash website under Hash File:
sha256sum dashcore-0.12.2.3-linux64.tar.gz

Link to the hash file to verify download integrity
Create a working directory for Dash, extract the compressed archive, copy the necessary files to the directory and set them as executable:
mkdir .dashcore
tar xfvz dashcore-0.12.2.3-linux64.tar.gz
cp dashcore-0.12.2/bin/dashd .dashcore/
cp dashcore-0.12.2/bin/dash-cli .dashcore/
chmod 777 .dashcore/dash*
Clean up unneeded files:
rm dashcore-0.12.2.3-linux64.tar.gz
rm -r dashcore-0.12.2/
Create a configuration file using the following command:
nano ~/.dashcore/dash.conf
An editor window will appear. We now need to create a configuration file specifying several variables. Copy and paste the following text to get started, then replace the variables specific to your configuration as follows:
#----
rpcuser=XXXXXXXXXXXXX
rpcpassword=XXXXXXXXXXXXXXXXXXXXXXXXXXXX
rpcallowip=127.0.0.1
#----
listen=1
server=1
daemon=1
maxconnections=64
#----
Replace the fields marked with XXXXXXX as follows:
rpcuser: enter any string of numbers or letters, no special characters allowedrpcpassword: enter any string of numbers or letters, no special characters allowed
The result should look something like this:

Entering key data in dash.conf on the P2Pool node
Press Ctrl + X to close the editor and Y and Enter save the file. You can now start running Dash on the masternode to begin synchronization with the blockchain:
~/.dashcore/dashd
You will see a message reading Dash Core server starting. You can
continue with the following steps and check synchronization periodically
using the following command. Synchronization is complete when the number
of blocks is equal to the current number of blocks in the Dash
blockchain, as can be seen from any synchronized Dash wallet or block
explorer:
~/.dashcore/dash-cli getblockcount
We will now set up the P2Pool software and its dependencies. Begin with the dependencies:
sudo apt install python-zope.interface python-twisted python-twisted-web python-dev
sudo apt install gcc g++ git
Create working directories and set up p2pool-dash:
mkdir git
cd git
git clone https://github.com/dashpay/p2pool-dash
cd p2pool-dash
git submodule init
git submodule update
cd dash_hash
python setup.py install --user
We will add some optional extra interfaces to the control panel:
cd ..
mv web-static web-static.old
git clone https://github.com/justino/p2pool-ui-punchy web-static
mv web-static.old web-static/legacy
cd web-static
git clone https://github.com/johndoe75/p2pool-node-status status
git clone https://github.com/hardcpp/P2PoolExtendedFrontEnd ext
You can now start p2pool and optionally specify the payout address, external IP (if necessary), fee and donation as follows:
python ~/git/p2pool-dash/run_p2pool.py --external-ip <public_ip> -f <fee> --give-author <donation> -a <payout_address>
You can then monitor your node by browsing to the following addresses,
replacing <ip_address> with the IP address of your P2Pool node:
- Punchy interface: http://ip_address:7903/static
- Legacy interface: http://ip_address:7903/static/legacy
- Status interface: http://ip_address:7903/static/status
- Extended interface: http://ip_address:7903/static/ext
Example configuration showing a single Bitmain Antminer D3 connected to a p2pool-dash node on the local network
CPU Mining
This documentation describes how to mine Dash under the Windows operating system using just the CPU in your computer. Please note that the prevalence of GPU and ASIC miners mean that unless you have free electricity, this is highly unlikely to be profitable! Since this is the case, the software in this guide has not been updated in several years, and is intended for experimental purposes and testnet only.
This is a fairly simple procedure and examples will be given in order to achieve the fastest possible hash rate for your CPU, but remember that more optimized miners do exist, so we advise you to keep an eye out on mining sites such as these in order to keep up with the latest information and releases.
Mining software
The first step is to download appropriate mining software. A good basic miner for modern CPUs can be found here:
This software depends on your CPU supporting the AES-NI and AVX instruction sets. You can use CPU-Z to check if this is the case for your CPU:

CPU-Z showing details for an Intel i7 Haswell CPU
If your CPU does not support AES-NI and AVX, then you can try more generalized software which does not require specific instruction sets, such as these:
Our goal here is to choose mining software that supports the maximum possible instruction sets available on your CPU, and then try to increase the hash speed. Once you have made your choice, click Releases and download and extract the zip file. The different *.exe files indicate which specific processor optimizations they support. The folder should look something like this:

Executable CPU miners for Dash
Configuration
Begin by selecting a mining pool and generating a Dash address as described in the Mining Pools section above. Keep all your mining files in a single folder. In this example we will work from the Desktop. The node selected for this example is from the p2poolming.us list and is located in China:
http://118.184.180.43:7903/static/
Next, open Notepad and type in on one line the command we will use to start the miner, followed by pause on the second line. The general format is as follows:
<minerd> -a <algorithm> -o <url> -u <username> -p <password> -t <threads>
pause
Where:
- minerd = the executable miner daemon file you choose to use
- a = algorithm, which is X11 for Dash
- o = URL of your mining pool, including the protocol and port
- u = username, usually the Dash receiving address of your wallet or worker
- p = password, can often be set to x
- t = number of threads used
- pause = keeps the window open in the case of errors
For the CPU in the example above, the command may be:
minerd-avx-aes-sse2-sss3.exe -a X11 -o stratum+tcp://118.184.180.43:7903 -u XwZRjo1f6gmq3LCv7X1Hi5h3NkvDMHvu8G -p x -t 8
pause

Notepad file showing an example command to start a CPU miner
Click File, then Save As. Change Save as type to All Files, then type the file name as startminer.bat and save it in the same folder as the unzipped minerd files.
Testing
You are now ready to start! Keep an eye on your CPU usage in Task
Manager (right click the taskbar to open this) and be careful that the
CPU temperature does not exceed your maximum rating (around 64°C). If
you have temperature or desktop stability problems, reduce t to ~2
threads and try that first. If t is left out, the machine will
default to the maximum number of threads. After running the miner for a
while, take a look at the hash speed and payouts in your mining pool.
You can identify your miner by the wallet address on the page.

Example of CPU mining using DarkCoin CPUMiner 1.3 on Intel Core i7
Tips
Reduce the number of threads for added desktop usability and heat reduction. If the CPU temperature is too high, consider fitting a new fan and check that the heat sink thermal paste on the CPU is adequate. Tweak the processor clock speed for added performance using a motherboard controller like AI Suite for Asus motherboards. Reduction of CPU core voltage will result in lower temperature but increased instability.
Try to select a pool that is nearby to reduce network latency. If the node appears slow, switch to another location. Please distribute the hashing power globally to different pools to avoid forking.
GPU Mining
This guide consolidates several other guides on how to use your GPU (the processor on your graphics card) to mine Dash using the X11 algorithm on Windows. Please note that the growing market for ASIC miners means that this if probably not going to be profitable! A lot of the software and binaries described here also have not been updated for several years, so this guide should be used for experimental purposes only.
This guide will cover the process of downloading and configuring the mining software, followed by some suggestions for optimizations. This technology can change rapidly, so we advise you to keep an eye out on mining sites such as these in order to keep up with the latest information and releases.
Mining software
As for CPU mining, a range of mining software is available for GPU mining. Most of it based on sgminer compiled with different optimizations specific to different hardware. A good approach is to identify your graphics hardware, then choose an appropriate build of sgminer. You can use GPU-Z to identify your GPU hardware:

GPU-Z showing details for AMD Radeon Turks and NVIDIA Quadro GK104 class GPUs
Next, download the mining software. Most of these are based on the original sgminer, but this is not suitable for the X11 algorithm, offers no compiled binaries and hasn’t been updated in years. We will describe using pre-compiled binary software maintained by newer developers only.
AMD
NVIDIA
- https://github.com/tpruvot/ccminer/releases (focus on core application)
- https://github.com/sp-hash/ccminer/releases (sp-mod, optimized CUDA kernels for Windows)
- https://github.com/KlausT/ccminer/releases (similar to SP version, more clean)
Download your chosen release and extract the zip file to a known location. The folder should look something like this:

Executable GPU miners for Dash
The sgminer file is the executable file, while the various files with .cl extensions define the various algorithms supported by sgminer. In this case, we are interested in the darkcoin.cl and darkcoin-mod.cl implementations of X11. Note that the name of the executable file may be different for miners with different optimizations, for example ccminer for NVIDIA cards.
Configuration
Begin by selecting a mining pool and generating a Dash address as described in the Mining Pools section above. Keep all your mining files in a single folder. In this example we will work from the Desktop. The node selected for this example is from the p2poolming.us list and is located in China:
http://118.184.180.43:7903/static/
Next, open Notepad and create the basic configuration. The general format is as follows:
{
"pools" : [
{
"url" : "stratum+tcp://pooladdress:7903",
"user" : "walletaddress",
"pass" : "x",
"algorithm":"darkcoin"
}
]
}
Where:
- pools = defines a list of pools (in this case, only one) towards which the hashing power is directed
- url = URL of your mining pool, including the protocol and port
- user = username, usually the Dash receiving address of your wallet or worker
- pass = password, can often be set to x
- algorithm = hashing algorithm to use, in this case darkcoin (for historic reasons) or darkcoin-mod
For the pool above, the configuration may be:

Configuration file for a Dash GPU miner
Click File, then Save As. Change Save as type to All Files, then type the file name as sgminer.conf and save it in the same folder as the unzipped sgminer files.
Testing
Double click your sgminer.exe and a Command Prompt window should appear immediately. If it disappears too quickly, check your configuration for missing commas, unclosed brackets or incorrect file name. The program will compile a special binary specific to your GPU and store it in the folder, then begin hashing.

Example of GPU mining using sgminer 5.6.1-nicehash-51 on Intel HD Graphics 4600
ASIC Mining
ASIC stands for Application-Specific Integrated Circuit and describes a type of processor that is designed for one purpose only. ASICs are a popular choice for mining cryptocurrency because they can offer a higher efficiency than CPU or GPU miners, resulting in higher profit.
Please note that the information on this page may become obsolete very quickly due to the rapidly changing market and difficulty of mining Dash. You are responsible for carrying out your own research and any listing on this page should not be considered an endorsement of any particular product. A good place to begin your research is the mining section of the Dash Forums.
The following X11 ASIC miners are available on the market today, click the product name to visit the manufacturer’s website:
| Name | Hash rate | Power | Weight | Dimensions (mm) | Price |
|---|---|---|---|---|---|
| Bitmain Antminer D5 | 119 GH/s ±5% | 1566 W | 7.5 kg | 486 x 265 x 388 | $1,180 |
| iBelink DM56G | 56 GH/s ±5% | 2100 W | 17 kg | 490 x 390 x 180 | $1,800 |
| Innosilicon A5 | 32 GH/s ±8% | 750 W | 3.1 kg | 400 x 135 x 158 | $990 |
| Spondoolies SPx36 | 540 GH/s ±10% | 4400 W | 19.5 kg | 640 X 525 X 185 | $10,850 |
The following ASIC miners are either no longer easily available or obsolete due to the increase in difficulty on the network.
| Name | Hash rate | Power | Weight | Dimensions (mm) |
|---|---|---|---|---|
| Baikal BK-X | 10 GH/s ±5% | 800 W | 3.8 kg | 312 x 125 x 130 |
| Baikal Mini | 150 MH/s ±10% | 40 W | .475 kg | 140 x 100 x 95 |
| Baikal Giant+ A2000 | 2000 MH/s ±10% | 430 W | 3 kg | 300 x 140 x 125 |
| Baikal Giant A900 | 900 MH/s ±5% | 217 W | 2.5 kg | 300 x 123 x 123 |
| Baikal Quad Cube | 1200 MH/s ±10% | 300 W | 3 kg | 135 x 135 x 425 |
| Bitmain Antminer D3 | 17 GH/s ±5% | 970 W | 6.5 kg | 320 x 130 x 190 |
| iBelink DM384M | 384 MH/s ±10% | 715 W | 21 kg | 490 x 350 x 180 |
| iBelink DM11G | 11 GH/s ±5% | 810 W | 22 kg | 490 x 350 x 180 |
| iBelink DM22G | 22 GH/s ±5% | 810 W | 19 kg | 490 x 350 x 180 |
| Pinidea DR-1 | 500 MH/s ±10% | 320 W | 4.5 kg | 290 x 130 x 150 |
| Pinidea DR-2 | 450 MH/s ±5% | 335 W | 4.5 kg | 200 x 165 x 135 |
| Pinidea DR-3 | 600 MH/s ±5% | 345 W | 4.5 kg | 200 x 165 x 135 |
| Pinidea DU-1 | 9 MH/s ±5% | 7 W | 50 x 50 x 30 | |
| Pinidea DRX-Kuznetsov | 900 MH/s ±5% | 650 W | 280 x 180 x 150 | |
| Pinidea DRX-Varyag | 1200 MH/s ±5% | 850 W | 280 x 180 x 150 |
Developers
Dash Core has published an extensive Developer Guide to help new developers get started with the Dash code base, and as a reference for experienced developers. This guide can be leveraged to quickly and efficiently integrate external applications with the Dash ecosystem. Anyone can contribute to the guide by submitting an issue or pull request on GitHub. The documentation is available at: https://dash-docs.github.io/en/
The Dash Core Team also maintains the Dash Roadmap, which sets out delivery milestones for future releases of Dash and includes specific technical details describing how the development team plans to realise each challenge. The Dash Roadmap is complemented by the Dash Improvement Proposals, which contain detailed technical explanations of proposed changes to the Dash protocol itself.
The remaining sections available below describe practical steps to carry out common development tasks in Dash.
Translating Dash
Translations of all Dash products are managed courtesy of Transifex, which offers its own detailed documentation of all functions and features. Within Transifex, Dash maintains an organization which contains multiple projects and one team of translators assigned to all of the projects. Each project is assigned with one or more target languages for translation by the project maintainer. When a translator joins the team, they are able to choose the languages they feel able to translate. They can then work on any projects specifying this language as a target language.
In general, languages with minimal regional variation are to be
translated into the common language (rather than regional) target.
Portuguese, for example, is simply translated into the pt target
language, rather than two separate target languages pt_BR and
pt_PT, for Portuguese as spoken in Brazil and Portugal,
respectively. As Dash grows, these languages may be separated out into
their regional variants by proofreaders, depending on demand. Exceptions
to this rule apply where the same spoken language is written
differently, such as zh_CN and zh_TW for Simplified Chinese and
Traditional Chinese.
Keeping translations consistent over time as multiple translators work on each target language is a very important part of delivering a quality user experience. For this reason, if you come across any Dash-specific terminology such as masternodes, you should use the Concordance search function to see how the term has been translated in the past. Transifex will also provide Suggestions and History if it recognizes a similar string in the database of past translations. Stay consistent with past language use, but also ensure your terminology is up to date with current use!


The following documentation describes the various projects and any special features specific to the programming language in which the product is written.
Dash Core
https://www.transifex.com/dash/dash/
This project contains a file named dash_en.ts, which is an export of
all translatable user-facing content in the Dash Core Wallet. Languages with 80% or more of the translations
complete will be integrated in the next release. Note that the software
will often replace placeholders in the text with actual numbers,
addresses or usernames. If you see a placeholder in the source text, it
must also appear in the target text. If it does not, your translation
cannot be used. The Copy source string button can help you copy
everything over, so all you need to do is replace the English words
surrounding the placeholders. You can change the order of the
placeholders as necessary, according to the grammar of your target
language.
- Placeholders
Source:
E&xitTarget:
&BeendenNote that the
&character is placeholder used to indicate a keyboard shortcut in a program menu, and must appear next to the appropriate character in your target language with no adjacent space. Placeholders such as%1or%swill be replaced by the software as it is running to indicate a name or number of something relating to the message. You must insert these placeholders in the grammatically appropriate position in your target text.- Punctuation
Source:
change from %1 (%2)Target:
Wechselgeld von %1 (%2)Note that any brackets
()and punctuation such as full stops.at the end of a sentence must also exist in the target text.
Dash Docs
https://www.transifex.com/dash/dash-docs
This project contains all content from the Dash Documentation hosted at
https://docs.dash.org (probably the site you are reading now). Each
.html page in the documentation appears as a file in the resources
section, named according to the navigation steps required to open the
page. The Dash Documentation is written in a documentation language
called reStructuredText
and built using the open-source Sphinx Documentation Generator. To simplify layout, most of the text has
no markup or code marks at all, but hyperlinks and certain formatting
must be reproduced in the target language as follows:
- Inline literals
Source: Type ``./dash-qt`` to run the file.
Target: Escriba ``./dash-qt`` para correr el archivo.
Note that two backticks
``before and after a word or phrase will cause that text to appear as aninline literal. This is commonly used to highlight code or commands to be typed by the user.- Bold and italic
Source:
To encrypt your wallet, click **Settings** > **Encrypt** wallet.Target:
Para encriptar su billetera, haga click en **Settings** > **Encrypt** billetera.A single
*before and after a word or phrase will render it in an italic font, while a double**will render it in bold.- Internal hyperlinks
Source:
See :ref:`here <sporks>` for a brief introduction to sporks.Target:
Ver :ref:`aquí <sporks>` para una breve introducción a sporksAn internal hyperlink consists of the phrase
:ref:, followed by a single backtick`, followed by some text which must be translated, followed by angle brackets with the link target< >, followed by another backtick`. Translate the text, but do not translate the text inside the angle brackets.- External hyperlinks
Source:
The `official Dash website <https://www.dash.org>`_ also provides a list of major exchanges offering Dash.Target:
El `sitio web oficial de Dash <https://www.dash.org>`_ también proporciona una lista de las principales Casas de cambio o Exchanges que ofrecen Dash.An external hyperlink consists of a single backtick
`, followed by some text which must be translated, followed by angle brackets with the link target< >, followed by another backtick and a single or double underscore:`_or`__. Translate the text, but do not translate the hyperlink (unless you want to link to a version of the page in the target language).
Dash Graphics
https://www.transifex.com/dash/dash-graphics
Dash visual products such as infographics, flyers and conference handouts are produced using Adobe InDesign, Adobe Illustrator or Microsoft Word and are available for use in the Marketing section of the Dash Documentation. It is important to view the finished English layout during translation in order to understand the context of the text you are translating. For example, many words should be translated differently depending if they are a heading, a sentence or an item in a diagram.
Because these proprietary file formats are not easily handled by Transifex, the language content is exported to a text or Microsoft Excel file and uploaded to Transifex for processing. If you translate Dash Graphics, please send an email to leon.white@dash.org or @strophy on Discord when you are finished to request layout in the visual design.
Dash iOS Wallet
https://www.transifex.com/dash/dash-ios-wallet
All language content from the Dash iOS Wallet are available for translation in this project. Please have a device running the iOS wallet available during translation to understand the context of the text you are translating. Note that any placeholders in the source text segment must also appear in the target language, similar to the instructions above for Dash Core Wallet.
Dash Android Wallet
https://www.transifex.com/dash/dash-wallet
All language content from the Dash Android Wallet are available for translation in this project. Please have a device running the Android wallet available during translation to understand the context of the text you are translating. Note that any placeholders in the source text segment must also appear in the target language, similar to the instructions above for Dash Core Wallet.
Dash Videos
https://www.transifex.com/dash/dash-videos
This section primarily contains language content from Amanda B. Johnson’s popular Dash School video series. Please translate with the videos open in YouTube to properly understand the context of the source text. Once your translation is complete, please send an email to leon.white@dash.org or @strophy on Discord to request inclusion of the subtitles on YouTube.
Dash Website
https://www.transifex.com/dash/dash-website
The Dash website at https://www.dash.org is available for translation in Transifex. Please have the website open while you translate to correctly understand the context of the source text. Once your translation is complete, please send an email to leon.white@dash.org or @strophy on Discord to request a build of your translation onto the website.
Compiling Dash Core
While Dash offers stable binary builds on the website and on GitHub, and development builds using Jenkins, many users will also be interested in building Dash binaries for themselves. This process has been greatly simplified with the release of Dash Core 0.13.0, and users who do not required deterministic builds can typically follow the generic build notes available on GitHub to compile or cross-compile Dash for any platform.
The instructions to build Dash Core 0.12.3 or older are available here on a previous version of this page.
Gitian
Gitian is the deterministic build process that is used to build the Dash Core executables. It provides a way to be reasonably sure that the executables are really built from the source on GitHub. It also makes sure that the same, tested dependencies are used and statically built into the executable. Multiple developers build the source code by following a specific descriptor (“recipe”), cryptographically sign the result, and upload the resulting signature. These results are compared and only if they match, the build is accepted and uploaded to dash.org.
Instructions on how to build Dash Core 0.13.0 will appear here once the Docker build system for Gitian is available. Instructions to create deterministic builds of Dash Core 0.12.3 or older are available here on a previous version of this page.
Testnet and devnets
With the release of Dash Core 12.3, Dash added support for a great new feature — named devnets. Devnets are developer networks that combine some aspects of testnet (the global and public testing network) and some aspects of regtest (the local-only regression testing mode that provides controlled block generation). Unlike testnet, multiple independent devnets can be created and coexist without interference. For practical documentation on how to use devnets, see the developer documentation or this blog post.
Testnet is a fully functioning Dash blockchain with the one key exception that because the Dash on the network can be created freely, it has no value. This currency, known as tDASH, can be requested from a faucet to help developers test new versions of Dash, as well as test network operations using identical versions of the software before they are carried out on the mainnet. There are a few other key differences:
- Testnet operates on port 19999 (instead of 9999)
- Testnet addresses start with “y” instead of “X”, ADDRESSVERSION is 140 (instead of 76)
- Testnet balances are denominated in tDASH (instead of DASH)
- Protocol message header bytes are 0xcee2caff (instead of 0xbf0c6bbd)
- Bootstrapping uses different DNS seeds: test.dnsseed.masternode.io, testnet-seed.darkcoin.qa, testnet-seed.dashpay.io
- Launching Dash Core in testnet mode shows an orange splash screen
To start Dash Core in testnet mode, find your dash.conf file and enter the following line:
testnet = 1
Tools and links
The links below were collected from various community sources and may not necessarily be online or functioning at any given time. Please join Dash Nation Discord or the Dash Forum if you have a question relating to a specific service.
- Test builds: https://jenkins.dash.org/blue/
- Bugtracker: https://github.com/dashpay/dash/issues/new
- Discussion and help: https://www.dash.org/forum/topic/testing.53/
- Masternode tools: https://test.dashninja.pl/masternodes.html
- Android wallet: https://www.dash.org/forum/threads/dash-wallet-for-android-v5-testnet.14775/
- Testnet for Bitcoin: https://en.bitcoin.it/wiki/Testnet
Faucets
- https://test.faucet.dash.org - by flare
- http://test.faucet.dashninja.pl - by elbereth
- http://t.f.masternode.io - by coingun
- http://test.faucet.masternode.io - by coingun
- http://faucet.test.dash.crowdnode.io - ndrezza
Explorers
- https://test.explorer.dash.org - by flare
- https://test.insight.dash.siampm.com - by thelazier
- https://test.explorer.dashninja.pl - by elbereth
- http://test.insight.masternode.io:3001 - by coingun
- http://insight.test.dash.crowdnode.io
- https://testnet-insight.dashevo.org/insight
Pools
- https://test.pool.dash.org [stratum+tcp://test.stratum.dash.org] - by flare
- http://test.p2pool.dash.siampm.com [stratum+tcp://test.p2pool.dash.siampm.com:17903] by thelazier
- http://p2pool.dashninja.pl:17903/static - by elbereth
- http://test.p2pool.masternode.io:18998/static - by coingun
Masternodes
Installing a masternode under testnet generally follows the same steps as the mainnet masternode installation guide, but with a few key differences:
- You will probably be running a development version of Dash instead of the stable release. See here for a list of builds, then choose the latest successful build and click Artifacts to view a list of binaries.
- When opening the firewall, port 19999 must be opened instead of (or in
addition to) 9999. Use this command:
ufw allow 19999/tcp - Your desktop wallet must be running in testnet mode. Add the following
line to dash.conf:
testnet = 1 - When sending the collateral, you can get the 1000 tDASH for free from a faucet (see above)
- You cannot use dashman to install development versions of Dash. See the link to downloadable builds above.
- Your masternode configuration file must also specify testnet mode. Add
the following line when setting up dash.conf on the masternode:
testnet = 1 - As for mainnet masternodes, the RPC username and password must contain alphanumeric characters only
- When cloning sentinel, you may need to clone the development branch
using the
-boption, for example:git clone -b core-v0.12.2.x https://github.com/dashpay/sentinel.git - Once sentinel is installed, modify
~/.dashcore/sentinel/sentinel.conf, comment the mainnet line and uncomment:network=testnet - The wallet holding the masternode collateral will expect to find the
masternode.conffile in~/.dashcore/testnet3/masternode.confinstead of~/.dashcore/masternode.conf.
Testnet 12.3
In June 2018, the Dash team announced the start of testing of the upcoming Dash 12.3 release. Extensive internal testing has already been done on the 12.2 code, but there are numerous bugs that can only be revealed with actual use by real people. The Dash team invites anybody who is interested to download the software and become active on testnet. This release includes:
- Named Devnets, to help developers quickly create multiple independent devnets
- New format of network message signatures
- Governance system improvements
- PrivateSend improvements
- Additional indexes cover P2PK now
- Support for pruned nodes in Lite Mode
- New Masternode Information Dialog
Discussion:
- https://www.dash.org/forum/threads/v12-3-testing.38475
- Testnet tools: https://docs.dash.org/en/latest/developers/testnet.html
- Issue tracking: https://github.com/dashpay/dash/issues/new
Latest test binaries:
Testnet 12.2
In October 2017, the Dash team announced the launch of a testnet for public testing of the upcoming 12.2 release of the Dash software. Extensive internal testing has already been done on the 12.2 code, but there are numerous bugs that can only be revealed with actual use by real people. The Dash team invites anybody who is interested to download the software and become active on testnet. This release includes:
- DIP0001 implementation https://github.com/dashpay/dips/blob/master/dip-0001.md
- 10x transaction fee reduction (including InstantSend fee)
- InstantSend vulnerability fix
- Lots of other bug fixes and performance improvements
- Experimental BIP39/BIP44 complaint HD wallet (disabled by default, should be fully functional but there is no GUI yet)
Discussion:
- Testnet 12.2 discussion: https://www.dash.org/forum/threads/v12-2-testing.17412/
- Testnet tools: https://www.dash.org/forum/threads/testnet-tools-resources.1768/
- Issue tracking: https://github.com/dashpay/dash/issues/new
Latest successfully built develop branch binaries:
Insight API Installation
The open-source Dash Insight REST API provides you with a convenient, powerful and simple way to read data from the Dash network and build your own services with it. Simple HTTP endpoints exist for all common operations on the Dash blockchain familiar from the Bitcore Insight API, as well as Dash-specific features such as InstantSend transactions, budget proposals, sporks and the masternode list. This documentation describes how to set up the Dash Insight API server and (optionally) the Dash Insight UI block explorer.
A standard installation of Ubuntu Linux 18.04 LTS will be used as an environment for the server. We assume you are running as a user with sudo permissions. First update all packages and install some tools and dependencies:
sudo apt update
sudo apt upgrade
sudo apt install npm build-essential libzmq3-dev
Download and extract the latest version of Dash Core:
cd ~
wget https://github.com/dashpay/dash/releases/download/v0.12.3.3/dashcore-0.12.3.3-x86_64-linux-gnu.tar.gz
tar -xvzf dashcore-0.12.3.3-x86_64-linux-gnu.tar.gz
rm dashcore-0.12.3.3-x86_64-linux-gnu.tar.gz
Install Dashcore Node and create your configuration:
sudo npm install -g @dashevo/dashcore-node
dashcore-node create mynode
Install the Insight API service and (optionally) Insight UI:
cd mynode
dashcore-node install @dashevo/insight-api
dashcore-node install @dashevo/insight-ui
Change paths in the configuration file as follows:
nano dashcore-node.json
- Change the value of
datadirto../.dashcore - Change the value of
execto../dashcore-0.12.3/bin/dashd
Run it:
dashcore-node start
Your Insight API node will start up and begin to sync. Progress will be displayed on stdout. Once sync is complete, the API endpoints listed in the documentation will be available at:
https://<ip-address>:3001/insight-api/<endpoint>/
The Insight UI block explorer will be available at:
http://<ip-address:3001/insight/
Sporks
A multi-phased fork, colloquially known as a “spork”, is a mechanism unique to Dash used to safely deploy new features to the network through network-level variables to avoid the risk of unintended network forking during upgrades. It can also be used to disable certain features if a security vulnerability is discovered - see here for a brief introduction to sporks. This documentation describes the meaning of each spork currently existing on the network, and how to check their respective statuses.
Spork functions
Sporks are set using integer values. Many sporks may be set to a particular epoch datetime (number of seconds that have elapsed since January 1, 1970) to specify the time at which they will active. Enabled sporks are set to 0 (seconds until activation). This function is often used to set a spork enable date so far in the future that it is effectively disabled until changed. The following sporks currently exist on the network and serve functions as described below:
- SPORK_2_INSTANTSEND_ENABLED
- Governs the ability of Dash clients to use InstandSend functionality.
- SPORK_3_INSTANTSEND_BLOCK_FILTERING
- If enabled, masternodes will reject blocks containing transactions in conflict with locked but unconfirmed InstandSend transactions.
- SPORK_5_INSTANTSEND_MAX_VALUE
- Enforces the maximum value in Dash that can be included in an InstantSend transaction.
- SPORK_6_NEW_SIGS
- Enables a new signature format for Dash-specific network messages introduced in Dash 12.3. For more information, see here and here.
- SPORK_8_MASTERNODE_PAYMENT_ENFORCEMENT
- If enabled, miners must pay 50% of the block reward to a masternode currently pending selection or the block will be considered invalid.
- SPORK_9_SUPERBLOCKS_ENABLED
- If enabled, superblocks are verified and issued to pay proposal winners.
- SPORK_10_MASTERNODE_PAY_UPDATED_NODES
- Controls whether masternodes running an older protocol version are considered eligible for payment. This can be used as an incentive to encourage masternodes to update.
- SPORK_12_RECONSIDER_BLOCKS
- Forces reindex of a specified number of blocks to recover from unintentional network forks.
- SPORK_13_OLD_SUPERBLOCK_FLAG
- Deprecated. No network function since block 614820.
- SPORK_14_REQUIRE_SENTINEL_FLAG
- Toggles whether masternodes with status are eligible for payment if status is WATCHDOG_EXPIRED, i.e. Sentinel is not running properly.
- SPORK_15_DETERMINISTIC_MNS_ENABLED
- Controls whether deterministic masternodes are required. When activated, the legacy masternode list logic will no longer run and non-updated masternodes will not be eligible for payment.
- SPORK_16_INSTANTSEND_AUTOLOCKS
- Enables automatic transaction locking for transactions with less than a specified number of inputs, and removes the legacy InstantSend fee. Allows any node to request the transaction lock, not just the sending node.
- SPORK_17_QUORUM_DKG_ENABLED
- Enables the DKG process to create LLMQ quorums. At the moment, this only activates a dummy DKG on testnet, which will later be replaced by the real DKG for mainnet and testnet. When enabled, simple PoSe scoring and banning is also active.
Viewing spork status
The spork show and spork active commands issued in the debug
window (or from dash-cli on a masternode) allow you to interact with
sporks. You can open the debug window by selecting Tools > Debug
console.

spork show and spork active output in the Dash Core debug console
Version History
Full release notes and the version history of Dash are available here:
Marketing
This page includes downloads of various templates and designs intended for use as office stationary and presentations. For a visual overview of existing web and sticker designs, please see the following links.
Dash uses the following color scheme to promote a consistent visual identity.
| Color | RGB | CMYK | Hex | Pantone |
|---|---|---|---|---|
| Dash Blue | 0,141,228 | 76,38,0,0 | #008de4 | 2925c |
| Deep Blue | 1,32,96 | 100,94,31,29 | #012060 | 534c |
| Midnight Blue | 11,15,59 | 100,96,41,53 | #0b0f3b | 5255c |
| White | 255,255,255 | 0,0,0,0 | #ffffff | - |
| Grey | 120,120,120 | 54,46,45,11 | #787878 | Cool Gray 9 C |
| Black | 17,25,33 | 82,71,59,75 | #111921 | Black 6 C |
Design Materials
Brochures
An attractive brochure about Dash, designed for handing out at conferences and events. Prepared by community member Essra in 2018 following proposal sponsorship for the German Dash Embassy D-A-CH.
This design can be translated into your language at Transifex here. For more information on translating Dash products on Transifex, see here. Please contact leon.white@dash.org once translation is complete to request layout of the completed translation.
| Language | Download |
|---|---|
| English | |
| French | |
| German | |
| Spanish | |
| Thai |
Flyers
An attractive flyer about Dash, designed to be folded in half and placed on flat surfaces at conferences and events. Prepared by community member Essra in 2018 following proposal sponsorship for the German Dash Embassy D-A-CH.
This design can be translated into your language at Transifex here. For more information on translating Dash products on Transifex, see here. Please contact leon.white@dash.org once translation is complete to request layout of the completed translation.
| Language | Download |
|---|---|
| English | |
| Arabic | |
| Chinese (Traditional) | |
| Dutch | |
| French | |
| German | |
| Spanish | |
| Thai | |
| Turkish |
Handouts
This handout is ideal for dual-sided printing as a handout for conferences. The current version is v3.1; previous versions are available below.
This design can be translated into your language at Transifex here. For more information on translating Dash products on Transifex, see here. Please contact leon.white@dash.org once translation is complete to request layout of the completed translation.
| Language | Download |
|---|---|
| English | PDF DOCX |
| Arabic | PDF DOCX |
| Czech | PDF DOCX |
| Dutch | PDF DOCX |
| German | PDF DOCX |
| Russian | PDF DOCX |
| Slovak | PDF DOCX |
| Thai | PDF DOCX |
| Vietnamese | PDF DOCX |
Previous versions (English only):
| Version | Download |
|---|---|
| 2.0 | PDF DOCX |
| 1.0 | PDF DOCX |
Infographics
The Dash Difference
This engaging infographic details the improvements the Dash network has delivered by building on the Bitcoin code base. Based on an original design by community member J. Arroyo.
This design can be translated into your language at Transifex here. For more information on translating Dash products on Transifex, see here. Please contact leon.white@dash.org once translation is complete to request layout of the completed translation.
| Language | Download |
|---|---|
| English | PDF PNG |
| Arabic | PDF PNG |
| Bulgarian | PDF PNG |
| Chinese (Simplified) | PDF PNG |
| Chinese (Traditional) | PDF PNG |
| Czech | PDF PNG |
| French | PDF PNG |
| German | PDF PNG |
| Greek | PDF PNG |
| Italian | PDF PNG |
| Polish | PDF PNG |
| Russian | PDF PNG |
| Slovak | PDF PNG |
| Spanish | PDF PNG |
| Vietnamese | PDF PNG |
Ten Misconceptions About Dash
This infographic refutes many common yet uninformed arguments made against Dash. Based on an original design by community member DashDude.
This design can be translated into your language at Transifex here. For more information on translating Dash products on Transifex, see here. Please contact leon.white@dash.org once translation is complete to request layout of the completed translation.
| Language | Download |
|---|---|
| English | PDF PNG |
| Arabic | PDF PNG |
| Bulgarian | PDF PNG |
| Chinese (Traditional) | PDF PNG |
| Czech | PDF PNG |
| French | PDF PNG |
| German | PDF PNG |
| Greek | PDF PNG |
| Polish | PDF PNG |
| Russian | PDF PNG |
| Slovak | PDF PNG |
| Spanish | PDF PNG |
| Thai | PDF PNG |
| Vietnamese | PDF PNG |
Presentations
Dash Meetup

An attractive presentation about Dash, designed to guide the audience through the basics of cryptocurrency and advantages of Dash. Prepared by community member Essra in 2018 following proposal sponsorship for the German Dash Embassy D-A-CH.
| Language | Download |
|---|---|
| English | PPTX PDF |
| German | PPTX PDF |
Simple presentation

A simple presentation about Dash, available in 5 languages, 3 aspect ratios and 2 formats. Simply click the links to download. Note that the Noto Sans UI font must be installed if using the PowerPoint files.
| Language | Format | Download |
|---|---|---|
| English | 16:9 4:3 A4 | |
| PPTX | 16:9 4:3 A4 | |
| Chinese (Simplified) | 16:9 4:3 A4 | |
| PPTX | 16:9 4:3 A4 | |
| Portuguese | 16:9 4:3 A4 | |
| PPTX | 16:9 4:3 A4 | |
| Russian | 16:9 4:3 A4 | |
| PPTX | 16:9 4:3 A4 | |
| Spanish | 16:9 4:3 A4 | |
| PPTX | 16:9 4:3 A4 |
Business Templates
Document templates
Official Dash document templates.
| Name | Download |
|---|---|
| Word document with cover page and paragraph styles | DOCX |
| Word template with blue watermark | DOTX |
| Word template with grey watermark | DOTX |
Presentation templates
Official Dash presentation templates. We strongly recommend using predefined presentation slide layouts (check here for instructions).
| Name | Download |
|---|---|
| PowerPoint template with simple blue and white slides | POTX |
| PowerPoint template with sample layouts, styles and shapes | POTX |
| Presentation icons | PPTX |
Cards
High resolution cards for printing. Great for use as the back of business cards, or to hand out to explain and promote Dash.
| Name | Download version |
|---|---|
| Handout Card | English |
| Arabic | |
| Chinese (Simplified) | |
| Czech | |
| French | |
| Polish | |
| Portuguese | |
| Russian | |
| Spanish |
Legal
How the Law Applies to Dash
The purpose of the Dash DAO is to promote, protect and standardize Dash. In the course of our mission, we have received inquiries into how some aspects of Dash are treated under United States law. The purpose of this document is to address the most common of these inquiries and explain how we believe the laws apply to Dash. This is not meant as a legal opinion, and you should consult your own attorneys before relying upon it. However, it is meant to state our position on the law, and how the law should be properly interpreted.
One of the most common questions we receive is How are masternode operators treated under the US tax laws?
Tax Treatment
Block rewards
As many already know, block rewards are paid to masternode operators in exchange for validating transactions on the Dash network. The IRS has stated unequivocally that “when a taxpayer successfully ‘mines’ virtual currency, the fair market value of the virtual currency as of the date of receipt is includible in gross income.” To be sure, masternodes do not “mine”, but the IRS considers using computer resources to validate Bitcoin transactions and maintain the public Bitcoin transaction ledger to constitute “mining”. By analogy, a masternode operator should also treat as regular income the fair market value of the block reward.
Dash Collateral
A Dash user may demonstrate to the network his or her control over 1,000 DASH in order to run a masternode. These tokens never leave the user’s control. If at any point during the user’s tenure as a masternode operator, the user disposes of any or all of the 1,000 DASH, the network automatically strips the user of his or her status as a masternode. Under the US Internal Revenue Code, gain or loss is realized only on the “sale or exchange” of property. The term “sale” generally means the transfer of all right, title, and interest in the property transferred. A number of factors typically are considered to determine whether a sale has occurred, the most important being whether the benefits and burdens of ownership of the transferred property have passed from the transferor to the transferee. In Dash, the masternode operator retains control of the 1,000 DASH and simply demonstrates that control to the network. Therefore, the holding of the 1,000 DASH for purposes of qualifying as a masternode operator should not cause a taxable event to occur because the user has not transferred any of the benefits and burdens of ownership.
Capital Gains
Assuming that the 1,000 DASH are sold, whether that Dash is a “capital asset” will determine the tax treatment of the sale. Stocks, bonds and other investment property for example, are generally treated as capital assets. Inventory, depreciable property, and stock in trade, though, are not. Assuming the masternode operator held the 1,000 DASH either for investment purposes or for purposes of qualifying as a masternode operator, the IRS would likely treat gain or loss on the sale of those Dash tokens as capital in nature. Therefore, Dash held for a long enough period of time could be subject to the lower “long term capital gains” tax rate.
Legal Liability
As with cash or any other currency system, users may use Dash in connection with illegal activity. A common question we receive is whether masternode operators can also be liable for criminal activity, simply by relaying transactions related to that activity. The fundamental legal requirement of mens rea makes criminal liability unlikely for masternode operators.
Primary Liability
Almost all crimes require that a defendant have a defined mens rea at the time of an offense. Mens rea is a mental state like purposefulness, knowledge, recklessness or negligence. For example, to act with “purpose” is commonly understood as desiring as your “conscious object” the result of a crime. “Knowledge” is a less culpable mindset than “purpose” – acting with “knowledge” requires general awareness that your actions will bring about a particular crime. “Recklessness” requires disregard of a substantial risk. Finally, a person acts “negligently” if they should have been aware of a substantial and unjustifiable risk of a particular consequence of their actions, but were not.
Most masternodes have no awareness, while relaying Dash transactions, of the identity of the users involved, the ultimate destination of users’ funds, or any other circumstances of Dash transactions. As such, it would be difficult for a prosecutor to demonstrate that a masternode operator who facilitated an illegal transaction merely by relaying the transaction would have a culpable mens rea.
Secondary Liability
Even if someone is not the principal actor in the commission of a crime, that person can be secondarily liable for their involvement in it. As such, we are sometimes asked whether masternode operators, by their involvement in relaying Dash transactions, could be “aiding and abetting” or “conspiring” to commit a crime that might involve Dash. Generally speaking, aiding and abetting requires that the defendant (i) seek by his action to make the crime succeed and (ii) act with the same mens rea as required for the principal offense.
No matter the requisite mens rea of a particular principal offense committed by a Dash user, it is unlikely that a mere masternode operator, without more, could be found to have “aided and abetted.” To be sure, the masternodes do provide assistance in the principal offense – in that masternode action is required to process all Dash transactions. However, the masternodes would not have the requisite mens rea to satisfy the requirements of aiding and abetting liability. Masternode operators have no readily available information about the purpose or consequences of users’ Dash transactions, or even the originating identity of the sender of funds. As such, so long as a sufficient diversity of non-criminal transactions occur on the Dash network, they would not harbor even the least culpable mens rea (i.e. negligence) with respect to a user relaying or receiving Dash in furtherance of a particular crime.
“Conspiracy” liability is even less likely. Conspiracy generally requires i) an agreement to commit a crime, ii) knowledge of the unlawful purpose of the agreement, iii) intent to further the unlawful purpose, and iv) an act in furtherance of the conspiracy. None of these requirements are met by mere masternode operators.
Exchange Liability
Exchanges have asked whether they can be held liable for criminal activity connected with Dash PrivateSend transactions.
The Bank Secrecy Act (BSA) is the law that primarily governs exchanges in the United States. The BSA does not contain any prohibition on supporting Dash transactions. Indeed, the BSA take a flexible, risk- based approach to regulation and contemplate that financial institutions will enter into lines of business with new risks. This risk-based approach requires, at the outset, an independent risk assessment. By and large, the risks faced by exchanges who begin to support Dash will be similar to the risks associated with other virtual currencies. One significant difference concerns PrivateSend transactions, and we focus on this difference below:
- PrivateSend transactions obfuscate the source and destination addresses of funds, thus blockchain forensic techniques like clustering analysis may be less effective. To the extent that exchanges rely on such blockchain forensics tools for their information collection, reporting and reporting obligations under the BSA, they should consider alternative means.
- PrivateSend transactions are used for legitimate purposes and are often required to achieve personal or commercial privacy for sensitive transactions. The use of PrivateSend transactions is not inherently suspicious. Combination with other factors, including those identified in the exchange’s own risk assessment, may raise PrivateSend transactions to the level of suspicious activity.
- Exchanges should consider revising their risk assessments and AML policies to account for the unique characteristics of Dash. For example, including blockchain addresses in Suspicious Activity Reports (SARs) will be less descriptive and effective for investigations based on such addresses. Exchanges might consider adding additional context and explanation in SARs.
- When conducting Enhanced Due Diligence on customers and transactions, exchanges should account for the presence of PrivateSend transactions and update their AML policies accordingly. For example, identifying counterparties to a PrivateSend transaction may be more difficult than identifying counterparties to transactions in other virtual currencies when relying on blockchain forensics.
ATM & Fiat Compliance
Introduction
An aspect that required legal research is what are the compliance requirements to facilitate Dash-fiat exchange. This can be in the form of running ATM kiosks or using other mechanisms to personally offer Dash to fiat exchange services.
For this purpose we hired Cogent Law, who have a lot of experience working in compliance for digital money services. They have put together a compliance program that will be shared with anyone launching a Dash service if they require it. This includes:
- A finCEN BSA compliant written Principal MSB/KYC AML Program designed to prevent the Principal MSB from being used to facilitate money laundering and the financing of terrorist activities
- A comprehensive risk based assessment by a third party compliance consultant expert
Our lawyer for this project is Adella Toulon-Foerster who has extensive experience in this field including:
- Banking Secrecy Act (BSA), Anti-Money Laundering (AML), and Know Your Customer (KYC) regulations
- FinCEN requirements and guidance
- Written and on-going AML compliance programs
- State-by-state money transmitter laws and licensure requirements
We now have full documentation of the program from Cogent Law, the package includes:
- BSA AML Compliance training
- KYC CDD Policy
- AML Program
- Risk Assessment
- Surveillance and Monitoring Policy
- Different Reports to file in different situations
The documents have a format as if they were created for the fictional company “Initech” and then the interested Dash entrepreneur would have to replace it with their real corporation. We believe that some counsel would still be advisable for an investor launching a service but this will help provide a solid understanding of the requirements and get them 80% of the way. This should also be highly educational and help the Dash investor be more at ease as it enlightens a typically obscure topic for most crypto enthusiasts.
This program is directed at Dash investors that are interested in running a compliant service in regulated markets. If some users prefer to run services without a compliance program or don’t need one, we completely respect that too.
Dash ATM Compliance Program
- Please first read the Quick Guide To Operating a Virtual Currency Kiosk. This guide will guide you through the initial steps of registering as an MSB. It is crucial you start here.
- Listen to the Audio Guides on BSA AML and read the BSA AML Training Manual
- Get familiar with the documentation you will need by looking at the following templates
- Get familiar with some of the reports you may need to file as part of operations. In the Quick Guide in Step 1, we go through registration on the E - BSA filing system. This step also provides example CTR (Currency Transaction Report) and SAR (Suspicious Activity Report) report samples. Dash operators should be familiar with these as they may need to file them as part of operations. Sample reports:
- If you would now like to move forward with your project, we recommend getting in contact with Cogent Law, our recommended legal counsel. Preferential rates are available for Dash users. Please email: atoulon@cogentlaw.co
Social media