APIJSON Documentation
About APIJSON
APIJSON is a JSON based internet communication protocol exclusively for API design and an ORM library based on this protocal. APIJSON can largely simplifies the process of API development. It helps developers to build an automatic API with functions like CRUD, data search.
By saving communication time between front-end and back-end developers and hours of API development work, it largely reduces costs of API development.
APIJSON is recommanded to small to medium web applications that have decoupled front and back ends, such as startup company projects or company internal use projects.
APIJSON has been honored by Gitee as the Most Valuable Project in 2019.


Features
For API developers:
APIJSON largely reduces API developers’ workload by reducing most API protocals design work and documentation work.
APIJSON supports automatic permission verification, version management and SQL injection prevention. The API has no version, so developers no longer need to worry about the update of API protocals or the derivative documentation update.
With these features, it saves communication time between front-end and back-end developers about the API design.
For users:
You can get many resources and different forms of data by making just a single request While typical REST APIs require loading from multiple URLs. Being convenient and flexible, it saves sending multiple requests with multiple API endpoints.
It provides CRUD(read and write), Fuzzy Search, Remote Method Invocation (RMI), etc. Other features include saving duplicate data, checking request history, etc.
Examples
APIJSON is organized by json objects not endpoints. The client can access full capabilities of the data from a single endpoint. To send a request, the basic structure is :
baseURL / Methods(GET,GETS,POST,etc.) / JSONObject query
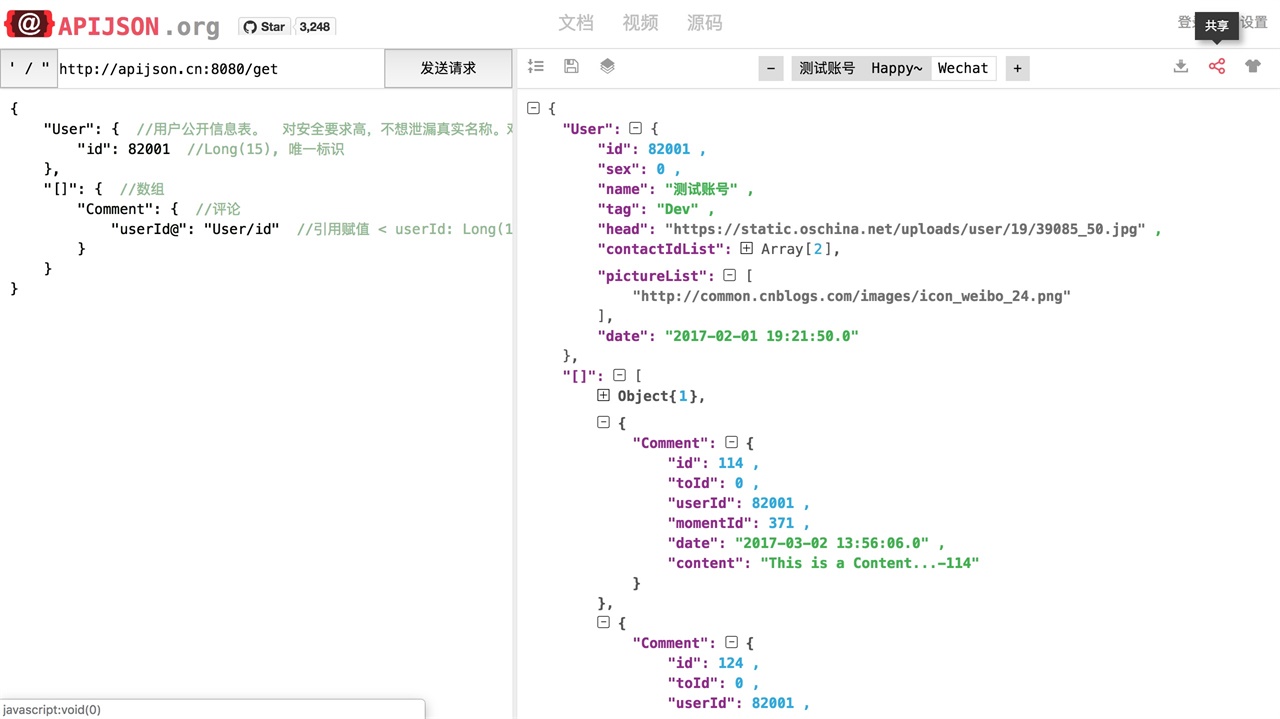
The following example shows how to query a user’s information.
Get a user:
Request
{
"User":{
}
}
Response
{
"User":{
"id":38710,
"sex":0,
"name":"TommyLemon",
"certified":true,
"tag":"Android&Java",
"phone":13000038710,
"head":"http://static.oschina.net/uploads/user/1218/2437072_100.jpg?t=1461076033000",
"date":1485948110000,
"pictureList":[
"http://static.oschina.net/uploads/user/1218/2437072_100.jpg?t=1461076033000",
"http://common.cnblogs.com/images/icon_weibo_24.png"
]
},
"code":200,
"msg":"success"
}
The following example shows the query of getting three users’ id and name.
Get an array of users
Request
{
"[]":{
"count":3,
"User":{
"@column":"id,name"
}
}
}
Response
{
"[]":[
{
"User":{
"id":38710,
"name":"TommyLemon"
}
},
{
"User":{
"id":70793,
"name":"Strong"
}
},
{
"User":{
"id":82001,
"name":"Android"
}
}
],
"code":200,
"msg":"success"
}

Server-side Deployment
This chapter shows how to make installation with Eclipse for JavaEE or IntelllJ IDEA Ultimate. For both, first download the project, unzip it and save it in a directory. you can also clone the project from github:
git clone https://github.com/TommyLemon/APIJSON.git
1. Installing with Eclipse
Prerequisites
Java Development Kit(JDK): version 1.8 or above.
MAVEN: version 3.0 or above
Mysql / Oracle
Eclipse Java EE IDE for Web Developers with version: Mars.1 Release (4.5.1)
Opening the project with Eclipse
Open Eclipse, then select File > Import > Maven > Existing Maven Projects > Next > Browse > Select the path of the project > APIJSON-Java-Server > APIJSONBoot > check pom.xml…apijson-demo > Finish
Preparing the library used in demo
In the menu at the right, click libs, then right click apijson-orm.jar, click add as library. Apply the same to the rest of .jar files in libs folder.
Add your own database
If you want to add your own database, open src-main-java-apijson-demo-server-model-DemoSQLConfig.java. In line 40-61, change return values of getDBUri, getDBAccount, getDBPassword, getSchema to your own database.

This is the file that you need to make changes.
@Override
public String getDBUri() {
//TODO: Change the return value to your own
return DATABASE_POSTGRESQL.equalsIgnoreCase(getDatabase()) ? "jdbc:postgresql://localhost:5432/postgres" : "jdbc:mysql://192.168.71.146:3306/";
}
@Override
public String getDBAccount() {
//TODO: Change the return value to your own
return DATABASE_POSTGRESQL.equalsIgnoreCase(getDatabase()) ? "postgres" : "root";
}
@Override
public String getDBPassword() {
//TODO: Change the return value to your own
return DATABASE_POSTGRESQL.equalsIgnoreCase(getDatabase()) ? null : "root";
}
@Override
public String getSchema() {
String s = super.getSchema();
return StringUtil.isEmpty(s, true) ? "thea" : s; //TODO: Change the return value to your own. For here,change "thea" to "your database's name"
}
Running the application
In Eclipse, in the menu on the top, click Run > Run As > Java Application >choose APIJSONApplication > OK

Then copy and paste link http://localhost:8080/get/{} to your browser to see if it returns the succesful message.
2. Importing database
This project needs MySQL Server and MySQLWorkbench. Please make sure that both of them are installed.
My configuration:
Windows 7 + MySQL Community Server 5.7.16 + MySQLWorkbench 6.3.7
OSX EI Capitan + MySQL Community Server 5.7.16 + MySQLWorkbench 6.3.8
Systems and softwares are all 64 bit.
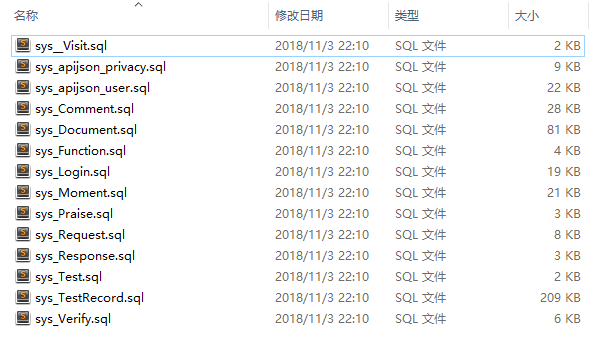
Select MySQLWorkbench > Enter a connection > Click Server menu > Data Import > Select the path of your .sql file > Start Import > Refresh SCHEMAS. Now you should see tables are added successfully.
You can also import demo sql tables in MySQL folder to test the app.
3. Installing with IntellIJ IDEA Ultimate
Opening the project
Open > Select the path of the project/APIJSON-Java-Server/APIJSONBoot > OK
Preparing the library used in demo
In libs, right-click apijson-orm.jar > Add as Library > OK. Apply this to all .jar files in libs.
Running the application
In the menu on the top: Run > Run > Edit Configurations > + > Application > Configuration
In Main class, choose APIJSON Application.
In Use classpath of module , choose apijson-demo.
Click Run in the bottom.
Note: After running, you should see test logs and finally, it would show ‘APIJSON已启动’ (APIJSON has launched). If it shows error message‘The address is already in use’, that means port 8080 has been used. You need to change the port. See how to change ports for a Spring Boot Application
Then copy and paste link http://localhost:8080/get/{} to your browser.
If it’s successful it returns with:
{
"code": 200,
"msg": "success"
}
Client-side Deployment
1. For Android app
Make sure you have either ADT Bundle or Android Studio installed.
My configuration:
Windows 7 + JDK 1.7.0_71 + Android Studio 2.2
OSX EI Capitan + JDK 1.8.0_91 + Android Studio 3.0
All the systems and software are 64 bit.
1.Importing
Select Open an existing Android Studio project > Select the path of APIJSON-Master/APIJSON-Android/APIJSONApp(or APIJSONTest) > OK
2.Running
Run > Run app
3.Testing
In the browser, send a request to the server to see if it responses.
If the default url is not available, change it to an available one, such as the IPV4 address which is running APIJSON project back side. Then click the request button again.
2.For iOS app
Open xCode, then APIJSON-Master/APIJSON-iOS/APIJSON-Swift > Open
In xCode, Product > Run
API design style guide
This chapter introduces methods in APIJSON. These methods are:
It provides a general way to retrieve resources. |
|
It provides a general way to count resources satisfying specifics in the request body. |
|
It requests for highly secured and confidential data like bank accounts, birth dates. |
|
It’s used for getting counts of highly secured resources(eg. bank accounts). |
|
It creates new resources under the specified parent resource(TableName). |
|
This method asks the server to update/edit an existing resource. |
|
This method deletes the specified resource. |
Request method tells the server what kind of action the client wants the server to take. The method are also commonly referred to as the request “verb”. This chapter will show you how these methods are included in url to send requests.
In the following explanations, the base_URL means the root URL. Everything that follows it is known as a URL path. All URL paths are relative to the base URL.
1. APIJSON Methods
GET :
A general way to retrieve resources.
base_url/get/
Request
{ "TableName"{ // conditions } } // eg. Request a post with id = 235 in table "Post": { "Post"{ "id": 235 } }
Response
{ "TableName":{ ... }, "code":200, "msg":”success” } // eg. The returned response: { "Moment":{ "id":235, "userId":38710, "content":"..." }, "code":200, "msg":"success" }
HEAD :
A general way to count resources satisfying specifics in the request body.
base_url/head/
Request
{
"TableName":{
// conditions
}
}
// eg. Get the number of posts posted by the user whose id = 38710:
{
"Post":{
"userId":38710
}
}
Response
{
"TableName":{
"code":200,
"msg":"success",
"count":...
},
"code":200,
"msg":"success"
}
// eg.
{
"Post":{"code":200, "msg":"success", "count":10},
"code":200,
"msg":"success"
}
GETS :
Request for highly secured and confidential data like bank accounts, birth dates.
base_url/gets/
Request
// You need to nest a key-value pair “tag”: tag // at the top level of the request json object. The tag is usually the related table's name. //Except that, the structure is the same as **GET**.
Response
// Same as **GET**
HEADS :
It’s used for getting counts of highly secured resources(eg. bank accounts).
base_url/heads/
Request
// You need to nest a key-value pair
“tag”: tag
// at the top level of the request json object.
//Except that, the structure is the same as **HEAD**.
Response
// Same as **HEAD**.
POST :
The POST method creates new resources under the specified parent resource(TableName).
base_url/post/
Request
{
"TableName":{…
},
"tag":tag
}
// Note the id in the object "TableName":{...} has been generated automatically when table is built and can’t be set by the user here.
// eg. A user with id = 38710 posts a new post:
{
"Post":{
"userId":38710,
"content":"APIJSON lets interfaces and documents go hell!"
},
"tag":"Moment"
}
Response
{
"Moment":{
"code":200,
"msg":"success",
"id":...
},
"code":200,
"msg":"success"
}
// If the request is successful, it should return following object.
{
TableName:{
"code":200,
"msg":"success",
"id":38710
},
"code":200,
"msg":"success"
}
PUT :
The PUT method asks the server to update/edit an existing resource. The part that will be modified is included in the request body.
base_url/put/
Request
{
"TableName":{
"id":id,
…
},
"tag":tag
}
// You need to either specify the id in the TableName object like the example above or add a id{} object in the request body.
// The following example makes request to update the content made by id = 235:
{
"Post":{
"id":235,
"content":"APIJSON lets interfaces and documents go hell !"
},
"tag":"Post"
}
Response
\\ Same as **POST**.
DELETE :
The DELETE method deletes the specified resource.
base_url/delete/
Request
{
TableName:{
"id":id
},
"tag":tag
}
// You need to either specify the id in the TableName object like the example above or add a id{} object in the request body.
// The following example send a request to delete comments made by id = 100,110,120
{
"Comment":{
"id{}":[100,110,120]
},
"tag":"Comment[]"
}
Response
{
"TableName":{
"code":200,
"msg":"success",
"id[]":[...]
"count":3
},
"code":200,
"msg":"success"
}
// The response to the request in the example above
{
"Comment":{
"code":200,
"msg":"success",
"id[]":[100,110,120],
"count":3
},
"code":200,
"msg":"success"
}
Note:
TableName means the name of the table that a user interacts with. It’s a string with the first letter capitalized. It can be any combination of letters, numbers and underscores. As a key, its value is a jsonObject which may include columns’ names in the table.
“tag”:tagneeds to be included when the request method is neither GET nor HEAD. The value tag is the key of the returned jsonObject in the response body. Usually, it’s the name of the related table.The request form under GET and HEAD methods are very flexible. The request jsonObject can be nested many levels. However, other methods need to be constrained by adding tags, etc. The structure of the request body needs to conform resources at the backend.
GETS and GET, HEADS and HEAD are the same type of operation. For both groups, the request bodies have something different, while the response bodies are the same.
When transmit through HTTP protocal, all the API methods (get,gets,head,heads,post,put,delete) use HTTP POST verb.
All jsonObjects are seen as variables or folders with the form of
{...}. It can store objects or associative arrays.Each object is related to an individually-addressable resource which has an unique address.
2. Functional Key-Value Pairs
Get data in an array: /get/{"key[]":{"tableName":{}}}
The part after the colon is a JSONObject. The key is optional. When key is as the same as the tableName, the JSONObject will be in a simplified form. For example: {"User[]":{"User":{"id",...}}} will be written as {"User[]":{"id",...}}.
Example
/get/{“User[]”:{“count”:3,”User”:{}}}
In this example, the request is to GET 3 users’ information. The response includes 3 users information with all categories saved in an array.
Get filtered data: /get/{"key[]":{"tableName":{"key2{}":[]}}}
Specifically in this part: "key2{}":[], the part after the colon is a JSONArray which contains key2’s values. This part is to specify the conditions that the return should satisfy.
Example
/get/{“User[]”:{“count”:3,”User”:{“id{}”:[38710,82001,70793]}}}
This example shows how to get users’s information with id equals 38710,82001,70793.
Get data with comparison operation: /get/{"key[]":{"tableName":{"id{}":"<=80000,>90000"}}}
Just as the comparison operation functions in SQL, it’s used here to get resources in a range. It dosn’t need to be numbers though.
Example
/get/{“User[]”:{“count”:3,”User”:{“id{}”:”<=80000,>90000”}}}
In SQL, it’d be
id<=80000 OR id>90000, which means get User array with id<=80000 | id>90000
Get data that contains an element: /get/{"key[]":{"User":{"key2<>":[object]}}}
This also used when the user wants to get data that meets specific conditions. key2 must be a JSONArray while object cannot be JSON.
Example
“/get/{“User[]”:{“count”:3,”User”:{“contactIdList<>”:38710}}}”:38710
In this example, it requests 3 User arrays whose contactIdList contains 38710. In SQL, this would be
json_contains(contactIdList,38710).
See if it exists /get/{"key":{"key2}{@":{"from":"tableName","tableName":{...}}}}
In this request url, }{ means EXISTS; key2 is the item you want to check.
Example
- `{“User”:
- {“id}{@”:{
“from”:”Comment”, “Comment”:{“momentId”:15} } } } <http://apijson.cn:8080/get/%7B%22User%22:%7B%22id%7D%7B@%22:%7B%22from%22:%22Comment%22,%22Comment%22:%7B%22momentId%22:15%7D%7D%7D%7D>`_
In this example, the request is to check if the id whose
momentId = 15exists. The SQL form would beWHERE EXISTS(SELECT * FROM Comment WHERE momentId=15)
Include functions in url parameters /get/{"Table":{"key":value, key()":"function (key0,key1...)}"
This will trigger the back-end function(JSONObject request, String key0, String key1…)to get or testify data.
Use - and + to show the order of priority: analyze key-() > analyze the current object > analyze key() > analyze child object > analyze key+()
Example
/get/{“Moment”:{“id”:301,”isPraised()”:”isContain(praiseUserIdList,userId)”}}
This will use function boolean
isContain(JSONObject request, String array, String value). In this case, client will get“is praised”: true(In this case, client use function to testify if a user clicked ‘like’ button for a post.)
Refer a value
"key@":"key0/key1/.../refKey"
Use forward slash to show the path. The part before the colon is the key that wants to refer. The path after the colon starts with the parent level of the key.
Example
- `”Moment”:{
“userId”:38710 },
- “User”:{
“id@”:”/Moment/userId” } <http://apijson.cn:8080/get/%7B%22User%22:%7B%22id@%22:%7B%22from%22:%22Comment%22,%22Comment%22:%7B%22@column%22:%22min(userId)%22%7D%7D%7D%7D>`_
In this example, the value of
idinUserrefer to theuserIdinMoment, which meansUser.id = Moment.userId. After the request is sent,"id@":"/Moment/userId"will be"id":38710.
Subquery expression
"key@":{
"range": "ALL",
"from":"Table",
"Table":{ ... }
}
Range can be ALL, ANY. It means which table you want to query. It’s very similar to how you query in SQL. You can also use COUNT, JOIN, etc.
Example
- `”id@”:{
“from”:”Comment”, “Comment”:{ “@column”:”min(userId)”
}
- code
WHERE id=(SELECT min(userId) FROM Comment)
Fuzzy matching "key$":"SQL search expressions" => "key$":["SQL search expressions"]
Any SQL search expression can be applied here.
Example
In SQL, it’s
name LIKE '%m%', meaning that get User with ‘m’ in name.
Regular Expression "key~":"regular expression" => "key~":["regular expression"]
It can be any regular expressions. Advanced search is applicable.
Example
In SQL, it’s
name REGEXP '^[0-9]+$'.
Get data in a range "key%":"start,end" => "key%":["start,end"]
The data type of start and end can only be either Boolean, Number or String. Eg. “2017-01-01,2019-01-01”, [“1,90000”, “82001,100000”]. It’s used for getting data from a specific time range.
Example
“date%”:”2017-10-01,2018-10-01”
In SQL, it’s
date BETWEEN '2017-10-01' AND '2018-10-01', meaning to get User data that registered between 2017-10-01 and 2018-10-01.
Make an alias "name:alias"
This changes name to alias in returning results. It’s applicable to column, tableName, SQL Functions, etc. but only in GET, HEAD requests.
Example
/get/{“Comment”:{“@column”:”id,toId:parentId”,”id”:51}}
In SQL, it’s
toId AS parentId. It’ll return parentID instead of toID.
Add / expand an item "key+":number/string/array...
The type of value on the right of the colon is decided by key. Types can be Number (such as 82001), String (such as “url0”), JSONArray (such as [“url0”,”url1”]). The method can only be PUT.
Example
- code
“praiseUserIdList+”:[82001]
In this example, add id 82001 to the praiser’s list. In SQL, it should be
json_insert(praiseUserIdList,82001).
Delete / decrease an item “Key-”:number/string/array...
It has the contrary function of “key+”.
Example
"balance-":100.00This example subtract 100 in the balance. In SQL, it would be
balance = balance - 100.00.
Logical Operators &,|,!
&,|,! refer to AND, OR, NOT in SQL respectively. The basic form to use them are: "key&{}":"conditions", "key|{}":"conditions", "key!{}":Object.
By default, conditions of the same key are connected with | operator. As for different "key":"conditons"`pairs, the default operator among them is :code:`&.
Example
① /head/{“User”:{“id&{}”:”>80000,<=90000”}}
In SQL, it’s
id>80000 AND id<=90000, meaning id needs to beid>80000 & id<=90000② /head/{“User”:{“id|{}”:”>90000,<=80000”}}.
It’s the same as
"id{}":">90000,<=80000". In SQL, it’sid>80000 OR id<=90000, meaning that id needs to beid>90000 | id<=80000.③ /head/{“User”:{“id!{}”:[82001,38710]}}.
In SQL, it’s
id NOT IN(82001,38710), meaningidneeds to be! (id=82001 | id=38710).
3. Build-in string functions part one
① "count":Integer
This is used to set the maximum number of the returning resources. The maximum number the system supports is 100. Without this, it’ll return the maximum number of results that meet the condition.
Example
/get/{“[]”:{“count”:5,”User”:{}}}
This example requests 5 Users’ data.
② "page":Integer
This is to indicate the page number starting with 0. The max number can be 100. It’s usually used with "count":Integer
Example
/get/{“[]”:{“count”:5,”page”:3,”User”:{}}}
This example get Users data on page 3 with the total number of 5.
③ "query":Integer
When the Integer is 0, it means get the resource. When it’s 1, it means counting the number and returning the number.When it’s 2, it means returning both.
Example
④ "join":"&/Table0/key0@,</Table1/key1@"
The joining table functions are represented by symbols:
“<” - LEFT JOIN
“>” - RIGHT JOIN
“&” - INNER JOIN
“|” - FULL JOIN
“!” - OUTTER JOIN
Example
This examples is equal to SQL expression
Moment INNER JOIN User LEFT JOIN Comment.
4. Build-in string functions part two
① "@combine":"&key0,&key1,|key2,key3,!key4,!key5,&key6,key7..."
This function combines conditions that have been listed to request data. It’ll group conditions according to their types. It uses logical operators(&,|,!) to connect among groups while within a group, it’ll follow the order that conditions have been listed. So, it’ll become :code:`(key0 & key1 & key6 & other keys) & (key2 | key3 | key7) & !(key4 | key5) `
The:code:other keys means keys that aren’t included in combine function. By default, it’s connected by AND.
Example
This example request User objects whose
nameortagincludes “a”.
② "@column":"column;function(arg)..."
This function defines which colunms will be returned.
Example
/get/{“User”:{“@column”:”id,sex,name”,”id”:38710}}
This request only returns colunms: id, sex, name. The returning follows the same order.
③ "@order":"column0+,column1-..."
This function can set descendent or ascendent order of returning data within a column.
Example
/get/{“[]”:{“count”:10,”User”:{“@column”:”name,id”,”@order”:”name-,id”}}}
This example requests data following descendent order in name column while the default order in id column.
④ "@group":"column0,column1..."
This function groups data with columns. If the table’s id has been declared in @column, then the id needs to be included in @group.
Example
/get/{“[]”:{“count”:10,”Moment”:{“@column”:”userId,id”,”@group”:”userId,id”}}}
This example returns
idgrouped by userId.
⑤ "@having":"function0(...)?value0;function1(...)?value1;function2(...)?value2..."
This function is as same as the HAVING function in AQL. Normally, it’s used with @group.
Example
/get/{“[]”:{“Moment”:{“@column”:”userId;max(id)”,”@group”:”userId”,”@having”:”max(id)>=100”}}}
This example get an array of Moment with userID and id where id >=100, grouped by userId.
⑥ "@schema":"sys"
What APIJSON has achieved?
Functions
•Registeration and login
•CRUD and remote procedure call(RPC) of functions
•Setting orders and pages on returned data
•Calculating and grouping data
•Fuzzy matching search
•Regular expressions
•Joining tables, subquery, and other SQL functions
Request Methods
The APIJSON supports the following request methods:
GET,HEAD,GETS,HEADS,POST,PUT,DELETE
For details of these requests methods, see design rules.
Request body structures
{ “Table”:{…} }
{ “Table0”:{…}, “Table1”:{…}, “Table2”:{…} … }
{ “[]”:{ “Table”:{…} } }
{ “[]”:{ “Table0”:{…}, “Table1”:{…}, “Array0[]”:{…}, … } } . . . etc.
Response body
The reponse body structure will be the same as request body structure.
Build-in functions
"key[]":{} // retrieve data arrays.
"key{}":[1,2,3] // Add constraints on returned data.
"key{}":"<=10;length(key)>1..." // Add constraints on returned data.
"key()":"function(arg0,arg1...)" // RPC of functions.
"key@":"key0/key1.../targetKey" // Refer a value.
"key$":"%abc%" // Fuzzy machting research.
"key~":"^[0-9]+$" // Include regular expressions.
"key%":"2018-01-01,2018-10-01" // Add constraints on returned data.
"key+":[1] // Add/Expand data.
"key-":888.88 // Reduce/Delete data.
"name:alias" // Make an alias.
"@combine":"name~,tag~" // Set more than two conditions.
"@column":"id,sex,name" // Set returned value.
"@group":"userId" // Group data.
"@having":"max(id)>=100" // Add aggregate functions.
"@order":"date-,name+" // Set orders.
"@schema":"sys" //
"@database":"POSTGRESQL" // Interact with different databases.
"@explain":true // Performance analysis.
"@role":"LOGIN" // Set the visiting role.