The AndroidAPS alt-Guide
An unofficial guide to AndroidAPS: the Artificial pancreas system for Android
If you’re reading this, you are almost certainly familiar with insulin pumps and continuous glucose monitors (CGMs) and you will have asked the very obvious question: “Why can’t these talk to each other and manage my blood glucose?”

Well, they can. AndroidAPS provides a way of taking the data from a Bluetooth enabled CGM, doing the necessary processing and then controlling a Bluetooth enabled insulin pump to emulate what a pancreas would do. It’s not a plug and play solution, it can never do as well as a natural pancreas would but with careful setting up and usage it can deliver results that are not far behind.
A natural pancreas can react very quickly to changes in blood glucose, and the insulin that it puts directly into the blood stream takes effect in minutes. By comparison CGM readings are typically be about 10-15 minutes behind, insulin infused into the subcutaneous tissue takes around an hour to reach full effect and the infused insulin takes a long time to die away compared to that from a natural pancreas.
Therefore, an artificial pancreas system is to a large extent dependent on being able to make predictions of what your blood glucose is likely to do in the next few hours. It does this by using much the same type of calculations as you would normally when working out your dosages, but crucially, it updates these forecasts every five minutes when it gets a fresh reading from your CGM. You still need to tell it about carbs you are going to eat, and if you are going to exercise and so on. You also need to configure it carefully with your basal profile, your various ratios (I:C ratio and ISF) and test them carefully. If you make the effort to understand all these things you can reasonably expect to see blood sugar results which approach those that a non-diabetic person would see.
About AndroidAPS
AndroidAPS is an app that runs a version of OpenAPS “oref0” and “oref1” algorithm and can communicate with bluetooth-enabled insulin pumps and CGMs. OpenAPS is an algorithm that has been developed independently of any pump or CGM manufacturer and whose underlying premise is that any manufacturer’s CGM and any manufacturer’s pump, given a suitable interface, could be used to build an artificial pancreas. You can read more about how the OpenAPS model works at the OpenAPS Reference Design
Before you start you should read your way through the information on this site and link up with some of the social media groups where you will be able to discuss any problems or queries with other people using AndroidAPS and ask for help if you need it.
Tell us you are looping
Once you have got your loop working, please let us know by filling in the online form. Just in case we need to notify you of urgent updates. You can find out more here
You will find the latest count of how many people are looping here.
Note
Disclaimer And Warning
- All information, thought, and code described here is intended for informational and educational purposes only. Nightscout currently makes no attempt at HIPAA privacy compliance. Use Nightscout and AndroidAPS at your own risk, and do not use the information or code to make medical decisions.
- Use of code from github.com is without warranty or formal support of any kind. Please review this repository’s LICENSE for details.
- All product and company names, trademarks, servicemarks, registered trademarks, and registered servicemarks are the property of their respective holders. Their use is for information purposes and does not imply any affiliation with or endorsement by them.
Please note - this project has no association with and is not endorsed by: SOOIL, Dexcom, Accu-Chek, Roche Diabetes Care.
Before you Start
Safety first
When you decide to build your own closed loop always think about security and impact of all your actions
General
- AndroidAPS is a just a tool to help you manage diabetes. Not something you can install and forget!
- Don’t absolutely trust any device taking control of insulin delivery. Watch it all the time, learn how it works and learn how to predict it’s actions.
- Remember the phone paired with pump can do anything with the pump. Dedicate this phone for APS and communication with your child. Do not allow to install other apps and games (!!!) to prevent installing together some unwanted code like trojans, viruses or bots.
- Install all security updates provided by phone manufacter and Google.
SMS Communicator
- If you enable SMS Communicator, consider what could happen when the phone enabled for remote commands is stolen! So always protect it at least by PIN code
- Since AndoridAPS 1.1 you will receive SMS notification of important remote actions like bolus or profile change. Setup at least 2 numbers for SMS communication to be notified about actions of second phone (for case it’s stolen)
Useful resources to read before you start
Before you build your rig you’re going to do a lot of reading up to understand how it all works and get the best out of it. We’ve put together a list of places you can go to get you started and hopefully answer a lot of your questions.
DIY Artificial Pancreas articles
Understanding the Loop Algorithm
Introducing oref1 and super-microboluses (SMB) (and what it means compared to oref0, the original #OpenAPS algorithm) - Dana Lewis
Blogs
Fine-Tuning settings - Katie DiSimone
Hypodiabetic Blog - Tim Omer
Diabetes and Technology - Where Diabetes meets Tech
Why we are regularly wrong in the duration of insulin action (DIA) times we use, and why it matters
Closing the loop on an artificial pancreas
Looping. Do I choose #OpenAPS or #Loop? Either way #wearenotwaiting!
Stuff on YouTube
Tim Omer: Empowered Citizen “Health Hackers” - We Are Not Waiting
Live interview with Dana Lewis, creator of Do-It-Yourself Pancreas System
Search for #wearenotwaiting
Press Articles
The $250 Biohack That’s Revolutionizing Life With Diabetes - Bloomberg
Position Statements on DIY Artificial Panchreas systems
Diabetes Australia - People with type 1 diabetes and Do It Yourself (DIY) technology solutions
Press releases and other articles about DIY closed looping
http://www.healthline.com/diabetesmine/dana-rs-insulin-pump-embraces-wearenotwaiting
https://btvnovinite.bg/video/bulgaria/dnes-e-svetovnijat-den-za-borba-s-diabeta.html
Glossary
For most looping terms see here: https://openaps.readthedocs.io/en/latest/docs/Resources/glossary.html
Some AndroidAPS specific terms include:
[[Circadian Percentage Profile]] - changes your base profile based on either a timeshift or a percentage.
Understanding AndroidAPS
Understanding the AndroidAPS screens
You can switch between screens by swiping left or right. The “hamburger” icon at the top left takes you to a menu of modules that you have hidden un the Config Builder and the three dots at the right takes you to a further menue of settings and other options.
The Overview screen

This is the first screen you will come across when you open AndroidAPS and it contains most of the information that you will need day to day.
Section A: allows you to navigate between the various AndroidAPS modules by swiping left or right. The “Hamburger” menu on the left allows you to access any modules that have been hidden from the main navigation and the three dots on the right give you access to the preferences and settings.
Section B: Allows you to change the loop status (open loop, closed loop, suspend loop etc), see your current profile, to see your current target blood glucose level and to set a temporary target. Long press on any of the buttons to alter the setting.
Section C: The latest blood glucose reading from your CGM, how long ago it was read, changes in the last 15 and 40 minutes,
Section D: shows your current basal rate - including any temporary basal rate (TBR) programmed by the system, your insulin on board (IOB) and carbs on board (COB).
The insulin on board figure would be zero if just your normal pre-programmed basal was running and there was no insulin remaining from previous boluses. The figures in brackets show how much consists of insulin remaining from previous boluses and how much is a basal variation due to previous TBRs programmed by AndroidAPS. This second component may be negative if there have recently been periods of reduced basal.
If you have a label AS as well as the IOB and COB this refers to the current AutoSense sensitivity.
Section E: Is the graph showing your blood glucose (BG) as read from your glucose monitor (CGM) it also shows Nightscout notifications such as fingerstick calibrations, and carbs entries.
The small pulldown arrow on the right is where you can select which information is displayed on the charts below. Press on the down arrow to see your options.
The predictions lines if you have them selected are:
- ORANGE (COB) predicts where your BG will go based on the current pump settings and assuming that the deviations due carb absorption remain constant. This line only appears if there are known COB.
- The DARK YELLOW (UAM) line (if present) is (UnAnnounced Meal). It is similar to the ORANGE COB line but it assumes that the deviations will taper down at a constant rate (by extending the current rate of reduction).
- The DARK BLUE line (IOB) shows what would happen under the influence of insulin only. For example if you dialled in some insulin and then didn’t eat any carbs.
- LIGHT BLUE line (Zero Temp) shows how the IOB trajectory line would change if the pump stopped all insulin delivery (0% TBR).
In this context a DEVIATION is the difference in BG caused the upward pressure of carb absorption relative to insulin alone. Deviations are used as a proxy for carb absorbtion and are discussed in greater detail elsewhere in this documentation.
The thin GREEN line is your BG target, in this illustration you can also see a temporary target lasting for around 25 minutes.
The blue line shows the basal delivery of your pump. The dotted blue line is what the basal rate would be if there were no temporary basal adjustments (TBRs) and the solid blue line is the actual delivery over time. Long press on the graph to change the time scale. You can choose 6, 8, 12, 18 or 24 hours.
Section F: is also configurable using the options in section D. In this example we are showing the IoB (Insulin on Board) - if there were no TBRs and no remaining boluses this would be zero, the sensitivity, and the deviation. GREY bars show a deviation due to carbs, GREEN that BG is higher than the algorithm expected it to be and RED that it is lower than the algorithm expected.
Section G: enables you to administer a bolus (normally you would use the Calculator button to do this) and to add a fingerstick CGM calibration. The buttons in this section are configurable using the settings for the Overview screen and you can choose to display those which are most useful to you.
The Calculator

When you want to make a meal bolus this is where you will normally make it from.
Section A: contains is where you input the information about the bolus that you want. The BG field is normally already populated with the latest reading from your CGM. If you don’t have a working CGM then it will be blank. In the CARBS field you add your estimate of the amount of carbs - or equivalent - that you want to bolus for. The CORR field is if you want to modify the end dosage for some reason, and the CARB TIME field is for pre-bolusing so you can tell the system that there will be a delay before the carbs are to be expected and the bolus will be delayed. You can put a negative number in this field if you are bolusing for past carbs.
SUPER BOLUS is where the basal insulin for the next two hours is added to the immediate bolus and a zero TBR is issued for the following two hours to take back the extra insulin. The idea is to deliver the insulin sooner and hopefully reduce spikes.
Section B: shows the calculated bolus. If the amount of insulin on board already exceeds the calculated bolus then it will just display the amount of carbs still required.
Section C: shows the various elements that have been used to calculate the bolus. You can deselect any that you do not want to include but you normally wouldn’t want to. TT stands for Temporary Target, ISF is Insulin Sensitivity Factor, COB is Carbs on Board, IOB is Insulin on Board.
Carbs

If you need to tell AndroidAPS about some extra carbs (or equivalent) you can do this here, without necessarily bolusing. A nice thing about this feature is that it allows you to tell the app about long lasting carbs that you might normally need an extended bolus for. These appear in your timeline in orange while they are still in the future and then change to the normal colour as time moves on.
In section A you enter any temporary target (TT) you think is appropriate, then in section B you can tell it (TIME) about how long you want the start of the carb action to be delayed (this can be a negative if you want the start to be in the past ) the DURATION you expect the carbs to last in hours, and finally the amount of carbs (or equivalent) in grams.
This tells the AndroidAPS algorithm that it needs to use the calculation for carbs on board rather than the one for controlling basal levels in the absence of carbs. If you have SMB (Super Micro Bolus) enabled then they will be issued if the algorithm calculates that they are necessary.
The “HYPO” temporary target is designed to prevent the rig from giving extra insulin in response to your rescue carbs. It will be preset automatically if your BG at the time is less than 4.0 mmol/L. Or you can simply select the HYPO TT before inputting the amount of your rescue carbs.
Actions

This screen shows a number of commonly used actions. Most are self explanatory. TDD is Total Daily Dose and it takes you to an analysis of your insulin usage over the last few days. The HISTORY BROWSER enables you to scroll back over your history and examine your BG records, basals, and so on.
Insulin Profile

This shows the activity profile of the insulin you have chosen. The PURPLE line shows how much insulin remains after it has been injected as it decays with time and the BLUE line shows how active it is.
You will normally be using one of the Oref profiles - and the important thing to note is that the decay has a long tail. If you have been used to manual pumping you have probably been used to assuming that insulin decays over about 3.5 hours. However, when you are looping the long tail matters as the calculations are far more precise and these small amounts add up when they are subjected to the recursive calculations in the AndroidAPS algorithm.
For a more detailed discussion of the different types of insulin, their activity profiles and why all this matters you can read an article here on Understanding the New IOB Curves Based on Exponential Activity Curves
And you can read an excellent blog article about it here: Why we are regularly wrong in the duration of insulin action (DIA) times we use, and why it matters…
And more at: Exponential Insulin Curves + Fiasp
Pump Status

Here we see the status of the insulin pump - in this case an Accu-Chek Combo. The information displayed is self explanatory. A long press on the REFRESH button will read the data from your pump history, including your basal profile. But remember only one basal profile is supported on the Combo pump.
Care Portal

This replicates the functions you will find on your Nightscout screen under the “+” symbol which allows you to add notes to your records. Functions such as recording when you change a pump site, or insulin cartridge should be self explanatory. BUT this section does not issue any commands to your pump. So if you add a bolus using this screen it simply makes a note of this on your Nightscout record, the pump won’t be instructed to deliver a bolus.
Loop, OpenAPS AMA
You don’t normally need to worry about these, they show the results of the OpenAPS algorith which runs each time the system gets a fresh reading from the CGM. These are discussed elsewhere.
Profile

AndroidAPS can run using a number of different profile configurations. Typically - as shown here - the Nightscout profile has been downloaded via the built in Nighscout client and is displayed here in read-only form. If you wanted to make any changes you would do this from your Nightscout user interface and then do a “Switch Profile” on your AndroidAPS rig to refresh the download. Data such as the basal profile would then be automatically copied over to your pump.
DIA: stands for Duration of Insulin Action and it is discussed above in the section on insulin profiles.
IC: is Insulin to Carb ratio. This profile has a number of different values set for different times of day.
ISF: is Insulin Sensitivity Factor - the amount by which one unit of insulin will reduce your blood glucose assuming that nothing else changes.
Basal: is the basal profile programmed into your pump.
Target: is the blood glucose level that you want the rig to be aiming for all the time. You can set different levels for differenttimes of day if you wish, and you can even set an upper and lower range so that the rig will only start to make changes when the predicted blood glucose value falls outside, but if you do that then the rig will respond more slowly and you are unlikely to achieve such stable blood sugars.
Treatment, xDrip, NSClient
These are simply logs of treatments (boluses and carbs), xDrip messages and messages sent to Nightscout via the built-in Nightscout client. You don’t normally need to worry about any of these unless there is a problem.
Config Builder

This is where you will set up the configuraton of your AndroidAPS rig. This screenshot shows a pretty typical rig using a Combo pump, a Dexcom G5 CGM sensor being managed via xDrip+ and running with NovoRapid insulin on an Oref profile and connected to a Nightscout cloud based server.
The tick box on the right determines if that particular module will be displayed in the top menu bar and the small gear wheel symbol allows access to the setting for that module, if there are any. If the module is not displayed in the top menu bar then you can still access it using the “hamburger” menu on the top left.
Settings and Preferences
At the top right of the navigation bar you will find three small vertical dots. Pressing on these takes you to the app’s preferences and settings, and emables you to export your settings if ever you need to transfer to a different rig. These are discussed elsewhere.
OpenAPS Features
Some of the features in AndroidAPS are from OpenAPS oref0 code so please refer to the OpenAPS docs for these:
- Advanced Meal Assist (AMA) after you give yourself a meal bolus, the system can high-temp more quickly after a meal bolus IF you enter carbs reliably. Turn it on in the Config tab, you will need to have completed Objective 7 to use this feature.
- Autosens analyze historical data on the go and make adjustments if it recognizes that you are reacting more sensitively (or conversely, more resistant) to insulin than usual. Turn it on in the Preferences menu, you will need to have completed Objective 6 to use this feature.
- Temporary Targets (Eating Soon and Activity Mode) Temporary or “temp” targets are ideal for when you want the loop to adjust to a different target level for a short period of time (temporarily) for example when you plan on eating or exercising. You can set temp targets either by the TempT option on the watch, Temporary Target button on the Actions tab, or by pressing and holding the current target displayed on the home screen. Temporary targets have a pre-defined duration so you don’t need to remember to turn it back to usual. The homepage will show the current target as blue is your usual target, and green if a temporary target.
How OpenAPS works
At its most basic OpenAPS works in much the same way that a person with diabetes does to determine insulin doses, corrections and the handling of carbohydrates. It works with the ratios that you are already familiar with and uses them to create a running forecast of what’s happening with your blood sugar. The main difference is that OpenAPS updates this calculation every five minutes and that it performs the calculation much more precisely and takes more factors into account than a person with diabetes could do in practical terms in real life.
The basic basal calculations
Firstly, OpenAPS assumes that your programmed basal rates are correct and that if it does nothing then your blood glucose (BG) will remain constant. It uses this as a zero baseline. It can increase your insulin on board (IOB) by increasing the basal rate and reduce it by decreasing the basal rate - to zero if necessary.
Because it knows your pump history and the rate that insulin decays - or is “used up” - it can mantain a running total of all previous insulin doses (boluses and TBRs) to give an IOB figure relative to your programmed basal level.
In order to calculate a correction that will bring BG back to the desired target level it uses your insulin sensitivity factor (ISF) to calculate how much more or less IOB you need to bring your eventual BG back to target - the “eventual blood glucose” (eventualBG). Having calculated the appropriate correction “bolus” it calculates the temporary basal rate that would deliver that amount over 30 minutes and sets that on the pump. It repeats this calculation and updates the results every five minutes when it gets a fresh BG reading from your sensor.
So ideally the following would always be true:
BG - ISF x IOB = eventualBG = targetBG.
By constantly reviewing this equation and issuing temporary basal rates (TBRs) we can ensure that there is always the right amount of insulin on board (IOB) to bring BG eventually to the preconfigured target.

Fig 1: Basals are constantly adjusted so that BG - ISF x IOB = targetBG
You can read in greater detail about how OpenAPS calculates the amount of IOB here.
Dynamic carb detection
We now need to take into account the effect of carbohydrates. One way to do this would be to estimate a rate at which carbs are absorbed and then try to work out an appropriate rate to deliver insulin by using the insulin to carb ratio (IC). However, as we know - unlike insulin which is absorbed in a fairly predictable way - different carbs are absorbed at different rates, and other factors, such as the amount of exercise, all have an effect - so we need something more dynamic.
The theory is that fast acting carbs will exert a strong upward pressure on BG but for a relatively short time, whereas slower acting carbs exert less pressure but for a longer time.
What OpenAPS does is to look at the upward pressure on BG and use that to estimate the rate at which carbs are being absorbed and then use that to estimate the rate at which insulin is needed to balance that upward pressure.
OpenAPS firstly calculates the effect that it would expect the alone insulin on board to have on BG. It does this by calculating the amount of insulin that would have been used since the last BG reading (normally 5 minutes) and multiplying it by ISF. This gives the Blood Glucose Impact (BGI). It then looks at the actual change in BG, referred to as the Delta. (It actually calculates this using a number of previous BG readings so as to minimise the impact of random fluctuations.) The difference between the Delta and the BGI is now referred to as a deviation.
Small positive deviations may happen for any number of reasons, but larger ones are assumed to be as the result of carb absorption and from this OpenAPS estimates the amount of carb absorption that has occured and hence the amount of insulin required to compensate using the insulin to carb (IC) ratio.
Of course, there are other things that can affect the upward pressure on BG, such as exercise. The problem here is that potentially the algorithm could be left thinking that there are still carbs on board when they have actually all gone. Therefore there is a parameter “min_5min_carbimpact” which acts as a safety valve such that carbs will always leak out of the algorithm at a minimum rate which is roughly equivalent to 24g/hr.
Clearly when there are carbs on board they will dominate the demand for insulin, which will be much reduced when there are no carbs. The trick is to ensure that there is a smooth transition between the two states.
Understanding the coloured prediction lines
On your AndroidAPS Overview screen, if you enable Predictions, you will see a number of coloured prediction lines. (You can see the same lines in Nightscout if you enable OpenAPS predictions, but they are all in purple.) These lines show you the different BG predictions: based on current carb absorption (COBpredBG); insulin only (IOBpredBG); how long it will take BG to level off at/above target if deviations suddenly cease and we run a zero temp until then (ZTpredBG) and optionally: unannounced meal/effect detection (UAMpredBG).
These lines are helpful in understanding, at a glance, why OpenAPS is making the decisions it is, based on your near-term and longer-term BG predictions.

COBpredG- (orange) prediction based on the current level of carb absorption. This line only appears if you have carbs on board (COB > 0)ZTpredG- (light blue) prediction based on Zero Temp from now on.IOBpredG- (dark blue) prediction based on IOB alone with no carb absorption.UAMpredBG- (yellow) prediction based on current deviations but ramping down to zero at the same rate they have been recently. This line is only present if UAM is turned on in the preferences.
OpenAPS algorithm examples
Scenario 1 - BG predicted to drop below safety threshold longer term
Here although BG is rising in the short term it is predicted that BG (minGuardBG) will drop below the safety threshold in the longer term. OpenAPS will issue a zero temp, until the eventualBG (in any time frame) is above threshold.

Scenario 2 - BG dropping and predicted to go below safety threshold short term
BG is currently dropping and is predicted to go low in the near-term, although it is predicted to eventually go above target. However, because the near-term low is below the safety threshold, OpenAPS will issue a zero temp, until there is no point where the prediction line dips below the threshold.

Scenario 3 - Eventual BG above target
Although the near-term prediction shows a dip below target it does not dip below the safety threshold. The eventual BG is above target. Therefore, OpenAPS will not add insulin that would contribute to the near-term low (by adding insulin that would make the prediction go below threshold). When the low has passed and it is safe to do so it will start to add insulin to bring the lowest level of the eventual predicted BG down to target. (Depending on your settings and the amount and timing of insulin required, this insulin may be delivered via temp basals or SMB’s).

Scenario 4 - BG rising but eventualBG below target
In this example, OpenAPS sees that you are spiking well above your target. However, due to the timing of insulin, you already have enough in your body to bring you into range eventually. In fact, you are predicted to eventually be below target. Therefore, to prevent contributing to a low in the longer-timeframe OpenAPS will not provide extra insulin. Even though your BG is rising OpenAPS will issue a low or zero temporary basal rate.

Exploring further
For every situation, the determine-basal output will be slightly different, but it should always provide a reasonable recommendation and list any temp basal that would be needed to start bringing BG back to target. If you are unclear on why it is making a particular recommendation, you can explore further by searching lib/determine-basal/determine-basal.js (the library with the core decision tree logic) for the keywords in the reason field (for example, “setting” in this case would find a line (rT.reason += ", setting " + rate + "U/hr";) matching the output above, and from there you could read up and see what if clauses resulted in making that decision. In this case, it was because (working backwards) if (snoozeBG > profile.min_bg) was false (so we took the else), but if (eventualBG < profile.min_bg) was true (with the explanatory comment to tell you that means “if eventual BG is below target”).
If after reading through the code you are still unclear as to why determine-basal made a given decision (or think it may be the wrong decision for the situation), please join the #intend-to-bolus channel on Gitter or another support channel, paste your output and any other context, and we’ll be happy to discuss with you what it was doing and why, and whether that’s the best thing to do in that and similar situations.
Other terms you may come across
- We also add other calculations that we do to better predict and analyze what is happening:
BGI(Blood Glucose Impact) = the degree to which BG “should” be rising or falling based on insulin activity alone.devordeviation= how much actual BG change is deviating from the BGIISF= ISF is anchored from the value in your pump; but if you use autotune and/or autosens, the ISF value shown is what is currently being used by OpenAPS, as modified by the Sensitivity RatioCR (Carb Ratio)= As with ISF, it is anchored from the value in your pump; but if you use autotune and/or autosens, the CR value shown is what is currently being used by OpenAPSEventual BG= what BG is estimated to be by the end of DIAminGuardBG- is the the lowest your BG is estimated to get over the period of DIA (Duration of Insulin Action).IOBpredG- predictions based on IOB alone.UAMpredBG- predictions based on current deviations ramping down to zero at the same rate they have been recently. These represent the last entry on the purple prediction lines.Safety Threshold=min_bg - 0.5*(min_bg-40)wheremin_bgis your BG target. This is the level below whichminGuardBGwill not be allowed to go.Sensitivity Ratio= the ratio of how sensitive or resistant you are. This ratio is calculated by “Autosensitivity” (or “autosens”), and is applied to both basal and ISF to adjust accordingly. <1.0 = sensitive; >1.0 = resistant. If your preferences allow it, sensitivityRatio can also be modified by temp targets.Target= pulled from your pump target; overridden if you have enacted a temporary target running.Carb Impact= we estimate carb impact by looking at what we predict to happen with your carbs entered (predCI) and adding it to our estimate of the remaining carb impact (remainingCI)
Sensitivity Detection and COB calculations
Understanding how Autosense sensitivity works
Sensitivity is an advanced feature of OpenAPS which enables the loop to respond more or less aggressively depending on how blood glucose is responding to the insulin inputs. Generally it looks at the response over a period of time (hours) and responds accordingly.
Autosense only includes data points where there are no active carbs, and so part of the calculation is to determine when carbs are active so that these points can be excluded.
Sensitivity in this context is viewed from the point of view of the loop’s response - if Autosense is less than 100% you are more sensitive to insulin than usual and the loop needs to be less aggressive than usual (<100%). If the figure is more than 100% then you are more resistant and the loop will react more strongly (>100%). To make the loop respond more strongly Autosense makes the ISF number smaller, increases your basals and also reduces your target BG all by the same factor. This causes the rig to deliver more insulin than usual. The reverse is also true, a sensitivity figure of less than than 100% makes the ISF number bigger, reduces the basals and raises the target BG.
Example
Your sensitivity is shown as 70% meaning that you are more sensitive to insulin than usual. So your ISF which is normally 3.5 is now divided by 0.7 and becomes 5.0. This means that the loop expects more response from each unit of insulin than it normally would and so to achieve the desired effect it delivers a smaller dose by a factor of 0.7. Your BG target is also raised by the same factor. So if your normal target is 5.5 mmol/l this is now increased to 7.8mmol/l so that the loop will respond more gently.
In order to calculate this ratio Autosense looks at each historical BG data point for the specified period and calculates the delta (actual observed change) over the last 5 minutes. It then compares it to “BGI” (blood glucose impact, which is how much it expects BG to be dropping based on insulin alone), and assesses the “deviations” (differences between the delta and BGI)
Each deviation is then classified as follows:
“x” : deviation is excluded because it is unexpectedly high - normally because of carb absorbtion. All deviations where COB > 0 are excluded until such time as the COB drops back to zero (carbs are fully absorbed) and deviations go negative once again. This is intended to eliminate the impact of rising BG due to carb absorption from sensitivity calculations and not falsely attribute it to insulin resistance. Deviations may also be excluded because of an unexpectedly high deviation (site failure, etc).
“+” : +ve deviation - BG was above what was expected (i.e. actual BG > estimated BG)
“-” : -ve deviation - BG was below what was expected. If a high temp target is running (i.e. activity mode), a negative deviation is also inserted every 5 minutes, this is to nudge the sensitivityRatio downward to reflect the increased sensitivity likely to result from physical activity.
“=” : neutral deviation - BG is doing what we expect. These neutral deviations are also inserted in every 2 hours to help decay the sensitivity ratio back to 100% in the event that all the deviation data in the calculation period has been excluded due to there being carbs on board or the deviations otherwise being unexpectedly high. (See above.)
Normally the sensitivityRatio == 100% - if it increases then temporary basal rates (TBR) will be increased and the Insulin Sensitivity Factor (ISF) is reduced to make the loop respond more aggressively.
Because times when there are carbs on board cannot be included in the sensitivity calculation we need a way of excluding those times. When all carbs have been absorbed BG data can once more be included into the sensitivity calculations.
There are four sensitivity detection modes which can be selected. Each has a different way of assessing sensitivity and deciding which data to exclude because carbs are present:
- Sensitivity Oref0
- Sensitivity AAPS
- Sensitivity WeightedAverage
- Sensitivity Oref1
Sensitivity Oref0
This works as per the Oref0 model as described in Oref0 documentation. Basically sensitivity is calculated from the previous 24 hours worth of data. To exclude times where there are carbs on board a maximum life for carbs is set in the preferences and after that time all carbs are assumed to have been absorbed. The two settings here are:
- min_5min_carbimpact - this is the assumed minimum impact that carb absorption has on BG in 5 minutes. This is effectively a safety setting and it allows carbs to “leak” down to zero over time so that the loop does not wrongly assume that there are still carbs present and respond accordingly.
- Meal max absorption time (h) - this is the time by which all carbs are assumed to have been absorbed.
Upper and lower limits to the sensitivityRatio can also be set - (default 0.7 - 1.2)
Example - Oref0
Oref0 - the assumed effect of unabsorbed carbs is truncated after a specified maximum time

Sensitivity AAPS
Sensitivity is calculated the same way as Oref0 but you can specify how far back in time the algorithm will look rather than having to accept the 24hr figure. The minimum rate of carbs absorption is calculated from the maximum carbs absorption time specified in the preferences. So our two settings are:
- Meal max absorption time (h)
- Interval for autosense (h)
Example - Sensitivity AAPS
Here the effect of COB is tapered down over time such thatCOB == 0after the specified Meal max absorption time

If the minimum carb absorption rate is used instead of the value calculated from deviations a green dot appears on the COB graph
Sensitivity WeightedAverage
This method is the fastest way to track sensitivity changes.
Sensitivity is calculated based on a weighted average of recent deviations. Deviations are calculated as the difference between the actual BG and that predicted by the algorithm. Newer deviations carry a greater weight in determining the sensitivity. The minimum rate of carb absorption is calculated from max carbs absorption time specified in the preferences.
- Meal max absorbtion time (h)
- Interval for autosense (h)
You can read a fuller description here: OpenAPS decision inputs.
Sensitivity Oref1
Super Micro Bolus (SMB)
SMB is an advanced feature of OpenAPS which allows insulin to be delivered faster by issuing a series of small boluses rather than raised basal rates (TBRs).
Extended carbs / “eCarbs”
With a regular pump therapy, extended boluses are a good way to deal with fatty or otherwise slowly-absorbed meals which increase blood glucose for longer than the insulin is normally active. In a loop context, however, extended boluses don’t make as much sense (and pose technical difficulties), since they’re basically a fixed high temporary basal rate, which goes against how the loop works, which is adjusting the basal rate dynamically. The need to deal with such meals still exists though. Which is why AndroidAPS as of version 2.0 supports so called extended carbs or eCarbs.
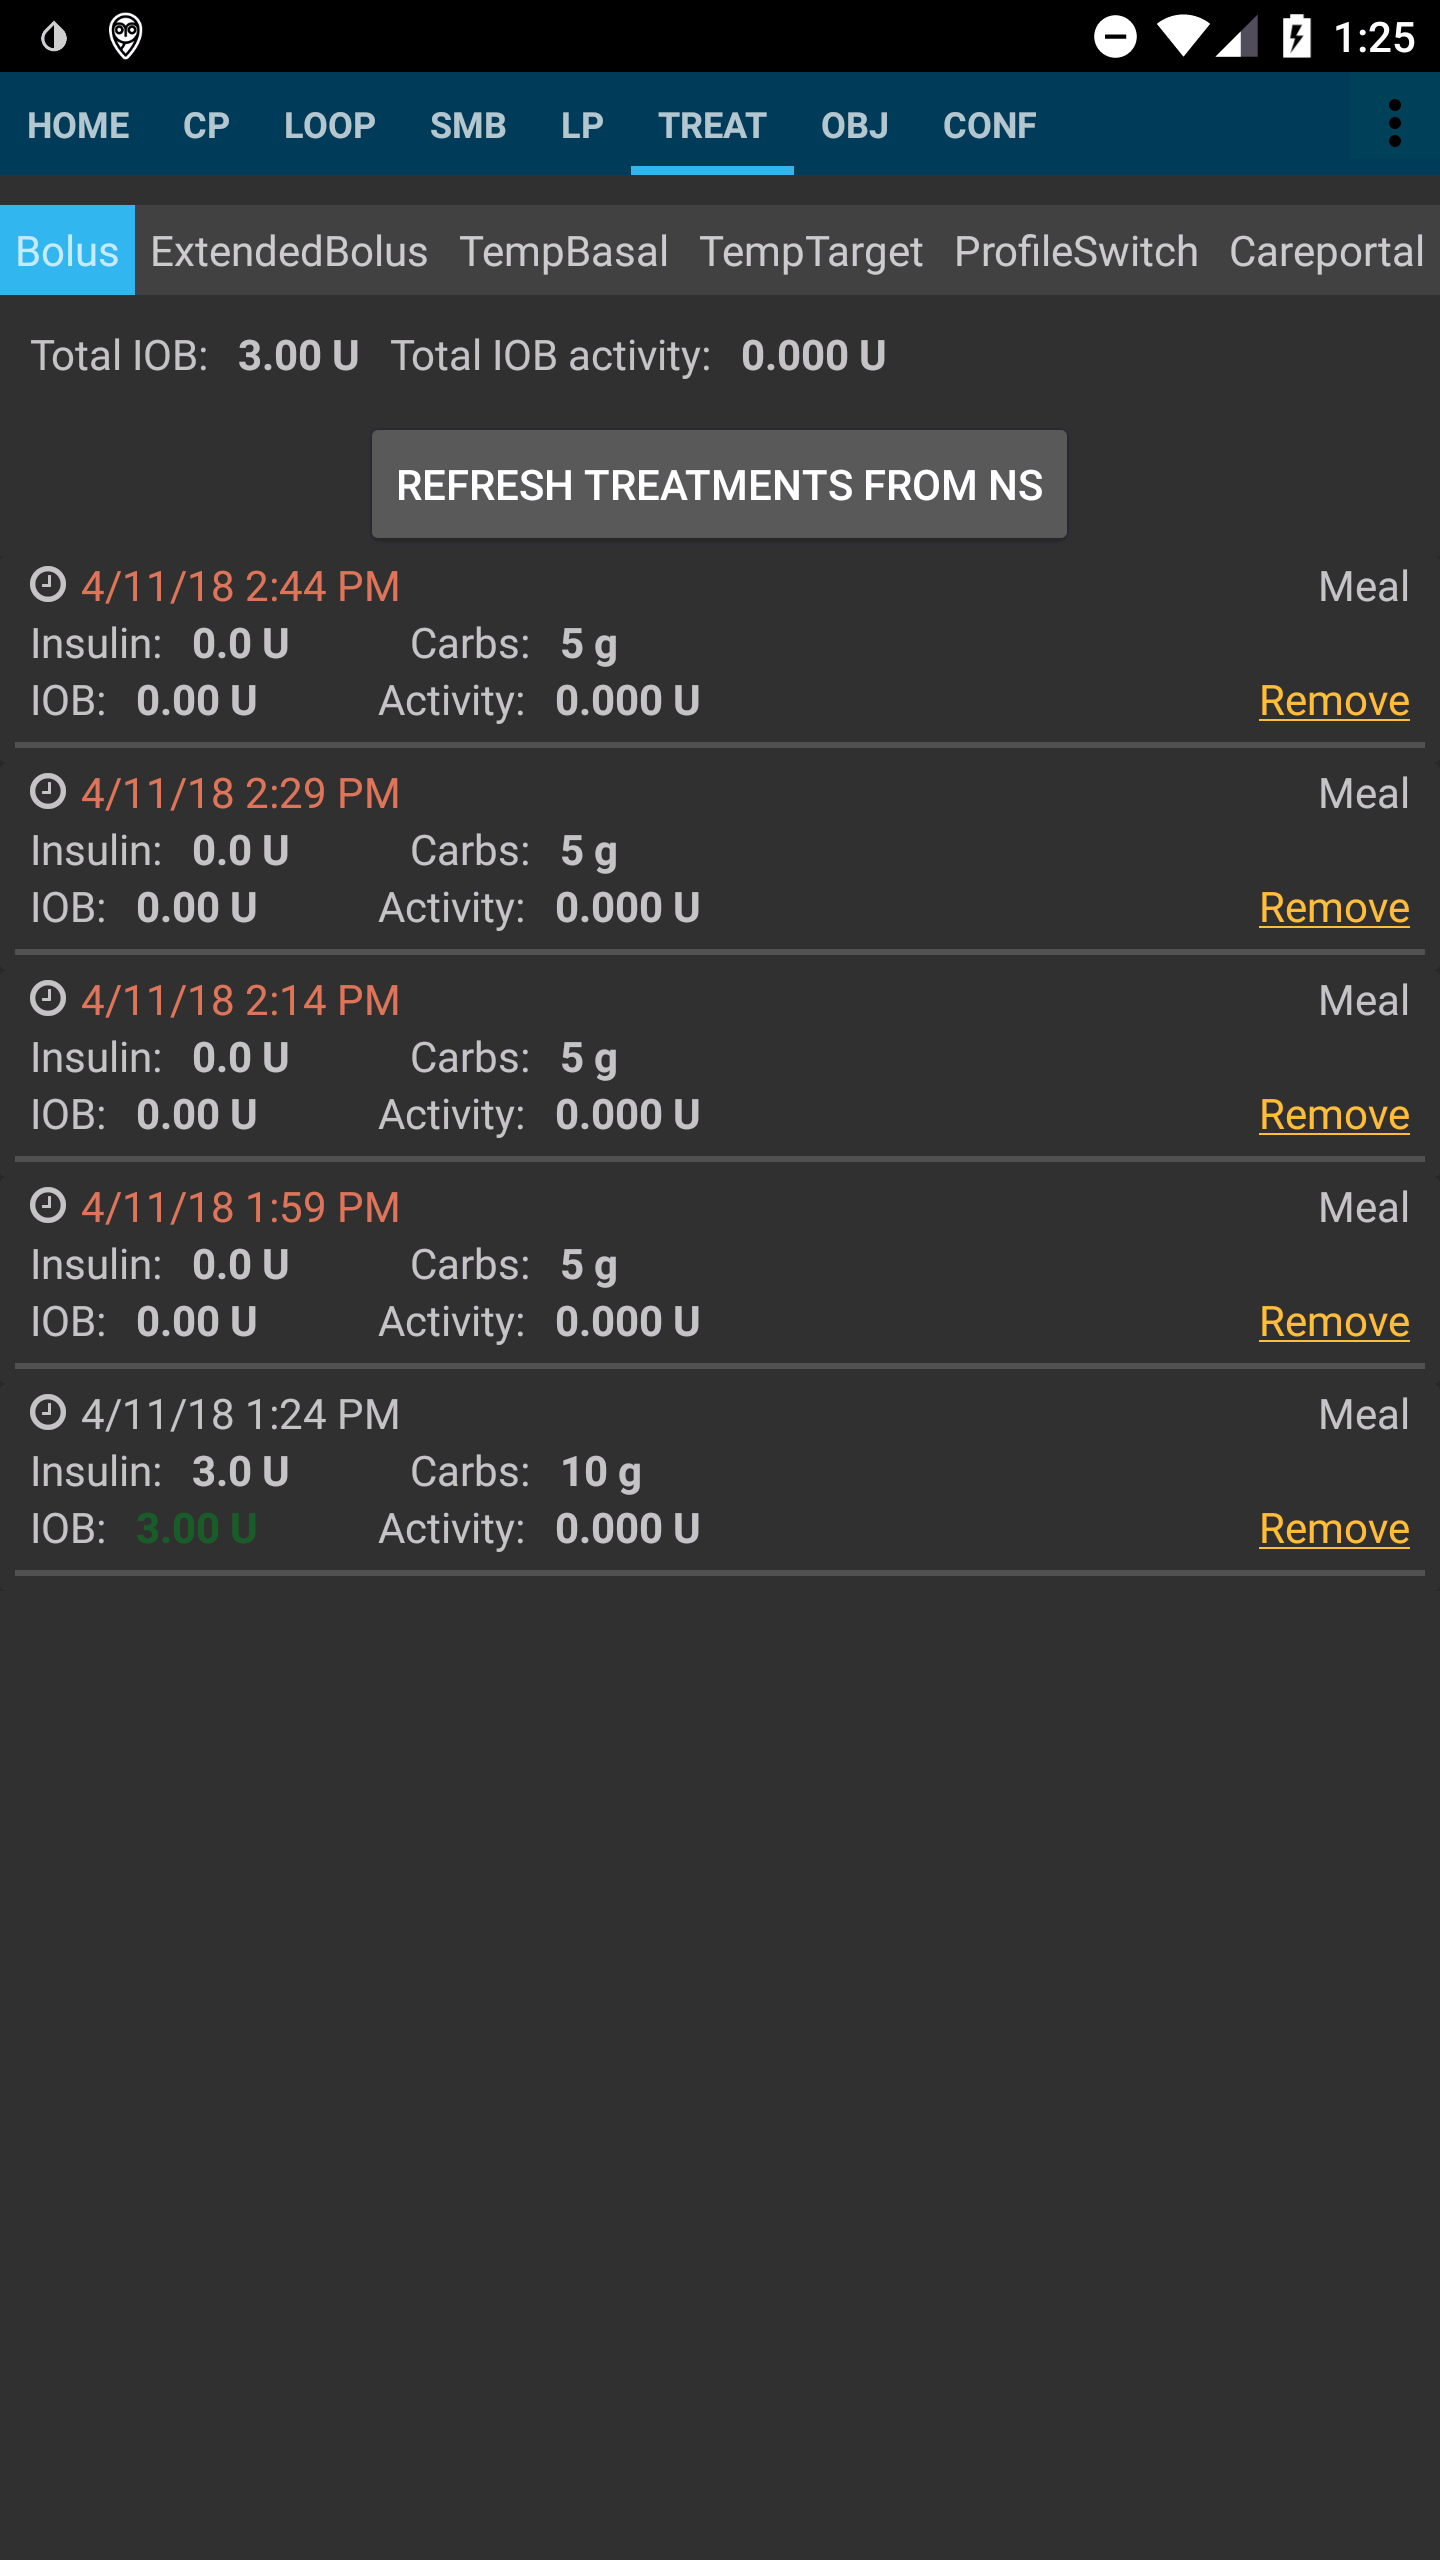
In AndroidAPS extended carbs are simulated by issuing small increments of carbs every few minutes over the chosen duration. This has the effect of maintaining the COB figure at a suitably high level over the required time period. With this information, the loop can administer SMBs every few minutes, thereby simulating an extended bolus, but dynamically. (This should also work without SMBs, but is probably less effective because the scope for delivering extra insulin via TBRs is limited.)
To enter eCarbs, set a duration in the Carbs dialog on the overview tab, the total carbs and optionally a time shift (this is a delay before the eCarb starts):

On the overview screen the future carbs are shown in brackets in the COB field and on the timeline you can see a series of small carb entries stretching into the future:

In the treatments tab the future carb entries are shown in dark orange. You also have the option to delete all entries that occur in the future if you need to do so:
The recommended setup is to use the OpenAPS SMB APS plugin, with SMBs enabled as well as the Enable SMB with COB preference enabled.
Example for a Pizza might be to give a (partial) bolus up front via the calculator and then use the carbs button to enter the remaining carbs for a duration of 4-6 hours, starting after 1 or 2 hours. Clearly you will need to experiment ot find what works best for you.
Hint: You can affect how aggressively the algorithm issues SMB corrections by adjusting the setting “max minutes of basal to limit SMB to” to make the algorithm more or less responsive.
With low carb, high fat/protein meals it may be enough to only use eCarbs without manual boluses. You can read a blog post about the eCarb function in action here
SMS Commands
It is possible to control AndroidAPS remotely via SMS messages. This feature is intended so that parents, for example, can make remote interventions.
AndroidAPS will only accept SMS commands from designated phone numbers for security.
To set up SMS commands on AndroidAPS
On your Android phone setting go to Applications > AndroidAPS > Permissions and enable SMS
In AndroidAPS go to Preferences > SMS Communicator and enter the phone number(s) that you will allow SMS commands to come from and also enable ‘Allow remote commands via SMS’
Send a SMS to the phone with AndroidAPS running from your approved phone number(s) using any of the commands in the table below, the AndroidAPS phone will respond to confirm success of command or status request.
| Command | Response |
|---|---|
| BG | Last BG: 5.6 4min ago, Delta: -0,2 mmol, IOB: 0.20U (Bolus: 0.10U Basal: 0.10U) |
| LOOP STOP/DISABLE | Loop has been disabled |
| LOOP START/ENABLE | Loop has been enabled |
| LOOP STATUS | Loop is disabled Loop is enabled Suspended (10 min) |
| LOOP SUSPEND 20 | Loop suspended for 20 minutes |
| LOOP RESUME | Loop resumed |
| TREATMENTS REFRESH | TREATMENTS REFRESH 1 receivers |
| NSCLIENT RESTART | NSCLIENT RESTART 1 receivers |
| DANAR / PUMP | Last conn: 1 minago Temp: 0.00U/h @11:38 5/30min IOB: 0.5U Reserv: 34U Batt: 100 |
| BASAL STOP/CANCEL | To stop temp basal reply with code EMF |
| BASAL 0.3 | To start basal 0.3U/h reply with code SWE Remote basal setting is not allowed (if remote commands not allowed) |
| BOLUS 1.2 | To deliver bolus 1.2U reply with code RRT Remote bolus not allowed (if within 15 min after last bolus command or remote commands not allowed) |
| CAL 5.6 | To send calibration 5.6 reply with code Rrt Calibration sent (if xDrip is installed. Accepting calibrations must be enabled in xDrip+) |
Designing Your Rig
What you need to get started:
- An Android Smartphone with Android 5.0 or later. See this spreadsheet for user reports on how well a particular phone works with AndroidAPS. If you are using an Accu-Chek Combo pump you will need to be running LineageOS 14.1 or Android 8.1 or later to be able to successfully pair the phone and the pump.
- A Continuous Glucose Monitor (CGM) data source: Dexcom G4/G5/G6, Freestyle Libre, Eversense or Medtronic Guardian
- An app to receive data from your CGM and interface with AndroidAPS such as: xDrip, xDrip+, Glimp, 600SeriesAndroidUploader
- The AndroidAPS app itself. This is provided as a source code which you will need to compile using Android Studio before it can be loaded onto your Android phone.
- Nightscout 0.10.2 or later
- A supported pump: a SOOIL Dana-R, Dana-RS Insulin Pump or a Roche Accu-Chek Combo. Other pumps may be possible but would require the necessary drivers to be written.
Pumps compatible with AndroidAPS
Currently with AndroidAPS you essentially have the choice of two insulin pumps, the Roche Spirit Combo and the SOOIL Dana* R or RS.
Roche Spirit Combo

The Combo is a widely available pump and all versions of it can be used for looping with AndroidAPS. You will need to install a special driver on your phone known as Ruffy which emulates the Combo handset and issues the appropriate commands via Bluetooth. This makes it somewhat slow to transfer commands to the pump but that’s not a problem in this situation.
Due to the vagaries of the version of Bluetooth on the Combo you will have to use a phone running either Android 8.1 or an older phone which has LineageOS 14.1 installed. (LineageOS is an alternative verson of Android and is widely and freely available.)
You will also need to alter some of the settings in the configuration of your pump. This is quite simple and requires an infrared cable and some configuation software both freely available from Roche or can be purchased online fairly cheaply. Or if you join one of the AndroidAPS facebook groups you will likely be bale to borrow one.
The Combo is a good solid pump, reliable and free of unnecessary frills. It also uses readily available size AA batteries - or equivalent rechargeables.
The SOOIL Dana* R or RS

The Dana* RS is an upgrade to the Dana* R and both have been designed with remote operation via Bluetooth in mind. Pairing the pump with your phone is easier with the Dana* pumps and no modifications to the phone’s operating system are required. Because of this commands are transferred more rapidly to the pump so it may seem more responsive to the user.
Details of the various distributors for these pumps is in this spreadsheet, please share the details of yours if not already listed.
It is possible that other pumps will join the list in due course - but at this point these are your only choices.
BG sources
AndroidAPS needs a source of blood glucose information. This generally would be in the form of an app which links to your CGM device and sends the data to to AndroidAPS. There are a number of choices, but bear in mind that the quality of your BG will significantly affect how well the loop performs:
- xDrip+ (most people’s preferred option) can link to Dexcom G5 and G6 CGMs, the Freestyle Libre via a Bluetooth adapter such as MiaoMiao, the Medtronic 640G and the Medtrum A6. The quality of the data from these different devices varies and some of the advanced features of AndroidAPS can only be used with the “cleaner” CGM sources such as the Dexcom. xDrip+ also integrates well with Nightscout.
- Dexcom G5 app this is a modified version of the app provided by Dexcom which has been patched so that it will interface with AndroidAPS and pass the data on.
- Glimp is an app designed as an alternative reader for the Freestyle Libre using the NFC reader chip in an Android phone.
- Nightscout you can use BG values downloaded from Nightscout although this will obviously only work while you have a live internet connection to your Nightscout server.
Setting up your Blood Glucose source
Dexcom users:
If you are using xDrip+…
- Download xDrip+ if you have not already done so and follow the instructions on Nightscout (G4 without share, G4 share, G5). The Dexcom G6 works basically the same as the G5 but you have to tick the box to say you are using a G6 sensor.
- So that xDrip+ will transmit its readings to AndroidAPS you need to go to Settings > Inter-app settings > Broadcast Locally and select ON.
- Whilst you are in this section Accept Treatments will cause xDrip+ to display and boluses that AndroidAPS issues. Normally you can select OFF.
- If you want to be able to enter calibratons via AndroidAPS then Accept Calibrations needs to be ON. You may also want to review the options in Settings > Less Common Settings > Advanced Calibration Settings.
- In AndroidAPS select xDrip+ as your BG source in the ConfigBuilder.
If you are using the patched Dexcom G5 app…
- If you have the original Dexcom app on your phone you will need to uninstall it.
- Download the .apk file from here. This version works whether you are using mg/dl or mmol/l.
- Select Dexcom G5 App in ConfigBuilder
If you are using a G4 with a USB OTG (On-The-Go) cable and Nightscout uploader (‘traditional’ Nightscout)…
This option relies on the Nightscout uploader loading your BG values to the Nightscout server and then configuring AndroidAPS to draw its BG data from Nightscout. Clearly for this to work requires a live internet connection.
- Download and set up the Nightscout Uploader app from the Play Store and follow instructions on Nightscout.
- In the AndroidAPS Preferences enter your Nightscout website URL and API secret.
- In AndroidAPS select NSClient as the BG source.
For Libre users:
If using xDrip+…
- If not already set up then download xdrip and follow instructions on LimiTTEer, Libre Alarm or BlueReader(Hardware).
- In xdrip go to Settings > Interapp Compatibility > Broadcast Data Locally and select ON.
- In xDrip+ go to Settings > Interapp Compatibility > Accept Treatments and select OFF.
- If you want to be able to use AndroidAPS to calibrate then in xdrip go to Settings > Interapp Compatibility > Accept Calibrations and select ON. You may also want to review the options in Settings > Less Common Settings > Advanced Calibration Settings.
- Select xdrip in ConfigBuilder (setting in AndroidAPS).
If using Glimp…
- If not already set up then download Glimp and follow instructions on nightscout.
- Select Glimp in ConfigBuilder (setting in AndroidAPS).
For users of MM640g or MM630g:
- If not already set up then download 600 Series Android Uploader and follow instructions on Nightscout.
- In 600 Series Uploader go to Settings > Send to xdrip+ and select ON (tick).
- Select MM640g in ConfigBuilder (setting in AndroidAPS).
For users of other CGM uploaded to nightscout:
If you have any other CGM set up that sends your data to Nightscout then
- In AndroidAPS Preferences enter your nightscout website and API secret.
- Select NSClient in ConfigBuilder (setting in AndroidAPS).
Nightscout
Nightscout is an open source cloud based system for managing your diabetes. It will record and manage all your diabetes data, from your CGM, from your pump and from events that you enter manually. generate reports and allow a third party to monitor you remotely if you choose to allow them to. It was originally created by parents who wanted to be able to monitor their children but it has moved a long way beyond that.
You have essentially two options:
- to set up your own Nightscout server using the freely available Nightscout software.
- to use a ready hosted Nightscout service where you can set up account (www.ns.10be.de) - this is probably your quickest and easiest option.
The following is work in progress…
It is assumed you already have a Nightscout site, if not visit the Nightscout page for full instructions on set up, the instructions below are then settings you will also need to add to your Nightscout site. Your Nightscout site needs to be at least version 10, so please check you are running the latest version otherwise you will get an error message on your AAPS app. Some people find looping uses more than the azure free quota allowed, so heroku is the preferred choice.
- Go to https://herokuapp.com/
- Click your App Service name.
- Click Application settings (azure) or Settings > “Reveal Config Variables (heroku)
- Add or edit the variables as follows:
ENABLE=careportal boluscalc food bwp cage sage iage iob cob basal ar2 rawbg pushover bgi pump openapsDEVICESTATUS_ADVANCED=truePUMP_FIELDS=reservoir battery clock- Various alarms can be set for monitoring the pump, battery % in particular is encouraged:
PUMP_WARN_BATT_P=51PUMP_URGENT_BATT_P=26
[[https://github.com/MilosKozak/AndroidAPS/wiki/images/nightscout1.png]]
- Click “Save” at the top of the panel.
Phones
In order to run AndroidAPS you will need an Android phone most reasonably new phones will do and you can find a list of ones that people have tried and used below:
List of tried and tested phones
If you are planning to use a Combo pump you will need to use either Android 8.1 or install LineageOS 14.1 on the phone. LineageOS is an open source version of Android and is freely and widely available. If you’re not up for installing it yourself you should be able to easily find a phone “geek” who can, but you need to be aware that some phones are “locked down” by the service provider and you won’t be able to use them.
Watchfaces
AndroidAPS is designed to be controlled by Android Wear watches. To achieve this you needed to select the build variant “fullRelease” when building the APK (or “pumpRelease” will allow you to just remote control the pump without looping). Within AndroidAPS, in the ConfigBuilder you need to enable Wear. You can access the setting by clicking on the cog. If you want to bolus etc from the watch then within Wear Setting you need to enable “Controls from Watch”.
There are several watchfaces to choose from that include average delta, IOB, currently active temp basal rate and basal profiles + CGM readings graph. You can also use the AAPS app on the watch to set a temporary target, administer a bolus, use the bolus wizard, prime/fill, and check the status of loop and pump. Ensure notifications from AndroidAPS are not blocked on the watch. Confirmation of action (e.g. bolus, tempt target) comes via notification which you will need to swipe and tick. To get faster to the AAPS menu, do a double tap on your BG. When doing a double tap onto the BG curve, it will show older/ just newer BG’s.
Troubleshooting the wear app:
- On Android Wear 2.0 the watch screen does not install by itself anymore. You need to go into the playstore on the watch (not the same as the phone playstore) and find it in the category apps installed on your phone, from there you can activate it. Also enable auto update.
- Sometimes it helps to re-sync the apps to the watch as it can be a bit slow to do it itself: Android Wear > Cog icon > Watch name > Resync apps.
- Enable ADB debugging in Developer Options (on watch), connect the watch via USB and start the Wear app once in Android Studio.
If you are using another looping system and want to view your looping detail on an AndroidWear watch, or want to watch your child’s looping, then you can build/download just the NSClient APK. To do this follow the build APK instructions selecting the build variant “NSClientRelease”. There are several watchfaces to choose from that include average delta, IOB, currently active temp basal rate and basal profiles + CGM readings graph.
Pebble users can use the Urchin watchface to view looping data (if uploaded to nightscout), but you will not be able to interact with AndroidAPS through the watch. You can choose fields to display such as IOB and currently active temp basal rate and predictions. If open looping you can use IFTTT to create an applet that says if Notification received from AndroidAPS then send either SMS or pushover notification.
Building the AndroidAPS software
Software Checklist
To build your rig there are a number of pieces of software that you will need, both to install on your phone, as online resources and on your PC.
On your phone.
For a typical rig you will need the following:
- xDrip+ to collect the blood glucose data from your sensor and share it with Android APS. For most people this is the collector of choice although there are others you can choose from. You can download it from here: https://jamorham.github.io/#xdrip-plus
- AndroidAPS the app itself which takes your blood glucose readings, your inputs in terms of carbs, boluses and your settings and which then controls your pump. It comes as a source code that you have to compile yourself (more about that later) and you can download it from here: https://github.com/MilosKozak/AndroidAPS
- Ruffy if you are using a Combo pump this piece of software essentially mimics the Combo’s bluetooth handset and sends commands to the pump. It also allows you to set up the bluetooth pairing between the pump and your phone. Once installed it acts as a driver for AndroidAPS to control the pump. Once again, it comes as a source code that you have to compile yourself. You can get it from here: https://github.com/MilosKozak/ruffy (Be careful that you choose this version as there are other versons around that won’t do what you want.)
- LineageOS this is a modified version of Android which you need if you are using a Combo pump in order to get the bluetooth to pair. (If you have a phone with Android 8 (Oreo) or newer you shouldn’t need this.) There are LineageOS downloads for different phones and you can get them from here: https://download.lineageos.org/. LineageOS is quite a well known modification for Android phones so if you don’t want to tackle this yourself you’ll probably find an independent phone repairer happy to do it for you.
On your PC
- Android Studio you will need this to compile the source code for AndroidAPS and Ruffy into .apk files that you can install on your phone. You can get it from here: https://developer.android.com/studio/
- GitHub Desktop not essential but useful. It enables you to maintain a local copy of the AndroidAPS and Ruffy source codes on your PC and keep track of any changes. You can get it from here: https://desktop.github.com/
In the Cloud
- Nightscout this provides a comprehensive way of gathering your diabetes management data together in one place, managing your profiles, generating reports and so on. It’s not essential but it is hugely advantageous. You can find out more here: http://www.nightscout.info/. You can either build your own Nightscout instance following the instructions on the website or you can use a hosted service like that at https://www.ns.10be.de. There are also Nightscout apps available from the AppStore and Google Play which can be used to follow blood glucose and the rest. Useful for parents monitoring their children.
- Autotune as you get into using your rig you will need to tune your profile in terms of carb ratios, sensitivity and basal rates. You can do this by hand of course but Autotune is a very effective tool for crunching the numbers and making recommendations. You can either do your own implementation using the information at https://openaps.readthedocs.io/en/latest/docs/Customize-Iterate/autotune.html or you can use a hosted service like that at https://autotuneweb.azurewebsites.net/
Installing AndroidAPS - Build the APK
AndroidAPS and Ruffy come in the form of a source code that you must download and compile using Android Studio. The process is not difficult once you have worked out what to do.
You will need to download a local copy of the source code folders (called a repository) onto your PC. There are several ways to do this:
- Install GitHub desktop (recommended) on your PC. This will download the repository for you and automatically download any updates that occur in the future.
- Use the “clone” function in Android Studio to download a copy of the repository directly into Android Studio. This works well but you will need to repeat the process each time there are future updates.
- Download the repository as a zip file and then unzip the folders and use those as the source for Android Studio.
In all cases you will need to install Android Studio. You will find instructions how to do this on their website. Once you have installed it you may find that it wants to install various updates - you need to do this.
We will look first at using the clone function in Android Studio, as per the following screenshot:

You then enter the URL of the repository you want to download. In this case AndroidAPS, but if you are using a Combo you will need to do the same process for Ruffy as well.
The URLs you need are:

From here on the process is the same no matter which method you chose for downloading the repository.
- In Android Studio click on “File”, select ‘Open an existing Android Studio project’ and select the location of the extracted files. You will also need to select which branch of the repository you want to compile. Normally this will be “Master”.

- You might get an error message about not finding build tools - click on the links Android Studio provides to download all the suggested software updates.
- Go to Build Menu and click on Generate Signed APK
- Then under Module select “app”:

- If this is your first time creating a signed .apk you will need to create a digital signature file, known as a keystore. If you already have a keystore then you can use that. For more information about using the keystore see https://developer.android.com/studio/publish/app-signing.html#generate-key

Once you have created your keystore make sure you save it in a place where you can find it easily - you will need it again.
Having done that, click “Next” and you will get the following dialogue:

- Select the build type and flavor as shown in the screenshot. Build Type = ‘Release’ should be your default choice. (‘Debug’ is just for people doing coding.)
- Select the flavor you want to build. Normally you need “full”.
* full (i.e. recommendations are automatically enacted in a closed loop)
* openloop (i.e. recommendations are given to the user to enact manually)
* pumpcontrol (i.e. basic remote control for the pump, no looping)
* nsclient (i.e. Nightscout client, displays the loop data of another user and enables Careportal entries to be added)
- Select V1 “Jar Signature” (V2 is optional) and click Finish.
- The APK will now take some time to generate. You will get the pop-up below when the process is done.

- Click on ‘Show in Explorer’. You’ll find the APK is generated, sometimes it may take time to display. If you are having difficulty finding the .apk file you should find the AndroidAPS file at {yourfolder}\app\full\release\app-full-release.apk and if you are looking for the “wear” file for a watch you can look for {yourfolder}\app\release\wear-release.apk. It is a good idea to make copies of these files somewhere you can find them again easily.
- You now need to copy the .apk files onto your phone and install them (just tap and follow the instructions). If you have not already done so you may need to set your phone to install .apk files from unknown sources. If you already have an older version of AndroidAPS on your phone that was signed with a different key then you will need to uninstall it first, but remember to export your settings first so you can reload them to the new installation.
Installing AndroidAPS
Install git (if you don’t have it)
- Any git version should work. For example https://git-scm.com/download/win
- Let Studio know where is git.exe located: File - Settings - Version Control - Git

Update your local copy
- Click: VCS->Git->Fetch
Selecting branch
- If you want to change branch select another branch from tray: master (latest release) or dev (developement version)

and then checkout

Updating branch from Github
- Press Ctrl+T, select Merge method and press OK

On the tray you’ll see green message about updated project
Upload to phone
- Connect phone now
- Press “Play” button on top toolbar

- Select connected phone and press OK

Configuring your rig
Config Builder
Config Builder (Conf) is the tab where you turn the modular features on and off. The boxes on the left hand side allow you to select which one to use, the boxes on the right hand side allow you to view these as a tab in AndroidAPS. Where there are additional settings available within the module, you can click on the cog graphic which will take you to the specific settings within Preferences.
Profile
Select the basal profile you wish to use:
- NS Profile uses the profiles you have saved on your nightscout site (https://[yournightscoutsiteaddress]/profile). You can use the Profile Switch to change which of those profiles is active, this writes the profile to the pump in case of AndroidAPS failure.
- Simple Profile needs detail
- Local Profile uses the basal profile manually entered on the pump. For both DanaR/RS and Combo pumps this only works with the pump Profile 1.
- Circadian Percentage Profile this feature is now included within Profile Switch and has been superceeded, you do not need to select this one. See [[Profiles]] page for more setup information.
Insulin
Select the type of insulin curve you are using. Basic AndroidAPS options are bilinear ‘Fast Acting Insulin’ for an insulin with DIA of less than 5 hours, or ‘Fast Acting Insulin Prolonged’ for an insulin with DIA of greater than 5 hours. These curves will only vary based on the duration of the DIA. The Oref options ‘Rapid-Acting Oref’, Ultra-Rapid Oref’ and ‘Free-Peak Oref’ are exponential and more information is listed in the OpenAPS docs, the curves will vary based on the DIA and the time to peak. You will need to enter additional settings for these. You can view the insulin curve graph on the Insulin (Ins) tab to help you understand which curve fits you.
BG Source
Select the blood glucose source you are using - see [[BG Source]] page for more setup information.
Pump
Select the pump you are using. For people wanting to open loop this needs to be ‘Virtual Pump’. See [[DanaR Insulin Pump]], [[DanaRS Insulin Pump]] or [[Accu Chek Combo Pump]] pages for more setup information.
Sensitivity Detection
Select the type of sensitivity detection. This will analyse historical data on the go and make adjustments if it recognizes that you are reacting more sensitively (or conversely, more resistant) to insulin than usual. Details about the Sensitivity Oref0 algorithm can be read in the OpenAPS docs. You can view your sensistivity on the homescreen by selecting SEN and watching the white line. Note, you need to be in Objective 6 in order to use Sensitivity Detection/autosens.
APS
Select either OpenAPS MA (meal assist) or OpenAPS AMA (advanced meal assist). More detail about OpenAPS AMA can be found in the OpenAPS docs; in simple terms the benefits are after you give yourself a meal bolus the system can high-temp more quickly IF you enter carbs reliably. You can view the active detail of the chosen algorithm in the OpenAPS(OAPS) tab. Note you need to be in Objective 7 in order to use OpenAPS AMA.
Loop
If you wish to use open or closed looping you will need to enable this here. You can see the active request and success of enactment in the Loop tab.
Constraints
If you view the Objectives (Obj) tab, you can see more information about how far you have progressed and what actions you still need to complete. See [[Objectives]] page for more information.
Treatments
If you view the Treatments (Treat) tab, you can see the treatments that have been uploaded to nightscout. Should you wish to edit or delete an entry (e.g. you ate less carbs than you expected) then select ‘Remove’ and enter the new value (change the time if necessary) through the Careportal (CP) tab.
General
- Actions allows you to make Profiles Switches (see [[Profiles]] for more setup information), Temporary Targets, and for those using DanaR/RS or Combo pump to set a manual TBR or prime the canula.
- Careportal allows you to record any specific care entries and view the current sensor, insulin, canula and pump batter ages in the Careportal (CP) tab.
- SMS Communicator allows remote caregivers to control some AndroidAPS features via SMS, see [[SMS Commands]] for more setup information.
- Food allows you to view and use the Nightscout food database, see Nightscout Readme for more setup information or http://[yournightscoutsiteaddress]/food to access your database.
- Wear allows you to view and control AndroidAPS from the Android Wear watch, see [[watchfaces]] for more setup information.
- xDrip Statusline (watch)
- Ongoing Notification displays a summary of current BG, delta, active TBR%, active basal u/hr and profile, IOB and split into bolus IOB and basal IOB on the phones dropdown screen and phonelock screen.
- NS Client
Your Pump Choices
Accu-Chek Combo Pump
The Roche Accu-Chek Combo pump is widely available and can now be used for looping. However, due to some vagaries of the Bluetooth interface you will need to use a phone with LineageOS 14.1 in order to pair with it. If you want all the technical details why you can find them here.
You will also need to install a second app known as Ruffy. This emulates the Combo handset and issues the same commands that you would if you were using your handset.
Having done that you will need to access the pump’s configuration settings and make a few simple changes to enable it to work successfully in a loop. To do this you will need some configuration software and an interface cable - both freely available from Roche.
Hardware you will need
- A Roche Accu-Chek Combo (any firmware, they all work)
- A Smartpix or Realtyme device together with the 360 Configuration Software to configure the pump. Roche sends out Smartpix devices and the configuration software free of charge to their customers upon request.
- A compatible phone: An Android phone with a phone running LineageOS 14.1 (formerly CyanogenMod) or Android 8.1 (Oreo). The LineageOS 14.1 has to be a recent version from at least June 2017 since the change needed to pair the Combo pump was only introduced at that time. A list of phones can be found in the AndroidAPS Phones document. Please be aware that this is not complete list and reflects personal user experience. You are encouraged to also enter your experience and thereby help others (these projects are all about paying it forward).
- Be aware that while Android 8.1 allows communicating with the Combo, there are still issues with AndroidAPS on 8.1. For advanced users, it is possible to perform the pairing on a rooted phone and transfer it to another rooted phone to use with ruffy/AndroidAPS, which must also be rooted. This allows using phones with Android < 8.1 but has not been widely tested: https://github.com/gregorybel/combo-pairing/blob/master/README.md
Limitations
- Extended bolus and multiwave bolus are not supported (see Extended Carbs instead)
- Only one basal profile is supported.
- Setting a basal profile other than 1 on the pump, or delivering extended boluses or multiwave boluses from the pump interferes with TBRs and forces the loop into low-suspend only mode for 6 hours as the the loop can’t run safely under these conditions.
- It’s currently not possible to set the time and date on the pump, so daylight saving times changes have to be performed manually (you may disable the phone’s automatic clock update in the evening and change it back in the morning together with the pump clock to avoid an alarm during the night).
- Currently only basal rates in the range of 0.05 to 10 U/h are supported. This also applies when modifying a profile, e.g. when increasing to 200%, the highest basal rate must not exceed 5 U/h since it will be doubled. Similarly, when reducing to 50%, the lowest basal rate must be at least 0.10 U/h.
- If the loop requests a running TBR to be cancelled the Combo will set a TBR of 90% or 110% for 15 minutes instead. This is because cancelling a TBR causes an alert on the pump which causes a lot of vibrations.
- Occasionally (every couple of days or so) AndroidAPS might fail to automatically cancel a TBR CANCELLED alert, which the user then needs to deal with (by pressing the refresh button in AndroidAPS to transfer the warning to AndroidAPS or confirming the alert on the pump).
- Bluetooth connection stability varies with different phones, causing “pump unrechable” alerts, where no connection to the pump is established anymore. If that error occurs, make sure Bluetooth is enabled, press the Refresh button in the Combo tab to see if this was caused by an intermitted issue and if still no connection is established, reboot the phone which should usually fix this. There is another issue were a restart doesn’t help but a button on the pump must be pressed (which resets the pump’s Bluetooth), before the pump accepts connections from the phone again. There is very little that can be done to remedy either of those issues at this point. So if you see those errors frequently your only option at this time is to get another phone that’s known to work well with AndroidAPS and the Combo (see above).
- Issuing a bolus from the pump will be not always be detected in time (checked for whenever AndroidAPS connects to the pump), and might take up to 20 minutes in the worst case. Boluses on the pump are always checked before a high TBR or a bolus issued by AndroidAPS but due to the limitations AndroidAPS will then refuse to issue the TBR/Bolus as it was calculated under false premises. (-> Don’t bolus from the Pump! See chapter Usage)
- Setting a TBR on the pump is to be avoided since the loop assumes control of TBRs. Detecting a new TBR on the pump might take up to 20 minutes and the TBR’s effect will only be accounted from the moment it is detected, so in the worst case there might be 20 minutes of a TBR that is not reflected in IOB.
Setup
- Configure the pump using 360 config software. If you do not have the software, please contact your Accu-Chek hotline. They usually send registered users a CD with the “360° Pump Configuration Software” and a SmartPix USB-infrared connection device (the Realtyme device also works if you have that).
- Required changes (marked green in screenshots):
- Set/leave the menu configuration as “Standard”, this will show only the supported menus/actions on the pump and hide those which are unsupported (extended/multiwave bolus, multiple basal rates), which cause the loop functionality to be restricted when used because it’s not possible to run the loop in a safe manner when used.
- Verify the Quick Info Text is set to “QUICK INFO” (without the quotes, found under Insulin Pump Options).
- Set TBR Maximum Adjustment to 500%
- Disable Signal End of Temporary Basal Rate
- Set TBR Duration increment to 15 min
- Enable Bluetooth
- Recommended changes (marked blue in screenshots)
- Set low cartridge alarm to your liking
- Configure a max bolus to suited yourself to protect against bugs in the software delivering over-large boluses
- Similarly, configure maximum TBR duration as a safeguard. This needs to be at least 3 hours, because the pump disconnect option in AndroidAPS may need to set a 0% TBR for up to 3 hours.
- You may want to enable the key lock on the pump to prevent bolusing from the pump. But be aware that if you do this and you become separated from the phone you use to run AndroidAPS then you won’t be able to operate the pump manually. If you do bolus from the pump then AndroidAPS will not be aware of this fact until it next reads the pump history and this may be a while.
- Set display timeout and menu timeout to the minimum of 5.5 and 5 respectively. This allows AndroidAPS to recover more quickly from error situations and reduces the amount of vibration alarms that may occur.
- Required changes (marked green in screenshots):


- Install AndroidAPS as described in this documentation.
- Make sure to read the wiki to understand how to setup AndroidAPS.
- Select the MDI plugin in AndroidAPS, not the Combo plugin at this point to avoid the Combo plugin from interfering with Ruffy during the pairing process.
- Follow the link http://ruffy.AndroidAPS.org and clone Ruffy via Git. Use the same branch as you use for
AndroidAPS, right now that’s the
combobranch, later on there will be the regularmasteranddevbranches. - Install ruffy and use it to pair the pump. If it doesn’t work after multiple attempts, switch to the
pairingbranch, pair the pump and then switch back the original branch. If the pump is already paired and can be controlled via ruffy, installing thecombobranch is sufficient. Note that the pairing processing is somewhat fragile (but only has to be done once) and may need a few attempts; quickly acknowledge prompts and when starting over, remove the pump device from the Bluetooth settings beforehand. Another option to try is to go to the Bluetooth menu after initiating the pairing process (this keeps the phone’s Bluetooth discoverable as long as the menu is displayed) and switch back to Ruffy after confirming the pairing on the pump, when the pump displays the authorization code. If you’re unsuccessful in pairing the pump (say after 10 attempts), try waiting up to 10s before confirming the pairing on the pump (when the name of the phone is displayed on the pump). If you have configured the menu timeout to be 5s above, you need to increase it again. Some users reported they needed to do this. - When AndroidAPS is using ruffy, the Ruffy app can’t be used. The easiest way is to just reboot the phone after the pairing process and let AndroidAPS start Ruffy in the background.
- If the pump is completely new, you will need to do one bolus on the pump, so the pump creates a first history entry.
- Before enabling the Combo plugin in AndroidAPS make sure your profile is set up correctly and activated(!) and your basal profile is up to date as AndroidAPS will sync the basal profile to the pump. Then activate the Combo plugin. Press the Refresh button on the Combo tab to initialize the pump.
- To verify your setup, with the pump disconnected, use AndroidAPS to set a TBR of 500% for 15 min and issue a bolus. The pump should now have a TBR running and the bolus in the history. AndroidAPS should also show the active TBR and delivered bolus.
Usage
- Keep in mind that this is not a product, esp. in the beginning the user needs to monitor and understand the system, its limitations and how it can fail. It is strongly advised NOT to use this system when the person using it is not able to fully understand the system.
- Read the OpenAPS documentation https://openaps.org to understand the loop algorithm AndroidAPS is based upon.
- Read the wiki to learn about and understand AndroidAPS http://wiki.AndroidAPS.org
- Ruffy provides the same functionality as the handset that comes with the Combo.
The handset mirrors the pump screen and relays button presses to the pump. The Ruffy app is needed to make this functionality available to AndroidAPS. A
scriptercomponents reads the screen and automates entering boluses, TBRs and so on by simulating button presses and then checking the responses to make sure inputs are processed correctly. AndroidAPS then interacts with the scripter to apply loop commands and to administer boluses. This mode has some restrictions: it’s comparatively slow (but well fast enough for what it is used for), and setting a TBR or giving a bolus causes the pump to vibrate. - The integration of the Combo with AndroidAPS is designed with the assumption that all inputs are made via AndroidAPS. Boluses entered on the pump directly will be detected by AndroidAPS when it checks the pump history, but it may take up to 20 min before this happens. Reading boluses delivered directly on the pump is a safety feature and not meant to be regularly used (the loop requires knowledge of carbs consumed, which can’t be entered on the pump, which is another reason why all inputs should be done in AndroidAPS).
- Don’t set or cancel a TBR on the pump. The loop assumes control of TBR and cannot work reliably otherwise, since it’s not possible to determine the start time of a TBR that was set by the user on the pump.
- The pump’s first basal rate profile is read when AndroidAPS starts and is updated by the app as necessary. The basal rate should not be manually changed on the pump, but will be detected and corrected as a safety measure (don’t rely on safety measures by default, this is meant to detect an unintended change on the pump).
- It’s recommended to enable key lock on the pump to prevent bolusing from the pump, esp. when the pump was used before and using the “quick bolus” feature was a habit. Also, with keylock enabled, accidentally pressing a key will NOT interrupt active communication between AndroidAPS and pump.
- When a BOLUS/TBR CANCELLED alert starts on the pump during bolusing or setting a TBR, this is caused by a disconnect between pump and phone, which happens from time to time. AndroidAPS will try to reconnect and confirm the alert and then retry the last action (boluses are NOT retried for safety reasons). Therefore, such an alarm can be ignored as AndroidAPS will confirm it automatically, usually within 30s (cancelling it is not problem, but will lead to the currently active action to have to wait till the pump’s display turns off before it can reconnect to the pump). If the pump’s alarm continues, automatic corfirmation failed, in which case the user needs to confirm the alarm manually.
- When a low cartridge or low battery alarm is raised during a bolus, they are confirmed and shown as a notification in AndroidAPS. If they occur while no connection is open to the pump, going to the Combo tab and hitting the Refresh button will take over those alerts by confirming them and show a notification in AndroidAPS.
- When AndroidAPS fails to confirm a TBR CANCELLED alert, or one is raised for a different reason, hitting Refresh in the Combo tab establishes a connection, confirms the alert and shows a notification for it in AndroidAPS. This can safely be done, since those alerts are benign - an appropriate TBR will be set again during the next loop iteration.
- For all other alerts raised by the pump: connecting to the pump will show the alert message in the Combo tab, e.g. “State: E4: Occlusion” as well as showing a notification on the main screen. An error will raise an urgent notification. AndroidAPS never confirms serious errors on the pump, but let’s the pump vibrate and ring to make sure the user is informed of a critical situation that needs action.
- After pairing, ruffy should not be used directly (AndroidAPS will start in the background as needed), since using ruffy at AndroidAPS at the same time is not supported.
- If AndroidAPS crashes (or is stopped from the debugger) while AndroidAPS and the pump were communicating (using ruffy), it might be necessary to force close ruffy. Restarting AndroidAPS will start ruffy again. Restarting the phone is also an easy way to resolve this if you don’t know how to force kill an app.
- Don’t press any buttons on the pump while AndroidAPS communicates with the pump (Bluetooth logo is shown on the pump).
DanaR Pump
These instructions are for configuring the app and your pump if you have a DanaR. Visit DanaRS Insulin Pump if you have the DanaRS launched in 2017 instead.
- In the pump go to Main Menu > Setting > User Option
- Turn on “8. Extended Bolus”

- Go to Main Menu > Setting > Discovery
- In phone settings go to Bluetooth, scan for nearby devices, select your DanaR serial number and input your password (Default password is either 1234 or 0000). If DanaR is not showing in scan then restart phone and take DanaR battery out, replace and start these two steps again.
- In AndroidAPS go to Config Builder and select the type of DanaR you have (DanaR, DanaR Korean, DanaRv2)
- Select Menu by tapping the 3 dots in the top right. Select Preferences.
- Select DanaR Bluetooth device, and click your DanaR serial number.
- Select Pump password, and input your password. (Default password is either 1234 or 0000)
- If you want AndroidAPS to allow basal rate above 200%, enable Use extended boluses for >200%. Note this means you cannot loop with high TBRs whilst using extended boluses for food.
- In Preferences under DanaR pump settings you can change the default bolus speed used (12sec per 1u, 30sec per 1u or 60sec per 1u).
- Set basal step on pump to 0.01 U/h
DanaRS Pump
These instructions are for configuring the app and your pump if you have a DanaRS from 2017 onwards. Visit DanaR Insulin Pump if you have the original DanaR instead.
- In AndroidAPS go to Config Builder and select ‘DanaRS’
- Select Menu by tapping the 3 dots in the top right. Select Preferences.
- Select DanaRS Pair New Pump, and click your DanaRS serial number.
- Select Pump password, and input your password. (Default password is either 1234 or 0000)
- Select Bolus Speed to change the default bolus speed used (12sec per 1u, 30sec per 1u or 60sec per 1u).
- Restart your phone.
- Set basal step on pump to 0.01 U/h using Doctors menu (see pump user guide)
Preferences
To access Preferences click on AndroidAPS to open the Overview screen, then tap the three dots on the top right of the screen and select Preferences.

You will then be presented with the following options:
Password for settings
This allows you to set a password in order to prevent accidental or unauthorised changes to Preferences. If you set a password here you will be required to your password in order to access Preferences. To remove the password option, delete the text you have entered under the words Password for settings.
Patient age
Algorithms are different based on patient age so select Child, Teenage or Adult here.
General
- Select your language here. If your language is not available, or not all of the words translated then feel free to make some suggestions. The translation files are found here: App > Src > Main > Res > Values > Strings or ask in the gitter chatroom.
- Quick Wizard settings allows you to add a quick button for a frequent snack or meal. Enter the appropriate carb details and on the homescreen if you select the quick wizard button it will calculate and bolus for those carbs based on your current ratios (not taking into account blood glucose value or insulin on board though).
Careportal
‘Entered by’ is the text displayed in your Nightscout Careportal ‘entered by’ field. Set this to something meaningful to you, whether it is the app name, the persons name or the phone name (for example if you are using AndroidAPS as NS Client on a phone that is not the patients phone you may wish to distinguish between phone owners here).
Treatments safety
Max allowed bolus [U]
This is the maximum amount of bolus insulin that AAPS is allowed to deliver. This setting exists as a safety limit to prevent the delivery of a massive bolus due to accidental input or user error. It is recommended to set this to a sensible amount that corresponds roughly to the maximum amount of bolus insulin that you are ever likely to need for a meal or correction dose. This restriction is also applied to the results of the Bolus Calculator.
Max allowed carbs [g]
This is the maximum amount of carbs that AAPS bolus calculator is allowed to dose for. This setting exists as a safety limit to prevent the delivery of a massive bolus due to accidental input or user error. It is recommended to set this to a sensible amount that corresponds roughly to the maximum amount of carbs that you are ever likely to need for a meal.
Loop
You can toggle between open and closed looping here. Open looping means TBR suggestions are made based on your data and appear as a notification but you must manually choose to accept them and manually enter them into your pump. Closed looping means TBR suggestions are automatically sent to your pump without confirmation or input from you. The homescreen will display in the top left corner whether you are open or closed looping, and pressing and holding this homescreen button will also allow you to toggle between the two.
OpenAPS AMA
OpenAPS Advanced Meal Assist (AMA) allows the system to high-temp more quickly after a meal bolus IF you enter carbs reliably. Turn it on in the Config tab to view the safety settings here. You need to have completed Objective 7 to use this feature. You can read more about the settings and Autosens in the OpenAPS docs.
Max U/hr a Temp Basal can be set to
This setting exists as a safety limit to prevent AAPS from ever being capable of giving a dangerously high basal rate. The value is measured in units per hour (u/hr). It is advised to set this to something sensible. A good recommendation is to take the highest basal rate in your profile and multiply it by 4. For example, if the highest basal rate in your profile was 0.5u/hr you could multiply that by 4 to get a value of 2u/hr.
Maximum basal IOB OpenAPS can deliver [U]
The amount of additional basal insulin (in units) allowed to accumulate in your body, on top of your normal basal profile. Once this value is reached, AAPS will stop giving additional basal insulin until your basal Insulin on Board (IOB) has decayed to within this range again.
- This value does not consider bolus IOB, only basal.
- This value is calculated and monitored independently of your normal basal rate. It is only the additional basal insulin on top of that normal rate that is considered.
- This value is measured in insulin units (u).
When you begin looping, it is advised to set Max Basal IOB to 0 for a period of time, while you are getting used to the system. This prevents AAPS from giving any additional basal insulin at all. During this time AAPS will still be able to limit or turn off your basal insulin to help prevent hypoglycaemia.
This is an important step in order to:
- Have a period of time to safely get used to the AAPS system and monitor how it works.
- Take the opportunity to perfect your basal profile and Insulin Sensitivity Factor (ISF).
- See how AAPS limits your basal insulin to prevent hypoglycaemia.
When you feel comfortable, you can allow the system to start giving you additional basal insulin, by raising the Max Basal IOB value. The recommended guideline for this is to take the highest basal rate in your profile and multiply it by 3. For example, if the highest basal rate in your profile was 0.5u/hr you could multiply that by 3 to get a value of 1.5u.
You can start conservatively with this value and increase it slowly over time.
These are guidelines only; everyone’s body is different. You may find you need more or less than what is recommended here, but always start conservatively and adjust slowly.
Note: As a safety feature, Max Basal IOB is hard-limited to 7u.
Absorption Settings
If you have selected to use AMA Autosense then you will be able to enter your maximum meal absorption time and how frequently you want Autosense to refresh. If you often eat high fat or protein meals you will need to increase your meal absorption time.
Pump settings
The options here will vary depending on which pump driver you have selected in ‘Config Builder’. Pair and set your pump up according to the DanaR Insulin Pump or DanaRS Insulin Pump or Accu Chek Combo Pump instructions where relevant. If using AndroidAPS to open loop then make sure you have selected Virtual Pump in config builder.
NS Client
- Set your Nightscout URL here (e.g. https://yourwebsitename.Herokuapp.com or https://yourwebsitename.Azurewebsites.net), and the ‘API secret’ (a 12 character password recorded in your Heroku or Azure variables). This enables data to be read and written between both the Nightscout website and AndroidAPS. Double check for typos here if you are stuck in Objective 1.
- ‘Log app start to Nightscout’ will record a note in your Careportal entries every time the app is started. The app should not need to start more than once a day, more frequently than this suggests a problem.
- ‘Enable local broadcasts’ will share your Careportal data to other apps on the phone such as xdrip.
- ‘Alarm options’ allows you to select which default Nightscout alarms to use through the app. For the alarms to sound you need to set the Urgent High, High, Low and Urgent Low alarm values in your Heroku or Azure variables. They will only work whilst you have a connection to Nightscout and are intended for parent/carers, if you have the CGM source on your phone then use those alarms instead (e.g. xDrip+)
SMS Communicator
This setting allows remote control of the app by texting instructions to the patient’s phone which the app will follow such as suspending loop, or bolusing. Further information is described in SMS Commands but it will only display in Preferences if you have selected this option in the Config Builder.
Other
- You can set defaults for your temp targets here, for the different types of temp target (eating soon and activity). When you select a temp target then if you choose for example “Eating Soon” from the drop down box, it will automatically populate the duration and value for you based on the figures you provided here. For more information on use of Temp Targets see [[Open APS features]].
- You can set default prime amounts - this will prime the pump the value specified and this insulin is counted as used from the reservoir but not counted in IOB calculations. See the instruction booklet in your cannula box for how many units should be primed depending on needle length and tubing length.
- You can change the display on the homescreen and watch for the values that are in range. Note that this is just how the graphs look and doesn’t impact on your target or calculations.
- ‘Shorten tab titles’ allows you to see more tab titles on screen, for example the ‘Open APS’ tab becomes ‘OAPS’, ‘Objectives’ becomes ‘Obj’ etc.
- ‘Local Alerts’ lets you decide if you receive a warning and after how long for not receiving blood glucose values (stale data) or the pump being unreachable. If you frequently get pump unreachable alerts then enable BT Watchdog in the Advanced Settings.
Advanced Settings ``requires more work
- OpenAPS MA
- Always use short average delta instead of… Enabling this setting is useful when you are using data from unfiltered sources such as xDrip+, as opposed to filtered sources such as an official Dexcom Receiver. Filtered data appears to be smooth, whereas unfiltered data can appear to be jumpy. This unfiltered data could cause AndroidAPS to apply Temporary Basal Rate changes more frequently than are really needed, as the OpenAPS algorithm reacts to the jumpy data. With this setting enabled, the OpenAPS algorithm will use the Short Average Delta (the average change in blood glucose over the past 15 minutes) instead of the last blood glucose reading received. This effectively has a “smoothing” effect on the data and attempts to compensate for any jumpy readings. Users of Abbot Freestyle Libre sensors collecting their glucose data via devices such as LimiTTers may find this setting provides better results with AAPS.
For further tips regarding data smoothing when using xDrip+ as the data source, see Smoothing Blood Glucose Data in xDrip+.
- OpenAPS preferences.json - before changing any of these settings, please view the descriptions of the safety values used and why in the OpenAPS docs.
- ‘Ignore profile switch events’ will not send your current AndroidAPS profile to the pump. It is encouraged not to select this unless you are testing code, as for safety sending profile switch events to the pump’s basal profile 1 means than should AndroidAPS stop working or loose connection with the pump then your pump will revert to the same profile as default rather than you having to manually enter it into the pump. For more information on profiles see Profiles.
- ‘BT Watchdog’ select this option if you keep loosing connection with your pump. When the pump looses connection it will toggle bluetooth off and on for you to improve the connection.
Wear Settings
For more information on the wear watchface settings see Watchfaces.
Profile switch
On starting your AndroidAPS and selecting your profile, you will need to do a “Profile switch” event with zero duration (explained later). By doing this AAPS starts tracking history of profiles and every new profile change requires another “Profile switch” even when you change content of the profile in NS. Updated profile is pushed to AAPS immediately but you need to switch the same profile again (in NS or AAPS) to start using these changes.
Internaly AAPS creates snapshot of profile with start date and duration and is using it within selected period. Duration of zero means infinite. Such profile is valid until new “Profile switch”.
If you use “Profile switch” with duration profile is switched back to previous valid “Profile switch”
If you use local AAPS profiles (Simple, Local, CPP) you have to press button there to apply these changes (it creates proper “Profile switch” event).
Within the “profile switch” you can choose two changes which used to be part of the Circadian Percentage Profile:
- Percentage - this applies the same percentage to all parameters. If you set it to 130% (meaning you are 30% more insulin resistant), it will up the basal rate by 30%. It will also lower the ISF and IC accordingly (divide by 1.3 in this example). It will be sent to the pump and then be the default basal rate. The loop algorithm (open or closed) will continue to work on top of the selected percentage profile. So for example separate percentage profiles can be set up for different stages of the hormone cycle.
- Timeshift - this moves everything round the clock by the number of hours entered. So for example, when working night shifts change the number of hours to how much later/earlier you go to bed or wake up.
This mechanism allows much precise calculations to the past and track profile changes.
In closed loop mode is recommended to turn on automatic update of profile in pump (in settings), this will mean any updated you make to your profile will be copied locally to the pump in case of failure.
Troubleshooting Profile Errors
- ‘Invalid profile’ or ‘Basal Profile not aligned to hours’ error message will appear if you have any basal rates or I:C rates not on the hour. The DanaR and DanaRS pumps do not support changes on the half hour.
- ‘Received profile switch from NS but profile does not exist locally’ or
Go either to Treatments tab in AndoridAPS and select Profile Switch, ‘remove’ the date and time that was mentioned in the error message. Or go to your mlab collection, search in the treatments for profile switch and delete the date and time that was mentioned in the error message.
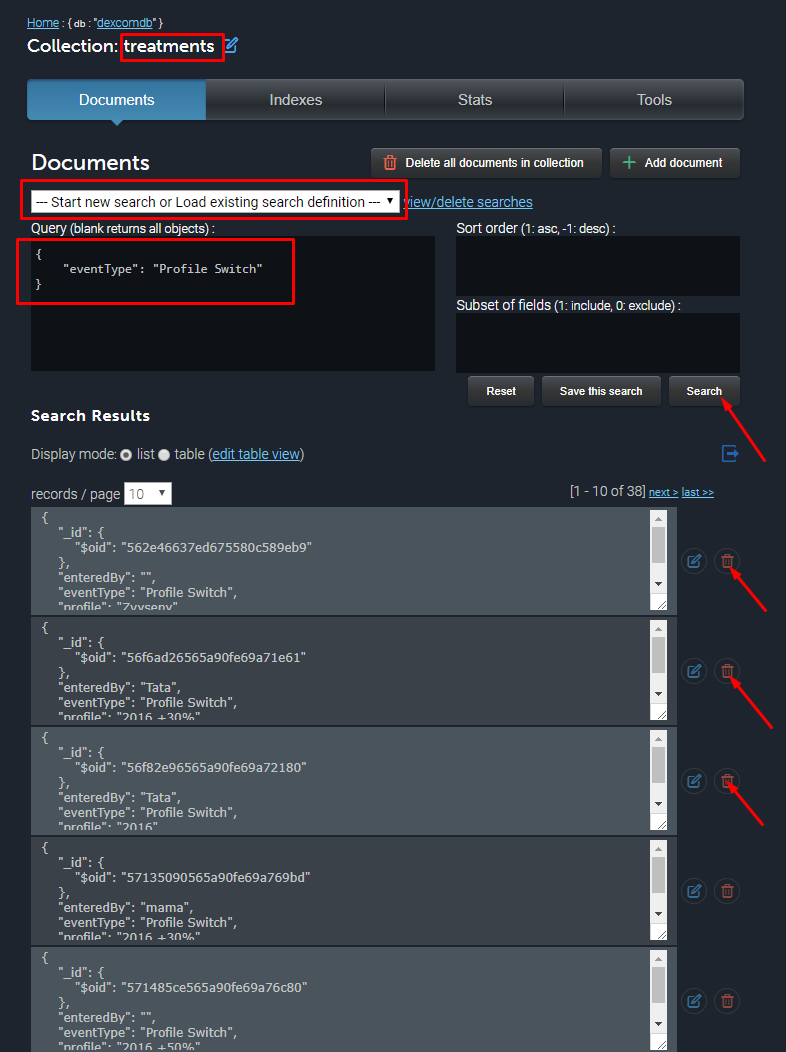
- ‘DIA 3hr too short’ error message will appear if your duration of insulin action in your profile is listed at a value that AndroidAPS doesn’t believe will be accurate. Read about selecting the right DIA, and edit it in your profile then do a Profile Switch to continue.
Understanding the Objectives
AndroidAPS has a series of Objectives that need to be completed to walk you through the features and settings of safe looping. They ensure you have configured everything detailed in the sections above correctly, and that you understand what your system is doing and why so you can trust it.
If you are upgrading phones then you can export your settings to keep your progress through the objectives; in the three dots in the top right corner select Export settings, it will tell you which folder it has saved the file to. On your new phone copy the file over to that location and then select Import settings. Not only will your progress through the objectives be saved, but also your safety settings such as max bolus etc. If you do not export and import your settings then you will need to start the objectives from the beginning again. It is a good idea to back up your settings frequently just in case.
- Objective 1: Setting up visualization and monitoring, and analysing basals and ratios
- Select the right blood glucose source for your setup. See BG Source for more information.
- Select the right Pump in ConfigBuilder (select Virtual Pump if you are using a pump model with no AndroidAPS driver for open looping) to ensure your pump status can communicate with AndroidAPS. If using DanaR pump then ensure you have followed DanaR Insulin Pump instructions to ensure the link between pump and AndroidAPS.
- Follow instructions in Nightscout page to ensure Nightscout can receive and display this data.
You may need to wait for the next blood glucose reading to arrive before AndroidAPS will recognise it.
- Objective 2: Starting on an open loop
- Select Open Loop either from Preferences, or by pressing and holding the Loop button in top left of the home screen.
- Work through the [[Preferences]] to set up for you.
- Manually enact at least 20 of the temporary basal rate suggestions over a period of 7 days; input them to your pump and confirm in AndroidAPS that you have accepted them. Ensure this data shows in AndroidAPS and Nightscout.
- Objective 3: Understanding your open loop, including its temp basal recommendations
- Start to understand the thinking behind the temp basal recommendations by looking at the determine basal logic and both the forecast line in AndroidAPS homescreen/Nightscout and the summary of outputs from the calculations in your OpenAPS tab.
You will want to set your target higher than usual until you are confident in the calculations and settings. The system allows a low target to be a minimum of 4 or maximum of 10, and a high target to be a minimum of 5 and maximum of 15. A temporary target as a single value can be anywhere in the range of 4 to 15. The target is the value that calculations are based on, and not the same as where you aim to keep your blood glucose values within. If your target is very wide (say, 3 or more mmol wide), you will often find because blood glucose is eventually predicted to be somewhere in that wide range not many fluctuating temporary basal rates are suggested. You may want to experiment with adjusting your targets to be a closer together range (say, 1 or less mmol wide), and observe how the behavior of your system changes as a result. You can view a wider range (green lines) on the graph for the values you aim to keep your blood glucose within by entering different values in Preference > Range for Visualisation.
Stop here if you are open looping with a virtual pump - do not click Verify at the end of this objective.
- Start to understand the thinking behind the temp basal recommendations by looking at the determine basal logic and both the forecast line in AndroidAPS homescreen/Nightscout and the summary of outputs from the calculations in your OpenAPS tab.
- Objective 4: Starting to close the loop with Low Glucose Suspend
- Select Closed Loop either from Preferences, or by pressing and holding the Open Loop button in the top left of the home screen.
- Set your target range slightly higher than you usually aim for, just to be safe.
- Watch how temporary basals are active by viewing the blue basal text on the homescreen or the blue basal render on the homescreen graph.
- Ensure your settings have supported AndroidAPS to avoid having to treat a low glucose over a period of 5 days. If you are still having frequent or severe low glucose episodes then consider refining your DIA, basal, ISF and carb ratios.
The system will override your maxIOB settings to zero, which means if blood glucose is dropping it can reduce basal for you, but if blood glucose is rising then it will only increase basal if the IOB is negative (from a previous Low Glucose Suspend), otherwise basal rates will remain the same as your selected profile. You may temporarily experience spikes following treated hypos without the ability to increase basal on the rebound.
- Objective 5: Tuning the closed loop, raising max IOB above 0 and gradually lowering BG targets
- Raise your maxIOB above 0 over a period of 1 day, the default is recommended to be 2 but you should slowly work up to this until you know your settings work for you.
- Once confident on how much IOB suits your looping patterns then reduce your targets to your desired level.
- Objective 6: Adjust basals and ratios if needed, and then enable auto-sens
- You can use autotune as a one off to check your basals remain accurate, or do a traditional basal test.
- Enable auto-sens over a period of 7 days and watch the white line on the homescreen graph show how your sensitivity to insulin may be rising or falling as a result of exercise or hormones etc, and keep an eye in the OpenAPS report tab how AndroidAPS is adjusting the basals and/or targets accordingly.
Don’t forget to record your looping in this form logging AndroidAPS as your type of DIY loop software, if you have not already done so.
- Objective 7: Enabling additional features for daytime use, such as advanced meal assist
- Now you should feel confident with how AndroidAPS works and what settings reflect your diabetes best, then over a period of 14 days you can try additional features that automate even more of the work for you.
Tuning and Troubleshooting
Fine Tuning Your Rig
This is an adaptation of a blog article by Katie DiSimone. You can find the original here
It is totally true that there is no one place to read How To Adjust Your Settings in any looping documents. The reason being…the answers are basically the same as other non-looping situations…test basals, test carb ratios, test insulin sensitivities. The difficulty is that once people are already looping, nobody wants to turn off their loop to go and test settings again. Everyone just wants to adjust settings on the fly while also keeping a closed loop. So…I’ll try to explain a little of both methods.
Before we start, let me say this in case it isn’t obvious…I’m not your medical professional, nor anyone else’s medical professional. Don’t take my words as a substitution for conversations with your doctor.
Ok…that warning provided… Think Like a Pancreas is a great reference for understanding some of the guiding principles in pump therapy. Let me summarize the important parts:
Basal rates should keep your BGs steady in the absence of other influences (such as food, medications, etc). Boluses should return your BGs to target after a meal. ISF should be the amount one unit of insulin drops your BGs without other influences. If you are new to looping, I recommend planning for a time to retest/reset all your assumptions about your diabetes settings. Keep an open mind if you want to keep a closed loop. (how’s that for a catch phrase?)
It is absolutely possible to have two wrong settings look like a right setting when they balance out. The problem is that those wrong settings won’t balance out in all situations. Example: Too low of basals can be offset by regular eating of meals with too strong of a carb ratio. If you stop eating though, you’ll start going high because that extra insulin from the meal boluses won’t be there to help the lack of basals. Taking the time to validate your settings by truly testing them is really good practice.
1st: Insulin Duration
New loopers’ number one settings issue will likely be too short of a duration of insulin action (DIA). Almost all of us have cut our DIA at about 3 hours on traditional pump therapy. There’s a reason for that. In traditional pump use, DIA is only used to calculate the remaining IOB at any given time after a bolus. That’s it. And when do we use remaining IOB in traditional pump therapy? Usually when we want to give a correction because a BG is stuck high or going low…in other words, DIA is used as a rough approximation to correct off-target BGs. It doesn’t have to be rocket science then…we’re making an approximation because some other numbers (carb count, basals, etc) weren’t behaving the way we were expecting either and therefore leading to an off-target BG.
But in looping, DIA (and its related IOB) plays a HUGE part in how the loop is anticipating and evaluating your BG movement. IOB is used literally every single minute for every single loop calculation for where to go next in setting a temp basal or providing a bolus recommendation.
Not only that, but the STRENGTH of the insulin at any given time is also being used. Closed-loops know and care about whether your insulin was given recently and is due to peak soon (like between 60-90 minutes with novolog/humalog), or if it is in the slow tail portion hours later where BG impacts are going to be way less dramatic. So, DIA means a lot in your closed-looping world.
What will happen if you use too short of a DIA in closed-looping? You’ll see it in a variety of ways, but too short a DIA will give the equivalent of insulin-stacking. The loops will be assuming insulin is disappearing faster than it actually is. If you are getting steady BGs while closed looping with a short DIA, it’s likely that your basals are being set too low to compensate. If instead you have your basals correctly set and use a short DIA in closed-looping, you will likely find yourself going low from corrections. One good indication of this is going lower than target carrying negative IOB from previous loop low/zero temp basals.
General recommendation: Set your DIA to 5 or 6 hours for novolog/humalog, do not keep using your old, short DIA from traditional pump therapy days. If you are using the newest versions of Loop or OpenAPS, the code is defaulted for 6 hours. Test your basals (see below) with the new longer DIA and make sure that you can get steady BGs with the new basals.
2nd: Basals
Now that you have a reasonable DIA set, make sure to test your basals. Personally, we find testing basals can be pretty painless and doesn’t require days of fasting. Instead, we look for easy opportunities. If you are willing to open-loop test, that is going to give the most accurate information in the quickest way.
It’s a pretty easy test. Turn off your loop. Don’t eat food, don’t do crazy exercise, don’t sit in a hot tub. Just have a relaxing average time period and see if your basals are able to hold you roughly steady. Doesn’t matter if you are at target or not…the idea is to simply have zero extra insulin on board from any boluses or corrections and watch what happens during those hours. Typically we like to see about two hours of BGs without the influence of food boluses.
Believe me when I say that Anna is not enthusiastic about fasting basal testing…so I look for opportunities to make it less cumbersome. For example, use a meal that I know like the back of my hand how to bolus for it and that generally needs no corrections. For us…that’s two extra large scrambled eggs (or three small ones) with cheese bolused at 8g. If she eats that meal, the BG response is slow and measured and by 3 hours after that meal…the bolus and food effects are really muted and we can start watching to see if BGs stay pretty steady for the next two hours.
For example, here’s some of a recent open-loop basal testing we did with Anna…confirmed that the BGs could stay pretty steady without the involvement of temp basal help from looping. The 8g of eggs at the end of almost 3 hours…looks like she went a little lower (and may have deceased even more if she hadn’t started the next meal) than she had started. Since basals appeared to be keeping her pretty steady, I made a mental note that carb ratio might be just a touch too strong, but didn’t adjust right away. I waited to see how the next meal was going to behave.

If you absolutely don’t want to turn off your closed loop to test this…see if you can find a time where BGs are steady, you are at/close to target, and you are not carrying positive or negative IOB. If you can’t find a time like that, chances are you may need to adjust settings. Nighttime is usually the easiest to find that…but having well-set nighttime basals does not mean that daytime is also necessarily well-set. That needs to be tested as well.
3rd: Insulin sensitivity factor
Insulin sensitivity factor (ISF) is the next logical setting to test. If you’ve just done the basal test and gotten steady BGs with an open loop…try taking a glucose tab or two. Wait for your BGs to be steady at the higher BG, and give a safe correction that you think will get you close to target. Watch the resulting BG drop over the next 2-3 hours. You should see BGs come to a steady level again. How much did the BG drop? How many units of insulin did you use? Divide the two numbers and you will have your ISF. If your BG dropped 15 mg/dl with half unit of insulin, your ISF is approximately 30 mg/dl/unit.
In the context of a closed loop ISF affects how strongly the loop responds to deviations from target. If your ISF number is too high then it won’t respond strongly enough to bring you back into line. Too small a number and the response will be too strong and it will oscillate between zero temping and high temp basals. And you’ll see a fluctuating BG as a result.
If your ISF number is too low (the insulin is having a bigger effect than the number would suggest), one of the most common symptoms you’ll see is a roller coaster of BGs where the temp basals are cycling between zero and high temping. I’m going to borrow a couple of example graphs from Looped group. These are examples where too low an ISF (ISF number too small) is more than likely a large factor in the roller-coaster (doesn’t mean it is the only culprit, and is more difficult to ferret out when food is involved like the second graph). But, lightning bolt high temp basals followed by very quick BG drops and zero temps is usually too low an ISF… raise the ISF number to help looping know that each unit of insulin is actually doing more BG dropping.


4th: Carb Ratios
Now that you have basals, ISF, and DIA all set-up…here’s where it gets really tempting to close loop and move on. And, truthfully, it’s not that hard to test carb ratios on a closed loop vs an open loop if you’ve solidly tested all these other factors.
A good carb ratio will bring your BGs back to the starting point of the meal within about 3 hours or so.
A bad carb ratio will leave you higher or lower than the starting point of the meal.
For example, these are two examples of carb ratios being too strong. In this first example, there’s 2.27 units of IOB and BGs are at 103 and headed down at a pretty good clip at about 2 hours after the meal. If the next meal hadn’t been eaten then, low treatment certainly would’ve been needed.

This next graph also shows too aggressive of a carb ratio. Three hours after the meal, there’s nearly 0.50 units IOB, BG is well below where the meal started, and definitely low treatments needed.

If you are finding that a correct carb ratio is yielding good BGs 3 hours later, but you aren’t happy with the peak BGs during the meal…then it may be time to explore increasing or adding prebolusing time to your meal or implementing “eating soon” targets an hour before meals to help control the post-meal BG spike. Artificially strengthening carb ratios to help control post-meal BG spike will likely yield lows 2-3 hours after a meal.
But what about diabetes?
Of course, as soon as you test and dial-in all these things, diabetes will throw you a curve ball and change your insulin needs. That’s the way it works. It’s not just YDMV (your diabetes may vary), it’s actually YDWV (your diabetes will vary). So how do you adjust settings without needing to open loop every time? Short answer: it takes practice.
For us personally, hormones play the largest variable in settings. If we estimate average basal rate of about 1 u/hr for Anna, hormones can make her range from 0.55 to 3 u/hr. Illness or heat can make her ISF change from typical 35 to a range between 30-45. We have gotten used to changing settings (basal rates mostly) to accommodate hormone fluctuations. Illness and heat we tend to use shorter-term fixes like temp targets to help rather than changing settings.
One of the easiest tells we have that basals need to change is hanging out above/below target with positive/negative IOB. Here’s one recent example. During the day before this screenshot, Anna was busy with some stressful things at school…like being front and center during the school’s pep rally for Homecoming around noon to 2pm. So, the unusual red spot on her graph didn’t immediately make me think anything was “wrong”. Then she went to Homecoming dance that night, hung a little higher than target, but nothing too bad and she wasn’t looping during dance (her choice). She came home around midnight, and at about 5am I noticed that she was hanging out steady at about 130s and carrying positive IOB. Fingerstick showed she was at 195 (thanks Dexcom). Gave a correction and started to wonder if may her basals were too low, because she shouldn’t have been that high under normal operations (but maybe homecoming dance was to blame?). I didn’t make any changes to her settings at this point, but did start to watch for signs.

In the morning, Anna had a typical breakfast with some toast and fruit. With fiasp, she hasn’t really been going above 150 (and usually not above 130)…so when she hit nearly 180 for the meal, I definitely started to think basals may indeed be low…but I waited to see how the meal would land.

As you can see above, about 2.5 hours after her meal of fairly quick carbs, she started to rise. And she started to rise with about 0.75 units IOB. This is odd for her. Ideally, we wouldn’t be seeing sharp, steady rises with a good amount of IOB. Additionally, this meal didn’t have protein or fat involved so I knew the rise wasn’t a late food contribution (even if Loop had some cob still on board).
So, once it looked like (1) the rise really wasn’t slowing down even like Loop thought it should, (2) she was climing with fiasp for nearly an hour of high temping with (3) positive IOB…then I finally decided to adjust basals. I moved her basals from 0.85 to 1.2 u/hr. Why that number? A guess based on basal rates she tends to move between during her regular variations. Trial and error have shown us that a rate slightly above 1 u/hour is usually needed sometimes.

One of the things I like to watch is the IOB pill when we make a basal change. Ideally, I like to get the IOB back to a number that is roughly how much I think may help get a correction going again. So, changing the basals from 0.85 to 1.2, Loop recalculated IOB from 0.52 to -0.48. Which was roughly in line with what I’d expect…Anna was about 27 mg/dl over her 95 mg/dl target with an ISF of 55…meaning she’d need about 0.49 units to correct to target. Perfect…seemed like a reasonable amount of movement for basals then. Loop started running a high temp and I wait to see how things look in about 2 hours.

About 1.5 hours later, Anna wasn’t quite coming down as fast as I would’ve expected. She was still holding 0.57 IOB and at same BG as she was 80 minutes before. So…I waited a bit and adjusted again to 1.4 u/hour. Again, just a guess, but nearly two hours after that adjustment we are sitting just about at target and just about even IOB. I’ll probably split the baby and use 1.3 u/hr going forward.
So…that’s how I look for and make tweaks to my settings while closed looping. The basis is knowing what “good” times look like and how foods normally behave. Open-loop testing really helps with that. Then, when you find yourself with some of the telltale signs (food going differently than expected, BGs holding steady but not at target, moving up/down without IOB helping, etc) over an extended period of time, you can make small adjustments and watch for the resulting behaviors. I don’t adjust based on just one meal or one period of above-target BGs. There’s too often another reason (stress, sensor issues, etc) that could explain a short term high/low BG pattern…but if I notice the trend continuing for a period of time/several meals, I adjust. Shorter term issues from stress or exercise we deal with using temp targets or just have a little more patience and wait for them to come down when the issue has passed.
Autotune
Autotune is an application which will read the data that has accumulated in your Nightscout server and help you to analyse it, giving you suggestions as to how to adjust your basal rates, your sensitivity and your carb ratios. As with Nightscout you can either set up your own using the freely available code or you can use a ready built online service
Warning
As Nightscout is the only source of data for Autotune, it’s important that the data in Nightscout is complete. If you don’t log all of your carb intake for example, Autotune is likely to produce misleading results.
Profiles & Basals
Autotune does not use profile switch events from Nightscout. It assumes that the profile given as part of the input to Autotune was used for the entire period of data being considered.
If you are using a closed loop system this shouldn’t be a problem, as most of the time you will have a temp basal rate running so even if the base profile basal rate was changed, the temp basal records in Nightscout will record what basal rate was running at the time. However, if you are running for most of the time using your standard profile basal, you may not get accurate records if your profile has changed significantly over the time period you are running Autotune over. You should therefore restrict Autotune to running only over a time period for which you were using the same basal profile.
Another point to note is how temp basal records are recorded in Nightscout. If you record temp basals as a percentage of the profile basal, those records will not be used by Autotune and it will assume that the profile basal was in force at the time. Your temp basal records should either be recorded as absolute basal values, or be percentages but with the additional rate property specified as part of the record as well.
Autotune Process
Autotune will start with the profile that you give it, then run the following process on each day’s worth of data in turn. The results from each day are used as the starting point for autotuning the next day’s data, and so on. The results from the final day are given as the ultimate recommendation.
Categorization
Autotune takes the BG entries from Nightscout, along with carbs and insulin (boluses and temp basal records). It looks at the difference between the actual and expected changes between each consecutive BG entry and uses the associated carbs and insulin data to determine why the change between the two BG entries was what it was.
Deltas and Deviations
In a sequence of BG readings, the delta is the difference between a BG reading and the preceding reading.
For each reading it is also possible to calculate the amount of insulin that would have taken effect since the preceding reading. Multiplying this amount of insulin activity by the insulin sensitivity factor (ISF) gives the expected change in BG (called by Blood Glucose Impact, or BGI).
The deviation is the difference between the actual BG delta and the BGI.
| Time | 10:00 | 10:05 | 10:10 | 10:15 | 10:20 |
|---|---|---|---|---|---|
| BG | 100 | 102 | 104 | 103 | 100 |
DeltaCurr. BG - Prev. BG
|
0 | 2 | 2 | -1 | -3 |
| IOB | 1.0 | 0.99 | 0.97 | 0.95 | 0.93 |
Insulin Activity (IA)Prev. IOB - Curr. IOB
|
0.00 | 0.01 | 0.02 | 0.02 | 0.02 |
BGI-IA * ISFAssuming ISF of 180 |
0.00 | -1.8 | -3.6 | -3.6 | -3.6 |
DeviationDelta - BGI
|
0.0 | 3.8 | 5.6 | 2.6 | 0.6 |
Each deviation is allocated to one of several different contributing factors:
CSF - if there are COB, or while the deviations stay positive (BG is rising quicker or not falling as fast as expected based on IOB) after COB reaches 0, those deviations are logged against the carb sensitivity factor (CSF)
In the example below, carbs and insulin are delivered at 10:05. All carbs are absorbed by 11:35 but deviations stay positive until 12:00, so all deviations from 10:05 to 11:55 are classed as CSF. Move your mouse over the purple deviation line to see an explanation of the categorisation at each data point.
UAM - if there is more IOB than the current hourly basal rate, or the deviation was more than 6 mg/dL, those deviations are logged against unannounced meals (UAM)
In the example below, carbs are not logged but the BG starts rising rapidly and then bolus insulin is delivered at 10:30. All deviations from when the BG starts rising until the IOB has reduced to below the basal level are classed as UAM.
basal - if the expected impact on BG of basal insulin is 4 or more times that of the net IOB, or the BG is rising, those deviations are logged against basals
In the example below, carbs are not logged, the BG rises gently and a small bolus is administered to reduce it. All deviations for the period are classed as basal.
ISF - if the BG is falling and the the expected impact on BG of the net IOB is at least a quarter of the basal insulin, those deviations are logged against the insulin sensitivity factory (ISF)
In the example below, the BG starts off high and a bolus is administered to reduce it. All deviations while the BG is falling after the bolus are classed as ISF.
After completing this process, some of the deviations will be moved to the other categories:
- If the
--categorize-uam-as-basaloption was specified on the Autotune command line, all the UAM deviations will be moved to the basal category. This is a useful option to specify if you have definitely entered all carbs, including rescue carbs, into Nightscout - If there are more than twice as many deviations classified as UAM than basal, the lowest 50% of the UAM deviations will be moved to the basal category and the highest 50% to the ISF category. This is based on the assumption that the basal & ISF settings are too far out, causing large deviations that have been incorrectly classified as UAM
- If there were fewer than 10 ISF deviations, and more than 4 times as many CSF deviations than basal deviations, all the CSF deviations will be moved to the ISF category. This is based on the assumption that the carb absorption calculations are out
Autotuning Carb Ratio
The carb ratio (CR) is autotuned by looking at the starting and ending BG for each meal (BG when carbs were entered and BG when COB reached zero and IOB was less than half the hourly basal rate). The CR is then calculated based on the IOB that was already present at the start of the meal and the insulin delivered during the absoption of the meal, plus/minus any additional insulin required to bring the ending BG back to the same level as the starting BG.
This is done for each meal and then averaged over the day to produce the suggested CR. Only 20% of the change to the CR is used in the output so it doesn’t produce fast-changing recommendations.
Autotuning Basals
The total basal deviations in each hour are summed, then the current ISF is applied to work out how much insulin would be needed to counteract those deviations. Only 20% of this change in insulin is considered for the later calculations so it doesn’t produce fast-changing recommendations.
If more insulin is needed, the basal rates for the previous 3 hours are each increased by 1/3 of the required extra insulin.
If less insulin is needed, the basal rates for the previous 3 hours are reduced in proportion to remove the calculated amount of insulin.
Finally, some hours will not have any deviations in the basal category, e.g. because all the deviations were allocated to carb absorption. In these cases, the basal recommendation will be based on the first hour before and after that were adjusted, taking 80% of the current basal setting for this hour plus 10% of each adjacent autotuned hour.
Warning
Note that this last point means that hours that are routinely dominated by carb absorption will over time have their basal rates set to an average of the surrounding hours. If you do have an underlying need for higher or lower basal rates than normal at these times as well, Autotune will combine these changes with your CSF. While those changes may work for these times, it can lead to a dangerously high carb ratio for other times.
Autotuning ISF
The deviations allocated to ISF are compared to the expected deviation. These ratios between actual and expected deviations are sorted and the median one is taken. The new ISF is then calculated by multiplying this median ratio by the current ISF. Only 20% of the change to the ISF is used in the output so it doesn’t produce fast-changing recommendations.
Safety Limits
A minimum and maximum ratio for all changes is included as part of the Autotune input. The suggested settings for these are -30% and +20%. Any suggested changes will be limited to this range, including CR, ISF and basals.
Tips and Tricks
The founding principle of closed looping is that your basal rate and carb ratio is accurate. All recommendations assume that your basal needs are met and any peaks or troughs you’re seeing are a result of other factors which therefore require some one off adjustments (exercise, stress etc). The adjustments the closed loop can make for safety have been limited (see maximum allowed temporary basal rate in OpenAPS Reference Design), which means that you don’t want to waste the allowed dosing on correcting a wrong underlying basal. If for example you are frequently low temping on the approach of a meal then it is likely your basal needs adjusting. You can use autotune to consider a large pool of data to suggest whether and how basals and/or ISF need to be adjusted, and also whether carb ratio needs to be changed. Or you can test and set your basal the old fashioned way.
Practicalities of looping
- If you don’t want your preferences to be easily changed then you can password protect the preferences menu by selecting in the preferences menu “password for settings” and type the password you choose. The next time you go into preferences menu it will ask for that password before going any further. If you later want to remove the password option then go into “password for settings” and delete the text.
- If you plan to use the android wear app to bolus or change settings then you need to ensure notifications from AndroidAPS are not blocked. Confirmation of action comes via notification.
- If you take your pump off for showering/bathing/swimming/sport etc then press and hold on the “Open Loop”/”Closed Loop” text on the main homepage and select “disconnect for…” however many hours you plan to disconnect for. This will set your basal to zero for that time period. The minimum length of time for a disconnection is due to the minimum length of TBRs that can be set on the pump so if you wish to disconnect for a shorter period of time, or you connect your pump sooner than expected then press and hold “Suspended (X mins)” and select “Resume”. Your IOB will then be accurate for calculations on your return to the pump.
- For safety, recommendations made are based on not one CGM reading but the average delta. Therefore if you miss some readings it may take a while after getting data back before AndroidAPS kicks in looping again.
- There are several blogs with good tips to help you understand the practicalities of looping:
- Fine-tuning Settings See my CGM
- Why DIA matters See my CGM
- Limiting meal spikes #DIYPS
- Hormones and autosens See my CGM
Batteries
Looping can reduce the pump battery faster than normal use because the system interacts through bluetooth far more than a manual user does. It is best to change battery at 25% as communication becomes challenging then. You can set warning alarms for pump battery by using the PUMP_WARN_BATT_P variable in your nightscout site. Tricks to increase battery life include:
- reduce the length of time the LCD stays on (within pump settings menu)
- reduce the length of time the backlight stays on (within pump settings menu)
- select notification settings to a beep rather than vibrate (within pump settings menu)
- only press the buttons on the pump to reload, use AndroidAPS to view all history, battery level and reservoir volume.
- AndroidAPS app may often be closed to save energy or free RAM on some phones. When AndroidAPS is reinitialized at each startup it establishes a Bluetooth connection to the pump, and re-reads the current basal rate and bolus history. This consumes battery. To see if this is happening, go to Preferences > NSClient and enable ‘Log app start to NS’. Nightscout will receive an event at every restart of AndroidAPS, which makes it easy to track the issue. To reduce this happening, whitelist AndroidAPS app in the phone battery settings to stop the app power monitor closing it down.
- clean battery terminals with alcohol wipe to ensure no manufacturing wax/grease remains.
- for DanaR/RS pumps the startup procedure draws a high current across the battery to purposefully break the passivation film (prevents loss of energy whilst in storage) but it doesn’t always work to break it 100%. Either remove and reinsert battery 2-3 times until it does show 100% on screen, or use battery key to briefly short circuit battery before insertion by applying to both terminals for a split second.
- see also more tips for particular types of battery to use for Combo pump
Changing reservoirs and canulas
The change of cartridge can not be done via AndroidAPS, but must be carried out as before directly via the pump.
- Long press on “Open Loop”/”Closed Loop” on the Home tab of AndroidAAPS and select ‘Suspend Loop for 1h’
- Now disconnect the pump, and change the reservoir as per pump instructions.
- Once reconnected to the pump continue the loop by long pressing on ‘Suspended (X m)’.
The change of a canula however does not use the “prime infusion set” function of the pump, but fills the infusion set and/or canula using a bolus which does not appear in the bolus history. This means it does not interrupt a currently running temporary basal rate. On the Actions (Act) tab, use the PRIME/FILL button to set the amount of insulin needed to fill the infusion set and start the priming. If the amount is not enough, repeat filling. You can set default amount buttons in the Preferences > Other > Fill/Prime standard insulin amounts. See the instruction booklet in your canula box for how many units should be primed depending on needle length and tubing length.
Other tips and tricks can be found in the Facebook group
Tips and Tricks - Combo
How to ensure smooth operations
- Always carry the smartphone with you, leave it next to your bed at night.
- Always make sure that the pump battery is as full as possible. See the battery section for tipps regarding the battery.
- It is best to not touch the app ruffy while the system is running. If the app is started again, the connection to the pump can break off. Once the pump is connected to ruffy, there is no need to re-connect. Even after a restart of the phone, the connection is automatically re-established. If possible, move the app to an unused screen or in a folder on your smartphone so you do not accidentally open it.
- If you unintentionally open the app ruffy during looping, it’s best to restart the smartphone right away.
- Whenever possible, only operate the pump via the AndroidAPS app. To facilitate this, activate the key lock on the pump under PUMP SETTINGS / KEY LOCK / ON. Only when changing the battery or the cartridge, it is necessary to use the pump’s keys.

Pump not reachable. What to do?
Activate pump unreachable alarm
- In AndroidAPS, go to Settings / Local Alarms and activate alarm when pump is unreachable and set pump not reachable limit [Min] to 31 minutes.
- This will give you enogh time to not trigger the alarm when leaving the room while your phone is left on the desk, but informs you if the pump cannot be reached for a time that exceeds the duration of a temporary basal rate.
Restore reachability of the pump
- When AndroidAPS reports a pump unreachable alarm, first release the keylock and press any key on the pump (e.g. “down” button). As soon as the pump display has turned off, press UPDATE on the Combo Tab in AndroidAPS. Mostly then the communication works again.
- If that does not help, reboot your smartphone. After the restart, AndroidAPS and ruffy will be reactivated and a new connection will be established with the pump.
- The tests with different smartphones have shown that certain smartphones trigger the “pump unreachable” error more often than others. AAPS Phones lists successfully tested smartphones.
Root causes and consequences of frequent communication errors
- On phones with low memory (or aggressive power-saving settings), AndroidAPS is often shut down. You can tell by the fact that the Bolus and Calculator buttons on the Home screen are not shown when opening AAPS because the system is initializing. This can trigger “pump unreachable alarms” at startup. In the Last Connection field of the Combo tab, you can check when AndroidAPS last communicated with the pump.
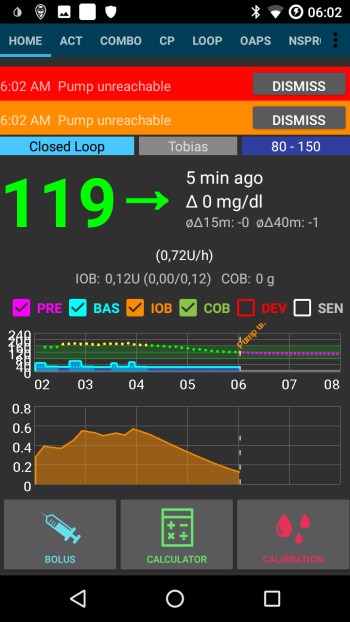
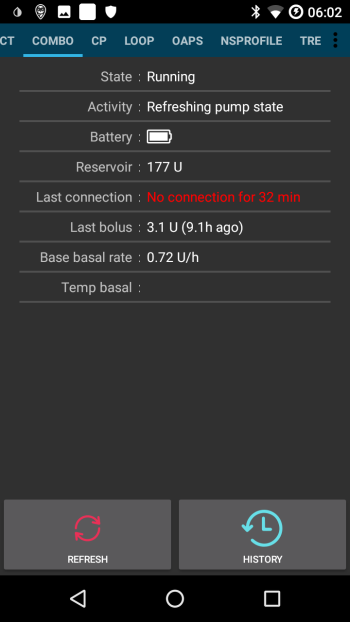
- This error can drain the pump’s battery faster because the basal profile is read from the pump when the app is restarted.
- It also increases the likelihood of causing the error that causes the pump to reject all incoming connections until a button on the pump is pressed.
Cancellation of temporary basal rate fails
- Occasionally, AndroidAPS can not automatically cancel a TBR CANCELED alert. Then you have to either press UPDATE in the AndroidAPS Combo tab or the alarm on the pump will be confirmed.
Pump battery considerations
Changing the battery
- After a low battery alarm, the battery should be changed as soon as possible to always have enough energy for a reliable Bluetooth communication with the smartphone, even if the phone is within a wider distance of the pump.
- Even after a low battery alarm, the battery might be used for a significant amount of time. However, it is recommended to always have a fresh battery with you after a “low battery” alarm rang.
- To do this, long-press on Closed Loop on the main screen and select Suspend loop for 1h.
- Wait for the pump to communicate with the pump and the bluetooth logo on the pump has faded.
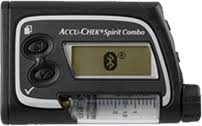
- Release the key lock on the pump, put the pump into stop mode, confirm a possibly canceled temporary basal rate, and change the battery.
- Then put the pump back in run mode select Resume when lon-pressing on Suspended on the main screen.
- AndroidAPS will re-set a necessary temporary basal rate with the arrival of the next blood sugar value.
Battery type and causes of short battery life
- As intensive Bluetooth communication consumes a lot of energy, only use high-quality batteries like Energizer Ultimate Lithium ,the “power one”s from the “large” Accu-Chek service pack, or if you are going for a rechargeable battery, use Eneloop batteries.


Ranges for typical life time of the different battery types are as follows:
- Energizer Ultimate Lithium: 4 to 7 weeks
- Power One Alkaline (Varta) from the servcie pack: 2 to 4 weeks
- Eneloop rechargable batteries (BK-3MCCE): 1 to 3 weeks
If your battery life is signifcantly shorter than the ranges given above, please check the following possible causes:
- Die latest version (March 2018) of the ruffy App significantly improved pump battery lifetime. Make sure you are on that version if you have issues with a short battery lifetime.
- There are some variants of the screw-on battery cap of the Combo pump, which partially short circuit the batteries and drain them quickly. The caps without this problem can be recognized by the golden metal contacts.
- If the pump clock does not “survive” a short battery change, it is likely that the capacitor is broken which keeps the clock running during a brief power outage. In this case, only a replacement of the pump by Roche will help, which is not a problem during the warranty period.
- The smart phone hardware and software (Android operating system and bluetooth stack) also impact the battery lifetime of the pump, even though the exact factors are not completely known yet. If you have the opportunity, try another smartphone and compare battery lifetimes.
Daylight saving time changes
- Currently the combo driver does not support automatic adjustment of the pump’s time.
- During the night of a daylight saving time change, the time of the smartphone is updated, but the time of the pump remains unchanged. This leads to an alarm due to deviating times between the systems at 3 am.
- If you do not want to be awakened at night, deactivate the automatic daylight saving time changeover on the mobile phone in the evening before the time changeover and adjust the times manually the next morning.
Extended bolus, multiwave bolus
The OpenAPS algorithm does not support a parallel extended bolus or multiwave bolus. But a similar treatment can be achieved by the following alternatives:
- Before eating, on the Actions tab in AndroidAPS set as a temporary Eating Soon goal with target glucose 80 for several hours. The duration should be based on the interval you would chosse for an extended bolus.
- Then use the CALCULATOR to enter the full carbs of the meal, but do not directly apply the values suggested by the bolus calculator. If a multiwave-like bolus is to be delivered, input the carbohydrate share as a bolus. Depending on the meal, the algorithm now has to deliver a very high temporary basal rate to counteract the increase in blood sugar. Here, the safety limitation of the basal rate (Max IE / h, Maximum basal IOB) should be very carefully experimented with and, if necessary, temporarily changed.
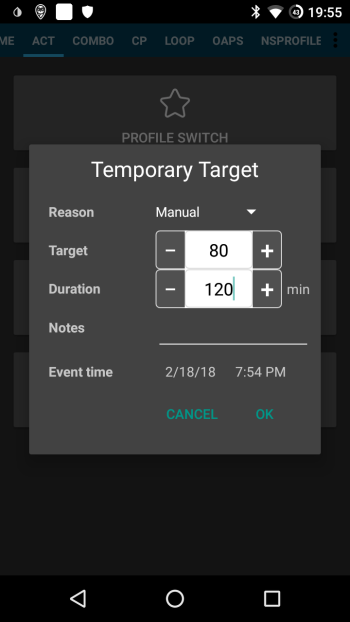
- Alternatively, on the Actions tab in AndoidAPS a profile change can be made with the duration of the delayed bolus and an increased percentage. There is no need for another profile (eg in Nightscout). The correct percentage can be calculated from the average basal rate over the selected period and the amount of insulin needed. Thus, a desired extended bolus of 4 IU for 4 hours at a basal rate of 0.5 IU / h would require a temporary basal rate of 300% .
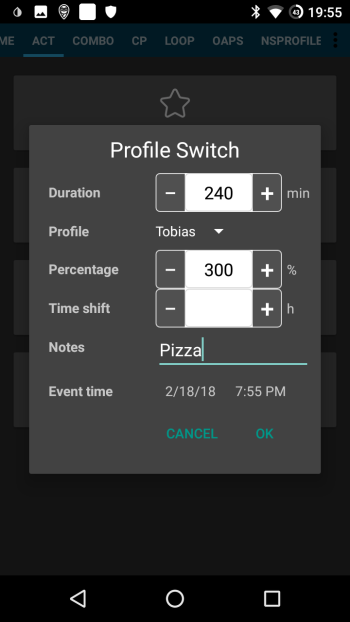
- IF you are tempted to just use the extended or multiwave bolus directly on the pump, AndroidAPS will penalize you wth disabling the closed loop for the next six hours to ensure that no excess insulin dosage is calculated.
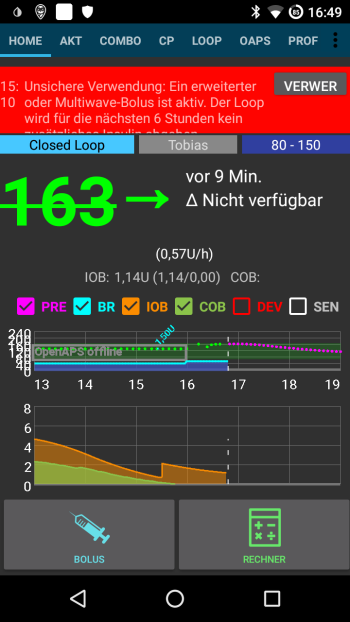
Alarms at bolus delivery
- If AndroidAPS detects that an identical has been successfully delivered at the same minute, bolus delivery will be prevented with identical numer of insulin units. If your really want to bolus the same inuslin twice in short succession, just wait two more minutes and then deliver the bolus again. If the fist bolus has been interruped ot was not delivered for other reasons, you can immediately re-submit the bolus since AAPS 2.0.
- Background is a safety mechanism that reads the pump’s bolus history before subm,itting a new bolus to correctly calculate insulin on board (IOB), even when a bolus is delivered directly from the pump. Here indistinguishable entries must be prevented.
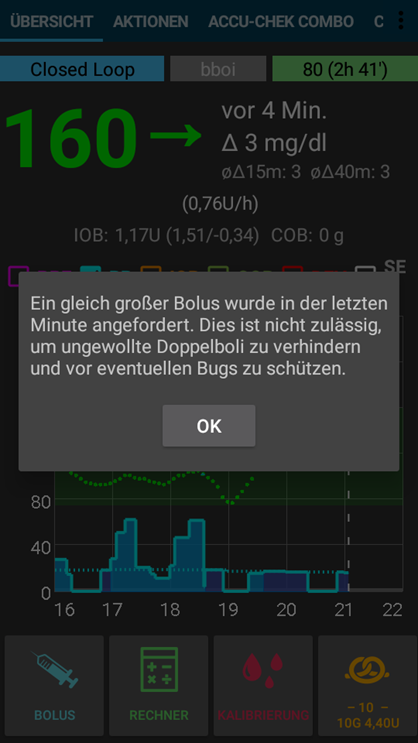
- This mechanism is also responsible for a second cause of the error: If during the use of the bolus calculator another bolus is delivered via the pump and thereby the bolus history changes, the basis of the bolus calculation is wrong and the bolus is aborted.
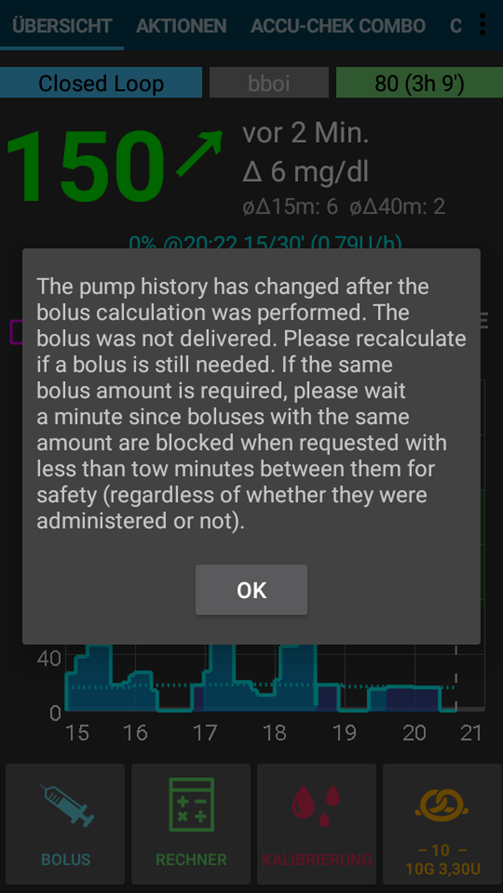
Accessing logfiles
- Connect phone to a computer in file transfer mode
- Locate log files in this directory or similiar (may little bit vary on different phones)

- The current log is a .log file which can be viewed in a number of ways such as LogCat in Android Studio, Log Viewer android app, or simply plain text. Previous log files are zipped and stored in folders in date/time order. If sharing your log in gitter when talking about a potential bug then unzip and upload the folder dated before the error occurred.
Development branch
Attention: The dev version of AndroidAPS is only for developers and testers comfortable dealing with stacktraces, looking through log files and maybe firing up the debugger to produce bug reports that are helpful to the developers (in short: people that know what they are doing without being assisted!). Therefore many unfinished features are disabled. To enable these features enter Engineering Mode by creating a file named engineering_mode in the same directory where you would find the log files. Enabling the engineering mode might break the loop entirely.
The most stable version of AndroidAPS to use is that in the Master branch. It is advised to stay on the Master branch while you complete the Objectives and get practiced at looping.
However, the Dev branch is a good place to see what features are being tested and to help iron out the bugs and give feedback on how the new features work in practice. Often people will test the Dev branch on an old phone and pump until they are confident it is stable - any use of it is at your own risk.
A short summary of some of the changes to old features or development of new features currently in the Dev branch is listed below, and links to any key issues known will be shared (if applicable).
Super Micro Bolus (SMB)
More can be read on Super Micro Boluses (SMB) on OpenAPS docs.
Remember that you are choosing to test a still-in-development feature. Do so at your own risk & with due diligence to keep yourself safe.
You should have run basic closed looping for more than four weeks (having completed Objective 7), and be very aware of all the types of situations in which your APS might fail.
You may need to adjust your settings to allow SMB to work effectively. A good place to start is increasing your max IOB to normal meal bolus + 3x max daily basal. But remain vigilant and adjust settings with care.
As with all updates, previous code has been cleaned, improved and bugs fixed.
If you find a bug or think something wrong has happened when using the Dev branch, then view the issues tab to check whether anyone else has found it, or add it yourself if not. The more information you can share here the better (don’t forget you may need to share your log files). The new features can also be discussed in the gitter room.
If you would like to be up-to-date on the Dev Branch you can use the same steps as already outlined in the [[Update to new version|Update-to-new-version]] page. You just need to change to the corresponding “dev”-Branch in Android Studio. See [[Selecting Branch|Update to new version#selecting branch]] for details.
Where to go for help
Connect with others Using AndroidAPS
Who is using AndroidAPS? Add yourself to the map here by going to Additions > Add Marker - Simple. Choose a green pin for “I’ve got it!” or an orange pin for “I want it”. List your name as your facebook name and in the description record extra info such as your pump, CGM and your endo/clinic name if they’re supportive. The address does not have to be your actual house, you can just add town name or even your clinic address if you prefer.
Make sure to join the AndroidAPS users group on Facebook!
Join the Facebook group if you want to contact anyone on the map to ask country specific questions.