Introduction¶
TODO
Contents¶
Quick Start¶
Environment setup¶
Windows Server 2012 R2 + Java 7 + Glassfish 3.1.2.2¶
Java setup¶
Download latest jdk 7 from official Oracle site. For now can be accessed from Oracle archive http://www.oracle.com/technetwork/java/javase/archive-139210.html
Install downloaded file
Add JAVA_HOME and JAVA_JRE path variables to your system. open command line from Administrator and run
setx -m JAVA_HOME "C:\Progra~1\Java\jdk1.7.0_XX"and
setx -m JAVA_JRE "C:\Progra~1\Java\jre7"with setting up correct path to installation.
Note
You can do that by reading following tutorial https://confluence.atlassian.com/doc/setting-the-java_home-variable-in-windows-8895.html
Apache2 setup¶
- Download Apache2 from http://www.apachelounge.com/download/
Hint
Don’t forget to install the “Visual C++ Redistributable” that is linked from the download page.
- Unzip the Apache24 folder to C:/Apache24 (that is the ServerRoot in the config).
Default folder for your your webpages is DocumentRoot C:/Apache24/htdocs
When you unzip to an other location, change ServerRoot in the httpd.conf and change in httpd.conf the Documenroot, Directories, ScriptAlias also when you use the extra folder config file(s) change to your location there
Edit the httpd.conf file located in <apache install folder>conf and uncomment following lines
LoadModule proxy_module modules/mod_proxy.so LoadModule proxy_http_module modules/mod_proxy_http.so LoadModule headers_module modules/mod_headers.so
And add proxy configuration at the end of file
<IfModule proxy_module> # Add header to prevent CORS problem with running streamflow webclient Header set Access-Control-Allow-Origin "*" ProxyRequests Off ProxyPreserveHost On ProxyVia On # Let apache correctly rewrite redirect ProxyPass / http://localhost:8080/ ProxyPass /streamflow/ http://localhost:8080/streamflow/ ProxyPass /surface/ http://localhost:8080/surface/ ProxyPassReverse / http://localhost:8080/ ProxyPassReverse /streamflow/ http://localhost:8080/streamflow/ ProxyPassReverse /surface/ http://localhost:8080/surface/ # don't lose time with IP address lookups HostnameLookups Off </IfModule>
- Edit the httpd.conf file located in <apache install folder>conf
Enable the following modules
LoadModule ssl_module modules/mod_ssl.so
and enable the following configuration at the end of the file
# Secure (SSL/TLS) connections Include conf/extra/httpd-ssl.conf # # Note: The following must must be present to support # starting without SSL on platforms with no /dev/random equivalent # but a statically compiled-in mod_ssl. # <IfModule ssl_module> SSLRandomSeed startup builtin SSLRandomSeed connect builtin </IfModule>
Edit the httpd-ssl.conf file located in <apache install folder>confextra
... ServerName streamflow.test.imcode.com:443 ServerAdmin tech@imcode.com ... SSLCertificateFile "c:/Apache24/conf/<your cert>.crt" (or bundle) ... SSLCertificateKeyFile "c:/Apache24/conf/<your key>.key" ...
If you want to automatically redirect the user from http to https you need to enable the module mod_rewrite and add the following lines to your httpd.conf files. See http://www.sslshopper.com/apache-redirect-http-to-https.html
RewriteEngine On RewriteCond %{HTTPS} off # No redirect for client download RewriteCond %{REQUEST_URI} !.*/client RewriteRule (.*) https://%{HTTP_HOST}%{REQUEST_URI}- Run as a service
httpd.exe -k install -n "Apache HTTP Service"
Glassfish setup¶
Download latest Glassfish 3 (3.1.2.2 for now) from http://www.oracle.com/technetwork/middleware/glassfish/downloads/ogs-3-1-1-downloads-439803.html
Launch downloaded file.
Important
If it complains about not installed java. Open console at administration mode and execute like
osgi-3.1.2.2.exe -j "C:\Progra~1\Java\jre7"During install choose custom installation -> Install and Configure.
Note
Don’t install update tool. It’s not gonna be update
Choose Create server domain and after input needed values
Also choose Create Operating System service for domain
Note
You can add system service later manually. To do that go to %Glassfish home directory%bin and then run asadmin.exe and execute following command
create-service --name %Your service name%Also you can check additional options at https://docs.oracle.com/cd/E19798-01/821-1758/create-service-1/index.html
- Go inside to following location under installation folder. glassfish/domains/%Domain name%/config/ and change domain.xml file and add following lines
<jvm-options>-Djavax.net.ssl.keyStorePassword=changeit</jvm-options> <jvm-options>-Djavax.net.ssl.trustStorePassword=changeit</jvm-options>
to java-config section (There are two of them) you can find iy quickly by huge amount of other jvm-options
If SSL was configured tell Glassfish that Apache acts as a SSL-terminating proxy server.
In the Admin Console go to Network Config - Network Listeners - http-listener-1 - Tab HTTP Enable Auth Pass Through
Important
In order to fix possible connections reset and 500 especially for webclient it’s recommended to increase max-thread-pool size for http In case of Glassfish it can be made by next param
<thread-pool name="http-thread-pool" max-thread-pool-size="200"/>
Put needed value (Maybe it should be lower than 200)
Local files¶
Streamflow database folder and configuration entries in Java Preferences(windows registry) are tight coupled to the user who is running Glassfish. Can be edited with VisualVM Manager
If Glassfish is run as a windows service with the system default user the database folder ends up in
Note
varies if run with 32bit or 64bit - SysWOW64 or System32
C:\Windows\System32\config\systemprofile\Application Data
It is possible to run Glassfish with its own user that has the userprofile location moved to another location - i.e. D:
Create a new Standard User with no password expiration and user may not change password.
If Glassfish was installed by an administrator the new user will need to be part of the administrators group to be able to run Glassfish.
Move the profile to the new location ( D: ) and create a link
mklink /D C:\Users\<username> D:\<username>Hint
(where ever you moved the profile to)
Go to the Glassfish windows service and change the user in LogOn tab to the newly created user.
Start the Glassfish service again to create the Streamflow database and the configuration location in the registry for the new user.
If you need to move an old database to the new location just replace the StreamflowServer folder inside the new Application Data with the one from the old location.
Configuration preferences are a little more tricky. The best way might be to export the old entries change the first part of the path to the location for the new user, change the location entry for the database files in the data key to represent the new database file location and then import the entries into the registry.
Ubuntu + Java 7 + Tomcat¶
Java setup¶
- Install Java
sudo add-apt-repository ppa:webupd8team/java sudo apt-get update sudo apt-get install oracle-java7-installer sudo apt-get install oracle-java7-set-default
Apache setup¶
- Install apache
sudo apt-get install apache2 a2enmod proxy a2enmod proxy_http
Edit default site configuration to enable proxy located at file /etc/apache2/sites-available/default
There should be following content
NameVirtualHost *:80 <VirtualHost *:80> ServerAdmin support@streamsource.se DocumentRoot /var/www <Directory /> Options FollowSymLinks AllowOverride None </Directory> <Directory /var/www/> Options Indexes FollowSymLinks MultiViews AllowOverride None Order allow,deny allow from all </Directory> ScriptAlias /cgi-bin/ /usr/lib/cgi-bin/ <Directory "/usr/lib/cgi-bin"> AllowOverride None Options +ExecCGI -MultiViews +SymLinksIfOwnerMatch Order allow,deny Allow from all </Directory> ErrorLog ${APACHE_LOG_DIR}/error.log # Possible values include: debug, info, notice, warn, error, crit, # alert, emerg. LogLevel warn CustomLog ${APACHE_LOG_DIR}/access.log combined Alias /doc/ "/usr/share/doc/" <Directory "/usr/share/doc/"> Options Indexes MultiViews FollowSymLinks AllowOverride None Order deny,allow Deny from all Allow from 127.0.0.0/255.0.0.0 ::1/128 </Directory> ProxyRequests Off ProxyPreserveHost On ProxyVia On # Let apache correctly rewrite redirect ProxyPass / http://localhost:8080/ ProxyPass /streamflow/ http://localhost:8080/streamflow/ ProxyPass /surface/ http://localhost:8080/surface/ ProxyPassReverse / http://localhost:8080/ ProxyPassReverse /streamflow/ http://localhost:8080/streamflow/ ProxyPassReverse /surface/ http://localhost:8080/surface/ # don't lose time with IP address lookups HostnameLookups Off </VirtualHost>And change /etc/apache2/ports.conf. Comment out following lines
#NameVirtualHost *:80
- Configure SSL if needed
Note
Ubuntu - check that ssl-cert - OpenSSL wrapper is already installed For Development or Test servers create a self signed certificate
sudo mkdir /etc/apache2/ssl sudo make-ssl-cert /usr/share/ssl-cert/ssleay.cnf /etc/apache2/ssl/apache.pem
Enable SSL on apache2
sudo a2enmod ssl sudo a2enmod rewrite sudo a2enmod headers sudo /etc/init.d/apache2 force-reload
Copy default virtual host config
sudo cp /etc/apache2/sites-available/default /etc/apache2/sites-available/ssl
Edit the new file by replacing the content with:
NameVirtualHost *:443 <VirtualHost *:443> ServerAdmin support@streamsource.se ServerName test.sf.streamsource.se # if not specified, the global error log is used ErrorLog ${APACHE_LOG_DIR}/error.log CustomLog ${APACHE_LOG_DIR}/access.log combined # Avoid open your server to proxying ProxyRequests Off #ProxyPreserveHost On ProxyVia On # SSL SSLEngine on SSLProxyEngine On SSLCertificateFile /etc/apache2/ssl/apache.pem # Let apache correctly rewrite redirect ProxyPass / http://localhost:8080/ #ProxyPass /streamflow/ http://localhost:8080/streamflow/ #ProxyPass /surface/ http://localhost:8080/surface/ #ProxyPass /client/ http://localhost:8080/client/ #ProxyPassReverse / http://localhost:8080/ #ProxyPassReverse /streamflow/ http://localhost:8080/streamflow/ #ProxyPassReverse /surface/ http://localhost:8080/surface/ #ProxyPassReverse /client/ http://localhost:8080/client/ # don't lose time with IP address lookups HostnameLookups Off ProxyPreserveHost on RewriteEngine on RequestHeader Set Proxy-keysize 512 RequestHeader Set Proxy-ip %{REMOTE_ADDR}e RequestHeader Set Host test.sf.streamsource.se RewriteRule ^/streamflow$ /streamflow/ [R,L] RewriteRule ^/streamflow/(.*) http://localhost:8080/streamflow/$1 [P,L] RewriteRule ^/client$ /client/ [R,L] RewriteRule ^/client/(.*) http://localhost:8080/client/$1 [P,L] RewriteRule ^/surface$ /surface/ [R,L] RewriteRule ^/surface/(.*) http://localhost:8080/surface/$1 [P,L] # configures the footer on server-generated documents #ServerSignature On </VirtualHost>Enable the new site with
sudo a2ensite ssl sudo /etc/init.d/apache2 reload sudo service apache2 restart
Tomcat setup¶
Install tomcat
sudo apt-get install tomcat8 tomcat8-admin
Edit default tomcat startup script located at /etc/default/tomcat8 and disable java security
TOMCAT8_SECURITY=no
Edit Tomcat /etc/tomcat8/server.xml in order to enable the AJP connector. Define AJP connector for communication between Tomcat and Apache:
<!-- Define an AJP 1.3 Connector on port 8009 --> <Connector port="8009" protocol="AJP/1.3" redirectPort="8443" />
Edit the /etc/tomcat6/tomcat-users.xml file in order to enable the manager user and add the manager user:
<tomcat-users> <role rolename="manager"/> <user username="streamflow" password="j0hnd0e" roles="manager"/> </tomcat-users>
- Make tomcat6 owner of the files:
chown -R tomcat8:tomcat8 ~tomcat8
- Restart tomcat:
service tomcat8 restart
- Configure ajp-proxy for Apache and Tomcat
a2enmod proxy_ajp
Edit proxy configuration at /etc/apache2/mods-enabled/proxy.conf. The file should look like this:
<IfModule mod_proxy.c> #turning ProxyRequests on and allowing proxying from all may allow #spammers to use your proxy to send email. ProxyRequests Off ProxyPreserveHost On <Proxy *> AddDefaultCharset off Order deny,allow #Deny from all #Allow from .example.com </Proxy> # Enable/disable the handling of HTTP/1.1 "Via:" headers. # ("Full" adds the server version; "Block" removes all outgoing Via: headers) # Set to one of: Off | On | Full | Block ProxyVia On ProxyPass /streamflow/ ajp://localhost:8009/streamflow/ ProxyPass /manager/ ajp://localhost:8009/manager/ ProxyPassReverse /streamflow/ ajp://localhost:8009/streamflow/ ProxyPassReverse /manager/ ajp://localhost:8009/manager/ RedirectMatch ^/streamflow$ /streamflow/ RedirectMatch ^/manager$ /manager/ </IfModule>Restart Apache:
service apache2 restart1
Important
In order to fix possible connections reset and 500 especially for webclient it’s recommended to increase max-thread-pool size for http In case of Tomcat it can be made by next param
<connector connectiontimeout="20000" maxthreads="200" port="8080" protocol="HTTP/1.1" redirectport="8443" />
Put needed value (Maybe it should be lower than 200)
SQL Server¶
To setup a connection to a SQLServer you need to:
Download the sql-driver from `Microsoft http://www.microsoft.com/en-us/download/details.aspx?displaylang=en&id=11774`_.
Unzip and copy sqljdbc4.jar to application folder library location
- Tomcat
- $CATALINA_HOME/lib
- Glassfish
- ../glassfish/domains/<domain>/lib/ext
Setup the datasource in Streamflow using VisualVM Manager the following information.
driver com.microsoft.sqlserver.jdbc.SQLServerDataSource url jdbc:sqlserver://<hostname>:1433;databaseName=<databasename>
Backup data¶
How to backup?¶
Backup is made with the help of VisualVM.
Let’s describe this step by step.
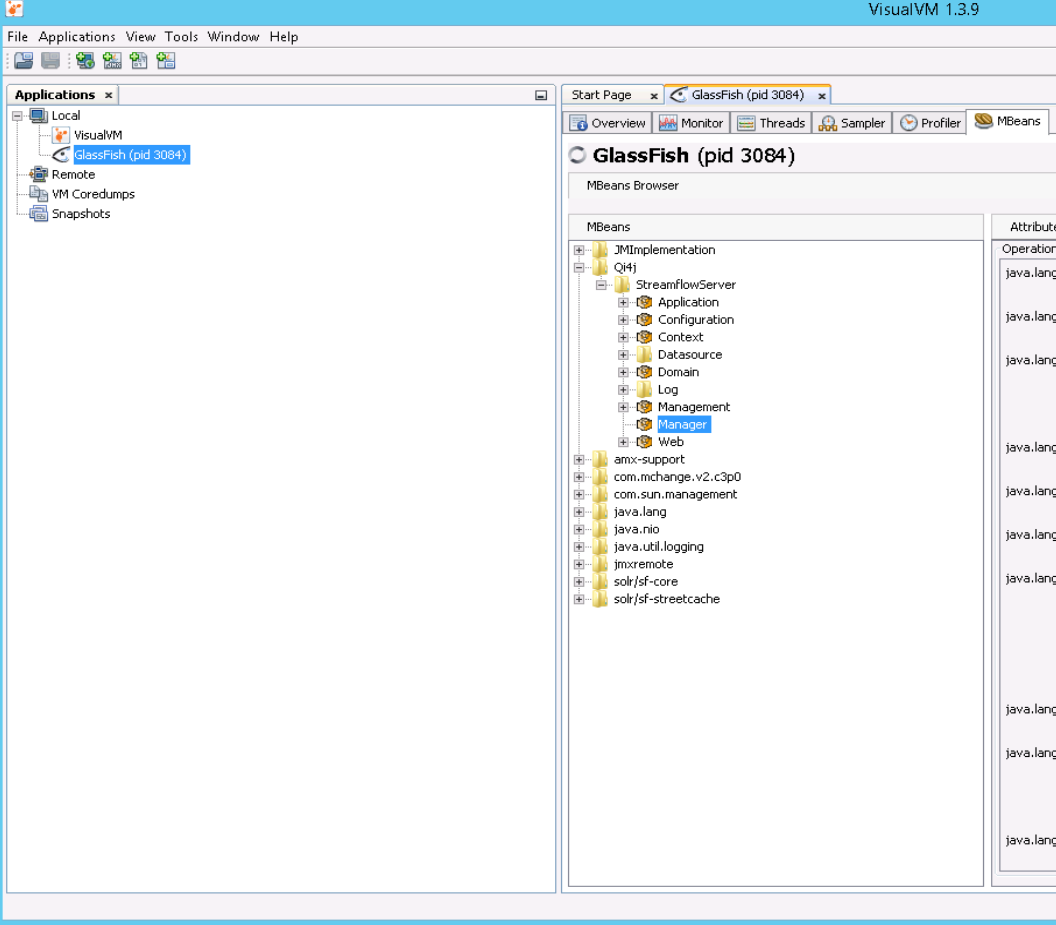
- Open VisualVM and click MBeans tab. There open path Qi4j/StreamflowServer/Manager.
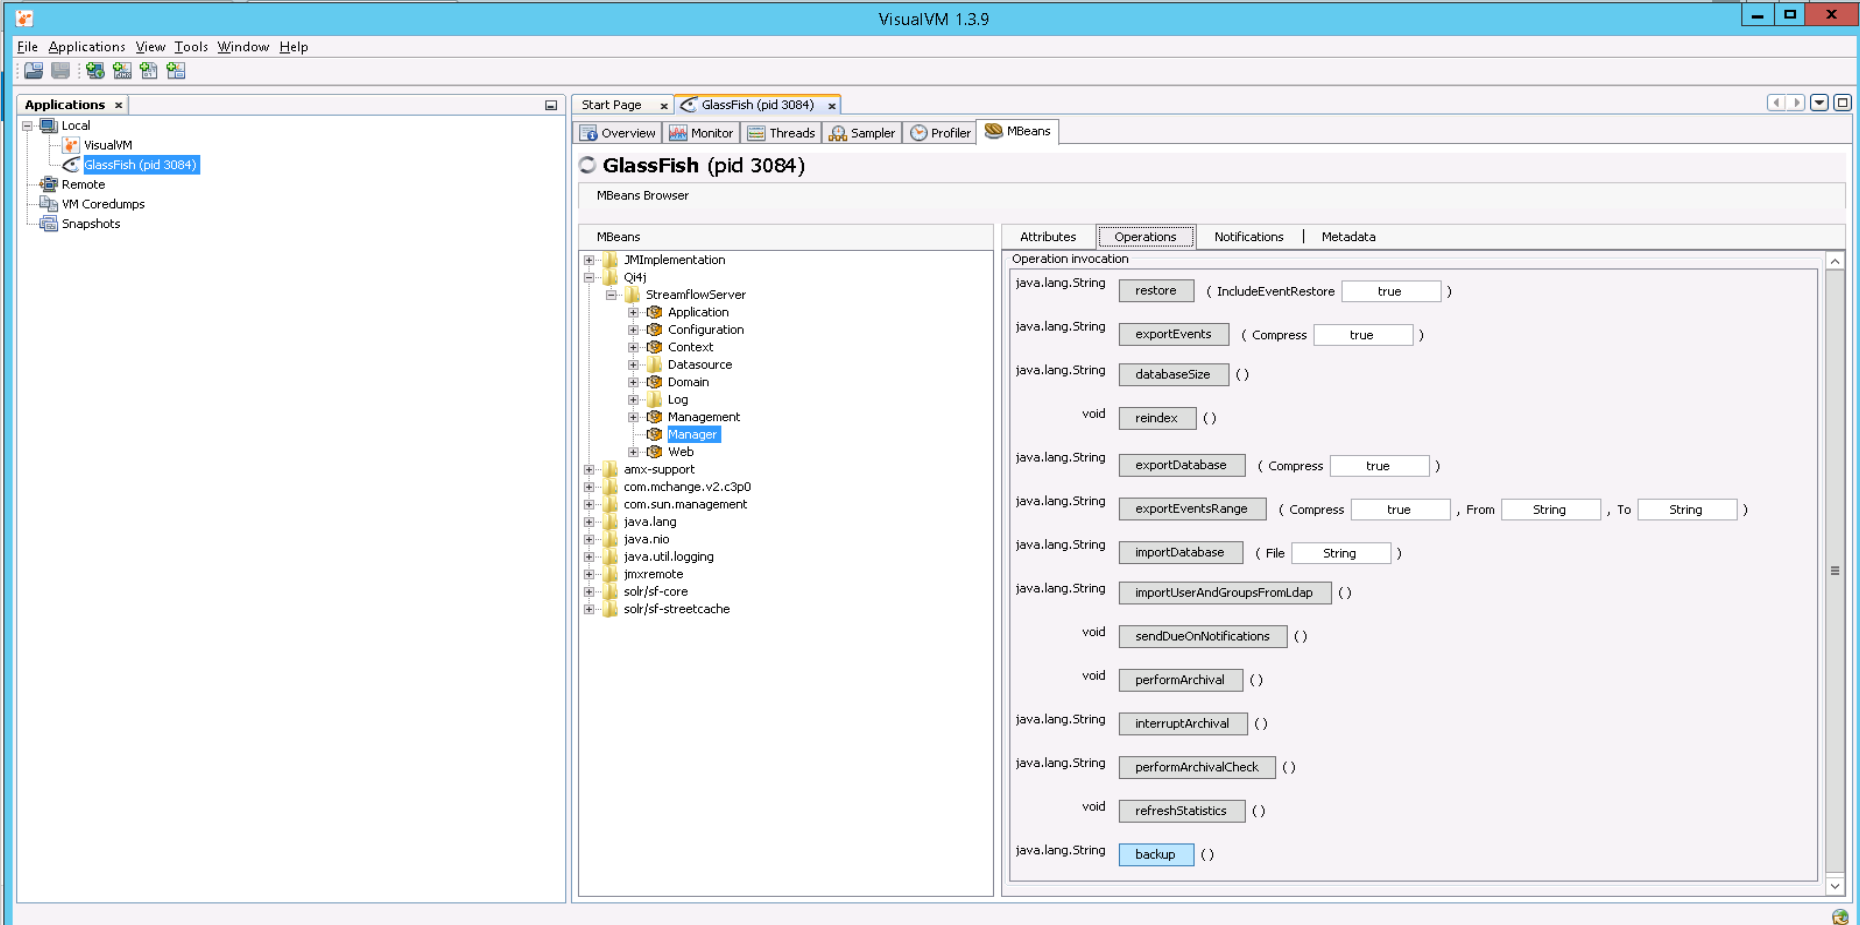
- Then click at Operations tab. There should backup button. Click on it.
- Where is placed backup read at Where is data?
Where is data?¶
Backup placed at `{StreamflowServer}/data/backup` folder.
Note
For more detailed information about files stored at system you can check Local files
Important
If you have necessary data at this location, you need it move to another folder, otherwise data will be lost.
Important
To perform complete backup recommended just to copy entire data folder in order to fix make easy revert.
- For `Windows` is
If launched directly: `C:Users<user>\AppData\Roaming\StreamflowServer`
If launched as service: `C:Windows\System32\config\systemprofile\Application Data\StreamflowServer`
For Linux is <User_home>/.StreamFlowServer
Restore data¶
- Firstly you needed files created at Backup data
- Then copy files obtained from backup to same folder {StreamflowServer}/data/backup.
- Open VisualVM and click MBeans tab. There open path Qi4j/StreamflowServer/Manager.
- Then click at Operations tab. There should restore button. Click on it.

Hint
Or you can just fully replace {StreamflowServer} folder and reload server
Note
For more detailed information about files stored at system you can check Local files
Installation¶
Server part + swing client + statistics¶
Glassfish¶
- Go to administration console of Glassfish. By default http://localhost:4848
- After log in at the left-hand menu, select “Applications”.
- Make sure that the application you are using do not install(Deploy) already exists in the list of installed.
- Then click on the “Deploy” button.
- Click on “Choose File” and select the ear file you thought down and unpacked from the zip file. It is called streamflow-x.x.ear.
- Click “Ok” in the top right corner or down the right corner. The button will be deactivated and displays the text “Processing”. It may take a few minutes before the application has been installed.
- When installation is complete, the list of installed applications will be displayed again.
- Now sign out again
Tomcat¶
Go to manager application of Tomcat. By default http://localhost:8080/manager/html
Unzip, unpack the ear file and grab the war files.
Rename files with saving .war extension to:
- streamflow-web to streamflow
- streamflow-war to client
- streamflow-statistic to statistic
Make sure that the application you are using do not install(Deploy) already exists in the list of installed. If already some press Undeploy button
Scroll down to Deploy section. Click on “Choose File” and select required war file and then click on the “Deploy” button.
Click “Ok” in the top right corner or down the right corner. The button will be deactivated and displays the text “Processing”. It may take a few minutes before the application has been installed.
When installation is complete, the list of installed applications will be displayed again.
Now sign out again
DB Entity export¶
Starting version 1.29-beta3 there is new feature which allows to export all entities to relational DB system like Microsoft SQL only (for now)
- First launch should trigger reindex automatically. But if now call it manually with VisualVM
- After successful reindexing enable entity export. Example configuration can be found at SQL Export
- After needed to preform server restart.
Important
If some problems occur refer to SQL Export Pitfalls section
Uninstall of previous version¶
Glassfish¶
- Go to administration console of Glassfish by default http://localhost:4848
- After log in at the left-hand menu, select “Applications”
- Then click the box in front of streamflow-x.x and select Undeploy from the menu. A dialog box opens where you must confirm that you want to uninstall (“Undeploy”) application.
- Once Streamflow is uninstalled, the list of installed applications will be displayed again.
- Before moving on and installing the new version recommended an extra backup of the whole The StreamflowServer directory is made. See Backup data
- After the old Streamflow version has been uninstalled, the GlassFish service must be started
- If it is a Windows server used then open the “Services” at Task manager. There you can look up the service and restart it.
Tomcat¶
Go to management tool of Tomcat by default http://localhost:8080/manager/html
- Find the application named streamflow-{module}-x.x in the list. Press Undeploy button to the right of application. A dialog box opens where you need to confirm that you want to uninstall (undeploy) the application.
Hint
- Actual streamflow module names are:
- streamflow-statistic-x.x
- streamflow-war-x.x
- streamflow-web-x.x
Warning
In theory you don’t need to uninstall each package. But it’s recommended to uninstall all of them.
Once Streamflow is uninstalled, the list of installed applications will be displayed again.
Before moving on and installing the new version recommended an extra backup of the whole The StreamflowServer directory is made. See Backup data
After the old Streamflow version has been uninstalled, the Tomcat service must be started
If it is a Windows server used then open the “Services” at Task manager. There you can look up the service and restart it.
Administration¶
Admin Tool¶
Each Streamflow Server can be reached through the REST API when logging in as administrator you have access to the automatic generated REST API.On the first page behind the URL http://<streamflowserver>:<port>/streamflow there is a link to the built-in Streamflow Admin Tool.
Note
In a production environment only use tab Console not any of the others or you might hang the server!
Console¶
The console is used for queries or data manipulations in the jdbm data store. It is a Bean Shell like console capable of executing java code. Check the provided Help page for guidance.
Can be accesed at http://<server>/streamflow/admin/tools/console
Console help¶
The admin console allows you to perform BeanShell scripts inside the Streamflow server. Enter the script in the textarea and click “Run script” to execute it. The “Result” part will contain all output from “print” commands in the script. The “Log” part will contain all the log events caused by the execution of the script. For more information about BeanShell, see their website. Predefined variables
The following variables and commands are already bound in the scripting environment:
Variables¶
qi4j- The Qi4j runtimeservices- A services finder in the web layeruow- The UnitOfWork for the script executionquery- A QueryBuilderFactory in the web layer
Commands¶
methods(object)- list methods of objectstate(entity)- list state of EntityComposite
Sample scripts¶
Here are some sample scripts for common tasks.
Get user
import se.streamsource.streamflow.web.domain.entity.user.UserEntity; admin = uow.get(UserEntity.class, "administrator"); state(admin); // Print state of admin user
Find user
import se.streamsource.streamflow.web.domain.entity.user.UserEntity; import org.qi4j.api.query.QueryExpressions; template = QueryExpressions.templateFor(UserEntity.class); admin = query.newQueryBuilder(UserEntity.class).where(QueryExpressions.eq(template.identity(), "administrator")).newQuery(uow).find(); print(admin);
Delete user
import se.streamsource.streamflow.web.domain.structure.user.User; entity = uow.get(User.class,"username"); uow.remove(entity);
Attention
Any operation that alters the content of the entity store demands the ElasticSearch and Solr index to be reindexed. To do so start jconsole and connect to the JMXConnector and trigger a reindex in Streamflow/Manager.
Find removed form entity
import se.streamsource.streamflow.web.domain.entity.form.FormEntity; import se.streamsource.streamflow.web.domain.Removable$Data; import se.streamsource.streamflow.web.domain.Describable$Data; import se.streamsource.streamflow.web.domain.interaction.gtd.Ownable$Data; import org.qi4j.api.query.QueryExpressions; forms = query.newQueryBuilder(FormEntity.class) .where( QueryExpressions.matches( QueryExpressions.templateFor( Describable$Data.class).description(), "" ) ) //.where( QueryExpressions.eq( QueryExpressions.templateFor( Removable$Data.class ).removed(), true) ) .newQuery(uow); for( FormEntity form : forms.iterator() ){ print( form.getDescription() + " --> Borttagen: " + ((Removable$Data)form).removed().get() + " --> Ägd av: " + ((Describable$Data) ((Ownable$Data)form).owner().get()).description() ); }
VisualVM Manager¶
Streamflow Service Configuration¶
VisualVM - Getting started¶
VisualVM is a managing and profiling tool included in the Java JDK installation and can be found under the installation folder in the bin directory. The simplest is to run the application on the server itself , but with the right settings of firewall etc , you can use from a client computer.
Streamflow is utilizing this tool for managing services and configurations.
The executable file is JAVA_HOME/bin/jvisualvm(.exe) or you can download it from https://visualvm.github.io/download.html
If you run on the server and the OS is Windows then VisualVM needs to run as Administrator. VisualVM should have rights to view Java processes that belong to the system profile . Initially, you also need to install VisualVm - MBeans plugin available under Tools / Plugin.
Under “Local” you need to add a JMX connection that goes against **localhost:1099**with the administrator user.

Service Configuration is made on MBeans tab under Qi4j/StreamflowServer/
On the first start we need to install the MBean plugin to be able to manage Streamflow. Choose Tools - Plugin on the menu bar and on the tab Available Plugins -> VisualVM-MBeans -> Install. Follow the install wizard.

Connect Streamflow locally on your server¶
Right click on Local node in the tree and add a new JMX connection. Provide localhost:1099 as address and the streamflow administrator user and password.

Connect Streamflow remotely from your PC¶
Right click on Remote node and add a new Remote host.

Right click on the new remote host and add a new JMX connection.
Manage Streamflow¶
Open the JMX connection by double-clicking on the representing tree node. Change to the the MBeans tab and select/open the Qi4j tree node. All Qi4j applications running in this java process ( JVM ) will show up under the Qi4j node.

StreamflowServer¶
In the tree find the node Qi4j/StreamflowServer/Manager and choose the tab Operations.

Operations¶
If no initial event backup file exists a new event backup file is created otherwise a event diff file spanning from the last created event backup file or event backup diff file until the backup timestamp is created.
This call makes also a backup copy of the Jdbm entity store in form of a g-zipped JSON file if there is no such file for the date when the method was called.
A good practice is to do a backup of the data store at least after each successful Streamflow version upgrade since restore might not work properly over database version boundaries if there where structural changes involved between versions.
If disk space becomes an issue it is advisable to empty the backup folder regularly and create a new fresh backup from scratch.
The mentioned files can be found in the StreamflowServer folder under data/backup.
Restores the Jdbm entity store from the latest backup file, restores the event store from event backup files and replays any application events from the event store that occurred between entity store backup file timestamp and now.
This method checks for cases that can be archived according to the archival rules set up in the Streamflow administration Gui for case types.
Performs a archival on cases that are due for archival according to the archival rules setup for case types. For now there is max age and archival type available as archival rules.
That means to be an archival candidate a case must be in status closed and must have reached maximum age for it’s case type.
There are two archival types available for now - delete and export. Delete removes the case from the system, export creates a PDF file of the case and saves it to the archive folder in StreamflowServer/data folder as <case-id>.pdf before it removes the case from the system.
Interrupt a commencing archival, both manual or scheduled archival can be interrupted with this command.
Empties the statistics database entirely and recreates statistics for cases in status closed from the first start of the Streamflow application.
Removes the RDF and Solr indices and regenerates them. The rdf index is for fast access to the Jdbm entity store and the solr index is for fast free text searches on case data.( i.e. case id, description, note, contacts, searchable form fields, etc.)
RDF - Resource Description Framework, an official W3C Recommendation for Semantic Web data models Solr - An Apache search engine based on Lucene
Exports the Jdbm entity store to a JSON file.
Imports a database into the Jdbm entity store from a JSON file.
Exports the events from the event store to a JSON file.
Exports the events of a range of time between given from and to date.
Returns the amount of objects located in the Jdbm store.
Important
In general services have to be restarted in order to be able to pick up configuration changes!

The archival service handles when and how cases are archived and removed or only removed from the system. The main configuration of this behavior is administrated inside the Streamflow administration GUI where you can set max age for cases of a certain case type or label before they are retired.
Archive configuration , see Qi4j/StreamflowServer/Application/Archival/Service/archival/Configuration
This service is used in archival/removal of cases, ie archiving of files to pdf and removal of them, alternative only removal.
In Streamflows administration interface an administrator can specified for each case type and for each label the following:
- Specify whether a case with a certain case type or label will be archived after a given number of days
- Set what action to be taken, a) the saving of the case to file (pdf) and then removal of the case from Streamflow , or b) Only the removal of the case.
Background: Some cases are only interesting from a statistical standpoint, but can regularly removed from the Streamflow database Jdbm. One example can be if incoming calls to the contact center are labelled with a label “Connected call”, and the label is used to remove cases in the Archival Service. One can set up cases with label “Connected call” shall be removed after an example 3 days.
It is advised that archiving/removal runs at night, after a daily complete backup. The service is such that the behaviour depends on a number of parameters, like how many cases it will handle for each activation of the operation, see Attributes below. If you haven´t done case removal before, then it will take a number of times before a balance is reached, where only the difference of cases between a day and the next are removed. Therefore, one can set up the constraints on the number of cases handled per operation.
Possibly it may in some cases be necessary with a re-indexing to optimise the index after extensive archiving / removal.
boolean¶If the service is on or off.
Integer¶Number of cases to be filed / deleted at a time before the service is paused.
Long¶How long in milliseconds the service should pause after each activation.
String¶String Scheduling of service startup inspired by cron , eg 0 0 9 ** ( every day at 9 am ) http://www.quartz-scheduler.org/documentation/quartz-2.1.x/tutorials/tutorial-lesson-06
boolean¶Archive automatically or only manually.
String¶Scheduling of service stop. For format, see startSchedule.
Attributes¶
boolean¶Tells whether the archival service is enabled or not.
boolean¶Tells whether the archival service performs an automatic case archival once a day or not.
Operations¶
Restarts the service.

The remove attachments service takes care of synchronising the removal of attached files from the attachment store corresponding to removed attachment entities. This is accomplished with help of application events related to attachment entity removal. If this service receives an event of a certain kind ( removedAttachment ) it will remove the appropriate attached files from the attachment store.
If the service is disabled over a period of time it will replay all events, since the point in time when it was disabled until the last event of that kind has been processed, once enabled again.
Attributes¶
boolean¶Tells whether the remove attachments service is enabled or not.
long¶Holds the point in time ( linux epoch in milliseconds ) when the last event was processed.
Operations¶

Attributes¶
String¶An Url pointing out the wiki template for case types in the external wiki.
boolean¶Telling whether this service is enabled or not.
String¶An Url pointing out the wiki template for labels in the external wiki.
Operations¶

Attributes¶
boolean¶Tells whether the create case from email service is enabled or not. If disabled, the client application will not show the email access point tab in the administration window.
long¶Holds the point in time ( linux epoch in milliseconds ) when the last event was processed.
Operations¶
Restarts the service.

This service receives emails from a certain mailbox and persists the data as an application event that can be consumed by other services like CreateCaseFromEmailService or ConversationReplyService. We recommend to use IMAP as your protocol of choice.
Attributes¶
String¶The name of the archive folder where processed mails from the inbox are copied to.
boolean¶Tells whether debug information from the java mail api should be printed to the log.
boolean¶Tells whether mails flagged as deleted are removed on close of the inbox. This property must be set to true in a IMAP setup!
boolean¶Tells whether this service is enabled or not.
String¶The mail host name.
String¶The password of the mailbox.
String¶The port of the mail host used for receiving mail.
String¶The protocol used by the mail host. Preferably imap
Integer¶The sleep period in minutes between retrieval calls to the mail host.
boolean¶Tells whether to use SSL encryption or not.
boolean¶Tells whether to use TSL encryption or not.
String¶The mailbox user.
Operations¶

Attributes¶
boolean¶Tells whether debug information from the java mail api should be printed to the log.
boolean¶Tells whether this service is enabled or not.
String¶The sender address.
String¶The mail host.
The timestamp when the last application event was processed.
String¶The mailbox password.
String¶The mail host port for sending mail.
boolean¶Tells whether to use SSL encryption or not.
boolean¶Tells whether to use TSL encryption or not.
String¶The mailbox user.
Operations¶
Restarts the service.

This service handles database migrations on server startup if necessary. If the system has a Streamflow assembly version with a higher version than lastStartupVersion the migration rules between lastStartupVersion and the new Streamflow assembly version will be executed and the lastStartupVersion will be changed to the new Streamflow assembly version.
Attributes¶
String¶The last Streamflow assembly version streamflow was started with.
Operations¶

Attributes¶
The header margin of the pdf file as a float.
String¶The locale language preferred for pdf generation if there is no request locale available. If none provided server system default is taken.
The left margin of the pdf file as a float.
The right margin of the pdf file as a float.
Operations¶

Attributes¶
boolean¶Tells whether the authentication service is enabled or not.
String¶The url to the plugin implementation of the external authentication system.
Operations¶

Attributes¶
boolean¶Tells whether the statistics service is enabled or not.
long¶Holds the point in time ( linux epoch in milliseconds ) when the last event was processed.
Operations¶

Attributes¶
String¶The database driver used.
boolean¶Tells whether the data source is enabled or not.
String¶The database user password.
String¶Database connection properties if necessary.
String¶The database url.
String¶The database user to connect with.
Examples¶

dbVendor mysql
driver com.mysql.jdbc.Driver
enabled true
password streamflow
properties
url jdbc:mysql://<hostname>:3306/streamflow
username streamflow
dbVendor mssql
enabled true
password streamflow
properties
driver com.microsoft.sqlserver.jdbc.SQLServerDataSource
url jdbc:sqlserver://<hostname>:1433;databaseName=<databasename>
username streamflow
Note
<hostname> is the machine on which the database server is installed. 1433 is the standard port, but could be different. <databasename> is the name of the database, normally streamflow. username is normally streamflow, but password may be something else, as set up when the database och user was created during installation.
Operations¶

Attributes¶
boolean¶RecordManager option to automatically commit data after each operation.
boolean¶RecordManager option to disable transaction (to increase performance at the cost of potential data loss).
String¶The absolute path to the database file for the Jdbm store.
Operations¶

Attributes¶
boolean¶Tells whether the service is enabled or not. If not enabled the contact lookup button in contacts view in the client application will not be visible.
String¶The url to the contact plugin implementation

Attributes¶
boolean¶Tells whether this service is enabled or not.
String¶The command line arguments used by the client to start the external program.
Operations¶
Restarts the service.

This plugin integration makes it possible to do searches for street information from the contact view or form fields with a data type suitable for street name searches. The data is fetched from a plugin implementation and put in a Apache Solr Core index locally in Streamflow for fast free text searches. The index will by default reload once a week.
Attributes¶
boolean¶Tells whether this service is enabled or not. The search functionality in the client application is not available if not enabled.
boolean¶Option whether to reload the Apache Solr Core index from the street plugin implementation.
long¶Shows the timestamp in milliseconds when the index was reloaded last time.
Integer¶Limits the search results to the given number of elements. -1 means no limit.
long¶The frequency in which the index is reloaded, the predefined value is one week in milliseconds.
String¶Url to the street lookup plugin implementation used.
Operations¶

Attributes¶
boolean¶Tells whether the service is enabled or not.
String¶The password for the instant messaging user.
String¶The instant messaging server.
String¶The instant messaging user.
Operations¶

Operations¶
Restarts the service.

During server startup the system is checking if the assembly version is higher than last startup version and executes all update rules where the version is between latest startup version and new assembly version. The new assembly version is set to lastStartupVersion when done.
Attributes¶
String¶The latest Streamflow assembly version the server was started with.
Operations¶

Attributes¶
boolean¶Tells whether this service is enabled or not.
long¶The timestamp in milliseconds of the last event processed.
Operations¶

Attributes¶
boolean¶Tells whether this service is enabled or not.
long¶The timestamp in milliseconds of the last event processed.
Operations¶

The log files¶
On the server there are a number of log files, including the one that begin with streamflow , see below. The streamflow log file can be investigated to see the outcome of the operations. The last activity is at the end of the file. Activities are time stamped.

SQL Export¶
Current data model¶
- Search in Streamflow web app based on Elastic search (ES) indexing. Flow is next:
- Compose entity state.
- Index entity state.
We don’t consider persist to database, because it isn’t necessary. ES indexes objects are JSON representation in next form:
{ "_identity": "ENTITY_UUID_KEY", "_types": [ "FULL", "NAME", "OF", "JAVA", "TYPES"] "propertyNameOfEntity": propertyValue, …, "propertyNameOfEntity": propertyValue, "associationName": "ASSOCIATED-IDENTITY", …, "associationName": "ASSOCIATED-IDENTITY", "manyassociationName": [ "ASSOCIATED", "IDENTITIES" ], …, "manyassociationName": [ "ASSOCIATED", "IDENTITIES" ] }
Search works according to JSON entity state properties. Index represantation isn’t equals JDBM persisted data. JDBM entity states has following JSON properties:
For operation on entity states we need order all entities by their modified timestamp. It helps to solve problems with relations. JDBM provides api only for sorting stored objects by their id, that’s why we need to use another approach. ES helps to solve JDBM limitations. Sorted search by modified timestamp will available if we added “_modified” property to index. After reindex we’ll be able to make ordered search by “_modified” timestamp.
Streamflow DB transfer model¶

On application startup:¶
- Read portion of data from jdbm DB
- Convert entity to JSON string and saving with identity as key it at temporary cache for further processing
- Add/update entity record to SQL DB with following fields identity, modified, isProceed. To prevent avoiding unnecessary processing in future
- Pass entities by it’s identity to reader to check current state.
- Selecting entities identity which have not processed state
- Transfer entire entity to cache for further processing
- Pass entity JSON from cache to Entity transfer
- Save entity at DB
- Pass entities identities which are out of date to Entity transfer
On each startup it takes some time to compare jdbm and sql DB. If no new or modified entities found it will not make any export again. If during previous process it was interrupted it will be resumed at same place. After all entities will be processed(checked or exported), application will start.
Enable and configure at VisualVM¶
Setup datasource
Example for Microsoft SQL server:

Note
Don’t forget to create scheme at DB
Enable entity export
Settings located under StreamflowServer -> Domain

Pitfalls¶
In order to completely reset SQL export required following steps:
- Remove folder {StreamflowServer}/data/entityexport at SF data folder
- Recreate DB scheme which was used before
Unexpected interruption
- If server was stopped/restarted or disabled by some pig at server room feel free to start again and export will go further.
- If still not running as expected perform reset procedure described above.
Important
Don’t remove folder {StreamflowServer}/data/entityexport without need to perform reset. It’s needed for correct work of entity export.
Statistic module¶
Setup¶
To enable statistics module needed to do following:
- Setup datasource described at environment setup if not was set up before
- Enable statistic module via visualVm at Qi4j > StreamflowServer > Application > Statistics > Service > statistics > Configuration. Set
enabledtotrue- Enable LiquiBase service(needed for generation of DB structure) at Qi4j > StreamflowServer > Domain > Database > Service > liquibase > Configuration. Set
enabledtotrueand if needed regenerate from scratch setlastEventDatevalue to0
Usage¶
SQL queries¶
Case count for all closed cases, built on closing organization, between 2 dates:
select count(case_id) from cases where created_on >= "2011-01-01 00:00:01" and created_on <= "2011-12-31 23:59:59" and assigned_organization in (select id from organization where organization.left>=(select organization.left from organization where name="Jönköping") and organization.right <=(select organization.right from organization where name="Jönköping"))
Case count for all closed cases, built on case type owner, between 2 dates: (Works as long as all case type owners are organizational unit. If there are case type owners that are projects we have to dig one level deeper!)
select count(case_id) from cases where created_on >= "2011-01-01 00:00:01" and created_on <= "2011-12-31 23:59:59" and casetype_owner in (select id from organization where organization.left>=(select organization.left from organization where name="Jönköping") and organization.right <=(select organization.right from organization where name="Jönköping"))
Check if all case types are owned by OU’s: (Expected result - empty set)
select distinct casetype_owner from cases where casetype_owner not in (select id from organization);
Check cases without case type:
select count(case_id) from cases where casetype is null and created_on >= "2011-03-01 00:00:01" and created_on <= "2012-01-31 23:59:59";
List of case counts for a certain period for all case type owners( regardless if case type owner is OU or project):
select descriptions.description, count(case_id) as numbers from cases, descriptions where cases.casetype_owner = descriptions.id and created_on >= "2011-03-01 00:00:01" and created_on <= "2012-01-31 23:59:59" group by casetype_owner order by numbers desc;
List of case counts per case type for a certain period:
select descriptions.description, count(case_id) as numbers from cases, descriptions where cases.casetype = descriptions.id and created_on >= "2011-03-01 00:00:01" and created_on <= "2012-01-31 23:59:59" group by casetype order by numbers desc;
Some other queries run for Oskarshamn statistic.
select date_format( closed_on, '%Y-%m' ) as period, count(case_id) as number from casesdescriptions where closed_on >= '2011-01-01' and closed_on <= '2012-01-31 23:59:59' group by period order by periodselect date_format( closed_on, '%Y-%m' ) as period, count(case_id) as number from casesdescriptions where closed_on >= '2011-01-01' and closed_on <= '2012-01-31 23:59:59' and casetype is not null group by period order by periodselect date_format( cases.closed_on, '%Y-%m' ) as period, count(case_id) as number from cases where cases.casetype_owner in ( select id from organization where organization.left >= 1 and organization.right <= 6 ) and closed_on >= '2011-01-01' and closed_on <= '2012-01-31 23:59:59' and casetype_owner is not null group by period order by periodselect casetype_owner, date_format(closed_on, '%Y-%m' ) as period, count(case_id) as number from casesdescriptions where closed_on >= '2011-01-01' and closed_on <= '2012-01-31 23:59:59' and casetype_owner is not null group by casetype_owner, period order by casetype_owner, period
Development¶
Architecture¶
This page outlines the Streamflow Core architecture, on a deployment level, system level, and some internal details that makes it easier to understand how it all works. Target audience are mainly developers wanting to understand Streamflow as a software system.
Deployment¶
From a deployment point of view, Streamflow Core has been designed as a standard JavaEE Web application, packaged as two WAR files. One WAR file contain the server part of the application, and the other contains a Java WebStart client that can be downloaded in order to interact with the system. Both WAR files are typically deployed in the same JavaEE container, such as Tomcat or Glassfish.
Once deployed, a user can access and install the Java WebStart client by accessing /client, from where he can download the client. This client then utilizes the REST API (Level 3 on maturity model) to perform all use cases in Streamflow. A standard web browser can also be used to inspect the REST API, which is deployed to the /streamflow web context.
Web application architecture¶
The Streamflow Core server application is designed as follows. The web application delegates to the Restlet framework, which in turn delegates to a Streamflow Restlet application. This application then instantiates the Qi4j application development framework, and assemble the Streamflow application, and instantiates an instance of it. This application has the following seven layers:
- Management
- REST API
- Context. This is where the use cases are implemented
- Application services
- Domain model
- Infrastructure services
- Configuration
For details on how these layers are connected to each other, please see StreamflowWebAssembler.
Configuration¶
The configuration of Streamflow is implemented using the Qi4j service configuration mechanism. Defaults for settings are provided in properties files, and once the application is instantiated a live configuration instance is created, which is stored using the Preferences API. Each platform uses different means for backing this (Windows Registry, .plist files, XML files).
Infrastructure services¶
The main infrastructures relate to data persistence, indexing, and event sourcing store. The data persistence and event source store are implemented using JDBM, with implementations coming from the Qi4j project. The indexing is done using an RDF store called Sesame, again using the Qi4j implementation. For free text searching there is an additional indexing using Solr/Lucene. These three are the backbone of how data is stored, queried, and shared.
Domain model¶
The domain model is implemented as Qi4j Entities and Values. Each Entity consist of an EntityComposite interface, which in turn extends any number of interfaces that each represent the various aspects of the entity. To add new types of entities, create a new EntityComposite subtype. To add more functionality to an existing entity, either extend one of the current mixin interfaces, or create new ones. Each aspect should have a Data part (for state), an Events part (for events), and a part with commands to be invoked to trigger the changes.
Application services¶
The application services provide a wide range of service-oriented functionality, such as sending/receiving emails, creating statistics, and consuming domain events in order to perform use cases as a “trigger”. Any services that involve external systems should use circuit breakers, to allow for easy monitoring of the health of the system.
Context¶
The use cases in Streamflow are implemented in the context layer using the DCI paradigm. This means that each use case is represented by one or more contexts which perform selection of objects, and then allow interactions on those objects to be performed. They then invoke methods on the domain model to perform state changes.
REST API¶
The contexts fo1rm the basis for the REST API, where each context (or set of contexts) are exposed as REST resources. Each “/” in a URL represent a context, and each query/command interaction in that context is then exposed as “/somename” resources. Subresources, which are used for sub use cases or object selections, are then exposed as “/someothername/”, i.e. with “/” at the end again. Links are used extensively to drive use cases forward, and these are used by the client as much as possible.
The parsing of the URL is done hierarchically, and so constraints and authorization checks can be done at any level, thus implementing “fail-fast” with regard to request handling.
Management¶
The management layer provides JMX beans that expose services, circuit breakers, and other features that help in managing the application as a whole. These can be accessed through VisualVM, either through local connection or the remote JMX connector.
Client architecture¶
The client is deployed as a Java WebStart client, which internally uses the Better Swing Application Framework. It also uses Qi4j extensively to perform dependency injection. It is based on the MVC paradigm, and so each part of the client has a Model, a Controller, and a Swing view that is instantiated and controlled through the Controller. The client also makes extensive use of GlazedLists and JGoodies FormBuilder, to deal with the remote REST API and also layouting.
Model-View-Controller interaction¶
Each part typically has a structure like this: a View is instantiated which hooks up the @Actions to the Swing components. On refresh (typically done when view is shown) the REST API is queried, and the model updated. When actions are triggered they will delegate to the model, which calls the REST API to perform any changes. Results are typically a list of domain events, which are distributed through the view, which may optionally pass them on to the model.
Data migration¶
Each object is stored in JDBM as a serialized JSON-object, which includes the version which was used to store it. Whenever the data for an entity is changed (added, removed, renamed, etc.) a migration of that state has to be done in order to convert it to the latest version. This is done by using the Qi4j Migration API.
Essentially, for each new version that requires data changes a set of migration rules needs to be added. This is done in MigrationAssembler. Here is an example:
toVersion("0.3.20.962"). renamePackage("se.streamsource.streamflow.web.domain.form", "se.streamsource.streamflow.web.domain.entity.form"). withEntities("FieldEntity", "FieldTemplateEntity", "FormEntity", "FormTemplateEntity"). end().
For more details and examples, see MigrationAssembler. These rules can either be applied at startup or whenever an object is accessed for the first time with the new version.
BDD Tests¶
Guidelines¶
We are using JBehave for the BDD tests.
Some small rules¶
Here’s what I have so far:
Setup classes must use regular Step classes to do the setup
Setup classes may use other Setup classes to build upon each other
Setup classes may NOT be used outside of the Setup classes
Some Step classes are for managing collections, such as ProjectsSteps, GroupsSteps, OrganizationalUnitsSteps, etc. These should have a “givenFoo” public field, and a @Given-marked method that can be used to populate the field. Example: UserSteps has the following:
@Given("user named §user") public void givenUser(String name) { givenUser = organizationsSteps.givenOrganizations().getUserByName( name ); }Note
If another Step class needs a user, it must have been set up by the scenario by doing “Given user named foo” first, and then the UserSteps.givenUser field is accessed directly.
Whenever a “When” method does a create, populate the givenFoo field at the same time
If you have When’s like this “When foo named xyz is …” then you know something is wrong, because the “foo named xyz” should have been a Given. Refactor it.
With these basic rules I think our step and setup classes becomes much easier to write and maintain. The Given’s become much more logical as well, and easier to compose into complex scenarios.
More guidelines¶
For test setup, there is a TestSetupStep that has a bunch of Given-methods, each of which sets up test data for a specific type of thing (users, groups, projects, etc.). You can use these individually, or if you want “all of it” there is one that calls the rest, which you can use by doing this in your scenario: Given basic setup 1
This will create all the entities. After that you will typically want to specify what entities you need for a scenario. Commonly you will want to specify which user to use. This is done in OrganizationsSteps (there are no longer any maps or given-fields in the setup classes), and you use it with this: Given user named user1
In your When-methods you can then refer to the public field OrganizationsSteps.givenUser. Do @Uses on OrganizationsSteps to get a reference to it. Look at existing steps for examples.
This removes the need to pass in names of things in all the When-methods (i.e. there is no longer any methods that say @When(“user named $name do …”))
For structural tests, which create/add/remove, I have in most cases put add/remove into one scenario, which simplifies things a lot. Here’s an example:
Scenario: Create, add, remove group Given basic organizational unit setup Given basic user setup When a group named newGroup is created Then events groupCreated,groupAdded,descriptionChanged occurred When group is removed Then events groupRemoved,removedChanged occurred When group is removed Then no events occurred
All create @When’s methods both create the entity and sets it as the givenFoo, in this case givenGroup, so that the other methods will use that if nothing else is said.
I think that’s about it. Please look at the scenarios and look how they setup the state for each case. If you ever specify an object in a @When-method (e.g. include “user named $name”) you are most likely doing something wrong, and should be using a Given before that method instead. Look at the existing step-classes for examples of how they do it.
Build¶
For development purposes¶
To install to local maven repository and build war/ear files
mvn clean install
To install to local maven repository and prepare war/ear files with proper signing by owned certificate (You should have certificate file).
mvn clean install -P sign
Note
For sign you need define properties in the ./webstart/certificate.properties and VALID certificate
For production and proper releases¶
Perform required actions at CVS(Github)
If there are uncommitted changes:
git status
And if there are uncommitted changes:
git push origin develop
Create a new git branch for the release preparations:
git checkout -b release-<version> develop
Note
For patch releases draw the the release branch from master!
git checkout -b release-<version> master
and you might need to change the pom version from a feature version to a patch version ( Optional ) After check validity of changed poms and if right.
If you made any changes to pom’s you need
git commit -a -m "Bumped version number to x.x.x-SNAPSHOT"
Note
If you are working on a patch release don’t forget to set the new development version to the version the develop branch is in! (Prevents merge conflicts after the release!)
If the release build breaks before checking in the changed poms, just re-run it. The release.properties file keeps track of where it was.
Prepare codesign storage
If you haven’t one create new. For example and details you can follow https://docs.oracle.com/javase/tutorial/security/sigcert/index.html or https://docs.oracle.com/javase/tutorial/security/sigcert/index.html.
Add your certificate to your store. You can do that with command
keytool -import -alias codesigncert -keystore <cacerts> -file <cert.pem>
Update properties at ./webstart/certificate.properties
Note
Signing code is only used for swing web start client. So you can freely build and use server part only.
Deploy build to repository
To /snapshots repository. You should have SNAPSHOT version:
mvn clean deploy -P sign
or if you want to define custom settings.xml:
mvn -s ../setings.xml clean deploy -P sign
Note
../settings.xml there is a path to settings.xml file.
For example like this:
<settings xmlns="http://maven.apache.org/SETTINGS/1.0.0" xmlns:xsi="http://www.w3.org/2001/XMLSchema-instance" xsi:schemaLocation="http://maven.apache.org/SETTINGS/1.0.0 http://maven.apache.org/xsd/settings-1.0.0.xsd"> <servers> <server> <id>repositoryId</id> <username>username</username> <password>password</password> </server> </servers> </settings>
To /pre-releases repository the same way as for /snapshots.
You should pre release stable version (alpha, beta, M, RC).
To /releases repository. You should have tested release stable version:
mvn clean deploy -P sign,release
Finish release at CVS(Github)
After the successful release build we have to push the last changes to the release branch and merge the results into both master and develop branch.
git push origin release-<version> git checkout master git pull origin master git merge release-<version> git tag -a streamflow-<version> git push origin master git checkout develop git pull origin develop git merge release-<version> git push origin develop
Important
Be sure that there are no .StreamflowServer* folders before deploying, in another case you will get lock error, in case of them remove and restart server.
Building WebForms¶
If you are releasing Streamflow WebForms you have to do the assembly your self
cd /target/checkout mvn assembly:assemblyThe zip-fil is located in the target folder.
Developer cheat-sheet¶
General rules¶
Keep sprint backlog and Jira issues you are working on synchronized. Always run mvn clean install on the root pom before committing your code changes. Naming conventions When creating new commands and queries in server resources, make sure you only use lowercase characters. I.e. not “fooBar”, use “foobar” instead. On the web you don’t use uppercase for names.
Accelerator keys¶
The component (JXTree for outline, JXTable for task view) has an InputMap with the key combo registered. You need to register a proxy action for it in the menu,eg “Sök”/”Find”. When a component that has the action that corresponds to the menu selected the accelerator (in this example: cmd-f/ctrl-f) becomes active.
CQRS and EventSourcing¶
Commands are requests to the domain model that something should happen. Events are notifications that something has happened. Names of commands should be in the imperative (“changeThis”, “doThat”) and names of events should be in past tense (“changedThis”, “doneThat”).
- Command methods in domain object have the following purposes:
- Validate that it is ok to perform it
- Create/invoke event methods on itself
- Call other commands
- Command methods may not:
- Change state. If commands change state, then that state will be lost on replay of events
Wrongdata.someProperty().set(“new value”)Correctdata.changedSomeProperty(DomainEvent.CREATE, “new value”);
- Call event methods on other objects. Instead a command on the other object should be called.
Wrongentity.changedDescription(“foo”)Correctentity.changeDescription(“foo”)
- Change state in other objects. Instead a command on the other object should be called:
Wrong((Some.Data)other).someProperty().set(“new value”)Correctother.changeSomeProperty(“new value”)Event methods in domain object have the following purposes:
- Change state
- Create entities
Note
Note that id of entity MUST be a parameter to the event method so that on replay the same id is used
- Event methods may not:
- Call other event methods. Event methods are only invoked as a response to an event. No other methods may call event methods.
- Call command methods. If an event method calls a command, it will create new events. An event is a notification of “what happened” and may not cause new things to happen.
Commands and events on the client¶
The client is responsible for firing off commands as REST calls as a response to UI actions. The events that are returned from a command can then be used by the client views and models to refresh state. Below are some guidelines on how to do this:
- All REST calls (cqc.postCommand,cqc.postLink, cqc.delete() etc.) must be invoked by subclasses of CommandTask. The CommandTask will gather the events from the responses, and then distribute them to the client view.
- @Action annotated view methods should return Task as type, and return instances of CommandTask that do the actual work.
- If a view wishes to receive notifications about events that occurred as a response to the commands, it must implement TransactionListener. This will be called on all visible UI components. The method must filter the events to figure out if a refresh is to be made. A refresh is usually done by calling refresh() on the owned model.
- The view is typically responsible for checking that the event has the id corresponding to the view, and then delegates to the model which checks that an event that causes it to refresh has been called. This gives a combination of id+eventtype checking which properly filters what should cause a refresh.
- When filtering events, make sure to use the util classes Iterables, Events and Specifications as much as possible. The helper methods there should be all you need.
Code branches and CVS(GitHub)¶
About general branching model you can look at good example here http://nvie.com/posts/a-successful-git-branching-model/ Also there some useful stuff can be found at Build
Resources and contexts on the server¶
The server-side REST API is implemented using resources and DCI contexts. The resources (subclasses of CommandQueryResource) are responsible for parsing the path of the URL, and maps objects into a RoleMap. Once an interaction (i.e. the last segment in a path, e.g. “/dostuff) is found the corresponding method is located in the context of the last resource. If the interaction is valid (i.e. no interaction constraint annotations fail), then the request will be parsed according to the interaction parameter type, and then invoked. The result is converted to HTML or JSON and then returned as response.
If you need to do anything related to HTTP, such as getting/setting headers, this should be done in a method on the resource that has the same name as the context method, and with no parameters. Call “invoke()” to invoke the context, and then work with the result and request/response objects.
REST representations¶
Do not use LinkValues for non-link purposes. Instead create a suitable DTO class extending ValueComposite.
Services default configuration¶
Keep service default configurations in the ConfigurationAssembly.configurationWithDefaults() method to avoid overwrite situations. Since there are multiple ways and opportunities to set default configurations this will be the best way to keep track of default configurations.
Frequent problems¶
Configuration for a configurable service is not showing up in MBeans¶
Important
Make sure the service interface and the Mixin extend the Configuration and Activatable interfaces ( must not be typed ).
Make sure you inject the desired configuration interface into the Mixin
@This Configuration<your configuration class> config;Note
If your service is not part of the JMX module you need to set the service visibleIn( Visibility.layer ).