Gnosis Apollo is a collection of packages that allows you to roll your own Prediction Market Interface or Prediction Market Tournament based on the Gnosis Prediction Market Framework.
It consists of the pm-contracts, pm-js, pm-trading-db and pm-trading-ui.
Gnosis Apollo
Getting Started
We are going to explain the minimum steps to have a prediction market deployed on a testnet and be able to interact with it through our trading interface.
Requirements
Create the market
git clone https://github.com/gnosis/pm-scripts
cd pm-scripts
npm i
You need to modify conf/config.json and use an ethereum account you own which has ether. check the rinkeby faucet
You can use this config:
{
"accountCredential":"man math near range escape holiday monitor fat general legend garden resist",
"credentialType":"mnemonic",
"account":"0x7ec8664a7be9c96a7e8b627f84789e5850887312",
"blockchain":{
"protocol":"https",
"host":"rinkeby.infura.io/gnosis/",
"port":"443"
},
"pm-trading-db":{
"protocol":"https",
"host":"tradingdb.rinkeby.gnosis.pm",
"port":"443"
},
"ipfs":{
"protocol":"https",
"host":"ipfs.infura.io",
"port":"5001"
},
"gasPrice":"1000000000",
"collateralToken":"0xd19bce9f7693598a9fa1f94c548b20887a33f141"
}
Please note that we are using a TEST ACCOUNT in the example above. Don’t use this account specified above with real funds or in production. Create another account for yourself with metamask, ganache-cli or any available ethereum wallet provider
You can use the example market pm-scripts/examples/categoricalMarket.json or modify its content. Be careful with the date format. Otherwise it won’t be indexed by the backend service.
Run the creation command:
npm run deploy -- -m examples/categoricalMarket.json -w 1e18
This will create all the contracts related to a prediction market, wrap ether for you and fund the market with the WETH.
Follow the instructions that pm-script prompts in the console until the end.
Run the Ethereum Indexer
There are many ways to run our ethereum indexer (trading-db) but let’s start with the basic one.
Download the project:
git clone https://github.com/gnosis/pm-trading-db
cd pm-trading-db
docker-compose up
This will install all the dependencies and orchestrate the different docker containers declared in docker-compose.yml
It will take a few minutes to complete, depending on your network connection and computer resources.
Finally you will have the service running and a web server listening on http://localhost:8000/ , you can see here the documentation of the different endpoints that our trading interface uses.
By default the indexer points to the rinkeby network through Infura nodes. Indexing a full chain can take a few hours consuming all nodes resources, but we don’t need to index all of the blockchain. We just need the indexing to start since the block which includes our prediction market contracts.
If you created the market just now, you can substract a few blocks from the current block. Go to etherscan substract 100 blocks (that’s around 20min of blocks) and execute:
docker-compose run web python manage.py setup --start-block-number <your-block-number>
This will start the indexing of the rinkeby chain and should take a few seconds. You should now see your market indexed in http://localhost:8000/api/markets/
Note: the default configuration points to infura and is very light in terms of performance so the service is not rate limited. For production settings, use DJANGO_SETTINGS_MODULE=config.settings.production
Setup the interface
The trading-ui interface offers a generic interface to interact with prediction markets and is intended to be used as the starting point which can be extended for your use case. Let’s start downloading and installing the project:
git clone https://github.com/gnosis/pm-trading-ui
cd pm-trading-ui
docker-compose build --force-rm
Now the interface is already functional, but we need to configure it with our ethereum account as a whitelisted account, in order to show the markets in the interface. Let’s build the config template:
docker-compose run web npm run build-config
open the file dist/config.json with your favourite text editor and change whiteslist: {} for something like this:
whitelist: {
"operator": "<your-ethereum-address>"
}
Now everything is set, you can run the interface and start buying shares on your first prediction market! run docker-compose up and open your browser at http://localhost:5000
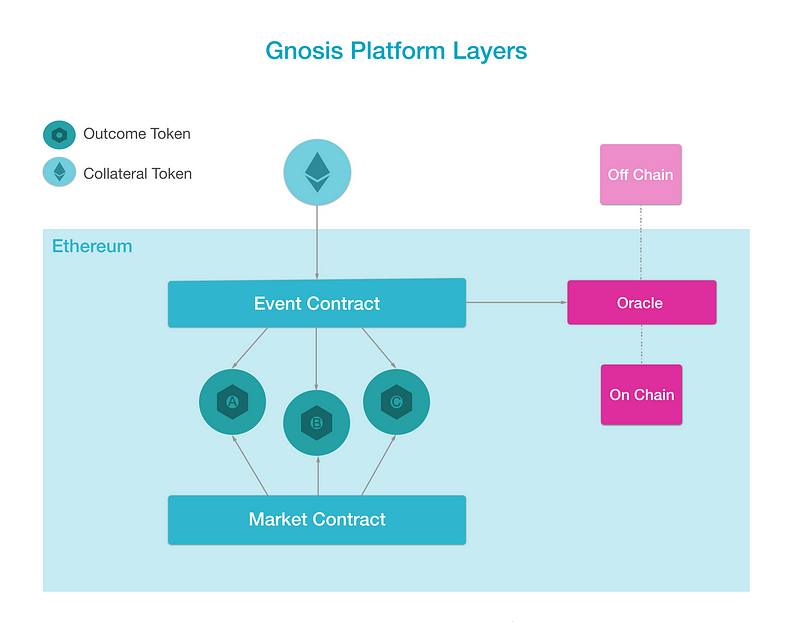
Prediction markets as a modular framework
The prediction markets platform that Gnosis offers aims to provide the foundational protocol upon which many projects will grow using prediction markets as one small piece or a as a core part of their projects. In this section we describe the different layers that compose the prediction markets framework.
Trading UI
The generic interface to interact with prediction markets is trading-ui, a javascript project built with React that you can use as starting point to adapt it for your particular use case
Ethereum Indexer
Discovering data in ethereum is complex and depending on the use case it might be even impossible. The “standard way” to query bulk data in ethereum is through filters this is very convenient for discovering ERC20 tx’s during a certain period, or the creation of a Multisig contract through a certain factory, but imagine you want something more complex like: Get all markets created by certain ethereum address that use a specific token. To get this information completely from ethereum, you will need to get all MarketCreation events and then query all the relations: Market -> Event -> Oracle -> IPFS
In practice this is O(n^4) and with many P2P network connections, might work with a few values, but as soon as you create markets, it will be unusable.
For this reason we have created an Ethereum Indexer called TradingDB a micro-service Python project that queries ethereum nodes and allows powerful queries to be run in milliseconds.
This is the basic architecture:

Javascript Library
If you want to go deeper and integrate with the ethereum blockchain, our javascript library pm-js is the middleware between the Smart Contracts and your program. It abstracts away some of the logic related to prediction markets and adds some useful features like validation.
You can directly use the contracts with web3, and it could be more intuitive for you but will be harder to perform buy and sell operations. Also, web3 won’t validate your parameters so you will have to be careful with the values you use or there will be many failing transactions.
Smart Contracts
The Smart Contracts are designed in a modular manner in order to make it easy to integrate with different Ethereum projects and extend their functionality. For example, you could use Gnosis Smart Contracts for all trading functionalities and use Augur as an Oracle by extending the Oracle interface and build a Smart Contract Adapter.
The main components are described in this blog post.
PM-SCRIPTS
pm-scripts is the recommended tool for deploying your prediction markets contracts. It allows you to deploy all kinds of prediction markets easily in any network even without having a full understanding of what all the pieces of a prediction market are.
Let’s start by getting the pm-scripts.
git clone https://github.com/gnosis/pm-scripts
npm i
We will configure the utils in the following way:
Configuration
conf/config.json: Let’s configure the pm-scripts using the mnemonic we used earlier to deploy the smart contracts. Also, make sure that the collateralToken is set to the deployed token. Finally, make sure that the tradingDB instance is pointed at an instance configured for your tournament. For example:
{
"mnemonic": "romance spirit scissors guard buddy rough cabin paddle cricket cactus clock buddy",
"account": "",
"blockchain": {
"protocol": "https",
"host": "rinkeby.infura.io",
"port": "443"
},
"tradingDB": {
"protocol": "http",
"host": "localhost",
"port": "8001"
},
"ipfs": {
"protocol": "http",
"host": "localhost",
"port": "5001"
},
"gasPrice": "1000000000",
"collateralToken": "0x0152b7ed5a169e0292525fb2bf67ef1274010c74"
}
- accountCredential: This is your wallet credential. Can be either an HD wallet mnemonic phrase composed by 12 words (HD wallet repository) or a private key (HD wallet private key repository);
- credentialType: is the type of credential you want to use to access your account, available values:
mnemonic,privateKey, default isprivateKey; - account: is your ethereum address, all transactions will be sent from this address. If not provided, pm-scripts will calculate it from your mnemonic phrase;
- blockchain: defines the Ethereum Node that pm-scripts should send transactions to (https://rinkeby.infura.io/gnosis/ by default);
- tradingDB: defines the pm-trading-db url, an Ethereum indexer which exposes a handy API to get your list of markets and their details (default: https://tradingdb.rinkeby.gnosis.pm:443);
- ipfs: sets the IPFS node that pm-scripts should send transactions to (https://ipfs.infura.io:5001 by default);
- gasPrice: the desired gasPrice
- collateralToken: the Collateral Token contract’s address (e.g Ether Token):
Deploy markets
conf/markets.json: We list the markets on which we would like to operate here:
[
{
"title": "What will be the median gas price on December 31st, 2018?",
"description": "What will be the median gas price payed among all transactions on December 31st, 2018?",
"resolutionDate": "2018-12-31T18:00:00.000Z",
"outcomeType": "CATEGORICAL",
"outcomes": [
"< 20 GWEI",
"20 GWEI",
"> 20 GWEI"
],
"currency": "WETH",
"fee": "0",
"funding": "1e18"
},
{
"title": "What will the expected volatility of the Ethereum market be by December 31st over a 30-day estimate?",
"description": "What will the expected volatility of the Ethereum market be by December 31st, 2018, over a 30-day estimate? Source: https://www.buybitcoinworldwide.com/ethereum-volatility/",
"resolutionDate": "2018-12-31T18:00:00.000Z",
"outcomeType": "SCALAR",
"upperBound": "11",
"lowerBound": "2",
"decimals": 0,
"unit": "%",
"currency": "WETH",
"fee": "0",
"funding": "1e18"
}
]
Params
- title: The title of the market.
- description: A text field describing the title of the market.
- resolutionDate: Defines when the prediction market ends, you can always resolve a market before its resolutionDate expires. Format must be any recognised by Javascript Date constructor, it’s recommended to use an ISO date format like 2018-03-27T16:20:11.698Z.
- currency: A text field defining which currency is holding the market’s funds. It’s informative, just to remind you wich token corresponds to the collateral token address.
- fee: A text field defining the amount of fees charged by the market creator.
- funding: A text field representing how much funds to provide the market with. (e.g 1e18 == 1 WETH, 1e19 == 10 WETH…)
- winningOutcome: A text field representing the winning outcome. If declared, pm-scripts will try to resolve the market, but will always ask you to confirm before proceeding.
- outcomeType: Defines the prediction market type. You must strictly provide ‘CATEGORICAL’ or ‘SCALAR’ (categorical market or scalar market).
- upperBound: (scalar markets) A text field representing the upper bound of the predictions range.
- lowerBound: (scalar markets) A text field representing the lower bound of the predictions range.
- decimals: (scalar markets) Values are passed in as whole integers and adjusted to the right order of magnitude according to the decimals property of the event description, which is a numeric integer.
- unit: (scalar markets) A text field representing the market’s unit of measure, like ‘%’ or ‘°C’ etc…
- outcomes: (categorical markets) An array of text fields representing the available outcomes for the market.
Then, we use npm run deploy to deploy these markets to the network. These markets will then gain values in conf/markets.json:
[
{
"title": "What will be the median gas price on December 31st, 2018?",
...,
"oracleAddress": "0xebf5e8897c15f3350fc3dc3032484dff7916dc75",
"ipfsHash": "QmXqkAe1oBP2z2xLe7h8hCcKSrbb5LFDRr9zHkApdz3Xyh",
"eventAddress": "0xf042bb28f521d02852dcc3635418a5cd7d9ab565",
"marketAddress": "0xcb5f35384e268f37504beb2465c1b8f42be8f414"
},
{
"title": "What will the expected volatility of the Ethereum market be by December 31st over a 30-day estimate?",
...,
"oracleAddress": "0x1c959692196025cd3e95c1c4661c94366de23612",
"ipfsHash": "QmY3LDEp2Hz7c9iM8Jci83VurhTkZWW7ccGr8WfNtRf8Rj",
"eventAddress": "0xc04f5adc5deba8acb39c0fdf9db0f5ed8cfe270d",
"marketAddress": "0x8bdc656a33ea8ee00e6fb7256bd9ea9e22ea7227"
}
]
Resolve Markets
pm-scripts is also used to resolve the outcome of a market. For that the steps are easy, let’s set up the parameter winningOutcome:
[
{
...
"winningOutcome": 123456789
...
}
]
And press resolve:
npm run resolve
PM-JS
The pm-js library offers a convenient way of accesing the Gnosis contracts for prediction markets with Javascript and Node.js. We recommend the use of pm-scripts for the creation of markets and pm-js for dealing with the automated market maker functions: BUY and SELL shares*. For interacting with the oracle contracts you might want to use it directly but pm-js allows to do it with some validation layers that are useful.
The use of pm-js assumes that you have a basic understanding of Web3.js interface. It also uses IPFS for publishing and retrieving event data, and so it will also have to be connected to an IPFS node.
Install
Install pm-contracts and pm-js into your project as a dependency using:
npm install --save '@gnosis.pm/pm-contracts' '@gnosis.pm/pm-js'
Be sure to issue this command with this exact spelling. The quotes are there in case you use Powershell.
This command installs the Gnosis core contracts and the Gnosis JavaScript library, and their dependencies into the node_modules directory. The @gnosis.pm/pm-js package contains the following:
- ES6 source of the library in
srcwhich can also be found on the repository - Compiled versions of the modules which can be run on Node.js in the
distdirectory - Webpacked standalone
gnosis-pm[.min].jsfiles ready for use by web clients in thedistdirectory - API documentation in the
docsdirectory
Notice that the library refers to the dist/index module as the package.json main. This is because even though Node.js does support many new JavaScript features, ES6 import support is still very much in development yet (watch this page), so the modules are transpiled with Babel for Node interoperability.
In the project directory, you can experiment with the Gnosis API by opening up a node shell and importing the library like so:
const Gnosis = require('@gnosis.pm/pm-js')
This will import the transpiled library through the dist/index entry point, which exports the Gnosis class.
If you are playing around with pm-js directly in its project folder, you can import it from dist
const Gnosis = require('.')
Browser use
The gnosis-pm.js file and its minified version gnosis-pm.min.js are self-contained and can be used directly in a webpage. For example, you may copy gnosis-pm.min.js into a folder or onto your server, and in an HTML page, use the following code to import the library:
<script src="gnosis-pm.min.js"></script>
<script>
// Gnosis should be available as a global after the above script import, so this subsequent script tag can make use of the API.
</script>
After opening the page, the browser console can also be used to experiment with the API.
PM-JS usage
After you import pm-js as a dependency, you can initialize it by calling the method create returning a promise. But before doing that, let’s install a web3 provider for our tests:
npm install 'truffle-hdwallet-provider-privkey' 'ethereumjs-wallet'
And generate a random private key for it:
export PRIVATE_KEY=$(node -e "console.log(require('ethereumjs-wallet').generate().getPrivateKey().toString('hex'))")
echo "Your private key: $PRIVATE_KEY"
export ADDRESS=$(node -e "console.log(require('ethereumjs-wallet').fromPrivateKey(Buffer.from('$PRIVATE_KEY', 'hex')).getChecksumAddressString())")
echo "Your address: $ADDRESS"
You can obtain rinkeby ETH using their faucet.
Once you have your rinkeby ETH, open your terminal and type: node
const Gnosis = require('@gnosis.pm/pm-js')
const HDWalletProvider = require("truffle-hdwallet-provider-privkey");
let gnosis
if (!process.env){
console.error("No PRIVATE_KEY env present")
process.exit(1);
}
Gnosis.create(
{ ethereum: new HDWalletProvider([process.env.PRIVATE_KEY], "https://rinkeby.infura.io", 0, 1, false) }
).then(result => {
gnosis = result
// gnosis is available here and may be used
})
// note that gnosis is NOT guaranteed to be initialized outside the callback scope here
Create parameters:
ethereum(string|Provider) – An instance of a Web3 provider or a URL of a Web3 HTTP provider. If not specified, Web3 provider will be either the browser-injected Web3 (Mist/MetaMask) or an HTTP provider looking at http://localhost:8545defaultAccount(string) – The account to use as the default from address for ethereum transactions conducted through the Web3 instance. If unspecified, will be the first account found on Web3. See Gnosis.setWeb3Provider defaultAccount parameter for more info.ipfs(Object) – ipfs-mini configuration objectipfs.host(string) – IPFS node address
ipfs.port(Number) – IPFS protocol port
ipfs.protocol(string) – IPFS protocol name
- logger (function) – A callback for logging. Can also provide ‘console’ to use console.log.
Know we would like to interact with a known market and perform buy/sell operations.
Let’s instanciate the market:
const market = gnosis.contracts.Market.at("0xff737a6cc1f0ff19f9f23158851c37b04979a313")
You can obtain also it’s event contract:
let event
market.eventContract().then(
function (addr){
event=gnosis.contracts.Event.at(addr)
}
)
For reference, all contract instances, will have the contract functions (both read and write operations) you can check which ones directly in the contract source. There are also more advanced functions that we will explain later (e.g buy and sell shares).
Now we have the market and the event contract instances, we can perform all buy and sell mechanisms. Basically there are two ways of interacting with the prediction market outcome tokens:
- Buying all outcome tokens for later on use it with a custom market maker (your own automated market maker, an exchange, etc)
- Through the market contract and it’s automated market maker (LMSR)
Buy all outcomes
Buying all outcomes means exchange 1 collateral token (let’s say WETH) to 1 Outcome token of each (Outcome Token YES, Outcome Token No for example). With this exchange of tokens you can always go back and exchange those again to collateral token if you use the function Sell All outcomes.
For all prediction markets we use ERC20 tokens, and because of this, all contract interaction needs to have an explicit approval of the tokens over the contract before you can actually buy/sell.
Let’s try to buy all outcome tokens:
async function buyAllOutcomes() {
const depositValue = 1e17 // 0.1 ether
const depositTx = await gnosis.etherToken.deposit.sendTransaction({ value: depositValue })
await gnosis.etherToken.constructor.syncTransaction(depositTx)
console.log("0.1 ETH deposited: https://rinkeby.etherscan.io/tx/" + depositTx)
const approveTx = await gnosis.etherToken.approve.sendTransaction(event.address, depositValue)
await gnosis.etherToken.constructor.syncTransaction(approveTx)
console.log("0.1 WETH approved: https://rinkeby.etherscan.io/tx/" + approveTx)
const buyTx = await event.buyAllOutcomes.sendTransaction(depositValue)
await event.constructor.syncTransaction(buyTx)
console.log("0.1 WETH exchanged 1:1 for collateral token index 0 and 1: https://rinkeby.etherscan.io/tx/" + depositTx)
}
buyAllOutcomes()
If you don’t see errors in the terminal, the shares should have been bought. You can check your shares balance by executing this command:
async function checkBalances() {
const { Token } = gnosis.contracts
const outcomeCount = (await event.getOutcomeCount()).valueOf()
for(let i = 0; i < outcomeCount; i++) {
const outcomeToken = await Token.at(await event.outcomeTokens(i))
console.log('Have', (await outcomeToken.balanceOf(gnosis.defaultAccount)).div('1e18').valueOf(), 'units of outcome', i)
}
}
checkBalances()
You have now two tokens:
- 0.1 Outcome Token with Index 0
- 0.1 Outcome Token with Index 1
If you want to exchange it back to WETH, execute:
async function sellAllOutcomes() {
const sellValue = 1e17 // 0.1 Outcome tokens
const sellTx = await event.sellAllOutcomes.sendTransaction(sellValue)
await event.constructor.syncTransaction(sellTx)
console.log("0.1 collateral token index 0 and 1 exchanged 1:1 for WETH: https://rinkeby.etherscan.io/tx/" + sellTx)
}
sellAllOutcomes()
And then check your WETH balance and convert it back to normal ETH.
gnosis.etherToken.balanceOf(gnosis.defaultAccount).then(balance => console.log("Your balance is: "+balance.div("1e18").toString()+" WETH"))
async function withdrawWETH(){
const withdrawValue = 1e17 // 0.1 ether
const withdrawTx = await gnosis.etherToken.withdraw(1e17)
await gnosis.etherToken.constructor.syncTransaction(withdrawTx)
console.log("0.1 WETH writhawed to ETH: https://rinkeby.etherscan.io/tx/" + withdrawTx)
}
withdrawWETH()
Automated market maker
The “normal” way to interact with prediction markets in Gnosis, it’s trough it’s LMSR automated market maker. Basically the market maker it’s the one that sets the outcome price based on the demand. It’s a zero-sum game where the potential money you can earn it’s due to a pontential loss of other party.
The automated market maker operates trough the market contract, and can be accessed individually to check market prices:
async function calcCost() {
const cost = await gnosis.lmsrMarketMaker.calcCost(market.address, 0, 1e18)
console.info(`Buy 1 Outcome Token with index 0 costs ${cost.valueOf()/1e18} WETH tokens`)
}
calcCost()
Let’s say now that you’ve decided that these outcome tokens are worth it. pm-js contains convenience functions for buying and selling outcome tokens from a market backed by an LMSR market maker. They are buyOutcomeTokens and sellOutcomeTokens. To buy these outcome tokens, you can use the following code:
async function buyOutcomeTokens() {
await gnosis.buyOutcomeTokens({
market,
outcomeTokenIndex: 0,
outcomeTokenCount: 1e18,
})
console.info('Bought 1 Outcome Token of Outcome with index 2')
}
buyOutcomeTokens()
This function internally will perform 2-3 transaction, depending if you already convert ETH to WETH or if it uses another token.
You can check your balance, as in the previous section, by calling: checkBalances(), you will notice that this time, you only have balance for one of the outcome tokens, not for both.
Similarly, you can see how much these outcome tokens are worth to the market with LMSRMarketMaker.calcProfit
async function calcProfit() {
const profit = await gnosis.lmsrMarketMaker.calcProfit(market.address, 0, 1e18)
console.info(`Sell 1 Outcome Token with index 0 gives ${profit.valueOf()/1e18} WETH tokens of profit`)
}
calcProfit()
If you want to sell the outcome tokens you have bought, you can do the following:
async function sellOutcomeTokens() {
await gnosis.sellOutcomeTokens({
market,
outcomeTokenIndex: 0,
outcomeTokenCount: 1e18,
})
}
sellOutcomeTokens()
PM-JS Integrations
Integration with webpack projects (advanced)
The ES6 source can also be used directly with webpack projects. Please refer to the Babel transpilation settings in .babelrc and the webpack configuration in webpack.config.js to see what may be involved.
Setting up an Ethereum JSON RPC
After setting up the pm-js library, you will still need a connection to an Ethereum JSON RPC provider. Without this connection, the following error occurs when trying to use the API to perform actions with the smart contracts:
Error: Invalid JSON RPC response: ""
pm-js refers to Truffle contract build artifacts found in node_modules/@gnosis.pm/pm-contracts/build/contracts/, which contain a registry of where key contracts are deployed given a network ID. By default Gnosis contract suite is already deployed on the Ropsten, Kovan, and Rinkeby testnets.
Ganache-cli and private chain providers
Ganache-cli is a JSON RPC provider which is designed to ease developing Ethereum dapps. It can be used in tandem with pm-js as well, but its use requires some setup. Since Ganache-cli randomly generates a network ID and begins the Ethereum VM in a blank state, the contract suite would need to be deployed, and the deployed contract addresses recorded in the build artifacts before use with Ganache-cli. This can be done by running the migration script in the core contracts package directory.
(cd node_modules/\@gnosis.pm/pm-contracts/ && truffle migrate)
This will deploy the contracts onto the chain and will record the deployed addresses in the contract build artifacts. This will make the API available to pm-js applications which use the transpiled modules in dist (typically Node.js apps), as these modules refer directly to the build artifacts in the @gnosis.pm/pm-contracts package. However, for browser applications which use the standalone library file gnosis-pm[.min].js, that file has to be rebuilt to incorporate the new deployment addresses info.
MetaMask
MetaMask is a Chrome browser plugin which injects an instrumented instance of Web3.js into the page. It comes preloaded with connections to the Ethereum mainnet as well as the Ropsten, Kovan, and Rinkeby testnets through Infura. pm-js works out-of-the-box with MetaMask configured to connect to these testnets. Make sure your web page is being served over HTTP/HTTPS and uses the standalone library file.
Note about Promises
Because of the library’s dependence on remote service providers and the necessity to wait for transactions to complete on the blockchain, the majority of the methods in the API are asynchronous and return thenables in the form of Promises.
Truffle contract abstractions
pm-js also relies on Truffle contract abstractions. In fact, much of the underlying core contract functionality can be accessed in pm-js as one of these abstractions. Since the Truffle contract wrapper has to perform asynchronous actions such as wait on the result of a remote request to an Ethereum RPC node, it also uses thenables. For example, here is how to use the on-chain Gnosis Math library exposed at Gnosis.contracts to print the approximate natural log of a number:
const ONE = Math.pow(2, 64)
Gnosis.create()
.then(gnosis => gnosis.contracts.Math.deployed())
.then(math => math.ln(3 * ONE))
.then(result => console.log('Math.ln(3) =', result.valueOf() / ONE))
Note about async and await
Although it is not strictly necessary, usage of async/await syntax is encouraged for simplifying the use of thenable programming, especially in complex flow scenarios. To increase the readability of code examples from this point forward, this guide will assume async/await is available and snippets execute in the context of an async function. With those assumptions, the previous example can be expressed in an async context like so:
const ONE = Math.pow(2, 64)
const gnosis = await Gnosis.create()
const math = await gnosis.contracts.Math.deployed()
console.log('Math.ln(3) =', (await math.ln(3 * ONE)).valueOf() / ONE)
Wrapping common operations
pm-js also exposes a number of convenience methods wrapping contract operations such as Gnosis.createCentralizedOracle and Gnosis.createScalarEvent.
Web3 options
The methods on the API can be provided with from, to, value, gas, and gasPrice options which get passed down to the web3.js layer. For example:
await gnosis.createCentralizedOracle({
ipfsHash: 'Qm...',
gasPrice: 20e9, // 20 GWei
})
Gas estimations
Many of the methods on the gnosis API also have an asynchronous estimateGas property which you can use, while allowing you to specify the gas estimation source. For example:
// using the estimateGas RPC
await gnosis.createCentralizedOracle.estimateGas(ipfsHash, { using: 'rpc' }))
// using stats derived from pm-contracts
await gnosis.createCentralizedOracle.estimateGas({ using: 'stats' }))
The gas stats derived from pm-contracts and used by the estimateGas functions when using stats are also added to the contract abstractions in the following property:
// examples of objects with gas stats for each function derived from pm-contracts test suite
gnosis.contracts.CentralizedOracle.gasStats
gnosis.contracts.ScalarEvent.gasStats
(Advanced) Notes for developers who use web3
If you would like to continue using web3 directly, one option is to skip this repo and use the core contracts directly. The NPM package @gnosis.pm/pm-contracts contains Truffle build artifacts as build/contracts/*.json, and those in turn contain contract ABIs, as well as existing deployment locations for various networks. The usage at this level looks something like this:
const Web3 = require('web3')
const CategoricalEventArtifact = require('@gnosis.pm/pm-contracts/build/contracts/CategoricalEvent.json')
const web3 = new Web3(/* whatever your web3 setup is here... */)
const eventWeb3Contract = web3.eth.contract(CategoricalEventArtifact.abi, '0x0bf128753dB586f742eaAda502301ea86a7561e6')
Truffle build artifacts are compatible with truffle-contract, which wraps web3.eth.contract functionality and provides additional features. If you’d like to take advantage of these features without pm-js, you may use truffle-contract in the following way:
const Web3 = require('web3')
const contract = require('truffle-contract')
// unlike the last setup, we don't need web3, just
const provider = new Web3.providers.HttpProvider('https://ropsten.infura.io') // or whatever provider you'd like
const CategoricalEventArtifact = require('@gnosis.pm/pm-contracts/build/contracts/CategoricalEvent.json')
const CategoricalEvent = contract(CategoricalEventArtifact) // pass in the artifact directly here instead
const CategoricalEvent.setProvider(provider)
// this is asynchronous because this is how truffle-contract recommends you use .at
// since in the asynchronous version, truffle-contract will actually check to make sure that
// the bytecode at the address matches the bytecode specified in the artifact
const eventTruffleContract = await CategoricalEvent.at('0x0bf128753dB586f742eaAda502301ea86a7561e6')
With pm-js, you may accomplish the above with:
const gnosis = await Gnosis.create({ ethereum: web3.currentProvider })
const event = await gnosis.contracts.CategoricalEvent.at('0x0bf128753dB586f742eaAda502301ea86a7561e6')
// and then for example
console.log(await event.isOutcomeSet())
LMSR Primer
The pm-js implementation of the logarithmic market scoring rule mostly follows the original specification. It is based on the following cost function:
$$ C(\vec{q}) = b \log \left( \sum_i \exp \left( { q_i \over b } \right) \right) $$
where
- \(\vec{q}\) is a vector of net quantities of outcome tokens sold. What this means is that although the market selling outcome tokens increases the net quantity sold, the market buying outcome tokens decreases the net quantity sold.
- \(b\) is a liquidity parameter which controls the bounded loss of the LMSR. That bounded loss for the market maker means that the liquidity parameter can be expressed in terms of the number of outcomes and the funding required to guarantee all outcomes sold by the market maker can be backed by collateral (this will be derived later).
- \(\log\) and \(\exp\) are the natural logarithm and exponential functions respectively
The cost function is used to determine the cost of a transaction in the following way: suppose \(\vec{q_1}\) is the state of net quantities sold before the transaction and \(\vec{q_2}\) is this state afterwards. Then the cost of the transaction \(\nu\) is
$$ \nu = C(\vec{q_2}) - C(\vec{q_1}) $$
For example, suppose there is a LMSR-operated market with a \(b\) of 5 and two outcomes. If this market has bought 10 tokens for outcome A and sold 4 tokens for outcome B, it would have a cost level of:
$$ C \begin{pmatrix} -10 \\ 4 \end{pmatrix} = 5 \log \left( \exp(-10/5) + \exp(4/5) \right) \approx 4.295 $$
Buying 5 tokens for outcome A (or having the market sell you those tokens) would change the cost level to:
$$ C \begin{pmatrix} -10 + 5 \\ 4 \end{pmatrix} = 5 \log \left( \exp(-5/5) + \exp(4/5) \right) \approx 4.765 $$
So the cost of buying 5 tokens for outcome A from this market is:
$$ \nu = C \begin{pmatrix} -5 \\ 4 \end{pmatrix} - C \begin{pmatrix} -10 \\ 4 \end{pmatrix} \approx 4.765 - 4.295 = 0.470 $$
Similarly, selling 2 tokens for outcome B (or having the market buy those tokens from you) would yield a cost of:
$$ \nu = C \begin{pmatrix} -10 \\ 2 \end{pmatrix} - C \begin{pmatrix} -10 \\ 4 \end{pmatrix} \approx -1.861 $$
That is to say, the market will buy 2 tokens of outcome B for 1.861 units of collateral.
Bounded Loss from the \(b\) Parameter
Here is the worst scenario for the market maker: everybody but the market maker already knows which one of the \(n\) outcomes will occur. Without loss of generality, let the answer be the first outcome token. Everybody buys outcome one tokens from the market maker while selling off every other worthless outcome token they hold. The cost function for the market maker goes from
$$ C \begin{pmatrix} 0 \\ 0 \\ 0 \\ \vdots \end{pmatrix} = b \log n $$
to
$$ C \begin{pmatrix} q_1 \\ -\infty \\ -\infty \\ \vdots \end{pmatrix} = b \log \left( \exp \left( {q_1 \over b} \right) \right) = q_1 $$
The market sells \(q_1\) shares of outcome one and buys shares for every other outcome until those outcome tokens become worthless to the market maker. This costs the participants \((q_1 - b \log n)\) in collateral, and thus, when the participants gain \(q_1\) from redeeming their winnings, this nets the participants \((b \log n)\) in collateral. This gain for the participant is equal to the market’s loss.
Thus, in order to guarantee that a market can operate with a liquidity parameter of \(b\), it must be funded with \((F = b \log n)\) of collateral. Another way to look at this is that the market’s funding determines its \(b\) parameter:
$$ b = {F \over \log n} $$
In the Gnosis implementation, the LMSR market maker contract is provided with the funding \(F\) through inspection of the market, and \(b\) is derived accordingly.
Marginal Price of Outcome Tokens
Because the cost function is nonlinear, there isn’t a price for outcome tokens which scales with the quantity being purchased. However, the cost function is differentiable, so a marginal price can be quoted for infinitesimal quantities of outcome tokens:
$$ P_i = {\partial C(\vec{q}) \over \partial q_i} = \frac{\exp(q_i / b)}{\sum_k \exp(q_k / b)} $$
In the context of prediction markets, this marginal price can also be interpreted as the market’s estimation of the odds of that outcome occurring.
LMSR Calculation Functions
The functions Gnosis.calcLMSRCost and Gnosis.calcLMSRProfit estimate the cost of buying outcome tokens and the profit from selling outcome tokens respectively. The Gnosis.calcLMSROutcomeTokenCount estimates the quantity of an outcome token which can be bought given an amount of collateral and serves as a sort of “inverse calculation” to Gnosis.calcLMSRCost. Finally, Gnosis.calcLMSRMarginalPrice can be used to get the marginal price of an outcome token.
Trading DB
We described in a previous section the benefits of having an ethereum indexer over the classical approach of quering directly the blockchain. In this section we will cover the differnt ways of executing it, configurations and more advanced scennarios where you will need to modify our indexer to fit with your custom smart contract modules and all the different configuration parameters available.
TradingDB is a python project based on django and celery that follows an architecture of micro-services, with 3 main components: the web API, a scheduler (producer) and worker (consumer). These 3 componentes use a message queu to communicate, by default we use Redis and also a Relational database (we recommend postgresql). There are other external services needed as and ethereum node (depending on the use case you could use infura) and an IPFS node (you can use infura for this).
There are many ways of executing this software, but mainly those are 4:
- Docker-compose
- Docker
- Container Orchestrator. e.g Kubernetes
- Bare-metal
Docker-compose
docker-compose is a a tool for defining and running multi-container Docker applications and link the dependencies between them. You can see it as tool for managing micro-service and container projects as monoliths, to make the execution easier for development.
If you take a look at our docker-compose.yml we have defined many services inside, like the postgresql database and the redis cache. This makes the onboarding very easy, everything you need to do is running two commands.
docker-compose build
docker-compose up
The up command will run forever. In case you need to access one of the services for management, you can use run:
docker-compose run web sh
docker-compose run worker sh
docker-compose run scheduler sh
python manage.py
Note that by default, the configuration used is for the Rinkeby network. Check config.settings.rinkeby
Docker
You can check the tradingdb images in the public docker registry here. The same image can be used for the 3 pieces of the system: web, scheduler and worker.
Basically you will need to run a different command for each piece:
- Web:
docker/web/run_web.shcode - Scheduler:
docker/web/celery/scheduler/run.shcode - Worker:
docker/web/celery/worker/run.shcode
Running it directly with docker will mean you need to manage restarts, failures and connections. Take a look at the configuration section to know which parameters do you need to pass from environment.
Kubernetes
Kubernetes is one of the most robust solutions for container orchestration and is what we recommend for production of TradingDB.
In order to run this project on your kubernetes cluster, you need to follow these steps:
# Verify Kubernetes version is > 1.9
kubectl get nodes
Database configuration
The database configuration of tradingdb uses kubernetes secrets for storing this sensitive information.
kubectl create secret generic tradingdb-database \
--from-literal host='[DATABASE_HOST]' \
--from-literal name=[DATABASE_NAME] \
--from-literal user=[DATABASE_USER] \
--from-literal password='[DATABASE_PASSWORD]' \
--from-literal port=[DATABASE_PORT]
Queue and Cache
We use Redis as message broker for Celery (handles the different tasks messages as indexing, issuing tokens, etc) and also as the cache service. You can apply it in your cluster by:
kubectl apply -f kubernetes/redis-tradingdb
By default this creates a deployment and a service in kubernetes. You should not need further configuration for this part.
TradingdDB services
As we explained in the previous section, tradingdDB follows a microservice architecture, and it’s core is formed by 3 services: worker, scheduler and web API. In order to deploy these services there are a minimum of configuration parameters you need to set up like:
- Ethereum node URL (by default points to infura, in production you should have an ethereum node that supports many requests per second). Besides what you would think, the interface with better performance is the RPC API (over Webservices or IPC sockets). This is because we can batch requests in the same HTTP connection and the underliying implementation of ethereum nodes it’s more efficient for the RPC API.
- DJANGO_SECRET_KEY this parameter secures your sessions with the admin interface (/admin). In a UNIX environment you can generate a random string with this command:
head /dev/urandom | shasum -a 512
There are many more parameters we describe in the configuration section.
After you have your configuration set, apply the deployment with:
kubectl apply -f kubernetes/tradingdb
Bare metal
TradingDB it’s a python 3.6 project, if you are
Configuration Parameters
In the project you will find some configuration templates for different environments. These are in config/settings/
base.pyAs the name says, it’s the base of all the config parameters, has the common configurations and the default values.ganache.pyYou should use this config when testing with ganache-cli runningganache-cli -dproduction.pyDisables the debug settings and is oriented to be use on mainnet (or a testnet for running an olympia tournament).rinkeby.pyHas configured the default addresses for rinkeby and also for one of the Olympia tournaments Gnosis run, as an example.test.pyUsed by tests.
Here you have a list of all the possible parameters you can set as ENV parameter (not all configs allows to override by ENV).
DJANGO_DEBUG
bool - Enables debug logs. Makes it easier for finding bugs in the API.
DATABASE_URL
url - Database url used by the service, follows django-environ supported db_url
CELERY_BROKER_URL
url - Follows this format
ETH_BACKUP_BLOCKS
int - amount of blocks saved for rollbacks (chain reorgs). It’s 100 by default.
ETH_PROCESS_BLOCKS
int - number of blocks processed as bulk for the indexer every time an indexing task is triggered (by default every 500ms). Increasing this value will mean “maybe” the indexing will be faster, but that will also depend on the cpu, memory and network resources. There will be many RPC requests and you might kill you ethereum node instance ^^.
ETH_FILTER_MAX_BLOCKS
int - follows the same concept than the previous parameter but with the difference that instead of performing pulling of ethereum logs, it uses ethereum filters. Ethereum filters are used for the first sync as those are faster for synchronizing historic data.
ETHEREUM_NODE_URL (mandatory in production)
protocol://host:port - The RPC endpoint of your ethereum node.
ETHEREUM_MAX_WORKERS
int - default 10. Represents the amount of parallel processes performing requests to the ethereum node.
ETHEREUM_MAX_BATCH_REQUESTS
int - default 500. Amount of RPC requests batched in one single HTTP request.
IPFS_HOST
string - default ipfs.infura.io
IPFS_PORT
int - default 5001
ALLOWED_HOSTS
string - Separated by commas, url and ips allowed to be used for the API.
LMSR_MARKET_MAKER
ethereum checksum address - Automated market maker allowed to be used by market contracts. You can check the default addresses for each network here
CENTRALIZED_ORACLE_FACTORY
ethereum checksum address - Centralized Oracle factory contract. You can check the default addresses for each network here
Extend TradingDB (ADVANCED)
There are many reason why you would like to extend the project, the main one is that you have custom contracts and specific data that you would like to save in the indexer or trigger some actions (like send an email after a deposit transfer).
Implement Python event receiver
With custom event receivers you will be able to listen for events on your own contracts. Custom event receivers can be set up in pm-trading-db extending django_eth_events.chainevents.AbstractEventReceiver and then defining methods:
save(decoded_event, block_info): Will process events when received.block_infowill have the web3 block structure of the ethereum block where the event is found.rollback(decoded_event, block_info): Will process events in case of reorg. The event will be the same that insave, so you decide how to rollback the changes (in case that’s needed).
Every decoded_event has address and name, and then decoded params under params key. address is always lowercase without 0x. Example of event:
{
"address": "b3289eaac0fe3ed15df177f925c6f8ceeb908b8f",
"name": "CentralizedOracleCreation",
"params": [
{
"name": "creator",
"value": "67ed2c5c09b7aa308dbd0fb8754b695e5bb030ad"
},
{
"name": "centralizedOracle",
"value": "88c2c1bb33c4939f58384629e7b5f26d90bafcc9"
},
{
"name": "ipfsHash",
"value": "QmNUhQD2hzRb8Pj31RHtBaJNpZUzQ9cg1AKKW8SFVScFb5"
}
]
}
You can add a custom EventReceiver to the event receivers file tradingdb/chainevents/event_receivers.py. An example of EventReceiver:
from django_eth_events.chainevents import AbstractEventReceiver
class TestEventReceiver(AbstractEventReceiver):
def save(self, decoded_event, block_info=None):
event_name = decoded_event.get('name')
address = decoded_event.get('address')
print('Received event', event_name, 'with address', address)
print(decoded_event.get('params'))
def rollback(self, decoded_event, block_info=None):
# Undo stuff done by `save` in case of reorg
# For example, delete a database object created on `save`
# No need for rollback in this case
pass
Add contract ABI
If you want to listen events for your own contract, you need to add the json ABI to tradingdb/chainevents/abis/ folder to make pm-trading-db capable of decoding the events.
Then you need to configure your receiver before starting pm-tradingdb for the first time. Go to config/settings/olympia.py and add your event receiver as a Python dictionary. Required fields are:
- ADDRESSES: List addresses of the contracts to be watched for events. If you need to watch one single address, use a one element list.
- EVENT_ABI: ABI of your custom contract (used to decode the events).
- EVENT_DATA_RECEIVER: Absolute python import path for the custom event receiver class.
- NAME: Name of the receiver, just don’t use same name that another receiver.
Configure custom event receiver
Example of a custom event receiver:
{
'ADDRESSES': ['0xD6fF69322719b077fDC5335535989Aa702016276', '0x992575d97fa3C31f39a81BDC3D517aE7D8C1C5A2'],
'EVENT_ABI': load_json_file(abi_file_path('MyTestContract.json')),
'EVENT_DATA_RECEIVER': 'chainevents.event_receivers.TournamentTokenReceiver',
'NAME': 'OlympiaToken',
},
You should now be ready to run tradingDB
Setting Up the Interface
First, clone the interface from github:
git clone https://github.com/gnosis/pm-trading-ui.git
Setup
Run npm i to install all dependencies. Now you can already start the application like such: NODE_ENV=development npm start and it will run a local webpack server on which you can test.
In order to build a production version, run NODE_ENV=production npm build and it will create a /dist folder that will be filled with a minified and bundled interface application.
But first let’s configure the interface:
Configuration
The pm-trading-ui uses a runtime configuration so that we have the ability to deploy changes to configuration at runtime. It works by having a default fallback configuration, and multiple different environments and configuration files.
Let’s look at a practical example, let’s say we want to setup an automated “staging” or pre-production environment. For this example I’ll use our mainnet configuration example:
/config
├── fallback.json # the default configuration file, don't edit this file!
├── local.json
├── mainnet
│ ├── development.json
│ ├── production.json
│ └── staging.json # our desired environment configuration, do edit this file
└── olympia
├── production.json
└── staging.json
You only need to define what you need in the specific configuration. Everything that is not defined, will be taken from fallback.json, which will run only the bare minimum of features.
Now, let’s build and deploy our application. First, we need to create the /dist folder by running NODE_ENV=production npm build. Now we need to copy our desired configuration into our build folder in a special way as config.js. This method allows us to easily exchange it later on, either automated using a CI system or manual, without having to build everything again.
In order to copy the configuration file, we prepared a script that will copy and prepare the configuration file automatically.
node ./scripts/configuration.browser.js mainnet/staging
configuration.browser.js is a simply script to copy, minify and add a crucial window.__GNOSIS_CONFIG__= snippet infront of your JSON config (as you can’t embed JSON as script files in HTML)
After this step, your application is ready to be run. Deploy your application to your filehoster of choice and access the page - the previously mentioned config.js will be used to determine the configuration, at runtime.
Basic Configuration Documentation
A quick rundown of all configuration entries, their meanings and their possible values. Please note that the interface currently does not throw warnings or errors, if you mistype a config entry, and will probably just use the fallback configuration.
Trading DB
gnosisdb configures which trading-db you want to use to run the interface. The pm-trading-db package is required in order to keep track of previous markets, without having to fully sync an ethereum node, each time you want to access the interface.
protocol - either https or http
host - hostname for the database.
port - 443 is the default for SSL.
{
"gnosisdb": {
"protocol": "https",
"host": "example.com/trading-db",
"port": 443
},
Ethereum Node
ethereum configures which ethereum node should be used to interact with the application. Infura is what we use and what is tested most in depth, but all other full-nodes should work too.
protocol - either https or http
host - hostname for the database.
port - 443 is the default for SSL.
"ethereum": {
"protocol": "https",
"host": "rinkeby.infura.io",
"port": 443
},
Gas Price Calculation
In order to display the cost of transactions, we require an external gas-estimation service. Multiple different ones are availble, ETHGasstation is the default but you can also define your own (take a look at the code).
external.url - the API url from which to fetch the gas price information
external.type - Which implementation does the API use? currently only available ETH_GAS_STATION but extendable, as mentioned above.
"gasPrice": {
"external": {
"url": "https://ethgasstation.info/json/ethgasAPI.json",
"type": "ETH_GAS_STATION"
}
},
If you rather use the built-in gas estimation, which is supectible to gas-price attacks, define this entry as such:
"gasPrice": {
"external": false
}
Market Creator Whitelist
The whitelist defines which users are allowed to create markets on your interface. Currently there is no way to disable the whitelist.
The object keys define the allowed addresses, the values (currently unused) are simply used as a way to remember which address belongs to which user. Please enter all addresses (the keys) in lowercase
"whitelist": {
"0x123...": "Admin #1"
},
Logo and Favicon
This property defines which icons the interface should use for differenct screensizes and as a favicon. All paths are defines from the root of the /src folder
"logo": {
"regular": "assets/img/gnosis_logo.svg",
"small": "assets/img/gnosis_logo_icon.svg",
"favicon": "assets/img/gnosis_logo_favicon.png"
},
Tournament Mode
Enabling Tournament Mode will currently enable the following functionality
- Custom Application Name will be used
- Gamification Stats on
/dashboardPage - Scoreboard, if desired
- Gamerules, if desired
"tournament": {
"enabled": false,
"name": "My Tournament"
},
Scoreboard
If you want to use a scoreboard in your application, please take a look at pm-trading-db.
"scoreboard": {
"enabled": false
},
Gameguide
The gameguide allows you to set rules and information for new users. In Olympia this is used to tell the user, how to use the interface if they’re new to ethereum and the blockchain.
"gameGuide": {
"enabled": false
},
Define a Collateral Token
You can define which collateral token the application should use when interacting with markets. Setting this property will also filter all markets based on their collateral, meaning only markets with the same collateral token as the one that was defined here will be shown!
source - defines how you want the ERC20 token contract should be found
contract - means you define a contract thats available in pm-jss Contracts property. To implement this, take a look at how this was done for our olympia tournament contracts.
address - hardcoded address of the contract that’s available on the network defined in ethereum. This is probably the easiest to setup.
eth - uses a combination of Ether and WETH, a ERC20 wrapped Ether token. Take a look here, for more information on this contract
contractName - is only required when using source: "contract", defines the name of the contract to be loaded.
isWrappedEther - if your collateralToken is a derivative of ETH (WETH), setting this to true will combine this token balance with the users wallet balance. This way we can show a total balance, with already wrapped collateral and wallet balance.
symbol - is used to overwrite the symbol. If this is not defined, it will try to use the name of the ERC20 token after loading it.
icon - used to display next to the amount of collateral a user has. If not defined, will use a default ethereum style icon.
"collateralToken": {
"source": "contract",
"options": {
"contractName": "etherToken",
"isWrappedEther": true,
"symbol": "ETH",
"icon": "/assets/img/icons/icon_etherTokens.svg"
}
},
Wallet Integrations
There are multiple different built-in providers that can be used with the interface. The most tested provider is metamask. Take a look at the code in order to build your own.. Currently the following providers are available: parity, metamask, remote, uport. All providers are always available, as long as the correct network is used.
default - defines which provider to use when multiple providers were found, or if no provider was found to tell the user which provider is recommended to interact with the application.
requireTOSAccept - if you require the user to accept the terms and conditions before they can connect to the application and interact with it.
"providers": {
"default": "METAMASK",
"requireTOSAccept": false
},
Legal Compliance
If you require legal compliance when your application is used outside of an internal testing or similar situations, you can enable a feature which will attach itself in multiple places, to have the user check-off all defines documents before they can access the application.
documents[].type - defines the type of legal information you want the user to accept. Can be either
TOS_DOCUMENT to refer to a file or TOS_TEXT to allow you to simply enter a text as text
documents[].id - defines a unique identifier that is used to check if the user previously accepted this document. If you later update a legal document, a version can be added, that will require the user to accept a specific document again. e.g. terms_of_service_v2.
documents[].title - Only for TOS_DOCUMENT to display as the title of the linked document.
documents[].file - Only for TOS_DOCUMENT to link to a document.
documents[].text - Only for TOS_TEXT to insert text that the user will have to “agree to”
"legalCompliance": {
"enabled": true,
"documents": [
{
"type": "TOS_DOCUMENT",
"id": "terms_of_service",
"title": "Terms of Service",
"file": "/assets/TermsOfService.html"
},
{
"type": "TOS_DOCUMENT",
"id": "privacy_policy",
"title": "Privacy Policy",
"file": "/assets/PrivacyPolicy.html"
},
{
"type": "TOS_DOCUMENT",
"id": "risk_disclaimer",
"title": "Risk Disclaimer",
"file": "/assets/RiskDisclaimerPolicy.html"
},
{
"type": "TOS_TEXT",
"id": "cookie_policy",
"text": "Gnosis' Cookies",
}
]
},
Reward Claiming
"rewardClaiming": {
"enabled": false,
"claimReward": {
"enabled": false,
"claimStart": "2018-06-01T12:00:00",
"claimUntil": "2018-07-01T12:00:00",
"contractAddress": "0xe89f27dafb9ba68c864e47a0bf1e430664e419af",
"networkId": 42
}
},
"rewards": {
"enabled": false,
"rewardToken": {
"symbol": "RWD",
"contractAddress": "0x84b06a41095be5536b3e6db1ee641ebc2f38cfcb",
"networkId": 3
}
},
Badges and Levels
You can enable user-badges for your tournament by enabling this feature. It will add a custom icon next to the users providers in the header, based on the amount of predictions they made.
"badges": {
"enabled": true,
"ranks": [
{
"icon": "assets/img/badges/junior-predictor.svg",
"rank": "Junior Predictor",
"minPredictions": 0,
"maxPredictions": 4
},
{
"icon": "assets/img/badges/crystal-gazer.svg",
"rank": "Crystal Gazer",
"minPredictions": 5,
"maxPredictions": 9
},
{
"icon": "assets/img/badges/fortune-teller.svg",
"rank": "Fortune Teller",
"minPredictions": 10,
"maxPredictions": 14
},
{
"icon": "assets/img/badges/clairvoyant.svg",
"rank": "Clairvoyant",
"minPredictions": 15,
"maxPredictions": 19
},
{
"icon": "assets/img/badges/psychic.svg",
"rank": "Psychic",
"minPredictions": 20
}
]
}
Thirdparty Services
In order to determine which thirdparty integrations we want to use, we developed a plug-in system for integrations that can be included at a global scope, such as Google Analytics and the Chat Platform Intercom. To see how this was done, take a look at the code.
"thirdparty": {
"googleAnalytics": {
"enabled": false,
"config": {
"id": "UA-000000-2"
}
},
"intercom": {
"enabled": false,
"config": {
"id": "INTERCOM_USERID"
}
}
},
}
WIP: KYC/AML Customer Verification
For legal compliancy, we integrated a KYC provider, which can be enabled if necessary. If you’re running on the test-net or a private interface, you most likely won’t need this.
"verification": {
"enabled": true,
"handler": "onfido",
"options": {
}
}
Misc Constants
These are configurable constants in the application.
LIMIT_MARGIN - during trading it can happen that the margin for trade has been reduced by another users trade, after the specified amount (in percent) the user will receive a warning that the trade has been chaged.
NOTIFICATION_TIMEOUT - how long it takes for transaction notifications to be considered timed out (milliseconds).
LOWEST_VALUE - lowest possible value to display in the interface. Any value below will be shown <${value}, e.g. Sell Price: <0.001
"constants": {
"LIMIT_MARGIN": 5,
"NOTIFICATION_TIMEOUT": 60000,
"LOWEST_VALUE": 0.001
}
Tournament Reward Claiming
In order to allow tournament recipients to claim a reward of some ERC20 token, an instance of the RewardClaimHandler may be deployed, and that information must be relayed to the frontend.
Deploying RewardClaimHandler using MyEtherWallet
To do so, you will need an account with actual Ether. We will use MyEtherWallet to do this deployment. For the purpose of this guide, we will issue rewards on the Kovan network, though you will almost certainly wish to use the public main network.
First we must deploy the contract RewardClaimHandler contract with MEW. You can find the bytecode in the @gnosis.pm/pm-apollo-contracts project in the build artifact build/contracts/RewardClaimHandler.json under the bytecode key, but this is reproduced for your convenience below:
0x6060604052341561000f57600080fd5b604051602080610c1b83398101604052808051906020019091905050806000806101000a81548173ffffffffffffffffffffffffffffffffffffffff021916908373ffffffffffffffffffffffffffffffffffffffff16021790555033600160006101000a81548173ffffffffffffffffffffffffffffffffffffffff021916908373ffffffffffffffffffffffffffffffffffffffff16021790555050610b5f806100bc6000396000f30060606040526004361061008e576000357c0100000000000000000000000000000000000000000000000000000000900463ffffffff16806319ec3ded14610093578063553eb4db146100e0578063570ca735146101835780638c9845b0146101d8578063a2fb117514610201578063b88a802f14610264578063e110342214610279578063f7c618c11461028e575b600080fd5b341561009e57600080fd5b6100ca600480803573ffffffffffffffffffffffffffffffffffffffff169060200190919050506102e3565b6040518082815260200191505060405180910390f35b34156100eb57600080fd5b610181600480803590602001908201803590602001908080602002602001604051908101604052809392919081815260200183836020028082843782019150505050505091908035906020019082018035906020019080806020026020016040519081016040528093929190818152602001838360200280828437820191505050505050919080359060200190919050506102fb565b005b341561018e57600080fd5b610196610572565b604051808273ffffffffffffffffffffffffffffffffffffffff1673ffffffffffffffffffffffffffffffffffffffff16815260200191505060405180910390f35b34156101e357600080fd5b6101eb610598565b6040518082815260200191505060405180910390f35b341561020c57600080fd5b610222600480803590602001909190505061059e565b604051808273ffffffffffffffffffffffffffffffffffffffff1673ffffffffffffffffffffffffffffffffffffffff16815260200191505060405180910390f35b341561026f57600080fd5b6102776105dd565b005b341561028457600080fd5b61028c610759565b005b341561029957600080fd5b6102a16109f0565b604051808273ffffffffffffffffffffffffffffffffffffffff1673ffffffffffffffffffffffffffffffffffffffff16815260200191505060405180910390f35b60036020528060005260406000206000915090505481565b6000806000600280549050148015610314575060008551115b8015610321575083518551145b801561037a5750600160009054906101000a900473ffffffffffffffffffffffffffffffffffffffff1673ffffffffffffffffffffffffffffffffffffffff163373ffffffffffffffffffffffffffffffffffffffff16145b151561038557600080fd5b60009150600090505b84518110156104325783818151811015156103a557fe5b906020019060200201518201915083818151811015156103c157fe5b906020019060200201516003600087848151811015156103dd57fe5b9060200190602002015173ffffffffffffffffffffffffffffffffffffffff1673ffffffffffffffffffffffffffffffffffffffff16815260200190815260200160002081905550808060010191505061038e565b6000809054906101000a900473ffffffffffffffffffffffffffffffffffffffff1673ffffffffffffffffffffffffffffffffffffffff166323b872dd3330856040518463ffffffff167c0100000000000000000000000000000000000000000000000000000000028152600401808473ffffffffffffffffffffffffffffffffffffffff1673ffffffffffffffffffffffffffffffffffffffff1681526020018373ffffffffffffffffffffffffffffffffffffffff1673ffffffffffffffffffffffffffffffffffffffff1681526020018281526020019350505050602060405180830381600087803b151561052957600080fd5b5af1151561053657600080fd5b50505060405180519050151561054b57600080fd5b8460029080519060200190610561929190610a15565b508242016004819055505050505050565b600160009054906101000a900473ffffffffffffffffffffffffffffffffffffffff1681565b60045481565b6002818154811015156105ad57fe5b90600052602060002090016000915054906101000a900473ffffffffffffffffffffffffffffffffffffffff1681565b600060028054905011801561070757506000809054906101000a900473ffffffffffffffffffffffffffffffffffffffff1673ffffffffffffffffffffffffffffffffffffffff1663a9059cbb33600360003373ffffffffffffffffffffffffffffffffffffffff1673ffffffffffffffffffffffffffffffffffffffff168152602001908152602001600020546040518363ffffffff167c0100000000000000000000000000000000000000000000000000000000028152600401808373ffffffffffffffffffffffffffffffffffffffff1673ffffffffffffffffffffffffffffffffffffffff16815260200182815260200192505050602060405180830381600087803b15156106ef57600080fd5b5af115156106fc57600080fd5b505050604051805190505b151561071257600080fd5b6000600360003373ffffffffffffffffffffffffffffffffffffffff1673ffffffffffffffffffffffffffffffffffffffff16815260200190815260200160002081905550565b60008060006002805490501180156107be5750600160009054906101000a900473ffffffffffffffffffffffffffffffffffffffff1673ffffffffffffffffffffffffffffffffffffffff163373ffffffffffffffffffffffffffffffffffffffff16145b80156107cc57506004544210155b15156107d757600080fd5b60009150600090505b6002805490508110156108f7576003600060028381548110151561080057fe5b906000526020600020900160009054906101000a900473ffffffffffffffffffffffffffffffffffffffff1673ffffffffffffffffffffffffffffffffffffffff1673ffffffffffffffffffffffffffffffffffffffff168152602001908152602001600020548201915060006003600060028481548110151561088057fe5b906000526020600020900160009054906101000a900473ffffffffffffffffffffffffffffffffffffffff1673ffffffffffffffffffffffffffffffffffffffff1673ffffffffffffffffffffffffffffffffffffffff1681526020019081526020016000208190555080806001019150506107e0565b6000809054906101000a900473ffffffffffffffffffffffffffffffffffffffff1673ffffffffffffffffffffffffffffffffffffffff1663a9059cbb33846040518363ffffffff167c0100000000000000000000000000000000000000000000000000000000028152600401808373ffffffffffffffffffffffffffffffffffffffff1673ffffffffffffffffffffffffffffffffffffffff16815260200182815260200192505050602060405180830381600087803b15156109ba57600080fd5b5af115156109c757600080fd5b5050506040518051905015156109dc57600080fd5b60006002816109eb9190610a9f565b505050565b6000809054906101000a900473ffffffffffffffffffffffffffffffffffffffff1681565b828054828255906000526020600020908101928215610a8e579160200282015b82811115610a8d5782518260006101000a81548173ffffffffffffffffffffffffffffffffffffffff021916908373ffffffffffffffffffffffffffffffffffffffff16021790555091602001919060010190610a35565b5b509050610a9b9190610acb565b5090565b815481835581811511610ac657818360005260206000209182019101610ac59190610b0e565b5b505050565b610b0b91905b80821115610b0757600081816101000a81549073ffffffffffffffffffffffffffffffffffffffff021916905550600101610ad1565b5090565b90565b610b3091905b80821115610b2c576000816000905550600101610b14565b5090565b905600a165627a7a723058200652f29a057236c9369c2c944946437d8769c29d3fdc0ea79bae1a4cd504018f0029
Then add the reward token address at the end, padded left to 64 hex characters (32 bytes/256 bits/one EVM word). For example, if your reward token address existed on the network at 0x3552D381b89Dcb92c59d7a0F8fe93b1e3BBE1886, then we would append this to the bytecode:
0000000000000000000000003552D381b89Dcb92c59d7a0F8fe93b1e3BBE1886
Then deploy the contract. Once your contract is deployed, you should have an address. Let’s say that address is 0x9720939c16665529dEaBE608bC3cA72509297F79
Deploying RewardClaimHandler using Truffle and pm-apollo-contracts
First, clone the pm-apollo-contracts repo:
git clone https://github.com/gnosis/pm-trading-ui.git
Install the dependencies:
npm i
Make sure you have truffle installed globally, you can run truffle version in your terminal to check, if it says “command not found” or similar, install truffle by executing this command:
npm i -g truffle
Configuring the project for deployment is covered in this guide, in this part we’ll cover the configuration very briefly as we expect you have it already prepared when you were going through previous parts of this guide.
Let’s assume that our RewardClaimHandler will be deployed to the Rinkeby Test Network. In the real life example the contract should be probably deployed to the Mainnet, the idea is the same except you’d have to replace node url and change network name/id
Create truffle-local.js file inside the root directory, and copy paste the content:
If you want to use a private key
const Provider = require('truffle-privatekey-provider')
const accountCredential = 'Your private key'
const config = {
networks: {
rinkeby: {
provider: new Provider(accountCredential, 'https://rinkeby.infura.io'),
network_id: '4',
},
},
}
module.exports = config
Important! For using private key as an account credential, we’ll need a package called truffle-privatekey-provider, you can install it by running this command in your terminal:
npm i truffle-privatekey-provider
Or if you want to use a mnemonic phrase
const Provider = require('truffle-hdwallet-provider')
const accountCredential = 'Your mnemonic phrase'
const config = {
networks: {
rinkeby: {
provider: new Provider(accountCredential, 'https://rinkeby.infura.io'),
network_id: '4',
},
},
}
module.exports = config
Replace accountCredential variable with a credential of your choose: private key or a mnemonic phrase. Don’t forget that network’s name and id has to be changed too if you want to deploy a contract to a different network.
Now, when you are done with the configuration, you need to run the following command:
npx truffle exec scripts/deploy_reward_contract.js --token=<token-address> --network=<your-network>
Important! Don’t forget to replace <token-address> with the address of a token you are going to use to reward your winners and <your-network> with your desired network’s name. Token Contract and RewardClaimHandler have to be on the same network.
After running the command, you should get the following output (an example):
> npx truffle exec scripts/deploy_reward_contract.js --token=0x1a5f9352af8af974bfc03399e3767df6370d82e4 --network=rinkeby
Using network 'rinkeby'.
RewardClaimHandler: 0x79f32a252bb4b370e5a4a37f34e6ff0e1acc52bf
Transaction hash: 0xa2694e3924137116e59501cf54d5fa24e2432ae052e11d40cbfe93b689861870
Save RewardClaimHandler address you got, you’ll need it in the next section.
Filling the contracts with winners and prize amounts
For this section, we’re assuming that you already have correct configuration for pm-scripts. If you haven’t used it, please first go to pm-scripts section of this documentation.
So, inside pm-scripts root directory, go to conf/config.json file. Now, you need to add rewardClaimHandler key to the json and configure it. You can use this example as a reference:
"rewardClaimHandler": {
"blockchain": {
"protocol": "https",
"host": "node.rinkeby.gnosisdev.com",
"port": "443"
},
"address": "0x42331cbc7D15C876a38C1D3503fBAD0964a8D72b",
"duration": 86400,
"decimals": 18,
"levels": [
{ "value": 5, "minRank": 1, "maxRank": 1 },
{ "value": 4, "minRank": 2, "maxRank": 2 },
{ "value": 3, "minRank": 3, "maxRank": 3 },
{ "value": 2, "minRank": 4, "maxRank": 4 },
{ "value": 1, "minRank": 5, "maxRank": 5 },
{ "value": 0.9, "minRank": 6, "maxRank": 7 },
{ "value": 0.8, "minRank": 8, "maxRank": 9 },
{ "value": 0.7, "minRank": 10, "maxRank": 11 },
{ "value": 0.6, "minRank": 12, "maxRank": 13 },
{ "value": 0.5, "minRank": 14, "maxRank": 15 },
{ "value": 0.4, "minRank": 16, "maxRank": 17 },
{ "value": 0.3, "minRank": 18, "maxRank": 19 },
{ "value": 0.2, "minRank": 19, "maxRank": 34 },
{ "value": 0.1, "minRank": 34, "maxRank": 100 }
]
}
Let’s go through configurations options.
- blockchain - an Ethereum node URL for RewardClaimHandler contract
- address - RewardClaimHandler’s contract address. You should’ve saved it in previous section
- duration - duration of reward claiming period in seconds, starting from the time you put data to the contract. Immutable after registering the rewards
- decimals - Amount of decimals token reward contract uses
- levels - Array which represents ranks and reward values. You can check the format in example configuration above. You can just copy-paste it from your interface configuration
After you’re done with the configuration, just run this in your terminal:
node lib/main.js claimrewards
After the execution of this command you’re done with smart contracts work, now let’s configure the interface.
Configuring the interface
Here are an example config of rewards section in the interface config:
{
"rewardClaiming": {
"enabled": false,
"claimReward": {
"enabled": false,
"claimStart": "2018-06-01T12:00:00",
"claimUntil": "2018-07-01T12:00:00",
"contractAddress": "0xe89f27dafb9ba68c864e47a0bf1e430664e419af",
"networkId": 42
}
},
"rewards": {
"enabled": true,
"rewardToken": {
"symbol": "RWD",
"contractAddress": "0x3552D381b89Dcb92c59d7a0F8fe93b1e3BBE1886",
"networkId": 42
},
"levels": [
{ "value": 5, "minRank": 1, "maxRank": 1 },
{ "value": 4, "minRank": 2, "maxRank": 2 },
{ "value": 3, "minRank": 3, "maxRank": 3 },
{ "value": 2, "minRank": 4, "maxRank": 4 },
{ "value": 1, "minRank": 5, "maxRank": 5 },
{ "value": 0.9, "minRank": 6, "maxRank": 7 },
{ "value": 0.8, "minRank": 8, "maxRank": 9 },
{ "value": 0.7, "minRank": 10, "maxRank": 11 },
{ "value": 0.6, "minRank": 12, "maxRank": 13 },
{ "value": 0.5, "minRank": 14, "maxRank": 15 },
{ "value": 0.4, "minRank": 16, "maxRank": 17 },
{ "value": 0.3, "minRank": 18, "maxRank": 19 },
{ "value": 0.2, "minRank": 19, "maxRank": 34 },
{ "value": 0.1, "minRank": 34, "maxRank": 100 }
]
},
...
}
Let’s go through options here:
- rewardClaiming
- enabled - If enabled, then the interface will show a reward claiming box on scoreboard page
- claimReward
- enabled - If enabled, then the interface will check if the current date is between
claimStartandclaimUntiland if it is, then the reward claiming process will be active. It was done because in some cases you’d want to sent the rewards manually instead of a contract. - claimStart - Start date of reward claiming
- claimUntil - End date of reward claiming
- contractAddress - Address of previously deployed RewardClaimHandler
- networkId - RewardClaimHandler’s network id
- enabled - If enabled, then the interface will check if the current date is between
- rewards
- enabled - If enabled, interface will show reward amount and an address the user will get the rewards to on scoreboard page
- rewardToken
- symbol - Reward token symbol
- contractAddress - Address of a reward token you want to use
- networkId = Reward token’s network id
- levels - Array of objects which represents ranks and reward values, each object should contain three properties:
- value - Reward amount value in ETH. So if a token contract uses X decimals, the amount of tokens a user will get is value * 10^X
- minRank - Minimum suitable rank for the reward
- maxRank - Maximum suitable rank for the reward, inclusive
Be aware that the levels key will show up on the scoreboard and signal to the players what their anticipated reward should be. Be sure that you have enough of the reward to offer!
The best way to handle the reward claiming is to configure everything at the tournament start except rewardClaiming.claimReward, just keep it disabled. Then, when reward claiming start itself, deploy and fill the contract, enable claimReward via runtime config or change the config and deploy a new version of the interface.
Tournament Operator Guide
We assume, you have read past sections, and you already know how to operate a Gnosis prediction market platform: create markets, set up tradingdb, host the website and resolve the markets. In this section we will explain step by steps what do you need in order to configure your own Prediction Markets Tournament.
Set up contracts
Create Ethereum Accounts
First of all, we need you to generate at least 2 accounts. Why two? because we need 1 account to issue tokens and other to create markets, and it might happen in parallel, so we need to separate the accounts to avoid nonce collision.
# In case you don't have ganache-cli. This is the main local testnet tool used for ethereum development. By default it creates random private keys and a Mnemonic, that's perfect for creating new accounts in bulk.
npm install -g 'ganache-cli'
ganache-cli
By executing this command, you get 10 accounts created, derived by a random mnemonic phrase and all it’s related private keys, as you can see in the picture.

Tournament Contracts
Download the
git clone https://github.com/gnosis/pm-apollo-contracts.git
Usually you would like to rename the contract from ‘OLY’ to something related with your project. For that end you just need to change two lines:
You can also change the file itself, if you want for example to look with a different names when validating the contract on etherscan, but it’s not necessary.
In case you want to modify deeper the tournament token, the requirements are: It should be ERC20 compliant and also implement the issue function (if you want to use automatic issuance for new users)
Deploy
Set up your private key or mnemonic:
export MNEMONIC='client catch that man dice easily brave either fatal discover welcome tattoo'
# or export PRIVATEKEY='0xb7e68f153f86ebea910f834bb7488b1d843f782eb8eb12f3482813c69cd6c4aa'
Install dependencies and execute migration:
npm run migrate -- --network=rinkeby
# If you want to run it again, you need to add the option --reset
This command will deploy 3 contracts:
Truffle migration contract. Keeps track of the different migrations, in case we add a new step, will go from the last point. Will not reset all the contracts.Tournament Token. It’s the ERC20 token used by the tournament markets and users.Address Registry. It’s the contract the users need to register to, in oder to appear in the scoreboard and also get tournament tokens (in case you set up auto-issuance).
Validate Contracts
This step is completely optional, but it’s a recommended practice, so you are transparent with your users about what the tournament contracts do.
Execute the command:
npx truffle-flattener contracts/OlympiaToken.sol > ValidateToken.sol
npx truffle-flattener contracts/AddressRegistry.sol > ValidateRegistry.sol
So, now you should go to etherscan and validate both contracts, in the url https://rinkeby.etherscan.io/verifyContract2?a=<address>
being <address> the contract address, you can check those with:
npx truffle -- networks
You need to enter:
- Contract Name: OlympiaToken or Address Registry
- Compiler 0.4.23 commit (you can check it with
npx truffle version) - Optimization off
- Code, the content of
ValidateToken.solandValidateRegistry.solrespectively.
Configure Contracts.
Previously we created a bunch of ethereum accounts to separate nonce of the issuer and market creator and isolate roles. For that end we need to execute 2 transactions through the command line in the pm-contracts project.
export CREATOR_ADDRESS=<address>
npm run add-admins -- --addresses=$CREATOR_ADDRESS --network=rinkeby
npm run issue-tokens -- --amount 1000e18 --to $CREATOR_ADDRESS --network=rinkeby
Note we issued 1000 Tournament tokens, it’s in scientific notation. Represents 1000 units with 18 decimals (the default value for decimals)
Deploy Markets with pm-scripts
We assume you already take a look at pm-scripts section and understand the usage of the tool. In order to deploy tournament markets you need to modify one more parameter in the config.json:
"collateralToken": "<address>" # This is the Tournament Token Contract deployed before.
And also, as you are using a new account that has admin rights over the token, you need to set up that account in the config.json.
Before deploying the markets with npm run deploy you should see your Token Balance and validate the market information.
TradingDB
You need to Set up the Indexer following the steps in tradingdb section. As soon as you have set it up there are a few differences to configure it for tournaments. Basically now you have two more contract addresses and also an optional ethereum account (automatic token issuance).
You need to set up the following env params:
TOURNAMENT_TOKENYour tournament token contract.ETHEREUM_DEFAULT_ACCOUNT_PRIVATE_KEYOptional, ethereum private key of the token creator for automatic issuance.GENERIC_IDENTITY_MANAGER_ADDRESSRegistry Contract.
There are other options available listed here
As soon as you configure your backend with these params, we need to create the periodic tasks and start the indexing, you can do it by executing the following command inside one of the containers (or in the root path if you are using a bare metal approach).
docker-compose run web sh
python manage.py setup_tournament --start-block-number
The command setup_tournament will prepare the database and set up periodic tasks:
--start-block-numberwill, if specified, start pm-trading-db processing at a specific block instead of all the way back at the genesis block. You should give it as late a block before tournament events start occurring as you can.- Ethereum blockchain event listener every 5 seconds (the main task of the application).
- Scoreboard calculation every 10 minutes.
- Token issuance every minute. Tokens will be issued in batches of 50 users (to prevent exceeding the block limitation). A flag will be set to prevent users from being issued again on next execution of the task.
- Token issuance flag clear. Once a day the token issuance flag will be cleared so users will receive new tokens every day.
All these tasks can be changed in the application admin. You will need a superuser:
docker-compose run web sh
python manage.py createsuperuser
Trading Interface
The prediction markets interface doesn’t differ in terms of build process, but it does in the configuration. You need to enable the tournament functionality and specify who are the market creators, the tournament token, the registry contract and also how will the reward work (if present).
cd pm-trading-ui
NODE_ENV=production npm run build
Configuration Template
First we need to generate the tournament template by running the command:
npm run build-config olympia/production
Adn then modify in dist/config.js the following parameters:
whitelist: should have your market creator addresscollateralToken: Your Tournament Token addressscoreboard: enabledgameguide: enabled
For the format of those parameters check the interface section
Now all the code over dist/ it’s ready to be served in your favourite web server.
Reward Claiming
If your tournament offers a reward for the TOP X in the scoreboard, you can send the reward manually, but maybe it’s more practical to do it through the reward claiming contract we implemented, so you only need to perform two transactions, and you establish a time-frame for redeeming. After that timeframe you can claim it back those tokens that were not used.
This contract is part of pm-apollo-contracts repo. Anyone can deploy it, and it will be on mainnet, so be sure the account you pass as env parameter have enough ether to deploy the market (<0.1ETH).
cd pm-apollo-contracts
npx truffle exec scripts/deploy_reward_contract.js --token=<token-address> --network=mainnet
token-address is the token you use as reward for your tournament, can be any ERC20 token (e.g GNO, RDN, OMG…)
Configure Reward Claiming on the Interface
Check this example. You can define the dates from which the claiming will be available that won’t be visible until you activate the claiming after the tournament ends.
Enable Reward Claiming.
The account that created the contract is the only one that can enable the claiming. For setting it up, we use pm-scripts.
cd pm-scripts
In order to execute the Reward Claim feature the following configuration property must be added to the config.json file. It specifies the Reward Claim contract address, the levels property, which defines the respective amount of winnings for each winner in the top X (number of levels in the array) positions from the scoreboard. As the Reward Contract could be running on a different chain than the contracts, you have to specify the blockchain property as described below:
"rewardClaimHandler": {
"blockchain": {
"protocol": "https",
"host": "mainnet.infura.io",
"port": "443"
},
"address": "0x42331cbc7D15C876a38C1D3503fBAD0964a8D72b",
"duration": 86400,
"decimals": 18,
"levels": [
{ "value": 5, "minRank": 1, "maxRank": 1 },
{ "value": 4, "minRank": 2, "maxRank": 2 },
{ "value": 3, "minRank": 3, "maxRank": 3 },
{ "value": 2, "minRank": 4, "maxRank": 4 },
{ "value": 1, "minRank": 5, "maxRank": 5 },
{ "value": 0.9, "minRank": 6, "maxRank": 7 },
{ "value": 0.8, "minRank": 8, "maxRank": 9 },
{ "value": 0.7, "minRank": 10, "maxRank": 11 },
{ "value": 0.6, "minRank": 12, "maxRank": 13 },
{ "value": 0.5, "minRank": 14, "maxRank": 15 },
{ "value": 0.4, "minRank": 16, "maxRank": 17 },
{ "value": 0.3, "minRank": 18, "maxRank": 19 },
{ "value": 0.2, "minRank": 19, "maxRank": 34 },
{ "value": 0.1, "minRank": 34, "maxRank": 100 }
]
}
Is important you define well duration (in seconds). This will be the timeframe your users have to redeem their tokens before you get can get back from the contract the remaining tokens.
To execute the Claim Reward just run the following command:
npm run claimrewards